1
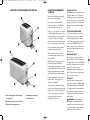
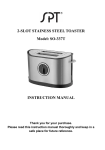
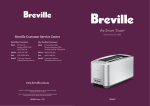
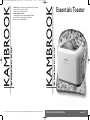
12122 KT50RGB TOASTER MANUAL.qxp:12122 KT50-60 Toaster Manual
11/7/07
10:26 AM
Page 1
Kambrook 461 Plummer Street, Port Melbourne 3207, Australia
Customer Service Line 1300 139 798
Customer Service Fax 1800 621 337
Kambrook New Zealand,
Private Bag 94411, Greenmount, Auckland, New Zealand
Customer Service Line/Spare Parts 09 271 3980
Customer Service Fax 0800 288 513
Due to continual improvement in design or otherwise, the product you purchase may differ slightly from the illustrations in this book. Issue 1/07
Essentials Toaster
KT50 | KT50R | KT50G | KT50B
Issue 1/07
12122 KT50RGB TOASTER MANUAL.qxp:12122 KT50-60 Toaster Manual
KAMBROOK SAFETY
11/7/07
10:26 AM
Bread may burn, therefore this toaster
should not be used near or below
curtains or other combustible material
and it should be supervised at all times
when in use.
Welcome to Kambrook and your new
toaster.
At Kambrook we believe that the safe
performance is the first priority in any
consumer product so that you, our valued
customer, can confidently use and trust
our appliances.
Ensure that bread to be toasted is the
correct size for the toaster and does not
protrude above the bread slice opening
and is not too thick or long that it will
jam or wedge the bread carriage.
We ask that any electrical appliance that
you use be operated in a sensible fashion
with due care and attention placed on the
following important operating
instructions.
Never cover the appliance whilst it is
plugged into the power outlet or while
hot.
Do not place cold toast on top of toasting
slots to warm toast as this may prevent
correct air circulation and damage the
appliance.
IMPORTANT SAFEGUARDS FOR
YOUR KAMBROOK TOASTER
Carefully read all instructions before
operating the toaster and retain them for
future reference.
To protect against electric shock, do not
immerse the power cord, plug or
appliance in water or any other liquid.
Remove any packaging material and
promotional labels before using the
toaster for the first time.
Do not move the toaster whilst in
operation or when hot. Do not touch
hot surfaces. Use side areas for lifting and
carrying the appliance.
Do not place the toaster near the edge of
a bench or table during operation. Ensure
the surface is level, clean and free of
water.
Always switch the power off at the power
outlet and then remove the power plug
from power outlet before attempting to
move the appliance, when the appliance is
not in use and before cleaning or storing
Do not place the toaster on or near a gas
or electric burner or where it could
touch as heated oven. Keep appliance
clear of walls and other head sensitive
materials such as cloths and curtains.
Minimum 200mm distance. When using
the toaster provide adequate air space
above and on all sides for air circulation.
Page 2
IMPORTANT SAFEGUARDS FOR
ALL ELECTRICAL APPLIANCES
Unwind the cord fully before use.
The installation of a residual current
device (safety switch) is recommended to
provide additional safety protection when
using electrical appliances. It is advisable
that a safety switch with a rated residual
operating current not exceeding 30mA be
installed in the electrical circuit supplying
the appliance. See your electrician for
professional advice.
Do not let the power cord hang over the
edge of a table, counter or bench tops,
touch hot surfaces or become knotted.
This appliance is not intended for use by
young children or infirm persons without
supervision.
NOTE:This Kambrook Toaster is electronically
controlled and will not operate or lock into the
toast position until the toaster is plugged into a
230/240 volt power point and switched on.
Young children should be supervised to
ensure that they do not play with the
appliance. Do not leave appliance where
children can touch hot surfaces.
WARNING: NEVER OPERATE
TOASTER ON ITS SIDE.
It is recommended to regularly inspect
the appliance. Do not use the appliance if
the power cord, power plug or appliance
becomes damaged in any way. Return the
entire appliance to the nearest authorised
Kambrook Service Centre for
examination and/or repair. Please call
1800 800 634 for service centre details.
NEVER ADD ANY FOOD SUBSTANCE
OR SPREADS TO THE BREAD, ENGLISH
MUFFINS OR CRUMPETS PRIOR TO
TOASTING AS THIS CAN LEAD TO
ELECTROCUTION OR FIRE.
THIS TOASTER IS FOR TOASTING
BREAD, CRUMPETS AND ENGLISH
MUFFINS ONLY. PLACING OTHER
ITEMS IN THE TOASTER CAN LEAD TO
ELECTROCUTION OR FIRE.
The appliance is intended for household
use only. Do not use this appliance for
other than its intended use. Do not use
in moving vehicles or boats.
Do not use outdoors.
Do not operate the toaster without the
removable crumb tray in place. The
crumb tray should be cleaned regularly.
Do not allow breadcrumbs to accumulate
in the bottom of the toaster.
Always use the toaster on a heat-resistant
surface. Do not use on a cloth-covered
surface. Do not use on metal surfaces, for
example, a sink drain board.
Keep the appliance clean. Follow the
cleaning instructions provided in this book
2
3
12122 KT50RGB TOASTER MANUAL.qxp:12122 KT50-60 Toaster Manual
11/7/07
10:26 AM
FEATURES OF YOUR KAMBROOK TOASTER
Page 4
USING YOUR KAMBROOK
TOASTER
CANCEL BUTTON
The CANCEL button is the lowest of the
3 buttons located on the control panel
and illuminates when the carriage control
lever is locked down into position and the
toasting process begins. Press this button
during operation to cancel the toasting
process.
Before first use, remove any packaging
material or promotional labels.
1
Place toaster on a dry, level surface.
5
3
2
4
1
Insert power plug into a 230/240Volt
power outlet then turn power on.
TOASTING FROZEN BREAD
To toast frozen bread, place the bread
into the bread slots, select the desired
browning setting and press the carriage
control lever down to lock into position,
then press the DEFROST button. The
Defrost button is the top button on the
control panel and illuminates during the
toasting process.
Place up to 1 slice of bread or 1 crumpet
or half an English muffin only into each of
the toasting slots (or 2 slices of bread or
2 crumpets or 2 halves of an English
muffin only into each of the toasting slots
if you have purchased the 4 slice model)
Select toast browning setting required,
using the browning control dial.
The first time the toaster is used, we
recommend that this control be set to
Setting number 3.
5
3
REHEATING TOAST
To reheat, place toast into bread slots,
press the carriage control lever down to
lock into position, then press the REHEAT
button. The Reheat button is the middle
button on the control panel and
illuminates during the reheating process.
Different types of bread and personal
preference may require a different
browning setting, for example, raisin toast
and white light-textured breads may require
a lighter setting, whilst heavier textured
rye breads may require a darker setting.
NOTE: The Defrost button and Reheat button can
not be selected at the same time.
Press the extra lift lever down to the
locked position. Toasting cycle will
commence immediately.
2
4
1. Self centring,extra wide and deep
toasting slots
4. Removable crumb tray
5. Extra lift lever
EXTRA LIFT
Extra lift is ideal for removing smaller
items such as crumpets or English muffins.
When the toasting process is finished, lift
the carriage control lever approximately
20mm above the starting position for easy
removal of the toasted bread, crumpets or
English muffins.
The toaster turns off when the desired
toast colour is achieved and automatically
raises the toast out of the toasting slots
NOTE: The toasting process can be stopped at
any time by pressing the Cancel button or
switching off at the power outlet.
WARNING Never attempt to
extract jammed toast, English muffins,
crumpets or any other item with a knife
or any other object, as contact with live
elements can cause electrocution.
2. Defrost, reheat and cancel buttons
3. Electronic browning control
4
5
12122 KT50RGB TOASTER MANUAL.qxp:12122 KT50-60 Toaster Manual
Never operate the toaster on its side and
never add any food substances to the
bread, muffins, or crumpets prior to
toasting as this can lead to electrocution.
11/7/07
10:26 AM
WARNING: Do not operate the
toaster without the removable crumb tray
in place. The crumb tray should be
regularly cleaned. Do not allow crumbs
to build up in the crumb tray.
This Kambrook toaster is electronically
controlled, and will not lock down in the
toasting position until the toaster is
plugged into a 230/240V power outlet and
switched on.
STORAGE
Always switch the power off at the power
outlet, remove the power plug from the
outlet and allow to cool completely before
storing. Follow the directions for cleaning
and store in an upright position on a flat
surface on your bench top or in an
accessible cupboard. Do not store anything
on top of the toaster.
MAINTAINING YOUR
KAMBROOK TOASTER
CLEANING
Always switch the power off at the power
outlet and remove the power plug from
the power outlet before cleaning the toaster.
Exterior Cleaning
Exterior of the toaster can be cleaned
with a damp cloth and wipe dry.
To clean any crumbs from the toaster,
slide the crumb tray from under the
control panel, discard crumbs and wipe
the tray clean. Replace the crumb tray
into position before using the toaster
again. The crumb tray should be cleaned
regularly. Do not allow breadcrumbs,
crusts, dried fruits, etc. to accumulate in
the bottom of the toaster. To clean any
additional crumbs, turn the toaster upside
down over a sink or bin and shake crumbs
free.
Never use any abrasive or chemical product
to clean the exterior of the toaster.
Clean the crumb tray with dry cloth and
return to toaster before using again.
If a damp cloth or water is used to clean
the crumb tray, ensure that the tray is
thoroughly dried before placing the tray
back into position.
To secure the crumb tray again, close the
tray on the unit with thumb/ finger in the
same groove and slide to the right and
release, ensure that it is clipped back into
position.
Exterior of the toaster can be cleaned
with a slightly damp cloth then wiped dry
and polished with a soft dry cloth. Never
use any abrasive or chemical product to
clean the exterior of the toaster.
Do not immerse the appliance or power
cord in water or any other liquid.
Page 6
Kambrook 12 Month
Replacement Warranty
If the product includes one or a number of
accessories only the defective accessory or
product will be replaced.
KAMBROOK warrants the purchaser
against defects in workmanship and
material, for a period of 12 months from
the date of purchase (3 months
commercial use).
In the event of KAMBROOK choosing to
replace the appliance, the guarantee will
expire at the original date, ie. 12 months
from the original purchase date.
Guarantee and purchase receipt for this
product are to be retained as proof of
purchase and must be presented if making
a claim under the terms of the
KAMBROOK guarantee.
In Australia, this KAMBROOK Guarantee
is additional to the conditions and
guarantees which are mandatory as
implied by the Trade Practices Act 1974
and State and Territory legislation.
KAMBROOK reserves the right to
replace or repair the appliance within the
warranty period.
For service, spare parts or product
information in Australia, please call
KAMBROOK on the Customer Service
Line (free call) 1300 139 798.
Warranty does not apply to any defect,
deterioration, loss, injury or damage
occasioned by, or as a result of the misuse
or abuse, negligent handling or if the
product has not been used in accordance
with the instructions.The guarantee
excludes breakages and consumable items
such as kneading blades.
For service, spare parts or product
information in New Zealand, please
call KAMBROOK New Zealand,
Private Bag 94411, Greenmount, Auckland
Phone 0800 273 845 Fax 0800 288 513.
For spare parts phone 0800 273 845.
This warranty is void if there is evidence
of the product being tampered with by
unauthorised persons.
If claiming under this guarantee the product
must be returned freight prepaid.
YOUR PURCHASE RECORD (Please complete)
Attach a copy of the purchase
receipt here.
DATE OF PURCHASE______________________________________________________
MODEL NUMBER ________________________________________________________
SERIAL NUMBER (If applicable) ______________________________________________
Please don’t return purchase record
PURCHASED FROM ______________________________________________________
until you are making a claim
6
7