1
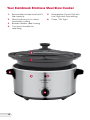
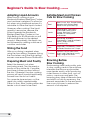
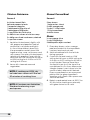
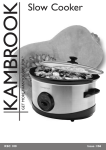
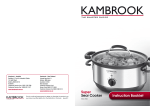
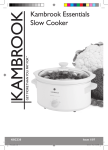
Stainless
3L Slow Cooker
KSC360
Instruction Booklet
Important
Please retain your instruction
book for future use.
In the event that you need some assistance with your
Kambrook appliance, please contact our Customer Service
Department on 1300 139 798 (Australia) or 09 271 3980 (New
Zealand). Alternatively, visit us on our website at
www.kambrook.com.au
Contents
Kambrook Recommends
Safety First
p4
Your Kambrook Stainless Steel Slow Cooker
p6
Operating Your Kambrook Stainless Steel Slow Cooker
p7
Using the Temperature Control Settings
p8
Beginner’s Guide to Slow Cooking
p9
Hints and Tips
p12
Care, Cleaning and Storage
p13
Recipes
p14
Warranty
p24
Kambrook Recommends Safety First
IMPORTANT: Please retain your
instruction book for future use.
At Kambrook, we believe that safe performance is the first priority in any
consumer product, so that you, our valued customer can confidently
use and trust our products. We ask that any electrical appliance that
you use be operated in a sensible fashion with due care and attention
placed on the following important operating instructions.
Important Safeguards For Your Kambrook
Stainless Steel Slow Cooker
• Carefully read all instructions before
operating the Kambrook Stainless Steel
Slow Cooker and save for future reference.
• Remove and safely discard any packaging
material and promotional labels before
using the appliance for the first time.
• To eliminate a choking hazard for young
children, remove and safely discard the
protective cover fitted to the power plug of
this appliance.
• Do not place the appliance near the edge
of a bench or table during operation.
Ensure the surface is level, clean and free of
water and other substances.
• Do not use the Kambrook Stainless Steel
Slow Cooker on a sink drain board.
• Do not place the appliance on or near a
hot gas or electric burner, or where it could
touch a heated oven.
• Position the Kambrook Stainless Steel Slow
Cooker well away from walls and provide
adequate space above and on all sides for
air circulation.
• The temperature of accessible surfaces will
be high when the appliance is operating
and for some time after use.
• Do not touch hot surfaces. Allow the
Kambrook Stainless Steel Slow Cooker to
cool completely before moving or cleaning
any parts.
4
• Use only the removable crockery bowl and
lid supplied. Do not use any other bowl
inside the stainless steel housing.
• Never plug in or switch on the Kambrook
Stainless Steel Slow Cooker without having
the removable crockery bowl placed inside
the stainless steel housing.
• Do not place food or liquid into the stainless
steel housing. Only the removable crockery
bowl is designed to contain food or liquid.
• Never operate the Kambrook Stainless
Steel Slow Cooker without food and liquid
in the removable crockery bowl. Ensure the
removable crockery bowl is at least ½ to 3⁄4
full of food and/or liquid before switching
on the appliance.
• Do not use a damaged or cracked
removable crockery bowl. Replace
before using.
• Always have the glass lid positioned
correctly on the removable crockery bowl
throughout operation of the appliance
unless stated in the recipe to have
it removed.
• The glass lid has been specially treated
to make it stronger, more durable and
safer than ordinary glass. However it is not
unbreakable. If dropped or struck extremely
hard, it may break or weaken, and could at
a later time shatter into many small pieces
without apparent cause.
• Extreme caution must be used when the
appliance contains hot food and liquids. Do
not move the appliance during cooking.
• Do not touch hot surfaces. Use handles to
move the Kambrook Stainless Steel Slow
Cooker and dry oven mitts to remove the
removable crockery bowl when hot.
• Do not place the removable crockery bowl
when hot on any hot surface that may be
affected by heat.
• Avoid sudden temperature changes. Do
not place frozen or very cold foods into the
removable crockery bowl when it is hot. Do
not place removable crockery bowl when
hot into cold water.
• The removable crockery bowl is not suitable
for storing food in the freezer.
• Do not use the removable crockery bowl in
a conventional oven or microwave oven.
Do not place the removable crockery bowl
onto a heat gas or electric burner.
• Avoid scalding from escaping steam when
removing the glass lid from the removable
crockery bowl when hot by carefully lifting
the lid angled away from yourself.
• Do not allow water from the lid to drip into
the stainless steel housing, only into the
removable crockery bowl.
• Do not attempt to operate the Kambrook
Stainless Steel Slow Cooker by any method
other than those described in this book.
• Always ensure the Kambrook Stainless
Steel Slow Cooker is properly assembled
before connecting to the power outlet and
operating. Follow the instructions provided
in this book.
• The appliance is not intended to be
operated by means of an external timer or
separate remote control system.
• Do not place anything, other than the lid,
on top of the Kambrook Stainless Steel Slow
Cooker when assembled, when in use and
when stored.
• Always switch the Kambrook Stainless
Steel Slow Cooker to the OFF position,
then switch off at the power outlet, then
unplug and allow to cool, if appliance
is not in use, before cleaning, before
attempting to move the appliance,
dissembling, assembling and when storing
the appliance.
• Keep the appliance clean. Follow the
cleaning instructions provided in this book. .
Important Safeguards For All
Electrical Appliances
• Fully unwind the power cord before use.
• Do not let the power cord hang over
the edge of a bench or table, touch hot
surfaces or become knotted.
• To protect against electric shock do not
immerse the power cord, power plug or
motor base in water or any other liquid.
• The appliance is not intended for use by
persons (including children) with reduced
physical, sensory or mental capabilities,
or lack of experience and knowledge,
unless they have been given supervision or
instruction concerning use of the appliance
by a person responsible for their safety.
• Children should be supervised
to ensure that they do not play with
the appliance.
• It is recommended to regularly inspect the
appliance. To avoid a hazard do not use
the appliance if power cord, power plug or
appliance becomes damaged in any way.
Return the entire appliance to the nearest
authorised Kambrook Service Centre for
examination and/or repair.
• Any maintenance other than cleaning
should be performed at an authorised
Kambrook Service Centre.
• This appliance is for household use only. Do
not use this appliance for anything other
than its intended use. Do not use in moving
vehicles or boats. Do not use outdoors.
Misuse may cause injury.
• The installation of a residual current device
(safety switch) is recommended to provide
additional safety protection when using
electrical appliances. It is advisable that
a safety switch with a rated residual
operating current not exceeding 30mA be
installed in the electrical circuit supplying
the appliance. See your electrician for
professional advice.
CAUTION: Hot surfaces
during and after use.
5
Your Kambrook Stainless Steel Slow Cooker
1.
Removable crockery bowl with 3
litre capacity
2. Glass lid allows you to check
food while cooking
3. Brushed stainless steel housing
4. Cool touch handles for
safe lifting
6
5. Temperature Control Dial with
Low, High and Auto settings
6. Power ‘ON’ Light
Operating Your Kambrook Stainless
Steel Slow Cooker
Before First Use
Remove and safely discard any
packaging material and promotional
labels before using the appliance for
the first time.
Wash the removable crockery bowl
and glass lid in hot, soapy water, rinse
and dry thoroughly.
Wipe the interior and exterior of the
stainless steel housing with a damp
cloth then dry thoroughly. Ensure the
interior of the stainless steel housing is
clean and clear of any debris.
7. Allow the Kambrook Stainless Steel
Slow Cooker to cool completely
before cleaning and storing.
Important
•
•
Assembly and Operation
1. Before placing the removable
crockery bowl in the stainless steel
housing, ensure the exterior of
the bowl is clean. This will ensure
proper contact with the inner
cooking surface.
2. Place the prepared food into the
removable crockery bowl, ensuring
denser foods are spread evenly
across the bottom of the bowl and
not heaped to one side. Ensure the
food and/or liquid fills at least ½ to
3
⁄4 of the removable crockery bowl.
Place the glass lid into position.
3. Insert the removable crockery bowl
into the stainless steel housing.
4. Ensure the temperature control
dial is in the OFF position then
insert the power plug into a 230V
or 240V power outlet and switch
on at the power outlet.
5. Select the required setting
using the temperature control
dial or as recommended in the
recipe section.
6. When cooking is complete, turn
the temperature control dial to
the OFF position, switch off at the
power outlet and then unplug the
power cord.
•
•
•
•
Always use the Kambrook
Stainless Steel Slow Cooker on a
dry, level surface.
Never operate the Kambrook
Stainless Steel Slow Cooker
without food and liquid in the
removable crockery bowl. Ensure
the removable crockery bowl is
at least ½ to 3 ⁄4 full of food and/
or liquid before switching on the
appliance.
Never operate the Kambrook
Stainless Steel Slow Cooker
without the removable crockery
bowl positioned in the stainless
steel housing.
Always have the glass lid
correctly positioned on the
removable crockery bowl
throughout operation of the
appliance unless when stated in
a recipe to have it removed.
Always use dry oven mitts to
remove the removable crockery
bowl when hot.
Do not place the removable
crockery bowl when hot on any
surface that may be affected
by heat.
CAUTION: Always lift
and remove the glass
lid carefully and angled
away from yourself to
avoid scalding from
escaping steam.
Do not use for
dry cooking.
7
Using the Temperature Control Settings
Low Setting
The Low setting gently simmers food
for an extended period of time
without overcooking or burning.
Generally no stirring is required when
using this setting.
High Setting
The High setting is used when cooking
dried beans or pulses and will cook
food in half the time required for the
Low Setting. Some foods may boil
when cooked on the High Setting,
so it may be necessary to add extra
liquid. This will depend on the recipe
and the amount of time in which it is
cooked. Occasional stirring of stews
and casseroles will improve the
flavour distribution.
Auto Setting
The Auto setting will first cook on a
high temperature for a period of
time to bring the food quickly to the
desirable temperature, then reduce
automatically to low temperature for
the completion of cooking. This setting
is ideal for slow cooking meals.
8
Beginner’s Guide to Slow Cooking
In years gone by, food cooked in
large pots and allowed to simmer for
hours was full of flavour, moist and
tender. The Kambrook Stainless Steel
Slow Cooker is designed to produce
these same results, whilst leaving you
the time to do other things, making it
perfect for today’s busy lifestyles.
Here is a guide to help simplify the
process of slow cooking, allowing
you to obtain maximum satisfaction
from your Kambrook Stainless Steel
Slow Cooker.
Timing
Most of the recipes contained within
this book can be cooked on the High
or Low setting, however the cooking
times will vary accordingly. Each
recipe will give specific instructions
indicating the appropriate settings
and suggested cooking times.
Adapting Cooking Times
Your favourite traditional recipes
can be adapted easily by halving
the amount of liquid and increasing
the cooking time considerably. The
following is a guide to adjusting your
favourite recipes.
Always allow sufficient time for the
food to cook. It is almost impossible to
overcook in the Kambrook Stainless
Steel Slow Cooker particularly when
using the Low Setting.
Traditional Recipe Time
Kambrook Stainless Steel Slow Cooker
Recipe Time
15-30 minutes
4-6 hours on Low Setting
60 minutes
6-8 hours on Low Setting
1-3 hours
8-12 hours on Low Setting
NOTE: High humidity, altitude,
cold tap water, ingredients and
minor fluctuations may slightly
affect the cooking times in the
slow cooker.
NOTE: These times are
approximate. Times can vary
depending on ingredients and
quantities in recipes.
9
Beginner’s Guide to Slow Cooking
Adapting Liquid Amounts
When food is cooking in your
Kambrook Stainless Steel Slow Cooker,
most moisture is retained. To allow for
this when using traditional recipes it is
advisable to halve the liquid content.
However, after cooking if the liquid
quantity is excessive, remove the
lid and operate the Kambrook
Stainless Steel Slow Cooker on the
High Setting for 30-45 minutes or until
the liquid reduces by the desired
amount. Alternatively, the liquid can
be thickened by adding a mixture of
cornflour and water.
Stirring the Food
Little or no stirring is required when
using the Low setting. However, stirring
the food when using the High setting
ensures more even flavour distribution.
Preparing Meat and Poultry
Select the leanest cuts when
purchasing meat. Trim the meat or
poultry of any visible fat. If possible,
purchase chicken portions without
the skin. Otherwise, the slow cooking
process will result in extra liquid being
formed from the fat as it melts.
For casserole-type recipes, cut the
meat into cubes, approximately
2.5cm to 3cm. Slow cooking allows less
tender cuts of meat to be used.
10
continued
Suitable Meat and Chicken
Cuts for Slow Cooking
Beef
Beef Chuck, Skirt, Round Steak,
Boneless Shin (Gravy) Beef,
Bone-In Shin (Osso Bucco).
Lamb
Lamb Shanks, Drumsticks
(Frenched shanks) Neck
Chops, Best Neck Chops,
Boned Out Forequarter
or Shoulder.
Veal
Diced Leg, Shoulder/
Forequarter Chops and Steaks,
Neck Chops, Knuckle
(Osso Bucco).
Pork
Leg Steaks, Diced Belly, Diced
Shoulder, Boneless Loin Chops.
Chicken
Portions such as: drumsticks,
thigh meat, Maryland, Lovely
Legs, wing drummettes
Browning Before
Slow Cooking
Pre-browning meat and poultry, prior
to slow cooking, seals in the moisture,
intensifies the flavour and provides
more tender results, whilst producing
richer flavours in other food, such as
onions, capsicums and leeks. Prebrowning may take a little extra time,
and whilst not strictly necessary, the
rewards are evident in the end results.
Use a non-stick pan to reduce the
amount of oil required.
Roasting
Pot Roasting
Roasting meats in the Kambrook
Stainless Steel Slow Cooker creates
tender, flavoursome results that are
easy to slice. The long, slow, covered
cooking process breaks down and
softens the connective and muscle
tissue within the meat. Cheaper cuts
of meat can be used to provide
perfect results cooked by this method.
Meat will not brown during the
roasting process, so for browner results
seal in a frypan before roasting.
The addition of liquid is not required
for roasting. Elevate the meat to be
roasted on an inverted, heatproof
saucer or plate. This will assist in
keeping the surface of the meat
dry and free from any fat released
throughout the cooking process.
Whole fresh chickens can be roasted
but if chickens that have been frozen
and thawed are used they may
release a significant amount of liquid
into the removable crockery bowl
whereby the chicken is pot-roasted or
steamed in this liquid.
The addition of liquid is required for
pot roasting. Place sufficient liquid
into the Removable Crockery Bowl to
cover up to a third of the meat. Meat
will not brown during the pot roasting
process. For browner results, seal in a
frypan before pot roasting.
Suitable Cuts for Roasting
Beef
Blade, Rump, Rib Roast, Sirloin,
Fresh Silverside, Topside.
Lamb
Leg, Mid Loin, Rack, Crown Roast,
Shank, Shoulder, Mini Roasts.
Veal
Leg, Loin, Rack, Shoulder/
Forequarter.
Pork
Loin, Neck, Leg (remove skin
and fat), Racks.
Suitable Cuts for Pot Roasting
Beef
Beef Topside, Blade, Silverside
Roasts, Rolled Brisket.
Lamb
Forequarter, Shank, Shoulder
Veal
Shoulder/Forequarter.
Pork
Loin, Neck.
Preparing Vegetables
Vegetables should be cut into evensized pieces to ensure more even
cooking. Frozen vegetables must be
thawed before adding to other foods
for cooking in the Kambrook Stainless
Steel Slow Cooker.
Preparing Dried Beans
and Pulses
If time permits, overnight soaking of
dried beans and pulses is preferable.
After soaking, drain the beans or
pulses then place into the removable
crockery bowl then pour in water
that is double the volume of beans.
Ensure the removable crockery bowl
is at least ½ to ¾ full. Cook beans on
the High Setting for 2-4 hours or until
tender. Pre-soaked beans and pulses
will cook a little faster.
11
Hints and Tips
•
•
•
•
•
Always thaw frozen meat and
poultry before cooking.
Trim all visible fat from meat
or poultry.
Meat and poultry require at
least 6-7 hours of cooking on
Low setting.
Ensure that the food or liquid to
be cooked fills at least ½ to 3⁄4 of
the removable crockery bowl.
On completion of cooking, if
there is too much liquid remove
the lid, turn the temperature
control dial to the High setting
and cook for 35-40 minutes until
the liquid reduces.
•
•
•
12
•
•
•
•
•
Do not place removable crockery
bowl or glass lid into or under cold
water while still hot.
Do not use the removable
crockery bowl or glass lid if
chipped or cracked.
Do not operate the Kambrook
Stainless Steel Slow Cooker
without the removable crockery
bowl in position.
Do not place a hot removable
crockery bowl onto a wet surface.
Do not cook with frozen meats
or poultry.
Never
Do
•
Do Not
Do ensure the removable
crockery bowl is at room
temperature when placing into
the Stainless Steel Housing prior
to cooking.
Do avoid extreme temperature
changes to the crockery
bowl and glass lid. Handle the
removable crockery bowl and
glass lid with care.
Do use oven mitts when lifting
the removable crockery bowl
containing hot liquids.
Do place the removable crockery
bowl onto a heat proof placemat
when serving from the removable
crockery bowl at the table.
•
•
•
Never place water or other liquids
into the stainless steel housing of
the Kambrook Stainless Steel
Slow Cooker.
Never immerse the stainless steel
housing, power cord or power
plug of the Kambrook Stainless
Steel Slow Cooker into water or
any other liquid.
Never touch hot surfaces with
bare hands.
CAUTION: Ensure the
removable crockery bowl
is correctly positioned
in the stainless steel
housing before you
commence cooking.
Care, Cleaning and Storage
Cleaning After Use
Storage
Before cleaning, always ensure the
Kambrook Stainless Steel Slow Cooker
is cool, the temperature control dial
is in the OFF position, the Kambrook
Stainless Steel Slow Cooker is switched
off at the power outlet and the power
cord is unplugged.
The removable crockery bowl and
glass lid can be washed in hot,
soapy water using a mild household
detergent. Rinse and dry thoroughly.
To remove stubborn, cooked-on foods
from the removable crockery bowl,
soften by filling with warm, soapy
water and soak for 20-30 minutes.
Remove by lightly scrubbing with a
soft, nylon kitchen brush.
Do not use abrasive cleaners, steel
wool, or metal scouring pads as these
can damage the surfaces.
The removable crockery bowl
and glass lid can be washed in a
dishwasher however care should
be taken not to chip or crack the
crockery bowl or lid.
Wipe the stainless steel housing
with a soft, damp cloth and then
dry thoroughly.
Before storing, the temperature
selection dial should be in the OFF
position, the Kambrook Stainless Steel
Slow Cooker switched off at the power
outlet and the power cord unplugged.
Ensure the Kambrook Stainless Steel
Slow Cooker is completely cool, clean
and dry. Store the appliance upright
with the removable crockery bowl
and the lid in position. Do not store
anything on top.
CAUTION: Do not
immerse stainless steel
housing, power cord or
power plug in water or
any other liquid as this
may cause electrocution.
13
Recipes
Vegetable Soup
Vichyssoise
Serves 4
Serves 4
1 ½ tablespoons/30g butter
2 large carrots, peeled and diced
4 large potatoes, peeled and diced
2 sticks celery, diced
2 large onions, diced
8 cups/2 litres chicken or beef stock
½ cup/125ml cream
1 tablespoon parsley, finely chopped
Salt and pepper, to taste
1 ½ tablespoons/30g butter
2 leeks, thinly sliced
1 onion, diced
2 medium potatoes, peeled and diced
4 cups/1 litre chicken stock
1 cup/250ml milk
1 cup/250ml cream
¼ cup sour cream
2 tablespoons chives, chopped
Salt and pepper, to taste
1. Melt butter in a saucepan, add
vegetables and cook for 10 minutes,
stirring occasionally.
2. Place vegetables into removable
crockery bowl, add stock and
seasonings. Cover with lid and cook
on LOW setting for 6-8 hours. Just
before serving, stir in cream and top
with parsley.
1. Melt butter in a pan, add leeks and
chopped onion and sauté over low
heat until lightly browned. Place into
the removable crockery bowl with
seasonings and potatoes. Stir in stock
and cover with lid, cook on LOW
setting for 5-6 hours or HIGH setting for
2-3 hours or AUTO setting for 3-4 hours.
2. Stir in milk, allow to cool then puree
in a blender or food processor. Stir in
cream then chill.
3. Serve topped with a spoonful of sour
cream and sprinkled with chives.
NOTE: Vichyssoise may also be
served hot.
NOTE: All recipes use Australian
Standard measuring cups
and spoons.
14
Cream of Mushroom Soup
French Onion Soup
Serves 4
Serves 4
1 tablespoons/30g butter or margarine
500g mushroom, sliced
1 large onion, diced
4 cups/1 litre chicken stock
1 cups/250ml cream
1 ½ cups/375ml milk
2 tablespoons cornflour
2 tablespoons parsley, finely chopped
Salt and pepper, to taste
5 cups/1 ¼ litres beef stock
4 tablespoons/80g butter
4 onions, thickly sliced
1 teaspoons/5g salt
2 teaspoons/10g sugar
½ cup/75g flour
¾ cups/60g grated Parmesan cheese
1. Melt butter in a saucepan and add
mushrooms and onion, sauté lightly.
Place mushrooms, onion and chicken
stock into the removable crockery
bowl and stir well. Cover with lid and
cook on LOW setting for 5-6 hours or
HIGH setting for 2-3 hours or AUTO
setting for 3-4 hours. 30 minutes before
serving, turn to HIGH setting then stir
in cream and milk. Blend cornflour
with 2 tablespoons of the hot soup
and blend until smooth. Stir flour
mixture into the soup and cook until
thickened. Serve topped with parsley.
1. Pour stock into the removable
crockery bowl, cover with lid and
select the HIGH setting. Melt butter in
a frypan, add onions and sauté until
golden brown.
2. Add salt, sugar and flour to the onions
and stir well. Add onion mixture to the
removable crockery bowl and stir well.
Cover with the lid and cook on LOW
setting for 5-6 hours or HIGH setting for
2-3 hours or AUTO setting for 3-4 hours.
3. Sprinkle with Parmesan cheese
to serve.
15
Swiss Steak
Chilli Con Carne
Serves 4
Serves 4
1.25kg round steak, cubed
½ cup/75g flour
1 teaspoon/5g salt
1 teaspoon/5g pepper
2 tablespoons/40g butter
2 stalks celery, diced
2 carrots, peeled and chopped
1 onions, diced
1 teaspoons/5g worcestershire sauce
2 x 425g cans tomatoes
1 cup/125g cheddar cheese, grated
700g dry red kidney beans
700g round steak, cut into thin strips
1⁄3 cup/50g flour
2 teaspoons/10g salt
2 teaspoons/10g chilli powder
2 tablespoons/40g butter
1 large onions, diced
1 x 425g can tomatoes
2 ½ cups/625ml water
2 cloves garlic, minced
1. Toss steak in flour and salt and pepper.
2. Melt butter in a frypan and seal the
cubed steak.
3. Place meat, vegetables,
worcestershire sauce and tomatoes
into the removable crockery bowl.
4. Cover with lid and cook on LOW
setting for 6-8 hours or HIGH setting for
3-4 hours or AUTO setting for 4-5 hours.
5. Sprinkle with grated cheese to serve.
16
1. Wash the beans well. Toss the steak in
flour mixed with salt and chilli powder.
Melt the butter in a frypan and seal
the steak. Place all ingredients into
the removable crockery bowl and stir
well. Cover with lid and cook on LOW
setting for 6-8 hours.
NOTE: All recipes use Australian
Standard measuring cups
and spoons.
Chicken in a Pot
Beef in Red Wine
Serves 4
Serves 4
2 carrots, peeled and sliced
2 onions, sliced
2 stalks celery, sliced
1.5kg chicken pieces
1 teaspoon/5g salt
1 teaspoon/5g ground black pepper
2 cups/500ml chicken stock
1 cup/250ml white wine
1 teaspoons dried basil
1.5 kg blade or chuck steak, cubed
1 cup/150g flour
Salt and pepper, to taste
2 tablespoons/40g butter
2 onions, diced
1 leek, finely chopped
2 carrots, chopped
2 cloves garlic, minced
2 tablespoons parsley, chopped
2 tablespoons chives, chopped
1 x 750ml red wine
1. Place half of the carrots, onion and
celery into the removable crockery
bowl. Add the chicken pieces, salt,
pepper, stock, wine and remaining
vegetables. Sprinkle with herbs. Cover
with lid and cook on LOW setting for
6-8 hours or HIGH setting for 3-4 hours
or AUTO setting for 4-5 hours.
1. Toss meat in flour and seasonings.
2. Heat butter in a frypan and seal
the meat. Place the meat into the
removable crockery bowl and add
onions, leek, carrots, garlic, parsley
and chives.
3. Pour red wine into pan used for
browning the meat and bring to boil.
Pour heated liquid into the removable
crockery bowl, cover with lid and
cook on LOW setting for 6-8 hours or
HIGH setting for 3-4 hours or AUTO
setting for 4-5 hours.
17
Chicken Marengo
Recipes Irish Stew
Serves 4-6
Serves 4
1.5kg chicken pieces or drumsticks
2 tablespoons/20g flour
Salt and pepper, to taste
2 tablespoons/40ml vegetable oil
2 tablespoons/40g butter
3 cloves garlic, minced
5 cups/1 ¼ litres chicken stock
½ cup/125ml white wine
2 large tomatoes, diced
12 mushrooms, sliced
2 tablespoons finely chopped parsley
½ cup black olives, to serve
1.5kg lamb neck chops
3 medium onions, diced
1 kg potatoes, peeled and sliced
Salt and pepper, to taste
4 cups/1 litres water
1 teaspoon mixed herbs
3 bay leaves
1. Cut chicken into serving pieces, pat
each piece dry and toss in flour mixed
with seasonings.
2. Heat oil and butter in a pan, add
the chicken pieces and cook over
medium heat until golden.
3. Remove from pan and place into
the removable crockery bowl. Add
the garlic, stock, wine, tomatoes and
mushrooms. Cover with lid and cook
on LOW setting for 6-8 hours or HIGH
setting for 3-4 hours or AUTO setting for
4-5 hours. Serve on a bed of steamed
potatoes and sprinkle with parsley
and olives.
NOTE: All recipes use Australian
Standard measuring cups
and spoons.
1. Trim any excess fat from chops. Place
all ingredients into the removable
crockery bowl. Cover with lid and
cook on LOW setting for 6-8 hours or
HIGH setting for 3-4 hours or AUTO
setting for 4-5 hours.
Coq Au Vin
Serves 4
¼ cup/60ml olive oil
1.5kg chicken pieces
4 slices bacon, trimmed and diced
5 small onions, diced
5 small onions, peeled and quartered
350g mushrooms, sliced
1 cloves garlic, minced
Salt and pepper, to taste
2 teaspoons dried thyme
10 baby potatoes, halved
1 ½ cups/375ml red wine
4 cups/1 litres chicken stock
Finely chopped parsley
2. Heat the oil in a large frypan and
lightly fry the chicken until golden
brown and crisp. Drain chicken on
paper towel and set aside to cool.
3. Use the same pan to brown the bacon
and sliced onions, drain off excess
fat and set aside with chicken. Place
all ingredients into the removable
crockery bowl and cover with lid and
cook on LOW setting for 6-8 hours or
HIGH setting for 3-4 hours or AUTO
setting for 4-5 hours. Serve garnished
with chopped parsley.
18
Beef Curry
Serves 4
1.5kg blade or chuck steak, 2.5cm cubes
½ cup/75g flour
¼ cup/60ml vegetable oil
2 large onions, diced
5 cloves garlic, minced
1 small pieces fresh ginger, peeled and
grated
1 teaspoon ground chilli powder
1 teaspoon ground cumin
1 teaspoon ground coriander
1 teaspoon ground cardamom
1 teaspoon salt
1 tablespoons vinegar
1 x 425g cans whole tomatoes
2 strips lemon rind
5 cups/1 ¼ litres beef stock
1. Toss the meat in the flour.
2. Heat the oil in a frypan, add the meat
and lightly brown, remove meat and
place into the removable crockery
bowl. Add onions, garlic and ginger
to the pan, cook for 5 minutes then
place into the removable crockery
bowl with remaining ingredients. Stir
well, cover with lid and cook on LOW
setting for 6-8 hours or HIGH setting for
3-4 hours or AUTO setting for 4-5 hours.
Serve with fluffy steamed rice.
NOTE: All recipes use Australian
Standard measuring cups
and spoons.
Meatballs in Creamy
Mushroom Sauce
Serves 4
Mushroom Sauce
2 x 440g cans mushrooms in butter sauce
2 cups/500ml beef stock
¼ cup/40g flour
¼ cup/60ml sherry
1 teaspoons paprika
1 cup sour cream
Meatballs
1.25kg minced beef
300g pork mince
1 x 60g eggs, lightly whisked
¼ cup parsley, chopped
Salt and pepper, to taste
2 cups/250g fresh breadcrumbs
¼ cup/60ml olive oil
2 tablespoons/40g butter
1. Place all the mushroom sauce
ingredients except sour cream into
the removable crockery bowl and
stir to combine. Mix all ingredients
for meatballs together in a bowl and
shape into walnut size balls. Heat oil
and butter in a frypan and lightly fry
meatballs, then add to sauce in the
removable crockery bowl. Cover with
lid and cook on LOW setting for 6-8
hours or HIGH setting for 3-4 hours
or AUTO setting for 4-5 hours. At 15
minutes before serving, switch to HIGH
setting and stir in the sour cream.
2. Serve with spaghetti or penne pasta.
19
Chicken Parisienne
Glazed Corned Beef
Serves 4
Serves 4
6 chicken breast fillets
Salt and pepper, to taste
1 teaspoons paprika
1 tablespoons/20g olive oil
1 tablespoons/20g butter
1 cups/250ml dry white wine
2 x 440ml cans cream of chicken soup
2 x 440g can sliced mushrooms, drained
1 cups sour cream
2 bay leaves
1 large onion, sliced
2 strips orange peel
5 cups/1 ¼ litres water
1.5 kg corned beef
8 whole cloves
1. Sprinkle chicken breasts lightly with
salt, pepper and paprika. Heat oil
and butter in a frypan and lightly
fry the chicken breast, place into
the removable crockery bowl. Mix
together wine, soup, mushrooms and
sour cream. Pour over chicken breasts,
sprinkle with paprika. Cover with lid
and cook on LOW setting for 6-8 hours
or HIGH setting for 3-4 hours or AUTO
setting for 4-5 hours.
2. Serve with steamed seasonal
vegetables.
NOTE: If cooking on HIGH, do
not add sour cream until the last
30 minutes of cooking time.
Glaze:
½ cup orange juice
½ cup/190g honey
2 tablespoons dijon mustard
1. Place bay leaves, onion, orange
peel and water into the removable
crockery bowl and mix well.
2. Add corned beef with the fat side
facing upwards.
3. Cover with lid and cook on LOW
setting for 6-8 hours or HIGH setting for
3-4 hours or AUTO setting for 4-5 hours
or until tender. Remove meat from
the liquid. Score (cut) the top of the
corned beef in criss-cross diamond or
triangle shapes. Insert cloves into the
centre of each diamond if desired.
Place corned beef on an oven proof
platter. Mix the glaze ingredients
together until smooth then spoon over
the corned beef.
4. Bake in a preheated oven at 200ºC for
NOTE: All recipes use Australian
Standard measuring cups
and spoons.
20
20-30 minutes, basting occasionally
with glaze. Serve hot or cold.
Ratatouille
Scalloped Potatoes
Serves 4
Serves 4
2 onions, sliced
1 medium eggplants, cubed
4 large zucchini, sliced
2 red capsicum, sliced
5 tomatoes, sliced
3 cloves garlic, minced
Salt and pepper, to taste
½ cup/125ml oil
12medium potatoes, peeled and
thinly sliced
2 medium onions, peeled and thinly sliced
Salt and pepper to taste
1 teaspoons paprika
1 cup/125g grated Cheddar cheese
1 x 285g cans cream of asparagus
or mushroom soup
1. Place onions into the removable
1. Place potato and onion into the
crockery bowl then add remaining
ingredients. Cover with lid and
cook on LOW setting for 6-8 hours
or AUTO setting for 4-5 hours. The
vegetables should be soft but not
mushy. Serve Ratatouille hot or cold,
as a filling for crêpes and omelettes,
as an accompaniment to meats and
poultry, over a bed of rice or a hot
dish of pasta.
removable crockery bowl. Sprinkle
with salt, pepper and paprika, then
grated cheese, repeat this procedure
three more times until all of the
potatoes are used. Gently pour the
undiluted soup over the top of the
ingredients. Sprinkle with paprika,
cover with lid and cook on LOW
setting for 6-8 hours or HIGH setting for
3-4 hours or AUTO setting for 4-5 hours.
NOTE: All recipes use Australian
Standard measuring cups
and spoons.
21
Old Fashioned Sago Pudding
Rice Custard
Serves 4
Serves 4
½ cup/75g sago
1 cups/250ml milk
1 cups/250g sugar
1 cups/150g sultanas
1 cups/100g fresh breadcrumbs
1 tablespoons/20g melted butter
2 teaspoon/10g bi-carbonate of soda
2 x 60g egg
2 cups/400g rice
5 cups/1 ¼ litres boiling water
3 x 60g eggs
1 ¼ cups/315g sugar
4 cups/1 litre milk
1 teaspoon/5g vanilla essence
1 tablespoons/20g butter
Nutmeg, to taste
½ cup/85g raisins
1. Soak sago in milk overnight. Add
remaining ingredients and mix
thoroughly. Place mixture into a
heatproof pudding bowl or casserole
dish that fits in the removable crockery
bowl. Cover the bowl or dish with foil
and secure around the edge with
kitchen string. Place a small trivet or
upturned heatproof saucer into the
removable crockery bowl and add
1-2 litres of water. Place the prepared
pudding bowl onto the trivet.
2. Cover with lid and cook on HIGH
setting for 3-4 hours. Serve hot or warm
with thickened cream and a sprinkle
of cinnamon or nutmeg.
1. Wash rice thoroughly under cold
running water, drain well. Cook rice
in boiling water for 20 minutes. Drain
well and put into a greased heatproof
pudding bowl or dish that will fit in the
removable crockery bowl. Beat eggs
with sugar, add remaining ingredients
then stir into the rice.
2. Cover pudding bowl or dish with
foil and secure edge with kitchen
string. Place a small trivet or upturned
heatproof saucer into the removable
crockery bowl and add 1-2 litres of
water. Place the prepared pudding
bowl onto the trivet.
3. Cover with lid and cook on LOW
NOTE: Replenish water in the
removable crockery bowl during
the cooking time if required.
Ensure the water does not
ingress into the pudding bowl.
22
setting for 4-5 hours. Serve warm.
NOTE: Replenish water in the
removable crockery bowl during
the cooking time if required.
Ensure the water does not
ingress into the pudding bowl.
Baked Apples
Serves 4
¼ cup/40g dried fruits
¼ cup/60g brown sugar
1 teaspoons/5g cinnamon
1 tablespoons/20g butter, melted
4 small Granny Smith apples, washed and
cored
2 cups/500ml water
1 tablespoons/20g sugar
1. Mix together the dried fruits, brown
sugar, cinnamon and butter. Fill the
centre of each apple with the dried
fruit mixture and place upright in the
removable crockery bowl.
2. Combine water and sugar and pour
into the removable crockery bowl,
cover with lid and cook on LOW
setting for 4-5 hours. Serve warm with
custard, cream or ice-cream.
Poached Pears in Red Wine
Serves 4
2 cups/500ml dry red wine
1 cups/250g brown sugar
4 medium pears, carefully peeled
Peel of 1 lemon, cut in strips.
1. Put wine and sugar in the removable
crockery bowl. Cover with lid and
cook on HIGH setting until the sugar
is dissolved. Place the pears into the
removable crockery bowl, turn the
pears to coat in the wine mixture, then
stand pears upright in the mixture.
Add the lemon peel, cover with lid
and cook on LOW setting for 4-5 hours,
turning occasionally or basting with
the wine mixture. Serve pears drizzled
with the wine mixture.
NOTE: Pears can have the stems
left intact or removed depending
on presentation preference.
23
Kambrook 12 Month Replacement Warranty
In Australia, this Kambrook Replacement
Warranty does not affect the mandatory
statutory rights implied under the Trade Practices
Act 1974 and other similar State and Territory
legislation relating to the appliance. It applies
in addition to the conditions and warranties
implied by that legislation.
In New Zealand, this Kambrook Replacement
Warranty does not affect your mandatory
statutory rights implied under the Consumer
Guarantees Act 1993 in relation to the appliance.
It applies in addition to the conditions and
guarantees implied by that legislation.
This Kambrook Replacement Warranty is valid only
in the country of purchase, but other statutory
warranties may still apply.
This Warranty card and the purchase receipt
for this product are to be retained as proof of
purchase and must be presented if making
a claim under the Kambrook Replacement
Warranty. Please note that under any applicable
statutory warranty you are not required to
produce these documents, but may be required
to provide a proof of purchase.
Kambrook warrants the purchaser against defects
in workmanship and material for a period of 12
months domestic use from the date of purchase
(or 3 months commercial use).
The Kambrook Replacement Warranty does not
apply to any defect, deterioration, loss, injury or
damage occasioned by, or as a result of, misuse
or abuse, negligent handling or if the product
has been used other than in accordance with
the instructions. The Kambrook Replacement
Warranty excludes breakables such as glass and
ceramic items, consumable items and normal
wear and tear.
This Kambrook Replacement Warranty is void if
there is evidence of the product being tampered
with by unauthorised persons.
If the product includes one or a number of
accessories only the defective accessory or
product will be replaced. Subject to your statutory
rights, in the event of Kambrook choosing
to replace the appliance, the Kambrook
Replacement Warranty will expire at the original
date, i.e. 12 months from the original date of
purchase.
In the event that you need some assistance
with your Kambrook appliance, please contact
our Customer Service Department on 1300 139
798 (Australia) or 09 271 3980 (New Zealand).
Alternatively, visit us on the website at
www.kambrook.com.au
Kambrook 12 Month Replacement Warranty
Your Purchase Record (Please Complete)
Attach a copy of the purchase receipt here.
Date Of Purchase_________________________________
Model Number____________________________________
Serial Number_____________________________________
Purchased From___________________________________
(Please don’t return purchase record
until you are making a claim)
Register your warranty at www.kambrook.com.au/service.asp
Kambrook - Australia
Building 2, Port Air Industrial Estate
1A Hale Street
Botany NSW 2019
Australia
Customer Service Line 1300 139 798
Customer Service Fax 1800 621 337
Kambrook - New Zealand
Private Bag 94411
Botany, Manukau
Auckland 2141
New Zealand
Customer Service Line/Spare Parts
0800 273 845 or 09 271 3980
Customer Service Fax 0800 288 513
Due to continual improvement in design or otherwise, the product you
purchase may differ slightly from the illustration in this book. Issue A10