1
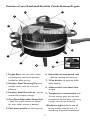
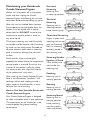
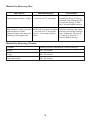
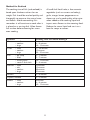
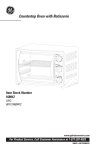
CombiSteamer/Frypan
UE GO
ME GO
OD NA
OD VAL
KD66B
2
Issue 1/00
Kambrook Safety
Welcome to Kambrook and your new
Versatile Combi-Steamer/Frypan.
At Kambrook we believe that the safe
performance of our products is the first
priority in any consumer product so that
you, our valued customer, can confidently
use and trust our products.We ask that
any electrical appliance that you use be
operated in a sensible fashion with due
care and attention placed on the following
important operating instructions:
This appliance is not intended for use by
young children or infirm persons without
supervision.
READ ALL INSTRUCTIONS
THOROUGHLY BEFORE
ACTIVATING THE APPLIANCE
AND RETAIN THEM FOR FUTURE
REFERENCE.
Do not let the cord hang over the edge of
a table or counter, touch hot surfaces or
become knotted.
Do not leave the appliance unattended
when in use.
Young children should be supervised to
ensure that they do not play with the
appliance.
Always use the appliance on a dry, level
surface
Do not place this appliance on or near a
hot gas or electric burner, or where it
could touch a heated oven
Ensure that the power source to be used
is the same as the voltage requirements
of the product.
This appliance is for household use only.
Do not use this appliance for other than
its intended use. Do not use outdoors.
Switch off at the power outlet and then
unplug and remove the temperature
control probe when the appliance is not
in use and before cleaning. Allow all parts
to cool before dissembling for cleaning
Extreme caution must be taken when
using this appliance filled with hot oil or
other liquid. Do not move during cooking
and allow to cool before removing oil or
other liquid.
Never immerse the power cord, plug or
control probe in any form of liquid.
Regularly inspect the power cord,
plug and actual appliance for any
damage. If found damaged in any
way, immediately cease use of the
appliance and return the entire
appliance to the nearest authorised
Kambrook Service Centre for
examination, replacement or repair.
Before inserting the temperature control
probe into the socket ensure the interior
of the socket is fully dry.To do this, shake
out excess water then wipe the interior
of the socket with a dry cloth.
Do not touch hot surfaces, use handles
or knobs
Please call 1800 800 634 for
Kambrook Service Centre details.
Do not immerse the cord or temperature
control probe in water or any other liquid.
2
Features of your Kambrook Versatile Combi-Steamer/Frypan
4
3
7
5
5
6
1
9
2
8
10
1. Frypan Base with non-stick surface
and heavy-duty cool-touch phenolic
handles for table serving.
6. Reversible chrome plated rack
– ideal for roasting and steaming.
7. 2 Pan dividers to separate foods
while cooking
2. Stainless Steel Steaming Tray with
multiple steam holes for maximum
efficiency.
8. 4 Anti-scratch cool touch feet
on base
3. Stainless Steel Domed Lid – can be
inverted for compact storage.
9. Temperature control probe with
10 heat settings gives you accurate
temperature control from simmering
through to searing and sealing.
4. Cool Touch Adjustable Steam Vent
– open for crisper texture or closed
for when softer texture is desired.
10.Indicator light cycles on and off
during cooking showing that it is
maintaining the preset temperature
5. Cool-touch handles on steaming tray.
3
Using Your Kambrook Versatile
Combi-Steamer/Frypan
Before first use remove any promotional
labels and wash the Combi-Steamer/Frypan
in warm, soapy water. Rinse and dry
thoroughly especially the heat control
socket.To ensure the interior of the
socket is fully dry, shake out excess water
then wipe the interior of the socket with
a dry cloth.
When cooking is completed, turn the dial
on the temperature control probe to ‘O’
and turn power off at the power outlet
and then unplug. Leave the temperature
control probe connected to the CombiSteamer/Frypan until cool.
This appliance must be used with
the temperature control probe
provided. Do not use any other
temperature control probe or
connector.
Although the Combi-Steamer/Frypan is
fully immersible, the temperature control
probe should never be immersed in
water or any liquid.
The Temperature Control Probe has 10
heat settings for accurate temperature
control, from lowest setting “simmering”
through to No. 10 for searing and sealing.
The Indicator light switches off
automatically when the correct
temperature is reached and will cycle on
and off during cooking.
Place the Combi-Steamer on a level, flat
surface.
“Condition” the non-stick surface by
applying a thin smear of cooking oil over
the surface with a soft cloth or paper towel
Set the temperature control probe to ‘O’,
fully anti-clockwise. Insert the temperature
control probe firmly into the socket on
the side of the Combi-Steamer/Frypan
Base.Then plug the cord into a 230/240volt power outlet and then turn the
power on. Always insert temperature
control probe into the CombiSteamer/Frypan first, and then plug the
power cord into a power outlet.
The Kambrook Combi-Steamer/Frypan is
now ready for use. Select the desired heat
setting.The indicator light will signal that
the element is heating up, and turn off
when the temperature is reached.The
indicator light will cycle on and off during
cooking, indicating that the correct
temperature is being maintained. Adjust
setting up or down as needed.
4
Maintaining your Kambrook
Combi-Steamer/Frypan
One-level
Steaming
Steaming rack
in steaming position.
Always turn the power off at the power
outlet and then unplug the CombiSteamer/Frypan and allowing the unit the
cool down before disassembling any parts.
Two-level
Steaming
Steaming rack in
steaming position
inside steaming tray.
After the unit has cooled down remove
the temperature control probe from the
socket, it can be wiped with a slightly
damp cloth but DO NOT immerse the
temperature control probe in water or
any other liquid.
Three-level Steaming
Frypan in place with
steaming tray on top
with the Steaming
Rack (in steaming
position) placed in
the steaming tray.
The frypan, steaming tray and lid are fully
immersible and dishwasher safe. If washing
by hand use hot soapy water. Do not use
abrasive cleaners, steel wool or scouring
pads as these can damage the non-stick
surface.
Steaming Smaller
Portions of Food
2 Pan dividers are
used inside the
steaming tray.
Rinse and dry all parts thoroughly
especially the socket where the temperature
control probe is inserted.To ensure the
interior of the socket is fully dry, shake
out excess water then wipe the interior
of the socket with a dry cloth.
Poaching
Steaming rack in
roasting position.
After washing the Combi-Steamer/Frypan
base in the dishwasher, “condition” the
cooking surface with cooking oil and a
paper towel, as the dishwasher is more
abrasive than hand washing.
Roasting
Steaming rack in
roasting position.
How to Use Your Versatile Kambrook
Combi-Steamer/Frypan
Steaming Bread
Steaming rack in
roasting position
inside steaming
tray (for greater
steam circulation).
Your Combi-Steamer/Frypan is designed
to cook a complete meal in one appliance.
The accessories can be stacked or used
interchangeably for greater cooking
convenience.
5
Hints and Tips:
Shallow frying
All cooking guides and recipe times are
to be used as an indication only, as the
freshness, size, and cuts etc. of vegetables
and meats used will vary the cooking
times
Recommended temperature control setting: 6 – 8
Less oil is used (about 1.5cm) for shallow frying
and the food is usually cooked at a lower
temperature so that a delicious brown crust forms
on the underside.The food is then turned over and
the process is repeated.
Read recipes over once before starting
to cook
Pan-Frying
Recommended temperature control setting: 4 – 6
Have all ingredients at hand before
cooking commences
Little or no fat is used, depending on the
fat content of the food.When frying, it is
important not to crowd the pan: food will
then stew rather than brown
Cooking times in the following recipes
serve as a guide only.The quality of the
meat, freshness and ripeness of the
vegetables, the size and the starting
temperature of foods could cause the
time to vary.
Roasting
Recommended temperature control setting: 10 & 3
The meat is first browned in a little fat or
oil on No. 10,then roasted using the
steaming rack, (roasting position) with the
temperature control probe on No. 3 and
the lid on.The roast then needs to be and
basted occasionally.
Foods, which overcook easily, should be
removed form the Combi-Steamer/Frypan
as cooking is finished.
Try to dry meat, poultry or vegetables
before adding to hot oil to prevent
unnecessary spattering.
Boiling
Recommended temperature control setting: 4
Boiling can be a very nutritious way of
serving fresh vegetables if it is done
properly. Always have the water boiling
and add some salt before adding the
vegetables. In order that heat penetrates
quickly, boil the vegetables in small
batches. Use the liquid after boiling for
soups or gravies.
Be sure the water is boiling before food
is added for steaming and always replenish
with boiling water during steaming.
Season food after steaming for greater
nutrient retention.
Adjust temperature control probe setting
up or down as needed for desired
cooking.
Poaching/Bain Maire
Cooking Guides
Recommended temperature control setting: 4
The thermostatically controlled CombiSteamer/Frypan makes it ideal for cooking
a wide variety of foods, as the recipes in
this book demonstrate. By simply adjusting
the temperature control you are assured
of perfect results every time.
Both methods are especially good for
foods requiring gentle heat, for instance
eggs, quenelles and custards. In poaching,
food is in direct contact with simmering
liquid (water, stock, milk, etc) and in bain
marie, the food is placed in a heat
resistant dish and then partially immersed
6
in water. Stand the dish on the steaming
rack (roasting position) to avoid direct
contact with the bottom of the CombiSteamer/Frypan.
Braising and Stewing
Recommended temperature control setting: 3
The technical difference between a braise
and a stew is that in a braise the meat is
always cooked “covered”, for instance,
browning it to form a crust (or “cover”)
so that meat is cooked in steam.The meat
is usually cooked in one piece and either
placed on the steaming rack (roasting
position) above some liquid or over a bed
of vegetables.The meat for a stew may be
browned first if desired, but the aim is to
extract the flavour from the meat to make
a delicious gravy. Both methods require
gentle simmering in a closed pan.
Steaming
Recommended temperature control setting: 4
Steamed food remains moist and
succulent and can be carried out without
constant attention; the water may need to
be replenished during long periods of
steaming. Place the food in steaming tray
or stand on the steaming rack (steaming
position) and add 4 cups of water to the
frypan base.
IMPORTANT: Remember always
replenish with boiling water.
Remove food as soon as steaming
is finished.
Slow Cooking
Recommended temperature control setting: 3
Cooking at low temperature is particularly
beneficial to tougher cuts of meat.When
cooked, the meat merely becomes firm so
that is slices evenly without tearing apart.
There is little shrinkage and juices, flavour
and nutrition value are retained.
Minimum Moisture or “Waterless”
Cooking
Recommended temperature control setting: 4
Another advantage of slow cooking is the
convenience factor. After a few minutes of
initial preparation, the food can be left to
cook for hours, or even a whole day, with
the minimum of attention. And should you
wish to speed up cooking at any time,
simply turn the temperature control
probe to No. 4-5
Vegetables cooked this way are nutritious
and remain succulent and crisp to the
bite.The success of this method depends
upon efficient heat control, so take the
time to experiment with your new
Combi-Steamer/Frypan.
Start by adding two to three tablespoons
of water to the pan - most vegetables can
be cooked without additional water the
water that clings to the vegetables after
washing is usually sufficient - then add the
vegetables, cover and bring to boil. Lower
heat immediately and cook until done.
Alternatively, start by frying the vegetables
on No. 6 in two to three tablespoons of
oil for a few minutes. Add three
tablespoons of water, cover and lower the
heat so no steam escapes; then cook until
done.
Keep Warm/Simmer
Recommended temperature control setting: 1 – 2
Food can be kept warm or at a slow
simmer for latecomers or second
helpings. Ideal for heating up buns.
Table Cooker
Recommended temperature control setting: 10 – 4
Present your Combi-Steamer/Frypan at
the table (Use a heat resistant mat to
protect your table from the heat of the
Combi-Steamer/Frypan) for a ‘Hot Rock’
style dinner, or try Mongolian Hot Pot
(recipes not included)
7
Temp. Control
Setting
Meat Type
Cooking Time
Rolled Roast Beef 11/2 – 2 kg
Setting 3
Leg of Lamb Roast 11/2 – 2 kg
Rare
11/4 – 11/2 hours
Medium
11/2 – 13/4 hours
Well Done
11/2 – 2 hours
Medium
11/4 – 11/2 hours
Well Done
13/4 – 2 hours
1
Setting 5
Setting 8
Roast Pork 1 /2 – 2 kg
21/2 – 3 hours
Roast Chicken 11/2 – 2 kg
1 – 11/2 hours
Fried Bacon
4 – 6 minutes
French Toast
2 – 4 minutes
Sausages
10 – 15 minutes
Hamburgers (20mm thick)
6 – 8 minutes
Lamb Chops
10 – 20 minutes
Porterhouse Steak Rare (10–25mm thick) Rare
10 – 15 minutes
Setting 10
for 4 minutes
then to Setting 8
Minute Steak (3 – 6mm thick)
Chicken
– Thigh
Medium
15 – 20 minutes
Well Done
20 – 25 minutes
Rare
2 minutes
Medium
4 minutes
Well Done
6 minutes
10 – 15 minutes or until cooked
– Drumsticks
15 – 20 minutes or until cooked
– Breast
20 – 25 minutes or until cooked
Pork Loin Cutlets
10 – 15 minutes or until cooked
Scotch Fillets
10 – 15 minutes or until cooked
the quantity of liquid.The general rule-ofthumb is to use any good quality red or
robust wine for meat and white or light
wine for chicken. Let your taste be your
guide.
Steaming Vegetables
The following vegetables can be
successfully steamed in the CombiSteamer/Frypan by placing them inside the
steaming tray or steaming rack provided.
Bring 4 cups of water to boil then turn
the temperature control probe to Setting
‘4’ before adding the vegetables. Always
replenish with hot water.
Guide to roasting
Place steaming rack in appliance (roasting
position) and place meat on top. Cover
and roast according to the chart above.
Note: For golden appearance quickly panfry before
steaming.
Guide to steaming
Meat and chicken can also be steamed. As
moist heat penetrates twice as quickly as
dry heat, steaming meat or chicken will
only take about half the time of roasting.
Simply place the meat on top of the
steaming rack (steaming position) or
steaming tray and add 4 cups of water to
the pan for steaming. For that special
occasion, you can use wine – up to half
Note:Cooking times will vary based on the size of
the vegetables being cooked and personal taste
preference.
8
Vegetable Steaming Chart
Ingredients
Preparation
Time on Temperature
Control Setting 4
Artichoke
Trim stalks and leaves; keep whole
Place in steaming tray or steaming
rack and steam for 20 – 30 minutes
Asparagus
Trim stalks; cut or leave whole
Place in steaming tray and steam for
5 – 7 minutes
Beans
Remove stem and string; cut or
leave whole
Place in steaming tray and steam
for 12 minutes
Broccoli
Remove leaves and ends of tough stalk.
Keep whole or separate into spears or
flowerets
Place whole broccoli on steaming
rack and flowerets in steaming tray
and steam for 10 – 15 minutes
Brussels
sprouts
Discard wilted leaves and trim ends
Place in steaming tray and steam
for 20 minutes
Cabbage
Discard wilted leaves; keep whole or
quartered
Place whole on steaming rack and
quarters in steaming tray and steam
for 10 – 15 minutes
Carrots
Scrape or peel and cut off end.
Keep whole or separate into flowerets
Place in steaming tray and steam
for 20 minutes
Cauliflower
Remove leaves and cut off end.
Keep whole or separate into flowerets
Place whole cauliflower on steaming
rack and flowerets in steaming tray.
Steam for 15 – 20 minutes
Celery
Remove strings and leaves. Cut into
5cm pieces.
Place in steaming tray and steam
for 5 – 7 minutes
Eggplant/
aubergine
Remove stem, slice 1.3cm thick. Sprinkle Place in steaming tray and steam for
with lemon juice if not using immediately 3 – 5 minutes
Mushrooms
Scrub and trim ends.
Keep whole or quartered
Place in steaming tray and steam
for 3 – 5 minutes
Capsicum
Remove stem and seeds.
Keep whole or cut as desired
Place in steaming tray and steam
for 4 – 6 minute
Parsnips
Peel and remove tops.
Cut into quarters or 1.3cm slices
Place in steaming tray and steam
for 20 minutes
Peas (fresh)
Remove pods
Place in steaming tray and steam
for 10 – 12 minutes
Peas (frozen)
Place in steaming tray and steam
for 5 – 7 minutes
Pumpkin
Remove the seeds and cut into
small pieces
Place in the steaming tray and steam
for 20 – 25 minutes
Potatoes
Peel and keep whole or quartered
Place whole on steaming rack and qtrs.
in steaming tray. Steam for 20 – 25
minutes or 10 – 15min for quarters.
Zucchini/
courgettes
Remove blossom and stem ends.
Cut into 1.3cm slices
Place in steaming tray and steam
for 10 – 12 minutes
Method for Steaming Rice
METHOD
INGREDIENTS
COOKING
Rice cooked directly in the
Combi-Steamer/Frypan frypan
Wash and rinse well. Combine
1 cup rice and 13/4 cup water
Put in appliance, cover (vent
closed) and bring to boil on
Setting 8, then simmer for 20
minutes on Setting ‘4’. Rest
for 5 minutes before serving
Rice cooked in a heat resistant
bowl inside the CombiSteamer/Frypan with water for
steaming in the frypan base.
Wash and rinse well. Combine
1 cup rice and 13/4 cup water.
Put in a 1 litre heat resistant
bowl
Place on steaming rack, cover
and bring to boil on Setting 8,
then simmer for 20 minutes
on Setting ‘4’. Rest for 5
minutes before serving.
Method for Steaming Chicken
Chicken
Cooking time on Temperature Control Setting 4
Breast
20 – 25 minutes
Thigh
20 – 25 minutes
Legs (drumstick)
30 – 35 minutes
10
Method for Seafood
The cooking time of fish (and seafood) is
based upon thickness rather than on
weight. Fish should be washed quickly and
thoroughly to preserve the natural taste
and flavour. Avoid overcooking fish remember it will continue to cook after it
is placed on a serving dish. Allow frozen
fish to thaw before steaming for more
even cooking.
Seafood
A handful of fresh herbs, a few aromatic
vegetables (such as carrots and celery),
garlic, vinegar, lemon, peppercorns or
cloves, etc. and a good quality white wine
when added to the steaming liquid will
impart extra flavour to the steaming food.
Reduce the steam liquid and use it as a
base for soups or sauces.
Cooking Time at Control Setting 4
Clams
– small
– medium
– large
3 minutes
6 – 8 minutes
10 – 12 minutes
Crabs
– small
– medium
– large
7 – 10 minutes
15 minutes
20 – 25 minutes
Fish
– flat (sole)
– fillets
5 – 7 minutes
5 – 7 minutes
– round (trout)
– steaks 2.5cm thick
10 – 12 minutes
5 – 8 minutes
Lobsters –
–
–
–
small
tails
medium
large
Mussels
15
15
20
25
minutes
minutes
minutes
minutes
5 – 8 minutes
Oysters, shucked
3 – 5 minutes
Prawns
4 minutes
6 – 8 minutes
10 – 12 minutes
– small
– medium
– large
11
Recipes
Sesame pumpkin
Potato and spinach salad
Serves 4
600g pumpkin, (Queensland Blue or
Japanese pumpkin) cut into 3cm pieces
Dressing:
2 tablespoons peanut oil
3 tablespoons toasted sesame seeds
1 tablespoon honey
1 tablespoon lemon juice
1 tablespoon soy sauce
Serves 4 – 6
800g new potatoes
1 medium Spanish onion, finely chopped
1 cup thinly sliced green shallots
1
/2 bunch English spinach
2 tablespoon freshly snipped chives
1
/2 cup roasted pine nuts
Dressing
3
/4 cup mayonnaise
2 tablespoons sour cream
1 1/2 tablespoons lemon juice
Freshly ground black pepper
1. Fill frypan reservoir with 4 cups of
water and place the steaming rack in
the steaming position and place in the
pumpkin.Turn the temperature control
probe to ‘10’.
1. Fill frypan reservoir with 4 cups of
water and place in the metal steaming
rack, in the steaming position.Turn the
temperature control probe to ‘10’.
2.When the water comes to the boil,
cover with the lid
2.When the water comes to the boil
place the potatoes in a single layer on
the steaming rack and cover with the lid.
3.Turn the temperature control probe to
‘4’ for 20 - 25 minutes and/or until
pumpkin is cooked.
3.Turn the temperature control probe to
‘4’.The potatoes will be ready in
approx. 20-min.
4. Combine the oil, sesame seeds, honey,
lemon juice and soy sauce in screw top
jar. Shake well.
4.To check the potatoes pierce them with
a thin skewer. If the skewer is easy to
insert, the potatoes are cooked.
5. Pour dressing over pumpkin. Serve.
5.While the potatoes are cooling wash
the spinach, let the spinach dry, and
then cut the leaves into thin strips.
6. Slice the potatoes in half while they are
still warm, combine the dressing
ingredients and pour dressing over
potatoes, add the spinach, pine nuts,
chives, onion and shallots.
7. Season with freshly ground black
pepper and milled rock salt. Serve.
12
Steamed salmon cutlets with
hokkien noodles
Steamed octopus with coriander and
ginger
Serves 2
2 salmon cutlets 150 – 200g each
300g hokkien noodles
200g snow peas, trimmed and cut in strips
2 tablespoons sweet soy sauce
Serves 4
1 kg baby octopus, cleaned and cut in half
2 tablespoons freshly squeezed limejuice
2 tablespoons finely grated ginger
2 tablespoons sweet Thai chilli sauce
3
/4 cup fresh coriander leaves
1 tablespoon fish sauce
1 tablespoon of sesame oil
1
/4 cup finely chopped green onion
1
/4 cup finely chopped fresh coriander
Freshly ground black pepper
1. Place the octopus into a bowl, add the
remaining ingredients and mix well
1. Fill frypan with 4 cups of water and
place the steaming rack in the steaming
position.Turn the temperature control
probe to ‘10’
2. Marinate the octopus for 4 hours in the
refrigerator
3. Fill frypan reservoir with 4 cups of
water and place the steaming tray on
top of the frypan.
2.When the water comes to the boil,
place the salmon in a single layer in the
steamer tray and cover with the lid.
4.Turn the temperature control probe
to ‘10’
3.Turn the temperature control probe to ‘3’
5. When the water comes to the boil
place the drained octopus into the
steaming tier and cover with the lid.
(Keep any left over marinade to place
on the octopus when cooked.)
4.After 4 min place the hokkien noodles
into the steaming tier, place the
steaming tier onto the frypan and
replace the lid
5. Combine all the other ingredients in a
bowl
6.Turn the temperature control probe to
‘4’ for 10 – 12 minutes and/or until
octopus is cooked
6.After 4 min remove the noodles and
salmon. Place the noodles into the bowl
to combine with the other ingredients
7. When the octopus is cooked mix with
the left over marinade.
7. Serve the drained noodles onto a plate
and top with the salmon, grind some
black pepper and drizzle the noodle
dressing onto the plate
8. Serve warm with either mixed salad or
steamed rice.
13
Chicken and mushroom risotto
Tuscan herb chicken
Serves 4
2 x chicken breast fillets (300g)
1 tablespoon butter
1 tablespoon olive oil
1 medium onion, finely chopped
1 clove garlic, crushed
1 cup of sliced button mushrooms
300g arborio rice
31/2 cups chicken stock
1
/4 cup freshly chopped basil and chives
1
/2 cup of grated Parmesan
Freshly ground black pepper
Serves 4
1 x 1.6kg chicken, giblets removed
2 tablespoons lemon juice
1 tablespoon fresh white bread crumbs
1 egg
Zest of 1 lemon
1
/2 bunch of sage
Tuscan dried herb seasoning
Preparation
1.Wash and pat the chicken dry.
2. Combine the breadcrumbs, egg, lemon
juice, lemon zest and sage leaves to
form the stuffing. Place the stuffing
inside the cavity of chicken.
1. Steam the chicken breasts as per the
steaming guide.
2. Heat the butter and oil in the frypan
and lightly saute the onion and garlic.
Add the rice and mix through until the
rice looks shiny.
3. Sprinkle the chicken generously with
Tuscan seasoning. Serve
Roasting
1. Using the frypan with the temperature
control probe on ‘8’, brown the breast
sides of the chicken. Remove the
chicken
3.Add the chicken stock and bring to
the boil.
4.Wash the sliced mushrooms and pat
dry add to the rice and stock
2. Place the steaming rack, in the roasting
position, into the frypan.Turn the
temperature control probe to ‘3’. Place
the chicken onto the steaming rack, and
replace the lid with the steam vent
open.
5. Set thermostat probe to ‘3’ for 30
minutes and/or until rice is cooked.
6.While the rice is cooking stir
occasionally, add more stock if the rice
appears to be too dry.
3. Check the chicken every 1/2 an hour, it
should be ready after 1-11/2 hours.
7. Slice the cooked chicken; add to the
risotto with the chopped mixed herbs,
freshly milled pepper and grated
parmesan. Serve
4.To check the chicken, pierce the thigh
with a skewer, if the resulting juices are
clear the chicken is cooked.
14
5. Reduce the temperature control probe
to ‘3’ – ‘4’ and gently simmer for 3 – 4
minutes. Remove the egg from the
water with a slotted spoon, drain on
absorbent paper.
Orange pikelets
Makes approximately 15
1 cup self-raising flour
2 teaspoons sugar
1 egg
2 teaspoons of melted butter or
margarine
Rind of 1 orange
1
/2 cup milk
6. Serve on toast or on top of your
favourite salad
NOTE: The freshness of the egg is very important
to how well it cooks. A good poached egg will have
the white surrounding the yolk
1. Sift the flour into a bowl, add sugar.
2. Make a well in the centre and break in
the egg. Add the cooled butter, orange
rind and almost all the milk.
1. Mix with a wooden spoon until the
mixture is smooth adding extra milk if
the mixture is too thick.
2. Heat the fry pan, turning the
temperature control probe to ‘3’.
3. Cook spoonfuls of the pikelet mixture
until bubbles break the surface.
4.Turn pikelets over to cook the second
side. Remove and serve hot or cold
with butter, honey or lemon butter.
Poached eggs
Serves 1
1 cup water
1
/4 teaspoon salt
1
/2 teaspoon vinegar
1-2 eggs
1. Place 4 cups of water into the frypan
2. Set the temperature control probe to
‘10’, place the vinegar and salt into the
water. Bring the water to the boil.
3. Break each egg into a cup
4. Gently ease the egg into the boiling
water.
15
Madras beef curry with tomatoes
and chickpeas
Kashmire roast lamb
Serves 6
1 x 2kg leg of lamb
2 tablespoons peanut oil
1 teaspoon ground cumin
2 teaspoon grated ginger
1 tablespoon lemon juice
2 cloves garlic, crushed:
1 cup hot water
1 teaspoon garam masala:
Serves 4
500g diced beef (blade, round or chuck
steak)
1 medium brown onion (diced)
2 teaspoon minced garlic
1 teaspoon bottled chilli paste
11/2 tablespoons madras curry paste
Freshly ground black pepper
3 tablespoon peanut oil
2 440g tins of peeled tomatoes
1 375g tin of chickpeas
1.Trim lamb of fat, score surface.
Combine ginger, garlic, oil, garam masala,
and ground cumin and lemon juice. Rub
over lamb.
1. Heat the frypan on ‘10’ using the
temperature control probe.
2. Place the temperature control probe
into the frypan and turn to ‘10’ when
the frypan has reached temperature seal
the lamb leg and then remove it.
2.Add the peanut oil and diced beef to
the frypan and seal the meat to a
goldern brown colour. Remove the
meat using a slotted spoon.
3. Place in the steaming rack in the
roasting position and add the hot water.
Place the lamb onto the steaming rack,
turn the temperature control probe to
‘3’. Cover with frying pan lid, Cook until
done to the desired tenderness 1 3/4
hours, basting occasionally.
3.Add the onion to the frypan and turn
the temperature control probe to
‘6’. Cook the onion for 5 min,
add the chilli and garlic and cook for
a further 2 min.
4.Add the curry paste and cook for 3
min. add the beef and tomatoes, bring
the curry back to the boil, then turn the
temperature control probe to ‘3’ and
replace the lid with the steam vent
open.
4. Place lamb on serving platter. Cover;
allow to rest for 10 minutes, before
carving.
5.The curry will take approx. 1 1/2 hours
to cook, it should be checked every 1/2
an hour.
6. Open the chickpeas and wash them,
add to the curry when it is cooked,
check the seasoning.
7. Serve with steamed rice and
pappadams, garnish with chives.
16
Notes
17
Notes
18
Kambrook 12 Month
Replacement Warranty
KAMBROOK warrants the purchaser
against defects in workmanship and
material, for a period of 12 months from
the date of purchase (3 months
commercial use).
Guarantee and purchase receipt for this
product are to be retained as proof of
purchase and must be presented if making
a claim under the terms of the
KAMBROOK guarantee.
KAMBROOK reserves the right to
replace or repair the appliance within
the warranty period.
Warranty does not apply to any defect,
deterioration, loss, injury or damage
occasioned by, or as a result of the misuse
or abuse, negligent handling or if the
product has not been used in accordance
with the instructions.The guarantee
excludes breakages and consumable items
such as kneading blades.
This warranty is void if there is evidence
of the product being tampered with by
unauthorised persons.
If the product includes one or a number of
accessories only the defective accessory or
product will be replaced.
In the event of KAMBROOK choosing to
replace the appliance, the guarantee will
expire at the original date, ie. 12 months
from the original purchase date.
In Australia, this KAMBROOK Guarantee
is additional to the conditions and
guarantees which are mandatory as
implied by the Trade Practices Act 1974
and State and Territory legislation.
For service, spare parts or product
information in Australia, please call
KAMBROOK on the Customer Service
Line (free call) 1800 800 634.
For service, spare parts or product
information in New Zealand, please
call KAMBROOK New Zealand, Mono
Place, Ellerslie, Auckland
Phone 0800 253 007 Fax 0800 263 001
If claiming under this guarantee the product
must be returned freight prepaid.
YOUR PURCHASE RECORD (Please complete)
Attach purchase receipt here.
DATE OF PURCHASE______________________________________________________
MODEL NUMBER ________________________________________________________
SERIAL NUMBER (If applicable) ______________________________________________
Please don’t return purchase record
PURCHASED FROM ______________________________________________________
until you are making a claim
Kambrook 4 Kingston Town Close Oakleigh,Victoria 3166, Australia
Customer Service Line (free call) 1800 800 634 Customer Service Fax 1800 621 337
Kambrook (New Zealand) Mono Place Ellerslie, Auckland, New Zealand
Customer Service Line/Spare Parts 0800 253 007 Customer Service Fax 0800 263 001
UE GO
ME GO
OD NA
OD VAL
Due to continual improvement in design or otherwise, the product you purchase may differ slightly from the illustrations in this book. Issue 1/00