1
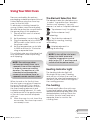
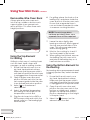
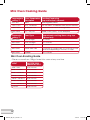
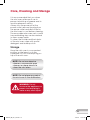
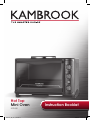
Hot Top
Mini Oven
Instruction Booklet
KOT630
KOT630_IB_B11_FA.indd 1
11/07/11 11:57 AM
Important
Please retain your instruction
book for future use.
In the event that you need some assistance with your
Kambrook appliance, please contact our Customer Service
Department on 1300 139 798 (Australia) or 0800 273845 (New
Zealand). Alternatively, visit us on our website at
www.kambrook.com.au or www.kambrook.co.nz
KOT630_IB_B11_FA.indd 2
11/07/11 11:57 AM
Contents
Kambrook Recommends
Safety First
p4
Your Hot Top Mini Oven
p6
Using Your Mini Oven
p7
Mini Oven Cooking Guide
p12
Care, Cleaning and Storage
p13
Recipes
p14
KOT630_IB_B11_FA.indd 3
11/07/11 11:57 AM
Kambrook Recommends Safety First
IMPORTANT: Please retain your
instruction book for future use.
At Kambrook, we believe that safe performance is the first priority in any
consumer product, so that you, our valued customer, can confidently
use and trust our products. We ask that any electrical appliance that
you use be operated in a sensible fashion with due care and attention
placed on the following important operating instructions.
Important Safeguards For Your
Kambrook Mini Oven
• Carefully read all instructions before operating
the Kambrook Hot Top Mini Oven for the first
time and save for future reference.
• Remove and safely discard any packaging
material and promotional labels before using
the Mini Oven for the first time.
• To eliminate a choking hazard for young
children, remove and safely discard the
protective cover fitted to the power plug of
this appliance.
• Do not place the Mini Oven near the edge of
a bench or table during operation. Ensure the
surface is level, clean and free of water and
other substances.
• Do not use the Mini Oven on a sink
drain board.
• Do not place this Mini Oven on or near a hot
gas or electric burner, or where it could touch
a heated oven.
• Position the Mini Oven at a minimum distance
of 50cm away from walls, curtains, cloths and
other heat sensitive materials when in use.
• Always operate the Mini Oven on a stable
and heat resistant surface. Do not use on a
cloth-covered surface, near curtains or other
flammable materials.
• Do not place cardboard, plastic, paper or
other flammable materials into the Mini Oven.
• Do not cover the crumb tray or any other
external part of the Mini Oven with metal foil.
This will cause overheating of the oven.
• The stove operates at very high temperatures.
Extreme caution should be exercised during
operation. Do not touch hot surfaces.
• Extreme caution must be used when the
appliance contains hot food and liquids. Do
not move the appliance during cooking.
• Do not place metallic objects such as knives,
forks, spoons and lids on the stove top hotplate
surface as they can become very hot.
• Do not operate the hotplate without a
cooking pot or pan positioned on the hotplate
heating surface.
• Always ensure the crumb tray is thoroughly
dried after cleaning and is reinserted into
position before operating the Mini Oven.
• When using the Mini Oven, provide sufficient
clearance (minimum 50mm) above and on all
sides for air circulation.
• This appliance is not intended to be operated
by means of an external timer or separate
remote control system.
• Always ensure the Mini Oven is properly
assembled before use.
• Always place the wire oven rack into top,
middle or bottom rack support guide inside
the oven in an upward rack return position.
• The door or the outer surface may get hot
when the appliance is operating.
• The temperature of accessible surfaces will be
high when the appliance is operating and for
some time after use.
• Do not touch hot surfaces, use insulated
oven mitts.
• Always wear protective, insulated oven mitts
when inserting, removing or handling items from
the Mini Oven.
4
KOT630_IB_B11_FA.indd 4
11/07/11 11:57 AM
• Always use extreme caution when removing
the tray or disposing of hot grease or other
hot liquids.
• Allow the Mini Oven to cool before handling.
• Do not place hands inside the Mini Oven
during operation.
• Do not leave the door open for extended
periods of time.
• The glass of the Mini Oven door has been
specially treated to make it stronger, more
durable and safer than ordinary glass,
however it is not unbreakable. If struck
extremely hard, it may break or weaken, and
could at a later time shatter into many small
pieces without apparent cause.
• Do not insert over-sized foods into the Mini
Oven as they create risk of fire or electric shock.
• It is recommended to use only the
accessories supplied with the Mini Oven.
• Do not store any materials other than the
supplied accessories in the Mini Oven when
not in use.
• Do not clean the interior of the Mini Oven with
metal scouring pads as pieces can break off
the pad and touch electrical parts, creating
risk of electric shock.
• Do not attempt to operate the Mini Oven by
any method other than those described in
this book.
• Always ensure the Mini Oven is properly
assembled before use. Follow the instructions
provided in this book.
• Do not place anything on top of the Mini Oven
when in use and when stored other than those
described in this book.
• The Mini Oven should not be left unattended
at any time when in use.
• Always ensure the Mini Oven has cooled, the
temperature control dials for both oven and
stove top hotplate are in the OFF ‘0’ positions.
The Mini Oven is switched off at the power
outlet and the cord is unplugged from the
power outlet before attempting to move the
appliance, when not in use, if left unattended
and before disassembling, cleaning or storing.
• Keep the Mini Oven clean. Follow the cleaning
instructions provided in the book on page 13.
Important Safeguards For All
Electrical Appliances
• C
arefully read all instructions before operating
the appliance and save for future reference.
• R
emove and safely discard all packaging
material and promotional labels before using
the appliance for the first time.
• Fully unwind the power cord before use.
• D
o not let the power cord hang over the edge
of a bench or table, touch hot surfaces or
become knotted.
• T o protect against electric shock, do not
immerse the power cord, power plug or
appliance in water or any other liquid, unless it
is recommended in the cleaning instructions.
• T he appliance is not intended for use by
persons (including children) with reduced
physical, sensory or mental capabilities, or lack
of experience and knowledge, unless they
have been given supervision or instruction
concerning use of the appliance, by a person
responsible for their safety.
• C
hildren should be supervised to ensure that
they do not play with the appliance.
• It is recommended to inspect the appliance
regularly. Do not use the appliance if the
power supply cord, plug, connector or
appliance becomes damaged in anyway.
Return the entire appliance to the nearest
authorised Kambrook Service Centre for
examination and/or repair.
• A
ny maintenance other than cleaning should
be performed at an authorised Kambrook
Service Centre.
• T his appliance is for household use only. Do not
use this appliance for other than its intended
use. Do not use in moving vehicles or boats.
Do not use outdoors. Misuse may cause injury.
• T he installation of a residual current device
(safety switch) is recommended to provide
additional safety protection when using
electrical appliances. It is advisable that a
safety switch with a rated residual operating
current not exceeding 30mA be installed in
the electrical circuit supplying the appliance.
See your electrician for professional advice
• A
lways turn the appliance to the OFF
position, switch off at the power outlet
and unplug at the power outlet when the
appliance is not in use.
• B
efore cleaning, always turn the appliance to
the OFF position, switch off at the power outlet,
unplug at the power outlet and remove the
power cord, if detachable, from the appliance
and allow all parts to cool.
• D
o not place this appliance on or near a heat
source, such as hot plate, oven or heaters.
• P
osition the appliance at a minimum
distance of 20cm away from walls, curtains
and other heat or steam sensitive materials
and provide adequate space above and on
all sides for air circulation.
5
KOT630_IB_B11_FA.indd 5
11/07/11 11:57 AM
Your Hot Top Mini Oven
1. 19 litre oven capacity
2. 19 cm die-cast hotplate
3. Oven: 1500 watts
Hotplate: 1000 watts
4. Oven temperature control dial
5. Hotplate temperature
control dial
6. Element selection dial – top
element only, bottom element
only, both top and bottom
elements or oven top hotplate.
7.
8.
9.
10.
11.
Heating indicator light
Glass door
Cool touch handle
Baking tray
Removable wire oven rack –
always place in an upward rack
return position.
12. Removable crumb tray
6
KOT630_IB_B11_FA.indd 6
11/07/11 11:57 AM
Using Your Mini Oven
Remove and safely discard any
packaging material and promotional
stickers before using the stove top
oven for the first time.
To eliminate a choking hazard for
young children, remove and safely
discard the protective cover fitted to
the power plug of this appliance.
1. Place the mini oven on a level,
flat surface.
The Element Selection Dial
2. Set the element control dial to
.
3. Plug the appliance into a 230V or
240V power outlet. Switch on at
the power outlet.
4. Set the temperature control dial
to MAX and time for 15 minutes
using a separate timer.
This will eliminate any oil residue that
may have been used for packing
and shipping.
= ‘Top & bottom elements’
together for roasting, toasting
and baking.
NOTE: The mini oven does
not have an inbuilt timer, so a
separate timer will be required
in order to measure cooking
duration. The appliance is not
intended to be operated by
means of an external timer or
separate remote control system.
When turned on for the first time,
the mini oven may give off vapours
for up to 15 minutes. This is due to
the protective substances on both
the oven heating elements and
hotplate heating element. It is safe,
not detrimental to the performance
of the mini oven and will dissipate
with use.
5. Allow the oven to cool. Insert the
accessories. The stove top oven is
now ready to use.
The element selection dial allows you
to select ‘top and bottom’ elements
‘bottom only’ element, ‘top only’
element, as well as ‘hotplate’ element.
= ‘Top element only’ for grilling.
= ‘Bottom element only’
for reheating.
= Hotplate element for
heating and boiling.
NOTE: To turn off the mini oven,
always turn both oven and
hotplate temperature control
dials to the OFF ‘0’ positions and
switch off at the power outlet.
Heating Indicator Light
The heating indicator light will
illuminate as the oven is heating
and will turn off when the oven has
reached the selected temperature. It
will also cycle on and off throughout
the cooking process.
Pre-heating
For best results allow the mini oven
to pre-heat before using. Select the
desired temperature and select the
desired element setting. Place the
food into the mini oven and set a
separate timer to monitor the
cooking time.
7
KOT630_IB_B11_FA.indd 7
11/07/11 11:57 AM
Using Your Mini Oven continued
Removable Wire Oven Rack
Always place the wire oven rack
into the top, middle or bottom rack
support guide in an upward rack
return position. This offers three rack
height positions.
6. For grilling, place the food on the
baking tray, and place inside the
oven and onto the wire oven rack.
Ensure that a separate timer is
now activated if required in order
to measure cooking duration.
NOTE: The mini oven does
not have an inbuilt timer, so a
separate timer will be required.
Fig. 1
Using the Top Element
for Grilling
Grilling is a fast way of cooking foods
such as steak, lamb chops and
sausages, as well as making toasties.
1. Ensure that the mini oven is on a
dry, level, heat resistant surface.
Make sure that the power outlet is
switched off and that the mini oven
is unplugged from the power outlet.
2. Open the glass oven door and
position the wire rack into the top
rack support guide inside the oven
in an upward rack return position.
3. Select
on the element
selection dial.
4. Select the desired temperature
according to the recipe on the
temperature control dial.
5. Plug the mini oven into a 230V or
240V power outlet and switch the
power outlet on. The heating light
will illuminate.
7. Leave the door slightly ajar,
leaving a minimum 50mm gap at
the top, rear and all sides of the
oven. This will ensure adequate
airflow during grilling.
8. Monitor the cooking to check if
the food needs to be turned.
9. When grilling has finished, remove
the baking tray with oven mitts,
and place the baking tray on a
heat resistance surface.
Using the Bottom Element for
Re-Heating
Re-heating allows pre-prepared meals
to be enjoyed as they were intended
to be.
1. Ensure that the mini oven is on a
dry, level, heat resistant surface.
Make sure that the power outlet is
switched off and that the mini oven
is unplugged from the power outlet.
2. Open the mini oven door and
position the wire oven rack in the
bottom or middle rack support
guide in an upward rack return
position, depending on the height
of the pan used.
3. Select the
element on the
element selection dial.
8
KOT630_IB_B11_FA.indd 8
11/07/11 11:57 AM
4. Select the desired temperature
setting on the temperature control
dial. The recommended range for
re-heating is 60°C to 90°C.
5. Plug the mini oven into a 230V or
240V power outlet and switch the
power outlet on. The heating light
will illuminate.
6. For re-heating, place the food
onto the baking tray, and place
inside the oven. Ensure that a
separate timer is now activated
if required in order to measure
cooking duration.
NOTE: The mini oven does
not have an inbuilt timer, so a
separate timer will be required.
7. Monitor the cooking to check if
the food needs to be turned or
stirred, depending on the food
being re-heated.
8. When re-heating has finished,
remove the baking tray with oven
mitts, and place the baking tray
on a heat resistance surface.
WARNING: Hot surfaces
during and after use.
Using the Top and Bottom
Element for Roasting,
Toasting and Baking
1. Ensure that the mini oven is on
a dry, level heat resistant surface.
Make sure that the power outlet
is switched off and that the mini
oven is unplugged from the
power outlet.
2. Open the oven door and position
the wire rack on the middle rack
support guide in an upward rack
return position.
3. Place the food onto the
baking tray.
4. Select the
position on the
element selection dial.
5. Select the required temperature
on the temperature control dial.
6. Plug the mini oven into a 230V or
240V power outlet and switch the
power outlet on. The heating light
will illuminate.
7. Preheat the oven for 15 minutes.
8. Place the baking tray inside the
oven. Ensure that a separate timer
is now activated if required in order
to measure cooking duration.
NOTE: The mini oven does
not have an inbuilt timer, so a
separate timer will be required.
9. Monitor the mini oven to check if
the food needs to be turned.
10. When cooking has finished,
remove the baking tray with oven
mitts, and place the baking tray
on a heat resistance surface.
9
KOT630_IB_B11_FA.indd 9
11/07/11 11:57 AM
Using Your Mini-oven continued
NOTE: Times will vary depending
on the density of food and
individual preference.
Using the Hotplate
The hotplate is great for heating and
boiling and compliments the functions
of the oven.
Before use, wipe the stove with a soft
damp cloth and dry thoroughly.
1. Ensure that the mini oven is on a
dry, level, heat resistant surface.
Completely unwind the power
cord and insert into a 230V or
240V power outlet. Make sure that
the power outlet is switched off.
2. Set the element selection dial to
the
position (see Fig. 2).
Fig. 2
3. Turn the hotplate temperature
control dial from the OFF
‘0’ position to the desired
temperature setting
(from 1- MAX). The temperature
settings are adjustable and can
be changed at any time during
the cooking process.
4. Plug the mini oven into a 230V or
240V power outlet and switch the
power outlet on. The heating light
will illuminate.
NOTE: When turned on for the
first time, the mini oven may give
off vapours for up to 15 minutes.
This is due to the protective
substances on both the oven
heating elements and hotplate
heating element. It is safe, not
detrimental to the performance
of the mini oven and will
dissipate with use.
5. Place a saucepan or cooking pot,
in which the food will be cooked,
on the hotplate.
NOTE: To achieve optimum
performance, ensure the
diameter of the cooking pot
or pan is no larger than the
diameter of the hotplate.
6. The heating light will illuminate
as the hotplate is heating and
will turn off when it has reached
the selected temperature. It will
cycle on and off throughout the
cooking process.
7. When cooking is finished, turn the
hotplate temperature control dial
to the OFF ‘0’ position. Turn the
power off at the power outlet and
unplug the power cord. Remove
the saucepan or pot from the
hotplate and place on a level,
heat resistance surface.
10
KOT630_IB_B11_FA.indd 10
11/07/11 11:57 AM
CAUTION: DO NOT touch
the hotplate during or
after operation. Wait for
the appliance to cool
before moving or storing.
Other functions can be used after
cooking on the hotplate. Use the
element selection dial to switch to
another function.
NOTE: Only one function can be
selected at any one time. The
oven and the hotplate cannot
be operated simultaneously.
WARNING: Always keep
in mind that the hotplate
will continue to radiate
residual heat after being
switched off.
WARNING: No more
that 5 litres of water
can be boiled at any
time. For more efficient
performance it is
recommended to use a
lid when boiling water.
WARNING: Do not
operate the appliance
without a cooking pot or
pan positioned on the
hotplate heating surface.
WARNING: Fully unwind
the power cord before
use. Do not allow the
power cord to come
in contact with the
hotplate. Do not move
the appliance until it has
completely cooled down.
11
KOT630_IB_B11_FA.indd 11
11/07/11 11:57 AM
Mini Oven Cooking Guide
Temperature
setting ºC
Oven Temperature Function/Food using
Description
‘top and bottom’ elements
60ºC-90ºC
Warm
Warming plates/dishes
120ºC-170ºC
Slow – Moderate
Rich fruit cakes, shortbreads, cakes, biscuits and slices
180ºC-200ºC
Moderate – Hot
Casseroles, roast meats and vegetables
200ºC-MAX
Hot – Very Hot
Bread, muffins, pastry, scones and pizza
Thermostat
setting ºC
Food Type
Approximate cooking times using ‘top’
element only
MAX GRILL
Thin sausages
10 minutes
MAX GRILL
Thick sausages
12-14 minutes
MAX GRILL
Lamb chops
10 minutes
MAX GRILL
Steaks each side
6-8 minutes for medium rare, 10-12 minutes for well
done both depending on thickness of meat
MAX GRILL
Kebabs
10-12 minutes
Mini Oven Roasting Guide
– Place no more than 1.5Kg of meat into oven at any one time
MEAT
TIME PER 500G
cooked at 180ºC
Beef – rare
20-25 minutes
Beef – medium
28-35 minutes
Beef – well done
35-40 minutes
Lamb – medium
35-40 minutes
Lamb – well done
40-45 minutes
Veal – well done
28-35 minutes
Pork – well done
40-45 minutes
Chicken
30-40 minutes
12
KOT630_IB_B11_FA.indd 12
11/07/11 11:57 AM
Care, Cleaning and Storage
It is recommended that you clean
the mini oven after each use to
prevent a build up of grease and to
avoid unpleasant odours.
Always turn the power off at the
power outlet, remove the plug from
the power outlet and allow time for
the mini oven to cool before cleaning.
The removable wire oven rack, crumb
tray and baking tray can be washed
in warm soapy water.
To clean the outside and the interior
of the mini oven, wipe with a mild
detergent and a damp cloth.
Storage
Store the mini oven in a convenient
position on the bench or in the
cupboard. Do not store anything on
top of the mini oven.
NOTE: Do not use abrasive
cleaners, commercial oven
cleaners or sharp utensils to
clean the mini oven.
NOTE: Do not place any part of
the mini oven in the dishwasher.
WARNING: Do not
immerse the appliance or
power cord and plug in
water or any other liquid.
13
KOT630_IB_B11_FA.indd 13
11/07/11 11:57 AM
Recipes for Mini Oven
Scones
Makes 10
375ml lemonade
300ml pure cream
4 cups self-raising flour, sifted
1. Preheat the mini oven to 180ºC.
2. In a bowl, fold together the lemonade,
cream and flour until just combined.
3. Dust a clean bench top with flour
and roll the dough out. Cut rounds
using a round 8cm cookie cutter or a
small glass.
4. Place onto an oven tray covered with
baking paper, 3cm apart and bake in
the oven for 13 minutes.
5. Serve with jam and cream or lemon
and lime butter (see lemon and lime
butter recipe on page 15).
Eggplant and Feta Pizza
Makes 1 pizza
200gm eggplant, sliced
½ brown onion, sliced
2 cloves garlic, peeled, minced
¼ cup basil leaves, chopped
1 tablespoon olive oil
½ cup baba ganoush
½ cup basil leaves
3 cloves garlic, minced
1 tablespoon lemon juice
1 round pizza base
100gm feta, crumbled
50gm parmesan, grated
100gm mozzarella, grated
4. In a separate bowl, mix together
the baba ganoush, basil, garlic and
lemon juice.
5. Evenly dispurse over the pizza base and
then top with the eggplant mixture,
feta, parmesan and mozzarella. Bake in
the oven for 20 minutes.
Sausage Rolls
Makes 4 sausage rolls
500gm sausage mince
1 small onion, peeled, diced
1 clove garlic, peeled, minced
5 slices of bread, crumbed
2 tablespoons tomato paste
1 tablespoon sweet chilli sauce
2 eggs
2 sheets puff pastry
1 tablespoon milk
1 tablespoon sesame seeds
1. Preheat the mini oven to 180ºC.
2. In a food processor bowl, combine the
mince, onion, garlic, bread, tomato
paste, chilli and eggs and process until
evenly combined.
3. Slice puff pastry sheets in half and
place a thick line of mince mixture
onto each piece, lengthways. Fold
pastry over and seal by gently pushing
the pastry together where it overlaps.
4. With a pastry brush, brush the tops with
milk and top with sesame seeds.
5. Bake in the oven for 30 minutes and
serve with tomato chutney.
1. Preheat the mini oven to 180ºC.
2. In a bowl, combine the eggplant,
onion, garlic, basil and olive oil.
3. Place mixture onto an oven tray and
bake for 30 minutes.
14
KOT630_IB_B11_FA.indd 14
11/07/11 11:57 AM
Recipes for Stove Top
Toffee Cups
Homemade Baked Beans
Makes 12
Makes 4 serves
1 cup caster sugar
½ cup water
1 tablespoon vinegar
2 tablespoons 100’s & 1000’s (optional)
1½ tablespoons olive oil
1 medium onion, sliced
1 clove garlic, minced
1½ tablespoons brown sugar
2 teaspoons balsamic vinegar
3 roma tomatoes, diced
2 cups canned kidney beans, rinsed
2 bay leaves
1 cup stock
Parmesan cheese, to serve
Parsley, chopped, to serve
Crusty bread, to serve
1. Place sugar, water and vinegar into a
20cm saucepan and stir on dial setting
3 for 2 minutes until sugar has dissolved.
2. Turn the dial to setting MAX and boil for
8 minutes.
3. Switch the settings dial to the
off position.
4. Pour the toffee into 12 mini patty
pans and allow to stand until
completely cooled.
5. Top with 100’s & 1000’s.
Lemon and Lime Butter
Makes 1 jar
45gm butter
½ cup caster sugar
¾ cup lime juice
4 egg yolks, whisked
1 tablespoon lemon zest
1. Place butter into a small saucepan and
1. Place the olive oil, onion and garlic into
a 30cm frypan and saute for 3 minutes
on dial setting 4, stirring occasionally.
2. Add the brown sugar and balsamic,
cook for 2 minutes.
3. Turn the dial up to setting MAX and
add the tomatoes, stirring frequently
over 4 minutes.
4. Turn the dial down to setting 3 and add
the beans, bay leaves and stock.
5. Put the lid on and simmer for
10 minutes, stirring regularly.
6. Serve with parmesan cheese, parsley
and crusty bread.
stir on dial setting 3 until butter is melted.
2. Add the sugar, juice, egg and zest and
stir constantly for 15 minutes.
3. Switch the settings dial to the
off position.
4. Pour into a sterilised jar and keep
refrigerated for up to 1 month, or frozen
for 3 months.
5. Serve with fresh scones.
15
KOT630_IB_B11_FA.indd 15
11/07/11 11:57 AM
Kambrook - Australia
Building 2, Port Air Industrial Estate
1A Hale Street
Botany NSW 2019
Australia
Customer Service Line 1300 139 798
Customer Service Fax 1800 621 337
www.kambrook.com.au
Kambrook - New Zealand
Private Bag 94411
Botany, Manukau
Auckland 2163
New Zealand
Customer Service Line/
Spare Parts 0800 273 845
Customer Service Fax 0800 288 513
www.kambrook.co.nz
Due to continual improvement in design or otherwise, the product you
purchase may differ slightly from the illustration in this book. Issue B11
KOT630_IB_B11_FA.indd 1
11/07/11 11:57 AM