1
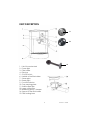
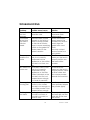
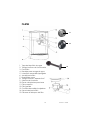
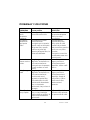
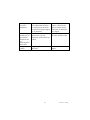
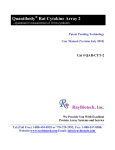
Espresso maker
Cafetera express
USK EXP 4
120V ~ 1250 W
IMPORTANT SAFEGUARDS
1. READ ALL INSTRUCTIONS
2. Check that your mains voltage corresponds to that stated on the
appliance.
3. Do not touch hot surfaces. Use handles or knobs.
4. To protect against electrical shock do not immerse cord, plugs, or
the appliance in water or other liquid.
5. Close supervision is necessary when any appliance is used by or
near children.
6. Unplug from outlet when not in use and before cleaning. Allow to
cool before putting on or taking off parts.
7. Do not operate any appliance with a damaged cord or plug or
after the appliance malfunctions or has been damaged in any
manner. Return appliance to the nearest authorized service
facility for examination, repair, or adjustment.
8. The use of accessory attachments not recommended by the
appliance manufacturer may cause injuries.
9. Do not use outdoors.
10. Do not let cord hang over edge of table or counter, or touch hot
surfaces.
11. Do not place on or near a hot gas or electric burner, or in a
heated oven.
12. Extreme caution must be used when moving an appliance
containing hot oil or other hot liquids.
13. Always attach plug to appliance first, then plug cord into the wall
outlet. To disconnect, put the switch in off position, then remove
plug from wall outlet.
14. Do not use appliance for other than intended use.
15. Scalding may occur if the lid of the water tank or if the filter
holder is removed during use.
16. Make sure the appliance never comes into contact with
inflammable materials such as curtains, textiles, ... when it is in use
as they might catch fire.
2
USK EXP 4 - 070830
17. When removing lime scale, only use special products for the
removal of lime scale. Never use ammonia or any other
substance that might damage your health.
18. Never use your espresso maker without water in it.
19. Avoid contact with steam, since scalding can occur if care is not
taken when steaming milk or any time the steam valve is open.
SAVE THESE INSTRUCTIONS
POLARIZED PLUG INSTRUCTIONS
This appliance has a polarized plug (one blade is wider than the
other). To reduce the risk of electric shock, this plug will fit into the
polarized outlet only one way. If the plug does not properly fit into
the outlet at first, reverse it. If it still does not fit, contact a competent
qualified electrician. Do not attempt to modify the plug in any way.
SHORT CORD INSTRUCTIONS
A short power supply cord is provided to reduce the hazards resulting
from becoming entangled in, or tripping over a longer cord.
Extension cords may be used if care is exercised in their use.
• The electrical rating of the extension cord should be at least
that of the appliance. If the electrical rating of the extension
cord is too low, it could overheat and burn.
• The resulting extended cord should be arranged so that it will
not drape over the counter top or tabletop where it can be
pulled on by children or tripped over.
3
USK EXP 4 - 070830
PART DESCRIPTION
11
12
13
1. Lid of the water tank
2. Power light
3. Filter holder
4. Drip tray
5. On/Off switch
6. Handle of the filter holder
7. Steam pipe
8. Ready light
9. Function selector
10. Cup warming plate
11. Small coffee filter
12. Large coffee filter
13. Measuring spoon / tamper
14. Support of the filter holder
15. Filter locking lever
4
USK EXP 4 - 070830
BEFORE USE
Check if all switches are in the OFF position.
We recommend to get used to all functions of your appliance
before using it for the first time.
Remove the lid of the water tank by lifting it up. Fill the water tank
with cold water. Put the lid back onto the water tank.
Before the first use, in order to clean the inner side of the appliance
circuit, you have to operate it three times reading the belowmentioned instructions (without coffee in the filter holder).
Clean the accessories thoroughly in hot soapy water, rinse and dry
them carefully.
USE
Important: during use, always check that there is enough water in the
water tank.
•
•
•
•
Check if all switches are in the OFF position and that the
appliance is unplugged.
Open the lid of the water tank (1) and fill it with cold water and
make sure not to exceed the maximum indicated water level.
Close the lid of the water tank.
Plug in the appliance. The appliance is now ready for use.
PREPARING ESPRESSO COFFEE
Espresso is a strong coffee, with a characteristic taste, extremely rich
in aroma. Therefore, the water, which arrives in the filter with a high
temperature, is pushed very fast through the coffee mass by a strong
pressure. It extracts the nectar from the grinding and draws the
essential aromas from the coffee. That’s why the espresso is usually
served in small “espresso” cups.
Use preferably a special espresso coffee with suitable roasting and
grinding.
Remember that the espresso needs a finer grinding than the
standard coffee.
5
USK EXP 4 - 070830
•
•
•
•
•
•
•
•
•
Place the small (11) or the large filter (12) correctly in the filter
holder.
According to the required number of cups, fill the small or large
filter with 1 or 2 measures of special espresso coffee powder using
the measuring spoon (13).
Then press the coffee with the tamper (13).
Insert the filter holder (3) in the support of the filter holder (14).
Therefore, place the handle (6) of the filter holder to the left and
check that the filter locking lever (15) is as far as possible from the
filter by pulling it to you. Insert the filter holder in its support and
turn it firmly to the right until it blocks. The filter holder should be as
far to the right of the closing zone as possible and at least in the
middle of the appliance. This will avoid that the filter holder
comes out of its housing as the pressure rises when the coffee is
flowing. If the filter holder does not fit in the closing zone and at
least in the middle of the appliance, do not operate your
appliance, remove the filter holder and position it again as
described here above.
Place one or two cup(s) on the grid of the drip tray (4) and under
the dripping holes of the filter holder.
Check that the function selector (9) is in off position and place
the ON/OFF switch (5) in ON position. The red power light (2) of
the switch will illuminate and indicate that the appliance is
switched on.
Wait until the blue ready light (8) lights up. When it comes on, turn
. The pump will start functioning
the function selector (9) to
and a few seconds later the coffee will start coming out through
the openings of the filter holder. At the beginning you can hear
that the pump makes more noise than when the water starts
flowing. This is absolutely normal.
When the cup(s) is (are) filled, turn the function selector (9) back
to “0" and the water will stop flowing.
To prepare other espressos, empty the used coffee of the filter.
Therefore you have to remove the filter holder by turning it to the
left. CAUTION: Be careful when you remove the filter holder
because the metal parts may still be hot. Never remove the filter
holder when the function selector is not in “0” position. Put the
filter locking lever (15) against the edge of the filter in order to
block it and beat the filter holder above the bin. Rinse the
6
USK EXP 4 - 070830
•
accessories with clear water and fill the filter again with the
desired amount of coffee.
Proceed as described here above.
CAUTION:
If you have not used your appliance for a long time, it is necessary to
make one or two brewing processes without coffee to rinse the inner
parts of the appliance.
HOW TO PREPARE A CAPPUCCINO
First of all prepare a coffee as described here above letting enough
place for the milk.
Caution: Before using the steam function, make sure the filter holder
has been removed from its support.
In order to obtain a thick and creamy milk froth it is necessary to
evacuate the remaining water in the hydraulic circuit of the
appliance. To do so:
•
•
•
•
•
Switch on the appliance. The red power light (2) will illuminate
and indicate that the appliance is switched on.
Fill the desired milk quantity into a heat resistant container (it has
to be large enough to avoid splashing, do not fill more than half
of the recipient) and place it under the steam pipe (7). Immerse
the steam nozzle completely in the milk in order to reduce
splashing.
Wait until the blue ready light (8) lights up. When it comes on, turn
. The milk will start frothing, which
the function selector (9) to
means that the steam is coming out.
When you obtain the required smoothness, turn the function
selector (9) back to “0”.
Then pour the preparation in your cup.
7
USK EXP 4 - 070830
Caution: the steam pipe should not touch the bottom of the
container because it may bother the steam flood.
Clean the steam pipe after each use especially when it has been
immersed in milk. If you do not clean it, the inner side of the pipe can
get blocked and it will be difficult to remove the milk residues around
it. The plastic nozzle of the pipe can be removed for cleaning by
simply pulling it down. In case of obstruction of the pipe, use a
needle to remove the milk residues. Just after having frothed up the
milk, wipe the body of the pipe with a damp cloth.
CAUTION: PAY ATTENTION NOT TO GET BURNED WITH THE STEAM AND
THE METAL PART OF THE PIPE (WHICH MAY BE HOT).
CLEANING
The body of the appliance: before cleaning the appliance, switch it
off, remove the plug from the wall socket and wait until it has cooled
down. Wipe the body of the appliance with a damp cloth. Never
immerse the body of the appliance in water or any other liquid.
Filters: Can be washed in the upper side of a dishwasher. If the holes
are blocked by coffee residues, you can wipe them with a small nonmetallic brush.
Support of the filter holder: The ground coffee residues can be
removed with a toothpick.
Steam pipe for cappuccino: See paragraph “How to prepare a
cappuccino”.
Drip tray: When the drip tray is full, a small plastic part will come out
indicating you have to empty it. In order to clean the drip tray,
remove the tray and the grid.
CAUTION: NEVER TRY TO OPEN OR TO DISASSEMBLE THE BODY OF THE
APPLIANCE.
8
USK EXP 4 - 070830
DESCALING
The expresso machine has to be descaled regularly. The frequency
depends on the water hardness and of the use frequency.
1. Remove the scale and the coffee residues from the filter grid and
from the support of the filter holder. It is recommended to use
only liquid descaling agent that can be found in shops and in the
proportions indicated on the packing paper by the producer.
2. Place the container under the support of the filter holder
(Caution: do not use the filter holder during the descaling).
3. Press the ON Switch, wait for the blue ready light to illuminate and
.
turn the function selector to
4. When the solution has finished flowing, turn the function selector
to “0”, switch off the appliance and let it cool down.
5. Repeat this operation a second time.
Then proceed in the same way but this time only with fresh water to
rinse the inner side of the circuit. For a good rinsing, the equivalent of
two expresso tanks has to pass through the circuit. Switch off the
appliance and remove the plug from the power supply. Let it cool
down.
Attention: Never use vinegar as descaling agent.
Some recognizable signs indicate that descaling is necessary:
• Increase of the noise during boiling.
• A longer time of decoction cycle
For a regular use, the descaling has to be done in the following
periodicity:
• With little bit hard water, once a year
• With middle hard water, once a trimester
• With hard water, once a month.
In case of doubt concerning the water quality, ask your local water
company.
9
USK EXP 4 - 070830
TROUBLESHOOTING
Problem
The coffee is
not hot
enough.
The coffee
drops from
the side of
infusion
head.
Possible cause/cause
The cup and the infusion
head are cold.
The pump
makes a lot
noise
No water in tank; or the
tank is not correctly
positioned into the
appliance; or the coffee
powder is not fresh, too
dry.
No water in tank; or the
tank is not correctly
positioned into the
appliance; or the filter
holder is blocked; or the
powder is too fine, not
tamped down enough;
or a scale in machine.
The powder is too
coarse; or the coffee
powder is not enough; or
the coffee powder is not
tamped down enough.
Steam pipe is blocked; or
the milk is not fresh; or
the milk is not cold; no
water in tank.
No water will
come out.
Beverage is
running fast.
Frothing is
not ideal.
The filter holder is fitted
properly to the infusion
head; or some powder
on the side of infusion
head; or some remaining
coffee on the gasket for
infusion head; or the
gasket is broken.
10
Solution
Pre-heat cups, infusion
head and other
attachments.
Check the infusion
head; remove the
powder from infusion
head; wipe the
gasket with a wet
cloth;
You may contact
service center for a
new gasket.
Fill the tank with
water; put the tank in
correct position; use
the fresh coffee
powder.
Fill the tank with
water; put the tank in
correct position; clean
up filter holder and
use coarser powder;
descale the machine
Use finer powder; add
more powder; tamper
the powder tightly.
Clean up steam pipe;
use fresh milk; use the
cold milk; fill the tank
with water.
USK EXP 4 - 070830
Too much
water
remains in
the filter
holder after
beverage is
ready.
No steam
The powder is not tightly
tamped down; or the
powder is not enough.
Tamp down the
powder tightly; add
more powder.
No water in the tank.
Fill the tank with
water.
11
USK EXP 4 - 070830
CONSEJOS DE SEGURIDAD
1. LEA TODAS LAS INSTRUCCIONES.
2. Antes de utilizar el aparato, compruebe que el voltaje de la red
eléctrica coincide con el del aparato.
3. No toque las superficies calientes. Siempre utilice las asas o los
botones.
4. Para protegerse contra una descarga eléctrica, no sumerja el
aparato o el enchufe en agua o en otros líquidos.
5. Es siempre necesaria la supervisión cercana cuando se utiliza
este aparato cerca de niños. Este aparato no debe ser usado
por niños.
6. Desconecte el aparato de la toma de corriente cuando la
unidad no se encuentra en uso o antes de limpiarla. Deje enfriar
el aparato antes de insertar o sacar accesorios.
7. No opere este y ningún aparato si el cable o el enchufe están
dañados, o después de que el aparato ha funcionado
inadecuadamente o ha sido dañado en cualquier manera. El
aparato debe ser reemplazado por el fabricante o por un centro
de servicio autorizado o por una persona similar cualificada.
8. El uso de accesorios no recomendados por el fabricante puede
causar lesiones.
9. No use en exteriores
10. No permita que el cable cuelgue del borde de la mesa o del
mostrador o toque las partes calientes.
11. No coloque este aparato cerca de quemadores de gas o
eléctricos, o dentro de un horno caliente.
12. Tenga mucho cuidado cuando desplace un aparato lleno de
aceite caliente u otros líquidos calientes.
13. Enchufe siempre primero el cable al aparato y después en el
enchufe de la red eléctrica. Para desconectar el aparato,
ponga el interruptor en la posición apagada y desenchufe el
aparato.
14. No use este aparato más que para lo que ha sido diseñado.
15. Pueden ocurrir quemaduras si se abre la tapa del depósito de
agua o si se quita el porta filtro durante el uso.
12
USK EXP 4 - 070830
16. Procure que el aparato no entre en contacto con materiales
fácilmente inflamables como cortinas, tejidos, etc., cuando esté
en funcionamiento, ya que podría provocar un incendio.
17. Si quiere eliminar la cal del aparato utilice solamente un
producto especialmente estudiado para este fin. No utilice
amoniaco o cualquier otro producto que pueda perjudicar la
salud.
18. No haga funcionar la cafetera express sin agua.
19. Evite cualquier contacto con el vapor ya que pueden ocurrir
quemaduras siempre la válvula del vapor esté abierta.
GUARDE ESTAS INSTRUCCIONES
INFORMACIÓN SOBRE EL ENCHUFE POLARIZADO
Para reducir el riesgo de choque eléctrico, este aparato tiene un
enchufe polarizado (una pata es más ancha que la otra).
Como medida de seguridad, este enchufe calza en el
tomacorriente polarizado de una sola manera. Si el enchufe no
cabe totalmente en el tomacorriente, gire el enchufe. Si aún así no
calza, consulte a un servicio técnico cualificado. No intente anular
esta característica de seguridad.
INSTRUCCIONES DEL CABLE
El cable de alimentación del aparato es un cable corto a fin de
disminuir el riesgo de accidentes (caídas al tropezar con él, etc.)
Puede utilizar un alargador si es necesario.
• Asegúrese de que el nivel eléctrico del cable es igual o
mayor que el indicado. Una extensión con un bajo nivel
eléctrico correría el riesgo de sobrecalentarse y de
estropearse.
• Para evitar riesgos colocar de forma tal que los niños no
puedan jalarlo o tropezar con él.. Que no arrastre nunca por
el suelo.
13
USK EXP 4 - 070830
PARTES
11
12
1. Tapa del depósito de agua
2. Testigo luminoso de funcionamiento
3. Porta filtro
4. Bandeja para recoger el agua
5. Interruptor encendido/apagado
6. Asa del porta filtro
7. Boquilla de vapor
8. Testigo luminoso “aparato listo”
9. Selector de funciones
10. Placa calentadora para tazas
11. Filtro pequeño
12. Filtro grande
13. Cuchara de medida/ majadero
14. Soporte del porta filtro
15. Palanca de bloqueo del filtro
14
13
USK EXP 4 - 070830
ANTES DEL USO
Compruebe que todos los interruptores están en la posición OFF.
Procure conocer todas las funciones del aparato antes de utilizarlo
por primera vez.
Quite la tapa del depósito de agua levantándola. Llene el depósito
con agua fría. Cierre el depósito de agua con la tapa.
Antes de la primera utilización, el circuito interior del aparato debe
ser limpiado, para ello haga funcionar el aparato 3 veces
respetando las siguientes instrucciones, pero sin poner café en el
porta-filtro.
Limpie todos los accesorios con agua jabonosa caliente, páselos por
agua y séquelos con cuidado.
USO
Importante: durante el uso, compruebe siempre que el depósito
contiene suficiente agua para preparar el café.
•
•
•
•
Asegúrese de que los interruptores estén en la posición
apagada y de que el aparato esté desenchufado.
Abra la tapa del depósito de agua (1) y llénelo con agua fría
sin superar el nivel máximo indicado.
Cierre la tapa del depósito de agua.
Enchufe el aparato. Ahora puede utilizar su aparato.
PREPARAR UN CAFÉ EXPRESS
El café express es un café fuerte, con gusto característico muy rico
de aromas. Para la obtención de un café express, se hace pasar
agua a alta presión a través del café. Se extrae el sabor esencial del
molido, por eso se suele servir el café express en pequeñas tazas.
Utilice preferentemente café especial para “café express” con
torrefacción y molido adaptados.
Para el café express, es necesario que el molido se haga muy fino.
• Coloque el filtro pequeño (11) o grande (12) correctamente en
el porta filtro.
15
USK EXP 4 - 070830
•
•
•
•
•
•
•
•
Dependiendo del numero de tazas que quiere preparar, llene el
filtro pequeño o grande con 1 o 2 medidas de café molido
especial para café express utilizando la cuchara de medida (13).
Comprima el café con el majadero (13).
Encaje el porta-filtro (3) en su suporte (14). Para ello, dirija el asa
(6) del porta-filtro hacia la izquierda y compruebe que la
palanca de bloqueo del filtro (15) está lo más alejado posible del
filtro. Introduzca el porta-filtro en su suporte y gírelo firmemente
hacia la derecha hasta que esté bloqueado. El porta-filtro tiene
que estar lo más a la derecha posible de la zona de cierre y por
lo menos en el medio del aparato. Ello permite que el porta-filtro
no salga de su sitio con el aumento de la presión durante la
preparación del café. Si no consigue posicionar el porta-filtro en
la zona de cierre y por lo menos en el medio del aparato, no
haga funcionar el aparato, saque el porta-filtro y vuelva a
encajarlo como arriba indicado.
Ponga una o 2 tazas en la rejilla de la bandeja para recoger el
agua (4) y debajo de las aberturas del porta-filtro.
Asegúrese de que el selector de funciones (9) está en la posición
apagada y coloque el interruptor encendido/apagado (5) en la
posición encendida. El testigo luminoso rojo (2) se encenderá
indicando que el aparato está en funcionamiento.
Espere que el testigo luminoso azul (8) se encienda. Cuando esté
. La
encendido, gire el selector de funciones (9) hacia
bomba se pondrá en marcha y algunos segundos después el
café saldrá por las aberturas del porta-filtro. Al principio la
bomba hará más ruido que cuando el agua sale. Es un
fenómeno normal.
En cuanto la(s) taza(s) esté(n) llena(s), gire el selector de
funciones (9) hacia la posición “0” para que el agua deje de
salir.
Para preparar más cafés express, vacíe el filtro. Para ello, retire el
porta-filtro girándolo hacia la izquierda. CUIDADO: Tenga mucho
cuidado al retirar el porta-filtro ya que las partes metálicas
podrían estar calientes. No retire nunca el porta-filtro si el selector
de funciones no está en la posición “0”. Ponga la palanca de
bloqueo (15) contra el borde del filtro y sacude el porta filtro
encima de la basura. Pase los accesorios por agua y llene el filtro
con la cantidad deseada de café molido.
16
USK EXP 4 - 070830
•
Repita las diferentes manipulaciones arriba indicadas.
CUIDADO:
Si no lo utilizó durante mucho tiempo, aconsejamos que haga
funcionar el aparato sin café una o dos veces para limpiar el circuito
hidráulico.
PREPARAR UN CAPUCCINO
Primero, prepare un café express como arriba indicado dejando sitio
en la taza para añadir la leche.
CUIDADO: Antes de utilizar la función vapor, asegúrese de que el
porta-filtro está retirado del aparato.
Para obtener una espuma de leche consistente y cremosa, es
necesario que no quede agua en el circuito hidráulico del aparato.
Para ello:
•
•
•
•
•
Ponga la cafetera en marcha. El testigo luminoso rojo (2) se
encenderá indicando que el aparato está en funcionamiento.
Vierta leche en un recipiente resistente al calor (y bastante alto
para evitar salpicaduras, no llene más que la mitad del
recipiente) y colóquelo debajo de la boquilla de vapor (7).
Sumerja la boquilla en la leche para evitar salpicaduras.
Espere que el testigo luminoso azul (8) se encienda. Cuando esté
. La leche
encendido, gire el selector de funciones (9) hacia
empezará a volverse consistente, ello significa que el vapor está
saliendo.
Una vez obtenida una espuma de leche consistente y cremosa,
pare el flujo de vapor girando el selector de funciones (9) hacia
la posición “0”.
Luego, vierta la espuma de leche en su taza.
CUIDADO: No toque el fondo del recipiente con la boquilla de vapor
para no dificultar el flujo de vapor.
17
USK EXP 4 - 070830
Limpie la boquilla de vapor después de cada utilización
especialmente cuando fue sumergida en la leche para evitar que la
boquilla esté obstruida por residuos de leche. Se puede quitar la
protección de plástica de la boquilla de vapor simplemente tirando
de ella. En casa de obstrucción de la boquilla, utilice una aguja
para quitar los residuos de leche. Inmediatamente después preparar
espumar de leche, pase la boquilla con un paño húmido.
CUIDADO: NO SE QUEME CON EL VAPOR Y LA PARTE METÁLICA DE LA
BOQUILLA (QUE PUEDE ESTAR MUY CALIENTE).
LIMPIEZA
Cuerpo del aparato: Antes de limpiar, apague el aparato,
desenchúfelo y deje que se enfríe. Limpie el cuerpo del aparato con
un paño humedecido. No sumerja nunca el aparato en el agua o
en cualquier otro líquido.
Filtros: Se pueden lavar en la parte superior del lavavajillas. Si los
huecos están obstruidos por residuos de café, puede limpiarlos con
un pequeño cepillo no metálico.
Suporte del porta filtro: Se pueden quitar los residuos de café con un
palillo.
Boquilla de vapor para capuchino: Véase párrafo “Preparar un
capuccino”.
Bandeja para recoger el agua: Cuando la bandeja para recoger el
agua esté llena, saldrá una pequeña pieza de plástico de la
bandeja indicando que se debe vaciar. Para limpiar la bandeja
para recoger el agua, quite la bandeja y la rejilla.
CUIDADO: NO INTENTE NUNCA ABRIR O DESMONTAR EL CUERPO DEL
APARATO.
18
USK EXP 4 - 070830
DESCALCIFICACIÓN
Desincruste la cafetera express con regularidad. Desincruste su
aparato más o menos a menudo dependiendo de la dureza del
agua y de la frecuencia de uso.
1. Elimine la cal y los residuos de café de la rejilla del filtro y del
suporte del porta filtro. Aconsejamos que utilice sólo un
desincrustante líquido que se encuentra en el comercio y que
respete las proporciones indicadas en la botella.
2. Coloque un recipiente debajo del orificio de conexión (Cuidado:
no utilice el porta filtro durante la descalcificación).
3. Pulse el interruptor encendido/apagado, espere que el testigo
luminoso azul se encienda y gire el selector de funciones hacia
.
4. Cuando toda la solución haya salido, gire el selector de
funciones hacia la posición “0”, apague el aparato y déjelo
enfriar.
5. Repita la operación una segunda vez.
Luego, proceda de la misma forma pero esta vez sólo con agua fría
para limpiar el interior del circuito. Para limpiar correctamente el
interior del circuito, llene el depósito con agua limpia por lo menos
dos veces. Apague el aparato y desenchufe la clavija. Déjelo
enfriar.
Cuidado: No utilice nunca vinagre para desincrustar la cafetera.
Algunas señales indican que es necesario desincrustar la cafetera:
• Más ruido cuando el agua hierve.
• El ciclo de preparación dura más tiempo.
Cuando se utiliza la cafetera a menudo, desincrústela con la
frecuencia siguiente:
• Con agua blanda, una vez por año.
• Con agua moderadamente dura, una vez cada 3 meses.
• Con agua dura, una vez por mes.
En caso de duda con respecto a la dureza de su agua, pida a la
empresa proveedora de agua.
19
USK EXP 4 - 070830
PROBLEMAS Y SOLUCIONES
PROBLEMA
El café no
está
bastante
caliente
El café se
desborda
del porta
filtro.
La bomba
hace mucho
ruido.
Ningún agua
sale
El café sale
muy rápido
Causa posible
La taza y el suporte del
porta filtro están fríos.
El porta filtro no está
correctamente
encajado en su suporte;
quedó café en los lados
del porta filtro; quedó
café en la junta del
suporte del porta filtro; la
junta está dañada.
Ningún agua en el
depósito; el depósito no
está correctamente
colocado en el aparato;
el café molido no está
fresco.
Ningún agua en el
depósito; el depósito no
está correctamente
posicionado en el
aparato; el porta filtro
está obstruido; el café
molido está demasiado
fino, no bastante
apisonado; hay cal en el
aparato.
El café no está bastante
fino; no hay bastante
café molido en el filtro; el
café no está bastante
apisonado
20
SOLUCIÓN
Precaliente las tazas,
el suporte del porta
filtro y los otros
accesorios.
Compruebe el
suporte del porta
filtro; quite el café
molido de los lados
del porta filtro; pase la
junta con un paño
húmido.
Contacte un servicio
cualificado para una
nueva junta.
Llene el depósito con
agua; posicione
correctamente el
depósito; utilice café
fresco.
Llene el depósito con
agua; posicione
correctamente el
depósito; limpie el
porta filtro y utilice
café menos fino;
desincruste el
aparato.
Utilice café más fino;
añada café; apisone
un poco más el café.
USK EXP 4 - 070830
La espuma
no está
perfecta
La boquilla de vapor
está obstruida; la leche
no está fresca; la leche
no está fría; ningún agua
en el depósito.
Mucho agua El café no está bastante
queda en el apisonado; no hay
porta filtro
bastante café molido en
después de
el filtro.
la
preparación
del café
Ningún
Ningún agua en el
vapor
depósito.
21
Limpie la boquilla de
vapor; utilice leche
fresca; utilice leche
fría; llene el depósito
con agua.
Apisone un poco más
el café; añada café.
Llene el depósito con
agua.
USK EXP 4 - 070830
22
USK EXP 4 - 070830
23
USK EXP 4 - 070830
K070830
Back cover page (last page)
Assembly page 24/24