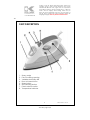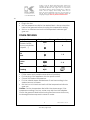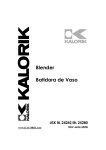
1
Copies of the I/B. Please reproduce them without any
changes except under special instruction from Team
International BELGIUM. The pages must be reproduced
and folded in order to obtain a booklet A5 (+/- 148.5 mm
width x 210 mm height). When folding, make sure you
keep the good numbering when you turn the pages of
the I/B. Don’t change the page numbering. Keep the
language integrity. Print only what is inside the frame.
Fax +32 2 359 95 50
Steam Iron
Plancha a vapor
USK DA 31750
www.KALORIK.com
120V~ 60Hz 1200W
Front cover page (first page)
Assembly page 1/20
Fax +32 2 359 95 50
Copies of the I/B. Please reproduce them without any
changes except under special instruction from Team
International BELGIUM. The pages must be reproduced
and folded in order to obtain a booklet A5 (+/- 148.5 mm
width x 210 mm height). When folding, make sure you
keep the good numbering when you turn the pages of
the I/B. Don’t change the page numbering. Keep the
language integrity. Print only what is inside the frame.
IMPORTANT SAFEGUARDS
When using your appliance, basic safety precautions should always
be followed, including the following:
READ ALL INSTRUCTIONS!
1. Use the iron only for its intended use.
2. Check that your mains voltage corresponds to that stated on the
appliance.
3. To protect against electrical shock do NOT immerse cord, plugs,
or iron in water or other liquid.
4. The temperature dial and steam knob always be turned to 0/MIN
before plugging or unplugging from the outlet. Never yank the
cord to disconnect form the outlet; instead, grasp the plug and
pull to disconnect.
5. Do not allow the cord to touch the hot surfaces. Let the iron cool
down completely before putting away. Rewind the cord
completely when storing.
6. Always disconnect the iron from the electrical outlet when filling
with water or emptying and when not in use.
7. Do not operate the iron with a damaged cord or plug or after the
appliance has been dropped or damaged in any manner. To
avoid the risk of electric shock, do not disassemble the iron, take
it to a qualified serviceman for examination and repair. Incorrect
reassembly can cause a risk of electric shock when the iron is
used.
8. Close supervision is necessary when the appliance is used by or
near children. Children should NOT play with this appliance. This
appliance is not intended for use by persons (including children)
with reduced physical, sensory or mental capabilities, or lack of
experience and knowledge, unless they have been given
supervision or instruction concerning use of the appliance by a
person responsible for their safety.
2
Assembly page 2/20
USK DA 31750 - 091222
Fax +32 2 359 95 50
Copies of the I/B. Please reproduce them without any
changes except under special instruction from Team
International BELGIUM. The pages must be reproduced
and folded in order to obtain a booklet A5 (+/- 148.5 mm
width x 210 mm height). When folding, make sure you
keep the good numbering when you turn the pages of
the I/B. Don’t change the page numbering. Keep the
language integrity. Print only what is inside the frame.
9. Burns can occur from touching hot metal parts, hot water or
steam. Use caution when you turn a steam iron upside down –
there may be hot water in the water tank.
10. If the iron is not operating normally, disconnect from the power
supply and have the iron serviced by an authorized service
center.
11. Deposit or Mineral in tap water will generate limescale and
eventually block the steam holes, therefore it is advisable to use
distilled water.
12. When placing the iron on a stand, ensure that the surface on
which the stand is placed is stable.
13. The iron is not to be used if it has been dropped, if there are
visible signs of damage or if it is leaking.
SPECIAL INSTRUCTIONS
•
•
To avoid a circuit overload, do not operate another high
wattage appliance on the same circuit.
If an extension cord is absolutely necessary, a 10-ampere cord or
more should be used. Cords rated for less amperage may
overheat. Care should be taken to arrange the cord so that it
cannot be pulled or tripped over.
SAVE THESE INSTRUCTIONS
HOUSEHOLD USE ONLY
POLARIZED PLUG INSTRUCTIONS
This appliance is equipped with a polarized plug (one blade is wider
than the other). To reduce the risk of electric shock, this plug will fit
into the polarized outlet only one way. If the plug does not properly
fit into the outlet at first, reverse it. If it still does not fit, contact a
competent qualified electrician. Do not attempt to modify the plug in
any way.
3
Assembly page 3/20
USK DA 31750 - 110127
Copies of the I/B. Please reproduce them without any
changes except under special instruction from Team
International BELGIUM. The pages must be reproduced
and folded in order to obtain a booklet A5 (+/- 148.5 mm
width x 210 mm height). When folding, make sure you
keep the good numbering when you turn the pages of
the I/B. Don’t change the page numbering. Keep the
language integrity. Print only what is inside the frame.
Fax +32 2 359 95 50
PART DESCRIPTION
1.
2.
3.
4.
5.
6.
7.
8.
Spray nozzle
Lid of the filling opening
Variable steam/dry dial
Burst of steam button
Spray button
Self Cleaning button
Fabric selector switch
Temperature indicator
4
Assembly page 4/20
USK DA 31750 - 110127
Fax +32 2 359 95 50
Copies of the I/B. Please reproduce them without any
changes except under special instruction from Team
International BELGIUM. The pages must be reproduced
and folded in order to obtain a booklet A5 (+/- 148.5 mm
width x 210 mm height). When folding, make sure you
keep the good numbering when you turn the pages of
the I/B. Don’t change the page numbering. Keep the
language integrity. Print only what is inside the frame.
CAUTION BEFORE FIRST USE
•
•
•
The iron has been greased, and as a result, the iron may slightly
smoke when switched on for the first time. After a short while, this
will cease.
Before using for the first time, remove any sticker or protective foil
from the soleplate. Clean the soleplate with a soft cloth.
Keep the soleplate smooth: avoid hard contact with metal
objects (such as clothes rack, button and slide fastener).
FILLING THE WATER TANK
Use preferably demineralised water. If you want to use the steam
dial, fill the water tank as follows:
1) Unplug the iron from the outlet to let it cool down and set it
horizontally on a stable level surface.
2) Put the temperature dial to "MIN" and the variable steam dial to
the 0 setting.
3) To fill the water tank, open the lid of the filling opening and pour
water using a measuring cup. Never exceed the MAX mark
indicated on the appliance.
4) When ironing, unplug the appliance before refilling. Fill the water
tank by holding the appliance in horizontal position without
putting down the hot soleplate, unless you have a heat-resistant
base.
TEMPERATURE SETTINGS
•
•
You can choose the temperature setting in function with the
cloth to iron.
Plug in the iron. Choose the correct ironing temperature by turning
the fabric selector switch (7). The temperature indicator lights up.
Once the desired temperature has been reached, the
temperature indicator lamp will go out.
DRY PRESSING
•
Put the variable steam dial on position 0.
5
Assembly page 5/20
USK DA 31750 - 110127
Fax +32 2 359 95 50
Copies of the I/B. Please reproduce them without any
changes except under special instruction from Team
International BELGIUM. The pages must be reproduced
and folded in order to obtain a booklet A5 (+/- 148.5 mm
width x 210 mm height). When folding, make sure you
keep the good numbering when you turn the pages of
the I/B. Don’t change the page numbering. Keep the
language integrity. Print only what is inside the frame.
•
•
•
Plug in the iron.
Set the temperature dial for the desired fabric. Always check the
label of the garment before choosing the temperature setting.
Set iron on heel rest and wait until temperature indicator light
goes out.
STEAM PRESSING
Kind of textile
Synthetic (e.g.
acetate, acrylic,
viscose, polyamide,
polyester, …)
Silk
Wool
Temperature dial
MIN
|
Steam ironing
0
|
|
1-2
|
|
Cotton
Linen
Cleaning
|
MAX
|
MAX
|
3-4
Fill the water tank (variable steam dial on 0 position).
Put the plug of the appliance into the power socket.
Choose the desired temperature.
Put the variable steam dial between 0 and 4 according to the
desired amount of steam.
• Set the iron on its heel and wait until the temperature indicator
goes out.
Caution: Set the temperature dial within the steam range. If the
temperature setting is too low, water may drip from the soleplate.
Check the garment label before ironing because some cloths may
be damaged when exposed to steam or water.
•
•
•
•
6
Assembly page 6/20
USK DA 31750 - 110127
Fax +32 2 359 95 50
Copies of the I/B. Please reproduce them without any
changes except under special instruction from Team
International BELGIUM. The pages must be reproduced
and folded in order to obtain a booklet A5 (+/- 148.5 mm
width x 210 mm height). When folding, make sure you
keep the good numbering when you turn the pages of
the I/B. Don’t change the page numbering. Keep the
language integrity. Print only what is inside the frame.
SPRAY
•
Produces a mist for removing stubborn creases.
•
Spray can be used at any temperature setting and during
either dry or steam pressing. Press down the spray button to spray.
BURST OF STEAM
The burst of steam feature
provides additional steam to remove
stubborn creases.
This button also allows you to iron delicate articles of clothing
vertically. This feature is called "vertical burst of steam". To do so,
hang your article of clothing on a hanger, keep the steam button
pressed and pass the iron to and fro in front of the article of clothing,
making sure that the soleplate does not come into contact with the
article of clothing. The distance between the soleplate and the
article of clothing depends on the kind of textile and the creases.
ANTI-CALC FEATURE
There is a decalcification box inside the appliance, which can
absorb unsolvable calcium ion and send out solvable sodium ion so
that water can be softened, and the process of mineral deposit will
be much slower.
AUTOMATIC SHUT-OFF
The automatic cut-off device trips after the iron has been left for
approximately eight minutes in the upright position or unused for
approximately thirty seconds in the horizontal position. The light
comes on to indicate that the cut-off device has tripped. As soon as
you move the iron, the device turns off and the iron starts working
again.
7
Assembly page 7/20
USK DA 31750 - 110127
Copies of the I/B. Please reproduce them without any
changes except under special instruction from Team
International BELGIUM. The pages must be reproduced
and folded in order to obtain a booklet A5 (+/- 148.5 mm
width x 210 mm height). When folding, make sure you
keep the good numbering when you turn the pages of
the I/B. Don’t change the page numbering. Keep the
language integrity. Print only what is inside the frame.
Fax +32 2 359 95 50
ANTI DRIP FEATURE
This iron is equipped with an anti drip feature that will protects fabrics
from water spotting even at low temperatures.
CARE AND CLEANING
•
•
•
•
•
•
•
•
Clean the iron regularly according to the hardness of the water
and the frequency of use.
Fill the water tank and put the thermostat in MAX position.
Plug in the appliance. The pilot light will come on. Make sure the
steam dial is in "0" position. Put the iron in vertical position.
Never use vinegar or other liquids to descale the iron.
As soon as the pilot light goes out, hold the iron over a sink and
press the cleaning button (6). Steam, water and dust particles will
come out of the soleplate.
When the water tank is empty, release the cleaning button.
To clean the plastic parts of the iron when it has cooled down,
use a humid cloth.
To clean the soleplate, make sure you use a product made
especially for this purpose. Never use abrasive products.
WHEN YOU HAVE FINISHED IRONING
•
•
•
Turn temperature dial to “MIN” and unplug iron from electrical
outlet.
With soleplate facing away from you, turn iron upside down to
empty water.
Then store the hot iron on its heel rest so that any remaining
moisture will evaporate. When the soleplate has cooled down,
you can store the iron.
8
Assembly page 8/20
USK DA 31750 - 110127
Fax +32 2 359 95 50
Copies of the I/B. Please reproduce them without any
changes except under special instruction from Team
International BELGIUM. The pages must be reproduced
and folded in order to obtain a booklet A5 (+/- 148.5 mm
width x 210 mm height). When folding, make sure you
keep the good numbering when you turn the pages of
the I/B. Don’t change the page numbering. Keep the
language integrity. Print only what is inside the frame.
WARRANTY
We suggest that you complete and return the enclosed Product
Registration Card promptly to facilitate verification of the date of
original purchase. However, return of the Product Registration Card is
not a condition of these warranties. You can also fill this warranty
card online, at the following address: www.KALORIK.com
This KALORIK product is warranted in the U.S.A. for 1 year from the
date of purchase against defects in material and workmanship. This
warranty is not transferable. Keep the original sales receipt. Proof of
purchase is required to obtain warranty performance.
During this period, the KALORIK product that, upon inspection by
KALORIK, is proved defective, will be repaired or replaced, at
Kalorik’s option, without charge to the customer. If a replacement
product is sent, it will carry the remaining warranty of the original
product.
This warranty does not apply to any defect arising from a buyer's or
user's misuse of the product, negligence, failure to follow KALORIK
instructions noted in the user’s manual, use on current or voltage
other than that stamped on the product, wear and tear, alteration
or repair not authorized by KALORIK, or use for commercial purposes.
There is no warranty for glass parts, glass containers, filter basket,
blades and agitators, and accessories in general. There is also no
warranty for parts lost by the user.
ANY WARRANTY OF MERCHANTABILITY OR FITNESS WITH RESPECT TO
THIS PRODUCT IS ALSO LIMITED TO THE ONE YEAR LIMITED WARRANTY
PERIOD.
Some states do not allow limitation on how long an implied warranty
lasts or do not allow the exclusion of incidental or consequential
damages, so the above limitations may not apply to you. This
warranty gives you specific legal rights, and you may also have other
rights which vary from state to state.
9
Assembly page 9/20
USK DA 31750 - 110127
Fax +32 2 359 95 50
Copies of the I/B. Please reproduce them without any
changes except under special instruction from Team
International BELGIUM. The pages must be reproduced
and folded in order to obtain a booklet A5 (+/- 148.5 mm
width x 210 mm height). When folding, make sure you
keep the good numbering when you turn the pages of
the I/B. Don’t change the page numbering. Keep the
language integrity. Print only what is inside the frame.
If the appliance should become defective within the warranty
period and more than 30 days after date of purchase, do not return
the appliance to the store: often, our Consumer Service
Representatives can help solve the problem without having the
product serviced. If servicing is needed, a Representative can
confirm whether the product is under warranty and direct you to the
nearest service location.
If this is the case, bring the product, or send it, postage prepaid by
the user (all Kalorik customers are responsible for the initial shipment
back to the warranty center), along with proof of purchase and
indicating a return authorization number given by our Consumer
Service Representatives, to the authorized KALORIK Service Center
(please visit our website at www.KALORIK.com or call our Customer
Service Department for the address of our authorized KALORIK
Service Center).
If you send the product, please include a letter explaining the nature
of the claimed defect.
If you have additional questions, please call our Consumer Service
Department (please see below for complete contact information),
Monday through Friday from 9:00am - 6:00pm (EST). Please note
hours are subject to change.
If you would like to write, please send your letter to:
KALORIK Consumer Service Department
Team International Group of America Inc.
1400 N.W 159th Street, Suite 102
Miami Gardens, FL 33169 USA
Or call:
Toll Free: +1 888-521-TEAM / +1 888-KALORIK
Only letters can be accepted at this address above. Shipments and
packages that do not have a return authorization number will be
refused.
10
Assembly page 10/20
USK DA 31750 - 110127
Fax +32 2 359 95 50
Copies of the I/B. Please reproduce them without any
changes except under special instruction from Team
International BELGIUM. The pages must be reproduced
and folded in order to obtain a booklet A5 (+/- 148.5 mm
width x 210 mm height). When folding, make sure you
keep the good numbering when you turn the pages of
the I/B. Don’t change the page numbering. Keep the
language integrity. Print only what is inside the frame.
CONSEJOS DE SEGURIDAD
Cuando se utilizan aparatos eléctricos, hay unas precauciones
básicas de seguridad que siempre se deben seguir, tales como:
LEA TODAS LAS INSTRUCCIONES ¡
1. Use la plancha únicamente para el uso al que está destinada.
2. Antes de utilizar el aparato, compruebe que el voltaje de la red
eléctrica coincide con el del aparato.
3. Para protegerse contra una descarga eléctrica, no sumerja la
plancha o el enchufe en agua o en otros líquidos.
4. El regulador de temperatura y el regulador de vapor siempre
deben estar en “0/MIN” antes de enchufar o desenchufar la
plancha del tomacorriente. Nunca tire del cable para
desconectarla del tomacorriente, sujete el enchufe y tire de él
para desconectarla.
5. No permita que el cable toque superficies calientes. Deje enfriar
la plancha por completo antes de guardarla. Envuelva el cable
flojamente alrededor de la plancha para guardarla.
6. Siempre desconecte la plancha del tomacorriente eléctrico
cuanto esté llenándola de agua o vaciándola y también
cuando no esté en uso.
7. No haga funcionar la plancha si el cable está dañado o si la
plancha se ha caído o dañado. Para evitar el riesgo de choque
eléctrico, no desarme la plancha. Llévela a un centro de servicio
autorizado para que la examinen y/o reparen. El rearmado
incorrecto puede provocar el riesgo de un choque eléctrico al
usar la plancha.
8. Este aparato no es un juguete, no deje que los niños jueguen con
él, se necesita una máxima supervisión cuando el aparato está
siendo usado por o cerca de niños. Este aparato no está
destinado a ser utilizado por personas (incluidos niños) con
discapacidad física, sensorial o mental, o falta de experiencia y
conocimiento, a menos que hayan sido supervisados o instruidos
acerca del uso del aparato por una persona responsable de su
seguridad.
9. Se pueden producir quemaduras por contacto con las partes de
metal calientes, el agua caliente o el vapor. Tenga cuidado al
11
Assembly page 11/20
USK DA 31750 - 110127
Fax +32 2 359 95 50
Copies of the I/B. Please reproduce them without any
changes except under special instruction from Team
International BELGIUM. The pages must be reproduced
and folded in order to obtain a booklet A5 (+/- 148.5 mm
width x 210 mm height). When folding, make sure you
keep the good numbering when you turn the pages of
the I/B. Don’t change the page numbering. Keep the
language integrity. Print only what is inside the frame.
invertir una plancha de vapor ya que puede quedar agua
caliente en el depósito.
10. Si la plancha no funciona normalmente, desconéctela del
tomacorriente y hágala revisar por un centro de servicio
autorizado.
11. Depósito de minerales en el agua corriente generará cal y
puede bloquear los orificios de vapor, por lo tanto es
recomendable usar agua destilada.
12. Al colocar la plancha sobre un soporte, asegúrese de que la
superficie sobre la que el soporte se coloca es estable.
13. La plancha no se debe utilizar si se ha caído, si hay signos visibles
de daños o si pierde agua.
INSTRUCCIONES ESPECIALES
•
•
Para evitar una sobrecarga del circuito no haga funcionar otro
aparato de alto vataje en el mismo circuito.
Si resulta absolutamente necesario usar un cable de extensión, se
debe usar un cable de 10 amperios. Los cables con tensiones
nominales menores pueden sobrecalentarse. Se debe cuidar de
poner el cable de extensión de modo tal que no pueda ser
arrancado o provocar tropiezos.
GUARDE ESTAS INSTRUCCIONES
SOLAMENTE PARA USO DOMESTICO
INFORMACIÓN SOBRE EL ENCHUFE POLARIZADO
Algunos aparatos están equipados con un enchufe polarizado (una
clavija es más ancha que la otra). Para reducir el riesgo de
descarga eléctrica, este enchufe encajará en la toma de corriente
polarizado únicamente de una manera. Si el enchufe no se ajusta
adecuadamente a la toma en un primer momento, dele la vuelta.
Si aún así no encaja, póngase en contacto con un electricista
competente.
No intente, de ninguna manera, modificar el enchufe.
12
Assembly page 12/20
USK DA 31750 - 110127
Fax +32 2 359 95 50
Copies of the I/B. Please reproduce them without any
changes except under special instruction from Team
International BELGIUM. The pages must be reproduced
and folded in order to obtain a booklet A5 (+/- 148.5 mm
width x 210 mm height). When folding, make sure you
keep the good numbering when you turn the pages of
the I/B. Don’t change the page numbering. Keep the
language integrity. Print only what is inside the frame.
PARTES
1.
2.
3.
4.
5.
6.
7.
8.
Vaporizador
Orificio de entrada de agua
Regulador seco/vapor
Botón de chorro de vapor
Botón spray
Botón de limpieza
Botón de elección de ropa
Testigo luminoso (temperatura)
13
Assembly page 13/20
USK DA 31750 - 110127
Fax +32 2 359 95 50
Copies of the I/B. Please reproduce them without any
changes except under special instruction from Team
International BELGIUM. The pages must be reproduced
and folded in order to obtain a booklet A5 (+/- 148.5 mm
width x 210 mm height). When folding, make sure you
keep the good numbering when you turn the pages of
the I/B. Don’t change the page numbering. Keep the
language integrity. Print only what is inside the frame.
PRECAUCIÓN ANTES DEL PRIMER USO
•
•
•
La plancha ha sido engrasada, y como resultado, cuando la
encienda por primera vez puede despedir algo de humo. Después
de un corto tiempo, este cesará.
Antes de utilizarla por primera vez, retire cualquier etiqueta o lámina
protectora de la suela y limpie la suela con un paño suave.
Mantenga la suela lisa: evite el contacto con objetos metálicos
(tales como perchas, botones y cremalleras).
LLENADO DEL DEPÓSITO
Puede utilizar agua destilada o agua del grifo. Para utilizar la función
vaporizador o de vapor, llene el depósito como abajo indicado:
1) Desenchufe el aparato para dejarlo enfriar y colóquelo sobre su
base anterior en una superficie plana.
2) Coloque el botón de ajuste de las temperaturas en la posición
MIN y el botón de ajuste del vapor en la posición "0".
3) Abra la tapa del orificio de llenado y llene el depósito sin
sobrepasar el nivel máximo indicado en el aparato.
4) Durante el planchado, desenchufe el aparato y llene el depósito
manteniendo la plancha en posición horizontal. No lo ponga en
la suela excepto si dispone de una superficie resistente a la
temperatura de la suela (la rejilla metálica de la mesa de
planchar, por ejemplo).
BOTÓN DE AJUSTE DE LAS TEMPERATURAS
•
•
Permite seleccionar la temperatura en función del tipo de tejido
que quiere planchar.
Enchufe el aparato. Después elija la temperatura girando el
botón de selección de ropa (7). La luz indicadora de la
temperatura se encenderá. Una vez alcanzada la temperatura
deseada, el testigo luminoso de la temperatura desaparecerá.
PLANCHADO EN SECO
•
Coloque el botón de ajuste del vapor en la posición "0".
14
Assembly page 14/20
USK DA 31750 - 110127
Fax +32 2 359 95 50
Copies of the I/B. Please reproduce them without any
changes except under special instruction from Team
International BELGIUM. The pages must be reproduced
and folded in order to obtain a booklet A5 (+/- 148.5 mm
width x 210 mm height). When folding, make sure you
keep the good numbering when you turn the pages of
the I/B. Don’t change the page numbering. Keep the
language integrity. Print only what is inside the frame.
•
•
•
Conecte el aparato a la red.
Elija la temperatura en función del tipo de tejido.
Coloque la plancha vertical y espere a que se apague el testigo
luminoso.
PLANCHADO A VAPOR
Tipo de tejido
Sintético (e.g.
acetato, acrílico,
viscosa, poliamida,
poliéster, ...)
Seda
Lana
Regulación de la
temperatura
MIN
|
Regulación del vapor
0
|
|
1-2
|
|
Algodón
Lino
LIMPIEZA
•
•
•
•
•
|
MAX
|
MAX
|
3-4
Llene el depósito de agua (botón de ajuste del vapor en la
posición "0").
Conecte el aparato a la red.
Elija la temperatura deseada.
Coloque el botón de ajuste del vapor entre 0 y 4 según la
cantidad de vapor deseada.
Coloque la plancha vertical y espere a que se apague el testigo
luminoso.
ATENCIÓN: Coloque el termostato en “ “ o “
”. Si la temperatura
está demasiado baja, agua puede salir por la suela.
Compruebe la etiqueta de la prenda antes de plancharla. Algunos
tejidos pueden estar dañados por el vapor o el agua.
15
Assembly page 15/20
USK DA 31750 - 110127
Fax +32 2 359 95 50
Copies of the I/B. Please reproduce them without any
changes except under special instruction from Team
International BELGIUM. The pages must be reproduced
and folded in order to obtain a booklet A5 (+/- 148.5 mm
width x 210 mm height). When folding, make sure you
keep the good numbering when you turn the pages of
the I/B. Don’t change the page numbering. Keep the
language integrity. Print only what is inside the frame.
BOTÓN PULVERIZADOR
•
•
La función PULVERIZADOR sirve para eliminar las arrugas.
Puede ser utilizada con cualquier temperatura y con o sin vapor.
BOTÓN VAPORIZADOR
La función vaporizador
produce vapor adicional para facilitar el
planchado de las partes difíciles y eliminar las arrugas.
Este botón sirve también para planchar las prendas con pocas
arrugas, difíciles de poner en la mesa o frágiles. Esta función se llama
"planchado vertical". Para ello, cuelgue la prenda en una percha y
pase la plancha en posición vertical a algunos centímetros de la
prenda presionando regularmente el botón vaporizador. La
distancia entre la prenda y la plancha depende de la fragilidad del
tejido y de la cantidad de arrugas.
RECARGA ANTICAL
Una recarga anti-cal que se encuentra en el interior del aparato
absorba los iones de calcáreo insolubles y emite iones de sodio
solubles para descalcificar el agua y reducir l fenómeno de
calcificación.
APAGADO AUTOMÁTICO
El dispositivo de apagado automático funciona si deja su aparato
sin mover durante 8 minutos en posición vertical o 30 segundos en
posición horizontal. La luz del depósito parpadea para indicar que
se interrumpe el funcionamiento del aparato. En cuanto mueva de
nuevo el aparato, la luz del depósito vuelve fija y el aparato vuelve
a funcionar.
16
Assembly page 16/20
USK DA 31750 - 110127
Fax +32 2 359 95 50
Copies of the I/B. Please reproduce them without any
changes except under special instruction from Team
International BELGIUM. The pages must be reproduced
and folded in order to obtain a booklet A5 (+/- 148.5 mm
width x 210 mm height). When folding, make sure you
keep the good numbering when you turn the pages of
the I/B. Don’t change the page numbering. Keep the
language integrity. Print only what is inside the frame.
LIMPIEZA
•
•
•
•
•
•
•
•
Limpie su plancha regularmente dependiendo de la dureza del
agua y de la frecuencia de utilización.
Llene el depósito e ponga el botón del termostato en la posición
MAX.
Conecte el aparato a la red. El testigo luminoso se enciende.
Ponga el botón de ajuste del vapor en la posición “0”. Coloque
la plancha vertical.
No utilice nunca vinagre u otros productos líquidos para
descalcificar la plancha.
Cuando el testigo luminoso se apague, mantenga la plancha en
cima de un fregadera y presione el botón de limpieza (6). Agua
y vapor saldrán por la suela. Las impurezas saldrán por la suela.
Cuando no quede agua en el depósito, suelte el botón de
limpieza.
Espere que el aparato haya enfriado del todo antes de limpiarlo.
Utilice un paño ligeramente húmedo para las partes plásticas.
No utilice nunca productos abrasivos para limpiar la suela. Utilice
productos especiales que se encuentran en el comercio.
ANTES DE RECOGER LA PLANCHA
•
•
•
Coloque el botón del termostato en la posición “MIN” y
desenchufe el aparato.
Vacíe el depósito y no dirija la suela hacia usted.
Luego apoye la plancha en su base anterior en posición vertical
para que enfríe y que la humedad se evapore para evitar la
formación de moho. Una vez la suela del todo fría, puede
recoger su plancha.
17
Assembly page 17/20
USK DA 31750 - 110127
Fax +32 2 359 95 50
Copies of the I/B. Please reproduce them without any
changes except under special instruction from Team
International BELGIUM. The pages must be reproduced
and folded in order to obtain a booklet A5 (+/- 148.5 mm
width x 210 mm height). When folding, make sure you
keep the good numbering when you turn the pages of
the I/B. Don’t change the page numbering. Keep the
language integrity. Print only what is inside the frame.
GARANTÍA
Le sugerimos rellenen y nos envíen rápidamente la Tarjeta de
Registro de Producto adjunta para facilitar la verificación de la
fecha de compra. Por lo tanto, la devolución de esa Tarjeta de
Registro de Producto no es una condición imprescindible para la
aplicación de esa garantía. Puede también rellenar dicha tarjeta de
garantía en línea en la dirección siguiente: www.KALORIK.com
A partir de la fecha de compra, este producto KALORIK está
garantizado un año contra los defectos materiales y de fabricación,
en los Estados Unidos. Esta garantía no es transferible. Conserve la
prueba de compra original. Se exige una prueba de compra para
obtener la aplicación de la garantía.
Durante este período, si el producto KALORIK después de una
inspección por parte de KALORIK, se manifiesta defectuoso, será
reparado o reemplazado, según lo que decida KALORIK, sin gastos
para el consumidor. Si se envía un producto de reemplazo, se
aplicará la garantía que queda del producto original.
Esta garantía no se aplica a los defectos causados por una mala
utilización por parte del comprador o del usuario, o una negligencia
al no respeto del manual de instrucciones KALORIK, o una utilización
en un circuito eléctrico cuyo voltaje es diferente al que figura en el
producto, o un desgaste normal, o modificaciones o reparaciones
no autorizadas por KALORIK, o por un uso con fines comerciales. No
existe garantía por las partes de cristal, jarras de cristal, filtros, cestos,
cuchillas y accesorios en general. No existe tampoco garantía por
las piezas perdidas por el usuario.
Toda garantía de valor comercial o de adaptabilidad a este
producto está limitada a un año también.
Algunos estados no ponen límites a la duración de la garantía tácita
o no autorizan la exclusión de daños y perjuicios accesorios o
indirectos, por lo que puede que las restricciones anteriormente
mencionadas no le sean aplicables a Usted. Esta garantía le otorga
derechos legales particulares, pero usted puede tener también otros
18
Assembly page 18/20
USK DA 31750 - 110127
Fax +32 2 359 95 50
Copies of the I/B. Please reproduce them without any
changes except under special instruction from Team
International BELGIUM. The pages must be reproduced
and folded in order to obtain a booklet A5 (+/- 148.5 mm
width x 210 mm height). When folding, make sure you
keep the good numbering when you turn the pages of
the I/B. Don’t change the page numbering. Keep the
language integrity. Print only what is inside the frame.
derechos que varían de un estado a otro y algunos derechos
pueden variar de un estado a otro.
Si el aparato tuviera un defecto durante el periodo de garantía y / o
más de 30 días después de que se compró, no devuelva el aparato
en la tienda donde le compró: a menudo, nuestro Servicio al
Consumidor puede ayudar a resolver el problema sin que el
producto tenga que ser reparado. Si hace falta una reparación, uno
de nuestros representantes puede confirmar si el producto está bajo
garantía y dirigirle al servicio post-venta más próximo.
Si fuera el caso, traiga el producto (o envíelo, correctamente
franqueado) con la prueba de compra que mencione el número de
autorización de devolución indicado por nuestro Servicio al
Consumidor, al servicio post-venta KALORIK más próximo. (Visite
nuestra web www.KALORIK.com o llame al Servicio al Consumidor
para obtener la dirección del Servicio post-venta KALORIK exclusivo
más próximo).
Si envía el producto, le rogamos añadan una carta explicando la
naturaleza del defecto.
Si tiene preguntas adicionales, por favor llame al Servicio al
Consumidor (véase abajo para los datos completos), de lunes a
viernes, de las 9 a las 18 (EST). Note que las horas pueden ser
modificadas.
Si quiere escribirnos, puede hacerlo a la dirección siguiente:
KALORIK Servicio al Consumidor
Team International Group of America Inc.
1400 N.W 159th Street, Suite 102
Miami Gardens, FL 33169 USA
O llame gratuitamente (U.S.A.) al +1 888-521-TEAM / +1 888-KALORIK
Las cartas se aceptan solamente en la dirección anteriormente
mencionada. Los envíos y paquetes que no tengan número de
autorización de devolución serán rechazados.
19
Assembly page 19/20
USK DA 31750 - 110127
Fax +32 2 359 95 50
Copies of the I/B. Please reproduce them without any
changes except under special instruction from Team
International BELGIUM. The pages must be reproduced
and folded in order to obtain a booklet A5 (+/- 148.5 mm
width x 210 mm height). When folding, make sure you
keep the good numbering when you turn the pages of
the I/B. Don’t change the page numbering. Keep the
language integrity. Print only what is inside the frame.
110127
www.KALORIK.com
20
Assembly page 20/20
USK DA 31750 - 110127