1
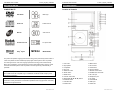
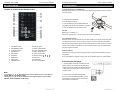
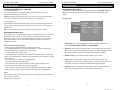
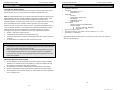
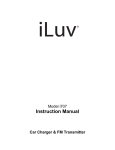
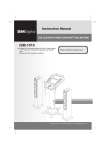
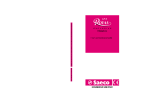
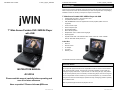
PORTABLE DVD PLAYER V11M11_IM_EN_10282009 PORTABLE DVD PLAYER V11M11_IM_EN_10282009 INTRODUCTION Thank you for purchasing JDVD768. Unpack the unit and make sure all the accessories are put aside so they will not be lost. We recommend that you retain the original carton and packaging materials for future use, should you transport or ship the unit in the future. 7” Wide Screen Portable DVD / MPEG4 Player with USB • Portable DVD player with 7” TFT wide screen LCD • Compatible with NTSC / PAL system • USB, SD/MMC/MS card slot for digital audio and video playback (SDHC cards not supported)* 7” Wide Screen Portable DVD / MPEG4 Player with USB • Audio and video output • Stereo headphone jack • Rechargeable battery • Built-in stereo speakers • Multiple OSD / menu / subtitle / audio languages • Repeat playback • Playable media: DVD / VCD / MPEG4 / MP3 / JPEG / Audio CD / CD-R / CD-RW / DVD±R / DVD±RW / Kodak picture CD In the Box • Main unit • Remote Control • AC Adapter • A/V Cable • Warranty card *Not all sizes and brands of cards supported. ABOUT DISC ERROR This compact disc player has built-in error compensation circuits to correct for minor defects in INSTRUCTION MANUAL a disc. There are limits, however, to the amount of correction available. In some cases, the DVD player may skip some tracks, or parts of tracks, on a disc during disc play. This problem may be caused by defects (such as scratches) in the disc being played, which are too large for JD-VD768 the error compensation circuits to handle. If you encounter this problem, try a new disc before Please read this manual carefully before operating and save it for future reference. having the unit serviced. If the DVD player operates normally, the skipping problem is probably due to a defective disc. Note: Only the above types of discs can be played on this unit. Have a question? Please visit www.jWIN.com 1 www.jWIN.com www.jWIN.com PORTABLE DVD PLAYER V11M11_IM_EN_10282009 PORTABLE DVD PLAYER V11M11_IM_EN_10282009 TABLE OF CONTENTS TABLE OF CONTENTS GETTING STARTED OPERATIONAL INSTRUCTIONS (CONTINUED) Introduction. …..………..…………………………………………………………………… 1 [ZOOM] ….………………………………………………………………………………….. 13 Compatibility ………………………………………………………………………………… 4 [AUDIO] …………………………………………………………………………………….. Panel illustration …………………………………………………………………………… 5 [SUBTITLE] …………………………………………………………………………………. 13 Location of controls on the remote control …………………………………………………6 [DISPLAY] …..………..…………………………………………………………………….. 13 Changing the remote control batteries………………………………………………………7 [GOTO] …….……………………………………………………………………………….. Cell data……………………………………………………………………………………… 7 [SETUP] …..…………………………………………………………………………………. 14 Using of remote control……………………………………………………………………… 7 [PROG] …….……………………………………………………………………………….. Notes on batteries………….………………………………………………………………… 7 [MENU] ………………………………………………………………………………………. 14 Brief instructions on installing the DVD player …………………………………………… 8 [TITLE] …….……………………………………………………………………………….. Navigating the Setup Menu ……………………….…………………………………………9 [ANGLE] ……..……………………………………………………………………………… 14 13 13 14 14 Language Setup …………………………………….……………………………………… 9 Video Setup …………………………………………………………..……………………… 10 Misc setup …………………………………..……………………………………………… 11 ADVANCED FEATURES Playing MP3 / WMA CDs …………………………………………………………………… 15 OPERATIONAL INSTRUCTIONS Displaying Picture CDs ……………………………………………………………………. 16 USB interface ………………………………………………………………………………. 17 [0 -9] Buttons ………………………………………………………………………………… 12 [W / S / T / X] DIRECTION Buttons……………………………………………………… 12 [LCD ON / OFF] …………………………………………………………………………….. 12 [SOURCE] …………………………………………………………………………………… 12 [ENTER] ………………………………………………………………………………..…. 12 [PLAY/ PAUSE] ………………………………………………………………………………12 [STOP] …………………………………….……………….………………………………… 12 CARE AND MAINTENANCE GUIDES Handling a disc ……………………………………………………………………………… 18 Cleaning the unit ……………………………………………………………………………. 18 [FWD] …………………………………………………………..……………………………. 12 [REV] …………..…………………………………………………………………………….. 12 [PREV] ……………………………………………………………………………….………. 12 [NEXT] …….……………………………………………………………………………….. 13 [REPEAT] ………………………………………………………………………………….. 13 TROUBLESHOOTING GUIDE ……………………………………………………................... 19 USER SAFETY GUIDE ………………………………………………………………………….. 20 SPECIFICATIONS ……………….………………………………………………………………. 25 3 2 www.jWIN.com www.jWIN.com PORTABLE DVD PLAYER V11M11_IM_EN_10282009 PORTABLE DVD PLAYER GETTING STARTED GETTING STARTED COMPATIBILITY Location of Controls DVD VIDEO Multi-angle AUDIO CD Subtitle choices MP3 CD Audio choices Kodak Picture CD TV Aspect Ratio MPEG4 Dolby® Digital V11M11_IM_EN_10282009 MPEG4 VIDEO This product incorporates copyright protection technology that is protected by method claims of certain U.S patents and other intellectual property rights owned by Macro vision Corporation and other rights owners. Use of this copyright protection technology must be authorized by Macro vision Corporation, and is intended for home and other limited viewing uses only unless otherwise authorized by Macro vision Corporation. Reverse engineering or disassembly is prohibited. The product complies with the Kodak Picture CD format and will display Kodak Picture CDs. The “Kodak Picture CD Compatible” logo is a trademark of Eastman Kodak Company and is used with the permission. Manufactured under license from Dolby Laboratories. Dolby and the double-D symbol are trademarks of Dolby Laboratories. Confidential unpublished works. Copyright 1992–1997 Dolby Laboratories. All rights reserved. 4 www.jWIN.com 1. LCD screen 13. NEXT button 2. Right speaker 14. PLAY button 3. Left speaker 15. STOP button 4. Disc cover 16. Charge indicator 5. OPEN disc button 17. Remote control sensor 6. SETUP button 18. POWER ON / OFF switch 7. MENU button 19. DC 12V input 8. LCD ON / OFF button 20. Headphone jack 9. DIRECTION (W / S / T / X) buttons 21. AV output 10. SOURCE button 22. VOLUME dial 11. PAUSE button 23. USB input 12. PREV button 24. CARD slot www.jWIN.com PORTABLE DVD PLAYER V11M11_IM_EN_10282009 PORTABLE DVD PLAYER GETTING STARTED GETTING STARTED Location of Controls on the Remote Control Changing the Remote Control Batteries V11M11_IM_EN_10282009 Place the remote control on an even surface and insert the supplied button cell into the remote control as follows. 1. Push the button towards left 2. Pull the battery loader out 3. Insert the battery into the receptacle Make sure The polarity matches the marks inside the component. 4. Insert the receptacle into the remote control. Cell data Battery type: 1x CR2025, 3 V Service life: approximately 1 year (for normal use and room temperature) jWIN Using Of Remote Control Point the remote control towards the main unit when operating. The remote control works best at a distance less than 5 m and at an angle of up to 30º to the front of the unit. No obstacles may stand in the way between remote control and infrared sensor and do not place the remote control in direct sunlight. If the remote control unit fails to work even when it is operated near 1. A-B REPEAT button 10. DISPLAY button 2. PROG/REPEAT button 11. ANGLE / AUDIO button 3. 0-9 Number buttons 12. TITLE / SUBTITLE button 4. SETUP button 13. MENU / ZOOM button 5. GOTO button 14. STOP / SLOW button 6. FWD button 15. Direction buttons ( 7. NEXT button 16. REV button 8. PREV button 17. ENTER button 18. PLAY / PAUSE button 9. SOURCE button the player, replace the battery. Notes on batteries If the remote control is not used for a long period of time, please remove the battery from the ) compartment. Do not heat batteries or dispose of them in fires. Do not dismantle, deform or modify batteries. Connecting the DVD player · The DVD player, the television set and any other electric devices to be connected to the DVD player must be switched off and disconnected from the mains. ·Observe the color coding when connecting audio and video cables. Note: - Long press 2, 11, 12, 13, 14 will activate the functions marked lower on these buttons (PROG, ANGLE, TITLE, MENU, SLOW). - Short press 2, 11, 12, 13, 14 will activate functions marked higher on these buttons (REPEAT, AUDIO, SUBTITLE, ZOOM, STOP). 1 .Connecting to a television set Audio/video Connectors Using the audio/video cable, connect the DVD player to the A/V inputs of the television set as shown in the illustration. 7 6 www.jWIN.com www.jWIN.com PORTABLE DVD PLAYER V11M11_IM_EN_10282009 PORTABLE DVD PLAYER GETTING STARTED GETTING STARTED Connecting the DVD player- continued Navigating the Setup Menu V11M11_IM_EN_10282009 2 .Connecting headphones In the setup menu, there are setup pages categorized as following: LANGUAGE, VIDEO and Connect the headphones to the headphone jack on the right side of the device. The MISC. Each setup page is composed of the several setup options corresponding to each loudspeakers are automatically deactivated. category. Caution: Excessively high volume can damage your hearing. Turn the volume down before connecting the headphones and then turn the volume up to a moderate level. Language Setup 3 .Power supply unit The DVD player is delivered with a power supply unit. Connect the power supply cable to the DC 12V IN jack on the right side of the device as shown below. Connect the power plug to an earthed socket. Note: Turn off the DVD player before you unplug the mains cable from the socket. Rechargeable battery pack A rechargeable lithium ion polymer battery is built in your portable DVD player. Fully charge the battery before you use the device for the first time. Normally it takes about 4 hours for the battery to be charged. When the rechargeable battery is fully charged, you can operate the device with it for about 1.5 hours. Fully charge the battery when it will not be used for an extended period of time. 1. LANGUAGE: Used to set the language for the On-Screen Display (OSD). This unit supports ENGLISH, FRENCH, SPANISH, and PORTUGUESE. Notes on using rechargeable batteries ·When using a new rechargeable battery, fully charge it prior to use. ·Use rechargeable batteries only in temperatures between 0℃ and 40℃. Do not expose 2. SUBTITLE: Used to select the subtitle language. The correct performance of this option depends on the subtitle contents supported by a DVD. If you select a language, which isn’t rechargeable batteries to high temperatures or direct sunlight. · Do not throw the battery into water or fire. supported by a DVD, this unit will use the default subtitle language of the DVD. · Ensure adequate air circulation around the device. Do not place the device on soft furniture, carpets or other materials while in operation, as this may restrict the air from properly circulating 3. MPEG4 Subtitle: Choose different MPEG4 subtitle encoding options. around the device. ·Do not short-circuit the contacts of a rechargeable battery. 4. AUDIO: Used to select the audio language. The correct performance of this option ·Do not disassemble the rechargeable battery. depends on the audio contents supported by a DVD. If you select a language, which isn’t ·When switched off, the indicator lamp will stay red when charging the battery and the supported by a DVD, this unit will use the default audio language of the DVD. indicator lamp will display yellow once the charging has finished. · When the state of charge reaches a low level, the WARNING LOW BATTERY symbol is displayed on the LCD screen. A few minutes later the DVD player turns off automatically. 5. DVD Menu: Used to choose the film’s menu language options. Follow the operating instructions in DVD MENU Setup in combination with the desired option Notes Please Charge the battery with the device switched off. This will shorten the charging time and extend the life of the battery. Charge the battery fully first use. 9 8 www.jWIN.com www.jWIN.com PORTABLE DVD PLAYER V11M11_IM_EN_10282009 PORTABLE DVD PLAYER GETTING STARTED GETTING STARTED Navigating the Setup Menu Navigating the Setup Menu Video Setup-continued MISC SETUP V11M11_IM_EN_10282009 Use Default Settings: Reset setup data to factory default and re-load disc. Video Setup 1. Screen saver: Enable/Disable screen saver function. ASPECT RATIO: Choose 4:3LB, 4:3PS, 16:9 a. 4:3PS / 4:3LB: Choose this setting when your DVD player is connected to a normal ratio TV. If this aspect ratio is chosen and the entire TV screen is used, parts of the picture on the left and right will be cut off. b. 16:9: Choose this setting if you have a wide screen TV. Choosing this aspect ratio on a standard screen may distort the images due to vertical compression. Note: The aspect ratio depends on the recorded disc format. Some discs may not display images on the chosen aspect ratio. For example: if a disc recorded in 4:3 format is played on a wide screen TV, black bars will appear on the left and right sides of the screen. Please adjust the screen setting depending on both the type of TV and the recorded material on the disc. 2. TV SYSTEM: This portable DVD player supports NTSC, and PAL TV systems. The screen may blink and become colorless when the wrong system is selected. For more information, please refer to the user’s manual for your TV set. 3. SMART PICTURE: Adjust display effect for video output: Standard: default effect. Bright: internal setting for bright view effect. Soft: internal setting for soft view effect. Dynamic: Users adjust brightness, contrast, color etc. 11 10 www.jWIN.com www.jWIN.com PORTABLE DVD PLAYER V11M11_IM_EN_10282009 PORTABLE DVD PLAYER OPERATIONAL INSTRUCTIONS OPERATIONAL INSTRUCTIONS [0 – 9] Buttons on the Remote Control [NEXT] These buttons are used to input the time, as well as title, chapter and track numbers. When a numeric item is displayed on the screen, press the 0-9 keys to select the desired entry, and press the [ENTER] button to confirm. When a VCD is playing (with PBC off), press the 0-9 keys to select a track directly. Note: Refer to the [MENU] button section for PBC operation. [W/S/X/T] Direction Buttons Press the [W/S/X/T] buttons to move the selected bar or cursor on any menu to your V11M11_IM_EN_10282009 While playing back a DVD, CD or VCD, press the [NEXT] button to skip to the next chapter or track. [REPEAT] Each short press of the [PROG / REPEAT] button on the remote control will change the repeat mode. selection. During VCD, CD playback, there are three modes: repeat Single, repeat ALL and Off. [LCD ON / OFF] Button on the Main Unit During DVD, playback, there are three modes: Repeat Chapter, Repeat Title and OFF. Note: Refer to the [MENU] button section for PBC operation. Turn off / on the LCD. Use this function when LCD is not necessary (ie. when listening to music) to save battery life. [ZOOM] While playing back a DVD, short press the [MENU / ZOOM] button on the remote control to [SOURCE] button Toggle between available media sources (DVD, USB, SD / MMC / MC card). zoom in or out the image. This function differs depending on the type of disc. [ENTER] [AUDIO] Press the [ENTER] button on the remote control to confirm your selection. During DVD/SVCD playback, short press the [ANGLE / AUDIO] button on the remote control to select different audio languages. [PLAY/ PAUSE] Press the [PLAY/PAUSE] button on the remote control or the [PLAY] button on the main unit to play back a disc in the stop mode. Press the [PLAY/PAUSE] button on the remote control or the [PLAY] button on the main unit to resume the playback in the pause mode. While playing back a disc, press the [PLAY/PAUSE] button on the remote control to pause. To Resume the playback, press the [PLAY/PAUSE] button again. [STOP] During VCD/CD/MP3 playback, the [ANGLE /AUDIO] button acts as L/R key to switch LEFT/RIGHT/MIX/STEREO. [SUBTITLE] While playing back a DVD, short press the [TITLE / SUBTITLE] button on the remote control to turn on the subtitle and to select the language for the subtitle. This function depends on the DVD. While playing back a DVD, CD or VCD, press the [STOP] button on the main unit once to stop the playback. To resume the playback at which you stopped, press the [PLAY/PAUSE] button on the remote control or the [PLAY] button on the main unit. Press the [STOP] button twice in the playback mode to completely stop. [DISPLAY] While playing a DVD, press the [DISPLAY] button on the remote control once to see the playback information. This function depends on the disc type. Press the [DISPLAY] button again to see other additional information. [FWD] While playing back a DVD, CD or VCD, press the [FWD] button on the remote control to play back the video or audio contents fast forward. Once you press [FWD] button, the disc will play at different speed. Press the [PLAY/PAUSE] button on the remote control or the [PLAY] button on the main unit to resume the normal playback. For DVDs, press this button to choose the desired title and chapter and search the desired title [REV] time and choose the desired track. While playing back a DVD, CD or VCD, press the [REV] button to play back the video or audio contents fast backward. Once you press [REV] button, the disc will play at different speed. Press the [PLAY] button to resume the normal playback. Notes: During VCD playback, the PBC mode must be set to OFF. [GOTO] time and chapter time. For Super VCDs, VCDs, or CDs, press this button to search the desired disc time and track [PREV] While playing back a DVD, CD or VCD, press the [PREV] button to skip to the previous chapter or track. 12 13 www.jWIN.com www.jWIN.com PORTABLE DVD PLAYER V11M11_IM_EN_10282009 PORTABLE DVD PLAYER V11M11_IM_EN_10282009 OPERATIONAL INSTRUCTIONS ADVANCED FEATURES [SETUP] Playing MP3 / WMA / MPEG4 Files Press the [SETUP] button to enter the setup mode. In the setup mode, you can set up the Language settings, video setting, Misc settings. When an MP3 / WMA / MPEG4 files are loaded, a directory structure will display as shown here: [MENU] During DVD playback, press the [MENU] button on the main unit or long press the [MENU / ZOOM] button on the remote control to display the disc menu of the current title. During VCD/SVCD playback, press the [MENU] button on the main unit or long press the [MENU / ZOOM] button on the remote control to control PBC ON/OFF. Note: This function is subject to the disc. [TITLE] While playing back a DVD, long press the [TITLE / SUBTITLE] button on the remote control to display the DVD title menu or play back the first title when the DVD disc doesn’t support the title menu. Note: This function depends on the disc type. [ANGLE] While playing back a DVD, long press the [ANGLE / AUDIO] button on the remote control to view the scenes from the different camera angles. To go back to the normal playback, long press the [ANGLE / AUDIO] button repeatedly until the angle function is turned off. A DVD must support the different angle view to activate this function. Use the [W/S/T/ X] buttons to choose the root directory and press the [ENTER] button enter the sub-directory. Press the [W/S/T/ X] buttons to choose the desired track and press the [ENTER] or [PLAY] button to enjoy the music or movie. [PROG] The Program playback option allows you to enter the order in which the chapters or tracks will be played, up to 12 maximum. 1. Long press the [PROG / REPEAT] button on the remote control to display the Program Menu. The cursor will highlight the chapters or tracks. 2. Move the cursor and use 0-9 keys to select the desired entry. 3. Use the [W / S / T / X] buttons to highlight the “PLAY” item and press the [ENTER] button. The chapters/tracks will play in the programmed order. Playback stops once all tracks have been played. 4. During Program playback, if the [PROG / REPEAT] button is pressed, the programmed order and contents will display and playback will stop. 5. To clear programmed order, use the [W / S / T / X] buttons to highlight the “CLEAR program items and press the [ENTER] button to modify the programmed order. 6. Press the [STOP] button to stop the program playback, press the [STOP] button twice or the [OPEN/CLOSE] button to cancel the program playback. Note: - Long press [PROG, ANGLE, TITLE, MENU, SLOW ] will activate the functions marked lower on these buttons. - Short press [REPEAT, AUDIO, SUBTITLE, ZOOM, STOP] will activate functions marked higher on these buttons. Use the [W/S/T/ X] buttons and select the the previous menu. icon and press the [ENTER] button to return to Filter: Allows selecting the categories of files displayed in the browser list. This selection is done among the 3 categories: Audio, Photo and Video. Repeat: To switch different repeat playing mode Mode: Select different playing mode Normal: Shuffle mode is cancelled 15 14 www.jWIN.com www.jWIN.com PORTABLE DVD PLAYER V11M11_IM_EN_10282009 PORTABLE DVD PLAYER V11M11_IM_EN_10282009 ADVANCED FEATURES ADVANCED FEATURES Playing MP3 / WMA / MPEG Files-continued USB interface Shuffle: Shuffle mode enabled. When playback reaches the end of the current chapter/track, Connect external device firsthand press the [SOURCE] button until you switched into USB playback jumps to a random chapter/track. As the end of each chapter/track is reached, mode. another random chapter/track will be played until all tracks/chapters have been played or the Shuffle mode is cancelled by toggling to a different Mode Option 1. Connect the device to the power supply. Music Intro: In this mode, the media will play 10 seconds then skip to next track 2. Switch the device on Edit Mode: To enable programmed playback mode. When you select the mode, press LEFT 3. Insert the USB memory stick into the USB port [W] Direction button to directory and press the [ENTER] button to choose the desired track and 4. Press the [SOURCE] button. press Add to program to start program playback. 5. Use the [W / S / T/ X] buttons to select USB and confirm by pressing [ENTER] Program view: Display program track Brower view: Display track directory Prior to connecting the device, make sure that the USB memory stick contains JPEG, Add to program: To choose the track press Add to program to add the track of the program MP3 or WMA or MPEG4 files. You can use the SD card slot in the same way play directory. Clear program: In the complete stop state (press the [STOP] button twice); choose the track Please refer to section “Playing MP3 / WMA / MPEG4 Files” for more playback information. press Clear program to delete the track of the program play directory. 3-In-1 Card Reader Function Displaying Picture CDs This unit has a 3-in-1 card slot. You can insert (MMC, SD, MS) three kinds of cards with A Picture CD has a director similar to the display below. the card port interface. After inserting a card and pressing the [SOURCE] button to choose CARD mode to play the MP3 / WMA music or MPEG4 movie and JPEG files, all the functions are the same as” Playing MP3 / WMA / MPEG4 Files”. NOTE: When using the USB or CARD function. Please insert in the correct direction, to avoid corrupting the stored files. Use the [W / S / T/ X] buttons to choose the root directory, pressing the [ENTER] button to enter the sub-directory. Use the [W / S / T/ X] buttons to choose the desired picture and press the [ENTER] or [PLAY] buttons to view the picture. To ROTATE the images use the [W / S / T/ X] buttons when in Picture Display mode. 16 www.jWIN.com www.jWIN.com PORTABLE DVD PLAYER V11M11_IM_EN_10282009 PORTABLE DVD PLAYER V11M11_IM_EN_10282009 CARE AND MAINTENANCE GUIDES TROUBLESHOOTING GUIDE Handling a Disc Please use the problem-solving measures described here before contacting Customer Support. • Treat the disc carefully. Handle the disc only by its edges. Never allow your fingers to Turn off the DVD player immediately as soon as you suspect a malfunction. Unplug the power contact with the shiny, unprinted side of the disc. plug and check whether the DVD player is unusually warm or if smoke is rising from it. • • • • Do not attach adhesive tape, stickers etc., to the disc label. Clean the disc periodically with soft, lint-free, dry cloth. Never use detergents or adhesive • DVD player does not work cleaners to clean the disc. If necessary, use a CD or DVD cleaning kit. o Disc cover is not closed. Close the disc cover. If disc skips or gets stuck on a section of the disc, it is probably dirty or damaged o No disc inserted. Please insert disc. (scratched). o Disc is dirty or deformed. Clean disc or insert another disc. When cleaning the disc, wipe in straight lines from the centre of the disc to the edge of the o disc. Never wipe in circular motions. • To remove a disc from its storage case, press down on the centre of the case and lift the o disc outs, holding it carefully by the edges. • Regional code of the player does not match the regional code of the disc. Purchase a disc with the proper regional code. There is moisture on the lens. Remove the disc and turn off the DVD player for at least two hours. Fingerprints and dust should be carefully wiped off the disc's recorded surface with a soft • No sound cloth. Unlike conventional records, compact disc have no groove to collect dust and o The player is not properly connected. Check that all connections are correct. microscopic debris, so gently wiping with a soft cloth should remove most particles. o Headphones are connected (speaker off). Disconnect headphones. o DVD sound settings are incorrect. Check that the sound settings are correct. o Disc is dirty or deformed. Clean disc or insert another disc. • No video o LCD screen is off or in incorrect video mode. Turn on the LCD screen and / or set correct video mode. o • o Cleaning the Unit • To prevent fire or shock hazard, disconnect your unit from the AC power source when • cleaning. • The finish on the unit may be cleaned with a dust cloth and cared for as other furniture, Use caution when cleaning and wiping the plastic parts. • If the cabinets become dusty wipe them with a soft dry dust cloth. Do not use any wax or polish sprays on the cabinets. • If the front panel becomes dirty or smudged with fingerprints it may be cleaned with a soft cloth slightly dampened with a mild soap and water solution. Never use abrasive cloths or polishes as these will damage the finish of your unit. • The player is not properly connected. Check that all connections are correct. Poor video and / or audio quality Disc is dirty or deformed. Clean disc or insert another disc. Repeated playback of one section o Repeat mode is set ON. Exit the repeat mode. o Disc is dirty or deformed. Clean disc or insert another disc. Remote control does not work o There is an obstacle between the remote control and the player. Remove the obstacle. o The remote control is not pointed directly at the player. Point the remote control directly at the player. o The remote control battery is improperly installed. Check that the battery matched the polarity marked in the battery compartment and insert the battery correctly. Caution: never allow any water or other liquids to get inside the unit while cleaning. o The battery power is too low or is empty. Insert a new battery. Other possible causes for problems: Static discharges or other external interferences can cause the DVD player to malfunction. When this happens, disconnect the power plug from the mains socket and plug it back in. If the problem persists, disconnect the device from the mains again and contact Customer Service or a repair shop. 18 19 www.jWIN.com www.jWIN.com PORTABLE DVD PLAYER V11M11_IM_EN_10282009 USER SAFETY GUIDE • • V11M11_IM_EN_10282009 USER SAFETY GUIDE IMPORTANT SAFETY INSTRUCTIONS-Continued WARNING TO PREVENT FIRE OR SHOCK HAZARD. DO NOT EXPOSE THIS APPLIANCE TO RAIN OR MOISTURE. THIS APPLIANCE SHALL NOT BE EXPOSED TO DRIPPING OR SPLASHING WATER AND THAT NO OBJECT FILLED WITH LIQUIDS SUCH AS VASES SHALL BE PLACED ON APPARATUS. CAUTION RISK OF ELECTRIC SHOCK DO NOT OPEN The lightning flash with arrowhead symbol, within an equilateral triangle, is intended to alert the user to the presence of unisulated “dangerous voltage” within the product’s enclosure that may be of sufficient magnitude to constitute a ri sk o f el ectric sho ck to people. PORTABLE DVD PLAYER WARNING: TO REDUCE THE RISK OF ELECTRIC SHOCK, DO NOT REMOVE COVER (OR BACK). NO USER-SERVIC-ABLE PARTS INSIDE. REFER SERVICING TO QUALIFIED SERVICE PERSONNEL. The exclamation point within a n eq u i l at e r al t ri a ng l e i s intended to alert the user to the presence of important operating and maintenance (servicing) instructions in the literature accompanying the appliance. IMPORTANT SAFETY INSTRUCTIONS 1. 2. 3. 4. 5. 6. 7. Read these instructions. Keep these instructions. Heed all warnings. Follow all instructions. Do not use this apparatus near water. Clean only with dry cloth. Do not block any ventilation openings. Install in accordance with the manufacturer’s instructions. 8. Do not install near any heat sources such as radiators, heat registers, stoves, or other apparatus (including amplifiers) that produce heat. 9. Do not defeat the safety purpose of the polarized or grounding-type plug. A polarized plug has two blades with one wider than the other. A grounding type plug has two blades and a third grounding prong. The wide blade or the third prong is provided for your safety. If the provided plug does not fit into your outlet, consult an electrician for replacement of the obsolete outlet. 10. Protect the power cord from being walked on or pinched particularly at plugs, convenience receptacles, and the point where they exit from the apparatus. 11. Only use attachments/accessories specified by the manufacturer. 12. Use only with the cart, stand, tripod, bracket, or table specified by the manufacturer, or sold with the apparatus. When a cart is used, use caution when moving the cart/apparatus combination to avoid injury from tip-over. 20 13. Unplug this apparatus during lightning storms or when unused for long periods of time. 14. Refer all servicing to qualified service personnel. Servicing is required when the apparatus has been damaged in any way, such as power-supply cord or plug is damaged, liquid has been spilled or objects have fallen into the apparatus, the apparatus has been exposed to rain or moisture, does not operate normally, or has been dropped. 15. Grounding or Polarization – This product may be equipped with a polarized alternatingcurrent line plug (a plug having one blade wider than the other). This plug will fit into the power outlet only one way. This is a safety feature. If you are unable to insert the plug fully into the outlet, try reversing the plug. If the plug should still fail to fit, contact your electrician to replace your obsolete outlet. Do not defeat the safety purpose of the polarized plug. Alternate Warnings – This product is equipped with a three-wire grounding-type plug, a plug having a third (grounding) pin. This plug will only fit into a grounding-type power outlet. This is a safety feature. If you are unable to insert the plug into the outlet, contact your electrician to replace your obsolete outlet. Do not defeat the safety purpose of the grounding-type plug. 16. Ventilation – Slots and openings in the cabinet are provided for ventilation and to ensure reliable operation of the product and to protect it from overheating, and these openings must not be blocked or covered. The openings should never be blocked by placing the product on a bed, sofa, rug, or other similar surface. This product should not be placed in a built-in installation such as a bookcase or rack unless proper ventilation is provided or the manufacturer’s instructions have been adhered to. 17. The MAINS plug or an appliance coupler is used as the disconnect device, the disconnect device shall remain readily operable. 21 www.jWIN.com www.jWIN.com PORTABLE DVD PLAYER V11M11_IM_EN_10282009 USER SAFETY GUIDE PORTABLE DVD PLAYER V11M11_IM_EN_10282009 USER SAFETY GUIDE FCC NOTICE TO A USER IN USA CLEANING Always disconnect unit from power supply before attempting to clean it. Use soft cloth moistened with soapy water, and wipe gently. Do not use solvents or abrasive materials. This equipment has been tested and found to comply with the limits for a Class B digital device, pursuant to Part 15 of the FCC Rules. These limits are designed to provide reasonable protection against harmful interference in a residential installation. This equipment generates, uses, and can radiate radio frequency energy and, if not installed and used in accordance with the instructions, may cause harmful interference to radio communications. However, there is no LASER SAFETY guarantee that interference will not occur in a particular installation. If this equipment does This unit utilizes laser technology. Only a qualified professional cause harmful interference to radio or television reception, which can be determined by turning should remove the cover or attempt to service this device, due to the equipment off and on, the user is encouraged to try to correct the interference by one or possible eye injury. more of the following measures: • Reorient or relocate the receiving antenna. CAUTION – CLASS 1 LASER PRODUCT • Increase the separation between the equipment and receiver. Use of controls adjustments and/or performance of procedure other • Connect the equipment into an outlet on a circuit different from that to which the receiver is than specified herein may result in hazardous radiation exposure. connected. • Consult the dealer or an experienced radio / TV technician for help. DANGER Invisible laser radiation when open and interlock failed or defeated. FCC RULES Avoid direct exposure to beam. CAUTION: HAZAROUS LASER This device complies with Part 15 of the FCC Rules. Operation is subject to the condition that RADIATION WHEN OPEN AND INTERLOCK DEFEATED. this device does not cause harmful interference. Note: Do not make changes or modify the device in any way. Changes or modifications not expressly approved by the party responsible for compliance could void the user’s YOU CAN HELP TO PROTECT THE ENVIRONMENT! authority to operate the equipment. Please remember to respect the local regulations: Hand in the non-working electrical equipment to an appropriate waste disposal center. IMPORTANT NOTES ON HEARING Your hearing is very important to you and to us, so please take care when operating this FOR USED BATTERIES equipment. We strongly recommend you to follow the guideline below in order to prevent Disposed of the used batteries properly. Please follow the local regulations for possible damage or loss of hearing. the battery disposal. If you continuously listen to the loud sounds, your hearing will adapt to continuous loud sounds and will give you the impression that the volume has been reduced. What seems normal to you may in fact be harmful. To guard against this BEFORE YOUR HEARING ADAPTS, set the volume at a low level and slowly increase the volume level until you can hear comfortably and clearly without distortion. Damage to your hearing is accumulative and is irreversible. Any ringing or discomfort in the ears indicates that the volume is too loud. Once you have established a comfortable listening level, DO NOT INCREASE THE VOLUME LEVEL FURTHER. In the use of headphones, please take more attention. Hearing experts say that listening to a loud music can damage your hearing, especially when listening to music with headphones. 23 22 www.jWIN.com www.jWIN.com PORTABLE DVD PLAYER V11M11_IM_EN_10282009 PORTABLE DVD PLAYER USER SAFETY GUIDE SPECIFICATIONS IC NOTICE TO A USER IN CANADA • • Since digital circuitry may cause interference to other radio or television tuners nearby, switch this unit off when not in use or move it away from the affected radio/television tuner. • NOTE: This digital apparatus does not exceed the Class B limits for radio noise emissions from digital apparatus as set out in the Radio Interference Regulations of Industry Canada. These limits are designed to provide reasonable protection against harmful interference in a residential installation. This equipment generates, uses and can radiate radio frequency energy and, if not installed and used in accordance with the instructions, may cause harmful • interference to radio communications. However, there is no guarantee that interference will not occur in a particular installation. If this equipment does cause harmful interference to radio or television operation (which can be determined by turning the equipment off), the user is encouraged to try to correct the interference by one or more of the following measures: • • • Reorient or relocate the receiving antenna. TV System: NTSC / PAL LCD Panel o Aspect Ratio: 16:9 / 4:3 o Diagonal Size: 7” Connectivity o AV output o 3.5mm stereo headphone jack o Mini USB port o SD/MMC/MS card slot o Power input jack Power Sources o Lithium-ion polymer Rechargeable Battery o AC Power Adapter Input (AC): 100–240V, 60Hz/50Hz Output (DC): 9V, 1.5A Power Consumption: ≤15W Unit Dimensions (W x H x D): 206mm x 43mm x 160mm (8.1” x 1.7” x 6.3) Unit Weights: 1.76 lbs (800 g) Increase the separation between the equipment and receiver. Connect the equipment into an outlet on a circuit different from that to which the receiver is connected. • • • • V11M11_IM_EN_10282009 * Specifications and features are subject to change without the prior notice. The weight and dimensions are approximate. Consult the dealer or an experienced radio / TV technician for help. WARNING! • The apparatus shall not be exposed to dripping or splashing and that no objects filled with liquids, such as vases, shall be placed on apparatus. • Mains plug is used as the disconnect device. It shall remain readily operable and should not be obstructed during intended use. To be completely disconnected, the apparatus from supply mains, the mains plug of the apparatus shall be disconnected from the mains socket outlet completely. ADDITIONAL IMPORTANT INSTRUCTIONS • Place the apparatus with some distances from the nearby objects or walls for sufficient ventilations. The ventilation should not be impeded by covering the ventilation openings with items such as newspapers, table-cloths, curtains, etc. • • • No naked flame sources such as lighted candles should be placed on the apparatus. Dispose of used batteries properly. Follow the local regulation for the battery disposal. Use this apparatus in the moderate climates. It is recommended not to use this apparatus such in a lightning storm. 25 24 www.jWIN.com www.jWIN.com PORTABLE DVD PLAYER V11M11_IM_EN_10282009 PORTABLE DVD PLAYER V11M11_IM_EN_10282009 TEL: 516-626-7188 FAX: 516-626-7105 www.jWIN.com © 2010 jWIN Electronics Corp. All rights reserved. No portion of this printed material or product enclosed herewith including design, shape or graphics, may be reproduced or transmitted in any form without the expressed written consent of jWIN Electronics Corp. by any means, electronic or mechanical, including photocopying, recording or use of an information storage and retrieval system. Any unauthorized distribution or reproduction of this printed material or product, or any portion there of, will be prosecuted to the fullest possible extent of the law. www.jWIN.com www.jWIN.com