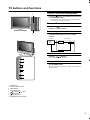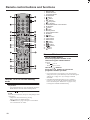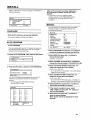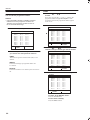
1
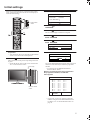
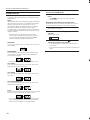
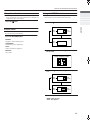
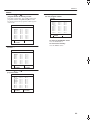
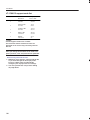
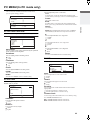
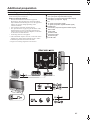
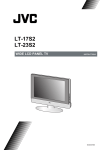
LT-17S2
LT-23S2
WIDE LCD PANEL TV
INSTRUCTIONS
5030057088
Thank you for buying this JVC LCD flat television.
To make sure you understand how to use your new TV, please read this manual thoroughly before you begin.
(“LCD” stands for Liquid Crystal Display.)
WARNING: TO PREVENT FIRE OR SHOCK HAZARD, DO NOT EXPOSE THIS APPLIANCE TO RAIN OR
MOISTURE.
WARNING
Always use the provided AC adapter and power cord.
WARNING
ENGLISH
• Fingers may be trapped under the TV causing injuries. Hold the TV at the
bottom in the middle, and do not allow it to tilt up or down.
• The TV may fall causing injuries. Hold the bottom of the stand with your
hand and tilt the TV up and down.
• Do not allow children to hang from the TV, place their elbows on the TV
or lean against the TV. Doing so may cause the TV to fall over and lead
to injuires.
CAUTION:
• To avoid electric shock or damage to the unit, first firmly
insert the small end of the power cord into the AC Adpater
unit it is no longer wobbly, and then plug the larger end of
power cord into an AC outlet.
CAUTION:
• Operate only from the power source specified (AC 100 – 240 V,
50/60 Hz) on the AC adapter.
• Avoid damaging the AC plug, AC adapter and power cord.
CAUTION ON HEATING OF AC ADAPTER:
• In using, the AC adapter get heat on the sunface of case.
It is normal, not defective.
• When you are not using this unit for a long period of time, it is
recommended that you disconnect the power cord from the
main outlet.
• Don't be covered with any material on case of AC adapter
while it is in operation.
NOTES:
• The rating plate (serial number plate) and safety caution
are on the back of the main unit.
• The rating information and safty causion of the AC Adapter
are on its upper and lower sides.
1
Point defects
LCDs use collections of fine pixels to display images. While there is no problem with more than 99.99% of these pixels, please
understand that a very small number of pixels may not light or may light all the time.
Distance recommendations
Avoid improper installation and never position the unit where good
ventilation is impossible.
When installing this TV, distance recommendations must be maintained
between the set and the wall, as well as inside a tightly enclosed area or
piece of furniture.
Keep to the minimum distance guidelines shown for safe operation.
150 mm
200 mm
150 mm
200 mm
50 mm
Failure to take the following precautions may cause damage to the television or remote control.
DO NOT block the TV’s ventilat ion opening s or holes.
(If the ventilation openings or holes are blocked by a newspaper or cloth, etc., the heat may not be able to get out.)
DO NOT place anything on top of the TV.
(such as cosmetics or medicines, flower vases, potted plants, cups, etc.)
DO NOT allow objects or liquid into the cabinet openings.
(If water or liquid is allowed to enter this equipment, fire or electric shock may be caused.)
DO NOT place any naked flame sources, such as lighted candles, on the TV.
DO NOT subject the TV to direct sunlight.
The surface of the TV screen is easily damaged. Be very careful with it when handling the TV.
Should the TV screen become soiled, wipe it with a soft dry cloth. Never rub it forcefully.
Never use any cleaner or detergent on it.
If there is a fault, unplug the unit and call a service technician. Do not attempt to repair it yourself or remove the rear cover and the
AC adapter.
Cleaning the screen
The screen is coated with a special thin film to reduce reflection. If this film is da maged, uneven colors, discoloration, scratches,
and other problems that can not be repaired may occur. Pay attention to the following when handling the screen.
• Do not use glue or adhesive tape on the screen.
• Do not write on the screen.
• Do not allow the screen to come in contact with any hard objects.
• Do not allow condensation to form on the screen.
• Do not use alcohol, thinner, benzene or other solvents on the screen.
• Do not rub the screen hard.
2
CONTENTS
Setting up your TV..................................4
Installation..........................................................4
Using the stand ..................................................4
Putting the batteries into the Remote control.....5
Remove the terminal cover ................................5
Connecting the aerial and video cassette
recorder (VCR)...................................................6
Connecting the power cord to the AC outlet ......6
Sound setting........................................ 19
Sound Adjustment........................................... 199
HYPER SOUND .............................................. 199
FEATURES............................................ 20
BLUE BACK .................................................... 201
CHILD LOCK................................................... 201
TV buttons and functions ......................9
Turn the TV on from standby mode ...................9
Choose a TV channel ........................................9
Watch images from external devices .................9
Adjust the volume ..............................................9
Using the Menu..................................................9
Remote control buttons and
functions ............................................10
Turn the TV on or off from standby mode ........10
Choose a TV channel ......................................10
Adjust the volume ............................................11
Watch images from external equipment ..........11
Displaying the source information.....................11
ZOOM function.................................................12
Sleep timer funtion...........................................13.
Picture mode....................................................13.
Using the PCPIP function ...............................13
Operating a JVC brand VCR or DVD player ....14
INSTALL................................................ 21
MANUAL.......................................................... 213
AUTO PROGRAM........................................... 213
TO edit the PR LIST menu.............................. 224
PC MENU............................................... 25
PC PICTURE POSITION................................. 253
PC PICTURE................................................... 253
SOUND............................................................ 254
PC support mode list........................................ 264
Additional preparation......................... 27
Connecting external equipment ...................... 278
Troubleshooting................................... 29
Specifications....................................... 31
Teletext function...................................15
Basic operation ................................................15
Hold..................................................................15
Sub-page .........................................................16
Reveal..............................................................16
Size ..................................................................16
Index ................................................................16
Cancel..............................................................16
Using the TV’s menu ............................17
Basic operation ................................................17
Picture setting.......................................18
PICTURE MODE .............................................18
Picture Adjustment...........................................18
WHITE BALANCE..........................................18
RESET..............................................................18
3
ENGLISH
Initial settings .........................................7
Setting up your TV
Installation
Cautions for installation
• Install the TV in a corner on a wall or on the floor so as to keep cords out of the way.
• The TV will generate a slight amount of heat during operation. Ensure that sufficient space is available around the TV to allow
satisfactory cooling. See “Distance recommendations” on page 2.
Using the stand
This TV comes with a Table Top Stand already
attached.
This stand can be used to adjust the direction of the TV
screen 5° up, 10° down, and 20° to the left or right.
Cable holder
A cable holder which is used to keep the connection cables
tidy is attached to the back of the stand.
Tilt the TV up and down:
While holding the bottom of the stand with one hand, use
your other hand to hold the middle of the top of the TV and
slowly tilt the TV up and down.
• As a safety measure, the stand is constructed so that it
requires a certain amount of force to tilt the TV.
cable holder
Rotate the TV to the left and right:
While holding the bottom of the stand with one hand, use
your other hand to hold the edge of the panel and slowly
adjust the direction of the TV screen.
4
Setting up your TV
Putting the batteries into the Remote control
Use two AA/R6 dry cell batteries.
Insert the batteries from the - end, making sure the + and - polarities are correct.
ENGLISH
•
•
•
•
Follow the warnings printed on the batteries.
Battery life is about six months to one year, depending on your frequency of use.
The batteries we supply are only for setting up and testing your TV, please replace them as soon as you need to.
If the remote control does not work properly, replace the batteries.
Remove the terminal cover
There are connection terminals behind the covers of the rear of the TV. Remove the cover before
connecting a DVD or VCR.
The covers can be removed by removing the hook at the top and then pulling out while lifting slightly. To replace the covers,
first connect the hook at the bottom of the cover to the TV and then insert the hook at the top.
• Leave the covers off if they do not fit properly. Do not force to replace the covers. Doing so may cause damages of the
connection cables and the covers.
• Leave these covers off when mounting the TV on a wall.
• 100mm mount based on VESA regulation is equipped.
• The handle and the stand can be left by loosing the screws with a screwdriver when mounting the TV on a wall.
• Spread a soft cloth on a flat table and then place the TV on the cloth with the screen facing downwards when you leave the
handle and the stand.
5
Setting up your TV
Connecting the aerial and video
cassette recorder (VCR)
Connecting the power cord to the AC
outlet
• Aerial cable is not supplied. Use a good quality 75-ohm
coaxial cable.
• Read the manual that came with the VCR before
connecting.
If you are connecting a AC adapter, follow
in the diagram below.
If not connecting a VCR (follow 1 ):
Connect an aerial cable to the aerial socket on
this TV.
If connecting a VCR:
1 Connect the aerial cable to the aerial input
socket on the VCR, and connect the VCR and
TV with another aerial cable
2 Connect the VCR’s VIDEO OUT (video output)
terminal and the TV’s VIDEO terminal with a
video cable
• Connect
to the TV and
to the AC outlet.
Caution
• Operate only from the power source specified (AC 100
– 240 V, 50/60 Hz) on the unit.
• Remove the AC plug from the outlet to completely
disconnect the TV from the power supply.
To connect a VCR to the TV with an S-VIDEO cable:
Connect the VCR’s S-VIDEO OUT (S-VIDEO output)
terminal and TV’s S-VIDEO terminal with an S-VIDEO
cable A, instead of connecting with a video cable.
Note that the connection with a video cable will be
ignored in case you connect a VCR to the TV with both
video cable and S-VIDEO cable.
VIDEO-1
S-VIDEO
VIDEO
VIDEO
L/MONO
AUDIO
R
COMPONENT
3 Connect the VCR’s VIDEO OUT (audio L/R
output) terminals and the TV’s AUDIO input
terminals with an audio cable
(VIDEO-2)
Y
Pb/Cb
Pr/Cr
L/MONO
AUDIO
R
DC IN
(12V)
• To connect additional external devices, please see
“Connecting the external equipment” on page 27.
• If the VCR's audio output is in mono, connect the VCR's AUDIO
OUT(audio output)terminal and the TV's audio L/MONO input
terminal with an audio cable.
PC IN
D-SUB
15 PIN
PC
AUDIO
IN
AUDIO
OUT
R
L
SUBWOOFER
OUT
A
B
VIDEO-1
VIDEO-1
S-VIDOE
S-VIDEO
VIDEO
VIDEO
VIDEO
L/MONO
VIDEO
AUDIO
L/MONO
R
2
AUDIO
Y
R
Pb/Cb
PR/CR
L/MONO
COMPONENT
(VIDEO-2)
AUDIO
R
Y
Pb/Cb
DC IN
(12V)
PC IN
D-SUB
15 PIN
PC
AUDIO
IN
AUDIO SUBWOOFER
OUT
OUT
R
L
Pr/Cr
L/MONO
R
1
B
A
6
AUDIO
Initial settings
When the TV is first turned on, it enters the initial setting
mode. Follow the instructions on the on-screen display to
make the initial settings.
3 AUTO PROGRAM menu appears.
INSTALL
LANGUAGE
ENGLISH
AUTO PROGRAM
VCR/TV/DVD
Switch
Yellow button
Blue button
: SELECT
4 Press the /
LANGUAGE.
5 Press the
OK
:MOVE
buttons to choose the
buttons to choose the ENGLISH.
The on-screen display will then be in English.
BACK
6 Press the
buttons to choose the
AUTO PROGRAM.
7 Press t he
buttons to enter the
AUTO PROGRAM.
AUTO PROGRAM
___PC ___
START
OK : START
1 Make sure to set the VCR/TV/DVD switch to the
TV position.
• You cannot turn the TV on when the VCR/TV/DVD
switch is set to the VCR or DVD position.
2 Press the
button on the remote control
After a short interval the power lamp changes from red
to green.
• Check that the AC plug on the power cord from the
TV is connected to AC outlet.
Power lamp
8 Press the OK button to start AUTO PROGRAM.
AUTO PROGRAM
NOW PROGRAMMING
CH-01
MENU : EXIT
The AUTO PROGRAM menu appears and received TV
channels are automatically stored in the programme
numbers.
• To cancel the AUTO PROGRAM function:
Press the MENU button.
After the TV channels have been registered in
the programme numbers, the PR LIST
menu appears
PR LIST
Remote control
Remote
sensor control
sensor
01 ----02 ----03 ----04 ----05 ----06 ----07 ----08 ----09 ----10 -----
NAME
INSERT
11 ----12 ----13 ----14 ----15 ----16 ----17 ----18 ----19 ----20 -----
21 ----22 ----23 ----24 ----25 ----26 ----27 ----28 ----29 ----30 -----
DELETE
• If you want, you can now edit the programme
numbers using the AUTO PROGRAM function.
For details, see “To edit the PR LIST menu” on
page 22.
7
Initial settings
Now, the initial settings are complete, and you can
watch the TV
• If your TV can detect the TV channel name from the TV
channel broadcast signal, the TV channel name is
assigned to the programme number to which the
TV channel has been set. However, which TV channels
are set to which programme numbers will depend
on the area in which you live.
• If a TV channel you want to view is not set to a
programme number, you can set it using the
MANUAL function. For details, see “To edit the
PR LIST menu" on page 22.
• The AUTO PROGRAM function does not set the
programme number PR 0 (AV) for your video cassette
recorder. You will need to set this using the MANUAL
function.
• In some areas you may get TV reception from more than
one transmitter, for example different ITV regions. In
this case each TV channel could be set twice. If this
happens, the first set of channels will have the stronger
signal. If you want to delete the second set of channels,
you will have to do it manually (see page 21).
8
TV buttons and functions
1
Turn the TV on from standby mode
Press the button or P / buttons to turn the TV
on from standby mode
• Check that the AC plug on the power cord from the TV
is connected to correctly AC outlet.
Choose a TV channel
Press the P / buttons to choose a programme
number or an EXT terminal
2
Watch images from external devices
Press the TV/AV button to choose a TV/AV
terminal
EXT modes
TV mode
Last
program
number
VIDEO-1
VIDEO-2
PC
Adjust the volume
3
4
5
Press the
buttons
The volume level indicator appears.
Using the Menu
Use the MENU button.
Refer to "Using the TV's menu"(see page 17) for details of
using the menu.
6
7
8
1
2
3
4
5
6
7
8
Power lamp
Remote control sensor
MENU button
TV/AV OK button
(Volume)
button
P / buttons
(Standby) botton
Headphone jack (mini jack)
9
Remote control buttons and functions
1
2
3
4
5
6
7
8
9
10
11
12
13
14
15
16
17
18
19
20
21
22
23
24
25
26
Muting button
Number buttons
Information button
ZOOM button
button
button
/ buttons
(Text) button
P / buttons
VCR/DVD/Teletext control buttons
/ buttons
button
button
Standby button
VCR/TV/DVD switch
AV button
button
Picture button
Color buttons
MENU button
OK button
/ buttons
BACK button
buttons
button
button
Choose a TV channel
Use the number buttons:
Enter the programme number of the
channel using the number buttons.
Example:
• PR 6
• PR 12
press 6
press 1 and 2
Use the P / buttons:
Press the P / buttons to choose the
programme number you want.
Turn the TV on or off from standby
mode
1 Make sure to set the VCR/TV/DVD switch to the
TV position.
• You cannot turn the TV on or off when the VCR/TV/
DVD switch is set to the VCR or DVD position.
2 Press the
(standby) button to turn the TV on
or off.
When the TV is turned on, the power lamp changes from
red to green.
• The power can be turned on by pressing
P / buttons or Number buttons.
• Check that the AC plug on the power cord from the
TV is connected to AC outlet.
10
• If you do not have a clear picture or no colour appears,
change the colour system manually. Follow the description
"MUNUAL" on page 21 to try to change COLOUR
SYSTEM.
• If the SOUND SYSTEM setting for a TV channel is
incorrect, it may provent the sound from being issued.
Follow the description "MANUAL" on page 21 to try
to change the SOUND SYSTEM setting.
Remote control buttons and functions
Adjust the volume
Displaying the source information
Press the
buttons to adjust the volume.
The volume indicator appears and the volume changes as
you press the
buttons.
You can display the source information and current time on
the screen.
Muting the sound
Press the (muting) button to turn off the
sound.
Press the i (information) button to display the
source information.
Pressing the i (information) button changes the display as
follows:
Pressing the (muting) button again restores the previous
volume level.
01
O
__ : __
Watch images from external equipment
Use the AV button:
Press the AV button to choose an EXT
terminal.
or
TV
VIDEO-1
No display
VIDEO-1
Signal source
EXT modes
TV mode
Last
program
number
VIDEO-1
VIDEO-2
PC
To use the Programme number 0:
• The source information and current time switched by
i (information) button.
• The source type :
TV/VIDEO-1/VIDEO-2/PC
• If the programme being watched does not have Teletext
transmission, only a box will be displayed at the same
location.
• When watching videos, an incorrect current time
is sometime displayed.
• In PC mode, the current time will not be displayed
When the TV and VCR are connected only by the Aerial
cable, choosing the Programme number 0 allows you to
view images from the VCR. Set the VCR RF channel to
the Programme number 0 manually. For details, see
"MANUAL" on page 21.
In the PC mode:
If following message appears, the power lamp blinks in
amber and the TV goes in to reduced power mode.
- "NO SIGNAL"
- "CABLE NO INSERT"
- "OUT OF RANGE"
See "Troubleshooting" on page 30 for detials of this messages.
11
Remote control buttons and functions
ZOOM function
You can change the screen size according to the picture
aspect ratio. Choose the optimum one from the following
ZOOM modes.
AUTO:
When a WSS (Wide Screen Signalling) signal, which shows
the aspect ratio of the picture, is included in the broadcast
signal or the signal from an external device, the TV
automatically changes the ZOOM mode to 16:9 ZOOM
mode or FULL mode according to the WSS signal.
If a WSS signal is not included, the picture is displayed in
accordance with the ZOOM mode set with the 4:3 AUTO
ASPECT function.
• When the AUTO (WSS) mode does not function
correctly due to poor WSS signal quality or when you
want to change the ZOOM mode, press the ZOOM
button and change to another ZOOM mode.
REGULAR:
Use to view a normal picture (4:3 aspect ratio) as this is its
original shape.
PANORAMIC:
This stretches the left and right sides of a normal picture
(4:3 aspect ratio) to fill the screen, without making the
picture appear unnatural.
• The top and bottom of the picture are slightly cut off.
14:9 ZOOM:
This zooms up the wide picture (14:9 aspect ratio) to the
upper and lower limits of the screen.
16:9 ZOOM:
This zooms up the wide picture (16:9 aspect ratio) to the
full screen.
16:9 ZOOM SUBTITLE:
This zooms up the wide picture (16:9 aspect ratio) with
subtitles to the full screen.
FULL:
This uniformly stretches the left and right sides of a normal
picture (4:3 aspect ratio) to fill the wide TV screen.
• For 16:9 aspect ratio pictures that have been squeezed
into a normal picture (4:3 aspect ratio), use the FULL
mode to restore the picture to its original shape.
12
Choose the ZOOM mode
1 Press the ZOOM button to display the ZOOM
menu
• The ZOOM button does not work in the twin
pictures mode.
Adjusting the visible area of the picture
If subtitles or the top (or bottom) of the picture are cut off,
you can adjust the visible area of the picture manually.
1 Press the ZOOM button
The ZOOM menu appears.
2 Press the OK button to display the ZOOM mode
indicator
The indicator appears.
16:9
ZOOM
3 While it is displayed, press the / buttons to
change the position of the picture
• You cannot adjust the visible area in REGULAR or
FULL mode.
• Only REGULAR and FULL modes are available in PC
mode.
Remote control buttons and functions
Sleep timer function
The Sleep Timer can turn the TV off for you after you fall
asleep. Programme it to work in intervals of 10 minutes, for
a total time of up to 120 minutes.
Press the
button.
You can choose one of four PICTURE MODEs to adjust
the picture settings automatically.
A PC picture and TV or a video programme from an
external device can be watched at the same time.
1 Press the
button.
Picture in picture mode
Mainpicture
ENGLISH
Picture mode
Using the PCPIP function
Subpicture
Press the PICTURE button.
BRIGHT:
Heightens contrast and sharpness.
STANDARD:
Standardizes picture adjustment.
SOFT:
Softens contrast and sharpness.
MANUAL:
User define.
Cancel the PIP function
Mainpicture
D0057
2 Press the
sub-picture
button to change the position of
Change sub-picture position
3 Press the
size
button to change the sub-picture
Picture in picture mode
Mainpicture
Subpicture
Change sub-picture size
Mainpicture
Subpicture
4 Press the button to choose the sound
MAIN : Main picture
SUB : Sub picture
13
Remote control buttons and functions
• If the main-picture signal is poor, the quality of the
sub-picture may also be poor.
• If the pictures have different standards, the top and
bottom of one of them may be missing.
• If you press the menu button when the PIP functions
is on, PC menu will appear. To display the TV menu,
change the mode to the TV mode.
Operating a JVC brand VCR or DVD
player
These buttons will operate a JVC brand VCR or DVD
player. Pressing a button that looks the same as the device’s
original remote control button has the same effect as the
original remote control.
1 Set the VCR/TV/DVD switch to the VCR or DVD
position
VCR:
When you are using a VCR, set the switch to the VCR
position. You can turn the VCR on or off with the
(Standby) button.
DVD:
When you are using a DVD player, set the switch to the
DVD position. You can turn the DVD player on or off
with the
(Standby) button.
2 Press the VCR/DVD Control Button to control
your VCR or DVD player
• If your device is not made by JVC, these buttons will
not work.
• Even if your device is made by JVC, some of these
buttons may not work, depending on the device you
are using.
• You can use the p / buttons to choose a TV channel
the VCR will receive, or choose the chapter the DVD
player plays back.
• Some models of DVD player use the p / buttons for
both operating the fast forward/backward functions
and for choosing the chapter.
• Set the VCR/TV/DVD switch to the TV position
when you turn the TV on or off.
14
Teletext function
Basic operation
1 Choose a TV channel with a teletext broadcast
2 Make sure to set the VCR/TV/DVD switch to the
TV position.
(Text) button to display the teletext
(Text) button changes the mode as follows:
You can hold a teletext page on the screen for as long as
you want, even while several other teletext pages are being
received.
Press the
(Hold) button
Hold indication
To cancel the Hold function:
Press
(Hold) button again.
ENGLISH
3 Press
Pressing
Hold
TV mode
TEXT--TEXT--TEXT--D1043
Text mode
4 Choose a teletext page by pressing the P /
buttons, number buttons or colour buttons
To return to the TV mode:
Press the
(Text) button.
• If you have trouble receiving teletext broadcasts,
consult your local dealer or the teletext station.
• The ZOOM function will not work in the TV and text
mode or Text mode.
• You cannot operate menus when viewing a teletext
programme.
15
Teletext function
Sub-page
Cancel
Some teletext pages include sub-pages that are
automatically displayed.
1 Choose a teletext page that includes sub-pages
Press the button, Sub-page numbers can be viewed
and displayed at the screen.
2 Press the number buttons to choose a sub-page
number
Sxxxx : xxxx is the number 0 ~ 9 that you entered.
For example, sub-page 1 is S0001, you must enter 0,0,
0 and 1 serially to view sub-page S0001.
Reveal
Some teletext pages include hidden text (such as the
answers to a quiz).
You can display the hidden text.
Each time you press the
hidden or revealed
(Reveal) button, text is
Size
You can double the height of the teletext display.
Press the
(Size) button.
Index
You can return to the index page instantly.
Press the
(Index) button
Returns to page 100 or a previously specified page.
16
You can search for a teletext page while watching TV.
1 Press the number button to enter a page
number, or press a colour button
The TV searches for a teletext page.
2 Press the
(Cancel) button
The TV programme appears. When the TV finds the
teletext page, its page number appears in the upper left
of the screen.
3 Press the
(Cancel) button to return to a
teletext page when the page number is on the
screen
• The TV mode cannot be resumed by pressing the
(Cancel) button. To return to the TV mode press
button.
Using the TV’s menu
This TV has a number of functions you can operate using
menus. To use all your TV’s functions, you need to
understand the basic menu operating techniques fully.
3 Press the / buttons to choose a function
• For details of the functions in the menus, see the
following pages.
BACK
5 Press the MENU button to complete the setting
The menu disappears.
• When watching the television with the NTSC system,
the menus are displayed at about half of their normal
vertical size.
• The menu will be disappear if you press the P /
buttons, the AV button or the number buttons while
the menu is displayed.
Operation with the buttons on the TV
You can also operate the menus using the buttons on the
front panel of the TV.
PC
Basic operation
1 Press the MENU button to display the MENU (main
menu)
MENU
PICTURE
MENU button
SOUND
FEATURES
OK button
INSTALL
: SELECT
OK: MOVE
2 Press the / and / buttons to choose a
menu title, and press the OK button
The menu appears.
To return to the previous menu:
Press the BACK button on the remote control or the
MENU button on the TV.
/
buttons
/
buttons
To exit a menu instantly:
Press the MENU button on the remote control or
press the MENU button on the TV several times.
The menu will disappear after about one minute if no
operation is performed.
17
ENGLISH
4 Press the / buttons to choose the setting of
that function
• If you want to operate a function which appears only
with its name, follow the descriptions of that function
on the following pages.
• The display appearing at the bottom of a menu shows
you a button on the remote control that you can use
when you operate a chosen function.
PICTURE SETTING
Refer to “Using the TV’s menu” (see page 17) for details of
displaying the menu.
You can select one of three WHITE BALANCE modes (three
tones of white) to adjust the white balance of the picture.
Since white is the colour which is used as a reference for all
the other colours, changing the WHITE BALANCE mode
affects the appearance of all the other colours on the screen.
PICTURE
PICTURE MODE
BRIGHT
CONTRAST
BRIGHT-1
SHARP
COLOUR
BRIGHT-2
WHITE BALANCE
COOL
RESET
: SELECT
: MOVE
PICTURE MODE
You can choose one of four PICTURE MODEs to adjust
the picture settings automatically.
BRIGHT:
Heightens contrast and sharpness.
STANDARD:
Standardizes picture adjustment.
SOFT:
Softens contrast and sharpness.
MANUAL:
User define.
Picture Adjustment
You can change the picture settings of each PICTURE
MODE mode as you like.
CONTRAST:
You can adjust the picture contrast.
: lower
: higher
BRIGHT-1:
You can adjust the picture brightness.
: darker
: brighter
SHARP:
You can adjust the picture sharpness.
: softer
: sharper
COLOUR:
You can adjust the picture colour.
: lighter
: deeper
BRIGHT-2:
You can adjust the back light.
: darker
: lighter
TINT:
You can adjust the picture tint.
: r eddish
: greenish
•You can change the TINT setting when the colour
system is NTSC 3.58, or NTSC 4.43.
18
WHITE BALANCE
COOL:
A bluish white. Using this mode when watching bright
pictures allows you to enjoy a more vivid and bright picture.
NORMAL:
The normal white colour.
WARM:
A reddish white. Using this mode when watching films
allows you to enjoy colours that are characteristic of films.
RESET
You can reset the picture settings you have chosen to the
default settings.
SOUND SETTING
Refer to “Using the TV’s menu” (see page 17) for details of
displaying the menu.
SOUND
BALANCE
OFF
: SELECT
You can enjoy Surround sound with a “live” effect by using
the HYPER SOUND function.
ON:
HYPER SOUND function is turned on.
OFF:
HYPER SOUND function is turned off.
BASS
TREBLE
HYPER SOUND
HYPER SOUND
:MOVE
ENGLISH
Sound Adjustment
You can adjust the sound to your liking.
BASS:
You can adjust the low tone of the sound.
: weaker
: strong
TREBLE:
You can adjust the high tone of the sound.
: weaker
: strong
BALANCE:
You can adjust the volume balance between the left and
right speaker.
: turn the left speaker’s volume level up.
: turn the right speaker’s volume level up.
19
FEATURES
Refer to “Using the TV’s menu” (see page 17) for details of
displaying the menu.
FEATURES
BLUE BACK
OFF
CHILD LOCK
OFF
: SELECT
:MOVE
BLUE BACK
You can set the TV to automatically change to a blue screen
and mute the sound if the signal is weak or absent, or when
there is no input from an external device.
ON:
This function is turned on.
OFF:
This function is turned off.
CHILD LOCK
When the CHILD LOCK mode is on, the TV buttons will be
locked except Power ON/OFF. TV only can be controled by
remote controller.
20
INSTALL
To edit the PR LIST menu
You can edit the programme numbers.
Caution
• Using the NAME, DELETE or INSERT functions
rewrites the current programme numbers list.
Therefore, the programme number of some of
the TV channels will change.
1 Choose PR LIST, then press the OK button
PR LIST
01 ----02 ----03 ----04 ----05 ----06 ----07 ----08 ----09 ----10 -----
NAME
INSERT
11 ----12 ----13 ----14 ----15 ----16 ----17 ----18 ----19 ----20 -----
21 ----22 ----23 ----24 ----25 ----26 ----27 ----28 ----29 ----30 -----
DELETE
2 Follow the operation description of a function
you want to use and operate the function
NAME:
This function registers a channel name (ID) to a TV
channel.
INSERT:
This function changes a programme number of a
TV channel.
DELETE:
This function deletes a TV channel you do not want to
list.
NAME
1 Press t he
channel
/
and
/- buttons to choose a TV
Every time you press the / and / buttons, the
programme number changes and the picture of the
TV channel stored in the programme number appears
on the screen.
2 Press the red button to start the NAME function
PR LIST
01 ----02 ----03 ----04 ----05 ----06 ----07 ----08 ----09 ----10 -----
11 ----12 ----13 ----14 ----15 ----16 ----17 ----18 ----19 ----20 -----
STORE
21 ----22 ----23 ----24 ----25 ----26 ----27 ----28 ----29 ----30 -----
CANCEL
3 Press the / and / buttons to edit the
channel name you want to give the TV channel
PR LIST
01 ----02 JVC
03 ----04 ----05 ----06 ----07 ----08 ----09 ----10 -----
11 ----12 ----13 ----14 ----15 ----16 ----17 ----18 ----19 ----20 -----
STORE
21 ----22 ----23 ----24 ----25 ----26 ----27 ----28 ----29 ----30 -----
CANCEL
4 Press the red button to store the setting
PR LIST
01 ----02 JVC
03 ----04 ----05 ----06 ----07 ----08 ----09 ----10 -----
NAME
INSERT
11 ----12 ----13 ----14 ----15 ----16 ----17 ----18 ----19 ----20 -----
21 ----22 ----23 ----24 ----25 ----26 ----27 ----28 ----29 ----30 -----
DELETE
To return- to the INSTALL menu:
Press th-e BACK- button.
To exit a menu instantly:
Press the MENU button.
22
INSTALL
INSERT
1 Press t he / and / buttons to choose a
program number for which you want
Every time you press the / and / buttons, the
programme number changes and the picture of the
TV channel stored in the programme number appears
on the screen.
PR LIST
11 ----12 ----13 ----14 ----15 ----16 ----17 ----18 ----19 ----20 -----
01 ----02 ----03 ----04 ----05 ----06 ----07 ----08 ----09 ----10 -----
NAME
INSERT
21 ----22 ----23 ----24 ----25 ----26 ----27 ----28 ----29 ----30 -----
DELETE
2 Press the green button to start the INSERT
function-
4 Press the green button to insert the channel into
the new program number
PR LIST
01 ----02 ----03 ----04 ----05 ----06 ----07 ----08 ----09 ----10 -----
NAME
INSERT
11 ----12 ----13 ----14 ----15 ----16 ----17 ----18 ----19 ----20 -----
21 ----22 ----23 ----24 ----25 ----26 ----27 ----28 ----29 ----30 -----
DELETE
To return to the INSTALL menu:
Press the BACK button.
To exit a menu instantly:
Press the MENU button.
PR LIST
11 ----12 ----13 ----14 ----15 ----16 ----17 ----18 ----19 ----20 -----
01 ----02 ----03 ----04 ----05 ----06 ----07 ----08 ----09 ----10 -----
INSERT
3 Press t he / and
program number
21 ----22 ----23 ----24 ----25 ----26 ----27 ----28 ----29 ----30 -----
CANCEL
/
buttons to choose a new
PR LIST
01 ----02 ----03 ----04 ----05 ----06 ----07 ----08 ----09 ----10 -----
INSERT
11 ----12 ----13 ----14 ----15 ----16 ----17 ----18 ----19 ----20 -----
21 ----22 ----23 ----24 ----25 ----26 ----27 ----28 ----29 ----30 -----
CANCEL
23
PC MENU
LT-17S2 PC support mode list
Mode NO.
Mode Name
Resolution
H Freq. (kHz)
V Freq. (Hz)
1
VGA 60 Hz
640x480
31.469
59.941
2
SVGA 56 Hz
800x600
35.16
56.25
3
SVGA 60 Hz
800x600
37.879
60.317
4
XGA 60 Hz
1024x768
48.363
60.004
5
WXGA
1280x768
47.73
60
LT-23S2
add the support mode list for LT-23S2
The resolution and the freauencies which are
displayed on the screen may not exactly same as
this list.
The Auto SETUP functions will work automatically
when you change the resolution of PC mode. The
picture position, clock, and phase will be optimized.
Notice when using LCD-TV under PC mode:
1. Whenever your LCD-TV is connected to the PC,
or you have changed the PC display mode.
Please use Auto Setup to automatically
configure your display to the best settings.
2. You must perform auto setup before making
any adjustment.
26
PC MENU (In PC mode only)
This TV also has a number of functions on PC mode,
you can operate using pc menus.
WHITE BALANCE:
You can adjust the picture colour mode.
COOL:
A bluish white. Using this mode when watching bright
pictures allows you to enjoy a more vivid and bright picture.
PC MENU
PC PICTURE POSITION
NORMAL:
PC PICTURE
The normal white colour.
SOUND
: SELECT
OK : MOVE
1024 X 768
V : 60 Hz
A reddish white. Using this mode when watching films
allows you to enjoy colours that are characteristic of films.
MANUAL:
User defined.
NOTE: When WHITE BALANCE at COOL, NORMAL
and WARM, R,G,B and bars in Gray and can not move.
PC PICTURE POSITION
You can adjust the picture settings as following functions.
PC PICTURE POSITION
AUTO SETUP
H POSITION
V POSITION
CLOCK
PHASE
RESET
:MOVE
: SELECT
AUTO SETUP:
You can adjust picture settings automatically for optimized
picture position, clock and phase.
H POSITION:
You can adjust picture horizontal position.
: left
: right
V POSITION:
You can adjust picture vertical position.
: down
: up
CLOCK:
You can adjust CLOCK to fine tune picture.
PHASE:
You can adjust PHASE to fine tune picture.
RESET:
You can select RESET mode for default setting.
PC PICTURE
You can change the picture settings of each PICTURE
MODE mode as you like.
PC PICTURE
CONTRAST
BRIGHT-2
WHITE BALANCE
R
G
B
RESET
: SELECT
COOL
:MOVE
CONTRAST:
You can adjust the picture contrast.
: lower
: higher
BRIGHT-2:
You can adjust the back light.
: darker
: lighter
R:
You can adjust the Red color component.
: reddish
: redder
G:
You can adjust the Green color component
: greenish
: greener
B:
You can adjust the Blue color component.
: blueish
: bluer
RESET:
You can select RESET mode for default setting.
SOUND
You can adjust the sound to your liking.
SOUND
BASS
TREBLE
BALANCE
HYPER SOUND
: SELECT
OFF
:MOVE
BASS:
You can adjust the low tone of the sound.
: weaker
: strong
TREBLE:
You can adjust the high tone of the sound.
: weaker
: strong
BALANCE:
You can adjust the volume balance between the left and
right speaker.
: turn the left speaker’s volume level up.
: turn the right speaker’s volume level up.
HYPER SUOUND:
You can enjoy Surround sound with a “live” effect by using
the HYPER SOUND functions.
ON: HYPER SOUND function is turned on.
OFF: HYPER SOUND function is turned off.
25
ENGLISH
H : 48 kHz
WARM:
PC MENU
PC support mode list
LT-17S2
Mode NO.
Mode Name
Resolution
H Freq. (kHz)
V Freq. (Hz)
1
VGA 60 Hz
640x480
31.469
59.941
2
SVGA 56 Hz
800x600
35.16
56.25
3
SVGA 60 Hz
800x600
37.879
60.317
4
XGA 60 Hz
1024x768
48.363
60.004
5
WXGA
1280x768
47.73
60
Mode Name
Resolution
H Freq. (kHz)
V Freq. (Hz)
1
VGA 70 Hz
640x350
31.469
70.087
2
VGA 60 Hz
640x480
31.469
59.941
3
SVGA 56 Hz
800x600
35.16
56.25
4
SVGA 60 Hz
800x600
37.879
60.317
5
XGA 60Hz
1024x768
48.363
60.004
6
XGA 70Hz
1024x768
56.476
70.069
7
MAC VGA
640x480
35
66.667
8
US TEXT
720x400
31.469
70.087
9
WXGA
1280x768
47.73
60
LT-23S2
Mode NO.
26
The resolution and the freauencies which are
displayed on the screen may not exactly same as
this list.
The Auto SETUP functions will work automatically
when you change the resolution of PC mode. The
picture position, clock, and phase will be optimized.
Notice when using LCD-TV under PC mode:
1. Whenever your LCD-TV is connected to the PC,
or you have changed the PC display mode.
Please use Auto Setup to automatically
configure your display to the best settings.
2. You must perform auto setup before making
any adjustment.
Additional preparation
Connecting external equipment
Connect the equipment to the TV, making the correct rear
panel and front panel connections.
VCR (composite signal)
VCR (composite signal/S-VIDEO signal)
Before connecting anything:
• Read the manuals that came with the equipment.
Depending on the equipment, the connection method
may be different from the diagram. Also, the equipment
settings may need to change depending on the
connection method.
• Turn off all the equipment including the TV.
• The “Specifications” on page 29 give the details of the
EXT terminals. If you are connecting equipment not
listed in the following connection diagram, see the table
to choose the best EXT terminal.
• Connecting cables are not supplied.
DVD player (composite signal/S-VIDEO signal)
DVD player (component signal)
PC
TV game (component signal)
TV game (composite signal/S-VIDEO signal)
Headphones
Camcorder (composite signal/S-VIDEO signal)
Video cable
Audio cable
S-VIDEO cable
Component cable
Stereo mini jack
D-SUB cable
8
12
14
• If the VCR'saudio output is in mono, connect the VCR's
AUDIO OUT (audio output) terminal and TV's Audio
L/MONO input terminal with an audio cable.
• Progressive scanning singnals are not availavle.
VIDEO-1
VIDEO-1
S-VIDEO
S-VIDEO
VIDEO
VIDEO
VIDEO
VIDEO
VIDEO
L/MONO
AUDIO
L/MONO
R
AUDIO
COMPONENT
(VIDEO-2)
R
Y
Pb/Cb
COMPONENT
(VIDEO-2)
Pr/Cr
L/MONO
R
Y
AUDIO
Pb/Cb
Pr/Cr
DC IN
(12V)
14
DC IN
(12V)
PC IN
D-SUB
15 PIN
DC IN
(19V)
PC IN
D-SUB
15 PIN
PC
AUDIO
IN
AUDIO
OUT
R
L
SUBWOOFER
OUT
L/MONO
AUDIO
R
PC IN
D-SUB
15 PIN
PC AUDIO IN
R
L
SUBWOOFER
12
8
27
Additional preparation
Equipment which can output the S-VIDEO
signal (Y/C signal) such as an S-VHS VCR
Connect the equipment to an EXT terminal.
You can choose between an S-VIDEO signal (Y/C signal).
Connecting headphones
Connect the headphones with a stereo mini-jack (3.5 mm
diameter) to the headphone socket at the TV.
Connecting the PC
Connecting Speakers/Amplifier
See the Audio equipment connection diagram, then connect
the audio equipment you desire to the TV.
You can use external front speakers to listen to the TV
sound instead of the TV speakers.
Before connecting anything:
• Read the manuals provided with the amplifier and
speakers.
• Turn the TV and amplifier off.
• To prevent magnetism from the speakers adversely
affecting the TV screen, use magnetically-shielded
speakers for the front speakers.
• Note that connecting cables are not supplied.
Connect the PC with the D-SUB cable to the D-SUB in at
the TV, and connect the sound device of PC with a stereo
mini-jack to PC AUDIO IN.
You can adjust the picture by AUTO SETUP function when
the PC signal is output correctly, the AUTO SETUP function
can optimize the picture position, clock and phase. You can
have a fine vision after AUTO SETUP function executed.
without terminal covers
R
L
SUBWOOFER
PC
AUDIO
IN
R
AUDIO SUBWOOFER
OUT
OUT
L
1 Amplifier
2 External speakers (Magnetic-shielded type)
• The output from the AUDIO OUT terminal is not
interrupted by headphone connection to the TV. You
cannot cut the sound from the front speaker even if you
connect a headphone to the TV.
• Adjust the volume of the external speakers with the
amplifier.
• Connect the subwoofer which carried an amplifier.
• The subwoofer is interlocked with the TV volume.
• You can not connect an amplifier and a Subwoofer
at the same time.
28
Troubleshooting
If a problem arises while you are using the TV, please read this troubleshooting guide carefully before you ask to have the TV
repaired. You may be able to fix it easily by yourself. For example, if the mains plug is disconnected from the mains outlet, or the
TV aerial has problems, you may think there is a problem with the TV itself.
Important:
• This troubleshooting guide only covers problems whose causes are not easy to decide. If you have a question when you are
operating a function, read the page(s) for that function carefully, not this troubleshooting guide.
• If you follow the advice in this troubleshooting guide without any success, unplug the mains plug and ask for your TV to be
repaired. Do not attempt to repair the TV by yourself or to remove the rear cover of the TV.
If you cannot turn on the TV
If you cannot turn off the TV
• Make sure to set the VCR/TV/DVD switch to the TV
position. You cannot turn the TV off when the VCR/TV/
DVD switch is set to the VCR or DVD position.
No picture or no sound
• Have you chosen a TV channel with very poor
reception? If so, the BLUE BACK function will be
activated: the entire screen becomes blue, and the sound
is muted. If you still want to view the TV channel,
follow the description “FEATURES” on page 20 to
change the BLUE BACK function setting to OFF.
• If the SOUND SYSTEM setting for a tTV channel is
incorrect, it may prevent the sound from being issued.
Follow the description “INSTALL” on page 21 to use the
MANUAL function to try to change the SOUND SYSTEM
setting.
Poor sound
• Have you adjusted BASS or TREBLE properly? If not,
follow the description “Sound Adjustment” on page 19.
If the TV does not respond to the remote
control
• Have the batteries of the remote control worn out?
Follow the description “Putting the batteries into the
Remote control” on page 5 and replace them with new
batteries.
• Have you attempted to use the remote control from the
sides or rear of the TV or from more than seven metres
away from the TV? Use the remote control in the front of
your TV or from less than seven metres away.
• When you are viewing a teletext programme, you cannot
operate the menus. Press the
button to return to the
ordinary TV programme, and then try operating the
menus.
• If the TV suddenly stops responding, disconnect the
power cord of the TV from the AC outlet.
Connect them to the AC outlet again to turn on the TV.
If the TV returns to a normal state, it is not a failure.
Poor picture
• If noise (snow) totally blocks out the picture, there may
be a problem with the aerial or aerial cable. Check the
following to try to solve the problem:
–Have the TV and aerial been connected properly?
–Has the aerial cable been damaged?
–Is the aerial pointing in the right direction?
–Is the aerial itself faulty?
• If the TV or aerial suffers interference from other
equipment, stripes or noise may appear in the picture.
Move any equipment such as an amplifier, personal
computer, or a hair drier, that can cause interference
away from your TV. Or try moving the TV. If the aerial
suffers interference from a radio tower or high-voltage
wire, please contact your local dealer.
• If the TV suffers interference from signals reflecting
from mountains or buildings, double-pictures (ghosting)
will occur. Try to change the aerial’s direction or replace
it with one with better directionality.
• Have the COLOUR and BRIGHT settings been adjusted
properly? Follow the description “Picture Adjustment”
on page 18 to try to adjust them properly.
• Videotaping teletext is not recommended because it may
not record correctly.
• When viewing images from commercially available
video software products, or videos from videotapes
which have been recorded improperly, the top of the
image may be distorted. This is due to the condition of
the video signal. There is nothing wrong with the TV.
29
ENGLISH
• Are the AC plug on the power cord from the TV is
connected to AC outlet?
• Make sure to set the VCR/TV/DVD switch to the TV
position. You cannot turn the TV on when the VCR/TV/
DVD switch is set to the VCR or DVD position.
Troubleshooting
Other concerns
• When the SLEEP TIMER function operates, the TV is
automatically turned off. If the TV suddenly turns off,
try to press the
(standby) button to turn on the TV
once again. If the TV goes back to normal, there is no
problem.
• When the TV is receiving a wide-screen signal (WSS) or
a signal from an external device affecting the screen
size, the ZOOM mode automatically changes. When you
want to resume the previous ZOOM mode, press the
ZOOM button again.
• It takes a short period of time from the time an operation
such as changing channels is performed until an image is
displayed. This is not a malfunction. This is the time
required for the image to stabilize before it can be
displayed.
• The TV may make a crackling sound due to a sudden
change in temperature. The picture or sound may be
normal. If you hear crackling sounds frequently while
you are viewing the TV, there may be other causes. As a
precaution, ask your service technician to inspect it.
• In the twin pictures mode the sub-picture may disappear
when the external device is operated. If this happens,
press the
button and display the sub-picture again.
• The top of the TV and the screen may become hot during
use but this has no affect on the performance of the TV.
Ensure that the ventilation holes are not blocked.
• When the picture is unstable, the screen may become
white for a moment. This occurs when the signal which
drives the liquid crystal is missing. This is not a
malfunction.
• When a still image has been displayed for a long period,
a faint residual image may remain on the screen for a
short time after the power has been turned off or when
another image is displayed. This is not a malfunction and
the image will eventually disappear.
• When the correct picture has not been displayed on screen,
the following error messages will display on screen.
NO SIGNAL - TV recived no signal from PC, you may
check your PC is working correctly or not.
CABLE NO INSERT - The cable is not connected correctly.
Ensure that the cable is connected correctly.
OUT OF RANGE - The picture resolution is out of limit.
Ensure that the PC picture resolution is set correctly.
30
Specifications
Item
Model
LT-23S2
LT-17S2
Broadcasting systems
CCIR B/G, I, D/K
Colour systems
PAL, SECAM
• The EXT terminals also support the NTSC 3.58/4.43 MHz system.
Channels and frequencies
• E2-E12, E21-E69, S1-S41, X, Y, Z, Z+1, Z+2, ITALY A-H, ITALY H+1, ITALY H+2, F2-F10, F21-F69, R1-R12,
R21-R69, IR A-J
• French cable TV channel of broadcast frequencies 116 - 172 MHz and 220 - 469 MHz
Sound-multiplex systems
A2 (B/G, D/K), NICAM (B/G, I, D/K ) system
Teletext systems
FLOF (Fastext), WST (World Standard System)
Power requirements
Power consumption
TV : 12V DC, AC adapter : 100 - 240 V AC, 50/60 Hz
60 W, Standby: 3 W
TV : 24V DC, AC adapter : 100 - 240 V AC, 50/60 Hz
120W, Standby: 3 W
Screen size
Viewable area 43.5 cm(measured diagonally)
1280 x 768 (W-XGA)
Viewable area 58.2cm(measured diagonally)
Display resolution
Audio output
Rated Power output: 3 W + 3 W
Rated Power output: 5 W + 5 W
Speakers
5.4 cm round x 2
VIDEO -1 terminal
• Video input, S-VIDEO (Y/C) input and Audio L/ MONO and R inputs are available.
VIDEO -2 terminal
• Component Video(Y,Pb,Pr) input and Audio L/MONO and R inputs are available.
AUDIO OUT terminal
RCA connectors x 3
• Audio L/R outputs and a subwoofer output are available.
PC IN terminal
Analog RGB : D-SUB (15 pins) x 1, PC AUDIO IN x 1
• PC signal and audio inputs are available.
Headphone jack
Stereo mini-jack (3.5 mm in diameter)
Dimensions (W x H x D)
465 mm x 325 mm x 78 mm (TV only)
465 mm x 363 mm x 190 mm
619 mm x 436 mm x 86 mm (TV only)
619 mm x 498 mm x 227 mm
Weight
6.1 kg (TV only)
7.3 kg
7.8 kg (TV only)
9.8 kg
Accessories
Remote control unit x 1 (RM-C1860)
AA/R6 dry cell battery x 2
AC adapter x 1 (HP-OL060D031)
Power cord x 1
Remote control unit x 1 (RM-C1860)
AA/R6 dry cell battery x 2
AC adapter x 1 (HP-OW120A033)
Power cord x 1
Design and specifications subject to change without notice.
Pictures displayed on the screen using this TV’s ZOOM functions should not be shown for any commercial or demonstration purpose
in public places (cafes, hotels, etc.) without the consent of the owners of copyright of the original picture sources, as this constitutes an
infringement of copyright.
31
5
© 2004 Victor Company of Japan, Limited
0604-MK-TU