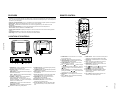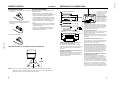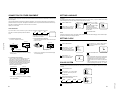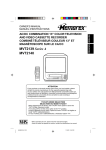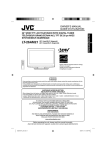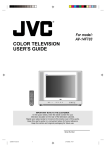
1
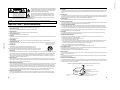
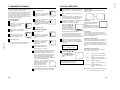
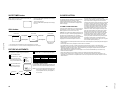
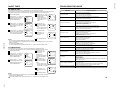
Model
AC Power Input:
AC Power Consumption:
TV Color System:
Picture Tube:
Audio Power Output Rating:
Speaker:
Input:
EARPHONE jack:
C-T2021
C-T1421
110V-240V 50Hz/60Hz (Rating), 100V-260V 50Hz/60Hz (Operating)
44 Watts
70 Watts
PAL-M, PAL-N, NTSC-M
33.6 cm (measured diagonally)
48 cm (measured diagonally)
0.75+0.75 Watts (monaural)
1.5 + 1.5. Watts (monaural)
10.8 cm x 4.5 cm Full Range, 8 ohm x 2 10.8 cm x 4.5 cm Full Range, 4 ohm x 2
Video: 1.0Vp-p 75 ohm
Audio: 300 mV, 47K ohm
3.5 mm ø x 1
No.51843
Tuner Type:
Remote Control:
Receiving Channels:
181 Channel, Quartz PLL Frequency Synthesized
Infrared, Direct Access, 2 x AAA batteries
VHF
2-13
UHF
14-69
CATV
01-97 (5A)-(A-3)
98-99 (A-2)-(A-1)
14-22 (A)-(I)
23-36 (J)-(W)
37-65 (AA)-(FFF)
66-125 (GGG)-(125)
Antenna Input Impedance:
75 Ohm (VHF/UHF/CATV) Coaxial Input
Dimensions:
Weight:
46 cm (W) x 36.3 cm (D) x 31.8 cm (H)
9.5 kg
For models:
C-T1421
C-T2021
COLOR TELEVISION
USER'S GUIDE
Instruction Book
SPECIFICATIONS
60 cm (W) x 48 cm (D) x 44.6 cm (H)
17.5 kg
ACCESSORIES:
Remote Control
AAA Batteries x 2
300-75 ohm Matching Transformer
Telescopic Antenna (C-T1421 only)
Specifications are subject to change without notice.
POWER
1
2
4
3
5
6
7
8
9
0
QUICK VIEW
SLEEP
CALL
MUTING
CH
VOL
VOL
MENU
CH
ENTER
– SET +
POWER
RESET
TV/VCR
TV/CAP/
TEXT
– VOLUME +
VIDEO — AV2 IN — AUDIO
– CHANNEL +
EARPHONE
STAND BY ON TIMER
CH. 1/2
–
ON/
OFF
SET
MENU
+
ENTER
RESET
VICTOR COMPANY OF JAPAN LIMITED
IMPORTANT NOTE TO THE CUSTOMER:
In the space below, enter the serial number for your
television (located on the rear of the television cabinet).
Staple your sales receipt or invoice to the inside cover of this guide.
Keep this user's guide in a convenient place for future reference.
Keep the carton and original packaging for future use.
Serial Number
C-T1421
16
CAUTION: TO REDUCE THE RISK OF ELECTRIC
SHOCK, DO NOT REMOVE COVER
(OR BACK). NO USER-SERVICEABLE
PARTS INSIDE. REFER SERVICING
TO QUALIFIED SERVICE PERSONNEL.
The exclamation point within an equilateral triangle is intended to
alert the user to the presence of important operating and maintenance (servicing) instructions in the literature accompanying the
appliance.
CAUTION: Changes or modifications not expressly approved by the party responsible for compliance with the FCC Rules
could void the user's authority to operate this equipment.
WARNING: TO PREVENT FIRE OR SHOCK HAZARD, DO NOT EXPOSE THIS TV SET TO RAIN OR MOISTURE:
IMPORTANT SAFEGUARDS
No.51843
1. READ INSTRUCTIONS
All the safety and operating instructions should be read before the unit is operated.
2. RETAIN INSTRUCTIONS
The safety and operating instructions should be retained for future reference.
3. HEED WARNINGS
All warnings on the unit and in the operating instructions should be adhered to.
4. FOLLOW INSTRUCTIONS
All operating and use instructions should be followed.
5. CLEANING
Unplug this unit from the wall outlet before cleaning. Do not use liquid cleaners or aerosol cleaners. Use a damp cloth for cleaning
the exterior cabinet only.
6. ATTACHMENTS
The manufacturer of this unit does not make any recommendations for attachments, as they may cause hazards.
7. WATER AND MOISTURE
Do not use this unit near water. For example, near a bathtub, washbowl, kitchen sink, laundry tub, in a wet basement, or near a
swimming pool.
PORTABLE CART WARNING
(symbol provided by RETAC)
8. ACCESSORIES
Do not place this unit on an unstable cart, stand, tripod, bracket, or table.
The unit may fall, causing serious injury, and serious damage to the unit.
8A. An appliance and cart combination should be moved with care. Quick stops, excessive
force, and uneven surfaces may cause the appliance and cart combination to overturn.
S3126A
9. VENTILATION
Slots and openings in the cabinet back or bottom are provided for ventilation, and to ensure reliable operation of the unit, and to
protect it from overheating. These openings must not be blocked or covered. The openings should never be blocked by placing
the unit on a bed, sofa, rug, or other similar surface. This unit should never be placed near or over a radiator or heat source.
This unit should not be placed in a built-in installations such as a bookcase or rack unless proper ventilation is provided or the
manufacturer's instructions have been adhered to.
10. POWER SOURCE
This unit should be operated only from the type of power source indicated on the rating plate. If you are not sure of the type of
power supply to your home, consult your appliance dealer or local power company. For units intended to operate from battery
power, or other sources, refer to the operating instructions.
11. GROUNDING OR POLARIZATION
This unit is equipped with a polarized alternating-current line plug (a plug having one blade wider than the other). This plug will fit
into the power outlet only one way. This is a safety feature. If you are unable to insert the plug fully into the outlet, try reversing
the plug. If the plug should still fail to fit, contact your electrician to replace your obsolete outlet. Do not defeat the safety purpose
of the polarized plug, if your unit is equipped with a 3-wire grounding-type plug, a plug having a third (grounding) pin. This plug
will only fit into a grounding-type power outlet. This too, is a safety feature. If you are unable to insert the plug into the outlet,
contacts your electrician to replace your obsolete outlet. Do not defeat the safety purpose of the grounding-type plug.
12. POWER-CORD PROTECTION
Power-supply cords should be routed so that they are not likely to be walked on or pinched by items placed upon or against
them, paying particular attention to cords at plugs, convenience receptacles, and the point where they exit from the appliance.
C-T1421
The lightning flash with arrowhead symbol, within an equilateral triangle
is intended to alert the user to the presence of uninsulated dangerous
voltage within the product's enclosure that may be of sufficient magnitude to constitute a risk of electric shock persons.
13. LIGHTNING
To protect your unit during a lightning storm, or when it is left unattended and unused for long periods of time, unplug it from the
wall outlet and disconnect the antenna or cable system. This will prevent damage to the unit due to lightning and power line
surges.
14. POWER LINES
An outside antenna system should not be located in the vicinity of overhead power lines or other electric light or power circuits,
or where it can fall into such power lines or circuits. When installing an outside antenna system, extreme care should be taken
to keep from touching such power lines or circuits, as contact with them might be fatal.
15. OVERLOADING
Do not overload wall outlets and extension cords as this can result in a risk of fire or electric shock.
16. OBJECT AND LIQUID ENTRY
Do not push objects through any openings in this unit, as they may touch dangerous voltage points or short out parts that could
result in fire or electric shock. Never spill or spray any type of liquid into the unit.
17. OUTDOOR ANTENNA GROUNDING
If an outside antenna or cable system is connected to the unit, be sure the antenna or cable system is grounded to provide
some protection against voltage surges and built-up static charges, Section 810 of the National Electrical Code, ANSI/NFPA
70, provides information with respect to proper grounding of the mast and supporting structure, grounding of the lead-in wire to
an antenna discharge unit, size of grounding conductors, location of antenna discharge unit, connection to grounding electrodes, and requirements for the grounding electrode.
18. SERVICING
Do not attempt to service this unit yourself as opening or removing covers may expose you to dangerous voltage or other
hazards. Refer all servicing to qualified service personnel.
19. DAMAGE REQUIRING SERVICE
Unplug this unit from the wall outlet and refer servicing to qualified service personnel under the following conditions:
a. When the power-supply cord or plug is damaged.
b. If liquid has been spilled, or objects have fallen into the unit.
c . If the unit has been exposed to rain or water.
d. If the unit does not operate normally by following the operating instructions. Adjust only those controls that are covered by
the operating instructions, as an improper adjustment of other controls may result in damage and will often require
extensive work by a qualified technician to restore the unit to its normal operation.
e. If the unit has been dropped or the cabinet has been damaged.
f . When the unit exhibits a distinct change in performance, this indicates a need for service.
20. REPLACEMENT PARTS
When replacement parts are required, be sure the service technician uses replacement parts specified by the manufacturer or
those that have the same characteristics as the original part.
Unauthorized substitutions may result in fire, electric shock or other hazards.
21. SAFETY CHECK
Upon completion of any service or repairs to this unit, ask the service technician to perform safety checks to determine that the
unit is in proper operating condition.
22. HEAT
The product should be situated away from heat sources such as radiators, heat registers, stoves, or other products (including
amplifiers) that produce heat.
23. NOTE TO CATV SYSTEM INSTALLER
This reminder is provided to call the CATV system installer's attention to Article 820-40 of the NEC that provides guidelines for
proper grounding and, in particular, specifies that the cable ground shall be connected to the grounding system of the building,
as close to the point of cable entry as practical.
EXAMPLE OF ANTENNA GROUNDING AS PER THE NATIONAL ELECTRICAL CODE
ANTENNA LEAD IN WIRE
GROUND CLAMP
ANTENNA DISCHARGE UNIT (NEC
SECTION 810-20)
ELECTRIC
SERVICE
EQUIPMENT
GROUNDING CONDUCTORS (NEC SECTION
810-21)
GROUND CLAMPS
NEC-NATIONAL ELECTRICAL CODE
S2898A
2
POWER SERVICE GROUNDING ELECTRODE
SYSTEM (NEC ART 250, PART H)
3
REMOTE CONTROL
FEATURES
• 181 Channel Tuner - The tuning system is capable of receiving all 68 VHF/UHF standard broadcast channels that are
available in your area. When operating on a cable system, it can tune to the standard VHF channel frequencies plus
up to 113 cable channel frequencies. The actual number of channels received depends upon channel reception in
your area or your cable system.
• On-Screen 3 Language Display - This TV can display the on screen language in English, Spanish or Portuguese.
• ON/OFF Timer - Allows you to automatically turn on or off your TV at a set time.
• Sleep Timer - Operable from the remote control, this TV can be programmed up to 120 minutes to turn off
automatically.
• Picture Control Adjustments - The On-Screen display allows precise remote control adjustment of
BRIGHTNESS, COLOR, CONTRAST, SHARPNESS, TINT.
• Closed Captioned Decoder - Displays text captions or 1/2 of full screen text on the screen for hearing impaired
viewers.
• Front Video Input Jacks - A VCR or other video device may be hooked up.
• Auto Voltage - This TV can be used from a household 110V-240V, 50/60Hz.
1
BACK
2
3
2
4
5
6
7
8
9
0
QUICK VIEW
10
3
4
5
LOCATION OF CONTROLS
FRONT
POWER
1
6
SLEEP
CALL
MUTING
CH
VOL
VOL
MENU
11
12
ENTER
CH
– SET +
13
7
No.51843
RESET
8
TV/AV
14
TV/CAP/
TEXT
9
CH. 1/2
15
AV1 IN
POWER
– VOLUME +
VIDEO — AV2 IN — AUDIO
– CHANNEL +
EARPHONE
VIDEO
AUDIO
STAND BY ON TIMER
–
ON/
OFF
SET
MENU
+
ENTER
RESET
9
POWER
– VOLUME +
VIDEO — AV2 IN — AUDIO
– CHANNEL +
10 11
EARPHONE
STAND BY ON TIMER
–
ON/
1
OFF
SET
MENU
2
+
ENTER
3
RESET
4 5 6
7
8
4
4. STAND BY Indicator - This indicator lights up showing
the unit is in standby mode.
5. ON TIMER Indicator - This indicator lights up when ON
TIMER program is turned ON.
6. Remote Sensor - Signals from the Remote Control unit
are received here.
7. AV 2 IN Jacks (Front) - Audio and video signal cables
from an external source can be connected here.
8. EARPHONE Jack - Plug an earphone with an 1/8
miniplug into this jack for listening.
9. AC Power Cord - Connect to the AC outlet.
10. VHF/UHF IN (ANT) Jack - Connect a VHF/UHF
antenna or CATV cable to this jack.
11. AV 1 IN Jacks (Rear) - Audio and video signal cables
from an external source (ex. VCR) can be connected
here.
8. RESET- Button - Press to reset the On-Screen picture
adjustments, clock setting and ON/OFF timer setting.
9. TV/AV Button - Switches between the TV and external
input sources.
10. CALL - Displays the current status time, channel (or
Input), the present settings on the TV screen.
11. MUTING Button - Press to turn off the sound. Press
again to turn the sound back on.
12. VOL / Buttons - Press the
button to increase,
or the
button to decrease the volume level.
13. ENTER Button - Press to enter selected setup.
14. TV/CAP/TEXT (Closed Caption) Button - Switches
between Caption, Text and TV modes for ClosedCaptioned programs.
15. CH. 1/2 Button - Switches between Channel 1 and
Channel 2 in the Closed Caption mode.
5
C-T1421
1. POWER Button - Press the POWER button on the front
panel to put the TV into standby mode.
2. VOLUME +/– Buttons - Press to raise or lower the
volume of the sound.
(MENU Buttons) - Press the both buttons to display the
On-Screen menu function.
(SET +/ – Buttons) - Press to select the desired setting
during On-Screen operations.
3. CHANNEL +/– Buttons - Press to select a higher or
lower numbered channel set into memory.
(Power on function) - You can also turn on the TV by
pressing the CHANNEL + or – button on the front panel
when the TV is in standby mode.
(ENTER Button) - Press to enter or select information
for On-Screen operations.
(RESET Button) - Press to reset the On-Screen picture
adjustments to their factory preset positions.
1. POWER Button - Press to turn the TV on or off when
the TV is standby mode.
2. 10-key pad - Allows direct access to any channel.
3. QUICK VIEW Button - Switches between the present
channel and the last channel selected.
4. SLEEP TIMER Button - Sets the TV to turn off automatically after up to 120 minutes.
5. CH
/
Buttons - Press the
button to change to
a higher numbered channel set into memory. Press the
button to change to a lower numbered channel set
into memory.
(Power on function) - You can also turn on the TV by
pressing the CHANNEL
or
button on the remote
control when the TV is in standby mode.
6. MENU Button - Press to display the On-Screen menu
function.
7. SET +/– Buttons - Press to select the desired setting
during On-Screen operations.
(CONTINUED)
BATTERY INSTALLATION
BATTERY PRECAUTIONS
1. Open the battery compartment cover in the direction
of the arrow.
The precautions below should be followed when using
batteries in this device:
1. Use only the size and type of batteries specified.
2. Be sure to follow the correct polarity when installing the
batteries as indicated in the battery compartment.
Reversed batteries may cause damage to the device.
To avoid a potential short circuit, insert the “–” end first.
3. Do not mix different types of batteries together (e.g.
Alkaline and Carbon-zinc) or old batteries with fresh
ones.
4. If the device is not to be used for a long period of time,
remove the batteries to prevent damage or injury from
possible battery leakage.
5. Do not try to recharge batteries not intended to be
recharged; they can overheat and rupture. (Follow
battery manufacturer’s directions.)
2. Install two “AAA” (penlight size) batteries, paying
attention to the polarity diagram in the battery
compartment.
ANTENNA/CATV CONNECTIONS
Combination VHF/UHF Antenna
Single 75 ohm Cable
300 ohm Twin-lead Wire
Take off the Splitter
Splitter
300-75 ohm
Matching Transformer
UHF Antenna
300 ohm Twin-lead Wire
Single 75 ohm Cable
300 ohm Twin-lead Wire
Combiner
(not supplied)
300-75 ohm
Matching Transformer
Converter/Descrambler
Converter/Descrambler
Splitter
A/B Switch
A B
No.51843
Combination VHF/UHF Antenna (Single 75 ohm
Cable or 300 ohm Twin-lead Wire)
EFFECTIVE DISTANCE OF THE REMOTE CONTROL TRANSMITTER
Connect the 75 ohm cable from a combination VHF/UHF
antenna to the Antenna Jack. If your combination antenna has
a 300 ohm Twin-lead Wire, use the 300-75 ohm Matching
Transformer.
Combination VHF/UHF Antenna (Separate VHF and
UHF 300 ohm Twin-leads)
Connect the UHF Twin-lead Wire to a Combiner (not supplied).
Connect the VHF Twin-lead to the 300-75 ohm Matching
Transformer. Attach the Transformer to the Combiner. Attach the
Combiner to the Antenna Jack.
15 FEET
30˚
30˚
AV1 IN
VIDEO
AUDIO
This television has an extended
tuning range and can tune most
cable channels without using a
cable company supplied
converter box. Some cable
companies offer "premium pay
channels" in which the signal is
scrambled. Descrambling these
signals for normal viewing
requires the use of a descrambler
device which is generally
provided by the cable company.
Indoor Antenna
VHF Antenna
Incoming CATV
3. Replace the compartment cover.
C-T1421
REMOTE CONTROL
A single pole antenna is supplied with the unit (C-T1421 only),
insert the antenna holder into the mounting hole on the back of
the cabinet until it locks into place. Attach the antenna plug to
the antenna jack. Adjust the length and angle of the antenna
rod to receive the best possible picture.
Separate VHF/UHF Antennas
Connect the 75 ohm Cable from the VHF antenna and the UHF
antenna Twin-lead to a combiner (not supplied). Attach the
Combiner to the Antenna Jack.
NOTE:If your VHF antenna has a Twin-lead Wire, use the 30075 ohm Matching Transformer, then connect the Transformer to
the Combiner.
For Subscribers to Basic Cable TV Service
For basic cable service not requiring a Converter/Descrambler
box, connect the CATV 75 ohm Coaxial Cable directly to the
Antenna Jack on the back of the television.
For Subscribers to Scrambled Cable TV Service
If you subscribe to a cable service which requires the use of a
Converter/Descrambler box, connect the incoming cable to the
Converter/Descrambler box and connect the output of the box
to the Antenna Jack on the back of the television. Follow the
connections shown left. Set the television to the output of the
Converter/Descrambler box (usually channel 3 or 4) and use
the Converter/Descrambler box to select channels.
For Subscribers to Unscrambled Basic Cable with
Scrambled Premium Channels
If you subscribe to a cable service in which basic cable
channels are unscrambled and premium channels require the
use of a Converter/Descrambler box, you may wish to use a
two-set signal splitter (sometimes called a "two-set coupler")
and an A/B Switch box from the cable installer or an electronics
supply store. Follow the connections shown left. With the switch
in the "B" position, you can directly tune any nonscrambled
channels on your TV. With the switch in the "A" position, tune
your TV to the output of the Converter/Descrambler box (usually
channel 3 or 4) and use the box to tune scrambled channels.
NOTES: • When there is an obstacle between the TV and the transmitter, the transmitter may not operate.
• When direct sunlight, an incandescent lamp, fluorescent lamp or any other strong light shines on the
Remote sensor of the TV, the remote operation may be unstable.
6
7
CONNECTION TO OTHER EQUIPMENT
SETTING LANGUAGE
The exact arrangement you use to interconnect various video and audio components to the TV is dependent on the model
and features of each component. Check the User’s Guide provided with each component for the location of video and audio
inputs and outputs.
This TV can display the channel number, on-screen displays and picture adjustments on the screen in English, Spanish or
Portuguese.
On-screen language selection (step 3) will automatically appear on the screen when you press the MENU button initially.
Select the language you prefer first, then proceed with the other menu options.
The connection diagrams in the following are offered as suggestions. You may need to modify them to accommodate your
particular assortment of components. The diagrams are intended to show component video and audio interconnections only.
Press the TV/AV button to select the AV mode to use the TV as a monitor.
Operate your VCR as usual.
1
Press the MENU button.
2
Press the SET + or – button to
select the LANGUAGE mode,
then press the ENTER button.
TV/AV SELECTION
MENU
CLOCK SET
ON/OFF TIMER
CH SET UP
PICTURE
LANGUAGE / IDIOMA
COLOR AUTO
3
〈 + / — / ENTER / MENU 〉
If you connect the TV to VCR, camcorder, TV game or DVD you can select by pressing the TV/AV button.
Press the TV/AV button repeatedly to select the desired
mode.
TV
AV 1
AV 2
AV1
An indication of input source will display
on the screen for 4 seconds.
3. To connect the TV to a camcorder
To playback from the camcorder, connect the camcorder
to the TV as shown.
1. To connect the TV to a VCR
(ex. Use AV 1 IN jacks to connect it.)
Press the SET + or – button
until the " " indicator points to
the desired language: English
(ENGLISH), Spanish
(ESPAÑOL) or Portuguese
(PORTUGUES), then press the
ENTER button.
LANGUAGE / IDIOMA
〈 + / — / ENTER / MENU 〉
4 Press the MENU button.
NOTE:
If Spanish or Portuguese is chosen, the Closed Caption indicators will be in the selected language, but the Closed Caption
text will not be affected by the language selection.
SETTING CLOCK
You must set the time manually for CALL and ON/OFF TIMER.
Rear of TV
Front of TV
No.51843
VCR
AV1 IN
VIDEO — AV2 IN — AUDIO
VIDEO
VIDEO
To Audio/
Video OUT
AUDIO
1
Press the MENU button.
AUDIO
To Audio
Video OUT
VIDEO
AUDIO
2
Press the SET + or – button
until the indicator next to
"CLOCK SET" begins to flash,
then Press the ENTER button.
(not supplied)
(not supplied)
• Select “AV 1” by pressing the TV/AV button to display
the VCR picture.
TV GAME
Front of TV
VIDEO — AV2 IN — AUDIO
EARPHONES
STAND BY ON TIMER
Press the SET + or – button to set the minute.
If you want to change the hour, press the
RESET button.
CLOCK SET
10 : 00
〈 + / — / ENTER / MENU 〉
〈 + / — / ENTER / RESET / MENU 〉
5
Press the SET + or –
button to set the hour, then
press the ENTER button.
CLOCK SET
0 : 00
〈 + / — / ENTER / RESET / MENU 〉
COLOR SYSTEM
Press the ENTER button.
NOTES:
• After a power failure, disconnection of the power
plug or turning the TV power off by pressing the
POWER button on the front panel, the time
display will be lost. In this case, set present time
again.
• When you set the minute, you can change in 10minutes by holding down the SET + or – button.
The color system is automatically selected, but if the picture is not clear or no color appears, select the color system
manually.
1
Press the MENU button.
2
Press the SET + or – button to select
the “COLOR” option then press the
ENTER button.
(not supplied)
• Select “AV 2” by pressing the TV/AV button to display
the TV GAME picture.
MENU
CLOCK SET
ON/OFF TIMER
CH SET UP
PICTURE
LANGUAGE / IDIOMA
COLOR AUTO
• Select “AV 2” by pressing the TV/AV button to display
the camcorder picture.
3
2. To connect the TV to a TV Game
The TV can also be used as a display device for many
video games. However, due to the wide variety of
different types of signal generated by these devices and
subsequent hook-up variations required, they have not
all been included in the suggested connection diagrams.
You'll need to consult each component's Owner's
Manual for additional information.
To Audio/Video OUT
4
EARPHONES
STAND BY ON TIMER
3
MENU
CLOCK SET
ON/OFF TIMER
CH SET UP
PICTURE
LANGUAGE / IDIOMA
COLOR AUTO
〈 + / — / ENTER / MENU 〉
Press the ENTER button to select the
desired COLOR SYSTEM.
AUTO
PAL-N
PAL-M
NTSC
MENU
CLOCK SET
ON/OFF TIMER
CH SET UP
PICTURE
LANGUAGE / IDIOMA
COLOR PAL-M
〈 + / — / ENTER / MENU 〉
8
Press the MENU button.
9
C-T1421
4
This TV is equipped with a channel memory feature which
allows channels to skip up or down to the next channel set
into memory, skipping over unwanted channels.
Before selecting channels, they must be programmed into
the TV's memory. In addition to normal VHF and UHF
channels, this TV can receive up to 113 Cable TV channels.
To use this TV with an antenna, set the TV/CATV menu
option to the TV setting. When shipped from the factory, this
menu option is in the CATV setting.
AUTOMATIC CHANNEL MEMORY
TV/CATV SELECTION
3
1
2
3
4
5
1
Press the MENU button.
2
Press the SET + or – button until the
indicator next to "CH SET UP" begins
to flash, then press the ENTER
button.
Press the MENU button.
Press the SET + or – button until the
indicator next to "CH SET UP"
begins to flash, then press the
ENTER button.
Press the SET + or – button until the
indicator next to "TV/CATV" begins
to flash.
Press the ENTER button to select
the TV or CATV mode. The arrow
indicates the selected mode.
MENU
CLOCK SET
ON/OFF TIMER
CH SET UP
PICTURE
LANGUAGE / IDIOMA
COLOR AUTO
〈 + / — / ENTER / MENU 〉
4
Press the SET + or – button until the
indicator next to "AUTO CH
MEMORY" begins to flash, then press
the ENTER button. The TV will begin
memorizing all the channels available
in your area.
MENU
CLOCK SET
ON/OFF TIMER
CH SET UP
PICTURE
LANGUAGE / IDIOMA
COLOR AUTO
〈 + / — / ENTER / MENU 〉
Press the POWER button on the front panel to put the
TV into standby mode. The STAND BY indicator will
light.
2
Press the POWER button on the remote control to turn
on the TV.
You can also turn on the TV by pressing the CHANNEL UP or DOWN button on the front panel or on the
remote control when the TV is in standby mode.
3
The VOLUME can be adjusted to a desired level by
pressing the VOL (VOLUME)
or
button.
TV CATV
AUTO CH MEMORY
ADD / DELETE
Press the MENU button.
2
Press the SET + or – button until the
indicator next to "CH SET-UP" begins
to flash, then press the ENTER
button.
〈 + / — / ENTER / MENU 〉
Press the MENU button.
3
No.51843
4
5
Press the SET + or – button until the
indicator next to "ADD/DELETE"
begins to flash, then press the
ENTER button.
TV CATV
AUTO CH MEMORY
ADD / DELETE
Adjust the volume level by
or
pressing the VOL
button. The volume level will be
indicated on the screen by
green bar. As the volume level
VOLUME
increases, so do the number of
bar. If the volume decreases,
the number of green bar also decreases.
〈 + / — / ENTER / MENU 〉
MENU
CLOCK SET
ON/OFF TIMER
CH SET UP
PICTURE
LANGUAGE / IDIOMA
COLOR AUTO
〈 + / — / ENTER / MENU 〉
4
CH SET UP
TV CATV
AUTO CH MEMORY
ADD / DELETE
Set the TV/CATV menu option to the appropriate
position. When shipped from the factory, this menu
option is in the CATV setting. See "TO MEMORIZE
CHANNELS".
〈 + / — / ENTER / MENU 〉
TV
CATV
Press the ENTER button to select ADD or DELETE.
If an unmemorized channel was selected (step 4), the
channel indication will be red. Press the CH + or –
button if you wish to ADD the unmemorized channel.
The channel indicator will change from red to green
when a channel is added and the channel will be
memorized. If a memorized channel was selected (step
4), the channel indication will be green.
Press the CH + or – button if you wish to DELETE the
6
32
The sound level will be indicated on the TV screen by
green bars and a number. As the sound level increases, so do the number of bars and the number on
the screen. The same is true for decreasing the level.
Select the desired channels to be
added or deleted using the 10-key
pad (0-9) or the CH + or – button.
channel from memory. The channel
indicator will change from green to
red when a channel is deleted.
Repeat Steps 4 and 5 for each
channel to be added or deleted.
QUICK VIEW button
Returns to the channel viewed just before the channel
currently onscreen.
CH 012
CH 007
CH SET UP
Press the MENU button.
1
NOTE: Contact your cable company to determine the
type of cable system used in your area.
10
1
TO ADD/DELETE CHANNELS
CH SET UP
C-T1421
TV BASIC OPERATION
TO MEMORIZE CHANNELS
ADD
CH 012
5
- VHF/UHF channels
- CABLE TV channels
CH (CHANNEL)
and
buttons
Press and release the CH
(CHANNEL)
or
button.
The channel automatically stops
at the next channel set into
memory.
MUTING button
MUTING
The MUTING button instantly turns the
volume down completely when you
press it.
Press MUTING button and the volume
level will instantly go to zero. To restore
the volume to its previous level, press MUTING button again.
10-key pad (0-9)
Press these buttons to select a channel. The channel
number will appear on the upper right corner of the TV
screen. If an invalid channel number is selected, the display
will revert to the original channel.
TV Mode Direct Channel Selection
When the TV/CATV menu option is in the TV position, all
channels can be instantly selected by using two buttons.
(For example, to select channel 2, press "0", then "2". If you
press only "2", channel selection will be delayed for a few
seconds). For channels 10 and above, press the 2 digits in
order.
CATV Mode Direct Channel Selection
When the TV/CATV menu option is in the CATV position,
channels can be selected as follows:
CH 012
CH. 1-9
CH. 10-12
For proper operation, before selecting channels,
they should be set into the TV's memory.
See "TO MEMORIZE CHANNELS".
CH. 13-99
CH. 100-125
〈 + / — / 0-9 / ENTER / MENU 〉
Press the MENU button after adding or deleting all of
the desired channels, to return to normal TV viewing.
Press "0" twice, then 1-9 as needed.
Example, to select channel 2, press
"002".
Press "0", then remaining 2 digits.
Example, to select channel 12, press
"012".
Press the 2 digits in order.
Example, to select channel 36, press
"36".
Press the 3 digits in order.
Example, to select channel 120, press
"120".
NOTE: If the station being viewed stops broadcasting, the
TV will automatically shut off after 15 minutes.
11
SLEEP TIMER button
CLOSED CAPTION
The Sleep Timer can turn the TV off for you after you fall
asleep. Program it to work in intervals of 10 minutes, for
a total time of up to 120 minutes.
SLEEP
120
• To change the sleep timer setting:
Press the SLEEP button repeatedly until the display
turns to desired time.
• To cancel the sleep time:
Press the SLEEP button repeatedly until the display
turns to 0.
WHAT IS CLOSED CAPTIONING?
This television has the capability to decode and display
Closed Captioned television programs. Closed
Captioning will display text on the screen for hearing
impaired viewers or it will translate and display text in
another language.
TO VIEW CLOSED CAPTIONS
Press the TV/CAP/TEXT button on the remote control to
switch between normal TV and the two Closed Caption
Modes (Captions and 1/2 of Full Screen Text).
CALL button
Press the CALL button to display the current informations on the screen.
Press Once
CLOCK
Press Twice
8 : 30
Color System
PAL-M
CAPTION CH1
CH 012
CAPTION CH1
Closed Caption*
Press 3 times
Channel No.
Closed Caption*
No.51843
Clear the current
informations**
* This indication dose not appear when the Closed Capition is not active.
** In the AV mode, “AV 1” or “AV 2” continues to display when there is no signal.
PICTURE ADJUSTMENTS
You can adjust the settings for color, sharpness, contrast, brightness, tint (NTSC only) and component.
1
Press the MENU button.
2
Press the SET + or – button
until the indicator next to
"PICTURE" begins to flash,
then press the ENTER button.
3
Press the ENTER button
repeatedly to select the
item you want to adjust.
4
Press the SET + or – button to adjust the setting.
BRIGHTNESS
CONTRAST
COLOR
TINT (NTSC only)
SHARPNESS
MENU
CLOCK SET
ON/OFF TIMER
CH SET UP
PICTURE
LANGUAGE / IDIOMA
COLOR AUTO
+
–
increase brightness
increase contrast
be brilliant color
be greenish color
makes picture clearer
decrease brightness
decrease contrast
be pale color
be reddish color
makes picture softer
Captions: This Closed Caption Mode will display text on
the screen in English or another language (depending on
the setting of the Closed Captions CH. 1/2 button).
Generally, Closed Captions in English are transmitted on
Captions Channel 1 and Closed Captions in other
languages are transmitted on Captions Channel 2.
Text: The Text Closed Caption Mode will usually fill 1/2 of
full screen with a programming schedule or other
information. After selecting a Closed Caption Mode, it will
stay in effect until it is changed, even if the channel is
changed. If the Captions signal is lost due to a commercial
or a break in the signal, the Captions will reappear when
the signal is received again. If the channels are changed,
the Captions will be delayed approximately 10 seconds.
The Captions will appear in places on the screen where
they will least interfere with the picture, usually on the
bottom of the screen. News programs will usually show
three-line Closed Captions which scroll onto the screen.
Most other shows provide two or three lined Captions
placed near the character who is speaking so the viewer
can follow the dialogue. Words in italics or underlined
describe titles, words in foreign languages or words
requiring emphasis. Words that are sung usually appear
enclosed by musical notes. For television programs
broadcasting with Closed Captions, look in your TV guide
for the Closed Captions symbol (CC).
• When activating the Closed Captioned Decoder, there will be a short delay before the Closed Captioned text appears
on the screen.
• Closed Captioned text is only displayed in locations where it is available.
• If no caption signal is received, no captions will appear, but the television will remain in the Caption Mode.
• Misspellings or unusual characters may occasionally appear during Closed Captioning. This is normal with Closed
Captioning, especially with live programs. This is because during live programs, captions are also entered live.
These transmissions do not allow time for editing.
• When Captions are being displayed, on-screen displays, such as volume and MUTING may not be seen or may
interfere with Closed Captions.
• Some cable systems and copy protection systems may interfere with the Closed Captioned signal.
• If using an indoor antenna or if TV reception is very poor, the Closed Caption Decoder may not appear or may
appear with strange characters or misspelled words. In this case, adjust the antenna for better reception or use an
outdoor antenna.
〈 + / — / ENTER / MENU 〉
TO RETURN TO INITIAL SETTING
Press the RESET button while the picture adjusting mode
appears on the screen (except the adjusting component).
BRIGHTNESS
0
〈 + / — / ENTER / RESET / MENU 〉
BRIGHTNESS
CONTRAST
SHARPNESS
TINT
(NTSC only)
13
C-T1421
12
COLOR
NOTE: The on-screen display will disappear 6 seconds
after finishing an adjustment. The settings can
only be adjusted when they are displayed on
the TV screen.
C-T1421
ON/OFF TIMER
TROUBLESHOOTING GUIDE
ON TIMER SETTING
Before requesting service, please refer to the following chart for the symptom and possible solution.
This feature allows you to have the TV automatically turn "ON" at predetermined time.
If you program the "ON" timer once the timer will turn "ON" the TV daily at the same time and to the same channel.
If the power has been turned on at programmed time, the channel is changed to a programmed one.
1
Press the MENU button.
2
Press the SET + or – button until
the indicator next to "ON/OFF
TIMER" begins to flash, then
press the ENTER button.
5
MENU
CLOCK SET
ON/OFF TIMER
CH SET UP
PICTURE
LANGUAGE / IDIOMA
COLOR AUTO
〈 + / — / ENTER / MENU 〉
3
Press the SET + or – button until
the indicator next to "ON TIMER"
begins to flash, then press the
ENTER button.
ON/OFF TIMER
ON TIMER
0:00
CH012
OFF TIMER
0:00
6
CANCEL
CANCEL
〈 + / — / ENTER / RESET / MENU 〉
4
Press the SET + or – button to set
the hour, then press the ENTER
button. If you want to change the
hour, press the RESET button.
ON/OFF TIMER
ON TIMER
0:00
CH012
OFF TIMER
0:00
CANCEL
7
CANCEL
Press the SET + or – button
to set the minute, then press
the ENTER button.
• You can change in 10minutes step by holding
down the SET + or –
button.
Press the SET + or –
button to set the channel,
then press the ENTER
button.
• You can set the channel
which is added in the
CH SET UP option.
ON/OFF TIMER
ON TIMER
7:00
CH012
OFF TIMER
0:00
ON/OFF TIMER
ON TIMER
7:30
CH012
OFF TIMER
0:00
Press the SET + or –
button to select the
SET mode.
CANCEL
ON/OFF TIMER
ON TIMER
7:30
CH007
No.51843
This feature allows you to have the TV turn "OFF" automatically at a predetermined time.
If you program the OFF TIMER once, The TV will be automatically turned off at the same time daily.
Press the SET + or – button until
the indicator next to "ON/OFF
TIMER" begins to flash, then
press the ENTER button.
MENU
CLOCK SET
ON/OFF TIMER
CH SET UP
PICTURE
LANGUAGE / IDIOMA
COLOR AUTO
〈 + / — / ENTER / MENU 〉
3
Press the SET + or – button
until the indicator next to "OFF
TIMER" begins to flash, then
press the ENTER button.
ON/OFF TIMER
ON TIMER
CH012
7:30
OFF TIMER
0:00
5
CANCEL
CANCEL
〈 + / — / ENTER / RESET / MENU 〉
6
7
ON/OFF TIMER
ON TIMER
7:30
CH012
OFF TIMER
0:00
Poor reception on some channels
• Station or CATV experiencing problems, tune to another station.
• Make sure channels are set into memory.
• Station signal is weak, reorient antenna to receive desired station.
• Check for sources of possible interference.
Poor color or no color
• Station or CATV experiencing problems, tune to another station.
• Make sure channels are set into memory.
• Check picture control adjustments.
• Check antenna or CATV connections, reorient antenna.
• Check for sources of possible interference.
• Check the color system.
Picture wobbles or drifts
• Station or CATV experiencing problems, tune to another station.
• Make sure channels are set into memory.
• CATV company is scrambling signal.
• Check antenna orientation.
No CATV reception
• Check all CATV connections.
• Set TV/CATV menu option to the CATV mode.
• Station or CATV system problems, try another station.
Horizontal or diagonal bars on screen
• Check antenna connections, reorient antenna.
• Check for sources of possible interference.
No reception above channel 13
• Make sure TV/CATV menu option is in the appropriate mode.
• If using antenna, check UHF antenna connections.
No Remote operation
• Batteries are weak, dead or inserted incorrectly.
• Remote is out of range, move closer to TV within (15 feet).
• Make sure Remote is aimed at sensor.
• Confirm there are no obstructions between the Remote and the TV.
• Make sure the power cord is plugged in.
CANCEL
CANCEL
〈 + / — / ENTER / RESET / MENU 〉
TV shuts off
ON/OFF TIMER
Press the SET + or –
ON TIMER
7:30
CH012
button to set the minute
CANCEL
then press the ENTER
OFF TIMER
11:00
CANCEL
button.
• You can change in 10〈 + / — / ENTER / RESET / MENU 〉
minutes step by holding
down the SET + or – button.
Press the SET + or –
button to select the SET
mode.
• Station or CATV experiencing problems, tune to another station.
• Make sure channels are set into memory.
• Check antenna or CATV connections, reorient antenna.
• Check for sources of possible interference.
• Check picture control adjustments.
CANCEL
OFF TIMER SETTING
2
Poor picture or No picture
CANCEL
8 Press the MENU button.
NOTES:
• You cannot set the ON/OFF TIMER when the clock is not set.
• This TV will automatically turn off approximately 1 hour later after the ON TIMER turns on the TV unless any
buttons are pressed.
• To cancel the ON TIMER function:
To cancel ON TIMER in step 7 above press the SET + or – button to select the CANCEL mode.
Press the SET + or –
button to set the hour,
then press the
ENTER button.
If you want to change the
hour, press the RESET
button.
• Station or CATV experiencing problems, tune to another station.
• Check sound adjustments (Volume and Muting).
• Check for sources of possible interference.
〈 + / — / ENTER / RESET / MENU 〉
OFF TIMER
0:00
4
Poor sound or No sound
CANCEL
〈 + / — / ENTER / RESET / MENU 〉
Press the MENU button.
TV does not operate
CANCEL
CANCEL
ON/OFF TIMER
ON TIMER
7:30
CH012
OFF TIMER
11:30
POSSIBLE SOLUTIONS
• Make sure the power cord is plugged in.
• Try another AC outlet.
• Power is off, check fuse or circuit breaker.
• Unplug unit for an hour, then plug it back in.
〈 + / — / ENTER / RESET / MENU 〉
〈 + / — / ENTER / RESET / MENU 〉
1
SYMPTOMS
• No broadcast on station tuned.
• Sleep Timer is set.
• ON/OFF TIMER is set.
• Power interrupted.
• Approximately 1 hour has passed after the ON TIMER turns on and no button was
pressed (See page 14).
Closed - Caption is not activated.
• TV station experiencing problems or program tuned is not closed captioned.
Try another channel.
• Check CATV connection or VHF/UHF antenna, reposition or rotate antenna.
• Press TV/CAP/TEXT button to turn on the closed caption decoder.
Display is not shown in your language.
• Select proper language in the menu options.
CANCEL
CANCEL
〈 + / — / ENTER / RESET / MENU 〉
Press the MENU button.
NOTES:
• If station being viewed stops broadcasting, the TV will automatically shut itself off after 15 minutes.
• To cancel the OFF TIMER function:
To cancel OFF TIMER, in step 7 above press the SET + or – button to select the CANCEL mode.
14
15
VP0106
H.K