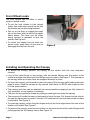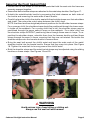
1
Caboose Ultralight
Instruction Manual
45X Series
Patent No. 5,622,375
Joovy • 2919 Canton Street • Dallas, TX 75226 • (877) 456-5049 • Fax: (214) 761-1774
Email: [email protected] • Web Site: www.joovy.com
!
WARNINGS
! Please read this instruction manual completely before using
this stroller. Keep these instructions for future reference.
•
•
•
•
Failure to follow these instructions could result in serious injury or death.
Never leave child unattended.
Avoid serious injury from falling or sliding out.
Always use safety belts and ensure that all children are positioned according to these
instructions.
• Keep all small parts out of reach of children while assembling the stroller.
• Be certain that the stroller is fully opened, the safety latch is in position, and the wheel
brakes are on before allowing children near the stroller.
• The maximum weight of the child that can be seated in the front seat is 45 lbs.
• The rear stand-on platform and the rear bench seat are designed for a child that is at
least 2-1/2 years old but LESS than 44 inches tall and less than 45 lbs.
• Use of the stroller with two children weighing more than 45 pounds each, or children
totaling more than 90 pounds, will cause excessive wear and stress on the stroller and
may cause a hazardous unstable condition.
• Never use this stroller to carry more than 2 children at the same time.
• Never allow a child to step on the footrest to get into or out of the stroller.
• Do not use the stroller on stairways or escalators.
• The included parent organizer is for use ONLY on the Joovy Caboose stroller. DO NOT
use it on other stroller models.
• Never carry hot beverages or open containers in the parent organizer. Maximum weight
allowed is 5 pounds.
• Hanging purses, shopping bags, parcels, diaper bags or other accessory items from the
handle bars or any other parts of the stroller may change the balance of the stroller and
cause a hazardous unstable condition.
• The maximum weight that can be carried in the storage basket is 5 pounds. Excessive
weight may result in a hazardous unstable condition.
• The total weight of contents in the seatback mesh pockets should be less than 2 pounds.
Excess weight may cause a hazardous unstable condition.
• When installing an infant carrier onto the stroller, ALWAYS use the restraining strap to
secure the carrier in place.
• Never allow your stroller to be used as a toy.
• Discard all packaging materials properly. Do not allow children to play with them.
• Check your stroller for loose rivets, snaps, worn parts, and torn material or stitching on a
regular basis.
• Discontinue use of the stroller should it malfunction or become damaged.
Please do not return this product to the store
If you experience any difficulty with the assembly or use of this product, or if you have a
question regarding these instructions, please contact our Customer Service Department
at (877) 456-5049 between the hours of 8:30 am and 5:00 pm Central Time.
Please note: Styles and colors may vary.
Page 1
Caboose Ultralight Instruction Manual
Assembling and Using your Stroller
! To ensure safe operation of your stroller, please follow these instructions carefully.
Unpacking the Product
• Carefully remove stroller and all parts from the box and plastic bag.
• Identify the parts (stroller, front wheels (2), rear wheels (2), canopy, parent organizer, tray, car
seat carrier support, rear axle, small washer (2), large washer (4), spring washer (2), snap pin
(2), hub cap (2), red plastic cap, and documents) with the pictures in Figures 1a and 1b.
NOTE: The rear axle is attached with red tie wraps to the rear frame tube. Please carefully
detach the axle from the frame and remove the yellow foam from the ends of the axle for
installation. Also, extra washers and snap pins may be included.
• Discard all packaging materials properly.
• Remove the plastic coverings from all foam handles and any other areas of the product and
discard also.
• DO NOT allow children to play with any packaging materials.
Figure 1a
Figure 1b
Small Washer (2) Large Washer (4)
Spring Washer (2) Snap Pin (2)
Hub Cap (2)
Red Plastic Cap
! CAUTION
Adult assembly is required for this product. This package contains small
parts. Keep all small parts away from children during assembly.
No Tools Required.
Caboose Ultralight Instruction Manual
Page 2
Unfolding the Stroller
• Keep children away from stroller while unfolding.
• Position the stroller with the handle bar closest to you.
• Release the locking latch located on the right side by lifting the lever off of the extended
rivet. See Figure 2.
• Lift up slightly on the handle of the stroller. Then place one foot onto the rear platform and
pull up and back on the handle until both side frame bars snap into their locking positions
in the frame.
CAUTION: While unfolding the stroller, be careful to keep your fingers from being pinched
by moving parts.
NOTE: Remove packing foam from rear frame assembly to ensure stroller locks in the
open position.
• Lock the safety latch on the lower left side of the stroller by pushing the lever down over
the extended rivet. See Figure 3.
• Ensure that the stroller is completely opened and the safety latch is secured before ANY
use of the stroller.
Figure 2
Figure 3
!
WARNING
ALWAYS secure the safety latch on the side of the stroller when it is in the
unfolded use position. This will prevent collapse of the stroller should the
handle trigger locks be accidentally opened.
Installing the Rear Wheels
Please use the following component sequence that indicates how all the parts for the rear wheel
assembly are installed.
1
2
3
4
5
6
Axle
Small
Washer
Wheel
Large
Washer
Spring
Washer
Large
Washer
7
Snap
Pin
8
Hub
Cap
• Turn stroller upside down, on a clean surface, so that it rests on the handlebar.
• Insert one end of the rear wheel axle through a rear axle hole in the plastic bracket under the
stand-on platform.
Page 3
Caboose Ultralight Instruction Manual
• Push the axle across and into the axle hole on the other side of the stroller.
NOTE: you may need to guide the axle into this hole.
• Slide one small washer over one end of the axle.
• Next place a rear wheel over the the small washer.
NOTE: The brake teeth on the wheel should be facing inward toward the red brake lever AND
the arrow shapes on the tire tread should point toward the handlebar.
• Then place one large washer over the axle.
• Next slide a spring washer over the end of the axle.
• Take another large washer and slide it over the axle.
• Then take one snap pin and insert the straight leg into the small hole in the axle. Push it firmly
into this hole until the round portion of the other leg snaps completely around the outside of
the axle.
NOTE: The snap pin is curved (concave) to make insertion easier.
• Push the axle as far as it will go toward the opposite side of the stroller.
• Next place the red plastic cap on the floor with the solid surface facing up.
• Next turn the stroller onto its side, with the already assembled wheel toward the floor. Place
the axle onto the center of the solid surface of the red plastic cap so that the axle is pushing
upwards for easier installation. See Figure 4.
• Keeping the axle on the red plastic cap, repeat the SAME installation sequence of washers,
wheel, snap pin and hubcap for the remaining wheel.
• Install a hubcap onto each wheel by aligning the 5 tabs on the hubcap with the 5 slots in the
wheel, and then pushing it into place. Ensure that ALL 5 snaps have engaged securely and
the hubcap cannot be pulled off.
Figure 4
Installing the Front Wheels
• Take one of the double wheel sets and locate
the small hole in the rotating bracket that is
inside the red lever.
• Push the front axle into this hole and keep
pushing the wheel set onto this axle until you
hear an audible click. See Figure 5.
• Pull downward on the wheel set to ensure
that it has locked into position on the axle.
• Repeat this same procedure for the other
wheel set.
• When assembled properly, both wheel sets
should rotate and roll smoothly.
Caboose Ultralight Instruction Manual
Figure 5
Page 4
Front Wheel Locks
The front wheels can be either in swivel
mode or locked mode.
• To put the front wheels in their locked
mode, first rotate each wheel set so that
the wheels are pointed straight ahead.
• Pull up on the lever to engage the small
tab on the lever with the slot in the plastic
frame sleeve. The lever can be either
facing forward or rearward to lock the
wheels. See Figure 6.
• To unlock the wheels and put them into
swivel mode, push down on the lever to
disengage the tab from the slot.
Figure 6
Installing and Operating the Canopy
• To attach the canopy, position the canopy on the stroller with the visor extension
forward.
• Line up the male fittings on the canopy with the female fittings near the center of the
stroller and push downward until the fittings snap into place. See Figure 7. Pull upward on
the canopy sides to be sure both are snapped securely in place.
• To open the canopy, pull forward on the front edge of the canopy while holding the back
edge in place. Once the canopy is fully opened, push down on BOTH side hinges to lock
it in the open position.
• The canopy and visor can be adjusted into several positions ranging from fully closed to
fully extended, or any position in between.
• The visor can be opened (or closed) by pulling (or pushing) it from under the canopy.
• The canopy will ratchet forward or backward to block the sun. Pull forward on the front of
the canopy frame tube to rotate it forward. Pull backward on the rear frame tube to rotate
it backward. See Figure 8.
• To close the canopy, unlock the side hinges and pull the front edge toward the rear of the
stroller until folded. See Figure 9.
• To remove the canopy, press the lock button on the side of each of the male fittings while
pulling upward on the canopy frame. See Figure 10.
Page 5
Caboose Ultralight Instruction Manual
Figure 7
Figure 8
Figure 9
Figure 10
!
WARNING
Possible pinching hazard - Be careful when closing and
opening the side hinges so as not to pinch your fingers.
Attaching/Detaching the Front Tray
• To attach the front tray, line up the female fittings
on the tray with the male fittings on the front of the
stroller and push inward until the fittings snap into
place. See Figure 11. Pull outward on both sides
of the tray to be sure both are snapped securely in
place.
• To remove the front tray, press the lock button on
the side of each of the male fittings while pulling
outward on the tray. See Figure 12.
Figure 11
Figure 12
! WARNING
The child tray is not a restraint device. Always secure your child with the seat
belt. Never lift the stroller by the child tray. Use caution when attaching the child
tray when there is a child seated in the stroller.
Caboose Ultralight Instruction Manual
Page 6
Rear Wheel Brakes
• Before placing any child into the stroller or removing them from the stroller, be certain that the
rear wheel brakes are engaged.
• To engage the rear wheel brakes, push down on the brake lever located on each rear wheel.
See Figure 13. The stroller may require slight forward or rearward movement in order to line
up the teeth on the brake with each wheel brake cluster.
• Check that the brakes are properly applied by attempting to push the stroller backward and
forward.
• To release the brakes, gently lift up on the brake lever. See Figure 14.
Figure 13 Figure 14
!
WARNING
Always set BOTH wheel brakes when the stroller is not being pushed so that
the stroller will not roll away. Never leave stroller unattended, especially on a
hill or incline, as the stroller may tip over or slide.
Adjusting the Footrest
The footrest can be adjusted to two positions – horizontal or all the way down.
• To place the footrest into the horizontal position, pull up on the footrest and position the
footrest lower bar into the upper slot at the middle of the plastic bracket on the underside
of the footrest. See Figure 15.
• Ensure that the bar is located securely into this slot on BOTH sides of the footrest. Push down
on both sides of the footrest to ensure it is secure.
• To place the footrest into the down position, pull up on the footrest to release the bar from
the slot. Lower the footrest slightly while moving the bar into the lower slot of the plastic
bracket on BOTH sides of the footrest. See Figure 16.
• Lower the footrest to its down position. Note that the footrest will not “lock” into the down
position, but will remain there by gravity only.
Figure 15
Figure 16
!
WARNING
Never allow a child to step onto the footrest in either position in order to get
into or out of the stroller. This may cause the stroller to tip over and injure the child.
Page 7
Caboose Ultralight Instruction Manual
Securing the Front Seated Child
• Ensure that the two snaps on both armrest pads that hold the seat onto the frame are
securely snapped together.
• Ensure that both shoulder straps are attached to the waist strap buckles. See Figure 17.
• Unlatch the waist/shoulder buckle by squeezing the latch releases on both sides of
the buckle and removing the male ends of each buckle.
• Carefully place the child in the stroller seat with the shoulder straps over their shoulders
and chest. Then place the crotch strap between the child’s legs.
NOTE: that there are three height adjustment positions for the shoulder harness straps.
For a younger child, the shoulder straps should be positioned through the lower sewnin loops on the seatback. For a young child that is tall, the shoulder straps may be
positioned through the upper sewn-in loops on the seatback. For a taller child, use
the shoulder straps WITHOUT positioning them through these sewn-in loops. To reposition the shoulder straps, unbuckle them from the harness buckle and feed these
straps through the sewn-in loops, ensuring that they are not twisted. Re-buckle the
shoulder straps onto the harness buckle to secure them.
• Bring the seat belt around the child’s waist and insert the male ends of the waist/
shoulder buckle into the female buckle. Ensure that they snap into place. See Figure
18. Tighten the waist belt to be snug around the child’s waist.
• Both the shoulder straps and the waist/crotch straps may be adjusted using the sliding
buckles on these straps. See Figures 19 and 20.
Figure 17
Figure 18
Figure 19
Figure 20
!
WARNING
Avoid serious injury from falling or sliding out.
Always use the seat belt and harness.
Caboose Ultralight Instruction Manual
Page 8
Seatback Positioning
The front seat has two positions. The fully upright position should only be used for a child that is at
least 6 months old.
• To place the seat in the upright position, push the bar on the rear of the seat toward the front of
the stroller and rotate the seatback towards the front of the stroller until this bar is locked in its
lowest position. See Figure 21.
• To recline the seat, pull the bar on the rear of the seat toward the rear of the stroller and rotate the
seatback down until this bar is again in its lowest position. See Figure 22.
Figure 21
Figure 22
!
WARNING
Whether the seatback is upright or reclined, ALWAYS make certain that the rotating
bar behind the seatback is in its LOWEST position before placing the child into the
seat.
Using the Stand-On Platform
• Push the bench seat to its most forward position.
• Position the canopy to its most forward position.
• Position the child on the platform on the back of the stroller. Be sure that the child is facing forward
and BOTH of their hands are holding the handles on the frame.
• Be sure that BOTH of the child’s feet are fully on the platform at all times.
• You may need to adjust the position of the seatback to allow for more room for the child to
stand.
!
WARNING
The rear stand-on platform and the rear bench seat are designed for a child
that is at least 2-1/2 years old but LESS than 44 inches tall and less than 45 lbs.
Use of the stroller with two children weighing more than 45 pounds each, or
children totaling more than 90 pounds, will cause excessive wear and stress
on the stroller and may cause a hazardous unstable condition.
NEVER allow a standing child to use the canopy as a hand hold.
NEVER use this stroller to carry more than 2 children at the same time.
Page 9
Caboose Ultralight Instruction Manual
Storage Basket
Please note there is elastic on the basket sides for easy access, or, you can access the storage
basket by sliding the rear bench seat forward or backward. The maximum weight that can be
carried in the storage basket is 5 pounds. Excessive weight may result in a hazardous unstable
condition.
Using the Rear Bench Seat
• Push the bench seat to its most rearward position.
NOTE: that there are webbing straps attached to the bottom of the rear seat
pad. These straps will lock the seat into the most rearward position. To
lock the seat, pull the straps from EACH side of the pad and loop them around
the frame as shown, then snap them together. See Figure 23. To slide the
seat forward, undo EACH snap and reattach the webbing to the underside of
the seat pad using the hook and loop attachments.
• Position the canopy to its most forward position.
• Unlatch the waist buckle by squeezing the latch releases on both sides of the buckle and
removing the male ends of each buckle.
• Have the child sit on the bench seat facing backward with their feet on the platform.
• You may need to adjust the position of the seatback to allow for more room for the child to sit.
• Place the crotch strap between the child’s legs.
• Bring the seat belt around the child’s waist and insert the male ends of the waist buckle into
the female buckle. Ensure that they snap into place. See Figure 24.
• Adjust the seat belt to be snug around the child’s waist.
• Be sure that the BOTH of the child’s feet are fully on the platform at all times.
• Be sure that BOTH of the child’s hands are holding the handles on the frame.
Figure 23
Figure 24
!
WARNING
NEVER allow a rear seated child to use the canopy as a hand hold.
Caboose Ultralight Instruction Manual
Page 10
Using the Stroller as an Infant
Car Seat Carrier
• To use the stroller to carry an infant car seat
carrier, you must replace the Front Tray with
the Car Seat Carrier Support.
• Remove the Front Tray by pressing in on
the lock tabs and pulling the tray off the
brackets. Store the tray in a convenient
place for later use.
• Line up the female fittings on the Car Seat
Figure 25
Carrier Support to the male fittings on the
front of the stroller and push inward until the
fittings snap into place. See Figure 25. Pull
outward on both sides of the support to be
sure both are snapped securely in place.
• Push the canopy to its most rearward
position.
• ADJUST THE SEATBACK TO ITS RECLINED
POSITION.
• Remove the infant carrier from the car seat
base.
• Place the infant carrier onto the top of the
Figure 26
stroller in a REAR FACING POSITION,
locating the head end of the carrier so that
it rests on the Car Seat Carrier Support and
the feet end of the carrier so that it rests on
the seatback, but NOT on the top edge of
the seatback. See Figure 26.
• Ensure that the head end of the infant carrier
is pushed down firmly inside the frame of
the Car Seat Carrier Support and that it is
centered side to side.
• Remove the carrier restraining straps from
the pouches on both sides of the stroller.
Figure 27
Buckle them in place over the LOWEST part
of the carrier sides. Adjust the straps so they
are tight around the carrier but AWAY from the child’s neck. Pull up on the carrier to be sure it is
held on securely. See Figure 27.
• Always check frequently to be sure that the restraining straps are tight across the infant carrier
but away from the child’s neck.
• When you remove the infant carrier from the stroller, always replace the two restraining straps
back into their side pouches.
Page 11
Caboose Ultralight Instruction Manual
! IMPORTANT NOTE
When using your stroller as an infant car seat carrier,
the following are the compatible infant car seat models
that the Caboose Ultralight will accommodate:
• Evenflo® Embrace™
• Baby Trend® Latch-Loc and Flex-Loc
• Graco® Safe Seat™
• Britax® Companion™
• Graco® Snug Rider™ Series
• Chicco® Key Fit Car Seat
• Maxi Cosi Mico
• Combi® Centre Series
• Peg Perego® Primo Viaggio
• Combi® Connection
• Compass® Light and Portable Infant • Peg Perego® Primo Viaggio SIP
Car Seat
• Safety 1st® Designer 22™
• Eddie Bauer® Infant Car Seat
(models 22-625 and 22-626)
For the most updated list of compatible infant car seats, please either check our website
at www.joovy.com or call our Customer Service Department at (877) 456-5049.
!
WARNING
ALWAYS install the infant carrier so that the child is facing toward the rear
(handle) of the stroller with the restraining straps secured.
ALWAYS position the infant carrier so that it is securely placed down inside
the Car Seat Carrier Support frame.
ALWAYS position the infant carrier so that it is resting ON the seatback, but
NOT on the top of the seatback.
NEVER position the carrier restraining straps on or near the child’s neck as
this may result in strangulation.
Right Way
Caboose Ultralight Instruction Manual
Page 12
Folding the Stroller
• Keep children away from stroller while
folding.
• Remove any infant carrier that has been
installed on the stroller. Note that the stroller
can still be folded with the car seat carrier
support in place.
• Position the stroller with the handle bar
closest to you.
• Place the canopy into its closed position
and push it all the way forward toward the
Figure 28
front of the stroller as far as it will go.
• Make sure both rear wheel brakes are set to their locked positions.
• Lock both front wheels in place with the locking levers facing forward.
• To fold, unlatch the safety latch on the lower left side of the stroller.
• Pull upward on the trigger mechanisms on both sides of the stroller. See Figure 28.
• While these mechanisms are in the upward position, push forward on the stroller using the
handle bar.
• Once the stroller begins to fold, push the handle all the way forward and down until the stroller
is completely folded. See Figure 29.
CAUTION: While folding the stroller, be careful to keep your fingers from being pinched
by moving parts.
• Secure the stroller in the folded position by engaging the locking latch on the right side of the
stroller over the extended rivet. See Figure 30.
Figure 29
Page 13
Figure 30
Caboose Ultralight Instruction Manual
Installing the Parent Organizer
• Separate the hook & loop attachments in the
open slot of the Organizer.
• Orient the Organizer so that the cup holder is
facing toward the front of the Caboose. See
Figure 31.
• Stretch the Organizer outward and slide it
down over the handlebar until it just comes
into contact with the red trigger releases.
• Press the hook & loop attachments together
to secure it in place.
Figure 31
! WARNING
For use ONLY on the Joovy Caboose Stand-On Tandem Stroller.
NEVER carry hot beverages or open containers in this product.
Maximum weight for Organizer is 5 lbs.
Maintenance
All of the fittings, snaps, locks, rivets, and other hardware and plastic parts on the stroller should be
inspected periodically to ensure that they are secured properly and not damaged or malfunctioning.
The seat belts and safety harnesses, as well as all other straps and fabric items and their stitching
should also be inspected periodically to ensure that they are secured properly and not loose,
torn or otherwise damaged. All moving parts, such as wheels, brakes, and hinges should also be
checked periodically to ensure they are operating properly.
Any missing, broken, or worn components should be replaced immediately, and the stroller should
not be used until they are replaced. Only original manufacturer’s components should be used. If
needed, please contact Joovy at our toll-free phone number.
Fabric fading may occur if the stroller is left in direct sunlight for long periods of time. When not in
use, store the stroller out of direct sun.
Cleaning
The fabric material on this stroller can be cleaned using mild household soap or detergent and
warm water on a sponge or clean cloth. Always allow the fabric to completely air dry before using
the stroller.
The frame and wheels should always be kept clean and free of dirt and foreign matter, especially
after operating the stroller in rain, snow, or other harsh environments. Use a sponge or cloth
dampened with warm water and a mild household soap or detergent to clean the wheels after
such use.
Caboose Ultralight Instruction Manual
Page 14
SATISFACTION GUARANTEED
We want you to be completely satisfied with your purchase of this product.
Should you experience any difficulty in assembling or using this product, or
if you have any questions, please contact our Customer Service Department
at (877) 456-5049 between the hours of 8:30 am and 5:00 pm Central Time.
Deluxe neoprene parent organizer
2 Cup holders
Zippered pocket
Three additional pockets
No tools needed for installation
Reversible two-sided seat pad.
COOL: Nylon mesh cover is designed to wick
away hot weather moisture from your child’s
skin. Soft weave is gentle to the touch and is
completely washable. Make warm weather
strolls enjoyable!
WARM: Insulating fleece helps maintain
warmth by trapping heat. Child stays warm
and dry even on the coolest days. Make cool
weather trips enjoyable!
Page 15
Caboose Ultralight Instruction Manual
Custom rain cover for both children
Zippered button hole pass through for front seat
Custom sun filter for both children’s comfort
Zippered button hole pass through for front seat
Protects from insects
Caboose Ultralight Instruction Manual
Page 16
Please log onto www.joovy.com to register your new Joovy product.
Look for these other Joovy products
Page 17
Caboose Ultralight Instruction Manual
t!
r Doll Rides in the B
ack, or Sits in the Fron
You
Caboose Ultralight Instruction Manual
Page 18
Joovy • 2919 Canton Street • Dallas, TX 75226 • (877) 456-5049 • Fax: (214) 761-1774
Email: [email protected] • Web Site: www.joovy.com
©Joovy 2008 • Document Version 1.1