1
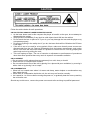
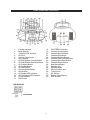
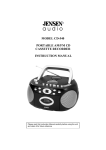
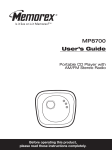
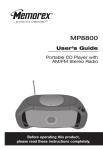
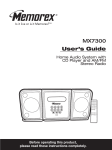
MODEL CD-545
PORTABLE AM/FM STEREO CD
CASSETTE RECORDER
INSTRUCTION MANUAL
Please read and follow this Instruction Manual carefully
before using the unit and retain it for future reference
IMPORTANT SAFETY INSTRUCTIONS
WARNING:
TO REDUCE THE RISK OF FIRE OR ELECTRIC SHOCK, DO NOT EXPOSE THIS APPLIANCE TO
RAIN OR MOISTURE. DANGEROUS HIGH VOLTAGES ARE PRESENT INSIDE THE ENCLOSURE.
DO NOT OPEN THE CABINET REFER SERVICING TO QUALIFIED PERSONNEL ONLY.
The Caution marking is located at the bottom of the unit
CAUTION:
PLEASE READ AND OBSERVE ALL WARNINGS AND INSTRUCTIONS GIVEN IN THIS OWNER’S
MANUAL AND THOSE MARKED ON THE UNIT, KEEP THESE INSTRUCTIONS. RETAIN THIS
BOOKLET FOR FUTURE REFERENCE.
This set has been designed and manufactured to assure personal safety. Improper use can
result in electric shock or fire hazard. The safeguards incorporated in this unit will protect you if
you observe the following procedures for installation, use and servicing. This unit does not
contain any parts that can be repaired by the user.
DO NOT REMOVE THE CABINET COVER, OR YOU MAY BE EXPOSED TO DANGEROUS
VOLTAGE. REFER SERVICING TO QUALIFIED SERVICE PERSONNEL ONLY.
1
SAFETY INSTRUCTIONS
Before using the unit, be sure to read all operating instructions carefully. Please note that these
are general precautions and may not pertain to
your unit. For example, this unit may not have
the capability to be connected to an outdoor
antenna.
1. READ INSTRUCTIONS
All the safety and operating instructions should
be read before the product is operated.
2. RETAIN INSTRUCTIONS
The safety and operating instructions should be
retained for future reference.
3. HEED WARNINGS
All warnings on the product and in the operating
instructions should be adhered to.
4. FOLLOW INSTRUCTIONS
All operating and use instructions should be followed.
5. CLEANING
Unplug this product from the wall outlet before
cleaning. Do not use liquid cleaners or aerosol
cleaners. Use a dry cloth for cleaning.
6. ATTACHMENTS
Do not use attachments not recommended by
the product's manufacturer as they may cause
hazards.
7. WATER AND MOISTURE
Do not use this product near water for example:
near a bathtub, washbowl, kitchen sink or laundry tub; in a wet basement; or near a swimming
pool.
8. ACCESSORIES
Do not place this product on an unstable cart,
stand, tripod, bracket or table.
PORTABLE CART WARNING
(symbol provided by RETAC)
The product may fall, causing
serious injury and serious damage to the product. Use only
with a cart, stand, tripod, bracket or table recommended by the
manufacturer or sold with the
product. Any mounting of the product should follow the manufacturer's instructions, and should
use a mounting accessory recommended by the
manufacturer.
8A. An appliance and cart combination should be
moved with care. Quick stops, excessive force
and uneven surfaces may cause the appliance
and cart combination to overturn.
9. VENTILATION
Slots and openings in the cabinet and in the
back or bottom are provided for ventilation, to
ensure reliable operation of the product and to
protect it from overheating. These openings
must not be blocked or covered. The openings
should never be blocked by placing the product
10.
11.
12.
13.
14.
15.
16.
2
on a bed, sofa, rug or other similar surface. This
product should never be placed near or over a
radiator or heat source. This product should not
be placed in a built-in installation such as a
bookcase or rack unless proper ventilation is
provided or the manufacturer's instructions have
been adhered to.
POWER SOURCES
This product should be operated only from the
type of power source indicated on the marking
label. If you are not sure of the type of power
supply to your home, consult your appliance
dealer or local power company. For products
intended to operate from battery power, or other
sources, refer to the operating instructions.
GROUNDING OR POLARIZATION
This product is equipped with a polarized alternating-current line plug (a plug having one blade
wider than the other). This plug will fit into the
power outlet only one way. This is a safety feature. If you are unable to insert the plug fully into
the outlet, try reversing the plug. If the plug
should still fail to fit, contact your electrician to
replace your obsolete outlet. Do not defeat the
safety purpose of the polarized plug.
POWER-CORD PROTECTION
Power-supply cords should be routed so that
they are not likely to be walked on or pinched by
items placed upon or against them, paying particular attention to cords at plugs, convenience
receptacles, and the point where they exit from
the appliance.
LIGHTNING
To protect your product from a lightning storm,
or when it is left unattended and unused for long
periods of time, unplug it from the wall outlet
and disconnect the antenna or cable system.
This will prevent damage to the product due to
lightning and power-line surges.
POWER LINES
An outside antenna system should not be located in the vicinity of overhead power lines or
other electric light or power circuits, or where it
can fall into such power lines or circuits. When
installing an outside antenna system, extreme
care should be taken to keep from touching
such power lines or circuits as contact with them
might be fatal.
OVERLOADING
Do not overload wall outlets and extension cords
as this can result in a risk of fire or electric
shock.
OBJECT AND LIQUID ENTRY
Never push objects of any kind into this product
through openings as they may touch dangerous
SAFETY INSTRUCTIONS
voltage points or short out parts that could result in
fire or electric shock. Never spill or spray any type
of liquid on the product.
17. OUTDOOR ANTENNA GROUNDING
If an outside antenna is connected to the product, be sure the antenna system is grounded so
as to provide some protection against voltage
surges and built-up static charges. Section 810
of the National Electric Code, ANSI/NFPA 70,
provides information with respect to proper
grounding of the mast and supporting structure,
grounding of the lead-in wire to an antenna discharge product, size of grounding conductors,
location of antenna discharge product, connection to grounding electrodes and requirements
for grounding electrodes.
22. DAMAGE REQUIRING SERVICE
Unplug the product from the wall outlet and refer
servicing to qualified service personnel under
the following conditions:
a. When the power-supply cord or plug is
damaged.
b. If liquid has been spilled or objects have
fallen into the product.
c. If the product has been exposed to rain or
water.
d. If the product does not operate normally by
following the operating instructions. Adjust
only those controls that are covered by the
operating instructions, as an adjustment of
other controls may result in damage and will
often require extensive work by a qualified
technician to restore the product to its
normal operation.
e. If the product has been dropped or the
cabinet has been damaged.
f. When the product exhibits a distinct change
in performance this indicates a need for
service.
23. HEAT
The product should be situated away from heat
sources such as radiators, heat registers, stoves
or other products (including amplifiers) that produce heat.
24. NOTE TO CATV SYSTEM INSTALLER
This reminder is provided to call the CATV system installer's attention to Article 820-40 of the
NEC that provides guidelines for proper grounding and, in particular, specifies that the cable
ground shall be connected to the grounding system of the building, as close to the point of cable
entry as practical.
ANTENNA
LEAD IN
WIRE
GROUND
CLAMP
ANTENNA
DISCHARGE UNIT
(NEC SECTION 810-20)
ELECTRIC
SERVICE
EQUIPMENT
GROUNDING CONDUCTORS
(NEC SECTION 810-21)
GROUND CLAMPS
NEC - NATIONAL ELECTRICAL CODE
POWER SERVICE GROUNDING
ELECTRODE SYSTEM
(NEC ART 250, PART H)
S2898A
EXAMPLE OF ANTENNA GROUNDING AS PER
NATIONAL ELECTRICAL CODE
18. SERVICING
Do not attempt to service this product yourself
as opening or removing covers may expose you
to dangerous voltage or other hazards. Refer all
servicing to qualified service personnel.
19. REPLACEMENT PARTS
When replacement parts are required, be sure
the service technician uses replacement parts
specified by the manufacturer or those that have
the same characteristics as the original part.
Unauthorized substitutions may result in fire,
electric shock or other hazards.
20. SAFETY CHECK
Upon completion of any service or repairs to this
product, ask the service technician to perform
safety checks to determine that the product is in
proper operating condition.
21. WALL OR CEILING MOUNTING
The product should be mounted to a wall or ceiling only as recommended by the manufacturer.
3
FCC NOTICE
This equipment has been tested and found to comply with the limits for a Class B digital device,
pursuant to Part 15 of the FCC Rules. These limits are designed to provide reasonable
protection against harmful interference in a residential installation. This equipment generates,
uses and can radiate radio frequency energy and, if not installed and used in accordance with
the instructions, may cause harmful interference to radio communications.
However, there is no guarantee that interference will not occur in a particular installation. If this
equipment does cause harmful interference to radio or television reception, which can be
determined by turning the equipment off and on, the user is encouraged to try to correct the
interference by one or more of the following measures:
– Reorient or relocate the receiving antenna.
– Increase the separation between the equipment and receiver.
– Connect the equipment into an outlet on a circuit different from that to which the receiver is
needed.
– Consult the dealer or an experienced radio/TV technician for help.
WARNING:
Changes or modifications to this unit not expressly approved by the party responsible for
compliance could void the user's authority to operate the equipment.
4
CAUTION
Follow the advice below for safe operations.
ON PROTECTION AGAINST LASER ENERGY EXPOSURE
•
•
•
•
•
•
As the laser beam used in this compact disc player is harmful to the eyes, do not attempt to
disassemble the casing.
Stop operation immediately if any liquid or solid object should fall into the cabinet.
Do not touch the lens or poke at it. If you do, you may damage the lens and the player may
not operate properly.
Do not put anything in the safety slot. If you do, the laser diode will be ON when the CD door
is still open.
If the unit is not to be used for a long period of time, make sure that all power sources are
disconnected from the unit. Remove all batteries from the battery compartment, and unplug
the AC cord from the wall outlet. Make it a practice to remove the AC cord by grasping the
main body and not by pulling the cord.
This unit employs a laser. The use of controls or adjustment or performance of procedures
other than those specified here may result in exposure to hazardous radiation.
ON PLACEMENT
• Do not use the unit in places where are extremely hot, cold, dusty or humid.
• Place the unit on a flat and even surface.
• Do not restrict the air-flow of the unit by placing it in a place with poor ventilation, by covering it
with a cloth or by placing it on a carpet.
ON CONDENSATION
• When left in a heated room where it is warm and damp, water droplets or condensation may
form inside the unit.
• When there is condensation inside the unit, the unit may not function normally.
• Let it stand for 1 to 2 hours before turning the power on, or gradually heat the room up and dry
the unit before use.
Should any trouble occur, remove the power source and refer servicing to qualified personnel.
5
FUNCTIONS AND CONTROLS
1.
2.
3.
4.
5.
6.
7.
8.
9.
10.
11.
12.
13.
14.
15.
16.
17.
Function Selector
Band Selector
Telescopic FM Antenna
CD Door
Volume Control Knob
Carry Handle
CD Skip/Search Forward Button
CD Skip/Search Backward Button
CD Program Button
CD Repeat Button
CD Stop Button
CD Play/Pause Button
LED Display
CD Repeat LED Indicator
CD Play/Pause LED Indicator
Power Indicator
Dial Pointer
18.
19.
20.
21.
22.
23.
24.
25.
26.
27.
28.
29.
30.
31.
32.
33.
LED DISPLAY
PLAY/PAUSE
6
FM STEREO Indicator
Cassette Compartment
Cassette Record Button
Cassette Play Button
Cassette Rewind Button
Cassette Fast Forward Button
Cassette Stop/Eject Button
Cassette Pause Button
Bass Boost Button
Speaker Left
Speaker Right
Stereo Phones Jack
Tuning Knob
AC Socket
Battery Compartment
AUX IN Jack
POWER SOURCE
This AM/FM CD Cassette Recorder operates on 8 X `D' size (UM-1) batteries or from AC120V
60Hz line power supply.
A. BATTERY OPERATION
For best performance and longer operating time, we recommend the use of alkaline batteries.
1.
2.
3.
1.
2.
3.
4.
Remove the Battery Door.
Following the polarity (+ and -) diagram as shown inside the battery compartment, insert 8 ‘D’
size (UM-1) batteries.
Replace the Battery Door.
BATTERY WARNING
Be sure that the batteries are installed correctly. Wrong polarity may damage the unit.
(a) Do not mix old and new batteries.
(b) Do not mix alkaline, standard (carbon-zinc) or rechargeable (nickel-cadmium) batteries.
If the unit is not to be used for an extended period of time, remove the batteries. Any old or
leaking batteries can cause damage to the unit and may void the warranty.
Do not dispose of batteries in fire, batteries may explode or leak.
B. AC POWER CONNECTION
1. Insert the power cord to the AC Socket (#31).
2. Connect the power cord to AC power source.
3. When the unit is operated from AC power source, the internal battery source will
automatically be disconnected.
CAUTION:
TO PREVENT ELECTRIC SHOCK, MATCH WIDE BLADE OF PLUG
TO WIDE SLOT. FULLY INSERT.
RADIO RECEPTION
1.
2.
3.
4.
5.
6.
Set the Function Selector (#1) to "RADIO".
Set the Band Selector (#2) to "AM" or "FM" for the desired radio band.
Turn the Tuning Knob (#30) to select the desired radio station.
Adjust the Volume Control (#5) to obtain the desired sound level the Built-in Speakers.
To enhance the bass effect, depress and release the BASS Button (#26) when a “click” is
heard.
To turn the Radio off, set the Function Selector (#1) to the “TAPE” position.
TIPS FOR BEST RADIO RECEPTION
1. To insure maximum FM tuner reception, the Telescopic Antenna (#2) should be fully
extended and rotated to obtain the best possible station reception. The FM Stereo
Indicator (#18) will light steadily when a stereo program is being received.
2. The AM antenna is built into the unit. When tuning in AM reception, be sure to place the unit
in a vertical position. To insure best AM reception, try repositioning the unit until the best
station reception is obtained.
7
CD PLAYER OPERATION
Note: This CD player will not only play commercial CDs, but also self-compiled CD-R/RW discs.
Do not attempt to play CD-ROM, CDI, VCD, DVD or computer CDs.
Notes on CD-R/RW Discs
x Because of non-standardized format definition/production of CD-R/RW, playback quality &
performance are not guaranteed.
x Manufacturer is not responsible for the playability of CD-R/RW due to recording conditions
such as PC performance, writing software, media ability, etc.
x Do not attach a label or seal to either side of the CD-R/RW disc. It may cause a
malfunction.
1.
2.
Open the CD Door by pressing the CD Door (#4) where indicated PUSH OPEN/CLOSE.
Carefully place an audio CD with its label side upward in the CD compartment and close the
CD Door by pressing on the CD Door (#4) where indicated PUSH OPEN/CLOSE.
3. Set the Function Selector (#1) to the "CD" position. The POWER Indicator (#16)
will light. The LED Display (#13) will briefly display flashing “- -”and then the total
number of tracks on the CD will appear in the LED Display (#13) after a few
seconds.
4. Press the CD PLPA/PAUSE
Button (#12). The CD Play/Pause Indicator (#15)
will light and the CD will start playing from the first track.
5. Adjust the Volume Control (#5) to obtain the desired sound level from the Built-in
Speakers.
6. To enhance the bass effect, depress and release the BASS Button (#26) when a “click” is
heard.
7. To suspend playing, press the CD PLAY/PAUSE
Button (#12) and the CD
Play/Pause Indicator (#15) will flash.
To resume playing, press the CD PLAY/PAUSE
Button again.
8. You can choose to play your favorite track directly by pressing either the Skip Forward
Button (#7) or Skip Backward
Button (#8). The LED Display (#13) will indicate
the correct track number selected.
9. To locate a particular passage within a track, keep the CD Search Forward
Button (#7)
or CD Search Backward
Button (#8) depressed until it is found.
10. To repeat a particular track, press the CD REPEAT Button (#10) until the CD
Repeat 1/All Indicator (#14) flashes.
11. To repeat the entire CD,, press the REPEAT Button (#10) until the CD Repeat 1/All
Indicator (#14) lights steadily.
12. To stop playing, press the CD STOP Ŷ Button (#11).
13. When you wish to turn off the CD Player, set the Function Selector (#1) to the "TAPE" position.
The POWER Indicator will go off.
CD PROGRAMMED PLAY
This function allows the tracks to be played in a programmed sequence.
NOTE: Program can only be set in STOP mode.
1.
In CD stop mode, press the PROGRAM Button (#9) once. Program No. “01”
will appear and blink in the LED Display (#13).
2.
Press the CD Skip Forward
Button (#7) or CD Skip Backward
Button
(#8) to select the song to be programmed. For example track 5 is selected.
8
3.
4.
5.
6.
7.
8.
Press the PROGRAM Button (#9) again to store selection. The LED Display
(#13) will go to “02” and blink to prompt for input.
Press the CD Skip Forward
Button (#7) or CD Skip Backward
Button (#8) to select the next song to be programmed and press the PROGRAM Button (#9)
to store the second selection.
You may repeat steps #2 - #4 to program as many as 20 tracks. The programmed tracks will
be shown in the LED Display (#13) one by one in the programmed sequence after the 20th
selection has been stored.
To check the programmed tracks, press the PROGRAM Button (#9) repeatedly until the last
Program No. appears and flashes in the Display and then press the PROGRAM Button (#9)
once again. The programmed tracks will be displayed one by one in the programmed
sequence.
Press the CD PLAY/PAUSE
Button (#12) to start playing in the programmed
sequence.
z After all the programmed tracks have been played the player stops but the
program remains in the memory.
z Press the PLAY/PAUSE
Button (#12) to begin programmed playback again.
To cancel programmed play, press the CD STOP Ŷ Button (#11).
CASSETTE RECORDER OPERATION
1. Open the Cassette Door and insert a pre-recorded cassette tape with the exposed tape facing
upwards. Close the Cassette Door.
2. Press the Cassette Play Button (#21) to start playback and adjust the Rotary Volume Control
(#5) to obtain the desired sound level.
3. Press the Cassette Pause Button (#25) to suspend play. Press same button again to resume.
4. Press the Cassette Fast Forward Button (#23) or the Cassette Rewind Button (#22) to rapidly
advance or rewind the tape.
5. Press the Cassette Record Button (#20) to record either from the Radio, AUX IN or CD. Use
the Function Selector (#1) to choose your signal source accordingly.
6. Press the Cassette Stop Button (#24) to stop operation.
AUTOMATIC STOP
To protect your cassette tapes and prevent unnecessary wear to the pinch roller of the cassette
mechanism, this unit is equipped with an Automatic Stop System. When the tape ends during
play, the Play Button (#9) will automatically release to stop the cassette from running.
CASSETTE TAPE OPERATING TIPS
1. High quality tapes are recommended to obtain maximum quality reproduction from
recordings.
2. Tapes with playing time of 120 minutes (C-120) are not recommended because they contain
thinner and longer tape that has a greater chance to malfunction and jam, which may damage
the cassette mechanism.
3. To obtain good reproduction, the head should be cleaned after every 10 to 20 hours of use.
It is also recommended that the cassette be kept away from excessive heat or cold.
9
4.
If there is slack in the tape, remove the slack prior to inserting the cassette. To remove the
slack, insert a pencil into the hub and rotate clockwise as shown below:
5.
A leader tape is provided at the beginning on each cassette. There is no recording on this
area, so it is necessary to let the tape run for about five seconds to clear the head.
Keep the tape head clean since a dirty head can cause distorted sound or improper tape
speed. Depress the Cassette Play Button (#21) and use a small cotton swab with tape head
cleaner or alcohol to clean the tape head, capstan and pinch roller as shown below:
6.
AUX IN OPERATION
You can play other music sources (MP3 or other digital audio players) through the speakers of this
player by connecting the AUX IN Jack (#33) to your external player’s audio out jack or headphone
jack.
1.
Plug one end of an audio cable (not included) into the AUX IN Jack (#33) and the other end
of the cable to the headphone jack of your digital audio player.
2.
Set the Function Selector (9) to “AUX”.
3.
Start playing the device you plugged into the AUX IN jack.
4.
Adjust the VOLUME Control (#5) to a comfortable listening level.
5.
To enhance the bass sound, press and release the BASS Button (#26) when a “click” is
heard.
6.
To turn the Radio off, set the Function Selector (#1) to the “TAPE” position.
USING HEADPHONES (NOT INCLUDED)
Inserting the plug of your headphones into the Stereo Headphone Jack (#29) will enable you to
listen to the CD, Radio or Cassette music in private. When using headphones, the Built-in
Speakers will be disconnected.
READ THIS IMPORTANT INFORMATION BEFORE USING YOUR HEADPHONES
1. Avoid extended play at very high volume as it may impair your hearing.
2. If you experience ringing in your ears, reduce the volume or shut off your unit.
3. Do not use while driving a motorized vehicle. This is dangerous and also illegal in some
states.
4. Keep the volume at a reasonable level even if your headset is an open-air type designed to
allow you to hear outside sounds. Please note excessive high volume may still block outside
sounds.
10
CARE AND MAINTENANCE
1.
2.
3.
4.
Clean your unit with a damp (never wet) cloth. Solvent or detergent should never be
used.
Avoid leaving your unit in direct sunlight or in hot, humid or dusty places.
Keep your unit away from heating appliances and sources of electrical noise such as
fluorescent lamps or motors.
If drop-outs or interruptions occur in the music during CD play,
or if the CD fails to play at all, its bottom surface may require
cleaning. Before playing, wipe the disc from the center
outwards with a good soft cleaning cloth.
TROUBLE SHOOTING GUIDE
If you experience difficulties in the use of this music system, please check the following or call
1-800-777-5331 for Customer Service.
Symptom
Noise or sound
distorted on AM or
FM broadcast
AM or FM no sound
CD player will not
play
CD skips while
playing
Intermittent sound
from CD Player
Cassette Player no
sound
Sound distorted
Speed varies
Cassette Recorder
will not record
Distorted sound on
playback
Possible Cause
Station not tuned properly for AM
or FM.
FM: Telescopic antenna is not fully
extended.
AM: Internal antenna is not
positioned correctly
Unit not in Tuner mode, AM or FM
band.
Volume at minimum
Unit not in CD function mode.
CD is installed incorrectly.
It the CD is self-compiled, the
media used may not be compatible
with the player.
Disc is dirty or scratched.
Solution
Fine tune the AM or FM
broadcast station.
FM: Fully extend the FM
Telescopic antenna.
AM: Reposition the unit until the
best reception is obtained.
Slide function selector to select
AM or FM.
Increase Volume
Select CD function mode.
Insert CD with label side up.
Use better quality blank media
and retest.
Unit not at TAPE function mode
Volume at minimum
Dirty tape head
Tape old or worn
Dirty roller and capstan
Prevention tab removed
Wipe CD with clean cloth or use
another disc.
Clean or replace the defective
disc.
Use a CD-lens cleaning disc to
clean the lens.
Relocate the player away from
shock or vibration
Slide function selector to TAPE
Increase volume
Clean the head
Replace the tape
Clean roller and capstan
Cover hole with tape
Defective tape or dirty tape head
Replace tape or clean tape head
Dirty or defective disc.
Dirty pick up lens.
Player is subject to excessive
shock or vibration
11
SERVICE
Please refer to the instructions on the enclosed warranty card for returning your unit for service.
When returning the unit, please remove batteries to prevent damage to the unit in transit and/or
from possible battery leakage. We are not responsible for batteries returned with the product or
for the cost of replacement.
Distributed by:
Spectra Merchandising International, Inc.
Chicago Industry Tech Park
4230 North Normandy Avenue
Chicago, IL 60634, U.S.A.
Please have model number ready, for Customer Service, call 1-800-777-5331
Printed in China
12