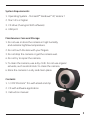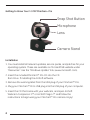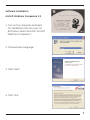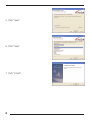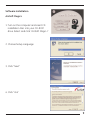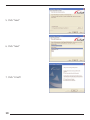
1
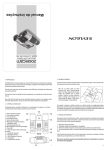
1.3 MP MiniCam™ Pro
User’s Manual
www.jascoproducts.com
98003
For technical support contact Jasco Products at 1-800-654-8483
Table of Contents
System Requirements....................................................................................... 3
Maintenance Care and Storage................................................................... 3
Contents.................................................................................................................. 3
Getting to Know Your MiniCam™ Pro.......................................................... 4
Installation.............................................................................................................. 4
WebCam Companion 3.................................................................................... 5
Magic i...................................................................................................................... 9
Snapshot by ArcSoft WebCam Companion 3......................................11
MSN® Messenger...............................................................................................12
Troubleshooting.................................................................................................13
2 Year Limited Warranty................................................................................14
FCC Statement....................................................................................................14
2
System Requirements
1. Operating System - Microsoft® Windows® XP, Vista & 7
2. Mac 10.5 or higher
3. CD drive (if using ArcSoft software)
4. USB port
Maintenance Care and Storage
1.Do not use or store the camera in high humidity
and extreme high/low temperature.
2.Do not touch the lens with your fingers.
3.Do not drop the camera or get the camera wet.
4.Do not try to repair the camera.
5.To clean the camera, use a dry cloth. Do not use organic
solvents, such as alcohol etc to clean the camera.
6.Store the camera in a dry and clean place.
Contents
1. 1.3 MP MiniCam™ Pro with stand and clip
2. CD with software application
3. Instruction manual
3
Getting to Know Your 1.3 MP MiniCam™ Pro
Snap Shot Button
Microphone
Lens
Camera Stand
Installation
1. You must install all relevant updates, service packs, and patches for your
operating system. These are available on Microsoft’s® website under
“Resources”. Use the “Windows Update” link. (www.microsoft.com).
2. Insert the included MiniCam™ Pro CD into the CD
Rom Drive. If installing the ArcSoft software.
3. Remove the warning label from the USB plug of your MiniCam™ Pro.
4. Plug your MiniCam™ Pro’s USB plug into the USB plug of your computer.
5. Insert the CD that came with your webcam, and open ArcSoft
Webcam Companion 3™ or ArcSoft Magic-i™ and follow the
instructions to begin using your MiniCam™ Pro camera. Enjoy!
4
WebCam Companion 3
New ways to get creative with your webcam!
Photo and Video Capturing
You don’t need a high-end digital video camera to make fun
movies, and share them with friends and family. WebCam
Companion makes capturing and editing video from your webcam
fast and fun. Also preview photos and videos in full screen view,
add animation effects to photos, and upload to YouTube.
Smart Video Enhancement
By using ArcSoft Noise Reduction, noise on webcam video will
be greatly minimized. The video quality is always poor for scenes
with lighting variations such as shadows and when color shifts
in illumination occurs. You can use the ArcSoft Dynamic Lighting
technology to improve the quality of real time video preview.
Pose Detection
With the Fun Frame application, automatically snap photos, adjust
the pose detection sensitivity, select a variety of layouts and
templates for printing, and select frame templates by category.
Masque your photos
Have fun and get creative with a morphing tool to integrate
your face into another character, and then snap a photo.
Preview your pictures with picture in picture, fit in view, portrait
view, zoom in/out, and flip tools. Create a template by loading
any pictures and then edit them with a variety of tools.
Editing Snapshots
Webcams are used primarily to stream video, but WebCam
Companion lets you take snapshots with a variety of editing
5
tools: adjust lighting with easy-to-use brightness and contrast
controls, even sharpness to help compensate for movements; flip
photos around to create mirror images, undo/redo changes with
a single click; resize images by pixel resolution or by percentage,
and now you can even crop your photos while you edit them.
Album Managing
As time goes by, your video and image file collections may grow
large and become unmanageable; finding the file you want then
becomes a difficult task. WebCam Companion has a convenient
album-managing function that allows you to organize your files
as soon as you create them. Captured images and video clips are
organized into albums so that you can quickly find the right one.
Intelligent Video Surveillance
It incorporates efficient in-house face detection and motion detection
technology to detect a face or object moving in front of the webcam
and can report it by alerting the user by email or FTP with captured
images. It also lets you set your recording to begin as soon as an
abnormal event is detected by your webcam. Furthermore, it gives a
convenient way to browse and review recorded videos by event.
6
Software Installation
ArcSoft WebCam Companion 3.0
1. Turn on the computer and insert
CD installation Disc into your CDROM drive. Select and click “ArcSoft
WebCam Companion.”
2. Choose Setup Language
3. Click “Next”
4. Click “Yes”
7
5. Click “Next”
6. Click “Next”
7. Click “Finish”
8
Software Installation
ArcSoft Magic-i
1.Turn on the computer and insert CD
installation Disc into your CD-ROM
drive. Select and click “ArcSoft Magic-i”
2. Choose Setup Language
3. Click “Next”
4. Click “Yes”
9
5. Click “Next”
6. Click “Next”
7. Click “Finish”
10
Snapshot by ArcSoft WebCam Companion 3.0
1. Click on the “WebCam Companion
3.0” icon on the desktop.
2. Click “Capture”
3. Click “Capture” for capture image
and the picture is saved.
4. Click “Record Video” for recording.
Note: The Snapshot button and its featuring
functions are not supported under Windows
Vista and Win7. To access this function,
please use the bundled software -ArcSoft Webcam Companion 3.0
11
MSN® Messenger
Installing/Opening MSN® Messenger
A.Windows® 2000
• Log on to http://messenger.msn.com to download
• After it has downloaded, you can open MSN® Messenger by
going to Start
Programs
Windows Messenger.
B. Windows® XP/Vista/7
• MSN® Messenger is already installed
• Open MSN® Messenger by going to Start
Programs
Windows Messenger.
Using MSN® Messenger with your camera
1. Make sure the MiniCam™ Pro driver has been installed.
2. Plug the camera into any USB port on your computer.
3. Open MSN® Messenger using the instructions above.
4. To start a video conference
a. In Windows® 2000 click on NetMeeting.
b. In Windows® XP/Vista/7 click on Actions
12
Start a Video Conversation.
Note 1: In order to chat and share video with a friend, you will need to add
your friend to your contact list. Your friend will also need to use MSN®
Messenger. This can be downloaded for free
from: http://messenger.msn.com
Note 2: Windows® XP & Vista users may be asked to add a .NET
Passport to your user account. Follow the instructions.
If you need more help, click on ”Help” in the upper righthand corner of the screen. Visit http://messenger.msn.com
for additional information and technical assistance
Troubleshooting
1. Camera will not turn on
• Make sure the camera is plugged into the USB port correctly
• Make sure your USB port is functioning properly. You may
need to install updates, service packs, or patches for your
operating system from Microsoft’s® website, www.microsoft.
com. Go to “Windows Update” under Resources.
2. Problems with ArcSoft Webcam Companion 3™ or ArcSoft Magic i™
• Visit http://www.arcsoft.com
3. Problems with MSN™ Messenger
• Visit http://messenger.msn.com
**Microsoft and Arcsoft may update their software at any time.
13
TWO YEAR LIMITED WARRANTY
Jasco Products Company warrants this product to be free from
manufacturing defects for a period of two years from the original
date of consumer purchase. This warranty is limited to the repair or
replacement of this product only and does not extend to consequential
or incidental damage to other products that may be used with this
unit. This warranty is in lieu of all other warranties express or implied.
Some states do not allow limitations on how long an implied warranty
lasts or permit the exclusion or limitation of incidental or consequential
damages, so the above limitations may not apply to you. This warranty
gives you specific rights, and you may also have other rights which
vary from state to state. If unit should prove defective within the
warranty period, return prepaid with dated proof of purchase to:
Jasco Products Company
10 E. Memorial
Oklahoma City, OK 73114
FCC Statement
Notice: Federal Communications Commission (FCC) requirements, Part 15
This equipment has been tested and found to comply with the limits for a
class B digital device, pursuant to part 15 of the FCC Rules. These limits are
designed to provide reasonable protection against harmful interference in
a residential installation. This equipment generates, uses and can radiate
radio frequency energy and, if not installed and used in accordance with
the instructions, may cause harmful interference to radio communications.
However, there is no guarantee that interference will not occur in a
particular installation. If this equipment does cause harmful interference to
radio or television reception, which can be determined by turning the
equipment off and on, the user is encouraged to try to correct
the interference by one or more of the following measures:
14
• Reorient or relocate the receiving antenna.
• Increase the separation between the equipment and receiver.
• Connect the equipment into an outlet on a circuit different from that to
which the receiver is connected.
• Consult the dealer or an experienced radio/TV technician for help.
CAUTION: Any changes of modifications not expressly approved by the
grantee of this device could void the user’s authority to operate the
equipment.
This device complies with Part 15 of the FCC Rules. Operation is subject to
the following two conditions: (1) this device may not cause harmful
interference, and (2) this device must accept any interference received,
including interference that may cause undesired operation.
Distributed for GE
by Jasco Products Company
10 E. Memorial, Oklahoma City, OK 73114
www.jascoproducts.com
15