1
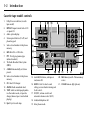
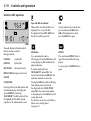
2002MY NAS Audio System Handbook
Foreword
Audio System Handbook
JAGUAR CARS LIMITED, as manufacturer, is
dedicated to the design and production of vehicles which meet
the expectations of the world’s most discerning purchasers.
This handbook forms part of the owner literature supplied with
your vehicle. It is designed to complement the relevant features
and systems of the vehicle, and make them easy to understand
and operate.
The information contained in this handbook applies to a range
of vehicles and not to a specific vehicle. For the specification of
a particular vehicle, owners should consult their Jaguar Dealer.
The manufacturer reserves the right to vary its specifications
with or without notice, and at such times and in such manner as
it thinks fit. Major as well as minor changes may be involved in
accordance with the Manufacturer’s policy of constant product
improvement.
To cover changes, it is sometimes necessary to issue one or
more handbook supplements. When reading this handbook,
check the owner literature for possible supplements.
For full details of the owner literature originally supplied with
the vehicle, owners should consult their Jaguar Dealer.
All rights reserved. No part of this publication may be
reproduced, stored in a retrieval system or transmitted, in any
form, electronic, mechanical, photocopying, recording or other
means without prior written permission from the
Service Division of Jaguar Cars Limited.
Published November 2001 by Parts and Service Communications Jaguar Cars Limited Publication Part No. JJM 18 03 24/22
Contents
1. Introduction
General information . . . . . . . . . . . . . . . . . . . . . . . . . . .1-1
Cassette tape model controls . . . . . . . . . . . . . . . . . . . .1-2
Single CD model and MiniDisc (MD) model controls. . .1-3
2. Controls and operation
Steering wheel controls (where fitted) . . . . . . . . . . . . . .2-1
Audio system display panel (in AM/FM mode). . . . . . . .2-1
Radio operation . . . . . . . . . . . . . . . . . . . . . . . . . . . . . .2-2
RBDS trouble-shooting guide . . . . . . . . . . . . . . . . . . . .2-7
Single CD player operation . . . . . . . . . . . . . . . . . . . . . .2-8
MiniDisc (MD) operation. . . . . . . . . . . . . . . . . . . . . . .2-10
Cassette tape player operation . . . . . . . . . . . . . . . . . .2-12
Radio set up . . . . . . . . . . . . . . . . . . . . . . . . . . . . . . . .2-13
Compact disc (CD) changer. . . . . . . . . . . . . . . . . . . . .2-14
3. System care
Audio system care. . . . . . . . . . . . . . . . . . . . . . . . . . . . .3-1
A comprehensive index is located at the back of this Handbook.
1
Introduction
Introduction
General information
This Handbook describes every option and model variant.
Some of the items covered may therefore not apply to your
particular vehicle.
The vehicle Audio system interacts with the Voice Activation,
In-car Phone and Emergency Message (JaguarNet) systems via
data on the multiplex communications vehicle network.
The audio system can be controlled from either the radio panel
or multi-function controls on the left-hand side of the steering
wheel.
The sound system antenna is an integral part of the vehicle
backlight and serves both FM and AM radio wavebands.
1-1
1-2
Introduction
Cassette tape model controls
1.
2.
3.
4.
5.
6.
7.
8.
9.
10.
11.
12.
13.
14.
Dolby B noise reduction (cassette
tape model).
REPEAT. Repeat current track of CD
or repeat CD.
Audio system display.
Station preset buttons (1 to 9) and
phone key pad.
Seek a stored number in the phone
memory.
MIX. Mix CDs or CD tracks.
PTY. Priority programme type
(where broadcast).
TA. Radio Broadcast Data System
(RBDS).
A MEM. Automatically set station
presets.
Seek a stored number in the phone
memory.
CD. Select CD changer.
AM/FM. Radio waveband select.
TAPE. Select cassette tape play when
in other audio mode, or tape side
change (when a tape is inserted and
playing).
Eject. Eject cassette tape.
15. Seek AM/FM station, seek tape or
cue/review CD.
16. MODE. Scroll to select sound
settings, voice activation training and
clock control.
17. ON/OFF, volume control and
automatic volume control (AVC).
18. Send/end telephone call.
19. Enter phone mode.
20. MR. Memory recall – Phone memory
access.
21. CLEAR. Remove digits (phone).
Introduction
1-3
Single CD model and MiniDisc (MD) model controls
1.
2.
3.
4.
5.
6.
7.
8.
9.
10.
11.
12.
13.
14.
15.
Mute. Mutes audio.
REPEAT. Repeat current track of
CD/MD or repeat CD/MD.
Audio system display.
Station preset buttons (1 to 9) and
phone key pad.
Seek a stored number in the phone
memory.
MIX. Mix CDs or CD/MD tracks.
PTY. Priority programme type
(where broadcast).
TA. Radio Broadcast Data System
(RBDS).
A MEM. Automatically set station
presets.
Seek a stored number in the phone
memory.
CDC. Select CD changer.
AM/FM. Radio waveband select.
CD. Select compact disc play when
in other audio mode, or CD pause
(when a CD is inserted and playing).
Eject. Eject CD or MD.
Seek AM/FM station, cue/review
CD/MD.
16. MODE. Scroll to select sound
settings, voice activation training and
clock control.
17. ON/OFF, volume control and
automatic volume control (AVC).
18. Send/end telephone call.
19. Enter phone mode.
20. MR. Memory recall – Phone memory
access.
21. CLEAR. Remove digits (phone).
22. MD. Select MiniDisc play when in
other audio mode or MD pause
(when MiniDisc is inserted and
playing).
23. CD. Select CD changer.
2
Controls and operation
Controls and operation
3. Press and release to cycle through
Radio FM, AM, Cassette, CD or MD
and CD Changer, or press and hold for
at least two seconds to select Phone
Ready mode.
4. Press upper or lower part of rocker
switch and release to cycle through
preset radio stations, the next CD/MD
track or tape AMS (Automatic Music
Search).
Press and hold for at least two
seconds to cycle to next strong
station, next CD or change tape side.
Steering wheel controls (where
fitted)
Four audio system control switches are
situated on the left-hand side of the
steering wheel. Duplicating the functions
of buttons on the audio panel, these
provide finger-tip control of audio,
telephone and voice activation systems
whilst driving.
1. Press to start voice session, or mute
when voice is not fitted. Answer
phone call when ringing or Send/End
when in Phone mode.
2. Press appropriate button to increase
or decrease volume.
2-1
Audio system display panel
(in AM/FM mode)
ST
Stereo.
PTY
Priority programme type
selected.
2-2
Controls and operation
Radio operation
Reception
FM reception offers the advantages of low
noise interference, minimal distortion,
wide dynamic range, extended frequency
response, and is usually broadcast in
stereo. FM frequency waves are however
relatively short and travel in a straight
line and can therefore be impeded by
obstructions, which may adversely affect
reception in certain parts of the country.
This is a condition known as Multipath
Interference.
Whilst FM reception generally provides
better quality sound, AM reception may
prove superior in remote areas not
covered by the shorter range
FM transmitters.
When experiencing poor FM reception,
background noise can be reduced by
pressing the MODE button, selecting
TREBLE and reducing the treble setting.
On/Off and volume control
Press the control knob to switch the radio
on, press again to switch off. Turn the
control knob clockwise to increase or
counter-clockwise to decrease volume.
Any volume setting made whilst in audio,
phone, or voice activation mode, will be
memorised for that system.
Automatic volume control (AVC)
This maintains radio volume at a level
sufficient to overcome road noise as
vehicle speed increases or decreases.
To activate AVC, press and hold the
volume control knob until AVC is
displayed. To de-activate AVC,
momentarily press the volume control
knob again. The level of AVC control can
be adjusted by turning the volume
control knob whilst in AVC ON mode.
When AVC is ON, manual adjustment of
volume will override the AVC setting.
MODE button
The MODE button functions at two levels
and is primarily used to adjust sound
quality to personal preference.
In addition, it is used to adjust Voice
Activation volume, select Voice
Activation Training and to set the audio
display clock.
Mode level 1
Repeatedly press and release the
MODE button to scroll through the
following modes:
BASS
Increase/decrease.
TREBLE
Increase/decrease.
BALANCE
Left to right.
FADE
Front to rear.
SUB LEVEL
(S-TYPE Premium
audio system only)
Increase/decrease
subwoofers.
Controls and operation
DSP Setting Seating Positions
With a mode selected, adjust the volume
control knob to the desired level.
After approximately five seconds the
audio system will return to normal
volume control mode.
Digital Signal Processing – DSP
(S-TYPE Premium Audio System only)
DSP facilitates optimisation of sound for
specific seating positions. To optimise
sound for all seating positions:
1. Repeatedly press the MODE button
until POS ALL is displayed.
2. Rotate the volume control knob to
cycle through POS F-LEFT (front left),
POS F-RIGHT (front right),
POS REAR, and POS FRONT until
the desired setting is achieved.
Following approximately five seconds of
no further actions or adjustments, the
audio system will return to the previous
display.
Mode level 2
Press and hold MODE button until
TA VOLUME is displayed, then
repeatedly press and release to scroll to
the following displays as required:
• VOICE (adjust Voice Activation
volume).
• VOICE TRAIN A.
• VOICE TRAIN B.
• CLOCK SET.
Press and hold MODE button to exit.
2-3
Setting the audio display clock
1. Press and hold the MODE button
until TA VOLUME is displayed.
2. Repeatedly press and release the
MODE button until CLOCK SET is
displayed.
3. While the hour format is flashing, use
the seek up/seek down keys to select
either 12 or 24 hour format.
4. Press and release the MODE button.
5. If the 12 hour format has been
selected, use the # key to select AM
or PM as appropriate.
6. Using the keypad, enter the correct
time. It should be noted that clock
time must be entered as four digits
e.g. 0325 or 1525, when in 12 or
24 hour format.
7. To exit clock setting procedure, press
and hold the MODE key until the
display reverts to audio mode.
2-4
Controls and operation
Source tone memory
Bass and Treble positions are
automatically memorised for AM radio,
FM radio, cassette tape and CD/MD,
allowing individual settings for each
mode.
Presetting memorised radio stations
Change audio system source
!
Press the desired audio system source
button.
Band Switch AM/FM
Pressing AM/FM repeatedly will cycle the
radio through FM. Band selection will be
shown in the display panel. When a tape
or CD/MD is being played, pressing the
band switch will select radio operation.
WARNING:
In the interests of road safety, do not
attempt to preset a station while
driving.
On each waveband, nine stations can be
memorised using keypad buttons 1 to 9.
After tuning to a station, press and hold
the selected button until the unit ‘beeps’.
A station can be recalled from the preset
memory by pressing and immediately
releasing the button. Pressing the steering
wheel preset selector button will cycle
through the preset stations.
Seek and manual tuning
In AM/FM mode, pressing and releasing
the left or right button will activate the
radio in seek mode, tuning through the
frequency range to the next available
station. Pressing either button for more
than two seconds will enter manual
tuning mode.
Auto memory (A MEM)
The automatic memory function
programmes the nine strongest stations
on a selected waveband to presets 1 to 9.
Note: These are additional to the preset
stations described earlier.
To activate this function, press and hold
A MEM button for at least two seconds.
The radio will be briefly muted while it
searches the waveband for the nine
strongest stations. When programming is
complete the radio will default to preset
number 1 and audio volume is restored.
Controls and operation
If stations cannot be located for all preset
positions, those that are found will be
allocated positions commencing with
number 1, leaving the remainder not
programmed. The display will show
NO FM or NO AM if unprogrammed
presets are selected.
To switch between the A MEM preset
stations and your own presets, press and
immediately release the A MEM button.
A MEM with radio broadcast data
system (RBDS) selected
If the A MEM function is operated while
in RBDS mode, the radio will be muted
briefly, while a search is made for the
nine strongest RBDS stations.
Radio broadcast data system (RBDS)
Jaguar sound systems are equipped with
Radio Broadcast Data System (RBDS).
When tuned to certain stations on the
FM waveband, the radio decodes signals
transmitted, to provide the following
functions (dependent upon the service
available).
• RBDS station name display:
When RBDS is selected the station
name is displayed in eight characters.
• RBDS Station/Programme type display
and search:
RBDS displays information on the type
of material broadcast by the station or
programme that is on i.e. News,
Classical, Rock etc. In addition to
this function, the radio can search for
a selected programme type.
• RBDS Priority programme type auto
re-tuning (where broadcast).
2-5
RBDS operation
To activate RBDS, press the TA button
and hold for at least two seconds until
RBDS ON is displayed.
To de-activate RBDS, press the TA button
and hold until RBDS OFF is displayed.
With the radio tuned to an RBDS station
and RBDS activated, the radio gathers
RBDS information and displays the
service name/data.
If the radio is not tuned to an RBDS
station, it will remain on that station and
display the frequency, and RBDS will
remain on in readiness for a signal.
When RBDS data is lost the radio will stay
on station, the display shows the
frequency only and RBDS remains on in
readiness for the signal to recover.
If the RBDS function does not respond
correctly, see RBDS trouble-shooting
guide on page 2-7.
2-6
Controls and operation
Programme type (PTY)
This has two functions:
To display current station programme
type and to select a programme type and
re-tune to it.
Momentarily press the PTY button to
display the current station programme
type. Use the tuning buttons to cycle
through the available programme types,
press the PTY button again to activate a
search for the selected programme type.
If there is a station with the correct PTY
then the radio will re-tune to it. If not, the
radio will indicate NO PTY and return to
the current station.
Priority programme type (PPTY)
Functions as an interrupt or as a
‘PTY Following’.
Press and hold the PTY button to activate
the selected priority programme
type, PPTY. The radio will now wait for
RBDS information to indicate that a
station has changed its programme type,
i.e. to NEWS. The radio will now re-tune
to the new station for the duration that it
remains on that programme type.
If the current station is already on the
selected priority programme type, then
when this station is lost, the radio will
attempt to find another with the correct
programme type.
To cancel priority programme type, press
and hold the PTY button, the PTY
indicator will clear from the display.
Note: PPTY interrupt feature is also
available in tape, CD/MD audio modes.
Priority PTY interrupt skip
Interruptions for NEWS or other selected
priority PTY, can be skipped by
pressing TA during the interrupt. The
radio returns to the previously selected
audio source.
Note:
1. Interrupt skip will not cancel
activation of PPTY and it will remain
ready for the next interrupt.
2. PTY and Priority PTY features are
reliant upon the broadcast
information from radio stations, and
may be much better in some areas
than others.
PTY31-Alarm (where broadcast)
When using the radio with RBDS
selected, a PTY31-ALARM service will
operate, to alert on any crises of major
national importance. When such a
broadcast is made, ALARM will appear in
the audio display.
Controls and operation
2-7
RBDS trouble-shooting guide
Incorrect response from RBDS
Radio does not display programme name.
Reason and rectification
Check that RBDS is turned on by pressing and holding the TA button until the
display confirms RBDS ON. If the radio does not display a programme service
name, it is not broadcasting RBDS data, or you are in a poor reception area.
Try re-tuning to another station with RBDS.
Station name is lost and displays frequency only. Radio has lost reception of the RBDS data due to vehicle moving out of
transmitter range, loss of signal in a tunnel, under a garage forecourt canopy, or
similar screening. If the latter is the case, when the vehicle is clear of the
screening, the station name will return after a short delay.
Upon operating A MEM, NO FM is displayed
when most or all of the preset positions are
selected.
The radio cannot locate nine FM or RBDS FM stations dependent upon the mode
selected. If this occurs, switch off RBDS and reselect A MEM.
2-8
Controls and operation
Single CD player operation
The audio display will indicate which
function has been selected.
Messages include:
LOADING
Loading CD.
EJECTING
Ejecting CD.
MIX TRACKS
Mix random tracks.
REPEAT TRACK Repeat current track.
PAUSED
CUE/REVIEW
Inserting a CD into the CD aperture will
start immediate play. The display will
show LOADING, followed by
TR-01 00' 00". The CD symbol will also
be displayed until the CD is ejected,
regardless of the selected audio source.
Eject and CD-in indicator
When a CD is inserted, the CD icon is
displayed. Press to eject the CD.
The display will show DISC EJECT and
the CD icon will be turned off.
MIX
To play random tracks from the disc,
press and release the MIX button.
MIX will be displayed. To cancel,
press the MIX button again.
CD button
If you are playing the radio or
CD changer, pressing the CD button will
resume playing any CD installed in the
player mechanism.
The audio display will show
TR-NN MM' SS", where NN is the
current track number and MM SS is the
track time in minutes and seconds.
Pressing the CD button while in CD play
mode will pause the current track, the
display will show TR-NN PAUSE
where NN is the current track number.
A subsequent press of the CD button will
resume play mode.
This function can also be controlled by a
button on the steering wheel
(see page 2-1).
REPEAT
Press and release REPEAT button to
repeat the current CD track being played.
To cancel, press the REPEAT button
again.
Controls and operation
Seek up and down
This control selects seeking of tracks up
or down. Momentarily press the righthand button to skip to the next track.
Repeated pressing will select further
tracks.
The left-hand button returns to the
beginning of the current track. Repeated
pressing selects previous tracks.
Pushing and holding either button selects
cue and review of the CD.
Note: Sound level is reduced when cuing
and reviewing a CD.
2-9
2-10
Controls and operation
MiniDisc (MD) operation
The audio display will indicate which
function has been selected.
Messages include:
LOADING
Loading MD.
EJECTING
Ejecting MD.
MIX TRACKS
Mix random tracks.
REPEAT TRACK Repeat current track.
PAUSED
CUE/REVIEW
Inserting a MD into the MD aperture will
start immediate play. The display will
show LOADING, followed by
TR-01 00' 00". The MD symbol will also
be displayed until the MD is ejected,
regardless of the selected audio source.
Eject and MD-in indicator
When a MD is inserted, the MD icon is
displayed. Press to eject the MD.
The display will show DISC EJECT and
the MD icon will be turned off.
MIX
To play random tracks from the disc,
press and release the MIX button.
MIX will be displayed. To cancel,
press the MIX button again.
MD button
If you are playing the radio or
CD changer, pressing the MD button will
resume playing any MD installed in the
player mechanism.
The audio display will show
TR-NN MM' SS", where NN is the
current track number and MM SS is the
track time in minutes and seconds.
Pressing the MD button while in MD play
mode will pause the current track,
the display will show TR-NN PAUSE
where NN is the current track number.
A subsequent press of the MD button will
resume play mode.
This function can also be controlled by a
button on the steering wheel
(see page 2-1).
REPEAT
Press and release REPEAT button to
repeat the current MD track being
played.
To cancel, press the REPEAT button
again.
Controls and operation
Seek up and down
This control selects seeking of tracks up
or down. Momentarily press the righthand button to skip to the next track.
Repeated pressing will select further
tracks.
The left-hand button returns to the
beginning of the current track. Repeated
pressing selects previous tracks.
Pushing and holding either button selects
cue and review of the MD.
Note: Sound level is reduced when cuing
and reviewing a MD.
2-11
2-12
Controls and operation
Cassette tape player operation
Eject and tape-in indicator
When a cassette is inserted, the aperture
door closes and a cassette icon is
displayed. Press to eject the cassette.
The audio display will indicate which
function has been selected.
Messages include:
SIDE1 UP1
Locate beginning of next
track on side 1.
SIDE1 DN1
Locate beginning of track
being played on side 1.
SIDE1 REW
Rewind.
SIDE1 FF
Fast forward.
LOADING
Loading tape.
TAPE EJECT
Ejecting tape.
TAPE CLEAN Tape mechanism
requires cleaning.
When loaded, a tape immediately plays
and after playing one side, auto-reverses
and plays the other. Equalisation of
non-ferric tapes is automatically adjusted.
TAPE button
If you are playing the radio or
CD changer, pressing TAPE will play any
cassette in the player. This function can
also be controlled by a button on the
steering wheel (see page 2-1).
Change tape side
While playing a cassette, press the
TAPE button to change to the other side
of the tape. This function can also be
controlled by a button on the steering
wheel (see page 2-1).
Fast forward and rewind
These controls have two functions,
to seek a track, and tape fast forward or
rewind. Momentarily pressing the righthand button will locate the beginning of
the next track. Similarly pressing the lefthand button, will return to the beginning
of the current track. Pressing and holding
the appropriate button for two seconds
will activate continuous fast forward or
rewind of the tape. This can be cancelled
by pressing either button again.
Dolby B
When using a cassette with a ‘Dolby’
recording, the noise reduction system can
be selected by pressing the DOLBY on/off
button. DOLBY will be displayed to
indicate the system is active.
Dolby noise reduction system is
manufactured under licence from
Dolby Laboratories Licensing
Corporation. ‘Dolby’ and the double-D
symbol are trade-marks of
Dolby Licensing Corp.
Controls and operation
Radio set up
This function enables the radio to be set to user operating
preferences. By selecting SET UP and using the preset buttons,
the owner or Jaguar Dealer can adjust certain radio functions.
When in SET UP, pressing the relevant preset button, as
detailed below, will display the facility selected and its state.
The state of that facility can be changed by pressing the preset
button again.
To enter SET UP: Press Tape Eject and AM/FM buttons
simultaneously.
The display will show SET UP. The following preferences can
then be selected or changed in any order, within a 15 second
period. After 15 seconds the display will clear and exit SET UP.
Preset 1
Press Preset 1 to enable or disable RBDS,
depending upon RBDS availability in the user’s
country.
Preset 2
On cassette tape models, this controls the
Tape Clean reminder facility. To switch off this
reminder, press the Preset 2 button until
TAPE CLN OFF shows on the display.
Preset 3
Blank.
Preset 4
Blank.
Preset 5
KEY OFF EJECT – On cassette tape models,
this sets the cassette tape to automatically eject
when the ignition key is turned to 0.
Preset 6
Blank.
Preset 7
Blank.
2-13
Preset 8
Blank.
Preset 9
Blank.
Preset 0
During initial factory installation, this is used to set
the radio to the USA region. Regional settings
determine the correct frequency increments
required for seeking stations, automatic tuning etc.
Note: The regions are preset at the factory.
Should you require a regional change, consult your
Jaguar Dealer.
2-14
Controls and operation
Compact disc (CD) changer
A CD changer (where fitted) is installed in the luggage
compartment and will accommodate up to six discs, each
mounted in a tray.
Caution: The 8 cm diameter discs and associated
adaptors available in some countries must not be
installed in the CD changer magazine. Any attempt to
install these items can result in permanent damage to the
CD changer mechanism.
CD check sequence
When the CD Player is switched on, a check is performed on
each disc tray in the CD changer magazine. When the six trays
have been checked the player returns to the first disc in the
magazine.
Loading discs and inserting magazine
Loading a disc into a magazine tray:
Slide the magazine door to the right (A). Press the eject
button (B), the magazine will then partly eject from the
CD changer. Pull the disc tray from the magazine (C).
Ensuring the playing surface is not touched, load a selected disc
into the tray with the label facing upwards (D). Push the tray
back into the magazine until it clicks. Tray slots are
numbered 1 (bottom) to 6 (top).
Inserting the magazine:
With the arrow mark facing upwards and pointing towards the
CD changer, insert the loaded magazine into the CD changer (E)
ensuring that it clicks into position. Close the sliding door.
Keep the sliding door closed to prevent dust entering the
playing mechanism.
JOL.850
Controls and operation
CD changer mode
The audio display indicates the CD and
track being played, and CD status.
Below is an example of the display when
playing track 1 from CD4.
Other messages:
CD1 LOADING – CD1 is being loaded.
NO DISC – In the selected position.
NO MAGAZINE – In the CD
autochanger.
CD1 MIX 10 – The player is playing CD1
in MIX mode (track 10).
D MIX – All CDs are in MIX mode.
MAG EJECT – Magazine is being ejected.
PAUSED – The CD changer is paused and
ready to play.
CDC button
Press CDC to select CD changer mode.
Note: Button labelled as CD for cassette
and MiniDisc models.
This function can also be controlled from
the appropriate button on the steering
wheel (see page 2-1).
CD selection
Preset buttons 1 to 6 select the compact
discs in those positions in the magazine.
If there is no disc in the selected position,
NO DISC will be displayed. If there is no
magazine in the CD changer,
NO MAGAZINE will be displayed.
2-15
MIX and CD MIX
To play random tracks from a selected
disc, press and release the MIX button.
MIX will be displayed. To cancel, press
the MIX button again.
To play random tracks from all discs
present in the magazine, press the
MIX button for two seconds. DISC MIX
will be momentarily displayed, followed
by D MIX. To cancel, press and hold the
MIX button.
Seek up and down
This control selects seeking of tracks up
or down. Momentarily press the righthand button to skip to the next track.
Repeated pressing will select further
tracks.
The left-hand button returns to the
beginning of the current track. Repeated
pressing selects previous tracks.
Pushing and holding either button selects
cue and review of the CD.
Note: Sound level is reduced when cuing
and reviewing a CD.
2-16
Controls and operation
REPEAT
Momentarily press the REPEAT button to
repeat the current CD track being played,
R-ONE will be displayed. To cancel,
momentarily press the REPEAT button
again.
Press and hold the REPEAT button for
two seconds to repeat the current CD,
R-ALL will be displayed. To cancel, press
and hold the REPEAT button again for
two seconds.
Pause
When playing a CD, press CDC button to
pause play. Press again to continue play.
3
System care
System care
Audio system care
Caution: Care must be taken to avoid
spilling or splashing drinks onto the
audio system head. In the event of
such an occurrence advise your
Jaguar Dealer.
Radio
Do not use petrol, solvents or abrasive
cleaners on the radio. Wipe the surface of
the radio with a lint-free cloth to remove
dust. Slightly moisten the cloth with clean
water to remove any finger marks from
the outside surface of the radio.
If the radio is to be removed or the
battery disconnected, first ensure that the
radio code is recorded. The number will
be required for re-insertion following
radio installation.
Cassettes
Always use good quality cassettes.
Inferior quality tapes can jam the player
mechanisms, adversely affect sound
quality, and accelerate the build-up of
deposits on the play-back head.
Before playing a cassette, ensure that the
tape is not loose on the spools. If
necessary, take up the slack by gently
turning the spools with the end of a
pencil. A jammed or sticking tape will
cause the auto-reverse mechanism to
operate continuously.
It is advisable not to use a tape longer
than 45 minutes playing time each
side (C90). Cassettes should be stored in
their library cases away from direct
sunlight. Do not store cassettes in door
pockets where magnets in loud-speakers
can impair sound reproduction. Never
insert a cassette that has a torn or loose
label, it may cause the mechanism to jam.
After approximately 15 hours playing
time, the audio screen will display
‘CLEAN TAPE’. Clean the tape
mechanism itself using a proprietary
cassette cleaning kit available from any
good Hi-Fi stockist.
Caution: Do not use abrasive type
cleaners as they can cause excessive
wear of the play-back head.
3-1
Compact discs (CDs) and
MiniDiscs (MDs)
When handling CDs/MDs, do not touch
the playing surface. CDs/MDs should be
stored in their cases away from direct
sunlight, heat and dust. Scratches,
finger-marks or dust on the surface of a
disc can cause the optical pick-up to skip
tracks. If the surface of a CD/MD is dirty,
use an appropriate CD/MD cleaner.
Do not attempt to play discs that are
damaged, warped, cracked or of incorrect
size. They can seriously damage the
play-back mechanism.
Index
Audio system
– Change audio system source . . . . . . . . . . . . . . . . . . . . . 2-4
– Display panel . . . . . . . . . . . . . . . . . . . . . . . . . . . . . . . . 2-1
– Setting the clock . . . . . . . . . . . . . . . . . . . . . . . . . . . . . . 2-3
– Steering wheel controls . . . . . . . . . . . . . . . . . . . . . . . . . 2-1
C
Care of the audio system
– Cassettes . . . . . . . . . . . . . . . . . . . . . . . . . . . . . . . . . . . . 3-1
– Compact Discs (CDs) . . . . . . . . . . . . . . . . . . . . . . . . . . . 3-1
– MiniDiscs (MDs) . . . . . . . . . . . . . . . . . . . . . . . . . . . . . . 3-1
– Radio . . . . . . . . . . . . . . . . . . . . . . . . . . . . . . . . . . . . . . 3-1
Cassette tape player operation . . . . . . . . . . . . . . . . . . . . 2-12
– Change tape side . . . . . . . . . . . . . . . . . . . . . . . . . . . . . 2-12
– Dolby B . . . . . . . . . . . . . . . . . . . . . . . . . . . . . . . . . . . . 2-12
– Eject and tape-in indicator . . . . . . . . . . . . . . . . . . . . . 2-12
– Fast forward and rewind . . . . . . . . . . . . . . . . . . . . . . . 2-12
– Model controls . . . . . . . . . . . . . . . . . . . . . . . . . . . . . . . 1-2
– Tape button . . . . . . . . . . . . . . . . . . . . . . . . . . . . . . . . 2-12
CD operation
– CD selection . . . . . . . . . . . . . . . . . . . . . . . . . . . . . . . . 2-15
– CDC button . . . . . . . . . . . . . . . . . . . . . . . . . . . . . . . . . 2-15
– MIX and CD MIX . . . . . . . . . . . . . . . . . . . . . . . . . . . . . 2-15
– Pause . . . . . . . . . . . . . . . . . . . . . . . . . . . . . . . . . . . . . 2-16
– Repeat . . . . . . . . . . . . . . . . . . . . . . . . . . . . . . . . . . . . . 2-16
– Seek up and down . . . . . . . . . . . . . . . . . . . . . . . . . . . . 2-15
CD player
– CD button . . . . . . . . . . . . . . . . . . . . . . . . . . . . . . . . . . . 2-8
– Eject and CD-in indicator . . . . . . . . . . . . . . . . . . . . . . . 2-8
– MIX . . . . . . . . . . . . . . . . . . . . . . . . . . . . . . . . . . . . . . . . 2-8
– Model controls . . . . . . . . . . . . . . . . . . . . . . . . . . . . . . . 1-3
– Operation . . . . . . . . . . . . . . . . . . . . . . . . . . . . . . . . . . . 2-8
– Repeat . . . . . . . . . . . . . . . . . . . . . . . . . . . . . . . . . . . . . . 2-8
– Seek up and down . . . . . . . . . . . . . . . . . . . . . . . . . . . . . 2-9
Compact disc (CD) changer . . . . . . . . . . . . . . . . . . . . . . . 2-14
– CD changer . . . . . . . . . . . . . . . . . . . . . . . . . . . . . . . . . 2-14
– CD changer mode . . . . . . . . . . . . . . . . . . . . . . . . . . . . 2-15
– CD check sequence . . . . . . . . . . . . . . . . . . . . . . . . . . . 2-14
– Ejecting the magazine . . . . . . . . . . . . . . . . . . . . . . . . . 2-14
– Inserting the magazine . . . . . . . . . . . . . . . . . . . . . . . . 2-14
D
Digital Signal Processing – DSP . . . . . . . . . . . . . . . . . . . . . 2-3
– Setting Seating Positions . . . . . . . . . . . . . . . . . . . . . . . . 2-3
G
General information . . . . . . . . . . . . . . . . . . . . . . . . . . . . . 1-1
M
MiniDisc (MD)
– Eject and MD-in indicator . . . . . . . . . . . . . . . . . . . . . . 2-10
– MD button . . . . . . . . . . . . . . . . . . . . . . . . . . . . . . . . . 2-10
– MIX . . . . . . . . . . . . . . . . . . . . . . . . . . . . . . . . . . . . . . . 2-10
– Model controls . . . . . . . . . . . . . . . . . . . . . . . . . . . . . . . 1-3
– Operation . . . . . . . . . . . . . . . . . . . . . . . . . . . . . . . . . . 2-10
– Repeat . . . . . . . . . . . . . . . . . . . . . . . . . . . . . . . . . . . . . 2-10
– Seek up and down . . . . . . . . . . . . . . . . . . . . . . . . . . . . 2-11
R
Index
Radio broadcast data system . . . . . . . . . . . . . . . . . . . . . . . 2-5
– Priority programme type (PPTY) . . . . . . . . . . . . . . . . . . . 2-6
– Priority PTY interrupt skip . . . . . . . . . . . . . . . . . . . . . . . 2-6
– Programme type (PTY) . . . . . . . . . . . . . . . . . . . . . . . . . . 2-6
– PTY31-Alarm . . . . . . . . . . . . . . . . . . . . . . . . . . . . . . . . . 2-6
– RBDS operation . . . . . . . . . . . . . . . . . . . . . . . . . . . . . . . 2-5
– RBDS trouble-shooting guide . . . . . . . . . . . . . . . . . . . . . 2-7
Radio operation . . . . . . . . . . . . . . . . . . . . . . . . . . . . . . . . . 2-2
– A MEM with RBDS selected . . . . . . . . . . . . . . . . . . . . . . 2-5
– Auto memory (A MEM) . . . . . . . . . . . . . . . . . . . . . . . . . 2-4
– Automatic volume control (AVC) . . . . . . . . . . . . . . . . . . 2-2
– Band Switch AM/FM . . . . . . . . . . . . . . . . . . . . . . . . . . . . 2-4
– Mode button . . . . . . . . . . . . . . . . . . . . . . . . . . . . . . . . . 2-2
– On/Off and volume control . . . . . . . . . . . . . . . . . . . . . . 2-2
– Presetting memorised radio stations . . . . . . . . . . . . . . . 2-4
– Reception . . . . . . . . . . . . . . . . . . . . . . . . . . . . . . . . . . . . 2-2
– Seek and manual tuning . . . . . . . . . . . . . . . . . . . . . . . . . 2-4
Radio set up modes . . . . . . . . . . . . . . . . . . . . . . . . . . . . . 2-13
S
Source tone memory . . . . . . . . . . . . . . . . . . . . . . . . . . . . . 2-4
JJM 18 03 24/22