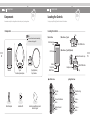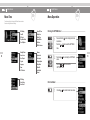
1
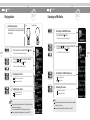
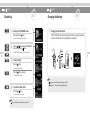
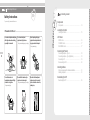
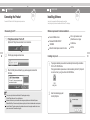
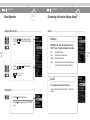
Instruction Manual
N11
www.iriver.com
Thank you for your purchase.
Please read this manual carefully before using your new player.
Quick Start
Contents
Turning on/off the Player
Quick Start
Turning on/off the Player ……………………
Playing Music ………………………………
Listening to FM Radio ………………………
Recording ……………………………………
Charging the Battery ………………………
1
2
3
4
5
1 Before Using the Product
Thank you for your iriver purchase ……… 8
Copyrights/Certification/Trademarks/
Limited Liability ……………………………… 9
Safety Instructions ………………………… 10
Note
Button image with white background = Press the button. (Example:
)
Button image with black background = Press and hold the button. (Example :
1
2 Getting started
Components ………………………………… 14
Locating the Controls ……………………… 15
LCD Screen ………………………………… 16
Connecting the Product …………………… 18
Installing Software ………………………… 21
Downloading from PC ……………………… 25
Press the [
] button.
Note
If the player does not power ON, please replace your battery.
2
I Turning off the player
Press and hold the [
The player will be turned off.
4 Useful Features
Menu Tree …………………………………… 50
Menu Operation …………………………… 51
Customizing the Function Settings (Menu) … 53
I Turning on the player
The player will be turned on and previous function mode will
be displayed.
3 Basic Operation
Selecting the Function Mode ……………… 28
Playing a Music File ………………………… 29
Browser Function …………………………… 38
Listening to FM Radio ……………………… 39
Recording …………………………………… 44
5 Additional information
Firmware Upgrade ………………………… 72
Initializing the Player (Format) …………… 73
Troubleshooting …………………………… 74
Specifications ……………………………… 76
FCC ………………………………………… 77
)
] button.
1
Quick Start
Quick Start
Playing Music
1
Listening to FM Radio
I Connecting earphone
Type A
Type B (Optional)
Connect earphone to the player as shown
in the image.
1
I Selecting the <FM RADIO> mode
Press and hold the [ ] button.
The function mode screen will be displayed.
2
2
When powered on, press and hold the [ ] button.
3
Press the [
] button to select the <MUSIC>
mode, then press the [
] button.
2
Press the [
] button to select the <FM RADIO>
mode, then press the [
] button.
The <FM RADIO> station will be displayed.
The function mode screen will be displayed.
3
Previous music file will resume playback.
4
I Selecting a music file
5
I Adjusting the volume
Note
: Selects previous music file
: Selects next music file
: Decreases volume level
: Increases volume level
The player will be automatically turned off if it is being left for a period
of time without doing anything.
(For more information about Timer Setting, refer to page 63.)
For more information about playing music, refer to page 29-37.
3
I Searching for a FM radio frequency
4
I Adjusting the volume
Note
: To previous station
: To next station
: Decreases volume level
: Increases volume level
In areas where the signal is weak, some channels may be unavailable
or reception may be poor.
For more information about FM radio station, refer to 39-43.
Quick Start
Quick Start
Recording
Charging the Battery
1
I Selecting the <RECORDING> mode
Press and hold the [ ] button.
1
The function mode screen will be displayed.
2
I Charging with mini USB adapter
Push "PUSH OPEN" on the back of your player to disconnect its cap as the image below.
Connect the USB port and PC with mini USB cable to charge battery.
Press the [
] button to select the <RECORDING>
mode, then press the [
] button.
The <RECORDING> standby screen will be displayed.
4
5
3
I To start recording
Press the [ ] button.
The recording will be started.
Press the [ ] button once again.
The recording will be finished.
Note
4
I To confirm recorded content
Press the [
] button.
The recorded content will be played.
Note
For more information about recording, refer to page 44-47.
You can also charge the battery when the player is tuned off.
Charging Time : 1.5 hours (At fully discharged/Stop mode)
I 1 Before Using the Product
Chapter
1
www.iriver.com
Thank you for your iriver purchase
Welcome ……………………………………………………………… 8
iriver’s web site ……………………………………………………… 8
Copyrights/Certification/Trademarks/Limited Liability
Copyrights/Certification/Trademarks/Limited Liability …………… 9
Safety Instructions
Precautions for Player …………………………………………… 10
Precautions for Others …………………………………………… 12
1 I Before Using the Product
1 I Before Using the Product
Thank you for your iriver purchase
Copyrights/Certification/Trademarks/Limited Liability
I Welcome I
I Copyrights I
Thank you for purchasing iriver's N11 player,
This user's manual is provided to help you safely use the product.
Please read this manual carefully before using it.
Thank you.
I iriver's web site I
8
iriver Limited has all the rights of the patent, trademark, literary property and intellectual property related
to this manual. You may not copy or reproduce any part of this manual unless authorized by iriver Limited.
You can be punished by using any part of this manual illegally.
The software, audio and video which have an intellectual property are protected by copyright and
international laws.
It is user’s responsibilities when he/she reproduces or distributes the contents created by this product.
The companies, institutions, products, people and events used in examples are not real data. We don't
have any intension to be related with any companies, institutions, products, people and events through
this manual and should not draw inferences.
User’s are responsible for observing the copyrights and intellectual properties.
© 1999~2005 iriver Limited. All rights reserved.
I Certification I
CE, FCC, MIC
I Trademarks I
Windows, Windows 98SE, Windows ME, Windows 2000, Windows XP and Windows Media Player are
the registered trademarks of Microsoft Corp.
is a tradmark of SRS Labs, Inc.
WOW technology is incoporated under license from SRS Labs, Inc.
http://www.iriver.com
The iriver's home page provides the overview of company and products, other related information,
and answers to customers' questions.
Firmware and software updates are also available as well as the most recent information about your
iriver product.
You may get useful information from "User's Forum" and FAQ.
Register your ID and get any appropriate online customer support. Also, you can get newsletter such
as newly announced product, firmware upgrade, various promotion events via email.
I Limited Liability I
Neither the manufacturer, importers nor dealers is responsible for any accidental damage including bodily injury
or any damage resulting from mususe or unsuitable operation by you. The information on this manual is prepared
with the current player specifications.
The manufacturer, iriver Limited, is adding new features to the product and may persistently apply new technologies
hereafter.
All standards may be changed at any time without notice.
9
1 I Before Using the Product
1 I Before Using the Product
Safety Instructions
Safety Instructions
For your safety, please read before use.
For your safety, please read before use.
I Precautions for Player I
Do not put metallic substance
such as coin, hair pin or
flammable substance into the
product.
Do not put heavy substance over
the product.
It may cause malfunction.
It may cause malfunction.
Do not put the product under
moist, dusty, and black smoky
environment.
It may cause malfunction.
Do not press more than 2 buttons
at the same time or dismantle the
player indiscriminately.
It may cause damage and
malfunction.
Keep out of direct sunlight and
extreme heat and cold.
It may cause malfunction.
Do not drop or subject the
device to impact.
It may cause damage and
malfunction.
10
11
Do not dampen your player with
rain (water), beverage, chemicals,
cosmetics and so on.
Never turn on the player. Quickly
wipe it off with dry cloth and get
service from authorized technician.
Do not spray water on the player
in direct. Wipe player's skin with
soft cloth or towel.
It may cause malfunction.
Do not use chemicals and
detergents since they deteriorate
and peel off product's skin.
It may cause malfunction.
Keep the player away from strong
magnets. Magnetic substance
such as magnet, CRT, TV,
monitor, speaker, and so on may
cause your player damaged.
It may cause malfunction.
Never dismantle, repair, or rebuild
your player without permission.
It may cause malfunction.
Data can be damaged because
of physical impact, lightning and
power failure.
Users are responsible for creating
backup data and iriver Limited is not
responsible for any damaged data.
1 I Before Using the Product
I 2 Getting started
Safety Instructions
For your safety, please read before use.
I Precautions for Others I
Do not wear headphone/earphone
with high volume when walking,
especially in crosswalk.
Do not use headphone /
earphones at high volume.
It may cause damage or your injury.
Avoid impacting the player
against other objects when it is
in your pocket or backpack.
It may cause injury.
Chapter
2
Components
Components ……………………………………………………… 14
Locating the Controls
Locating the Controls ……………………………………………… 15
LCD Screen
MUSIC mode ……………………………………………………… 16
FM RADIO mode…………………………………………………… 17
RECORDING mode ……………………………………………… 17
Connecting the Product
Connecting earphone – Type A …………………………………
Connecting earphone – Type B (Optional) ………………………
Connecting to PC …………………………………………………
Disconnecting from PC ……………………………………………
12
18
18
19
20
Installing Software
Minimum requirements for software installation ………………… 21
Installing iriver plus 2 ……………………………………………… 21
Do not listen music via
headphone/earphone with high
volume for a long time.
It may cause injury.
Be careful that necklace style
earphone is not entangled.
It may cause damage or your injury.
Be careful that headphone/
earphone is not to be caught
in door of vehicle such as car,
subway, etc.,
Downloading from PC
Downloading from PC …………………………………………… 25
2 I Getting Started
2 I Getting Started
Components
Locating the Controls
Accessories are subject to change without notice and may vary from image shown.
Your player may differ slightly from that shown in the illustrations.
I Components I
I Locating the Controls I
Note
For more information about assembling
necklace, refer to page 18.
Front View
Cap
Rear View – Type A
USB Connection
Jack
PUSH OPEN button
Rear View – Type B (Optional)
LCD Screen
14
Necklace Connection Loop
Main unit
Type A
Necklace style earphone
Type B (Optional)
Cap, Necklace
Built-in
Microphone
RESET button
Cap
Left Side View
Mini USB adapter
Installation CD
Instruction manual/Warranty card/
Quick start guide
PUSH OPEN button
Earphone Jack
Right Side View
Play/Stop
button
Mode/Recording
button
Previous/Fast Reverse
button
Volume button
Next/Fast forward
button
Volume +
button
15
2 I Getting Started
2 I Getting Started
LCD Screen
LCD Screen
I MUSIC mode I
I FM RADIO mode I
1 Current time
1 Selected frequency
2 Title name
2 Preset indicator
3 Current play status
3 Stereo indicator
4 Progress bar
4 Channel number
5 Battery indicator
5 Frequency bar
6 Play mode
16
17
7 Played time l Total playing time of the title
8 File format
9 Volume level
10 Bit rate I Sampling rate
Note
I RECORDING mode I
File format
ASF
IRM
MP3
OGG
WAV
WMA
IRM (iriver Rights Management)
The iriver Rights Management is a digital music format designed by iriver Limited.
The IRM technology protects copyright and property from unauthorized usage of digital contents provided by
iriver Limited.
Please visit our web site for details about this music format.
1 Recording status
2 Current play status
3 Remaining memory space
4 Recorded time I Remaining time
5 Recording file name
2 I Getting Started
2 I Getting Started
Connecting the Product
Connecting the Product
Connect the USB cable to the PC after playback stops to avoid error.
I Connecting earphone – Type A I
Connect the earphone to the main unit
as shown in the picture.
I Connecting to PC I
1
I Installation of "New Hardware"
Push "PUSH OPEN" on the back of your player to disconnect its cap as the image
below. Connect the USB port and PC with mini USB adapter.
After connecting the player to your PC, "Found New Hardware" message is displayed.
18
19
I Connecting earphone – Type B (Optional) I
1 Hold the connection part of necklace and
push it into the direction of arrow.
2 Hold the end of strap and pull it out to the
direction of arrow to separate the connection
part.
3 Assemble the earphone with the opposite
order after putting the strap in the connection
hole of the player.
Open the Windows Explorer to confirm the created driver icon for N11.
2 I Getting Started
2 I Getting Started
Connecting the Product
Installing Software
Connect the USB cable to the PC after playback stops to avoid error.
iriver plus 2 is a program that efficiently manages the music files.
iriver plus 2 gives you freedom to transfer music files from PC to the player.
I Disconnecting from PC I
I Minimum requirements for software installation I
1
I "Safely Remove Hardware" from the PC
Right-click the "Safely Remove Hardware" icon in the taskbar.
Pentium 133MHz or faster
Windows 98 SE/ ME/ 2000/ XP
128M RAM
Microsoft Internet Explorer version 6.0 or later
20
2
3
Click the popup message as shown below.
The tray icon may be hidden in some Windows XP operating system settings.
Click the "Display hidden icon" to view the hidden icon.
Hardware safe removal may not be available while using some applications such as Windows Explorer or
Windows Media Player. Please close all applications using the product before the hardware safe removal process.
In some Windows XP operation system settings, hardware safe removal is temporarily unavailable due to some
system communication. Please wait and try again.
CD-ROM drive
USB Port
I Installing iriver plus 2 I
1
The program installation process will start automatically after inserting the Installation
CD to the PC's CD-ROM drive.
If the program installation process does not start automatically, click the “My Computer”
icon and run ‘iriver 2_setup_full.exe’file in the CD-ROM drive.
2
Select the desired language and
click the [OK] button.
When the "Safely Remove Hardware" popup window appears, disconnect the
USB cable.
Note
SVGA or high resolution monitor
(800x600 resolution or higher)
21
2 I Getting Started
2 I Getting Started
Installing Software
Installing Software
iriver plus 2 is a program that efficiently manages the music files.
iriver plus 2 gives you freedom to transfer music files from PC to the player.
iriver plus 2 is a program that efficiently manages the music files.
iriver plus 2 gives you freedom to transfer music files from PC to the player.
3
Follow on screen instructions which appear
after the initial screen as shown in the picture.
5
Select the components and click the [Next]
button.
For the first installation of this software,
choose "Full installation".
22
23
4
If the "License Agreement" window appears,
click the [I Agree] button.
6
Select the folder and click the
[Installation] button.
2 I Getting Started
Installing Software
2 I Getting Started
Downloading from PC
iriver plus 2 is a program that efficiently manages the music files.
iriver plus 2 gives you freedom to transfer music files from PC to the player.
I Downloading from PC I
7
Click the [Next] button after selecting the file
format to be supported in iriver plus 2.
The icons for selected formats will be changed
to the icon of iriver plus 2.
24
8
1
Push "PUSH OPEN" on the back of
your player to disconnect its cap as
the image below.
Connect the USB port and PC with
mini USB adapter.
2
Run iriver plus 2.
The PC and player window will be
displayed.
3
After selecting the music file in the PC,
drag and drop it to the folder of N11.
Click the [Finish] button when the installation
complete screen is displayed.
25
I 3 Basic Operation
Chapter
3
Selecting the Function Mode
Selecting the Function Mode ……………………………………… 28
Playing a Music File
Playing a Music File ………………………………………………
Selecting a music file ………………………………………………
Selecting Playback Mode …………………………………………
A-B Repeat …………………………………………………………
Changing Sound EQ ………………………………………………
Deleting file …………………………………………………………
29
31
32
34
35
36
Browser Function
Using the browser ………………………………………………… 38
Listening to FM Radio
www.iriver.com
Listening to FM Radio ……………………………………………
Scanning FM Radio Frequency – Manual Scan…………………
Scanning FM Radio Frequency – Auto Scan ……………………
Saving FM Radio Frequency - Manually …………………………
Saving FM Radio Frequency – Automatically……………………
Scanning FM Radio Frequency – PRESET Memory …………
Deleting FM Radio Channel ………………………………………
Recording
Recording FM Radio Station ………………………………………
Recording Voicee …………………………………………………
Note for recording …………………………………………………
Playing Recorded File ……………………………………………
39
40
40
41
42
42
43
44
45
46
46
3 I Basic Operation
3 I Basic Operation
Selecting the Function Mode
Playing a Music File
I Selecting the Function Mode I
I Playing a Music File I
1
I Selecting the Function Mode
When powered on, press and hold the [ ] button
to display the function mode screen.
1
There are 5 modes including BROWSER, MUSIC, FM RADIO,
RECORDING and SETTINGS.
28
Press and hold the [ ] button to display the
function mode screen.
Press the [
] button to select the <MUSIC>
mode and press the [
] button.
Previous music file will resume playback.
29
Note
2
Press the [
] button to choose the desired
function mode.
3
Press the [
] button to enter the mode.
Press the [ ] button to cancel mode selection.
2
Press the [
] button to pause playback and
press it again to resume playback.
3
During the music file playback, press the [
button.
: Decreases volume level
: Increases volume level
]
3 I Basic Operation
3 I Basic Operation
Playing a Music File
Playing a Music File
I Selecting a music file I
4
I Playing previous/next file
During the music file playback, press the [
button to skip to the previous/next file.
]
1
: Plays previous file
: Plays next file
Press and hold the [ ] button to display the
function mode screen.
Press the [
] button to select the <BROWSER>
mode and press the [
] button.
The music file list will be displayed.
30
31
5
I Fast-forward/Fast-reverse
Press and hold the [
] button for fast-forward
or fast-reverse playback.
2
Use the [
music file.
], [ ], [
] buttons to select a
: Moves up
: Moves down
: Moves to upper folder
: Moves to lower folder
: Plays previous file
: Plays next file
To exit file list screen, press the [ ] button.
3
Press the [
] button to start music playback.
3 I Basic Operation
3 I Basic Operation
Playing a Music File
Playing a Music File
The playback mode can be modified only in <Sound > - <Play Mode Select> under <SETTINGS> menu.
I Selecting Playback ModeI
1
Press and hold the [ ] button to display the
function mode screen.
Press the [
] button to select the <SETTINGS>
mode and press the [
] button.
The <SETTINGS> screen will be displayed.
32
2
Press the [
] button to select the <Sound>
menu and press the [
] button to display the
submenu.
3
Press the [
] button to select the
<Play Mode Select> menu and press the
[
] button to display the submenu.
4
Press the [
] button to select the desired mode
and press the [
] button to play music with the
selected playback mode.
Note
Icons for indicating playback mode.
Normal
playback
Repeat
playback
Plays all files in the player, then stops.
Plays all files in selected folder, then stops.
Plays a single file repeatedly.
Plays all files in the player repeatedly.
Plays all files in the current folder repeatedly.
Shuffle
playback
Randomly plays all files in the player, then stop.
Shuffle
playback
repeatedly
Randomly plays all files in the player repeatedly.
Randomly plays all files in the current folder, then stop.
Randomly plays all files in the current folder repeatedly.
33
3 I Basic Operation
34
3 I Basic Operation
Playing a Music File
Playing a Music File
You can use this function to repeat selected block during playback.
The EQ mode can be modified only in <Sound> - <EQ Select> under <SETTINGS> menu.
I A-B Repeat I
I Changing Sound EQ I
1
I Selecting point A
2
I Selecting point B
Press the [ ] button while playing to select the
beginning point (A).
Press the [ ] button again to select the end point (B).
Now the player plays between point A and B repeatedly.
1
Press and hold the [ ] button to display the
function mode screen.
Press the [
] button to select the <SETTINGS>
mode and press the [
] button.
The <SETTINGS> screen will be displayed.
2
Press the [
] button to select the <Sound>
menu and press the [
] button to display the
submenu.
3
Press the [
] button to select the <EQ Select>
menu and press the [
] button to display the
submenu.
4
Press the [
] button to select the desired EQ
and press the [
] button to play music with the
selected EQ.
Note
To cancel A-B repeat, press the [ ] button again.
The mode will be returned to normal playback.
Note
You can select one of the following EQ types:
NORMAL, CLASSIC, LIVE, POP, ROCK, JAZZ, U BASS, METAL,
DANCE, PARTY, SRS, USER EQ
35
3 I Basic Operation
3 I Basic Operation
Playing a Music File
Playing a Music File
The file can be deleted only in <Advanced> - <Delete File> under <SETTINGS> menu.
I Deleting file I
1
While in stop mode, press and hold the [ ] button
button to display the function mode screen.
Press the [
] button to select the <SETTINGS>
mode and press the [
] button.
The <SETTINGS> screen will be displayed.
36
2
Press the [
] button to select the <Advanced>
menu and press the [
] button to display the
submenu.
3
Press the [
] button to select the <Delete File>
menu and press the [
] button to display the
file list.
4
Move to the file to delete by using the [
], [ ],
[
] buttons and press the [
] button to display
the <Delete File> screen.
: Moves up
: Moves down
: Moves to upper folder
: Moves to lower folder
5
Press the [
press the [
] button to select <YES> and
] button to delete it.
Note
The file which is playing currently cannot be deleted.
You cannot delete folder using the player.
37
3 I Basic Operation
3 I Basic Operation
Browser Function
Listening to FM Radio
You can browse music file with this function.
I Using the browser I
1
Press and hold the [ ] button to display the
function mode screen.
Press the [
] button to select the <BROWSER>
mode and press the [
] button.
I Listening to FM Radio I
1
File list screen will be displayed as a tree structure.
38
Press and hold the [ ] button to display the
function mode screen.
Press the [
] button to select the <FM RADIO>
mode and press the [
] button.
The previous station will be displayed.
2
Press the [
station.
] button to select your desired
: To previous station
: To next station
3
I Change STEREO/MONO
Press the [ ] button to display the radio function
screen while listening to radio.
Press the [
] button to select <STEREO ON>
or <STEREO OFF> and press the [
] button.
The station will be changed to stereo or mono.
Note
In areas where the signal is weak, some channels may be
unavailable, or reception may be poor.
39
3 I Basic Operation
3 I Basic Operation
Listening to FM Radio
Listening to FM Radio
I Scanning FM Radio Frequency – Manual Scan I
I Saving FM Radio Frequency - Manually I
1
If <
> is displayed, press the [
] button
to exit the <
> mode.
Press the [
] button to increase/decrease the
frequency.
40
I Scanning FM Radio Frequency – Auto Scan I
1
If <
> is displayed, press the [
] button
to exit the <
> mode.
To automatically locate a station press and hold the
[
] button.
1
If <
> is displayed, press the [
] button
to exit the <
> mode.
Press the [
] button to select your desired
station.
2
Press the [ ] button to display the radio function
screen.
Press the [
] button to select <SAVE CHANNEL>
and press the [
] button to display the
<SAVE CHANNEL> screen.
3
Press the [
] button to select the channel
number and press the [
] button to save it.
: Saved channel (Unavailable)
: Empty channel (Available)
To exit the <SAVE CHANNEL> screen, press the
[ ] button.
: Moves to previous available station
: Moves to next available station
Note
While in the <
available.
> mode, the AUTO SCAN function is not
Note
Up to 20 channels can be stored.
41
3 I Basic Operation
3 I Basic Operation
Listening to FM Radio
Listening to FM Radio
I Saving FM Radio Frequency – Automatically I
I Deleting FM Radio Channel I
1
Press the [ ] button to display the radio function
screen.
Press the [
] button to select <AUTO SAVE>
and press the [
] button to automatically select
stations and save them in sequential order.
1
42
I Scanning FM Radio Frequency – PRESET Memory I
1
If <
> is displayed, press the [
] button
to exit the <
> mode.
Press the [
] button to move to previous/next
Preset station.
: Moves to previous PRESET station
: Moves to next PRESET station
Note
Only stored Preset stations can be selected.
When the player does not have any preset stations, “EMPTY” will be
> mode.
displayed at <
2
If <
> is displayed, press the [
] button
to exit the <
> mode.
Press the [ ] button to display the radio function
screen.
Press the [
] button to select <DELETE
CHANNEL> and press the [
] button to display
the <DELETE CHANNEL> screen.
Press the [
] button to select the channel
number and press the [
] button to delete it.
: Saved channel (Unavailable)
: Empty channel (Available)
To exit the <DELETE CHANNEL> screen,
press the [ ] button.
43
3 I Basic Operation
3 I Basic Operation
Recording
Recording
I Recording FM Radio Station I
I Recording Voice I
1
Press the [ ] button to display the radio function
screen while listening to radio.
Press the [
] button to select <RECORDING>
menu and press the [
] button to record it.
1
Press and hold the [ ] button to display the
function mode screen.
Press the [
] button to select the <RECORDING>
mode and press the [
] button.
The recording standby screen will be displayed.
44
2
Press the [
process.
] button to pause the recording
Press the [
] button again to resume recording.
2
In the recording standby screen, press the
[ ] button to begin recording.
3
Press the [
process.
] button to pause the recording
Press the [
] button again to resume recording.
The recording will be saved in the same file after resuming
from the pause mode.
3
Note
Press the [ ] button to stop recording.
The recorded file is saved as TMMDDXXX.MP3 in the RECORD folder.
(MM: Month, DD: Day, XXX: sequential number)
You can adjust recording quality at the <FM Setting>.
(Refer to page 61.)
Volume cannot be controlled while recording.
The recording will be saved in the same file after resuming
from the pause mode.
4
Note
Press the [ ] button to stop recording and display
the recording standby screen.
The recorded file is saved as VMMDDXXX.MP3 in the VOICE folder.
(MM: Month, DD: Day, XXX: sequential number)
You can adjust recording quality at the <Voice Recording Quality>.
(Refer to page 61.)
Volume cannot be controlled while recording.
Keep the proper distance between microphone and mouse while recording.
45
3 I Basic Operation
3 I Basic Operation
Recording
I Note for recording I
Note
The recording will be automatically finished if :
the amount of recorded data exceeds the capacity.
the battery is low.
46
I Playing Recorded File I
1
Press the [
] button in the recording standby mode
to play the recorded file.
: Voice recording
: Radio recording
2
While not in recording process, press and hold the
[ ] button to display the function mode screen.
Press the [
] button to select <BROWSER> and
press the [
] button.
3
Select the recorded file in the <RECORD> or
[VOICE] folder by using [
], [ ], [
] button
and press the [
] button to play it.
: Moves up
: Moves down
: Moves to upper folder
: Moves to lower folder
47
I 4 Useful Features
Chapter
4
www.iriver.com
Menu Tree
Menu Tree ………………………………………………………… 50
Menu Operation
Entering the SETTINGS Menu ……………………………………
Enter Sub Menu ……………………………………………………
Menu Operation ……………………………………………………
Setting the Menu Functions ………………………………………
Exit Sub Menu ………………………………………………………
Customizing the Function Settings (Menu)
Sound ………………………………………………………………
Display ………………………………………………………………
Recording ……………………………………………………………
Timer …………………………………………………………………
Advanced ……………………………………………………………
51
51
52
52
52
53
56
61
63
66
4 I Useful Features
4 I Useful Features
Menu Tree
Menu Operation
Functions are subject to change with different firmware versions.
Users can configure their own settings.
50
SRS Setting
User EQ
EQ Select
Play Mode Select
Rec. Play Mode
Power Off Timer
Sleep Timer
Date & Time
Alarm/FM Rec.
Set Alarm
FM Rec. Reserve
Backlight Timer
Screen Saver
Scroll Speed
Tag Info.
Language
Name
LCD Contrast
Resume
System Info.
Scan Speed
Playback Speed
Study Mode
Delete File
Load Default
Format
FM Setting
Voice Setting
Voice Detect
I Entering the SETTINGS Menu I
1
Press and hold the [ ] button to display the function
mode screen.
Press the [
] button to select the <SETTINGS>
mode.
2
Press the [
screen.
] button to display the <SETTINGS>
Press the [
] button to move in the
<SETTINGS> menu.
I Enter Sub Menu I
1
Press the [
] button to enter the sub menu screen.
51
4 I Useful Features
4 I Useful Features
Menu Operation
Customizing the Function Settings (Menu)
I Setting the Menu Functions I
I Sound I
1
Press the [
press the [
screen.
] button to select sub menu and
] button to enter sub menu setting
1
SRS Setting
SRS-WOW is a 3D sound effect developed by Lab, Inc.
<SRS>, <Focus>, <TruBass> and <Boost> are available.
SRS
Focus
TruBass
Boost
52
2
Press the [
] or [
the function setting.
] button to customize
: Moves in the sub menu
: Sets the sub menu
2
: Adjusts the SRS value.
: Adjusts the sound resolution value.
: Adjusts the TruBass value.
: Adjusts the sound boost value. Use proper boost value
depends on the feature of earphone or headphone.
User EQ
You can adjust the sound to your preference.
There are 5 band frequency steps from <-15dB> ~ <+15dB> by 1dB
increment.
I Exit Sub Menu I
1
Press the [ ] button to exit sub menu.
Press the [ ] button again to exit the <SETTINGS>
menu.
53
4 I Useful Features
Customizing the Function Settings (Menu)
3
EQ Select
4 I Useful Features
Customizing the Function Settings (Menu)
5
Rec. Play Mode
You can set the EQ value.
You can set the Playback mode of recorded file.
The EQ mode can be modified only in <EQ Select> under the <Sound>
menu.
The playback mode can be modified only in <Rec. Play Mode> under the
<Sound> menu.
54
55
4
Play Mode Select
You can set the Playback mode.
The playback mode can be modified only in <Mode Setting> under the
<Sound> menu.
4 I Useful Features
Customizing the Function Settings (Menu)
4 I Useful Features
Customizing the Function Settings (Menu)
I Display I
1
Backlight Timer
3
You can adjust the time that the Backlight stays on.
Select scroll type and speed of the current title playback
information.
The Backlight can be set to: <5 SEC>, <10 SEC>, <30 SEC>, <1 MIN>,
<5 MIN>, <10 MIN> or <ALWAYS ON>.
The scroll type can be set to :
<SCROLL>, <VERTICAL> or <HORIZONTAL>.
The scroll speed can be set to :
<SLOW>, <NORMAL> or <FAST>.
56
2
Screen Saver
Scroll Speed
4
Tag Info.
Automatically display screen saver after a selected time at
playback mode. (4 kinds of savers are available.)
While playback mode, you can display the information of
music file by using ID3 Tag.
The TIME can be set to :
<OFF>, <10 SEC>, <30 SEC>, <1 MIN> or <3 MIN>.
The TYPE can be set to :
<IGUY>, <THUNDER>, <IRIVER> or <SPECTRUM>.
The LCD will be turned off after the designated time.
You can set <ON> or <OFF>.
Off : Displays track with file name.
* File name will be displayed by default for music without ID3 information.
57
4 I Useful Features
Customizing the Function Settings (Menu)
5
Language
4 I Useful Features
Customizing the Function Settings (Menu)
6-1
Select the character by using the [
] button
and press the [
] button to input the character.
6-2
To move the cursor in the name window,
use the [
] button.
6-3
To delete the character, press and hold the
[ ] button.
You can select the language to display the file name and ID3
tag information.
40 languages are supported in this function.
58
6
To select the number/symbol, press and hold the
[ ] button.
Name
You can input your name or custom text.
6-4
Note
Press the [ ] button to finish the name setting.
The selected name will be displayed while the player stops.
The name setting is available with Korean and English only.
59
4 I Useful Features
Customizing the Function Settings (Menu)
4 I Useful Features
Customizing the Function Settings (Menu)
I Recording I
7
LCD Contrast
1
You can the LCD screen contrast.
FM Setting
You can the quality of FM recording.
The supported levels are <HIGH>, <MIDDLE> and <LOW>.
The LCD contrast can be adjusted from <0> to <40>.
60
61
2
Voice Setting
You can the quality of voice recording.
The supported levels are <HIGH>, <MIDDLE> and <LOW>.
4 I Useful Features
Customizing the Function Settings (Menu)
4 I Useful Features
Customizing the Function Settings (Menu)
I Timer I
3
Voice Detect
1
The voice recording mode will automatically pause during
silence. This is useful for recording over a long period of
time to save memory.
62
Power Off Timer
Automatically turns the power off at the stop mode.
Time range can be set to <1 MIN>, <2 MIN>, <3 MIN>, <5 MIN>,
<10 MIN>, <20 MIN>, <30 MIN> or <60 MIN>.
LEVEL : Set the relative level of sound needed to activate the recorder.
(<OFF>, <01>, <02>, <03>, <04> or <05>)
TIME : Set the number of seconds of silence to record before pausing.
(<OFF>, <01>, <02>, <03>, <05> or <10>)
In case of selecting <OFF>, the Voice Detect function will be disabled.
63
2
Sleep Timer
Automatically turns the power off after a fixed time.
Time range can be set to <OFF>, <5 MIN>, <10 MIN>, <20 MIN>,
<30 MIN>, <60MIN>, <120 MIN> or <180 MIN>.
In case of selecting <OFF>, the Sleep Timer function will be disabled.
4 I Useful Features
Customizing the Function Settings (Menu)
3
Date & Time
4 I Useful Features
Customizing the Function Settings (Menu)
5
You can set the current date and time.
Set Alarm
You can set the activation time of alarm.
The supported settings are <SUN>, <SAT>, <DAILY>, <MON-SAT> and
<MON-FRI>.
64
65
4
Alarm/FM Rec.
You can set whether you will use the Alarm or FM Rec.
function.
The supported settings are <OFF>, <ALARM> and <FM RECORDING>.
6
FM Rec. Reserve
You can set the time to be recorded.
The supported settings are <SUN>, <SAT>, <DAILY>, <MON-SAT> and
<MON-FRI>.
You can set the station to be recorded.
The supported time ranges are from <10> to <240> by 10 minutes
increments.
4 I Useful Features
Customizing the Function Settings (Menu)
4 I Useful Features
Customizing the Function Settings (Menu)
I Advanced I
1
Resume
3
Playback will resume from the previous location in a song
when the player is stopped or powered off.
You can adjust the speed of FF/RW (fast-forward/fastrewind).
The supported settings are <ON> and <OFF>.
It is useful when you study foreign language.
The Scan Speed can be set to <1X>, <2X>, <4X> or <6X>.
66
2
Scan Speed
System Info.
4
Playback Speed
You can check information of the product.
You can adjust the speed of playback.
The firmware version, free memory space and total number of tracks are
displayed.
It is useful when you study foreign language.
The Playback Speed can be set from <-5 > to <+5>.
67
4 I Useful Features
Customizing the Function Settings (Menu)
5
Study Mode
4 I Useful Features
Customizing the Function Settings (Menu)
7
While playing, press the [
] button to skip in the current
track as designated time range.
Load Default
Reset menus to the original factory settings.
When the Load Default is done, the player will be rebooted automatically.
Time range can be set to <OFF>, <3 SEC>, <10 SEC>, <20 SEC>,
<30 SEC>, <60 SEC>, <120 SEC> or <180 SEC>.
In case of selecting <OFF>, the Study Mode will be disabled.
68
6
Delete File
You can delete the file while the player stops.
(Refer to page 36.)
69
8
Format
Memory is formatted and all saved files are deleted.
Care must be taken as formatted files cannot be recovered.
Always back up the data first before formatting the product.
When the Format is done, the player will be rebooted automatically.
I 5 Additional information
Chapter
5
Firmware Upgrade
What is firmware? ………………………………………………… 72
Initializing the Player (Format)
How to format N11 player ………………………………………… 73
Troubleshooting
Troubleshooting …………………………………………………… 75
Specifications
Specifications ……………………………………………………… 76
FCC
www.iriver.com
5 I Additional information
5 I Additional information
Firmware Upgrade
Initializing the Player (Format)
I What is firmware? I
I How to format N11 player I
It is the operating system that works in the N11.
iriver provides you with the latest and best features through firmware upgrade.
You can choose manual or automatic upgrade function.
1
In below cases, format the player to solve the problem.
- When the firmware file has error or data are damaged.
- When the error message appears right after turning on the player.
Push "PUSH OPEN" on the back of
your player to disconnect its cap as
the image below.
Connect the USB port and PC with
mini USB adapter.
1
2
Run iriver plus 2 and select
[Option – Firmware Upgrade].
2
Run iriver plus 2 and select [Option
– Portable Device Initialization].
3
Click [Yes] to download the firmware upgrade file automatically.
After the download is completed, disconnect the mini USB adapter to activate firmware
upgrade.
3
Click [Yes] to begin initialization process.
72
Note
Do not disconnect the player from PC during firmware upgrade.
To use the "Firmware Upgrade" function, your PC should be connected to internet.
Do not turn the player off until the upgrade is completed.
Note
Push "PUSH OPEN" on the back of
your player to disconnect its cap as
the image below.
Connect the USB port and PC with
mini USB adapter.
The player also can be initialized in <SETTINGS >– <Advanced> –<Format>.
(Refer to page 69.)
73
5 I Additional information
5 I Additional information
Troubleshooting
Troubleshooting
Should any problem persist after you have checked these symptoms, consult your iriver dealer or
contact support at http://www.iriver.com/.
Should any problem persist after you have checked these symptoms, consult your iriver dealer or
contact support at http://www.iriver.com/.
Trouble
Solution
Trouble
Check if battery is charged.
No Power.
If the power is not turned on after charging, please contact
iriver customer support.
Press the RESET button using thin pin.
74
No sound during
playback.
Heavy noise occurs
during playback.
Characters in LCD
are corrupted.
Poor FM reception.
Firmly connect the earphone.
Download failure.
Check whether the music file is corrupted.
Check it again with other music file.
Corrupted MP3 or WMA files may make a static noise
and the sound may cut off.
Check whether the right language has been selected.
The languages can be set in <SETTINGS> - <Display> –
<Language>. (Refer to page 58.)
Check whether an earphone is connected.
The Earphone cord functions as an antenna.
Radio reception will be poor unless an earphone is
connected to the player.
Adjust the position of the player and earphone.
Turn off the power of other electric devices near the player.
If it is effective, move and use the player away from those
electric devices.
Check whether VOLUME is set to "0".
Check whether the plug or connection jack of earphone
is dirty.
If earphone plug is not clean, noise may be created.
Solution
Charging failure.
Check the connection between your computer and
the player.
If the battery is fully charged, it cannot be charged.
Check the USB connection.
75
5 I Additional information
5 I Additional information
FCC
Specifications
Item
Category
Memory
Audio
FM Tuner
76
File Playback
Capacity
Frequency range
Headphone Output
S/N ratio
Sound Channel
N11 256MB* / N11 512MB* / N11 1GB*
20Hz~20KHz
(L)14mW + (R)14mW (16Ω) max. Volume
90dB(MP3)
Stereo (Right/Left)
FM Frequency
S/N ratio
Antenna
87.5MHz ~ 108MHz
60dB
Frequency range
File Type
Bit Rate
MP3(MPEG 1/2/2.5 Layer3), WMA, OGG, ASF
MP3
: 8Kbps~320Kbps
WMA
: 8Kbps~320Kbps
OGG
: Q1~Q10
ID3 V1, ID3 V2 2.0, ID3 V2 3.0, ID3 V2 4.0
Tag
Recording
Max. Recording time
(@32kbps)
Dimension
General
I Federal Communications Commission (FCC) I
Specifications
Weight
LCD
Battery
Operational Temperature
Max. Playtime
256MB
Approx. 18 hours
512MB
Approx. 36 hours
1GB
Approx. 72 hours
27.2 (W) X 49.8 (D) X 13.3 (H) mm (Body)
27.2 (W) X 62.5 (D) X 13.3 (H) mm (Including Type A earphone)
22 g (Body with Battery)
4 LINE OLED 16 GRAY
Lithium Polymer battery
-5 °C ~ 40 °C
Approx. 13 hours
(128 kbps, MP3, Vol 20, LCD off, EQ Normal)
* 1MB = 1,000,000 Bytes, 1GB = 1,000 MB = 1,000,000,000 Bytes
Not all memories are available for storage.
Memory is not expandable.
The device manufactured and found to comply with limits for a Class B computing device according to
the specifications in FCC rules Part 15. Operation is subject to the following two conditions;
1. This device may not cause harmful interference.
2. This device must accept any interference received, including interference that may cause
undesired operation.
3. If your device needs repairs, you must arrange for the manufacturer to make them if you are
to keep the device's FCC registration valid.
This equipment, like other electronic equipment, generates and uses radio frequency energy.
If not installed and used according to the instructions in this manual, this equipment may cause
interference with your radio and television reception.
If you think this equipment is causing interference with your radio or television reception, try turning
the equipment off and on. If the interference problems stop when the equipment is switched off, then
the equipment is probably causing the interference. You may be able to correct the problem by doing
one or more of the following:
- Adjust the position of the radio or TV antenna
- Move away the device from the radio or TV
If necessary, consult your dealer or an experienced radio or television technician.
You may find this booklet helpful:"How to Identify and Resolve Radio and TV Interference Problems"
(Stock No. 004-000-00345-4), prepared by the FCC and available from the U.S Government Printing
Office, Washington, DC 20402. See individual devices FCC ID and registration numbers.
I For the customers in Europe I
The CE mark on the CD player is valid only for products marketed
in the European Union.
77