1
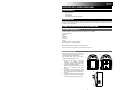
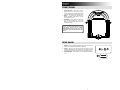
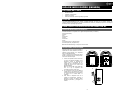
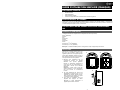
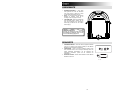
RETRO ROCKER
QUICKSTART GUIDE
ENGLISH ( 3 – 4 )
GUÍA DE INICIO RÁPIDO
ESPAÑOL ( 5 – 6 )
GUIDE D'UTILISATION RAPIDE
FRANÇAIS ( 7 – 8 )
GUIDA RAPIDA
ITALIANO ( 9 – 10 )
KURZANLEITUNG
DEUTSCH ( 11 – 12 )
SNELSTARTGIDS
NEDERLANDS ( 13 – 14 )
QUICKSTART GUIDE (ENGLISH)
BOX CONTENTS
•
•
•
•
RETRO ROCKER
Power Adapter
Quickstart Guide
Safety and Warranty Information Booklet
REGISTRATION
Please go to http://www.ionaudio.com to register your RETRO ROCKER. Registering your product ensures that we
can keep you up-to-date with any new product developments and provide you with world-class technical support,
should you run into any problems.
USING RETRO ROCKER WITH YOUR iOS DEVICE
iOS DEVICE COMPATIBILITY
RETRO ROCKER is compatible with the following iOS devices (not included):
iPad (3rd generation)
iPad 2®
iPad
iPhone 4S®
iPhone 4
iPhone 3GS
iPhone
iPod touch® (2nd, 3rd, and 4th generation)
iPod nano® (4th, 5th, and 6th generation)
Note: RETRO ROCKER will charge a connected iOS device.
iPad, iPhone, iPod touch, and iPod nano are trademarks of Apple Inc.
SETUP INSTRUCTIONS
Get ready to travel back to the heyday and play
groovy tunes using your favorite music app on
your iOS device with RETRO ROCKER.
Note that Retro Rocker needs a minute to warm
up before the bubbles will start to flow.
1.
2.
3.
1
Connect your iOS device to the 30-pin
connector
on
RETRO
ROCKER.
Alternatively, connect a media device such as
a CD player, tapedeck, or MP3 player to the
1/8” LINE IN of RETRO ROCKER.
Note: The LINE IN can only be used if an iOS
device is not connected to the 30-pin
connector.
On your iOS device, launch your iTunes
music library or your favorite jukebox app to
play a song, adjusting the output volume from
your app.
To release the iOS device from the dock, hold
the iOS device, press the DOCK RELEASE,
and gently remove the device from the dock.
2
+
3
+
3
FRONT PANEL
1.
DOCK RELEASE* – When this lever is
pressed down, the iOS device will lean
forward, allowing you to easily grasp and pull
up the iOS device, removing it from the dock.
2.
DOCK – To connect your iOS device to
RETRO ROCKER, gently slide it onto the
30-pin connector here.
3.
SPEAKERS – Plays back the audio from
your iOS device. Select from your iTunes
library or favorite jukebox app (works with
most jukebox apps).
3
3
*Note: To ensure safe removal of your
iOS device, gently press the DOCK
RELEASE down and securely grasp the
iOS device when it leans forward from the
dock.
2
1
REAR PANEL
1.
POWER – Use the included power adapter (12V DC, 3A, center pinpositive) to connect RETRO ROCKER to wall power.
2.
LINE IN – This stereo 1/8” line-level input can be used to connect a
CD player, MP3 player, or other audio source. To adjust the volume
of the audio signal, adjust the output volume of your audio source.
3.
2
1
LINE IN
DC 12V
POWER BUTTON – Press this button to turn RETRO ROCKER on
or off.
3
ON
OFF
4
MAIN POWER
GUÍA DE INICIO RÁPIDO (ESPAÑOL)
CONTENIDO DE LA CAJA
•
•
•
•
RETRO ROCKER
Adaptador de alimentación
Guía de inicio rápido
Folleto de información sobre la seguridad y la garantía
REGISTRO
Visite http://www.ionaudio.com para registrar su RETRO ROCKER. El registro de su producto asegura que
podamos mantenerle actualizado con los nuevos desarrollos de productos y brindarle apoyo técnico de categoría
mundial en caso de que tenga algún problema.
CÓMO USAR EL RETRO ROCKER CON SU DISPOSITIVO iOS
COMPATIBILIDAD CON DISPOSITIVOS iOS
El RETRO ROCKER es compatible con los siguientes dispositivos iOS (no incluidos):
iPad (3ra generación)
iPad 2®
iPad
iPhone 4S®
iPhone 4
iPhone 3GS
iPhone
iPod touch® (2da, 3ra y 4ta generación)
iPod nano® (4ta, 5ta y 6ta generación)
Nota: RETRO ROCKER carga un dispositivo iOS conectado.
INSTRUCCIONES DE INSTALACIÓN
Prepárese para volver a las épocas doradas y
reproduzca esos temas fantásticos usando su
aplicación musical favorita en su dispositivo
iOS con el RETRO ROCKER.
Tenga en cuenta que es necesario que Retro
Rocker se caliente durante un minuto para que
comiencen a fluir las burbujas.
1.
2.
3.
1
2
Conecte su dispositivo iOS al conector de
30 pines del RETRO ROCKER. Como
alternativa, conecte un dispositivo de
medios, como un reproductor de CD,
bandeja de cinta o reproductor MP3 a la
entrada de línea de 1/8” LINE IN del
RETRO ROCKER.
Nota: La entrada LINE IN se puede usar
solo si no hay un dispositivo iOS
conectado al conector de 30 pines.
En su dispositivo iOS, abra su biblioteca
musical iTunes o su aplicación de rocola
favorita para reproducir un tema, ajustando
el volumen de la salida desde su
aplicación.
Para liberar el dispositivo iOS de la
estación de acoplamiento, sostenga el
dispositivo, presione la palanca DOCK
RELEASE (Liberación) y extráigalo con
cuidado.
+
3
+
5
PANEL FRONTAL
1.
PALANCA DE LIBERACIÓN DE LA
ESTACIÓN DE ACOPLAMIENTO* –
Cuando se presiona esta palanca hacia
abajo, el dispositivo iOS se inclina hacia
adelante, permitiéndole tomarlo firmemente
y tirar de él hacia arriba, para extraerlo de la
estación de acoplamiento.
2.
ESTACIÓN DE ACOPLAMIENTO – Para
conectar su dispositivo iOS al RETRO
ROCKER, deslícelo con cuidado hacia el
conector de 30 pines de la misma.
3.
3
3
ALTAVOCES – Reproducen el audio de su
dispositivo iOS. Seleccione el tema en su
biblioteca iTunes o su aplicación de rocola
favorita (funciona con la mayoría de las
aplicaciones de rocola).
*Nota: Para asegurar la extracción segura
de
su
dispositivo
iOS,
presione
suavemente la palanca DOCK RELEASE
hacia abajo y tome firmemente el
dispositivo iOS cuando se incline hacia
adelante en la estación de acoplamiento.
2
1
PANEL TRASERO
1.
ALIMENTACIÓN – Use el adaptador de alimentación incluido (12 V
CC, 3 A, pin central positivo) para conectar el RETRO ROCKER al
tomacorriente de pared.
2.
ENTRADA DE LÍNEA – Esta entrada de nivel de línea de 1/8"
estéreo se puede usar para conectar un reproductor de CD, MP3 u
otra fuente de audio. Para ajustar el volumen de la señal de audio,
ajuste el volumen de la salida de su fuente de audio.
3.
BOTÓN DE ENCENDIDO – Pulse este botón para encender y
apagar el RETRO ROCKER.
2
1
LINE IN
3
ON
OFF
6
DC 12V
MAIN POWER
GUIDE D’UTILISATION SIMPLIFIÉ (FRANÇAIS)
CONTENU DE LA BOÎTE
•
•
•
•
RETRO ROCKER
Câble d’alimentation
Guide d’utilisation simplifié
Livret des consignes de sécurité et d’informations concernant la garantie
ENREGISTREMENT DU PRODUIT
Veuillez visiter le site internet http://www.ionaudio.com pour enregistrer votre RETRO ROCKER. L'enregistrement
des produits vous permet d'être informé sur les toutes dernières nouveautés concernant les produits et de vous offrir
un soutien technique de qualité, si vous en aviez besoin.
UTILISATION DU RETRO ROCKER AVEC VOTRE PÉRIPHÉRIQUE
iOS
APPAREILS iOS COMPATIBLES
Le RETRO ROCKER est compatible avec les dispositifs iOS suivants (non inclus) :
iPad (3e génération)
iPad 2®
iPad
iPhone 4S®
iPhone 4
iPhone 3GS
iPhone
iPod touch (2e, 3e et 4e génération)
iPod nano® (4e, 5e et 6e génération)
Remarque : Le RETRO ROCKER permet le rechargement de la pile du périphérique iOS branché.
INSTALLATION
Préparez-vous à voyager dans le temps et à
faire jouer votre musique à l'aide de votre
application préférée sur votre périphérique iOS
avec le DOCK JUKEBOX. Veuillez noter que le
Retro Rocker prend une minute à se réchauffer
avant que les bulles ne soient produites.
1
2
1. Branchez votre périphérique iOS au
connecteur 30
broches
du
RETRO
ROCKER. Vous
pourriez
également
brancher un périphérique multimédia tel
qu'un lecteur de CD, magnétophone ou
lecteur MP3 à l’entrée ⅛ po du RETRO
ROCKER.
Remarque : L'entrée LINE IN peut être
utilisée seulement si aucun périphérique
iOS n'est branché au connecteur 30
broches.
2. Sur votre périphérique iOS, lancez votre
bibliothèque de musique iTunes ou votre
application de musique préférée afin de
lancer la lecture d’une chanson, et ajustez
le volume de sortie de l’application.
3. Pour éjecter le périphérique iOS, tenir
l'appareil iOS, appuyez sur DOCK
RELEASE et retirez délicatement le
périphérique de la station d’accueil.
+
3
+
7
PANNEAU AVANT
1.
DOCK RELEASE* – Lorsque ce levier est
enfoncé vers le bas, le périphérique iOS se
pencher vers l'avant, ce qui vous permet de
le saisir facilement et de le retirer de la
station d’accueil.
2.
STATION D’ACCUEIL – Cette station
permet de brancher votre périphérique iOS
au RETRO ROCKER. Insérez-le glisser
doucement sur le connecteur 30 broches.
3.
HAUT-PARLEURS – Ils permettent de faire
jouer le signal audio provenant de votre
périphérique
iOS.
Sélectionnez
votre
bibliothèque de musique iTunes ou votre
application de musique préférée (fonctionne
avec la plupart des applications jukebox).
3
*Remarque :
Afin
d'éjecter
votre
périphérique iOS de manière sécuritaire,
appuyez doucement sur le levier DOCK
RELEASE et saisissez fermement le
périphérique lorsqu'il penche vers l'avant
sur la station d’accueil.
3
2
1
PANNEAU ARRIÈRE
1.
ENTRÉE D'ALIMENTATION – Utilisez le câble d’alimentation inclus
(12 V CC, 3 A, polarité positive au centre) pour brancher le RETRO
ROCKER dans une prise secteur.
2.
ENTRÉES LIGNE – Cette entrée ⅛ po stéréo permet de brancher
un lecteur de disques compacts, un lecteur MP3 ou autres sources
audio. Pour régler le volume du signal audio, ajustez le niveau du
volume de la source audio (périphérique).
3.
INTERRUPTEUR D’ALIMENTATION – Cette touche permet de
mettre le RETRO ROCKER en marche ou à l’arrêt.
2
1
LINE IN
3
ON
OFF
8
DC 12V
MAIN POWER
GUIDA RAPIDA (ITALIANO)
CONTENUTI DELLA CONFEZIONE
•
•
•
•
RETRO ROCKER
Adattatore di alimentazione
Guida rapida
Libretto di istruzioni di sicurezza e garanzia
REGISTRAZIONE
Recarsi alla pagina http://www.ionaudio.com per registrare il RETRO ROCKER. La registrazione del prodotto ci
consente di tenervi aggiornati con tutti gli ultimissimi sviluppi del prodotto e di offrirvi assistenza tecnica di livello
mondiale, in caso di eventuali problemi.
UTILIZZO DEL RETRO ROCKER CON UN DISPOSITIVO iOS
COMPATIBILITÀ DISPOSITIVI iOS
Il RETRO ROCKER è compatibile con i seguenti dispositivi iOS (non in dotazione):
iPad (3ª generazione)
iPad 2®
iPad
iPhone 4S®
iPhone 4
iPhone 3GS
iPhone
iPod touch® (2ª, 3ª e 4ª generazione)
iPod nano® (4ª, 5ª e 6ª generazione)
Nota bene: il RETRO ROCKER å in grado di collegare un dispositivo iOS collegato.
ISTRUZIONI PER LA CONFIGURAZIONE
Preparatevi a tornare ai tempi d'oro e a
suonare fantastici motivi grazie al vostro app
musicale preferito sul vostro dispositivo iOS
con il RETRO ROCKER. NB: Retro Rocker
necessita di un minuto per riscaldarsi prima
che le bolle vengano riprodotte.
1
2
1.
2.
3.
Collegate il vostro dispositivo iOS al
connettore a 30 poli presente sul RETRO
ROCKER. Alternativamente, collegate un
dispositivo multimediale quale un lettore
CD, una piastra di registrazione o un
lettore MP3 all'INGRESSO DI LINEA da
1/8” del RETRO ROCKER.
Nota bene: l'ingresso di LINEA può essere
utilizzato unicamente se un dispositivo iOS
non è collegato al connettore da 30 poli.
Sul dispositivo iOS, lanciate la libreria
musicale iTunes o la vostra app jukebox
preferita per suonare una canzone,
regolando il volume di uscita dall'app.
Per scollegare il dispositivo iOS dal dock,
reggere il dispositivo iOS, premere il
DOCK
RELEASE
e
rimuovere
delicatamente il dispositivo dal dock.
+
3
+
9
PANNELLO ANTERIORE
1.
DOCK RELEASE* – Quando viene premuta
questa leva, il dispositivo iOS si inclina in
avanti, consentendo di afferrare e sollevare
facilmente il dispositivo iOS, rimuovendolo
dal dock.
2.
DOCK – Per collegare il dispositivo iOS al
RETRO
ROCKER,
farlo
scorrere
delicatamente nel connettore a 30 poli a
questo livello.
3.
CASSE – Riproducono l'audio del dispositivo
iOS. Selezionatelo dalla vostra libreria
iTunes o dalla vostra app jukebox preferita
(funziona con la maggior parte delle app
jukebox).
3
*Nota bene: per garantire la rimozione
sicura del dispositivo iOS, premere
delicatamente il DOCK RELEASE e
afferrare saldamente il dispositivo iOS
quando pende dal dock.
3
2
1
PANNELLO POSTERIORE
1.
ALIMENTAZIONE – Servirsi dell'adattatore di alimentazione in
dotazione (12V DC, 3A, polo centrale positivo) per collegare il
RETRO ROCKER all'alimentazione a parete.
2.
LINE IN – Questo ingresso stereo da 1/8" può essere utilizzato per
collegare un lettore CD, un lettore MP3 o altre sorgenti audio. Per
regolare il volume del segnale audio, regolare il volume di uscita
della fonte audio.
3.
INTERRUTTORE DI ALIMENTAZIONE – Premere questo tasto per
accendere o spegnere il RETRO ROCKER.
2
1
LINE IN
3
ON
OFF
10
DC 12V
MAIN POWER
KURZANLEITUNG (DEUTSCH)
LIEFERUMFANG
•
•
•
•
RETRO ROCKER
Netzteil
Schnellstart-Anleitung
Sicherheitshinweise und Garantieinformationen
REGISTRIERUNG
Bitte besuchen Sie http://www.ionaudio.com, um Ihr RETRO ROCKER zu registrieren. Wenn Sie Ihr Produkt
registrieren, sorgen wir dafür, dass Sie immer am neuesten Stand aller Produktentwicklungen sind. Außerdem bieten
wir Ihnen erstklassige technische Unterstützung an, sollten Sie auf Probleme stoßen.
SO VERWENDEN SIE DAS RETRO ROCKER MIT IHREM iOS-GERÄT
KOMPATIBILITÄT MIT iOS-GERÄTEN
Das RETRO ROCKER ist mit folgenden iOS-Geräten kompatibel (nicht im Lieferumfang enthalten):
iPad (3. Generation)
iPad 2®
iPad
iPhone 4S®
iPhone 4
iPhone 3GS
iPhone
iPod touch® (2., 3. und 4. Generation)
iPod nano® (4., 5. und 6. Generation)
Hinweis: Das RETRO ROCKER lädt angeschlossene iOS-Geräte auf.
SETUP-ANWEISUNGEN
Machen Sie sich bereit, in die gute alte
Zeit zurückzureisen und mit dem RETRO
ROCKER groovige Songs mit Ihrer
Lieblings-App auf Ihrem iOS-Gerät zu
spielen. Beachten Sie, dass Retro
Rocker eine kurze Aufwärmphase
braucht, bevor die Blasen zu fließen
beginnen.
1.
2.
3.
1
2
+
Verbinden Sie Ihr iOS-Gerät mit dem
30-poligen Anschluss am RETRO
ROCKER. Wahlweise können auch
Medien-Geräte
wie
CD-Player,
Kassettenrekorder oder MP3-Player
mit dem 1/8"-LINE-Eingang des
RETRO
ROCKER
verbunden
werden.
Hinweis: Der LINE-Eingang kann
nur verwendet werden, wenn kein
iOS-Gerät mit dem 30-poligen
Anschluss verbunden ist.
Rufen
Sie
Ihre
iTunes
Musikbibliothek oder Ihre bevorzugte
Jukebox-App auf Ihrem iOS-Gerät
auf, um einen Song zu spielen und
die
Lautstärke
in
der
App
einzustellen.
Um das iOS-Gerät aus dem Dock zu
entfernen, halten Sie das iOS-Gerät,
drücken
die
ENTRIEGELUNGSTASTE
und
nehmen das Gerät vorsichtig aus der
Dockingstation.
3
+
11
VORDERSEITE
1.
ENTRIEGELUNGSTASTE* – Wenn diese
Taste gedrückt wird, wird das iOS-Gerät
nach vorne gekippt, so dass Sie es leicht
aus dem Dock herausnehmen können.
2.
DOCK – Um Ihr iOS-Gerät mit dem RETRO
ROCKER zu verbinden, setzen Sie es
vorsichtig auf den 30-poligen Anschluss.
3.
LAUTSPRECHER – Geben die Audiosignale
Ihres iOS-Geräts wieder. Wählen Sie aus
Ihrer iTunes Bibliothek oder bevorzugten
Jukebox-App (funktioniert mit den meisten
Jukebox-Apps).
3
*Hinweis:
Drücken
Sie
die
ENTRIEGELUNGSTASTE
vorsichtig
herunter und achten Sie darauf, dass Sie
das iOS-Gerät gut festhalten, wenn es nach
vorne aus dem Dock gekippt wird.
3
2
1
RÜCKSEITE
1.
STROMVERSORGUNG – Verwenden Sie das mitgelieferte Netzteil
(12V DC, 3A, mittlerer Pin mit positiver Polarität), um das RETRO
ROCKER an eine Steckdose anzuschließen.
2.
LINE-EINGANG – Dieser 1/8”-Line-Level-Eingang (Stereo) kann
dazu verwendet werden, einen CD-Player, MP3-Player oder eine
andere Audioquelle anzuschließen. Um die Lautstärke des
Audiosignals einzustellen, passen Sie die Lautstärke der
Audioquelle an.
3.
EIN-/AUS-SCHALTER – Drücken dieses Schalters schaltet RETRO
ROCKER ein oder aus.
2
1
LINE IN
3
ON
OFF
12
DC 12V
MAIN POWER
SNELSTARTGIDS (NEDERLANDS)
INHOUD VAN DE DOOS
•
•
•
•
RETRO ROCKER
Stroomadapter
Snelstartgids
Informatieboekje over Veiligheid en Garantie
REGISTRATIE
Surf naar http://www.ionaudio.com om uw RETRO ROCKER te registreren. Als u uw product registreert, wordt u op
de hoogte gehouden van alle nieuwe producten en kunt u rekenen op hoogstaande technische productondersteuning,
indien u ooit een probleem mocht ondervinden.
RETRO ROCKER GEBRUIKEN MET UW iOS-APPARAAT
COMPATIBELE iOS-APPARATEN
RETRO ROCKER is compatibel met de volgende iOS-apparaten (niet meegeleverd):
iPad (3de generatie)
iPad 2®
iPad
iPhone 4S®
iPhone 4
iPhone 3GS
iPhone
iPod touch® (2de, 3de, en 4de generatie)
iPod nano® (4e, 5e en 6e generatie)
Opmerking: RETRO ROCKER laadt het aangesloten iOS-apparaat op.
INSTALLATIE-INSTRUCTIES
Keer terug naar de hoogtijdagen van de muziek en gebruik de favoriete muziek-app van je iOs-apparaat om hippe
songs af te spelen op de RETRO ROCKER. Let op: Retro Rocker moet een minuutje opwarmen voor de
luchtbelletjes beginnen te stromen.
1.
2.
3.
Sluit je iOS-apparaat aan op de 30-pins connector op RETRO ROCKER. Het is ook mogelijk om een mediaapparaat, zoals een cd-speler, tapedeck of MP3-speler aan te sluiten op de 1/8"-lijningang van RETRO
ROCKER.
Opmerking: De lijningang kan alleen worden gebruikt als er geen iOS-apparaat is aangesloten op de 30-pins
connector.
Start uw iTunes-muziekbibliotheek op uw iOS-apparaat of start uw favoriete jukebox-app om een nummer af te
spelen. Het uitgangsvolume past u aan vanaf uw app.
Om het iOS-apparaat uit het dock te halen: houd het iOS-apparaat vast, druk op DOCK VRIJGEVEN en verwijder
voorzichtig het apparaat uit het dock.
13
VOORPANEEL
1.
DOCK VRIJGEVEN*: wanneer deze hendel
wordt ingedrukt, zal het iOS-apparaat
overhellen, zodat u het gemakkelijk kan
vastnemen en naar boven trekken, om het uit
het dock te verwijderen.
2.
DOCK: om uw iOS-apparaat aan te sluiten
op de RETRO ROCKER: schuif het
voorzichtig op de 30-pins connector.
3.
LUIDSPREKERS: speelt de audio van uw
iOS-apparaat af. Kies audio uit uw iTunesbibliotheek of uw favoriete jukebox-app
(werkt met de meeste jukebox-apps).
3
*Opmerking: Voor een veilige verwijdering
van uw iOS-apparaat: druk voorzichtig de
knop DOCK VRIJGEVEN naar beneden en
neem het iOS-apparaat stevig vast
wanneer het naar voren uit het dock
overhelt.
3
2
1
ACHTERPANEEL
1.
Voeding: gebruik de meegeleverde stroomadapter (12 V DC, 3 A,
middelste pin is positief) om de RETRO ROCKER aan te sluiten op
het stroomnet.
2.
LIJNINGANG: Deze stereo 1/8"-ingang kan worden gebruikt om een
cd-speler, mp3-speler of andere geluidsbron te verbinden. Om het
volume van het audiosignaal aan te passen,
past u het
uitgangsvolume van uw audiobron aan.
3.
AAN/UIT-SCHAKELAAR: druk op deze knop om RETRO ROCKER
aan of uit te zetten.
2
1
LINE IN
3
ON
OFF
14
DC 12V
MAIN POWER
SPECIFICATIONS
Speaker Output: 5W + 5W (1 KHz, 0 dB input signal)
Power: 12V DC, 3A, center pin-positive
15
www.ionaudio.com
MANUAL VERSION 1.0