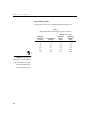
1
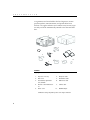
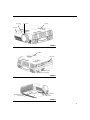
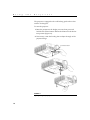
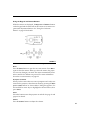
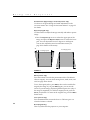
5404LP790Dividers.qxd 10/4/01 5:06 PM Page 2
large audience projector
LP 790
®
User’s Guide
FCC Warning
!"
#
"
$
"
#
%
#
&
"
"#
#
$
!"
""
"
!"
#!
#
$
"
"
"#
#
""'
#
!"
(
"'
#
#
$
$
!
#
$
)
Canada
"
$
*+',
"-!
#"
.
"
/01',
'
Safety Certifications
23
23
45
/0
&0
6+ &
EN 55022 Warning
"
"
"
#'
$
"
!
(
!
"
Remote Control Warning
3
7
$
89"7
")""
"
&"
"
$
!"
#
&
:
:
&"
"
$
!"
#
*/
8
;%'<
==:
>
Declaration of Conformity
0#<
991
+
?($
=99
2+
*
##<
"
/3',
/+
@"
/
3?9=
A
#"
#$
"<
*0
B
;=C,,8C**
"
=,C8;C**
*0<
*/
%%
*/
%%:
*/
8','
*/
8',',
3$
5
B
9,C,C**
"
=,C8;C**
+#<
*/
8=%<
==
>
>
>
,
>
:<
==9
Australian Certification C-tick mark
Trademarks
0
?$1(
"(
"(
#
"
10
?+C
"(
"(
#
1
0
0#
?$?
$
"(
"(
#
0#
3?
"(
"(
#
TABLE OF CONTENTS
Safety Instructions
iii
Introduction
"
&
"
2(
?A
2
6
#
D
/
1
:
:
%
Setting up the Projector
"
"
$
B5
"
$
&+',
5
?
5
?
1/
*)
+(
&"
?$
?A
##
?A
7
=
,
8
Using the Projector
1
"
A"
A
?A
2
&"
2
E
&"
1
2
'+
0
1
0
+
"
17
9
9
=
,
:
8
i
T
ii
a
b
l
e
o
f
C
o
n
t
e
n
t
s
Maintenance & Troubleshooting
3
B
&
?A
3"
&
1
&"
2
+
3(
33
,,
,,
,%
,9
,9
,;
Appendix
+#
?
3
2
5
0
$
?$1(
"
?A
"
+F
43
:,
::
:8
%
%
Index
53
SAFETY INSTRUCTIONS
?
#$
#
1*&*
$
A
"
$
#
'
"
#
(
A
"
"
"
!"
?
#
Safety Definitions:
G Warning:
+"
#
A
G Caution:
+"
#
"
!"
Safety Symbols:
Attention:
#"
#
#
#
2H
6
Warning:
@
#
B
$
"
A
Warning:
3
&
B
"
Safety Terms:
G Warning:
BH
(
$
A
GWarning:
"
A
##
$
$
8
"
#
"
$
2H
6
GWarning:
?
$
$
$
#
IJ
"
GWarning<
3
&
B
"
iii
S
a
f
e
t
y
I
n
s
t
r
u
c
t
i
o
n
s
G Warning: &#
!#
+'
$
A
$
$
+
$
#
#"
G Caution:
BH
(
G Caution:
BH
!
A
+
!
"
"
A
G Caution:
BH
A
#
G Caution:
B
A
A
'
7
:%
#
#
Important Operating Considerations
B
A
#
"
(
(
#
'
#
A
"
)
6m
t (.
2f
Do not place objects in
this area on the side of the project
Technical Support
#
+
1-800-799-9911
+
#
$
8
"
8
"
?+ 0
+
/
"
#
$(
#
#
';;;'%='8;
'"
[email protected]
*
/
(31) 35-6474010
+
(65) 353-9449
iv
INTRODUCTION
K
3?9=L
""
A
#
#
"
"
Image Resolution
M6
#
3?9=H
A
"
:)98;
A
"
$
8)
#
"H
8)
$
#
A
Compatibility
A
"
$
$
#
"
<
NOTE: The LP790 automatically
G 10'"
"
8)
images to 1024x768.
expands 640x480 and 800x600
G K
0K
?$1(K
"
8)
G 0
5&
B5B
@B 5
"'
NOTE: The projector is compati-
Unpacking the Projector
ble with 1080i and 720P HDTV
A
"
$
"
$
(
"(
Contact your InFocus dealer immediately if anything is missing.
formats.
#
)
"
$
)
"'
A
#
2H
6
*
#
H
"'
B
$'
$$$#"
1
I
n
t
r
o
d
u
c
t
i
o
n
)
&
"
##
#"
$$$#"CC'
$
"
$
#
"'
1
2
4
3
5*
6
7
10
8
9
FIGURE 1
Shipping box contents
1.
Projector + lens cap
6.
Computer cable
2.
Dust cover
7.
Audio/Video cable
3.
User’s Guide, Quick Start
card, and CD
8.
USB mouse cable
4.
Remote control with batteries
9.
S-Video cable
5.
Power cord*
10.
SCART adapter
*additional country-dependent power cords may be included
2
focus ring
zoom ring
keypad
IR sensor
FIGURE 2
Front view of projector
speakers
connectors
security lock
power connector/switch
FIGURE 3
Rear view of projector
adjustable foot
lamp housing
dust filter
foot release
FIGURE 4
Bottom view of projector
3
I
n
t
r
o
d
u
c
t
i
o
n
Usage Guidelines
G B
(
A
$
A
"
"
G B
(
A
&
#$
##
#
"
$
"
#
"
(
G @
A
$
$
"
1
#
G A
)"
#
)
#
"
#
$
"
"
#
G
A
'
#
?
"
#
:%
If You Need Assistance
#
(
#
"
1
(
N O
,;
(
+
+
#
$
http://www.infocus.com/service. DH
#
3
P
'"
#"
NOTE: For general product
information, please call
1-800-294-6400.
#
H
$
!
D
+
1-800-799-9911
$
8
"
8
"
?+ 0
+
/
"
#
$(
#
#
';;;'%='8;
*
/
(31) 35-6474010
+
(65) 353-9449
'"
[email protected]
http://www.infocus.com.
4
Warranty
(
"
$'
$
#
$
(
#
"
)
$
"
#"
"
$
$
&#
:%
#
"
A
#
""
(
"
'
#
(
"
(
#
?
"
#
#
5
I
6
n
t
r
o
d
u
c
t
i
o
n
SETTING UP THE PROJECTOR
1 ?
A
#
#
G
A
"
$
,
#
I:
"J
#
$
"
G #
$
A
#"
A
+
N&O
9
"
G #
A
#
"
$
0
E
#
"
#"
"
$
NO
9
0
E
'
N
O
:%
2 ?
A
#"
G #
"
"
F"
NOTE: The projector must be at
least 3.9 feet (1.2 m) from the
projection screen.
8
f t.
5.8
f t.
16
.7
f t.
A
F
"
A
#$
($
%
$
A
"
F
"
#'
"
"
F
N?A
"
+FO
%
2.
30.6 ft.
10.5 ft.
4.6 ft
FIGURE 5
Projected image size
3 0(
A
"
##
7
S
e
t
t
i
n
g
u
NOTE: Before you continue,
p
t
h
e
P
audio in
S-video
make sure the projector and all
r
computer
monitor
o
j
e
c
t
o
r
PS/2 mouse
component video
ethernet
other equipment is turned off. If
you’re connecting a computer,
make sure the distance between it
and the projector is 13 feet or less.
video
audio out
remote
computer VESA
RS-232
audio in
computer DVI
USB mouse
FIGURE 6
Connector panel
A
#$
C
<
NOTE: If you are connecting an
older Macintosh computer that
does not have a 15-pin connector,
you must use a Mac adaptor
between the computer and the
projector. See “Optional
Accessories” on page 45.
Source
Video
Audio
Computer
RGBHV
3 Single-ended analog RGB
+ 2 H&V sync (5 BNCs)
mini jack
Computer
VESA* (2)
VESA Single-ended analog
RGB (HD-15)
mini jack
ComputerDVI
DVI-D
mini jack
Component Video
Base-band component video
(BNC)
Left and right line-level
(2 RCAs)
Composite
Video*
Base-band composite video
(RCA)
Left and right line-level
(2 RCAs)
S-Video*
S-video Y/C (4-pin circular)
Left and right line-level
(2 RCAs)
Q
$
A
8
Connecting a Computer
1 ?
#
"
N"
56O A
2 ?
#
"
"
'
"
#
(
"'
"
#"
"
NOTE: Many laptop computers
do not automatically turn on their
external video port when a secondary display device such as a
projector is connected. Refer to
your computer manual for the
command that activates the external video port. Activation commands for some laptop computers
are listed in the Appendix of this
manual on page 46 and in the
Service section of our website.
computer cable
FIGURE 7
Connecting the projector to a computer
Do you want to play your computer’s audio on the projector?
1 ?
#
I
J
"
2 ?
#
N
O
'
A
Do you want to display the image on your desktop computer’s monitor as well as on the projection screen?
1 ?
"H
N0O
A
9
S
e
t
t
i
n
g
u
p
t
h
e
P
r
o
j
e
c
t
o
r
Do you want to control the computer’s mouse from the projector’s
remote?
NOTE: The USB mouse is
supported for use with
Windows 98 or higher only.
#
"
2+1
$
=;
2+1
"
1 ?
#
#
2+1
"
"
'
"
2 ?
!
#
2+1
"
N2+1O
A
D
"
2+1
"
2+1
#
$
=;
$
NOTE: If your computer has a
PS/2 mouse, purchase an optional
PS/2 mouse cable.
If your computer has a PS/2 connector, use an optional PS/2 mouse
cable.
1 ?
#
?+C
"
"
'
"
2 ?
#
?+C
"
N?+O
A
NOTE: You do not need to restart
your computer after connecting a
USB mouse to use it (it is hotpluggable). You must restart your
/$
H
$
A
"
+(
N?$
?AO
,
Connecting a Computer with a DVI Cable
B5
N"
B5O
'
A
I
8
;J
"
computer after plugging in a PS-2
mouse.
10
Connecting a Computer with an RS-232 Cable
D
A
#"
3B
'
&+',
A
I
8
;J
+#
&+',
""
#
+
+'
#
$
$$$#"
Connecting a Video Player
#
I5&
B5B
"J
'
"
"
C
IC5J
G #
#'
+'
'
+'
+'
!
"
1 ?
C5
H
$
N'
O
I
;J
'
"
N 0O
G #
H
+'
(
N+'
O
2 ?
$
N5O
A
G #
H
+'
#
N+'5O
A
A/V cable
FIGURE 8
Connecting the projector to a VCR using the A/V cable
11
S
e
t
t
i
n
g
u
p
t
h
e
P
r
o
j
e
c
t
o
r
A/V cable
FIGURE 9
Connecting the projector to a VCR using the S-video cable
3 ?
C5
H
$
#
N
O
?
H
'
N
O
4 ?
#
C5
$
N
O
A
CAUTION: Your video player
may also have a “Video Out”
connector for a coaxial cable
connection. DO NOT use this to
connect to the projector.
A
"
$
"A
<
/ +
/ +
::,
?3
?3'0
?3'/
?3'8
+*0
"
A
"F
#"
#
"
Connecting a Video Player using BNC Cables
1/
'
A
I
8
;J
Connecting External Speakers
)
(
(
N
O
I
8
;J
A
(
"
"#
Connecting the Remote Control Cable
NOTE: For more information on
using the remote, see page 19.
12
#
A
"H
"
#
H
A
"
A
$
"
+
N
O
:%
?
"
N&"O
A
?
#
"
Powering up the Projector
1 &"
2 ?
$
(
#
A
'
$
""
NOTE: Always use the power cord
that shipped with the projector.
3 ?
$
$
(
#
A
G
3*B
#
A
I
8
;J
#
#$
4 #
3*B
Power
AH
(
"
$
G
#
3*B
#
A
(
I
#
A
'
J
(
"
#
"
#
5 #
G
"
A
#
H
Video
(
"
I J
"
6 #
"
a
#
"
"
'
A
"
F
A
N$
'
$O
/$
@$
F
$
F
'
I$
$
$
$
'
"J
NOTE: The first time you connect
your computer to the projector, the
computer may display a message
stating that new hardware was
found. The Add New Hardware
Wizard may appear. Use the Wizard to load the correct driver (the
computer considers the projector a
Plug and Play Monitor).
13
S
e
t
t
i
n
g
u
p
t
h
e
P
r
o
j
e
c
t
o
r
(
/)
0(
N+
#
O
(
/)
2(
(
)
(
/)
$
"'
#
"
$
"
B
14
$
#
(
/)
(
$
"
7
"
"
A
#
H
Computer
(
"
"H
"
G 0(
H
)
7
N?
3
O
:8
#
G #
"(
A"
"
'
AH
'
"
"
Menu
(
"
"
#"'
"
,
NOTE: With some computers,
the order in which you power up
the equipment is very important.
Most computers should be turned
on last, after all other peripherals
have been turned on. Refer to your
computer’s documentation to
determine the correct order.
15
S
e
t
t
i
n
g
u
p
t
h
e
P
r
o
j
e
c
t
o
r
Turning Off the Projector
##
A
Power
)
(
#
#"
?
Power
"
##
#
#
=
A'
##
#
$
"
(
"
$
=
#
"
"
$H
#
H
NOTE: To maximize lamp life,
allow the projector to run for at
least five minutes before turning
it off.
16
D
B
?$
0"
+"
IB?0+J
"
A
##
#
#
+
9
#
USING THE PROJECTOR
$
"(
A"
A
#
(
"
#"
'
"
Basic Image Adjustment
1 0(
$
!"
I ,J
2 #
"
H
"
F"
"
I 9J
A
#
A
I ;J
"
A
F
I 8J
1
A
=
3 #
"
#
#
#
I 9J
4 #
H
(
A
I :J
Adjusting the Projector
#
"
#
I
J
"
F"
"
F"
A
"
F
NOTE: To obtain the best overall
zoom ring
focus quality, open the menu and
focus on the text. This will ensure
that the best overall image quality
is achieved.
focus ring
FIGURE 10
Focus ring and zoom ring
17
U
s
i
n
g
t
h
e
P
r
o
j
e
c
t
o
r
A
!
$
#'(
!('
#
$
#
A<
1 &
A
$
#
&
(
#
I
J
2 #
#
A
#
A
"
foot release button
FIGURE 11
Adjusting the height of the projector
18
Using the Remote Control
"H
"
#"
AH
"
"
2+1
?+C
"
"
A
+
#
"
"
$
#
"
"H
3*B
$
"
?
"
A
#
#
A
I
"J
#
'
""
: #
#
"
A
(
'
A
"
!
:
#
"
A
NOTE: If you can’t aim the
remote control at the projector so
that its signal is received R for
example, when using rear projection
R use the optional remote
control cable to connect the
remote directly to the projector.
LED
FIGURE 12
Remote control
?
$
#
(
"
D
"
"
(
&
3
"
"H
#
"
19
U
s
i
n
g
t
h
e
P
r
o
j
e
c
t
o
r
Laser
##
$
#
0#K
?$?K
"H
"
$
+
+$
"
#
?$?
#
#"
"
(
5$
'
N?
0
&
0
(O
+
+$
(
E
$
H
?$'
?H
+
+$
"
#
(
)
(
I
?$?
"
##J
20
Using the Keypad and Remote Buttons
"
Keystone
Volume
(
(
"
"
'
A"
+
N2
'+
0O
,
#
LEDs
FIGURE 13
Keypad and remote buttons
Menu
?
Menu
'
"
?
Menu
"
"
A'
"
"
"
#
"
#
"
#"
'
"
,
Computer and Video
"
I"
J
'
A
$
"
Computer
Video
N+
+O
)
2
(
$
(
Select
Power
?
A
##
+
,
8
#
Volume
?
Volume
A
"
21
U
s
i
n
g
t
h
e
P
r
o
j
e
c
t
o
r
Arrow buttons (keypad only) or track ball (remote only)
2
"(
A"
'
"
+
N2
'+
0O
,
#
Keystone (keypad only)
2
#
A
"
"(
!
"
1 ?
Keystone up
$
#
"
Keystone down
$
$
D
A
#"
'%
>:
D
A
(
#"
1
"
I
%
#
"J
2
increasing keystone
decreasing keystone
FIGURE 14
Adjusting the keystone
Effect (remote only)
?
(
##
#
##
"#
D
"
#F
"(
"
8<=
+
;
#
"#
##
Effect
(
"#
"
#
Effect
$
"
##
#
I
#
"
"#J
"#
"
Select
I
LJ
F
Effect
$
Laser (remote only)
?
Laser
$
22
Reset (keypad only)
'F
A
"
Using the On-Screen Menus
A "
$
"(
"
A'
"
#
'
"
Menu
(
"
Basic
"
Keystone
Volume
(
"
?
$
$
"
$
$ "
(
"
"
NOTE: Some menu items may be
grayed out (dimmed) at certain
times. This indicates the item is
not applicable to your setup or the
item is not enabled until another
selection is made.
FIGURE 15
On-screen menu
"
$
$
(
"
$
"
$
I
"
J
Select 2
#
$
(
A
##
?
Select
$
'"
Select
(
"
$
#
"
Select
2
$
$
(
"
"
A"
Menu
"
23
U
s
i
n
g
t
h
e
P
r
o
j
e
c
t
o
r
Basic Menu
FIGURE 16
Basic menu
Contrast
#
##
$
'
(
#
A
"
#
(
$
"
1 2
$
$
Select
#
$
A
#"
Select Brightness
A
#
"
1 2
$
$
1
Select
#
$
A
#"
Select Color
NOTE: The color setting applies
to video sources only.
A
"
#"
(
$
#
1 2
$
$
Select
#
$
A
#"
Select 24
Keystone
(
"
!
#
A'
2
#
A
"
"(
!
"
D
A
#"
'%
>:
+
#
(
A"
1 ?
$
E
Select
2
#
$
A
(
'
#"
'%
:%
?
Select Setup
+
#$
#
"
Reset
'F
A
"
About
'
"
#"
F
#!
25
U
s
i
n
g
t
h
e
P
r
o
j
e
c
t
o
r
Setup menu
FIGURE 17
Setup and Picture menus
Picture menu
G Aspect Ratio<
#
:<,
(
8<=
#
$
$
#"
(
/
"
#"
@
&
Select
$
$
Select
#
$
?
"
G Color Temp<
#
9,
##
A
"
#
"
G Sharpness<
A
#
"
G Tune<
2
#
$
A
F
#
#
"
G Width<
2
#
$
A
$
#
"
G Position<
2
#
$
A
F
#
"
$
$
A
G Tint:
2
#
$
A
#
"
26
System menu
#
+"
"
##
"
Select
("(
)
#
7
"
)
"
#
##
FIGURE 18
System menu
G Ceiling<
"
$
#
'"
A
G Rear<
"
A
#"
G SourceSearch<
#
A
"'
#
##
"
Computer Video $
"
G Hide OSD<
'
I+BJ
#
A'
"
$
A
('
"
"
"H
A"
G DPMS enable<
B
?$
0"
+'
"
IB?0+J
A
"
##
#
,
"
#
A
$
"
""
#
#
%
"
A
##
D
"
Power
A
(
3*B
(
$
B?0+
"
27
U
s
i
n
g
t
h
e
P
r
o
j
e
c
t
o
r
Language menu
D
'
"
*
6"
+'
B
/$
?
S
+"#
@
Select
"
$
""
FIGURE 19
Language menu
Effect menu
"
$
##
##
Effect
'
"
#
##
"#
@
##
Select
##
FIGURE 20
Effect menu
G Magnify<
$
##
#
"
+
#
"#
G Freeze<
#F
A
"
G Mask<
"(
A
"
$
(
G Mute<
"
G 16:9<
$
$
$
:<,
8<=
$'
28
#"
Service menu
FIGURE 21
Service menu
G Factory reset<
I)
'
?
"
"J
#
'
@
Select
#"
)
?
Select
$
/
Select
#
H
$
G Info<
'
$$
#"
'
AH
#$
"
#
"
"
?
Select
$$
G Reset lamptimer<
"
"
F
#
"
I ,%J
&
""
Select
#"
"
#
$$
F
G Service Code<
$$
'
29
U
s
i
n
g
t
h
e
P
r
o
j
e
c
t
o
r
User’s logo menu
"
$
(
(
#
#
$
$
"
FIGURE 22
User’s logo menu
G @
Select
#
$
"
G
30
"
"
$
'
"
/$
Select
?
Select ILJ " "
A
#"
Network menu
A
&S:%
*
I
;
J
$(
?C?
'
$
$
#
""
#
'
A
$(
#
"
FIGURE 23
Network menu
G IP Address:
#
A
$(
G Subnet mask:
+
$(
#
?
G Default gateway:
?
#
G DHCP:
+
"
?
+
"(
B#
$
G Info:
?
#"
$(
#
NOTE: If you are connected to a
local network, contact your network administrator to get a valid IP
address, subnet mask, and default
gateway address.
31
U
s
i
n
g
t
h
e
P
r
o
j
e
c
t
o
r
Audio
FIGURE 24
Audio menu
G Bass, Treble, Volume:
A
#
G Loudness:
#
$
G Mute Internal:
(
32
MAINTENANCE & TROUBLESHOOTING
$
<
G
G
(
#
G
A
"
G
"
G
(
#
G
A
Cleaning the Lens
$
A
<
1 '
"
#
G )
"
#
H
G "
"
2 3
$
"
3 #
H
A
""
Cleaning the Dust Filter
#
#
#'
"
A
"
"#
1
2
##
A
$
A
$
$
#
#
33
M
a
i
n
t
e
n
a
n
c
e
&
T
r
o
u
b
l
e
s
h
o
o
t
i
n
FIGURE 25
Removing the dust filter
3 #
"
$
$
4 &
#
$
FIGURE 26
Cleaning the filter
34
g
Replacing the Projection Lamp
"
"
+
#
"
"
#
"
"
"
3*B
"
"
D
$
"
#"
+
NO
::
#
#"
allow the projector to cool for at
least 60 minutes before you
replace the lamp. Never extract
$
A
"<
1
WARNING: To avoid burns,
the lamp housing while the projec-
##
A
$
tor is operating.
2 8
"
$
A
3
A
$
$
"
WARNING: Be extremely careful
when removing the lamp housing.
In the unlikely event that the bulb
ruptures, small glass fragments
may be generated. The lamp module is designed to contain these
fragments, but use caution when
removing the lamp module.
FIGURE 27
Removing the screw on the lamp door
4 $
"
5 3
$
"
35
M
a
i
n
t
e
n
a
n
c
e
&
T
r
o
u
b
l
e
s
h
o
o
t
i
n
g
FIGURE 28
Loosening the screws on the lamp housing
6 #
"
"
B
#
"
"
"
FIGURE 29
Removing the lamp housing
7 $
"
$
8 &
"
WARNING: Do not drop the
lamp module or touch the glass
bulb! The glass may shatter and
cause injury.
36
9 ?
$
?$
$
Power
A
(
10 "
"
+C+
"
&
""
+
=
#
+
"
Replacing the Batteries in the Remote Control
#
#
$
#
$
"
+""
#
$
$
"
#
'
1
"
#
$
2 +
##
#
"
3 &"
#
"
'
"
"
4 $
$
(
0(
FIGURE 30
Replacing the batteries in the remote
5 &'
Using the Security Lock
A
#
$
?
6'
3(
+"
I
,J
+
N
O
:%
#
#"
&#
#"
"
$
(
#
$
FIGURE 31
Installing the security lock
37
M
a
i
n
t
e
n
a
n
c
e
&
T
r
o
u
b
l
e
s
h
o
o
t
i
n
g
Troubleshooting
LEDs
"
3*B
#
A
I
,
J
$
"
G "
3*B
"
"
"
+
,%
G (
"
3*B
"
A
'
##
A
$
3*B
#
A
"
'
#
A
G 3*B
"
A
G (
3*B
"
A
'
F
B?0+
"
+
9
G (
3*B
"
A
B?0+
"7
3*B
"
A
B?0+
"
+
9
#
Problem: The projector is not running
G0(
$
#
0(
$
A
G#
A
$
"(
$
G0(
A
5#
3*B
Problem: Projector is running, but nothing appears on projection screen
G0(
"
A
#
#
A
G0(
0(
*##
"
+
;
G(
AH
"
"
+
N&
?A
3"O
,%
38
Problem: Only the start-up screen displays
G5#
+
=
#
G0(
G5#
+
N"'
5O
G A
+
%
GD
"
##
$
!"
&#
"'
H
"
"
G0(
H
)
+
N?
3
O
:8
"H
"
#
G0(
"H
'
#
G0(
"
"
A
H
6
*6
"
#
H
$
=;<
1 N0
"O
?
#
B
2 (
+
3 5#
B(
8)
Problem: Color or text not being projected
GD
"
A
$
)
&#
N1O
:
#
"
#'
"
Problem: The screen resolution is not right
G0(
"H
#
#
8)
Problem: Image isn’t centered on the screen
G0
A
"
G&
"
"
&#
8
G1
A
=
39
M
a
i
n
t
e
n
a
n
c
e
&
T
r
o
u
b
l
e
s
h
o
o
t
i
n
g
Problem: Image is too wide or narrow for screen
GA
F"
A
"
GA
$
#
"
+
8
Problem: Image is out of focus
G A
#
"
G0(
A
,=
#
I
"J
#"
A
A
=
G(
A
#
Problem: Image and menus are reversed left to right
G&
A
"
&
##
+"
"
"
""
#$
A
+
9
Problem: Image and menus are upside down.
G
"
##
+"
"
+
9
Problem: Projected image is distorted
G A
+
%
GA
#
"
+
8
Problem: Projected colors don’t match the computer or video
player’s colors
GS
##
#
##
"'
#
##
$
"
"
A
"
A
C
0
"
+
:
Problem: Lamp seems to be getting dimmer
G "
$
#
"
&
"
N&
?A
3"O
,%
Problem: Lamp shuts off
G
"
$
"
"
##
##
A
$
"
(
G0(
"
(
#
A
40
(
"
#"
#
+
+
#
$
http://www.infocus.com/service. DH
#
3
P
'
'"
#"
1#
+
#
'
#$
#"
<
G
"
"
#
A
G
AH
"
I
"
J
G
AH
#$
I
+C#
"+
=
#
G
#
"
+
1-800-799-9911 $
8
"
8
"
?+ 0
+
/
"
#
$(
#
#
';;;'%='8;
*
/
(31) 35-6474010
$
;
"
8
"
*
"
(65) 353-9449 $
=
"
8
"
'"
[email protected]
41
M
42
a
i
n
t
e
n
a
n
c
e
&
T
r
o
u
b
l
e
s
h
o
o
t
i
n
g
APPENDIX
Specifications
A
"
$
"'
"
#
Temperature
Operating
41 to104° F (5 to 40° C) at sea level
41 to 98° F (5 to 35° C) at 10,000 feet
Non-operating
-4 to 140° F (-20 to 60° C)
Altitude
Operating
0 to 10,000 feet (T3,000 meters)
Non-operating
0 to 20,000 feet (T6,000 meters)
Humidity
Operating
Non-operating
20% to 80% relative humidity, non-condensing
10% to 90% relative humidity, non-condensing
Dimensions
5.1 x 12.7 x 13.9 inches (13.0 x 32.2 x 35.2 cm)
Weight
13 lbs. (5.9 kg) unpacked
Optics
Focus Range
3.9 - 36.1 feet (1.2 - 11 m)
Lamp
Type
270-watt SHP lamp
Input Power Requirements
100-240V~ 4-1,5A 50-60 Hz
Ceiling Mount
UL tested/listed ceiling mount with minimum capacity of 52 lbs (23.6kg)
Minimum distance from wall:12/20 (30/50 cm) inch for proper ventilation
43
A
p
p
e
n
d
i
x
Accessories
NOTE: Use only InFocusapproved accessories. Other
products have not been tested with
the projector.
44
Standard Accessories
(ship with the projector)
Part Number
Quick Start card
801970
User’s Guide
801466B
Dust Cover
305044
Shipping Box (with packaging)
407250
Computer Cable 6 ft (1.8 m)
301376B
Audio/Video Cable 6 ft (1.8 m)
301377A
S-Video Cable 6 ft (1.8 m)
301106
USB Mouse Cable
301160
European Power Cord (additional countrydependant power cords may be included)
300093
Remote
200160NEU
Projection Lamp Module (included in projector)
SP-LAMP-001
Lens Cap
4009080
SCART Adapter
301130
Online User’s Guide CD-ROM
802413
Optional Accessories
Shipping Case (ATA approved)
CA-ATA-008
NOTE: You can purchase these
Samsonite Deluxe Travel Case
CASE-801
items by contacting your dealer or
Ceiling Mount Kit
SP-CEIL-001
InFocus Catalog Sales at
Gray LiteMount Pipe Tubing Extension
SP-LTMT-EXT-GRAY
1-800-660-0024. For general
LiteMount False Ceiling Plate
SP-LTMT-PLT
product information, please call
Digital/Analog Interface Card
SP-DVI-CARD
1-800-294-6400.
Audio/Video Cable (30’; 9m)
SP-AV30
DVI Cable (6.6’, 2m)
420016
DVI-VGA Cable (6.6’, 2m)
420041
Mouse Cable (13.1’,4m)
301102
Replacement Projection Lamp Module
SP-LAMP-001
Wired Remote Control Cable
301145
Mind Path Gyropoint RF
GYRO-RF
Mind Path Remote Control
IR50F/X
Mind Path Pocket Point RF Remote/Laser Poniter
HW-RF-POCKTPNT
Laser Pointer
A90
Power Supply, Universal, Black
A17
VGA Long Distance Amplifier (2 VGA Ports)
A51-1
1-in-2-out VGA Distribution Amplifier
HW-VGA2OUT
Portable Projector Stand
SP-STND
PC Guardian Projector Cable Lock
SP-LOCK
eBeam (Web Enabled Electronic Meeting
Assistant)
HW-EBEAM
50” Portable Projection Screen
HW-PORTSCR50
60” Deluxe Insta-Theatre Screen
HW-DLXSCRN
Pull Down Screen, 84” Diagonal
HW-WALLSCR84
3rd Year Extended Warranty (1 year extension)
EW-1YEAR
4th YearExtended Warranty (2 year extension)
EW-2YEAR
45
A
p
p
e
n
d
i
x
Portable and Laptop Activation Chart
NOTE: Visit our website at
www.infocus.com for the most
current activation chart. It is
located in the Technical Library in
the Service and Support section.
0
"
"
)'
$
A
"'
"
#
"
"
#$
I#
"
""
$(
#
"H
"
#
'
""J
"
#
(
$
#
)"
NOTE: Usually, pressing the key
)
& C3B
commands once activates the
Computer
Key command to
activate port
Key command to
de-activate port
external video port, pressing it
Acer
Ctrl-Alt-Esc (for setup)
Ctrl-Alt-Esc (for setup)
FN-D or Ctrl-D
FN-D or Ctrl-D
and internal ports, and pressing it
Ctrl-FN-D
Ctrl-FN-D
a third time activates the internal
FN-F5
FN-F5
type from A:/IVGA/CRT
type from A:/IVGA/CRT
again activates both the external
AST* **
port. Refer to your computer’s
FN-F12
FN-F12
AMS
FN-F2
FN-F2
AMT
setup screen
setup screen
AT&T
FN-F3
FN-F6
FN-F3
FN-F6
Advanced Logic
Research
Ctrl-Alt-V
Ctrl-Alt-V
Altima
Shift-Ctrl-Alt-C
Shift-Ctrl-Alt-L
setup VGA/
Conf.Simulscan
setup VGA/
Conf.Simulscan
FN-F12
FN-F12
FN-F5
FN-F5
documentation for details on your
specific model.
Ambra**
Amrel* **
Apple
46
F2/Choose Option/F5
F2/Choose Option/F5
setup menu
setup menu
Shift-Ctrl-D
Shift-Ctrl-D
see Mac Portable and Mac PowerBook
Aspen
automatic
automatic
Award
FN-F6
FN-F6
BCC*
automatic
reboot computer
Key command to
activate port
Key command to
de-activate port
Bondwell
LCD or CRT options after
bootup
reboot for LCD or CRT
options to appear
Chaplet**
setup screen
setup screen
FN-F6
FN-F6
FN-F4
FN-F4
Computer
Chembook
FN-F6
FN-F6
Commax
Ctrl-Alt-#6
Ctrl-Alt-#5
Compaq* **
Ctrl-Alt-<
Ctrl-Alt->
FN-F4
FN-F4
Compuadd* **
automatic
automatic
mode/? (for setup option)
mode/? (for setup option)
automatic
automatic
Alt-F for screen setup
option
Alt-F for screen setup
option
Data General
Ctrl-Alt-Command
Ctrl-Alt-Command
Data General
Walkabout
2 CRT/X at DOS prompt
reboot
Datavue
Ctrl-Shift-M
Ctrl-Shift-M
DEC**
Dell**
Digital*
FN-F5
FN-F5
FN-F4
FN-F4
Ctrl-Alt-<
Ctrl-Alt->
Ctrl-Alt-F10
Ctrl-Alt-F10
FN-F8 (CRT/LCD)
FN-F8
FN-D
FN-D
FN-F12
FN-F12
automatic
reboot
FN-F2
FN-F2
Dolch
dip switch to CRT
dip switch to LCD
Epson
dip switch to CRT
dip switch to LCD
Everex*
setup screen option
setup screen option
For-A
Ctrl-Alt-Shift-C
Ctrl-Shift-Alt-L
Fujitsu
FN-F10
Gateway
FN-F3
FN-F1/FN-F1 again simultaneous
FN-F3
FN-F1
47
A
p
p
e
n
d
i
x
Key command to
activate port
Key command to
de-activate port
FN-F2, choose auto or
simultaneous
FN-F2
Ctrl-Alt-Tab
Ctrl-Alt-Tab
Hitachi
FN-F7
FN-F7
Honeywell
FN-F10
FN-F10
Computer
Grid* **
Hyundai
setup screen option
setup screen option
IBM 970*
automatic
warm reboot
IBM ThinkPad**
reboot, enter setup menu
FN-F2
FN-F7, select choice from
setup menu
FN-F1, select choice
FN-F5, select choice
PS/2 SC select choice
(CRT, LCD, etc.)
Infotel
FN-F12
FN-F12
Kaypro
boot up, monitor plugged
in
unplug monitor
Kris Tech
FN-F8
FN-F8
Leading Edge
FN-T
FN-T
Mac Portable
100
no video port: not compatible
Mac PowerBook
48
140, 145, 150,
170
no video port: requires a 3rd-party interface
160, 165, 180,
520, 540, 5300
Control Panel folder,
PowerBook Display
folder; Activate Video
Mirroring
210, 230, 250,
270, 280, 2300
requires Apple Docking Station or Mini Dock
Magitronic
FN-F4
FN-F4
Mastersport
FN-F2
FN-F1
Micro Express*
automatic
warm reboot
Micron
FN-F2
FN-F2
warm reboot
Computer
Key command to
activate port
Key command to
de-activate port
Microslate*
automatic
warm reboot
Mitsubishi
SW2 On-Off-Off-Off
SW2 Off-On-On-On
NCR
setup screen option
setup screen option
NEC* **
setup screen option
setup screen option
CRT at the DOS prompt
LCD at the DOS prompt
FN-F3
FN-F3
automatic
automatic
FN-O/*
FN-O/*
FN-F0
FN-F0
Ctrl-Alt-<
Ctrl-Alt->
Olivetti*
Packard Bell* **
Panasonic
FN-F2
FN-F2
Prostar
Ctrl-Alt-S at bootup
Ctrl-Alt-S at bootup
Samsung*
setup screen option
setup screen option
Sanyo
setup screen option
setup screen option
Sharp
dip switch to CRT
dip switch to LCD
Sun SPARCDataview
Ctrl-Shift-M
Ctrl-Shift-M
Tandy**
Ctrl-Alt-Insert
Ctrl-Alt-Insert
setup screen option
setup screen option
Tangent
FN-F5
FN-F5
Texas Instruments*
setup screen option
setup screen option
Top-Link* **
setup screen option
setup screen option
FN-F6
FN-F6
Ctrl-Alt-End
Ctrl-Alt-Home
FN-End
FN-Home
Toshiba* **
Twinhead*
FN-F5
FN-F5
setup screen option
setup screen option
FN-F7
FN-F7
FN-F5
FN-F5
Automatic
Automatic
WinBook
Ctrl-Alt-F10
Ctrl-Alt-F10
Wyse
software driven
software driven
Zenith**
FN-F10
FN-F10
49
A
p
p
e
n
d
i
x
Computer
Zeos**
Key command to
activate port
Key command to
de-activate port
FN-F2
FN-F2
FN-F1
FN-F1
Ctrl-Shift-D
FN-F1
Ctrl-Shift-D
FN-F1
* These manufacturers have models that automatically send video
to the external CRT port when some type of display device is
attached.
** These manufacturers offer more than one key command depending on the computer model.
50
Using Video Mirroring with a PowerBook Computer
"
I
+"+
$
?$'
1(R
$J
A
"
#"'
?$1(H
'
"
##
A
(
"
#
#
"<
1 0
7
(
0
2 +
"
#
$
3 +
(
"
4 +
N 5
0
O
/$
"
##
#"
+
$
0
"
$
A
"
"
(
$
#
#"
#$
<
1
##
"
2 0
3 0
$
"
0
A
"
"
4 &
?$1(
Using SimulScan
+"
$
?$1(
"
)
"
A
##
+"+
A
"
#"
?$1(
+"+<
1 ?
'(
0
+
2 &
+"+
"
(
E
3 #
)
(
E
#"
51
A
p
p
e
n
d
i
x
Projected Image Size
2
"
A
"
F
Distance to screen
Diagonal
Screen Size
(inches)
34
40
70
100
200
236
NOTE: Visit our website at
www.infocus.com for an interactive
image size calculator. It is located
in the Technical Library in the
Service and Support section.
52
Image Width
(inches)
27
32
56
80
160
189
Maximum
distance
(feet)
4.6
5.7
10.5
15.2
30.6
36.1
Minimum
Distance
(feet)
4.1
4.6
8.2
11.8
23.8
28.2
"
=
INDEX
"
"
=
Numerics
8
=
#"
;
1/
"
=
A
::
:%
)
(
""
#
"'
"
:8
$
,
A
"
:
:
:
#
A
9
U
&+',
"
8
"
$
8
(
%
A
"
8
"
:,
"
A
:
D
'
"
+
+
B?0+
"
9
B
E
1
"
:
*##
1/
*##
"
;
A
:
)
(
C
F
=
=
#
"
9
"
F
;
"
::
H
"
@
+B
9
"
A
9
A
,,
"
8
A
:
H
"
"
:
,=
"
10'"
0
53
I
n
d
e
x
M
I
10'"
"
0
"
"
"
=
"
;
"#
"
A
,
9
"
,,
H
"
"H
:
"
+
'
"
#
9
"
A
H
"
#F
;
:
:
"
,=
0
;
,;
#
#
:
!
,=U:
O
'
"
,
:
P
F
9
%
$
$
,=
F"
9
?
"
8
A
8
$
,
K
$
"
9
(
(
A"
%
$
!
%
,=
?+C
"
L
"
R
::
,%
##
)
:
"
"
=
3
"
;
"
!
$
:8
"
=
=
3*B
,
,;
::
,,
3?9=
9
#
:,
##
8
,
54
&
A
9
"
,9
=
A
"
"
,%
&
%
"
"
=
A
%
=
&+',
S
U
#
2+1
"
(
,9
:%
2H
"
,
+
"
=
+
"
%
V
:
+
8
##
A
8
+"+
$
?$1(
%
"
?$1(
%
++
9
#
:,
A
,
+'
+"
"
9
W
$
:%
$
#"
;
Z
F"
"
9
T
+
*
:
2+
:
#"
#
:
"
"
:,
)
,=
,;
8
##
A
8
A
,
55
I
56
n
d
e
x
LIMITED WARRANTY
ASK, InFocus, Proxima-Branded Products
INOJ
$
+E
?)"'
IN?OJ
#"
$
#"
"#
#
#
#"
#
"
$("
#
$
$
?
$
"
#
!"
#
'
"
3"
'
""
#
'
"
+
3"
'
I#
$
?
#
#
#
J
)
"
3"
"
#
#
#
?
$
$
$
#
#
?
#
#
#
"
#
3"
#
#
$
IJ
I
J
#
?A
?7
#
IJ
I
J
#
"
?7
#
I=J
%
I
J
$
"
#
#
3"
?
I$
'
A
"J
B
#
?
&'
"
"
$
"
#
A
$
='
%
$
"
#
#"
"
#
?
$
)
?'
$
"
#
H
I
#J
?
#
#
$
#
$
$
#
!
$
#"
B
)
3"
"
#
'
#
F
#
'
$
#
?
#
#
+
#
F
?
&
0
F
/"
I&0
VJ
!
"
#
?
?
#
(
"
(
##
!
#
#
F
$
C
?
#
?
#
"
"
$
<
J
)
"7
J
#
#
#
7
J
H
"7
J
"
"
#
?
2
!
#
F
#
#
#
"
"
"
$
?
$
?
"
#
"#
I?
"
)
#J
?'
"
#
$
/
"
#
?
#
)
?
$("
##
#
#
I=J
#'
$
"
#
"
#
?
$
WARRANTY LIMITATION AND EXCLUSION
3"
)
?
#"
F
#
#
3"
#
?
"'
"
(
#
)
"(
F
"#
"
F
#"
#
?
#
$
?
3"
)
?
"
#
"
"
"
#
"
$
?
#
"
#
3"
$
"
"
?
?
N"O
?
$
"
"
#
3"
"
)
"
$
3"
?
)
)
"
&"#
?
+#$
?
)"
#"
#
3"
?
#
&"#
?
3"
+#$
?
3"
#
#"
DISCLAIMER OF UNSTATED WARRANTIES
@*
&&/ D
?&/ *B
15*
+
@*
/3D
&&/ D
??313*
@+
?2&@+*
33
@*&
&&/ *+
*M?&*++
&
0?3*B
/32B/6
12 / 30 *B
@*
0?3*B
&&/ *+
0*&@/ 13 D
/B
/*++
&
?& 23&
?2&?+*
&*
B+'
30*B
@*&*
&*
/
&&/ *+
@ *M */B
1*D/B
@*
*
@*&*
/B
@*
&*6/6
&&/ D
+@33
/ 1*
*M */B*B
3 *&*B
&
5&*B
*M*? 1D
& */
/+ &20*/ +6/*B
1D
/2+
+0*
S2&+B /+
B
/ 33
30 /+
/
@
3/6
/
0?3*B
&&/ D
0D
3+ +
+2@
30 /+
0D
/ ??3D
D2
LIMITATION OF LIABILITY
+
2/B*&+ B
/B
6&**B
@ /2+H
313 D
@* @*&
/
/ & /
& 2/B*&
/D
&&/ D
/
/*636*/*
&
@*&+*
+@33
/ *M**B
@*
&* 2&/
@*
02/ @*
?2&@+*
?&*
?B
1D
?2&@+*&
/B
2/B*&
/
&20+ /*+
+@33
/2+
1*
313*
&
+?*3
/B&* /B*/ 3
&
/+*P2*/ 3
B0'
6*+
&
3+ ?& +
3+ &*5*/2*+
&
3+ +5/6+
@*
?&*
+ *B
&
@*
?&B'
2 +
/+B*& /
/
30 /6
/2+H
313 D
/
/
&*6&B3*++
&0
&+/6
2 @*
6&**0*/ ?2&@+*
@*
?&B2 0D
1*
1&26@ 1D
?2&'
@+*&
0&*
@/
/*
D*&
*&
@*
2+*
/
@+
&2*B
+0*
S2&+B'
/+
B
/ 33
@*
*M32+/
&
30 /
/B*/ 3
&
/+*P2*/ 3
B06*+
+
@*
15*
30 /
&
*M32+/
0D
/ ??3D
D2
@+
30 *B
&&/ D
65*+
D2
+?*
3*63
&6@ +
/B
D2
0D
3+
@5*
@*&
&6@ +
B*?*/B/6
/
S2&+B /
?
/"
',='