1
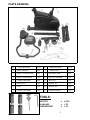
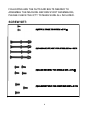
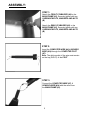
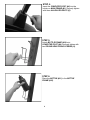
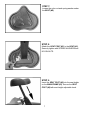
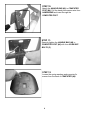
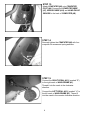
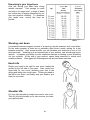
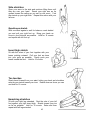
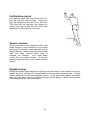
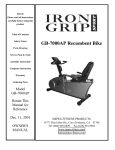
Please read all instructions
carefully before using this
product
Table of Contents
Safety Notice
Parts Drawing
Screw Set
GB-3006AP Upright Bike
Assembly Instruction
Computer Instruction
Warranty
Ordering Parts
Model
GB-3006AP
Retain This
Manual for
Reference
Nov. 15, 2001
OWNER'S
MANUAL
IMPEX INC.
Impex Fitness Products
14777 Don Julian Rd., City of Industry, CA 91746
Tel: (800) 999-8899 Fax (626) 961-9966
www.impex-fitness.com
[email protected]
TABLE OF CONTENTS
BEFORE YOU BEGIN.......................................................................................................1
IMPORTANT SAFETY NOTICE........................................................................................2
PARTS DRAWING………..............................................................................................…3
SCREW SET………………….........................................................................................…4
ASSEMBLY INSTRUCTION….………………....................................................................5
COMPUTER…………...................................................................................................….10
FITNESS TIPS..................................................................................................................13
WARRANTY......................................................................................................................17
ORDERING PARTS.....................................................................................................…..17
BEFORE YOU BEGIN
Thank you for selecting the IRON GRIP SPORT GB-3006AP UPRIGHT BIKE
by IMPEX FITNESS PRODUCTS. For your safety and benefit, read this
manual carefully before using the machine.
As a manufacturer, we are
committed to provide you complete customer satisfaction. If you have any
questions, or find there are missing or damaged parts, we guarantee you
complete satisfaction through direct assistance from our factory. To avoid
unnecessary delays, please call our TOLL-FREE customer service number.
Our Customer Service Agents will provide immediate assistance to you.
Toll-Free Customer Service Number
1-800-999-8899
Mon. - Fri. 9 a.m. - 5 p.m. PST
www.impex-fitness.com
[email protected]
1
IMPORTANT SAFETY NOTICE
PRECAUTIONS
This exercise machine is built for optimum safety. However, certain precautions
apply whenever you operate a piece of exercise equipment. Be sure to read the
entire manual before you assemble or operate your machine. In particular, note the
following safety precautions:
1. Keep children and pets away from the machine at all times. DO NOT leave children
unattended in the same room with the machine.
2. Only one person at a time should use the machine.
3. If the user experiences dizziness, nausea, chest pain, or any other abnormal
symptoms, STOP the workout at once. CONSULT A PHYSICIAN IMMEDIATELY.
4. Position the machine on a clear, leveled surface. DO NOT use the machine near
water or outdoors.
5. Keep hands away from all moving parts.
6. Always wear appropriate workout clothing when exercising. DO NOT wear robes or
other clothing that could become caught in the machine. Running or aerobic shoes are
also required when using the machine.
7. Use the machine only for its intended use as described in this manual. DO
NOT
use attachments not recommended by the manufacturer.
8. Do not place any sharp object around the machine.
9. Disabled person should not use the machine without a qualified person or physician in
attendance.
10. Before using the machine to exercise, always do stretching exercises to properly warm
up.
11. Never operate the machine if the machine is not functioning properly.
12. Maximum Weight – 250 LBS
WARNING: BEFORE BEGINNING ANY EXERCISE PROGRAM, CONSULT YOUR
PHYSICIAN. THIS IS ESPECIALLY IMPORTANT FOR INDIVIDUALS OVER THE AGE
OF 35 OR PERSONS WITH PRE-EXISTING HEALTH PROBLEMS.
READ ALL
INSTRUCTIONS BEFORE USING ANY FITNESS EQUIPMENT. IMPEX INC. ASSUMES
NO RESPONSIBILITY FOR PERSONAL INJURY OR PROPERTY DAMAGE SUSTAINED
BY OR THROUGH THE USE OF THIS PRODUCT.
SAVE THESE INSTRUCTIONS.
2
PARTS DRAWING:
NO.
DESCRIPTION
Q'TY
NO.
DESCRIPTION
Q'TY
1
MAIN FRAME
1 PC
8
COMPUTER
1 PC
2
FRONT STABILIZER
1 PC
9
HANDLE BAR
1 PC
3
REAR STABILIZER
1 PC
10
BOTTLE FRAME
1 PC
4
COMPUTER POST
1 PC
11
BOTTLE
1 PC
5
SEAT POST
1 PC
12
PEDAL (L)
1 PC
6
SEAT
1 PC
13
PEDAL (R)
1 PC
7
COMPUTER WIRE
1 PC
14
SENSOR WIRE
1 PC
TOOLS:
BATTERY
ALLEN KEY
SCREWDRIVER
x
x
x
3
4 PCS
1 PC
1 PC
FOLLOWING ARE THE NUTS AND BOLTS NEEDED TO
ASSEMBLE THE MACHINE. BEFORE START ASSEMBLING,
PLEASE CHECK THE Q'TY TO MAKE SURE ALL INCLUDED.
SCREW SET:
4
ASSEMBLY:
STEP 1:
Attach the FRONT STABILIZER (#2) to the
MAIN FRAME (#1). Securely tighten with two
CARRIAGE BOLTS, WASHERS AND NUTS
(B).
Attach the REAR STABILIZER (#3) to the
MAIN FRAME (#1). Securely tighten with two
CARRIAGE BOLTS, WASHERS AND NUTS
(B).
STEP 2:
Insert the COMPUTER WIRE (#4) & SENSOR
WIRE (#14) through the COMPUTER POST
(#7).
Note: The white socket of the wire must remain
on the top (RIGHT) of the POST.
STEP 3:
Connect the COMPUTER WIRE (#7) &
SENSOR WIRE (#14) with the wires from
the MAIN FRAME (#1).
5
STEP 4:
Insert the COMPUTER POST (#4) into the
holder on MAIN FRAME (#1). Securely tighten
with three ALLEN KEY BOLTS (D).
STEP 5:
Attach BOTTLE FRAME (#10) onto
COMPUTER POST (#4). Securely tighten with
two ROUND HEAD FIXING SCREWS (A).
STEP 6:
Place the BOTTLE (#11) in the BOTTLE
FRAME (#10).
6
STEP 7:
Loosen the nylon nut and spring washer under
the SEAT (#6).
STEP 8:
Attach the SEAT POST #(5) to the SEAT #(6).
Securely tighten with SPRING WASHERS and
NYLON NUTS.
STEP 9:
Insert the SEAT POST (#5) into the seat holder
on the MAIN FRAME (#1). Secure the SEAT
POST (#5) with seat height adjustable knob.
7
STEP 10:
Attach the HANDLE BAR (#9) to COMPUTER
POST (#4). Pull the hand pulse sensor wire from
HANDLEBAR and insert through the
COMPUTER POST.
STEP 11:
Securely tighten the HANDLE BAR (#9) to
COMPUTER POST (#4) with four ALLEN KEY
BOLTS (C).
STEP 12:
Loosen the spring washers and computer fix
screws from the back of COMPUTER (#8).
8
STEP 13:
Attach COMPUTER (#8) onto COMPUTER
POST (#4). Connect the COMPUTER WIRE
(#7), SENSOR WIRE (#14) and HAND PULSE
SENSOR to the back of COMPUTER (#8).
STEP 14:
Securely tighten the COMPUTER (#8) with four
computer fix screws and spring washers.
STEP 15:
Connect the RIGHT PEDAL (#13) (marked “R”)
to the right crank of MAIN FRAME (#1).
Thread it into the crank in the clockwise
direction.
Connect the LEFT PEDAL (#12) (marked “L”) to
the left crank of MAIN FRAME (#1). Thread it
into the crank in the counter-clockwise direction.
9
COMPUTER INSTRUCTION MANUAL
A. POWER UP:
1. Install four UM-2 or R14 batteries into the battery case on the back of monitor.
Batteries must be installed in sequence and be correctly positioned according to the
polarity.
2. If the power source is lower than 2.6V, the low battery indicator on the screen will
remind you to replace with new batteries.
3. After power up, all LCD segments will light up for 2 seconds. The CPU will reset the
resistance level to 0 and then set the system into the initial mode.
REMARK:
1. If the connection cables were installed incorrectly, the monitor will display "E" and
generate a beep sound. Check all the connections then turn on the power switch again
to reset the power and release the beep sound.
2. After using a period of time, if the power source cannot drive smoothly, the monitor will
display a sigh of "E". Please take out the batteries and wait for 15 seconds, then
re-install them. If the monitor still presents "E" & beeps, please call customer service.
B. KEY BOARD:
+
: Selects program or set up the values of load level, time & age.
-
: Selects program or set down the values of load level, time & age.
ENTER
: During STOP mode, press ENTER key to enter time or age setting.
START / STOP : To start or stop exercise.
Hold this button for 2 seconds can enter initial & reset all values to 0.
10
C. FUNCTIONS:
This system contains 12 different programs. The workout time can be preset and the system will
divide the time by 10 intervals. If you do not preset the workout time, the system will count up the
workout time by one-second increment.
1.DETAIL OPERATION OF PROGRAM 1 TO PROGRAM 10:
A. To enter the initial mode, press and hold the START / STOP key for 2 seconds.
B. Press + or - key to choose the exercise program you prefer. The profile will be displayed on
the screen.
C. After finish program setting, press ENTER key to enter time setting.
D. Press + or - key to set up your desired workout time.
E. After finishing time setting, press ENTER to exit or press START key to start exercising.
F. During workout, you can press + or - key to increase or decrease the resistance.
G. You can press STOP key to enter PAUSE mode and then press START key again to continue
your program.
2.DETAIL OPERATION OF PROGRAM 11 AND 12:(HEART RATE CONTROL)
This is a unique function. It allows the monitor to adjust the workout resistance according to your
heart rate. If your present heart rate is greater then your target heart rate, CPU will decrease the
workout resistance automatically. In addition, if your present heart rate is less than your target heart
rate, CPU will increase the workout resistance.
PROGRAM 11: (60% OF MAX HEART RATE)
Your MAXIMUM heart rate =220 - your age.
TARGET HEART RATE = 60% × your MAXIMUM heart rate.
PROGRAM 12: (85% OF MAX HEART RATE)
Your MAXIMUM heart rate =220 - your age.
TARGET HEART RATE = 85% × your MAXIMUM heart rate.
OPERATING:
A. During STOP mode, press START/ STOP key for over 2 seconds to enter initial mode.
B. Press + or - key to enter heart rate control program (11th or 12th program).
C. Press ENTER key to enter time setting.
D. Press + or - key to set up your desired exercise time.
E. Repeat step C & D to set up your age.
F. After completion of all setting, press START key to start exercising.
NOTE:
If there is no input signal for over 4 minutes, the system will enter SLEEP mode and all displays will
be turned off automatically. When signals received, the LCD screen will light up again and monitor
will be back to initial mode.
11
D. TECHNICAL NOTES:
1. The PULSE rate will be displayed after detecting 4 stable pulse signals.
2. Each pulse is a signal and will be accompanied with one "♥" symbol flashing.
3. If no PULSE detected for over 8 seconds, the CPU will turn off the pulse circuit automatically.
This is a power saving measure and you can press START / STOP key to restart the pulse function.
FUNCTIONS
TIME
SPEED
DISPLAY VALUE
00:00 - 99:59 (COUNT UP)
05:00 - 99:00 (COUNT DOWN)
0.00 - 99.9 KPM or MPH
DISTANCE
0.0 - 999.9 KM or MILE
CALORIE
AGE
PULSE
0.0 - 99.9 - 100 - 999 K.cal
1 - 99
39 - 240
E. LCD CONTRAST CALIBRATION:
1. During STOP mode, press and hold the ENTER & + keys simultaneously for over 2 seconds
to enter LCD CONTRAST CALIBRATION mode.
2. Press + or - keys to adjust the LCD contrast to be lighter or darker.
3. After completion the CALIBRATION, press START / PAUSE key to exit.
12
FITNESS TIPS
CONSULT YOUR PHYSICIAN
Before using this product, please consult your personal physician for a complete physical
examination. Your doctor should approve frequent and strenuous exercise. If any
discomfort should result from your use of this product, stop exercising and consult your
doctor. Proper usage of this product is essential. Please read your manual carefully
before exercising. Please keep all children away from the equipment during use and when
equipment is unattended.
Dress comfortably
Always wear appropriate clothing, including athletic shoes, when exercising.
loose clothing that could become caught during exercise.
Do not wear
Check your equipment
Make sure that all bolts and nuts are tightened when equipment is in use. Periodic
maintenance is required on all exercise equipment in order to keep it in good condition.
Begin at your Fitness level
How you begin your exercise program depends on your physical condition. If you have
been inactive for several years, or are severely overweight, you must start slowly and
increase your time gradually, a few minutes per week.
Initially you may be able to exercise only for a few minutes in your target zone; however,
your aerobic fitness will improve over the next six to eight weeks. Do not become
discouraged if it takes longer. It is important to work at your own pace. Ultimately, you
will be able to exercise continuously for 30 minutes. The better your aerobic fitness, the
harder you will have to work to stay in your target zone. But remember these essentials.
Contact your physician before starting a workout or training program. Have him review
your training and diet programs to advise you on a workout routine you should adopt.
Begin your training program slowly with realistic goals that have been set by you and your
physician. Supplement your program with some type of aerobic exercise such as Walking,
Jogging, Swimming, Dancing and Bike Riding.
Monitor your pulse frequently. If you do not have an electronic heart rate monitor, have
your physician show you the proper way to manually check your pulse by using your wrist or
neck. Establish your target heart rate based on your age and condition.
Drink plenty of fluids during the course of your routine. You must replace the water content
that you have lost from excessive exercising to avoid dehydration. Fluids should be room
temperature when consumed. Avoid drinking large amounts of cold liquids.
Check your pulse
To make sure your heart is beating in its target zone, you will need to know how to monitor
your heart rate. The easiest way is to feel the pulse in the carotid artery on either side of
your neck, between the windpipe and the large neck muscles. Count the number of beats
in ten seconds then multiply by six. This gives you the number of beats per minute.
13
Exercising in your target zone
How fast should your heart beat during
aerobic exercise? Fast enough to reach
and stay in its “target zone”, a range of beats
per minute that is largely determined by our
age and physical condition. To determine
your target zone, consult the chart we
provide.
Warming cool down
A successful exercise program consists of a warm-up, aerobic exercise, and a cool-down.
Do the entire program at least two or preferably three times a week, resting for a day
between workouts. After several months, you can increase your workouts to four or five
times per week. Warming up is an important part of your workout, and should begin every
session. It prepares your body for more strenuous exercise by heating up and stretching
out your muscles. At the end of your workout, repeat these exercises to reduce sore
muscle problems. We suggest the following warm-up and cool-down exercises:
Head rolls
Rotate your head to the right for one count, feeling the
stretch up the left side of your neck. Next, rotate your
head back for one count, stretching your chin to the
ceiling and letting your mouth open. Rotate your head to
the left for one count, and finally, drop your head to your
chest for one count.
Shoulder lifts
Lift your right shoulder up toward your ear for one count.
Then lift your left shoulder up for one count as you lower
your right shoulder.
14
Side stretches
Open your arms to the side and continue lifting them until
they are over your head. Reach your right arm as far
upward toward the ceiling as you can for one count. Feel
the stretch up your right side. Repeat this action with your
left arm.
Quadriceps stretch
With one hand against a wall for balance, reach behind
you and pull your right foot up. Bring your heels as
close to your buttocks as possible. Hold for 15 counts
and repeat with left foot up.
Inner thigh stretch
Sit with the soles of your feet together with your
knees pointing outward. Pull your feet as close
into your groin as possible. Gently push your
knees toward the floor. Hold for 15 counts.
Toe touches
Slowly bend forward from your waist, letting your back and shoulders
relax as you stretch toward your toes. Reach down as far as you can
and hold for 15 counts.
Hamstring stretches
Sit with your right leg extended. Rest the sole of your left
foot against your tight inner thigh. Stretch toward your toe
as far as possible. Hold for 15 counts. Relax and then
repeat with left leg extended.
15
Calf/Achilles stretch
Lean against a wall with your left leg in front of
the right and your arms forward. Keep your
right leg straight and the left foot on the floor.
Then bend the left leg and lean forward by
moving your hips toward the wall. Hold, then
repeat on the other side for 15 counts.
Aerobic exercise
Aerobic exercise is any sustained activity that
sends oxygen to your muscles via your heart
and lungs—your body’s most important muscle.
Aerobic fitness is promoted by any activity that
uses your large muscles—arms, legs, or
buttocks, for example.
Your heart beats
quickly and you breathe deeply. An aerobic
exercise should be part of your entire exercise
routine.
Weight training
Along with aerobic exercising which helps get rid of and keep off the excess fat that our
bodies can store, training is an essential part of the exercise routine process. Weight
training helps tone, build and strengthen muscle. If you are working above your target
zone, you may want to do a less amount of reps. And as always, consult your physician
before beginning any exercise program.
16
IMPEX INC.
LIMITED WARRANTY
IMPEX Inc. ("IMPEX") warrants this product to be free from defects in workmanship and material,
under normal use and service conditions, for a period of two years on the Frame from the date of
purchase. This warranty extends only to the original purchaser. IMPEX's obligation under this
Warranty is limited to replacing or repairing, at IMPEX's option.
All returns must be pre-authorized by IMPEX. Pre-authorization may be obtained by calling
IMPEX Customer Service Department at 1-800-999-8899. All freights on products returned to
IMPEX must be prepaid by the customer. This warranty does not extend to any product or
damage to a product caused by or attributable to freight damage, abuse, misuse, improper or
abnormal usage or repairs not provided by a IMPEX authorized service center or for products
used for commercial or rental purposes. No other warranty beyond that specifically set forth
above is authorized by IMPEX.
IMPEX is not responsible or liable for indirect, special or consequential damages arising out of or
in connection with the use or performance of the product or other damages with respect to any
economic loss, loss of property, loss of revenues or profits, loss of enjoyments or use, costs of
removal, installation or other consequential damages or whatsoever natures. Some states do
not allow the exclusion or limitation of incidental or consequential damages. Accordingly, the
above limitation may not apply to you.
The warranty extended hereunder is in lieu of any and all other warranties and any implied
warranties of merchantability or fitness for a particular purpose is limited in its scope and duration
to the terms set forth herein. Some states do not allow limitations on how long an implied
warranty lasts. Accordingly, the above limitation may not apply to you.
This warranty gives you specific legal right.
state to state. Register
You may also have other rights which vary from
on-line www.impex-fitness.com
IMPEX INC.
14777 Don Julian
City of Industry, CA 91746
ORDERING REPLACEMENT PARTS
Replacement parts can be ordered by calling our Customer Service Department toll-free at
1-800-999-8899 during our regular business hours: Monday through Friday, 9 am until 5 pm Pacific
standard time.
[email protected]
When ordering replacement parts, always give the following information.
1.
2.
3.
4.
Model
Description of Parts
Part Number
Date of Purchase
17