1
Information, Communication, Entertainment
Owner’s Manual
Manufactured under License from Dolby Laboratories. “Dolby” and the
double-D symbol are trademarks of Dolby Laboratories. Confidential
unpublished works. ©1992-2001 Dolby Laboratories. All rights reserved.
iCEBOX, LLC
1520 Bellevue Avenue
Seattle, WA 98122-2015
www.iceboxllc.com
tel: (800) 897-8554
tel: (206) 448-0354
fax: (206) 448-0359
iCEBOX is a registered trademark of iCEBOX, LLC.
Shockwave and Flash are registered trademarks of Macromedia, Inc.
Java is a registered trademark of Sun Microsystems, Inc.
Specifications subject to change without notice.
Multiple patents issued and pending.
Printed in Korea. ©iCEBOX, LLC, September 2001.
PN 10533 Rev. J
091801
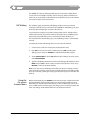
Table of Contents
Table of Contents
Important Safety Instructions . . . . . . . . . . . . . . . . . . . . . . . . . . . . . . . . . . . . . . . . . . . . . . . . iv
1. Welcome to the iCEBOX . . . . . . . . . . . . . . . . . . . . . . . . . . . . . . . . . . . . . . . . . . . . . . . . . . .1
2. Setting Up Your iCEBOX . . . . . . . . . . . . . . . . . . . . . . . . . . . . . . . . . . . . . . . . . . . . . . . . . . 2
Quick Setup. . . . . . . . . . . . . . . . . . . . . . . . . . . . . . . . . . . . . . . . . . . . . . . . . . . . . . . . . . . .2
Unpacking the iCEBOX . . . . . . . . . . . . . . . . . . . . . . . . . . . . . . . . . . . . . . . . . . . . . . . . .3
Installing the Batteries . . . . . . . . . . . . . . . . . . . . . . . . . . . . . . . . . . . . . . . . . . . . . . . . .3
Connecting the TV Cable or Antenna . . . . . . . . . . . . . . . . . . . . . . . . . . . . . . . . . . .4
Connecting the Phone Line. . . . . . . . . . . . . . . . . . . . . . . . . . . . . . . . . . . . . . . . . . . . .5
Connecting to Power. . . . . . . . . . . . . . . . . . . . . . . . . . . . . . . . . . . . . . . . . . . . . . . . . . .6
Connecting Other Devices to the iCEBOX . . . . . . . . . . . . . . . . . . . . . . . . . . . . . . .7
Turning on the iCEBOX for the First Time . . . . . . . . . . . . . . . . . . . . . . . . . . . . . . . .8
Viewing the Welcome CD . . . . . . . . . . . . . . . . . . . . . . . . . . . . . . . . . . . . . . . . . . . . . .8
3. Overview of controls and connectors . . . . . . . . . . . . . . . . . . . . . . . . . . . . . . . . . . . . .9
iCEBOX Front Panel. . . . . . . . . . . . . . . . . . . . . . . . . . . . . . . . . . . . . . . . . . . . . . . . . . . . .9
iCEBOX Rear Panel . . . . . . . . . . . . . . . . . . . . . . . . . . . . . . . . . . . . . . . . . . . . . . . . . . . .10
Remote Control . . . . . . . . . . . . . . . . . . . . . . . . . . . . . . . . . . . . . . . . . . . . . . . . . . . . . . .11
Keyboard . . . . . . . . . . . . . . . . . . . . . . . . . . . . . . . . . . . . . . . . . . . . . . . . . . . . . . . . . . . . .11
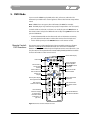
4. TV Mode . . . . . . . . . . . . . . . . . . . . . . . . . . . . . . . . . . . . . . . . . . . . . . . . . . . . . . . . . . . . . . . . .12
Remote Control: TV Functions . . . . . . . . . . . . . . . . . . . . . . . . . . . . . . . . . . . . . . . . .12
TV Setup Menu . . . . . . . . . . . . . . . . . . . . . . . . . . . . . . . . . . . . . . . . . . . . . . . . . . . . . . .13
TV Channel Setup . . . . . . . . . . . . . . . . . . . . . . . . . . . . . . . . . . . . . . . . . . . . . . . . . . . . .13
5. DVD Mode. . . . . . . . . . . . . . . . . . . . . . . . . . . . . . . . . . . . . . . . . . . . . . . . . . . . . . . . . . . . . . . .16
Remote Control: DVD Functions . . . . . . . . . . . . . . . . . . . . . . . . . . . . . . . . . . . . . . .16
Keyboard: DVD Functions . . . . . . . . . . . . . . . . . . . . . . . . . . . . . . . . . . . . . . . . . . . . .17
DVD On-screen Menus . . . . . . . . . . . . . . . . . . . . . . . . . . . . . . . . . . . . . . . . . . . . . . . .18
Setting Controls on DVD Viewing . . . . . . . . . . . . . . . . . . . . . . . . . . . . . . . . . . . . . .19
6. Internet Mode. . . . . . . . . . . . . . . . . . . . . . . . . . . . . . . . . . . . . . . . . . . . . . . . . . . . . . . . . . . .21
Remote Control: Internet Functions . . . . . . . . . . . . . . . . . . . . . . . . . . . . . . . . . . . .21
Registering a New iCEBOX . . . . . . . . . . . . . . . . . . . . . . . . . . . . . . . . . . . . . . . . . . . . .22
Going Online After Registration is Complete . . . . . . . . . . . . . . . . . . . . . . . . . . .24
E-mail . . . . . . . . . . . . . . . . . . . . . . . . . . . . . . . . . . . . . . . . . . . . . . . . . . . . . . . . . . . . . . . .24
Call Waiting . . . . . . . . . . . . . . . . . . . . . . . . . . . . . . . . . . . . . . . . . . . . . . . . . . . . . . . . . . .25
Using the On-screen Internet Menu. . . . . . . . . . . . . . . . . . . . . . . . . . . . . . . . . . . .25
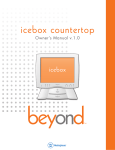
Countertop - iCEBOX™ Owner’s Manual
i
Table of Contents
Adjusting the Display . . . . . . . . . . . . . . . . . . . . . . . . . . . . . . . . . . . . . . . . . . . . . . . . .28
Printing. . . . . . . . . . . . . . . . . . . . . . . . . . . . . . . . . . . . . . . . . . . . . . . . . . . . . . . . . . . . . . .29
Internet Error Messages . . . . . . . . . . . . . . . . . . . . . . . . . . . . . . . . . . . . . . . . . . . . . . .29
Internet Troubleshooting. . . . . . . . . . . . . . . . . . . . . . . . . . . . . . . . . . . . . . . . . . . . . .30
7. Monitor and Security Mode . . . . . . . . . . . . . . . . . . . . . . . . . . . . . . . . . . . . . . . . . . . . . .31
Other Monitor Mode Functions . . . . . . . . . . . . . . . . . . . . . . . . . . . . . . . . . . . . . . . .31
Monitor Setup Menu . . . . . . . . . . . . . . . . . . . . . . . . . . . . . . . . . . . . . . . . . . . . . . . . . .31
Security Mode . . . . . . . . . . . . . . . . . . . . . . . . . . . . . . . . . . . . . . . . . . . . . . . . . . . . . . . .32
8. Caring for Your iCEBOX. . . . . . . . . . . . . . . . . . . . . . . . . . . . . . . . . . . . . . . . . . . . . . . . . . .33
Cleaning . . . . . . . . . . . . . . . . . . . . . . . . . . . . . . . . . . . . . . . . . . . . . . . . . . . . . . . . . . . . . .33
9. Troubleshooting . . . . . . . . . . . . . . . . . . . . . . . . . . . . . . . . . . . . . . . . . . . . . . . . . . . . . . . . .34
Appendix
1. Privacy Policy . . . . . . . . . . . . . . . . . . . . . . . . . . . . . . . . . . . . . . . . . . . . . . . . . . . . . . . . . . .A-1
2. Specifications . . . . . . . . . . . . . . . . . . . . . . . . . . . . . . . . . . . . . . . . . . . . . . . . . . . . . . . . . . .A-3
3. Digital vs. Analog phone lines . . . . . . . . . . . . . . . . . . . . . . . . . . . . . . . . . . . . . . . . . .A-4
4. FCC Statement . . . . . . . . . . . . . . . . . . . . . . . . . . . . . . . . . . . . . . . . . . . . . . . . . . . . . . . . . .A-5
5. Contacting Customer Service . . . . . . . . . . . . . . . . . . . . . . . . . . . . . . . . . . . . . . . . . . .A-5
List of Figures
Figure A. Example of Antenna Grounding . . . . . . . . . . . . . . . . . . . . . . . . . . . . . . . . . . . . . vi
Figure 1. iCEBOX - Information, Communication, Entertainment . . . . . . . . . . . . . . . .1
Figure 2. Unpacking the iCEBOX . . . . . . . . . . . . . . . . . . . . . . . . . . . . . . . . . . . . . . . . . . . . . . .2
Figure 3. Remote Control Battery Installation. . . . . . . . . . . . . . . . . . . . . . . . . . . . . . . . . . 3
Figure 4. Keyboard Battery Installation . . . . . . . . . . . . . . . . . . . . . . . . . . . . . . . . . . . . . . . .4
Figure 5. Rear Panel - TV/IN and Modem Connectors . . . . . . . . . . . . . . . . . . . . . . . . . . .5
Figure 6. Phone Cord and Splitter . . . . . . . . . . . . . . . . . . . . . . . . . . . . . . . . . . . . . . . . . . . . .6
Figure 7. Rear Panel - Power Connector . . . . . . . . . . . . . . . . . . . . . . . . . . . . . . . . . . . . . . . .6
Figure 8. Rear Panel - Optional Connections . . . . . . . . . . . . . . . . . . . . . . . . . . . . . . . . . . .7
Figure 9. iCEBOX Front Panel . . . . . . . . . . . . . . . . . . . . . . . . . . . . . . . . . . . . . . . . . . . . . . . . . .9
Figure 10. iCEBOX Rear Panel . . . . . . . . . . . . . . . . . . . . . . . . . . . . . . . . . . . . . . . . . . . . . . . . . .10
Figure 11. Remote Control . . . . . . . . . . . . . . . . . . . . . . . . . . . . . . . . . . . . . . . . . . . . . . . . . . . . .10
ii
©iCEBOX, LLC, September 2001
Table of Contents
Figure 12. iCEBOX Keyboard . . . . . . . . . . . . . . . . . . . . . . . . . . . . . . . . . . . . . . . . . . . . . . . . . . .11
Figure 13. Remote Control: TV Functions . . . . . . . . . . . . . . . . . . . . . . . . . . . . . . . . . . . . . .12
Figure 14. TV Setup Menu . . . . . . . . . . . . . . . . . . . . . . . . . . . . . . . . . . . . . . . . . . . . . . . . . . . . .13
Figure 15. Edit Channel List Submenu. . . . . . . . . . . . . . . . . . . . . . . . . . . . . . . . . . . . . . . . . .14
Figure 16. Remote Control: DVD/CD Functions . . . . . . . . . . . . . . . . . . . . . . . . . . . . . . . . .16
Figure 17. Special DVD Keyboard Functions . . . . . . . . . . . . . . . . . . . . . . . . . . . . . . . . . . . .17
Figure 18. DVD Setup Options Main Menu . . . . . . . . . . . . . . . . . . . . . . . . . . . . . . . . . . . . .19
Figure 19. Remote Control: Internet Functions. . . . . . . . . . . . . . . . . . . . . . . . . . . . . . . . . .21
Figure 20. “Select Internet Service Provider” Screen . . . . . . . . . . . . . . . . . . . . . . . . . . . .22
Figure 21. iCEBOX-Provided Internet Service Registration Screen. . . . . . . . . . . . . . . .23
Figure 22. Alternate Internet Service Provider (ISP) Screen . . . . . . . . . . . . . . . . . . . . . .23
Figure 23. Internet Menu . . . . . . . . . . . . . . . . . . . . . . . . . . . . . . . . . . . . . . . . . . . . . . . . . . . . . .26
Figure 24. Internet Display Settings Menu . . . . . . . . . . . . . . . . . . . . . . . . . . . . . . . . . . . . . .28
Figure 25. Monitor Setup Menu . . . . . . . . . . . . . . . . . . . . . . . . . . . . . . . . . . . . . . . . . . . . . . .32
List of Tables
Table 1.
TV Channel Setup Submenu. . . . . . . . . . . . . . . . . . . . . . . . . . . . . . . . . . . . . . . . .14
Table 2.
TV Setup On-screen Menus . . . . . . . . . . . . . . . . . . . . . . . . . . . . . . . . . . . . . . . . .15
Table 3.
DVD Mode Keyboard Functions . . . . . . . . . . . . . . . . . . . . . . . . . . . . . . . . . . . . .18
Table 4.
Rating Submenu . . . . . . . . . . . . . . . . . . . . . . . . . . . . . . . . . . . . . . . . . . . . . . . . . . .19
Table 5.
DVD Setup Menu . . . . . . . . . . . . . . . . . . . . . . . . . . . . . . . . . . . . . . . . . . . . . . . . . . .20
Table 6.
Using the Internet Menu . . . . . . . . . . . . . . . . . . . . . . . . . . . . . . . . . . . . . . . . . . . .26
Table 7.
Internet Display Settings . . . . . . . . . . . . . . . . . . . . . . . . . . . . . . . . . . . . . . . . . . . .28
Table 8.
Monitor Setup On-screen Menus . . . . . . . . . . . . . . . . . . . . . . . . . . . . . . . . . . . .32
Table A-1. iCEBOX Specifications . . . . . . . . . . . . . . . . . . . . . . . . . . . . . . . . . . . . . . . . . . . . . .A-3
Countertop - iCEBOX™ Owner’s Manual
iii
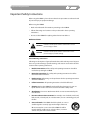
Important Safety Instructions
Important Safety Instructions
When using the iCEBOX™, please observe these basic precautions to reduce the risk
of personal injury or equipment damage.
Before using the iCEBOX:
•
Read and understand all instructions pertaining to the iCEBOX.
•
Follow all warnings and cautions on the product and in these operating
instructions.
•
Do not use the iCEBOX for anything other than its intended use.
Definition of Terms
WARNING
Hazards or unsafe practices which could result in serious
personal injury or death.
CAUTION
Hazards or unsafe practices which could result in minor
personal injury or product damage.
General Warnings and Cautions
Following are descriptions of general hazards that could result in personal injury to
the user or product damage. Specific warnings and cautions are found in relevant
sections of the operating instructions.
1.
Read the instructions. All the safety and operating instructions should be
read before operating the iCEBOX.
2.
Retain the instructions. The safety and operating instructions should be
retained for future reference.
3.
Heed warnings. All warnings on the product and in the operating instructions
should be adhered to.
4.
Follow instructions. All operating instructions should be followed.
5.
Cleaning. Unplug the iCEBOX from the wall before cleaning it. Do not use
liquid cleaners or aerosol cleaners. Clean the unit with a damp cloth.
6.
Attachments. Do not use attachments which are not recommended by the
manufacturer.
7.
Do not use the monitor near water. For example, near a bath tub, wash bowl,
kitchen sink, or laundry tub; in a wet basement; or near a swimming pool; and
the like.
8.
Carts and Stands. The iCEBOX should be placed on a cart or
stand designed to securely support the weight of the unit.
When mounted on a cart or stand, the iCEBOX should be
moved carefully. Sudden stops, excessive force, or uneven
surfaces may cause the cart to overturn.
iv
©iCEBOX, LLC, September 2001
Important Safety Instructions
9.
Accessories. Do not place this product on an unstable cart, stand, tripod,
bracket, or table. The product may fall causing serious injury to a child or an
adult and serious damage to the product.
10. Ventilation. Slots and openings in the cabinet are provided for ventilation and
to ensure reliable operation of the unit and to protect from overheating. These
openings must not be blocked or covered. The openings should never be
blocked by placing the unit on a bed, sofa, rug, or other similar surfaces. This
product should not be placed in a built-in installation such as a bookcase or
rack unless proper ventilation is provided.
11. Power sources. This product should only be operated from the type of power
source indicated on the marking label. If you are not sure of the power supply
to your home, consult your product dealer or local power company.
12. Grounding or polarization. This product is equipped with a three-wire
grounding-type plug, a plug having a third grounding pin. This plug will only
fit into a grounding type power outlet. This is a safety feature. If you are unable
to insert the plug into the outlet, contact your electrician to replace the
obsolete outlet. Do not defeat the safety purpose of the grounding-type plug.
13. Power-cord protection. Power-supply cords should be routed so that they
are not likely to be walked on or pinched by items placed upon or against
them, paying particular attention to cords at plugs, convenience receptacles,
and the point where they exit from the product.
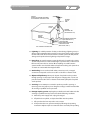
14. Outdoor antenna grounding. If an outside antenna or cable system is
connected to the product, be sure the antenna or cable system is grounded so
as to provide some protection against voltage surges and built-up static
charges. Article 810 of the National Electrical Code, ANSI/NFPA 70, provides
information with regard to proper grounding of the mast and supporting
structure, grounding of the lead-in wire to an antenna discharge unit, size of
grounding conductors, location of antenna-discharge unit, connection to
grounding electrodes, and requirements for the grounding electrode. Refer to
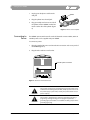
Figure A on the following page.
Countertop - iCEBOX™ Owner’s Manual
v
Important Safety Instructions
FIGURE A
EXAMPLE OF ANTENNA GROUNDING
AS PER NATIONAL ELECTRICAL CODE
ANTENNA
LEAD IN
WIRE
GROUND
CLAMP
ANTENNA
DISCHARGE UNIT
(NEC SECTION 810-20)
ELECTRIC
SERVICE
EQUIPMENT
NEC - NATIONAL ELECTRIC CODE
GROUNDING CONDUCTORS
(NEC SECTION 810-21)
GROUND CLAMPS
POWER SERVICE GROUNDING
ELECTRODE SYSTEM
(NEC ART 250, PART H)
15. Lightning. For added protection for this product during a lightning storm, or
when it is left unattended and unused for long periods of time, unplug it from
the wall outlet and disconnect the antenna or cable system. This will prevent
damage to the product due to lightning and power-line surges.
16. Power lines. An outside antenna system should not be located in the vicinity
of overhead power lines or other electric light or power circuits, or where it can
fall into such power lines or circuits. When installing an outside antenna
system extreme care should be taken to keep from touching such power lines
or circuits as contact with them might be fatal.
17. Overloading. Do not overload wall outlets, extension cords, or integral
convenience receptacles as this can result in a risk of fire or electric shock.
18. Object and liquid entry. Never push objects of any kind into this product
through openings as they may touch dangerous voltage points or short-out
parts that could result in a fire or electric shock. Never spill liquid of any kind
on the product.
19. Servicing. Do not attempt to service this product yourself as opening or
removing covers may expose you to dangerous voltage or other hazards. Refer
all servicing to qualified service personnel.
20. Damage requiring service. Unplug this product from the wall outlet and refer
servicing to qualified service personnel under the following conditions:
a. When the power-supply cord or plug is damaged.
b. If liquid has been spilled, or objects have fallen into the product.
c.
If the product has been exposed to rain or water.
d. If the product does not operate normally by following the operating
instructions. Adjust only those controls that are covered by the operating
vi
©iCEBOX, LLC, September 2001
Important Safety Instructions
instructions as an improper adjustment of other controls may result in
damage and will often require extensive work by a qualified technician to
restore the product to its normal operation.
e. If the product has been dropped or damaged in any way.
f.
When the product exhibits a distinct change in performance, this
indicates a need for service.
21. Replacement parts. When replacement parts are required, be sure the service
technician has used replacement parts specified by the manufacturer or have
the same characteristics as the original part. Unauthorized substitutions may
result in fire, electric shock, or other hazards.
22. Safety check. Upon completion of any service or repairs to this product, ask
the service technician to perform safety checks to determine that the product
is in proper operating condition.
23. Heat. The product should be situated away from heat sources such as
radiators, heat registers, stoves, or other products (including amplifiers) that
produce heat.
Countertop - iCEBOX™ Owner’s Manual
vii
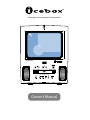
Welcome to the iCEBOX!
1. Welcome to the iCEBOX!
Welcome to iCEBOX™ — the ultimate Information, Communication, and
Entertainment resource. The space-conscious iCEBOX is packed with great features
and designed to fit easily into your lifestyle. From the comfort of your kitchen, surf
the Internet, send e-mail, order groceries, review local traffic and weather
conditions, listen to an audio CD or watch a DVD or video CD, or tune in your
favorite TV show. A video camera connection allows you to check on children
playing in another room or to watch the front door. Switching between modes is as
easy as pressing a button.
The iCEBOX is compact in size but delivers big performance with an ultra sharp,
high resolution monitor, a 125 channel cable-ready TV, Dolby® audio technology,
and two high performance speakers. There’s also a full size, wireless keyboard and
omnidirectional remote control. Both the keyboard and remote control are water
resistant, grease proof, and shock proof.
The iCEBOX also features a built in 56k modem, a printer port, connections for
intercom and electronic locks, and a dual phone line jack that allows your iCEBOX
and your telephone to share a single wall jack.
Figure 1. iCEBOX - Information, Communication, Entertainment
Countertop - iCEBOX™ Owner’s Manual
1
Setting Up Your iCEBOX
2. Setting Up Your iCEBOX
You’re probably eager to try out your new iCEBOX™, but please take a few minutes
to read through this manual in order to familiarize yourself with all the great
features built in to your iCEBOX.
Setting up the iCEBOX is easy and takes just a few minutes. The Quick Setup
procedure is outlined below. Detailed information on using and customizing
iCEBOX features as well as Internet registration and use are contained in later
sections of this manual.
Quick Setup
Begin by locating a stable surface for the iCEBOX with access to a telephone jack.
You can have your iCEBOX ready for action in five easy steps:
•
Remove all the contents from the shipping container.
•
Install the batteries in the keyboard and the remote control
•
Connect the TV cable or antenna
•
Connect the phone line
•
Connect to power
Each step is explained in detail on the following pages.
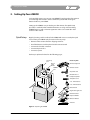
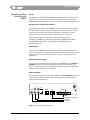
Accessory
box
Quick
Start
Guide
iCEBOX
unit
Accessory box:
Wireless keyboard
Remote control
AC power cord
Modular 2-for-1
telephone splitter
Telephone cord
3 ea. 'AA' batteries
2 ea. 'AAA' batteries
Welcome CD
Registration/gift card
Remote Control
Keyboard Guide
Owner’s Manual
Antenna
Figure 2. Unpacking the iCEBOX
2
©iCEBOX, LLC, September 2001
Setting Up Your iCEBOX
Unpacking the
iCEBOX
Set the shipping container right side up and carefully open the top flaps (do not
insert any sharp objects through the top of the box).
Locate the Quick Reference Card. It contains a packing list and an illustration of all
the items included with the iCEBOX showing how you will find them in the
shipping container. Carefully remove the contents of the shipping container and
verify that you have received everything listed on the Quick Reference Card.
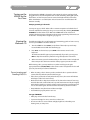
Installing the
Batteries
Remote Control Batteries
The remote control requires two AAA batteries (supplied). Alkaline batteries are
recommended. To install the batteries:
1.
On the back of the remote control, remove the small screw in the center panel.
2.
Install two AAA batteries. Place the negative end (–) of the battery on the
spring.
3.
Reinstall the battery cover. Make sure it is seated correctly in order to maintain
the remote control’s waterproof seal. Make sure the screw is snug but do not
over-tighten it.
Figure 3. Remote Control Battery Installation
Keyboard Batteries
The keyboard requires three AA batteries (supplied). To install the batteries:
1.
Countertop - iCEBOX™ Owner’s Manual
On the back of the keyboard, remove both large screws. Remove the battery
cover and rubber gasket.
3
Setting Up Your iCEBOX
2.
Install the three AA batteries as shown in Figure 4 below.
3.
Replace the rubber gasket. Make sure it is positioned properly.
4.
Reinstall the battery cover. Make sure it is seated correctly in order to maintain
the remote control’s waterproof seal. Make sure the screws are snug but do
not over-tighten.
Cover
Gasket
Figure 4. Keyboard Battery Installation
Connecting the
TV Cable or
Antenna
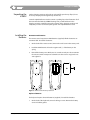
Screw your existing TV cable into the coaxial connector on the back panel of the
iCEBOX to enable cable programming (see Figure 5). If cable service is not
available, use the supplied antenna to enhance local broadcast reception.
To install the antenna:
4
1.
Insert the plastic base of the antenna into the mounting hole on top of the
unit.
2.
Using firm pressure, plug the antenna connector into the TV/IN connector on
the back panel of the iCEBOX.
©iCEBOX, LLC, September 2001
Setting Up Your iCEBOX
Cable/antenna connector
L
R
OUT
VIDEO
TV / IN
AUDIO
MODEM
DIN
75 C
PRINTER
IN
Modem connector
Figure 5. Rear Panel - TV/IN and Modem Connectors
Connecting the
Phone Line
CAUTION
DO NOT connect the iCEBOX to a digital phone line!
Connecting the iCEBOX to a digital phone line will cause
permanent damage to the unit.
Digital phone lines are mainly used in industrial and
commercial settings. Most homes are wired with analog phone
lines. Consult the Appendix of this manual for more
information about digital and analog phone lines. If you aren’t
certain what type of phone line you have, please contact your
phone company.
CAUTION
The phone cord supplied with the iCEBOX is a 26 AWG cord. To
reduce the risk of fire, use only No. 26 AWG or larger
telecommunication line cord.
Your iCEBOX is equipped with a built-in modem. When properly connected to a
phone line, you can use the iCEBOX to access the Internet and to send and receive
e-mail. Please refer to Section 6 on page 21, for detailed instructions on using your
iCEBOX to access to Internet.
To connect the phone line:
1.
Insert one end of the supplied phone cord into the modem connector on the
back panel of the iCEBOX (see Figure 5).
2.
Insert the other end into a phone jack with a dial tone.
You may connect your regular phone line and the iCEBOX modem line to the same
wall jack using the phone splitter supplied with your iCEBOX (Figure 6).
To connect your telephone and the iCEBOX modem to the same wall jack:
Countertop - iCEBOX™ Owner’s Manual
5
Setting Up Your iCEBOX
1.
Unplug your telephone cord from the
wall jack.
2.
Plug the splitter into the wall jack.
3.
Plug your telephone line into one side of
the splitter and the iCEBOX modem line
into the other side of the splitter (Figure
6).
Splitter
Figure 6. Phone cord and splitter
Connecting to
Power
The iCEBOX operates with normal household electrical current: 120VAC, 60 Hz. A
120 VAC power cord is supplied with your iCEBOX.
To connect to power:
1.
Plug the supplied AC power cord into the AC connection on the rear panel of
the iCEBOX (Figure 7).
2.
Plug the other end into a wall socket.
120 VAC power connector
Figure 7. Rear Panel - Power Connector
WARNING! Risk of electric shock.
This product should only be operated from the type of power source
indicated on the marking label (120VAC, 60 HZ). If you are not sure of
the power supply to your home, consult your product dealer or local
power company.
WARNING! Risk of electric shock.
This product is equipped with a three-wire grounding-type plug, a
plug having a third grounding pin. This plug will only fit into a
grounding type power outlet. Do not defeat the safety purpose of the
grounding-type plug.
6
©iCEBOX, LLC, September 2001
Setting Up Your iCEBOX
Connecting Other
Devices to the
iCEBOX
Printer
The iCEBOX is compatible with Hewlett Packard DeskJet 900 series printers. The
printer connector is on the rear panel of the unit (Figure 8). Please refer to the
iCEBOX Web site (www.iceboxllc.com) for a current list of other compatible printers.
Electronic Locks and Intercom Speakers
To provide security functions, the iCEBOX may be connected with professionally
installed electronic locks and intercom speakers. The lock and intercom speaker
connectors are located on the rear panel of the unit (see Figure 8). For more
information about these features, please refer to Section 7 on page 31.
For detailed information on setting up a security system using your
Countertop - iCEBOX, please refer to the Countertop - iCEBOX™ Security Mode
Installation Guide. This guide is also available on the iCEBOX Web site
(www.iceboxllc.com).
Video Camera
You may use the iCEBOX to monitor another area of your home in which a video
camera is installed by connecting the video camera to the video connection on the
rear panel of the unit (Figure 8). Please refer to Section 7 on page 31 for more
information.
VCR or Video Game System
You may connect a VCR or video game system to the iCEBOX using the VIDEO and
AUDIO IN connectors on the rear panel (Figure 8). Please refer to Section 7 on
page 31 for more information. In addition, refer to the instructions provided with
the VCR or video game for more information.
External Speakers
You may connect external speakers to the iCEBOX using the AUDIO OUT connectors
on the rear panel (Figure 8). Please refer to the instructions provided with the
speakers for more information.
L
R
OUT
VIDEO
AUDIO
TV / IN
MODEM
DIN
75 C
PRINTER
IN
Printer
Electronic lock and intercom
Audio input
Video input
Figure 8. Rear Panel - Optional Connections
Countertop - iCEBOX™ Owner’s Manual
7
Setting Up Your iCEBOX
Turning on the
iCEBOX for the
First Time
The first time the iCEBOX is plugged in and anytime it has been unplugged and
plugged back in, the unit will spend a few seconds initializing. During this period,
the buttons on the front panel, remote control and keyboard will not function.
When initialization is concluded, the unit can be turned on and all buttons will
function normally.
Autoprogramming TV Channels
You may set up your TV for either cable or antenna reception and edit the list of
channels available for viewing by using on-screen menus. By selecting AUTOSCAN
CHANNELS from the TV On-screen Menu the iCEBOX will locate and tune all
available TV channels. More information about autoprogramming TV channels can
be found in “TV Setup Menu” beginning on page 13.
Viewing the
Welcome CD
The Welcome Video CD is an informative and entertaining guide on how to set up
and use your iCEBOX. To view the Video CD:
1.
Turn the iCEBOX on. Press EJECT (on the front of the unit) to open the tray.
Insert the Welcome CD with the label facing up.
2.
Press PLAY on the monitor, or press DVD on the remote control or the
keyboard.
The Welcome CD will begin to play automatically. If you wish, you may press
NEXT to skip the introductory material and go directly to the main menu.
3.
At the main menu, press the numbered key on the remote control or keyboard
that corresponds to the menu number of the program you want to watch.
While viewing a disc, you may switch to any other mode by pressing the
appropriate button ( TV, NET, MON) on the remote control or keyboard. The disc will
pause in place until you return to DVD Mode.
Tips on Inserting and
Handling DVD/CDs
•
When inserting a disc in the tray, make sure that the disc is positioned in the
center of the tray with the printed side facing up.
•
If the disc is positioned correctly when the tray closes, the screen will indicate
which type of disc has been inserted.
•
Make sure the disc is kept clean and free of oils, dirt and moisture. If necessary,
wash the disc with a mild solution of soap and warm water and dry thoroughly
with a lint free cloth. Do not apply solvents such as benzene or paint thinner. Do
not use anti-static agents. Do not scrub the disc with any abrasive material.
•
Keep DVD/CDs away from heat and direct sunlight.
•
Store DVD/CDs properly when not in use.
Storage of DVD/CDs
8
•
After play, remove the disc from the tray.
•
To prevent damage, be sure to store discs in their case.
•
Do not store discs in areas of direct sunlight, high heat or humidity, near
heating vents, or dusty areas.
©iCEBOX, LLC, September 2001
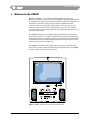
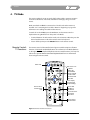
Overview of Controls and Connectors
3. Overview of Controls and Connectors
This section provides an overview of the controls and connectors on the iCEBOX
front and rear panels, the keyboard, and the remote control.
iCEBOX
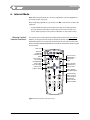
Front Panel
Push button functions and other important features of the iCEBOX front panel are
shown below in Figure 9.
Intercom microphone
Press to raise or lower
the sound level
Press to select higher or
lower TV channels
Press power on or off
ON / OFF
VOL
–
EJECT
CH
+
–
STOP
PAUSE
+
PREV
BACK
NEXT
PLAY
Press to pause disc play
Press again to resume
play from the point
of interruption
Press to begin disc play
Press to back up or move
ahead one track
Press to stop disc play
Press to open or close
disc tray
Adjust flipdown feet for
best viewing angle
Figure 9. iCEBOX Front Panel
Countertop - iCEBOX™ Owner’s Manual
9
Overview of Controls and Connectors
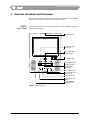
iCEBOX
Rear Panel
Rear panel connectors are shown below in Figure 10.
Optional audio connection
to external amplifier
Modem
L
Cable TV/
antenna
R
OUT
VIDEO
AUDIO
TV / IN
MODEM
75 C
DIN
PRINTER
IN
Printer
Electronic lock and intercom
Audio input
Video input
Figure 10. iCEBOX Rear Panel
Remote Control
The omnidirectional remote
control provides instant
access to all iCEBOX functions.
Its sealed case is water
resistant and shock proof. For
a detailed description of
remote control functions for
each iCEBOX mode, please
refer to the separate Remote
Control and Keyboard Guide
or the TV/Internet/DVD Mode
sections of this manual.
Mode keys
Power on/off
Functions identical
to keyboard buttons
Figure 11. Remote Control
10
©iCEBOX, LLC, September 2001
Overview of Controls and Connectors
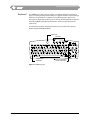
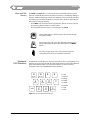
Keyboard
The iCEBOX comes with a full size, wireless, omnidirectional keyboard shown in
Figure 12. The keyboard’s patented design is rugged and water resistant making it
ideal for use in the kitchen. In addition to using the keyboard to type e-mail
messages, the keyboard’s mode keys (across the top of the keyboard) and the keys
below the iCEBOX logo duplicate the functions of the corresponding remote
control keys.
For a detailed description of keyboard functions, please refer to the separate
Remote Control and Keyboard Guide.
Power on/off
Mode keys
Back
R epeat
Menu
Random
Audio
Subtitle
Next
Scroll
Title
D isplay
Option
Zoom
Angle
3D Audio
Print button
Functions are identical to
remote control buttons
Figure 12. iCEBOX Keyboard
Countertop - iCEBOX™ Owner’s Manual
11
TV Mode
4. TV Mode
This section explains how to set up the TV for either cable or antenna reception
and how to edit the list of channels available for viewing by using on-screen
menus.
Make sure that the iCEBOX is connected to a TV cable or that the antenna is
installed. See “Connecting the TV Cable or Antenna” beginning on page 4 for
information on installing the cable and the antenna.
To watch TV on the iCEBOX, press the TV button on the remote control or
keyboard. Pressing TV will turn on the power in TV Mode.
Remote Control:
TV Functions
•
To switch between TV and another mode, such as Internet or Monitor, press the
desired mode button on either the remote control or keyboard.
•
To turn off the power press the ON/OFF button on the remote control.
The remote control is illustrated below in Figure 13 with descriptions of button
functions in TV Mode. Unidentified buttons do not function in TV Mode. (Buttons
on the right side of the keyboard duplicate remote control functions.) You may also
refer to the separate Remote Control and Keyboard Guide for more information
about using the remote control.
Power on/off
Press to turn on TV
For Options
functions only.
Press directional
buttons to navigate
on-screen menus.
Press GO to select
a menu item.
Press to display
on screen menus
(to adjust settings)
Press to raise or
lower the sound
level
Press to select
next higher or
lower channel
Press to mute sound
Press again to
restore sound
Press to enter TV
channel numbers
Figure 13. Remote Control: TV functions
12
©iCEBOX, LLC, September 2001
TV Mode
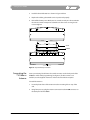
TV Setup Menu
Use the TV Setup on-screen menu to customize TV settings such as brightness,
contrast, audio quality, and for channel list editing. To navigate and make
selections in the on-screen menus you can use either the keyboard or the remote
control.
While in TV Mode, press OPTIONS on the remote control or keyboard to open the
TV setup menu (Figure 14, below). While using the on-screen menus keep in mind:
•
Repeatedly pressing OPTIONS will toggle the menu off and on.
•
A yellow box indicates the active menu
item.
•
To move the selection box press the up or
down buttons.
•
To adjust a setting higher, press the right
button. To adjust a setting lower, press the
left button.
•
Select CANCEL to cancel your changes and
return to the previous menu.
•
Select DONE to save your changes and
return to the main menu.
•
When the desired menu item is highlighted, press GO to make your selection.
tv setup
image
sound
TV channel setup
cancel
Figure 14. TV Setup Menu
TV Channel Setup
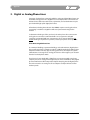
You may set up your TV for either cable or antenna reception and edit the list of
channels available for viewing by using on-screen menus. From the TV SETUP
menu (shown above, in Figure 14), select TV CHANNEL SETUP. The TV channel setup
submenu will appear.
The TV channel setup submenu selections and functions are explained in Table 1
on page 14. See Table 2 on page 15 for an explanation of all the TV setup menus.
Countertop - iCEBOX™ Owner’s Manual
13
TV Mode
Table 1. TV Channel Setup Submenu
Menu Selection
Meaning
Antenna Mode
(Or, Cable Mode)
Antenna Mode: the TV receives broadcast channels only.
Cable Mode: the TV receives all programming via cable.
To change modes, press the left or right directional button
on the keyboard or remote control. When the desired mode
is displayed, select DONE and press GO to return to the TV
channel setup submenu.
Autoscan channels
Select AUTOSCAN CHANNELS to have the TV tuner
automatically locate all available broadcast and/or cable
channels. During autoscan, the message AUTO CHANNEL
SCAN IN PROGRESS appears on the screen. When autoscan
is complete, select DONE or make another menu selection.
Edit channel list
This menu allows you to block or unblock selected channels.
All autoscanned channels are available for viewing unless
individually selected and blocked.
antenna mode
using your remote,
select channel to
delete and press
“GO”
The current TV reception
mode is displayed
at the top of the menu
(antenna mode or
cable mode)
delete channel ##
cancel
done
Figure 15. Edit channel list submenu
To block or unblock a channel:
1.
From the TV CHANNEL SETUP submenu, select EDIT
CHANNEL LIST and press GO.
2.
To block (delete) a channel: With the remote control or
keyboard: Use the channel (+) or (-) buttons to scroll
through the channels one by one, or use the number
keys to enter the desired channel number.
3.
14
•
Unblocked channels are displayed with the
message DELETE CHANNEL ##.
•
Press GO to block the channel, or,
•
Do nothing to leave the channel available for
viewing.
To unblock (add) a channel: Using the number keys on
the remote control or keyboard, enter the blocked
channel number. The message ADD CHANNEL ## will
be displayed.
•
Press GO to unblocked the channel, or,
•
Do nothing to leave the channel blocked.
©iCEBOX, LLC, September 2001
TV Mode
Table 2 describes all the on-screen menus in TV Mode:
Table 2. TV Setup On-screen Menus
Select
image
sound
TV channel setup
Countertop - iCEBOX™ Owner’s Manual
To adjust:
Then select/adjust:
brightness
slider bar
contrast
slider bar
color
slider bar
tint
slider bar
restore factory
defaults
“select done to reset TV image options to
defaults”
bass
slider bar
treble
slider bar
balance
slider bar
restore factory
defaults
“select done to reset TV sound options to
defaults”
antenna or cable
select antenna or cable
autoscan channels
“autoscan in progress”
edit channel list
delete channel ##
(Or add channel ##)
“select channel, press go to delete”
(Or “select channel, press go to add”)
15
DVD Mode
5. DVD Mode
You can use the iCEBOX to play DVDs, video CDs, or listen to audio CDs. The
information provided in this section applies to all three disc formats except where
noted.
Note: iCEBOX does not support other CD formats (CD-ROM, for example).
Note: The DVD player may not function properly in temperatures over 35°C (95°F).
To watch a DVD or video CD, or to listen to an audio CD, press the DVD button on
the remote control or key board. When the unit is off, pressing DVD will turn on the
power in DVD Mode.
Remote Control:
DVD Functions
•
To switch between DVD and another mode such as TV, Monitor or Internet,
press the desired mode button on either the remote control or keyboard.
•
To turn off the power press the ON/OFF button on the remote control.
The remote control is illustrated below in Figure 16 with descriptions of button
functions in DVD Mode. Unidentified buttons do not function in DVD Mode.
(Buttons on the right side of the keyboard duplicate remote control functions.) You
may also refer to the separate Remote Control and Keyboard Quick Reference Guide
for more information on the remote control.
Press to start disc play
Power on/off
Press to back up
or move ahead
one track
Press to return to a
DVD or VCD menu
Press to fast forward
or reverse playback
(Press DVD to resume
normal play)
Press to access title
function on DVDs
Press to stop
disc play
Press to pause disc play
Press again to resume
Press to raise or
lower the sound level
Press directional
buttons to navigate
on-screen menus.
Press GO to select
a menu item or to
play a disc.
Press to access DVD
setup menus
Press to mute sound
Press again to restore
sound
Press number buttons to
enter disc track selections
Figure 16. Remote Control: DVD/CD Functions
16
©iCEBOX, LLC, September 2001
DVD Mode
Menu and Title
Buttons
The MENU and TITLE buttons on the remote control and keyboard have special
functions in DVD Mode. However, the functions will vary somewhat depending on
the type of DVD or VCD being viewed. Some DVDs use menu and/or title functions
for similar purposes. DVDs and VCDs have unique menu selections depending on
their purpose and programming.
•
Press MENU on the remote control or keyboard to discover and access special
programming features built in to a DVD or VCD.
•
On some DVDs the main menu is accessed by pressing TITLE.
Home or Main Menu, or back one menu. These functions may
vary between DVDs.
Top level disc menu. On some discs this button functions as a
Home or Main Menu button similar in function to the MENU
button.
A “hand” icon appearing on the screen indicates that the
selected key or function is not available at that time.
Keyboard:
DVD Functions
In DVD Mode, several letter keys have special functions. The most frequently used
functions are grouped on the left side of the keyboard and are printed in light blue
letters below the key letter as shown below in Figure 17. Table 3 contains
descriptions of the special DVD Mode button functions.
Q
Repeat
R
E
W
Random
A = Audio
C = 3D audio
D = Display
A
Audio
F
D
S
Subtitle
Display
Q = Repeat
S = Subtitle
W = Random
shift
Z
Zoom
X
C
Angle
3D Audio
X = Angle
Z = Zoom
Figure 17. Special DVD Keyboard Functions
Countertop - iCEBOX™ Owner’s Manual
17
DVD Mode
Table 3. DVD Mode Keyboard Functions
DVD
On-screen
Menus
Key letter
Function
Description
A
Audio
Press to toggle between audio tracks on a DVD. Some
DVDs contain language options or director’s
commentary. (These functions are not available on all
DVDs.)
C
3D audio
An optional audio mode that may enhance the listening
quality of some DVD/CDs. Toggle on and off to enable/
disable this mode.
D
Display
Press to toggle between information displays such as
time elapsed and time remaining. Press DISPLAY
repeatedly to cycle through all display functions and clear
from the screen.
Q
Repeat
Press to toggle between different repeat modes such as
track or disc. Selections may vary depending on the type
of disc being played.
S
Subtitle
Press to display subtitles. (Not available on all DVDs.)
Press again to remove subtitles.
W
Random
Press to have tracks play in random order. Press again to
cancel random play.
X
Angle
Press to view scenes from different camera angles (not
available on all DVDs). Press again to cancel.
Z
Zoom
Press repeatedly to toggle through three zoom settings
and return to normal viewing.
Use on-screen menus to customize DVD settings such as brightness, contrast,
audio quality, image aspect, and viewer ratings. To navigate and make selections in
the on-screen menus you can use either the keyboard or the remote control.
While in DVD Mode, press OPTIONS on the remote control or keyboard to open the
DVD on-screen options menus. The main DVD Setup menu is shown in Figure 18.
While using the on-screen menus keep in mind:
18
•
Repeatedly pressing OPTIONS will toggle
the menu off and on.
•
A yellow box indicates the active menu
item. To move the selection box press the
up or down buttons.
•
To adjust a setting higher, press the right
button. To adjust a setting lower, press the
left button.
•
Select CANCEL to cancel your changes and
return to the previous menu.
•
Select DONE to save your changes and
return to the main menu.
•
When the desired menu item is highlighted, press GO to make your selection.
©iCEBOX, LLC, September 2001
DVD Mode
dvd setup
image
sound
controls
done
Figure 18. DVD Setup Options Main Menu
Setting controls on
DVD viewing
You may control viewing of DVDs with X, R, or PG1 ratings. To set the control level:
From the main DVD on-screen menu, select CONTROLS, then select RATING.
Three levels of control are available: no adult titles, kids only, and view all. The
RATING submenu and functions are explained below in Table 4.
Table 4. Rating Submenu
Menu Selection
Meaning
Rating is unlocked
All viewing is allowed
Rating is locked
Viewing control has been selected
Enter code to lock
(or)
Enter code to unlock
Choose a 4-digit password to set the permitted viewing level.
Three levels of control are available: “view all,” “kids only,”
and “no adults,” as explained below.
Note: Be sure to save your password in a safe place in case
you need to change viewing controls.
No adults
Allows viewing of G, PG, PG1, and R rated titles. Blocks
viewing of X rated titles.
Kids only
Allows viewing of G and PG titles only. Blocks viewing of PG1,
R, and X rated titles.
View all
View all ratings
Note: Programming controls are not 100 percent reliable! Not all DVDs will work
with the ratings control feature. Only DVDs that are programmed to work with a
parental control system will respond to the rating controls. In addition, rating
systems are not consistently followed by DVD manufacturers. Therefore, certain
titles may still play even if you have chosen to block them. You must exercise
discretion with DVDs that contain potentially offensive material.
Countertop - iCEBOX™ Owner’s Manual
19
DVD Mode
Table 5 describes all the DVD setup menu user settings.
Table 5. DVD Setup Menu
Select
image
Then select/adjust
brightness
slider bar
contrast
slider bar
picture aspect
letterbox, pan and scan
restore factory defaults
“select done to reset DVD
image options to default”
bass
slider bar
treble
slider bar
balance
slider bar
restore factory defaults
“select done to reset DVD
sound options to defaults”
controls
subtitles
auto, english, off
(Available only when a disc
is not playing)
rating
rating is unlocked
(Or, rating is locked)
enter code to lock = xxxx
(Or, enter code to unlock =
xxxx)
no adults, kids only, view all
on-screen display
on, off
restore factory defaults
“select done to reset DVD
sound options to defaults”
sound
20
Then select:
©iCEBOX, LLC, September 2001
Internet Mode
6. Internet Mode
Note: Before using the Internet, a one-time registration is required. Registration
instructions begin on page 22.
After completing registration, to go online, press NET on the remote control or the
keyboard.
Remote Control:
Internet Functions
•
To switch between Internet and another mode such as TV, DVD or Monitor,
press the desired mode button on either the remote control or keyboard.
•
To turn off the power press the power on/off button on the remote control.
The remote control is illustrated below with button functions for Internet Mode.
(Buttons on the right side of the keyboard duplicate remote control functions.)
Unidentified buttons do not function in Internet Mode. You may also refer to the
Remote Control and Keyboard Quick Reference Guide for information about using the
remote control.
Power on/off
Press to be
automatically
connected to the
Internet
Press to back up
or move ahead
one viewable page
Press to return
to your home page
Press to stop a
page from loading
Press to move the
viewable area of a
page to the left
or right
Press to move the
viewable area of a
page up or down
Press to make the
Internet Menu appear
Press the up/down
buttons to move up
or down in a menu
list of links and
options. Press GO
to make a selection
Figure 19. Remote Control: Internet Functions
Countertop - iCEBOX™ Owner’s Manual
21
Internet Mode
Registering
a new iCEBOX
Before you can go online with your new iCEBOX, you must call a iCEBOX Customer
Care representative at 1-877-463-7637. If you currently have an Internet Service
Provider account and wish to use it, the representative will assist you through the
registration process. If you do not have an Internet Service Provider account, the
representative will help you choose one and establish your account.
Important Internet Service Information
•
iCEBOX offers a selection of popular Internet Service Providers
including its own Internet portal.
•
Internet service typically requires a monthly connection fee.
•
The iCEBOX operating system does not support Internet services that
require additional downloaded or user-installed software.
To complete the registration process:
1.
Complete the registration phone call to iCEBOX Customer Care (1-877-4637637) as described above.
2.
Make sure your iCEBOX is connected to a phone line with a dial tone. If the
phone line is not connected, please refer to “Connecting the Phone Line”
beginning on page 5.
3.
Press NET on the remote control or keyboard. The iCEBOX will automatically
connect to the Internet. To complete the registration process, follow the
on-screens instructions.
Need help? l Privacy
Please select Internet Service Provider
Internet Service
Provider :
User Log In
Choose an internet service provider, user
name and password. Your user name
and password will allow you access to
your iCEBOX™ portal experience.
iCEBOX
iCEBOX
Please enter yourother
username and password.
Username :
Password :
Confirm
Password :
Submit
Figure 20. “Select Internet Service Provider” Screen
22
©iCEBOX, LLC, September 2001
Internet Mode
Need help? l Privacy
Great! Now just choose a dial-up number that is
close to you.
State :
Washington
City :
Dial Up
Thank you! Pick any of the numbers
here and we’ll set up your new
connection. Please be sure to check that
the number you choose is not longdistance.
Dial up number :
-
-
Dialing Prefix :
Check here to dial “1” before the number
Check here to enable 10-digit dialing
Long Distance Charges may apply.
Submit
Figure 21. iCEBOX-Provided Internet Service Registration Screen
Need help?
Please fill in your personal ISP information
below
Dial up number :
Dialing Prefix :
Dial Up
DNS1 :
Please fill in the following ISP
configuration data from your existing ISP.
DNS2 :
Username :
Password :
Home URL :
Use this ISP
Figure 22. Alternate Internet Service Provider (ISP) Registration Screen
4.
When registration is complete, you must disconnect from the Internet. To
disconnect:
• Press OPTIONS on the remote control or keyboard, select HANGUP from
the on-screen menu, then press GO, or
•
Turn the iCEBOX off.
Note: If you must dial a prefix from your location, to get an outside line ("9" for
example), you must stop the dial up process and first change the dial up settings.
To change the dial up settings:
Countertop - iCEBOX™ Owner’s Manual
•
Press STOP on the remote control or keyboard to cancel dialing.
•
Press OPTIONS to open the Internet on-screen menu.
•
Select USER SETTINGS and press GO.
•
Select DIALING PREFIX and type the numerals required to access an outside line.
•
Select DONE and press GO to save your entry and close the on-screen menu.
23
Internet Mode
•
Going Online after
Registration is
Complete
Press OPTIONS again, select DIAL and press GO. The iCEBOX will now begin the
registration process using the dialing prefix just entered.
To go online after completing registration:
1.
Pressing NET on the remote control or the keyboard when you are in another
mode such as TV, DVD, or Monitor, will automatically connect you to the
Internet.
If you are already in Internet Mode but are not online, you may either:
•
Jump to another mode, then select NET to automatically connect, or
•
Press OPTIONS to open the Internet on-screen menu, select DIAL and press
GO.
The iCEBOX will connect to the Internet and the default home page will open.
Note: Pressing NET while in Internet Mode opens a special setup menu (see
Figure 24, “Internet Display Settings Menu,” on page 28). You can close the
setup menu by pressing NET again.
2.
To go to another Web site, press OPTIONS on the remote control or keyboard.
When the Internet Menu appears, select GOTO. Type the desired Internet
address in the space provided and press GO.
3.
Use the directional buttons surrounding GO (on the remote
control or keyboard) to navigate web pages. Press GO or ENTER
(on the keyboard) to make a selection. To return to your home
page, press the home button (MENU) on the remote control or
keyboard.
Very Important - Telephone Modem Connection!
E-mail
24
•
The iCEBOX connects to the Internet through your telephone line.
While you are online (connected to the Internet), you will not be able to
make or receive phone calls.
•
While online, you may switch to another mode (TV, DVD, Monitor,
Security) without being disconnected from the Internet.
•
To make or receive phone calls, you must first disconnect from the
Internet. To disconnect, you must select HANGUP from the on-screen
Internet menu and press GO, or turn the iCEBOX off.
If you chose iCEBOX as your ISP, an e-mail account was automatically setup during
the registration process. To access your iCEBOX e-mail account, connect to the
Internet (as explained above) then select the e-mail icon at the top of the screen.
©iCEBOX, LLC, September 2001
Internet Mode
The iCEBOX also supports third party Web-based e-mail. Dozens of Web-based
e-mail services are available and many are free of charge. Keep in mind that you
must have an account with an ISP (Internet Service Provider) to access the Internet
and use these web-based e-mail services.
Call Waiting
The “clicking” signal generated by Call Waiting will disconnect your Internet
connection. If the phone line connected to the iCEBOX has Call Waiting, you must
disable it before attempting to connect to the Internet.
Your local phone company can provide a dialing prefix (*70, for example) that is
added to the Internet access phone number. This prefix causes Call Waiting to be
temporarily suspended while you’re connected to the Internet. When you
disconnect from the Internet (hang up), your Call Waiting service is automatically
restored.
To temporarily disable Call Waiting when you connect to the Internet:
1.
Contact your local phone company for the deactivation code.
2.
Press NET on the remote control or keyboard, press STOP to interrupt the
dialing process, then press OPTIONS to make the Internet Menu appear.
3.
Select USER SETTINGS and press GO. When the User Settings sub-menu opens,
select DIALING PREFIX.
4.
Type the Call Waiting deactivation code into the dialing prefix field, then select
DONE and press GO to save the entry and return to the previous screen. Press
OPTIONS to return to the Internet Menu.
Note: If you ever cancel Call Waiting service with your phone company, you must
return to the User Settings menu and remove the deactivation code dialing prefix.
If you do not do this, you will get a busy signal every time you try to connect to the
Internet.
Using the
On-screen
Internet Menu
Countertop - iCEBOX™ Owner’s Manual
While in Internet Mode, press OPTIONS on the remote control or keyboard to make
the Internet Menu appear (shown in Figure 23). Use the Internet Menu to enter
Web addresses, disconnect from the Internet, or refresh a Web page. You can also
choose a Web site for your home page, and change your user name, password, and
other user settings. Internet Menu functions are explained in Table 6.
25
Internet Mode
Internet menu
goto
hangup
refresh
user settings
online setup
done
Figure 23. Internet Menu
Table 6. Using the Internet Menu
Select
Function
goto
To go to a Web site, type in the desired Web site address in the
address field, then press GO.
erase
Select and press GO to erase the address field.
cancel
Select and press GO to exit the menu without entering an
address.
done
Select and press GO to exit the menu.
hangup
Select and press GO to disconnect from the Internet.
refresh
Select and press GO to reload the current Web page.
user settings
26
user name
A unique user name. Contact your ISP before changing your user
name.
password
A unique security code. Contact your ISP before changing your
password.
home page
Choose a Web site for your default home page. Type the desired
Web site address and select DONE and press GO to save your
selection.
ISP phone
number
A phone number provided by your Internet Service Provider that
allows access to their server.
Type in the required phone number then select DONE and press
GO to save your entry.
©iCEBOX, LLC, September 2001
Internet Mode
Table 6. Using the Internet Menu (Continued)
Select
Function
dialing prefix
Numerals preceding the ISP phone number, if required, to access
an outside line or to temporarily disable Call Waiting.
Note: Contact your local phone company to verify the code
required to temporarily disable Call Waiting.
Enter the numerals required to temporarily deactivate Call
Waiting (usually “*70”) and extra numerals required to access an
outside line (“9” for example). Select DONE and press GO to save
your entry and return to the Internet Menu.
dialing sound
Choose OFF or ON for modem dialing sound, then select DONE
and press GO to save your choice and return to the main menu.
DNS primary
Special settings provided by your ISP. (Changing the DNS
Primary settings may disable your Internet connection and/or
your ability to receive and send e-mail. Don’t adjust these
settings unless you are certain of the results.)
Type in the settings provided by your ISP then select DONE and
press GO to save your entry and return to the main menu.
DNS secondary
Type in the settings provided by your ISP then select DONE and
press GO to save your entry and return to the main menu.
Cancel
Return to the main menu without saving any changes.
Done
Save your changes and return to the main menu.
online setup
dialing prefix
Same as Dialing Prefix in User Settings above.
reg. phone #
The phone number for registration.
cancel
Cancel your changes and return to the main menu.
done
Save your changes and return to the main menu.
Done
Countertop - iCEBOX™ Owner’s Manual
Close the Internet Menu.
27
Internet Mode
Adjusting the
Display
If desired, you can adjust the monitor display. To access the display settings menu,
press NET on the remote control or keyboard twice rapidly. The display settings
menu is shown below in Figure 24. Menu functions are explained in Table 7.
Internet setup
image parameters
image size/pos
image geometry
system info
restore factory defaults
done
Figure 24. Internet Display Settings Menu
Table 7. Internet Display Settings
Select:
Then select:
Then select/adjust:
image parameters
brightness
contrast
Slider bar
Slider bar
restore defaults
“select done to reset
Internet image options to
default”
horiz position
Slider bar
vert. position
Slider bar
width
Slider bar
image size/pos
image geometry
system info
28
height
Slider bar
rotation
Slider bar
restore defaults
“select done to reset
Internet image size options
to defaults”
pin cushion
Slider bar
trapezoidal
Slider bar
parallelogram
Slider bar
pincush. balance
Slider bar
restore defaults
“select done to reset
Internet image geometry
options to defaults”
system info
©iCEBOX, LLC, September 2001
Internet Mode
Table 7. Internet Display Settings (Continued)
Select:
Printing
Then select:
Then select/adjust:
restore factory defaults
“select done to reset
Internet options to
defaults”
done
Closes the Internet display
settings menu
The iCEBOX is compatible with Hewlett Packard 900 Series DeskJet printers. For a
complete list of compatible printers, please refer to the iCEBOX Web site:
www.iceboxllc.com.
If a printer is connected to the iCEBOX, press the PRINT button (in the lower left
corner of the keyboard) to print the image displayed on the screen. Refer to page 7
for more information about connecting a printer to the iCEBOX. The Print function
works only in Internet Mode.
Zoom
Print button
Internet Error
Messages
The iCEBOX is not enabled for some Web sites which require additional userinstalled software (for example Java™ or Shockwave™). If you attempt to log on to
one of these sites, you may receive an error message. To exit the site, press BACK on
the remote control or keyboard, or press OPTIONS and GO TO to enter a new Web
address.
If you receive an error message from a Web site:
1.
First read the message to see if it offers any further instructions.
2.
If there are no further instructions, press HOME to return to your home page.
3.
If this still doesn't produce the desired result, press OPTIONS. The Internet
Menu will appear. Select HANGUP and press GO. This will disconnect you from
the Internet. To redial and return to your home page, press OPTIONS on the
remote control or keyboard, select DIAL (or CONNECT) and press GO.
If you’re continuing to have problems, please refer to the warranty card for the
technical support phone number.
Countertop - iCEBOX™ Owner’s Manual
29
Internet Mode
Internet
Troubleshooting
Some problems that commonly occur during Internet use are described below
along with solutions. If problems persist, refer to the warranty card for information
on how to contact customer support.
Error Screens
While using the Internet you will periodically come across screens that read “Error”
followed by the type of error. In these cases you may either press GO on the remote
control or the keyboard and try again, or repeat your previous action.
You will receive an error screen on sites that utilize web technologies that the
iCEBOX does not support, such as Shockwave™, Java™, and Flash™.
Unit Freezes
Internet Connect
Failure / Error
Connecting to
Internet
If your iCEBOX freezes (does not respond to input from the keyboard or remote
control) turn the power off and unplug the unit for a few seconds. Then plug the
unit back in and turn it on.
If your iCEBOX has problems dialing or connecting, turn the power off and unplug
it for a few seconds, then turn the unit back on. Be sure to verify the following:
•
Make sure voice mail (if you have this service) is not interfering. The message
waiting tone will interrupt the dialing process.
•
Check your phone jack to verify the unit is properly plugged in.
•
Does your phone system require you to dial a prefix (e.g., “9”)?
To add a dialing prefix, press NET, press OPTIONS, select USER SETTINGS from the
on-screen menu, then select DIALING PREFIX. Type the required prefix into the
dialing prefix field then select DONE and press GO.
•
Make sure that Call Waiting (if you have this service) is not interfering. The call
waiting tone will interrupt the Internet connection. Your local phone company
can provide a deactivation code that will temporarily disable Call Waiting while
using your phone line to connect to the Internet.
To enter the deactivation code to your dial-up settings: press NET, press
OPTIONS, select USER SETTINGS from the on-screen menu, then select DIALING
PREFIX. Type the required deactivation code into the dialing prefix field then
select DONE and press GO.
If problems persist, please refer to the warranty card for a customer service phone
number.
30
©iCEBOX, LLC, September 2001
Monitor and Security Mode
7. Monitor and Security Mode
When a video camera is connected to the iCEBOX, you are able to view live video
input from anywhere the video camera is installed: for example a child’s room, or
your front door. The iCEBOX is configured to accept one video camera or video line
without installing any additional components. To view live video input, press MON
on the remote control or keyboard.
Other Monitor
Mode Functions
A VCR or video game system may also be connected to the VIDEO IN connector. To
access programming from these devices, the iCEBOX must be in Monitor Mode
(press MON on the remote control or keyboard).
Note: While in Monitor Mode, the word MONITOR is continuously displayed on the
screen. To remove this display:
•
Open the Monitor Setup menu (explained below)
•
Select MONITOR MODE
•
Using the right/left directional arrow keys, change MONITOR MODE to VIDEO
MODE
•
Monitor
Setup Menu
Select DONE to return to the Monitor Setup menu. Select DONE again to close
the setup menu.
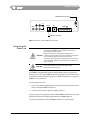
While in Monitor Mode, you can open the Monitor Setup menu by pressing
OPTIONS on the remote control or keyboard.
Use the Monitor Setup menu to customize Monitor settings such as brightness,
contrast, and audio quality. To navigate and make selections in the on-screen
menus you may use either the keyboard or the remote control.
While using the on-screen menus keep in mind:
Countertop - iCEBOX™ Owner’s Manual
•
A yellow box indicates the active menu item.
•
To move the selection box press the up or down
buttons.
•
To adjust a setting higher, press the right
button. To adjust a setting lower, press the left
button.
•
Select CANCEL to cancel your changes and
return to the previous menu.
•
Select DONE to save your changes and return to
the main menu.
•
When the desired menu item is highlighted, press GO to make your selection.
31
Monitor and Security Mode
monitor setup
image
sound
monitor mode
done
Figure 25. Monitor Setup Menu
Table 8 describes the Monitor Mode sub-menus and user settings.
Table 8. Monitor Mode Setup On-screen Menus
Select
Then select:
Then select/adjust
image
• brightness
slider bar
slider bar
• contrast
• color
• tint
sound
slider bar
slider bar
• restore defaults
“select done to reset monitor image options
to default”
• bass
slider bar
slider bar
slider bar
• treble
• balance
monitor
mode
Security Mode
Talk
Unlock
32
• restore defaults
“select done to reset monitor sound options
to defaults”
monitor \ video
Choose “monitor” if the iCEBOX is connected
to a video camera.
Choose “video” if the iCEBOX is connected to
a VCR, video game system, laser disc system,
etc., rather than a video camera.
To provide security functions, the iCEBOX may be connected with professionally
installed electronic locks and intercom speakers. The lock and intercom speaker
connectors are located on the rear panel of the unit (see Figure 8). For more
information about these features, please visit the iCEBOX Web site at
www.iceboxllc.com.
Press the TALK button (on the keyboard) to activate the iCEBOX microphone
(above the TV screen).
Press the UNLOCK button (on the keyboard) to remotely unlock a door equipped
with professionally installed electronic locks.
©iCEBOX, LLC, September 2001
Caring for Your iCEBOX
8. Caring for Your iCEBOX
WARNING! Risk of electric shock.
Do not disassemble the iCEBOX TV/monitor, remote control, or keyboard.
There are no user-serviceable components and dangerous voltages may
be present. All service must be performed by an authorized service
technician. For more information please refer to your warranty service
card.
Cleaning
Never use solvents or abrasive cleaners on any of the iCEBOX components.
Monitor
Clean the exterior plastic surface using a slightly damp sponge and mild detergent
or dish soap. Clean the screen by first applying a small amount of glass cleaner to a
lint free cloth.
Remote control and keyboard
Use a soft, non-abrasive sponge and mild detergent or dish soap. DO NOT put the
remote control or keyboard in the dishwasher!
WARNING! Risk of electric shock.
Unplug the iCEBOX from the wall before cleaning it. Do not use liquid
cleaners, solvents or aerosol cleaners. Clean the unit with a damp cloth.
Countertop - iCEBOX™ Owner’s Manual
33
Troubleshooting
9. Troubleshooting
Please refer to the following information if your iCEBOX is not functioning properly:
The iCEBOX doesn’t work at all
• Make sure the power cord is plugged in.
• Make sure the power outlet is working properly.
There’s no dial tone when
attempting to connect to the
Internet.
• Make sure the phone line is connected firmly into
the back panel of the unit.
• Make sure the phone line has a dial tone by
connecting a different phone to the line. If there is
no dial tone on the phone, the problem is in your
wiring or local service. In that case, contact your
local telephone company.
The tray won’t open/close
when EJECT or DVD button is
pressed.
• Make sure the power is on.
Hand icon appears on screen.
• The selected function is not supported on the disc
• Make sure the disc is inserted correctly.
• The disc may be dirty or scratched.
being played.
Disc ejects automatically or
will not play
• The disc may be damaged or dirty.
• The disc is not placed correctly in the tray.
• The disc is upside down in the tray.
The unit does not respond to
remote control input.
• Replace the remote control batteries.
• Or, if the batteries were recently replaced verify that
they are inserted correctly.
The unit does not respond to
keyboard input.
• Replace the keyboard batteries.
• Or, if the batteries were recently replaced verify that
they are inserted correctly.
Unit freezes (does not respond
to remote control or keyboard
input)
34
• Turn the unit off and unplug it for a few seconds.
Plug it back in and turn it on.
©iCEBOX, LLC, September 2001
Appendix
1. Privacy Policy
iCEBOX, LLC is committed to protecting the privacy and security of iCEBOX users.
This privacy policy will advise you about how we protect your personal information
and address your potential concerns over the use of this information. We may need
to change this policy from time to time in order to address new issues and changes
in our product. If you have any questions or concerns about your privacy, please
contact us through e-mail at [email protected].
Personal
Identification
Information
Privacy of
Children
Other Web sites
Security
Information
iCEBOX, LLC will never intentionally disclose any personal identification
information about you as an individual user, such as your address, name, or
telephone number. We may request personal identification information for the use
of our services. We have two exceptions to this policy:
1.
We will release specific information about your account to comply with any
valid legal process, such as a search warrant, subpoena, statute, or court order.
2.
We will release specific information in special cases, such as when there is a
physical threat to you or others.
We urge all parents to participate in their children’s Internet and online experience.
Please teach children about protecting their personal information while online.
If you should give out personal information online, through bulletin boards or
other web sites, that information can be used by third parties. You disclose
information in these areas at your own risk. We encourage you to investigate and
ask questions before disclosing information to third parties.
Protecting your privacy and information is a priority of iCEBOX, LLC. We have taken
careful measures to secure both our information and our physical premises. We
exercise great care in providing secure transmissions of your personal information
from your unit to our servers. Our server software encrypts information, which is
intended to ensure all iCEBOX, LLC transactions remain private (unless sent by an
unsecured means such as e-mail). We also make use of firewalls and Secure Socket
Layers where appropriate.
Please contact your own Internet Service Provider for information on their privacy
policies. iCEBOX, LLC is not responsible for the policies of private Internet Service
Providers.
Notwithstanding our use of technology to provide appropriate security, in this
time of rapidly changing technology, any responsible Internet related business
must recognize and acknowledge that there are individuals and even businesses
Countertop - iCEBOX™ Owner’s Manual
A-1
Appendix
that may attempt to use unethical or illegal means to access information or disrupt
communications.
Therefore, we must advise you that no security system is perfect and that your use
of the iCEBOX product constitutes a waiver of any claim against iCEBOX, LLC for
direct, consequential and all other damages arising from the unauthorized access,
use, or disclosure of information maintained on our systems, unless such damages
are due to our intentional wrongdoing or gross negligence.
A-2
©iCEBOX, LLC, September 2001
Appendix
2. Specifications
Specifications for iCEBOX components are contained below in Table A-1.
Table A-1. iCEBOX specifications
Countertop - iCEBOX™ Owner’s Manual
Size:
12.75 in x 11 in x 12.25 in
(32.5 cm x 27.8 cm x 31 cm)
Weight:
20.5 pounds (9.3 kg)
Environment:
Operating Temperature 0°C to 35°C
(32°F to 113°F)
Storage Temperature –20°C to 60°C
(-4°F to 140°F)
TV case
Injection molded, high impact ABS plastic
Remote control case
Injection molded, high impact ABS plastic
Power source
120Vac, 60Hz
Switch controls
On/Off, Channel +/-, Volume +/-, Play, Eject, Stop,
Pause, Previous, Next,
Video inputs/outputs
Coaxial CATV Antenna In (F-type jack), Stereo Audio In/
Out (RCA type), Composite Video In (CVBS)
DVD player
Plays audio CDs, video CDs, and DVDs
TV channels
125 channels available
Telephone connection
RJ-11
Internet connection
56k V.90 Modem
Other connections
Security unlock, printer (PCL 3), intercom audio out
Display
9 inch viewable CRT Display
Keyboard housing
Injection molded, high impact ABS plastic
Keyboard keys
On/Off, TV, Net (Internet), DVD, Mon (Monitor), Talk,
Unlock, Tab, Caps Lock, Shift, Print, Alt, Escape, Delete,
Backspace, Back, Next, Reverse, Forward, Scroll +/-,
Stop, Menu, Title, Pause, Options, Go (Multidirectional),
Volume +/-, Channel +/-, Program direct select 1 – 9,
Full Alpha/Numeric keyboard with punctuation
Remote control
On/Off, TV, Net (Internet), DVD, Mon (Monitor), Back,
Next, Reverse, Forward, Scroll +/-, Stop, Menu, Title,
Pause, Options, Go (Multidirectional), Volume +/-,
Channel +/-, Program direct select 1 – 9
Speakers
Two 3-inch speakers., resistance: 8 ohms
A-3
Appendix
3. Digital vs. Analog Phone Lines
Two types of phone lines commonly available: analog and digital. Most homes are
wired with analog phone lines. Digital lines are usually found in commercial and
industrial sites. However, newer homes, apartments, and condominiums may be
pre-wired with high speed digital phone lines.
All modems, including the modem in the iCEBOX, require an analog phone line.
Connecting a modem to a digital line will cause permanent damage to the
modem.
To determine which type of line you have, look at the phone line connector. An
analog phone connector is terminated with 2 or 4 copper wires. A digital
connector is terminated with 6 or 8 copper wires. If you cannot determine for
certain which type of phone line you have, contact your phone service provider.
If You Have a Digital Phone Line:
In commercial buildings, apartment buildings, and condominiums, digital phone
lines usually come from a "telephone switch" or PBX located in the building. These
telephone switches will also support analog phone lines. The telephone system
administrator can arrange for an analog phone line to be brought to your location
from the local telephone switch.
If you live in a house wired with a digital line, you can arrange with your phone
company to have an analog line brought into your home. In addition, many digital
phone manufacturers offer inexpensive adapters that plug into the digital phone
line and convert it to an analog line. These adapters usually work best at lower
modem speeds.
A-4
©iCEBOX, LLC, September 2001
Appendix
4. FCC Statement (USA)
The United States Federal Communications Commission (in 47 CFR 15.105) has
specified that the following notice be brought to the attention of users of this
product:
This equipment has been tested and found to comply with the limits for a Class B
digital device, pursuant to part 15 of the FCC rules. These limits are designed to
provide reasonable protection against harmful interference in a residential
installation. This equipment generates, uses, and can radiate radio frequency
energy and, if not installed and used in accordance with the instructions, may
cause harmful interference to radio communications. However, there is no
guarantee that interference will not occur in a particular installation. If this
equipment does cause harmful interference to radio or TV reception, which can be
determined by turning the equipment off and on, the user is encouraged to try to
correct the interference by one of the following measures:
•
Reorient or relocate the receiving antenna.
•
Increase the separation between the equipment and the receiver.
•
Connect the equipment into an outlet on a circuit different from that to which
the receiver is connected.
•
Consult the dealer or an experienced radio/TV technician for help.
5. Contacting Customer Service
Customer service contacts for the iCEBOX may vary depending on where your
iCEBOX was purchased. Please refer to your warranty card for the Customer Service
phone number for your unit.
If you misplace your warranty card, you can call Customer Service at iCEBOX, LLC at
1-877-463-7637 between 9:00 am and 5:00 pm Pacific Time.
Countertop - iCEBOX™ Owner’s Manual
A-5
iCEBOX, LLC
1520 Bellevue Avenue
Seattle, WA 98122-2015
www.iceboxllc.com
tel: (800) 897-8554
tel: (206) 448-0354
fax: (206) 448-0359
iCEBOX is a registered trademark of iCEBOX, LLC.
Shockwave and Flash are registered trademarks of Macromedia, Inc.
Java is a registered trademark of Sun Microsystems, Inc.
Specifications subject to change without notice.
Multiple patents issued and pending.
Printed in Korea. ©iCEBOX, LLC, September 2001.
P/N 10533 Rev. J
091801