1
ERserver
iSeries
Query for iSeries Use
Version 5
SC41-5210-04
ERserver
iSeries
Query for iSeries Use
Version 5
SC41-5210-04
Note
Before using this information and the product it supports, be sure to read the information in
“Notices” on page 261.
Fifth Edition (September 2002)
This edition applies only to reduced instruction set computer (RISC) systems.
© Copyright International Business Machines Corporation 2000, 2002. All rights reserved.
US Government Users Restricted Rights – Use, duplication or disclosure restricted by GSA ADP Schedule Contract
with IBM Corp.
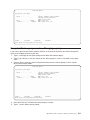
Contents
About Query for iSeries Use . . . . . . . . . . . . . . . . . . . . . . . . . . . . ix
Who should read the Query for iSeries Use book . . . . . . . . . . . . . . . . . . . . . ix
Part 1. Introduction to Query for iSeries . . . . . . . . . . . . . . . . . . . . 1
Chapter 1. What is Query for iSeries? .
Query for iSeries fundamentals . . . . .
Files, fields, and record formats in Query
Query for iSeries definitions . . . . .
Libraries in Query for iSeries . . . . .
Major functions of Query for iSeries . . .
.
.
for
.
.
.
. . .
. . .
iSeries
. . .
. . .
. . .
.
.
.
.
.
.
.
.
.
.
.
.
.
.
.
.
.
.
.
.
.
.
.
.
.
.
.
.
.
.
.
.
.
.
.
.
.
.
.
.
.
.
.
.
.
.
.
.
.
.
.
.
.
.
.
.
.
.
.
.
.
.
.
.
.
.
.
.
.
.
.
.
.
.
.
.
.
.
.
.
.
.
.
.
.
.
.
.
.
.
.
.
.
.
.
.
.
.
.
.
.
.
.
.
.
.
.
.
.
.
.
.
.
.
Chapter 2. General operating information for Query for iSeries
Practicing with Query for iSeries . . . . . . . . . . . . .
Getting started with Query for iSeries . . . . . . . . . . .
When you are finished working with Query for iSeries . . . .
Telling Query for iSeries what you want . . . . . . . . . . .
Using prompts and default values in Query for iSeries . . . .
Using Query for iSeries function keys . . . . . . . . . .
Using lists in Query for iSeries . . . . . . . . . . . . .
Using Query for iSeries commands . . . . . . . . . . . .
Using the Query Utilities menu. . . . . . . . . . . . . .
Using the Work with Queries display . . . . . . . . . . .
Choosing a single Query for iSeries task . . . . . . . . .
Choosing multiple Query for iSeries tasks . . . . . . . .
Working with a list of Query for iSeries queries . . . . . .
Selecting a library for your Query for iSeries queries . . . .
Displaying the format of constants in Query for iSeries . . . . .
Query for iSeries profile information . . . . . . . . . . . .
Handling Query for iSeries messages and errors . . . . . . .
Changing your Query for iSeries queries . . . . . . . . .
.
.
.
.
.
.
.
.
.
.
.
.
.
.
.
.
.
.
.
.
.
.
.
.
.
.
.
.
.
.
.
.
.
.
.
.
.
.
.
.
.
.
.
.
.
.
.
.
.
.
.
.
.
.
.
.
.
.
.
.
.
.
.
.
.
.
.
.
.
.
.
.
.
.
.
.
.
.
.
.
.
.
.
.
.
.
.
.
.
.
.
.
.
.
.
.
.
.
.
.
.
.
.
.
.
.
.
.
.
.
.
.
.
.
.
.
.
.
.
.
.
.
.
.
.
.
.
.
.
.
.
.
.
.
.
.
.
.
.
.
.
.
.
.
.
.
.
.
.
.
.
.
.
.
.
.
.
.
.
.
.
.
.
.
.
.
.
.
.
.
.
.
.
.
.
.
.
.
.
.
.
.
.
.
.
.
.
.
.
.
.
.
.
.
.
.
.
.
.
.
.
.
.
.
.
.
.
.
.
.
.
.
.
.
.
.
.
.
.
.
.
.
.
.
.
.
.
.
.
.
.
.
.
.
.
.
.
.
.
.
.
.
.
.
.
.
.
.
.
.
.
.
.
.
.
.
.
.
.
.
.
.
.
.
.
.
3
3
3
5
5
5
7
7
7
7
7
7
8
9
11
11
12
12
13
14
16
17
18
18
18
Part 2. Defining and using Query for iSeries query definitions . . . . . . . . . 21
Chapter 3. Creating a Query for iSeries query definition . . . . .
Starting Query for iSeries query definition . . . . . . . . . . .
Selecting definition steps when defining a Query for iSeries query . .
Selecting options for a Query for iSeries query definition . . . . .
Moving through the Query for iSeries definition displays . . . . .
When you return to the Query for iSeries Define the Query display .
Considerations for creating Query for iSeries queries . . . . . . .
Selecting files, records, and fields for Query for iSeries . . . . .
Suggested sequence of tasks for creating Query for iSeries queries .
.
.
.
.
.
.
.
.
.
Chapter 4. Specifying and selecting files for a Query for iSeries query
Specifying file selections for a Query for iSeries query . . . . . . . .
Choosing a file for a Query for iSeries query . . . . . . . . . .
Choosing a library for a Query for iSeries query . . . . . . . . .
Choosing a member or record format for a Query for iSeries query . .
Selecting multiple files for a Query for iSeries query. . . . . . . .
Confirming your options for a Query for iSeries query . . . . . . .
Handling errors on the Query for iSeries Specify File Selections display
© Copyright IBM Corp. 2000, 2002
.
.
.
.
.
.
.
.
.
.
.
.
.
.
.
.
.
.
.
.
.
.
.
.
.
.
.
.
.
.
.
.
.
.
.
.
.
.
.
.
.
.
.
.
.
.
.
.
.
.
.
.
.
.
.
.
.
.
.
.
.
.
.
.
.
.
.
.
.
.
.
.
.
.
.
.
.
.
.
.
.
.
.
.
.
.
.
.
.
.
.
.
.
.
.
.
.
.
.
27
27
28
29
30
30
30
30
31
.
.
.
.
.
.
.
.
.
.
.
.
.
.
.
.
.
.
.
.
.
.
.
.
.
.
.
.
.
.
.
.
.
.
.
.
.
.
.
.
.
.
.
.
.
.
.
.
.
.
.
.
.
.
.
.
.
.
.
.
.
.
.
.
.
.
.
.
.
.
.
.
.
.
.
.
.
.
.
.
.
.
.
.
.
.
.
.
33
33
34
34
35
35
36
36
iii
Selecting files on the Query for iSeries Select File display . . . . . . . . . . .
Selecting file members on the Query for iSeries Select Member display . . . . . .
Selecting record formats on the Query for iSeries Select Record Format display . . .
Displaying all files selected on the Query for iSeries Display File Selections display . .
Joining files in a Query for iSeries query . . . . . . . . . . . . . . . . . .
Types of joins in a Query for iSeries query . . . . . . . . . . . . . . . .
How to join files in a Query for iSeries query . . . . . . . . . . . . . . .
Rules for joining files in a Query for iSeries query . . . . . . . . . . . . .
Examples of joining files in a Query for iSeries query . . . . . . . . . . . .
Sequencing secondary files for a primary join in a Query for iSeries query . . . .
Displaying all join tests in a Query for iSeries query . . . . . . . . . . . . . .
Handling missing fields in a Query for iSeries query . . . . . . . . . . . . . .
Handling missing fields during file selection process of a Query for iSeries query . .
Handling missing fields when starting to change or display a Query for iSeries query
.
.
.
.
.
.
.
.
.
.
.
.
.
.
.
.
.
.
.
.
.
.
.
.
.
.
.
.
.
.
.
.
.
.
.
.
.
.
.
.
.
.
.
.
.
.
.
.
.
.
.
.
.
.
.
.
.
.
.
.
.
.
.
.
.
.
.
.
.
.
.
.
.
.
.
.
.
.
.
.
.
.
.
.
37
39
40
41
42
43
43
44
46
49
53
54
55
55
Chapter 5. Defining result fields in Query for iSeries . . . . . . .
Creating results fields in Query for iSeries . . . . . . . . . . . .
Query for iSeries result field name . . . . . . . . . . . . . .
Query for iSeries expressions . . . . . . . . . . . . . . . .
Query for iSeries numeric expressions. . . . . . . . . . . . .
Query for iSeries character expressions . . . . . . . . . . . .
Query for iSeries character functions . . . . . . . . . . . . .
Date, time, and timestamp expressions in Query for iSeries . . . . .
Displaying constants format in Query for iSeries . . . . . . . . .
Date, time, and timestamp arithmetic operations in Query for iSeries . .
Date arithmetic operation in Query for iSeries . . . . . . . . . .
Time arithmetic operation in Query for iSeries . . . . . . . . . .
Durations in Query for iSeries . . . . . . . . . . . . . . . .
Date, time, and timestamp functions in Query for iSeries . . . . . . .
CHAR Query for iSeries function . . . . . . . . . . . . . . .
DATE Query for iSeries function . . . . . . . . . . . . . . .
DAY Query for iSeries function . . . . . . . . . . . . . . .
DAYS Query for iSeries function . . . . . . . . . . . . . . .
HOUR Query for iSeries function . . . . . . . . . . . . . . .
MICROSECOND Query for iSeries function . . . . . . . . . . .
MINUTE Query for iSeries function . . . . . . . . . . . . . .
MONTH Query for iSeries function . . . . . . . . . . . . . .
SECOND Query for iSeries function. . . . . . . . . . . . . .
TIME Query for iSeries function . . . . . . . . . . . . . . .
TIMESTAMP Query for iSeries function . . . . . . . . . . . .
YEAR Query for iSeries function . . . . . . . . . . . . . . .
Additional date, time, and timestamp functions in Query for iSeries . .
Converting date formats in Query for iSeries . . . . . . . . . . .
Converting date for output to a database file in Query for iSeries . . .
Converting date for output to a display or printer in Query for iSeries .
General considerations when creating an expression in Query for iSeries .
Column headings in Query for iSeries . . . . . . . . . . . . . .
Length and decimal positions in Query for iSeries . . . . . . . . .
Example of defining a result field in Query for iSeries . . . . . . .
Adding or removing result fields in Query for iSeries . . . . . . . .
.
.
.
.
.
.
.
.
.
.
.
.
.
.
.
.
.
.
.
.
.
.
.
.
.
.
.
.
.
.
.
.
.
.
.
.
.
.
.
.
.
.
.
.
.
.
.
.
.
.
.
.
.
.
.
.
.
.
.
.
.
.
.
.
.
.
.
.
.
.
.
.
.
.
.
.
.
.
.
.
.
.
.
.
.
.
.
.
.
.
.
.
.
.
.
.
.
.
.
.
.
.
.
.
.
.
.
.
.
.
.
.
.
.
.
.
.
.
.
.
.
.
.
.
.
.
.
.
.
.
.
.
.
.
.
.
.
.
.
.
.
.
.
.
.
.
.
.
.
.
.
.
.
.
.
.
.
.
.
.
.
.
.
.
.
.
.
.
.
.
.
.
.
.
.
.
.
.
.
.
.
.
.
.
.
.
.
.
.
.
.
.
.
.
.
.
.
.
.
.
.
.
.
.
.
.
.
.
.
.
57
57
58
58
59
60
61
66
69
69
70
73
73
74
74
75
75
76
76
77
77
78
78
79
79
80
80
80
80
81
83
85
85
86
86
.
.
.
.
.
.
.
.
.
.
.
.
.
.
.
.
.
.
.
.
.
.
.
.
.
.
.
.
.
.
.
.
.
.
.
.
.
.
.
.
.
.
.
.
.
.
.
.
.
.
.
.
.
.
.
.
.
.
.
.
.
.
.
.
.
.
.
.
.
.
.
.
.
.
.
.
.
.
.
.
.
.
.
.
.
.
.
.
.
.
.
.
.
.
.
.
.
.
.
.
.
.
.
.
.
.
.
.
.
.
.
.
.
.
.
.
.
.
.
.
.
.
.
.
.
.
.
.
.
.
.
.
.
.
.
.
.
.
.
.
.
.
.
.
.
.
.
.
.
.
.
.
.
.
.
.
.
.
.
.
.
.
.
.
.
.
.
.
.
.
.
.
.
.
.
Chapter 6. Selecting and sequencing fields in Query for iSeries . . . . . . . . . . . . . . 87
Letting Query for iSeries select and sequence fields. . . . . . . . . . . . . . . . . . . . 87
Selecting fields and specifying their sequence in Query for iSeries . . . . . . . . . . . . . . 87
Chapter 7. Selecting records in Query for iSeries
iv
Query for iSeries Use V5R2
. . . . . . . . . . . . . . . . . . . 91
Letting Query for iSeries select records . . . . . . . .
Selecting the records you want in Query for iSeries . . . .
Comparison fields in Query for iSeries . . . . . . . .
Comparison values in Query for iSeries . . . . . . .
Comparison tests in Query for iSeries . . . . . . . .
Using more than one comparison test in Query for iSeries
Adding and removing comparisons in Query for iSeries .
.
.
.
.
.
. 91
. 91
. 92
. 93
. 95
. . . . . . . . . . . . . . . . 101
. . . . . . . . . . . . . . . . 103
Chapter 8. Selecting sort fields in Query for iSeries . . .
Letting Query for iSeries determine the order of records for you
Selecting the sort fields you want to use in Query for iSeries .
Additional sort considerations in Query for iSeries . . . .
.
.
.
.
.
.
.
.
.
.
.
.
.
.
.
.
.
.
.
.
.
.
.
.
.
.
.
.
.
.
.
.
.
.
.
.
.
.
.
.
.
.
.
.
.
.
.
.
.
.
.
.
.
.
.
.
.
.
.
.
.
.
.
.
.
.
.
.
.
.
.
.
.
.
.
.
.
.
.
.
.
.
.
.
.
.
.
.
.
.
.
.
.
.
.
.
.
.
.
.
.
.
.
.
.
.
.
.
105
105
105
108
. . .
. . .
. . .
. . .
. . .
. . .
. . .
. . .
iSeries
. . .
. . .
. . .
.
.
.
.
.
.
.
.
.
.
.
.
.
.
.
.
.
.
.
.
.
.
.
.
.
.
.
.
.
.
.
.
.
.
.
.
.
.
.
.
.
.
.
.
.
.
.
.
.
.
.
.
.
.
.
.
.
.
.
.
.
.
.
.
.
.
.
.
.
.
.
.
.
.
.
.
.
.
.
.
.
.
.
.
.
.
.
.
.
.
.
.
.
.
.
.
.
.
.
.
.
.
.
.
.
.
.
.
111
111
111
111
112
112
113
113
114
115
116
117
.
.
.
.
.
.
.
.
.
.
.
.
.
.
.
.
.
.
.
.
.
.
.
.
.
.
.
.
.
.
.
.
.
.
.
.
.
.
.
.
.
.
.
.
.
.
.
.
.
.
.
.
.
.
.
.
.
.
.
.
.
.
.
.
.
.
.
.
.
.
.
.
.
.
.
.
.
.
.
.
.
.
.
.
.
.
.
.
.
.
.
.
.
.
.
.
.
.
.
.
.
.
.
.
.
.
.
.
119
119
119
119
120
121
122
122
124
127
129
131
Chapter 11. Specifying report summary functions in Query for iSeries reports
Types of summary functions in Query for iSeries reports . . . . . . . . . .
Summarizing columns in Query for iSeries reports . . . . . . . . . . . . .
Location of column summary values in Query for iSeries reports. . . . . . . .
.
.
.
.
.
.
.
.
.
.
.
.
.
.
.
.
.
.
.
.
.
.
.
.
.
.
.
.
135
135
137
137
Chapter 12. Defining Query for iSeries report breaks. .
Defining a Query for iSeries report break . . . . . . .
Defining report break formatting in Query for iSeries reports
Skip to new page in Query for iSeries reports . . . .
Suppress summaries in Query for iSeries reports . . .
Break text in Query for iSeries reports . . . . . . .
.
.
.
.
.
.
.
.
.
.
.
.
.
.
.
.
.
.
.
.
.
.
.
.
.
.
.
.
.
.
.
.
.
.
.
.
.
.
.
.
.
.
.
.
.
.
.
.
139
139
143
143
143
144
reports
. . .
. . .
. . .
. . .
.
.
.
.
.
.
.
.
.
.
.
.
.
.
.
.
.
.
.
.
.
.
.
.
.
.
.
.
.
.
.
.
.
.
.
145
145
146
146
147
Chapter 10. Specifying report column formatting in Query for iSeries
Formatting the columns of the Query for iSeriesquery report . . . . .
Column spacing in Query for iSeries reports . . . . . . . . . .
Column headings in Query for iSeries reports. . . . . . . . . .
Length and decimal positions in Query for iSeries reports . . . . .
Omitting fields from a Query for iSeries report . . . . . . . . .
Editing numeric fields in Query for iSeries reports . . . . . . . . .
Defining numeric field editing in Query for iSeries reports . . . . .
Describing numeric field editing in Query for iSeries reports . . . .
Describing date/time field editing display in Query for iSeries reports .
Specifying an edit code in Query for iSeries reports . . . . . . .
Specifying edit words . . . . . . . . . . . . . . . . . .
.
.
.
.
.
.
.
.
.
.
.
.
.
.
.
.
.
.
.
.
.
.
.
.
.
.
.
.
.
.
.
.
.
.
.
.
.
.
.
.
.
.
.
Chapter 9. Selecting a collating sequence in Query for iSeries . .
Letting Query for iSeries select a collating sequence . . . . . . .
Setting your default collating sequence in Query for iSeries. . . .
Purpose of a collating sequence in Query for iSeries . . . . . . .
Collating sequence and CCSIDs in Query for iSeries . . . . . .
How a collating sequence affects Query for iSeries. . . . . . . .
Selecting a Query for iSeries collating sequence . . . . . . . .
Using the hexadecimal collating sequence in Query for iSeries . .
Using the language collating sequence for your country in Query for
Defining your own collating sequence in Query for iSeries . . . .
Selecting a translation table in Query for iSeries. . . . . . . .
Selecting a system sort sequence in Query for iSeries . . . . .
.
.
.
.
.
.
.
.
.
.
.
.
.
.
.
.
.
.
.
.
.
.
.
.
.
.
.
Chapter 13. Selecting output type and output form in Query for iSeries
Selecting the output type and form you want in Query for iSeries reports .
Form of output of Query for iSeries reports . . . . . . . . . . .
Line wrapping in Query for iSeries reports . . . . . . . . . . . .
Wrapping width in Query for iSeries reports . . . . . . . . . . .
.
.
.
.
.
.
.
.
.
.
.
.
.
.
.
.
.
.
.
.
.
.
.
.
Contents
v
Record on one page in Query for iSeries reports . . . . . .
Displaying wrapping widths in Query for iSeries reports . . . .
Defining output to the printer in Query for iSeries reports . . .
Defining output of Query for iSeries reports to a database file. .
Using an existing output file definition in Query for iSeries reports
Building a new output file definition in Query for iSeries reports .
Using an output database file created by Query for iSeries . . .
.
.
.
.
.
.
.
.
.
.
.
.
.
.
.
.
.
.
.
.
.
.
.
.
.
.
.
.
.
.
.
.
.
.
.
147
147
148
154
155
156
161
Chapter 14. Specifying Query for iSeries processing options . . . . . . . . . . .
Purpose of Query for iSeries processing options . . . . . . . . . . . . . . . . .
Rounding numeric field values during Query for iSeries processing . . . . . . . . . . .
Ignoring decimal data errors during Query for iSeries processing . . . . . . . . . . .
Ignoring character substitution warnings during Query for iSeries processing . . . . . . .
Using collating sequence for all character comparisons during Query for iSeries processing
.
.
.
.
.
.
.
.
.
.
.
.
.
.
.
.
.
.
163
163
164
164
165
165
Chapter 15. Exiting and running a Query for iSeries query . . . .
Ending a Query for iSeries query definition . . . . . . . . . . .
Saving a Query for iSeries query definition. . . . . . . . . . .
Running a Query for iSeries query . . . . . . . . . . . . . . .
Using function key F5 when running a Query for iSeries query . . .
Running a Query for iSeries query from the Query for iSeries menu .
Running a Query for iSeries query from the Exit This Query display .
Running a Query for iSeries query from the Work with Queries display
Running a Query for iSeries query using the RUNQRY command . .
Chapter 16. Working with Query for iSeries query definitions . .
Changing a Query for iSeries query definition. . . . . . . . . .
Starting changes by copying a Query for iSeries query definition .
Changes you can make to a Query for iSeries query . . . . . .
Considerations for changing Query for iSeries queries . . . . .
Copying a Query for iSeries query definition . . . . . . . . . .
Renaming a Query for iSeries query definition . . . . . . . . .
Deleting a Query for iSeries query definition . . . . . . . . . .
Displaying a Query for iSeries query definition . . . . . . . . .
Printing a Query for iSeries query definition . . . . . . . . . .
Information printed for a Query for iSeries query definition . . . .
Example of printed record format information for a Query for iSeries
.
.
.
.
.
.
.
.
.
.
.
.
.
.
.
.
.
.
.
.
.
.
.
.
.
.
.
.
.
.
.
.
.
.
.
.
.
.
.
.
.
.
.
.
.
.
.
.
.
.
.
.
.
.
.
.
.
.
.
.
.
.
.
.
.
.
.
.
.
.
.
.
.
.
.
.
.
.
.
.
.
.
.
.
.
.
.
.
.
.
.
.
.
.
.
.
.
.
.
.
.
.
.
.
.
.
.
.
.
.
.
.
.
.
.
.
.
.
.
.
.
.
.
.
.
.
.
.
.
.
.
.
.
.
.
.
.
.
.
.
.
.
.
.
.
.
.
.
.
.
.
.
.
.
.
167
167
167
169
169
169
169
170
171
. . . . . .
. . . . . .
. . . . . .
. . . . . .
. . . . . .
. . . . . .
. . . . . .
. . . . . .
. . . . . .
. . . . . .
. . . . . .
query definition
.
.
.
.
.
.
.
.
.
.
.
.
.
.
.
.
.
.
.
.
.
.
.
.
.
.
.
.
.
.
.
.
.
.
.
.
.
.
.
.
.
.
.
.
.
.
.
.
.
.
.
.
.
.
.
.
.
.
.
.
.
.
.
.
.
.
.
.
.
.
.
.
173
173
173
173
176
177
178
178
179
180
181
182
Part 3. Advanced information about Query for iSeries . . . . . . . . . . . . 185
Chapter 17. Additional information about Query for iSeries for programmers . . . .
Files with different record formats in Query for iSeries . . . . . . . . . . . . . .
File sharing considerations in Query for iSeries . . . . . . . . . . . . . . . . .
Overriding database files in Query for iSeries. . . . . . . . . . . . . . . . . .
DBCS considerations when defining result fields in Query for iSeries . . . . . . . . .
Joining files in Query for iSeries . . . . . . . . . . . . . . . . . . . . . .
Using *ALL in Query for iSeries . . . . . . . . . . . . . . . . . . . . . .
Using fields other than sort fields for report breaks in Query for iSeries . . . . . . . .
Result field length and decimal positions in Query for iSeries . . . . . . . . . . . .
Tips for dealing with presentation length and decimal positions in Query for iSeries. . .
Length and decimal positions used for internal numeric calculations in Query for iSeries .
Example: Increasing the decimal precision for result fields in Query for iSeries . . . .
Selecting records (ignoring field case) in Query for iSeries . . . . . . . . . . . .
.
.
.
.
.
.
.
.
.
.
.
.
.
.
.
.
.
.
.
.
.
.
.
.
.
.
.
.
.
.
.
.
.
.
.
.
.
.
.
.
.
.
.
.
.
.
.
.
.
.
.
.
187
187
187
187
187
188
188
188
188
188
189
190
191
Part 4. Appendixes . . . . . . . . . . . . . . . . . . . . . . . . . . . . . 193
vi
Query for iSeries Use V5R2
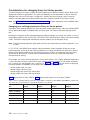
Appendix A. Differences between Query for iSeries and Query/36 . .
Conceptual Differences . . . . . . . . . . . . . . . . . . . .
Operational Differences . . . . . . . . . . . . . . . . . . . .
Command differences between System/36 and Query for iSeries commands
Migration differences between System/36 and Query for iSeries definitions .
.
.
.
.
.
.
.
.
.
.
.
.
.
.
.
.
.
.
.
.
.
.
.
.
.
.
.
.
.
.
.
.
.
.
.
.
.
.
.
.
.
.
.
.
.
.
.
.
.
.
195
195
195
197
197
Appendix B. Practice exercise for Query for iSeries query
Query for iSeries query exercise: Creating an IDDU definition.
Query for iSeries query exercise: Creating a database file . .
Query for iSeries query exercise: Entering data . . . . . .
Query for iSeries query exercise: Creating and running a query
Query for iSeries query exercise: Creating a query. . . .
Query for iSeries query exercise: Changing a query . . . .
Query for iSeries query exercise: Creating an advanced query
.
.
.
.
.
.
.
.
.
.
.
.
.
.
.
.
.
.
.
.
.
.
.
.
.
.
.
.
.
.
.
.
.
.
.
.
.
.
.
.
.
.
.
.
.
.
.
.
.
.
.
.
.
.
.
.
.
.
.
.
.
.
.
.
.
.
.
.
.
.
.
.
.
.
.
.
.
.
.
.
.
.
.
.
.
.
.
.
.
.
.
.
.
.
.
.
.
.
.
.
.
.
.
.
.
.
.
.
.
.
.
.
.
.
.
.
.
.
.
.
199
199
203
203
206
207
211
215
Appendix C. Query for iSeries performance tips and techniques .
Introduction to Query for iSeries query processing . . . . . . . .
Keyed sequence access paths in Query for iSeries . . . . . .
Select/omit access paths in Query for iSeries. . . . . . . . .
Access plans in Query for iSeries . . . . . . . . . . . . .
File definitions and data in Query for iSeries . . . . . . . . . .
File definitions in Query for iSeries. . . . . . . . . . . . .
File data considerations for Query for iSeries . . . . . . . . .
Defining queries for Query for iSeries . . . . . . . . . . . .
Query for iSeries performance when designing or changing queries
Define result fields in Query for iSeries . . . . . . . . . . .
Select and sequence fields in Query for iSeries . . . . . . . .
Select records in Query for iSeries. . . . . . . . . . . . .
Select sort fields in Query for iSeries . . . . . . . . . . . .
Select collating sequence in Query for iSeries . . . . . . . .
Specify report summary functions in Query for iSeries . . . . .
Select output type and output form in Query for iSeries . . . . .
Specify processing options in Query for iSeries . . . . . . . .
Using join operations in Query for iSeries . . . . . . . . . . .
Performance tips for join operations in Query for iSeries. . . . .
Miscellaneous tips and techniques for Query for iSeries . . . . . .
Batch processing for Query for iSeries . . . . . . . . . . .
Query for iSeries performance tuning. . . . . . . . . . . .
Query for iSeries migration considerations N to N-1 . . . . . .
Query for iSeries status messages. . . . . . . . . . . . . .
Query for iSeries debug mode messages . . . . . . . . . . .
.
.
.
.
.
.
.
.
.
.
.
.
.
.
.
.
.
.
.
.
.
.
.
.
.
.
.
.
.
.
.
.
.
.
.
.
.
.
.
.
.
.
.
.
.
.
.
.
.
.
.
.
.
.
.
.
.
.
.
.
.
.
.
.
.
.
.
.
.
.
.
.
.
.
.
.
.
.
.
.
.
.
.
.
.
.
.
.
.
.
.
.
.
.
.
.
.
.
.
.
.
.
.
.
.
.
.
.
.
.
.
.
.
.
.
.
.
.
.
.
.
.
.
.
.
.
.
.
.
.
.
.
.
.
.
.
.
.
.
.
.
.
.
.
.
.
.
.
.
.
.
.
.
.
.
.
.
.
.
.
.
.
.
.
.
.
.
.
.
.
.
.
.
.
.
.
.
.
.
.
.
.
.
.
.
.
.
.
.
.
.
.
.
.
.
.
.
.
.
.
.
.
.
.
.
.
.
.
.
.
.
.
.
.
.
.
.
.
.
.
.
.
.
.
.
.
.
.
.
.
.
.
.
.
.
.
.
.
.
.
.
.
.
.
.
.
.
.
.
.
.
.
.
.
.
.
.
.
.
.
.
.
.
.
.
.
.
.
.
.
.
.
.
.
.
.
.
.
.
.
.
.
.
.
.
.
.
.
.
.
.
.
.
.
.
.
.
.
.
.
.
.
.
.
.
.
.
.
.
.
.
.
231
231
231
232
232
233
233
234
234
234
235
235
235
236
237
237
237
238
238
239
240
240
241
241
241
242
Appendix D. Preventing users from running Query for iSeries queries interactively. . . . . . 243
Appendix E. Coded character set identifiers (CCSIDs) in Query for
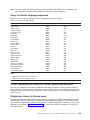
CCSID marking in Query for iSeries . . . . . . . . . . . . .
CCSIDs and collating sequences in Query for iSeries. . . . . . .
Query for iSeries language sequences . . . . . . . . . . .
CCSID conversions for Query for iSeries options and functions . . .
Displaying a Query for iSeries query . . . . . . . . . . . .
Changing a Query for iSeries query . . . . . . . . . . . .
Getting a list of objects with text in Query for iSeries . . . . . .
Defining a Query for iSeries query . . . . . . . . . . . . .
Defining a collating sequence in Query for iSeries . . . . . . .
Getting a list of formats or members with text in Query for iSeries .
Saving a Query for iSeries query definition. . . . . . . . . .
iSeries
. . .
. . .
. . .
. . .
. . .
. . .
. . .
. . .
. . .
. . .
. . .
.
.
.
.
.
.
.
.
.
.
.
.
.
.
.
.
.
.
.
.
.
.
.
.
.
.
.
.
.
.
.
.
.
.
.
.
.
.
.
.
.
.
.
.
.
.
.
.
.
.
.
.
.
.
.
.
.
.
.
.
.
.
.
.
.
.
.
.
.
.
.
.
.
.
.
.
.
.
.
.
.
.
.
.
.
.
.
.
.
.
.
.
.
.
.
.
.
.
.
.
.
.
.
.
.
.
.
.
245
247
248
249
249
249
250
250
250
250
251
251
Contents
vii
Running a Query for iSeries query . . . . . . . . . . . .
Running a default query in Query for iSeries . . . . . . . .
Selecting records at run time in Query for iSeries . . . . . .
CCSIDs and Query for iSeries query definition items . . . . . .
CCSID and file selections in Query for iSeries . . . . . . .
CCSID and join tests in Query for iSeries . . . . . . . . .
CCSID and result field expressions in Query for iSeries . . . .
CCSID and result field column headings in Query for iSeries . .
CCSID and sort fields in Query for iSeries . . . . . . . . .
CCSID and record selection tests in Query for iSeries . . . .
CCSID and summary functions in Query for iSeries . . . . .
CCSID and column formatting and editing in Query for iSeries .
CCSID and report breaks in Query for iSeries . . . . . . .
CCSID and break and final text in Query for iSeries . . . . .
CCSID and cover page, page headings and footings in Query for
CCSID compatibility considerations in Query for iSeries . . . . .
. . .
. . .
. . .
. . .
. . .
. . .
. . .
. . .
. . .
. . .
. . .
. . .
. . .
. . .
iSeries
. . .
.
.
.
.
.
.
.
.
.
.
.
.
.
.
.
.
.
.
.
.
.
.
.
.
.
.
.
.
.
.
.
.
.
.
.
.
.
.
.
.
.
.
.
.
.
.
.
.
.
.
.
.
.
.
.
.
.
.
.
.
.
.
.
.
.
.
.
.
.
.
.
.
.
.
.
.
.
.
.
.
.
.
.
.
.
.
.
.
.
.
.
.
.
.
.
.
.
.
.
.
.
.
.
.
.
.
.
.
.
.
.
.
.
.
.
.
.
.
.
.
.
.
.
.
.
.
.
.
.
.
.
.
.
.
.
.
.
.
.
.
.
.
.
.
.
.
.
.
.
.
.
.
.
.
.
.
.
.
.
.
251
251
251
252
252
252
252
253
253
253
253
253
253
253
253
254
Bibliography . . . . . . . . . . . . . . . . . . . . . . . . . . . . . . . . . 259
Notices . . . . . . . . . . . . . . . . . . . . . . . . . . . . . . . . . . . 261
Trademarks . . . . . . . . . . . . . . . . . . . . . . . . . . . . . . . . . . 262
Index . . . . . . . . . . . . . . . . . . . . . . . . . . . . . . . . . . . . 263
viii
Query for iSeries Use V5R2
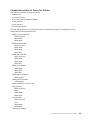
About Query for iSeries Use
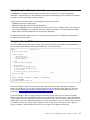
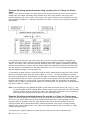
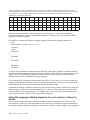
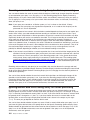
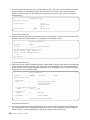
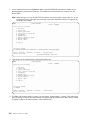
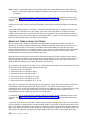
Query for iSeries is a decision support utility you can use to obtain information from the DB2 UDB for
iSeries. This book describes how to use Query for iSeries to select, arrange, and analyze information
stored in one or more database files to produce reports and other data files.
You may need to refer to other IBM books for more specific information about a particular topic.
For a list of publications related to this book, see the “Bibliography”.
Who should read the Query for iSeries Use book
This book is intended for people creating query reports and managing data on the iSeries system.
Before you use this book, you must be familiar with the introductory material for using the iSeries system.
You do not have to understand how to use a high-level programming language to use Query for iSeries.
© Copyright IBM Corp. 2000, 2002
ix
x
Query for iSeries Use V5R2
Part 1. Introduction to Query for iSeries
Chapter 1. What is Query for iSeries? . . . . . . . . . . .
Query for iSeries fundamentals . . . . . . . . . . . . . . .
Files, fields, and record formats in Query for iSeries . . . . . .
Double-byte character set (DBCS) fields in Query for iSeries . .
UCS2 level 1 character set support in Query for iSeries . . . .
Data definition languages and utilities support in Query for iSeries
Query for iSeries definitions . . . . . . . . . . . . . . .
Libraries in Query for iSeries . . . . . . . . . . . . . . .
Major functions of Query for iSeries . . . . . . . . . . . . .
.
.
.
.
.
.
.
.
.
.
.
.
.
.
.
.
.
.
.
.
.
.
.
.
.
.
.
Chapter 2. General operating information for Query for iSeries . . . . . . . . . . . .
Practicing with Query for iSeries . . . . . . . . . . . . . . . . . . . . . . . . .
Getting started with Query for iSeries . . . . . . . . . . . . . . . . . . . . . . .
When you are finished working with Query for iSeries . . . . . . . . . . . . . . . .
Telling Query for iSeries what you want . . . . . . . . . . . . . . . . . . . . . . .
Using prompts and default values in Query for iSeries . . . . . . . . . . . . . . . .
Using Query for iSeries function keys . . . . . . . . . . . . . . . . . . . . . .
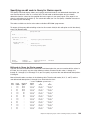
Checking the results before printing the Query for iSeries report. . . . . . . . . . . .
Printing what you see on your Query for iSeries display . . . . . . . . . . . . . . .
Using lists in Query for iSeries . . . . . . . . . . . . . . . . . . . . . . . . .
Displaying a Query for iSeries list . . . . . . . . . . . . . . . . . . . . . . .
Selecting items in a Query for iSeries list . . . . . . . . . . . . . . . . . . . .
Special library names in Query for iSeries . . . . . . . . . . . . . . . . . . .
Using Query for iSeries commands . . . . . . . . . . . . . . . . . . . . . . . .
Using the Query Utilities menu. . . . . . . . . . . . . . . . . . . . . . . . . .
Using the Work with Queries display . . . . . . . . . . . . . . . . . . . . . . .
Choosing a single Query for iSeries task . . . . . . . . . . . . . . . . . . . . .
Specifying a Query for iSeries query and its library . . . . . . . . . . . . . . . .
Choosing multiple Query for iSeries tasks . . . . . . . . . . . . . . . . . . . .
Working with a list of Query for iSeries queries . . . . . . . . . . . . . . . . . .
Selecting a Query for iSeries query name from a list . . . . . . . . . . . . . . .
Using Query for iSeries list subsets . . . . . . . . . . . . . . . . . . . . . .
Positioning a list of Query for iSeries queries . . . . . . . . . . . . . . . . . .
Using F11 to display additional information about Query for iSeries queries . . . . . . .
Selecting a library for your Query for iSeries queries . . . . . . . . . . . . . . . .
Other considerations when you are trying to locate or use a particular Query for iSeries query
Displaying the format of constants in Query for iSeries . . . . . . . . . . . . . . . . .
Query for iSeries profile information . . . . . . . . . . . . . . . . . . . . . . . .
Handling Query for iSeries messages and errors . . . . . . . . . . . . . . . . . . .
Changing your Query for iSeries queries . . . . . . . . . . . . . . . . . . . . .
.
.
.
.
.
.
.
.
.
.
.
. 7
. 7
. 7
. 7
. 7
. 7
. 8
. 8
. 9
. 9
. 9
. 10
. 10
. 11
. 11
. 12
. 12
. 13
. 13
. 14
. 14
. 14
. 15
. 15
. 16
17
. 17
. 18
. 18
. 18
© Copyright IBM Corp. 2000, 2002
.
.
.
.
.
.
.
.
.
.
.
.
.
.
.
.
.
.
.
.
.
.
.
.
.
.
.
.
.
.
.
.
.
.
.
.
.
.
.
.
.
.
.
.
.
.
.
.
.
.
.
.
.
.
.
.
.
.
.
.
.
.
.
.
.
.
.
.
.
.
.
.
.
.
.
.
.
.
.
.
.
.
.
.
.
.
.
.
.
.
.
.
.
.
.
.
.
.
.
.
.
.
.
.
.
.
.
.
3
3
3
4
4
4
5
5
5
1
2
Query for iSeries Use V5R2
Chapter 1. What is Query for iSeries?
Query for iSeries is an IBM® licensed program and a decision support utility that can be used to obtain
information from the DB2 Universal Database for iSeries database. It can obtain information from any
database files that have been defined on the system using Operating System/400 (OS/400®) data
description specifications (DDS), the OS/400 interactive data definition utility (IDDU), or DB2 UDB for
iSeries Structured Query Language (SQL).
You use Query to select, arrange, and analyze information (data) stored in one or more database files to
produce reports and other data files. You can create your own query definitions and then run them, you
can run existing queries that you did not create, or you can even run a default query against a particular
database file (using an unnamed query). You determine what data the query is to retrieve, the format of
the report, and whether it should be displayed, printed, or sent to another database file.
You can use Query to obtain information from a single file or a combined set of up to 32 files. You can
select all the fields, or a few of the fields and organize them as you want them to appear in the type of
output chosen. You can have all records in the files included in the output, or you can select only a few to
be included, using record selection tests. These and other functions are described in detail later.
| This chapter begins by introducing basic information about Query, and then it introduces all the major
| tasks (such as creating, displaying, or running query) that can be done using Query.
Query for iSeries fundamentals
Several elements on your system organize and store information, or data, so that you and other system
users can work with it to get the results that you need. The following topics introduce those elements, tell
you about them and how they relate to you and Query, and direct you to other publications where you can
find more information.
Files, fields, and record formats in Query for iSeries
Information, or data, is organized and stored on your system in various forms, primarily in objects called
database files (usually referred to as just files). A file contains individual units of information, called
records, that each contain related pieces of data. Each piece of information in a record is called a field,
and how the fields are organized is defined in a record format (often just called a format).
When you run a query to produce a report, Query uses the files, fields, and record formats to get the
information you want from the database, in the form of records, and uses those records to produce a
query report.
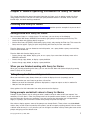
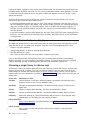
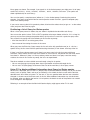
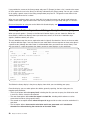
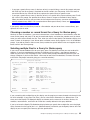
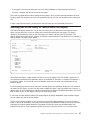
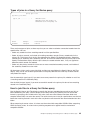
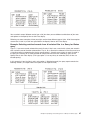
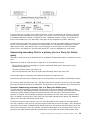
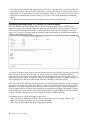
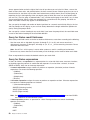
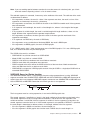
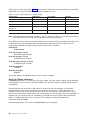
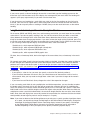
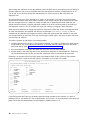
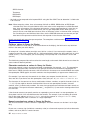
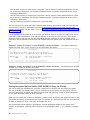
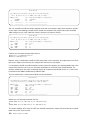
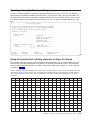
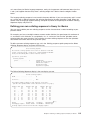
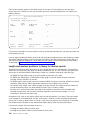
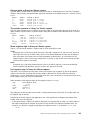
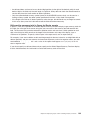
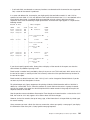
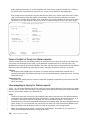
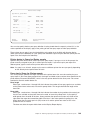
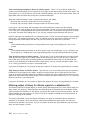
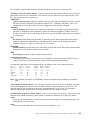
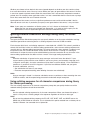
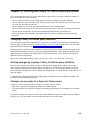
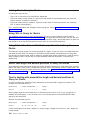
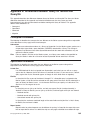
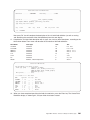
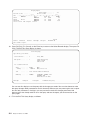
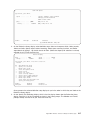
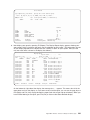
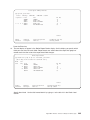
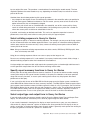
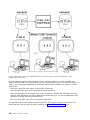
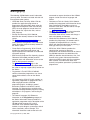
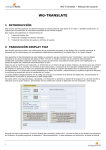
For example, an employee name and address file named NAMEADDR might contain a group of records that
identify one employee in each record (see Figure 1). Each record has several fields that contain the name
and address of an employee. The fields in each record might have names like NAME, STREETADDR, CITY,
STATE, and ZIPCODE. This order of the fields might be specified in a record format also named NAMEADDR.
NAME
STREETADDR
CITY
STATE ZIPCODE
Susan P Gantner
907 Abbey Hwy
Mushroom Manor
OR
67891
Perry C Swenson
19821 Metro Hwy.
St. Paul
OR
67891
Matt F Thomas
961 S 19th Ave
Piney Island
OR
67890
Figure 1. Three Records in NAMEADDR File (Using Record Format NAMEADDR)
© Copyright IBM Corp. 2000, 2002
3
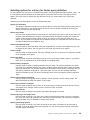
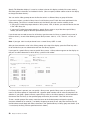
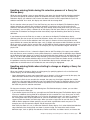
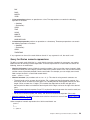
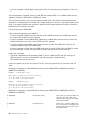
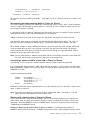
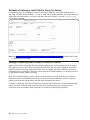
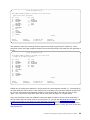
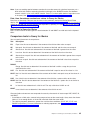
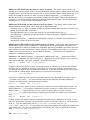
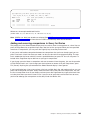
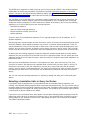
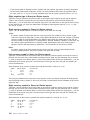
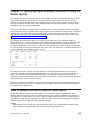
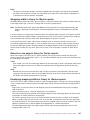
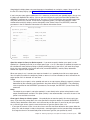
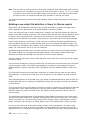
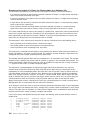
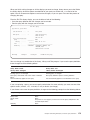
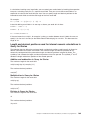
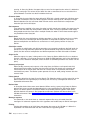
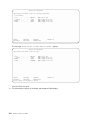
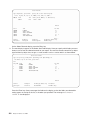
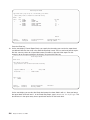
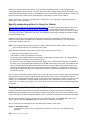
Another record format, named ZIPADDRESS, might be defined for a file that might be location-oriented and
contain only the ZIPCODE, STATE, CITY, and STREETADDR fields, in that order (see Figure 2).
ZIPCODE
STATE
CITY
STREETADDR
67891
OR
Mushroom Manor
907 Abbey Hwy
67891
OR
St. Paul
19821 Metro Hwy.
67890
OR
Piney Island
961 S 19th Ave
Figure 2. Three Records in NAMEADDR File (Using Record Format ZIPADDRESS)
Query retrieves the data you want from the files you choose. It uses certain fields (and record formats)
from those files to select, sort, calculate, and summarize that data in the form you want. It also produces
the query reports containing that data.
Double-byte character set (DBCS) fields in Query for iSeries
Some countries use pictographs or symbolic characters in their language. DBCS fields must be used for
such data. As a general rule, if your national language uses single-byte character set (SBCS) characters,
your files do not contain DBCS data. You can ignore any on-line help information that refers to DBCS data.
Notes:
1. To properly display DBCS data, you need a DBCS-capable display.
2. In Query, the following naming convention is used for DBCS data:
v Character data refers to both SBCS and DBCS character data.
v DBCS data refers to any type of DBCS data, including bracketed-DBCS and DBCS-graphic data
types.
v Bracketed DBCS refers to DBCS-open, DBCS-either, or DBCS-only data types.
UCS2 level 1 character set support in Query for iSeries
UCS2 Level 1 is a 16-bit encoding for graphic characters. When doing business in a worldwide
environment you need the ability to enter and process data from more than one national language. For
example, a list of customer names may contain German, Greek, English, and Thai characters that must be
printed or displayed on the same device at the same time.
Query for iSeries™ treats UCS2-graphic data the same as GRAPHIC or VARGRAPHIC data. A
UCS2-graphic field is a DBCS-graphic field tagged with a UCS2 CCSID.
The VARCHAR and VARGRAPHIC functions help you write queries that include UCS2 data.
Data definition languages and utilities support in Query for iSeries
Query can query data in files that are created using different data definition languages or products.
Although the description given above applies to all the files on your system, the names or concepts that
might be used depend on the programming language or product (like IDDU, DDS, and DB2 UDB for
iSeries) that is used to define the files.
|
|
|
|
|
|
|
|
|
If you are not a programmer and you want to create a file that you can query from Query, you may want to
use IDDU to create the file. If a programmer can create the file for you, he might use IDDU, DDS and
control language (CL), or the DB2 UDB for iSeries program to create the file. Consider the following:
v IDDU is a menu-driven utility used to define files, fields, and record formats, to store all those definitions
in a data dictionary, and to create the files so they can be used to store data. A file defined using IDDU
can have more than one format. For more information about IDDU, see the IDDU Use book.
v The data file utility (DFU) is used to add, change, and delete data in a database file. You can use DFU
directly, or you can use some of its function through the Enter data option of the IDDU Work with
Database Files display. For more information about DFU, see the ADTS/400: Data File Utility book.
4
Query for iSeries Use V5R2
| v CL and DDS use the same terms and descriptions as IDDU, but they provide additional support for files.
|
Using DDS and CL commands, you can define and create physical files and logical files to indicate how
|
fields are to be organized in files.
|
A physical file contains the fields of data, as records, but logical files do not. A physical file contains at
|
least one record format. The field order in a physical file determines the format of the records.
|
A logical file gives a different view of the data stored in one physical file or in several physical files. A
|
logical file does not contain data. That is, a logical file lets you see information in records that are stored
|
in physical files as though the records actually existed that way. This is accomplished without having to
|
duplicate and store that data on the system in that logical view (thus, the name logical file). A logical file
|
can use a subset of the fields in one physical file, a composite of all or some of the fields in several
|
physical files, or even a mixture of fields from physical and other logical files. Join logical files can have
|
only one record format, but nonjoin logical files can have more than one record format.
|
For more information about physical files, logical files, CL, and DDS, refer to the CL Programming
|
book.,
| v The DB2 UDB for iSeries program uses a relational model of data; that is, all data is perceived as
|
existing in tables. On the iSeries system, DB2 UDB for iSeries objects are created and maintained as
|
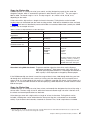
OS/400 objects. The following table shows the relationship between OS/400 terms and DB2 UDB for
|
iSeries relational database terms:
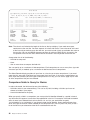
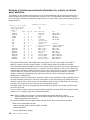
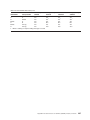
|| OS/400 Term
DB2 UDB for iSeries Term
|
|
|
|
|
|
|
|
Library
Collection. Consists of a library, journal, journal receiver, data dictionary, and DB2 UDB for
iSeries catalog. A collection groups related objects and allows the user to find the objects by
name.
Table. A set of columns and rows.
Row. The horizontal part of a table containing a serial collection of columns.
Column. The vertical part of a table of one data type.
View. A subset of columns and rows of one or more tables.
|
Query for iSeries definitions
Physical file
Record
Field
Logical file
You use a query to get information from database files to produce a report. The file or files that a query
uses to get the information and what is to be done with that information are defined and stored in a query
definition. A query definition is an object (with type *QRYDFN) and it contains all the details that Query
needs to find and use the files in the way you specify, and to produce the results that you expect.
To create a query definition, you follow a sequence of displays that guide you through the process of
defining and saving a query definition. Once you have defined your query (and even while you are defining
your query), you can run it (as a query) to produce the reports that you need.
Libraries in Query for iSeries
A library is a place on the system to store objects, including the query definitions and files that you use in
Query for iSeries. Therefore, when you are working with queries and files, you may need to specify the
library where a query or file is stored.
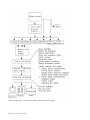
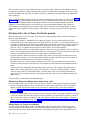
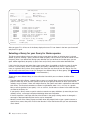
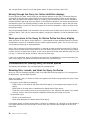
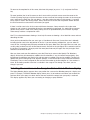
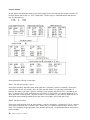
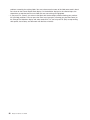
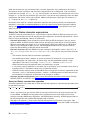
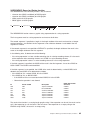
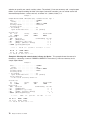
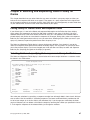
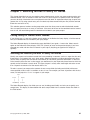
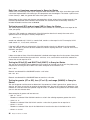
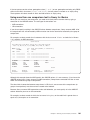
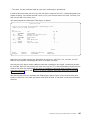
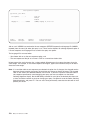
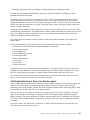
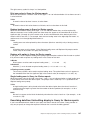
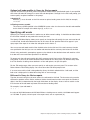
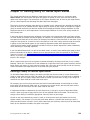
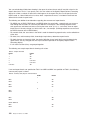
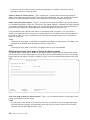
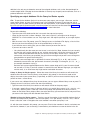
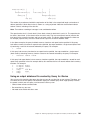
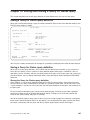
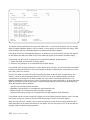
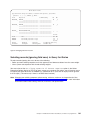
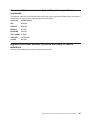
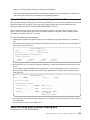
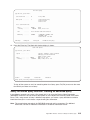
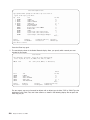
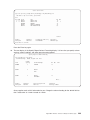
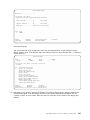
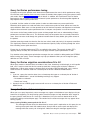
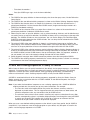
Major functions of Query for iSeries
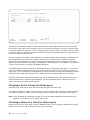
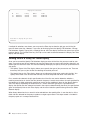
Two primary Query displays, the Query menu and the Work with Queries display, are the starting point for
the major tasks that you can do using Query. (See Figure 3 on page 6.) Another important display is the
Define the Query display, which starts all the tasks in a query definition.
| v The Query menu allows you to start working with queries, run a query, or delete a query. It also allows
you to start working with files.
|
| v The Work with Queries display allows you to do specific tasks with one or more queries. You can
create, change, display, copy, delete, or run a query, or print a query definition.
|
Chapter 1. What is Query for iSeries?
5
Figure 3. Major Tasks on the Query Menu and the Work with Queries Display
6
Query for iSeries Use V5R2
Chapter 2. General operating information for Query for iSeries
This chapter describes the general operating information for Query, such as getting started with Query,
using prompts and lists, how you can check your query definition before it is finished, how to use the
function keys, and error recovery procedures.
Practicing with Query for iSeries
Appendix B, “Practice exercise for Query for iSeries query”, provides practice examples that you can do in
order to quickly become familiar with Query.
Getting started with Query for iSeries
|
|
|
|
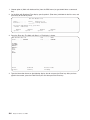
You can access Query in a variety of ways. To use Query, you can do any of the following:
v Use the Work With Query (WRKQRY) command by typing WRKQRY and pressing the Enter key. This
causes the Work with Queries display to appear.
v Use the Start Query (STRQRY) command by typing STRQRY and pressing the Enter key. This causes the
Query menu to appear. Typing GO QUERY and pressing the Enter key has the same effect.
From the Query menu, you can choose to work with queries, run a query, delete a query, work with files,
or do an office-related task.
From the Work with Queries display you can:
v Create, change, copy, delete, display, print, or run a query if you came from the Query menu or the
WRKQRY command.
| v Create, change, copy, delete, or display a query definition.
| v Create, change, copy, delete, or display a query definition.
When you are finished working with Query for iSeries
When you are finished working with Query, you can exit from the Work with Queries display by pressing
either F3 (Exit) or F12 (Cancel).
Telling Query for iSeries what you want
When you work with a query, Query shows you a series of displays that ask (or prompt) you for:
v What information you want Query to get from a file or files
v Whether you want the information printed or displayed as a report or output as data in another file
v How you want the report to look
Query gathers all of this information from what you enter on the displays.
Using prompts and default values in Query for iSeries
Prompts are the system’s way of asking you what it needs to know in order to fulfill your request. You
need only “fill in the blank.” Often, the prompt even lists the possible correct choices, so you only need to
type the choice that fits what you are doing. If you are not sure what information you are supposed to
supply at a prompt, you can move the cursor to the prompt and press the Help key.
Also, when a display appears, some of the prompts are already filled in. These values are called default
values—they are the values assumed by the system if you do not specify anything yourself. You can leave
a default value the way it is, or if you want, you can change it to another value by moving the cursor to the
prompt and typing over the default value.
© Copyright IBM Corp. 2000, 2002
7
Using Query for iSeries function keys
Function keys like Enter, Help, and Print can be used at any time with any query display. However, not all
the function keys (such as F3, F4, and F11) apply to all displays. Each display shows, at the bottom of the
display, which function keys are commonly used with that display (all the available keys may not be
shown). If you want to know how all the available keys work on a particular display, move the cursor to the
function key section of that display and press the Help key.
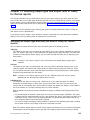
Checking the results before printing the Query for iSeries report
Function keys F5 (Report) and F13 (Layout) can be used to check the results of your work at many points
in the query definition process. That is, during query definition, you can use these keys to see if you are
getting the output results you expected. If so, you can continue on with confidence; if not, you can make
whatever changes are necessary to get what you want before you move on to the next definition step. In
some situations, looking at the layout may be more useful than looking at the report, and vice versa (for
example, F13 can be used when there is no data in a file that is used by the query).
Before printing a query report, remember the following:
v F5 (Report) uses all the information you have defined so far in this and previous definition steps to run
the query and display the results. The results are shown on the Display Report display in report form.
Note: If Query finds errors in numeric fields when your query is run, an error message might be
displayed or the field value might be shown in the output as plus signs (++++). Plus signs are
also used to indicate division by zero and overflow (when the overflow occurs as data is being
taken from the file). You can specify that Query ignore any numeric field errors—see “Ignoring
decimal data errors during Query for iSeries processing” on page 164 for more information.
Asterisks (*****) are shown if the field length and/or number of decimal positions was changed
on the Specify Report Column Formatting display to a size too small for the value to be shown.
When the query is run, if Query finds conversion errors either in the date, time, or timestamp
fields, or in character fields due to the coded character set identifier (CCSID), plus signs (++++)
are shown in the output. Plus signs are also shown if the data is not good or overflows.
Field, break text, minimum, maximum, average, and total values can be null and are represented by a
dash (-) on the display.
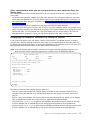
v F13 (Layout) uses all the information that you have defined so far to show the column heading and field
layout without actually running the report.
On the Display Report Layout display, Xs show SBCS character data and 9s show numeric data. The
current date, time, or timestamp shows where date, time, or timestamp data is.
If
v
v
v
floating-point fields are present:
9‘s and 0’s, followed by E +029, represent single-precision data.
9‘s and 0’s, followed by E +299, represent double-precision data.
You may also see 1.00 for a floating-point field if the data is smaller than the size selected by Query
(which is a length of four with two decimal positions).
If you are using a DBCS-capable display and if DBCS fields are present, you may see:
v Double-byte J’s, which represent DBCS-only data. DBCS-only fields contain only DBCS data.
v Double-byte O’s, which represent DBCS-open (mixed) data. DBCS-open (mixed) fields contain DBCS
data, SBCS data, or a mixture of both types of data.
v Double-byte E’s, which represent DBCS-either data. DBCS-either fields contain either all SBCS data or
all DBCS data, but not both in the same field.
v Double-byte G’s, which represent DBCS-graphic data. DBCS-graphic fields contain only DBCS-graphic
data.
8
Query for iSeries Use V5R2
DBCS characters take twice the amount of space of SBCS characters. In addition, a shift-out character
precedes DBCS data, and a shift-in character follows the data. The shift-out and shift-in characters are
called DBCS bracket characters. DBCS-graphic data is stored in the database without bracket characters;
however, the bracket characters are present when DBCS-graphic data is displayed or printed.
Although you must use a DBCS display to type or read data contained in DBCS fields, you do not need to
use a DBCS display to display the layout of a report that uses DBCS fields. However, the layout may not
be readable.
You can look at the displayed results and determine whether the spacing between columns, the length of
each field, and the column headings produce the results you want.
Note: The displayed report or report layout contains all the entries or changes that you have made this
far, including those typed just before you pressed F5 or F13.
Printing what you see on your Query for iSeries display
You can use the Print key to print a copy of what you see on any Query display at any time. You may find
this useful during query definition, for example, when you type many values in the fields on a display, such
as on the Define Result Fields display or on the Select Records display. The printed copy of the displayed
information is printed on the printer that is associated with your display station.
You can also use the Print key, when needed, to print the displayed output of the function keys F5
(Report) and F13 (Layout). However, only what is shown on the display is printed. If your report or layout
is wider than the display and you have not specified that line wrapping be used, the far right side of the
report is cut off and is not printed. In this case, you could use the shift function keys to move text lines to
the right and then press the Print key again to obtain a printout of the remainder (or possibly just more) of
the report.
Using lists in Query for iSeries
For many displays, Query provides lists of items that can be used to complete the prompts. Those items
might include:
v
v
v
v
v
Libraries you are authorized to use
Queries you are authorized to use
Files you are authorized to use
Record formats for a specified file
Members for a specified file
v Fields available for your query
v Translation tables
The lists eliminate the need to memorize names, and they also reduce the number of potential typing
errors.
Displaying a Query for iSeries list
You can obtain a list of an item (for example, a list of files or a list of libraries) by moving the cursor to the
prompt and pressing F4 (Prompt) so that the list appears. Note that you cannot display a list for just any
item on a display; the items for which lists are available are signified by a comment next to the prompt that
you can use F4 to obtain a list.
You could also obtain a particular subset of a list of items by typing a generic name or a special library
name in the prompt or prompts before you press F4. (For more information on special library names, see
“Special library names in Query for iSeries” on page 10.) Typing a generic name (such as ABC*) in a
prompt that allows generic names limits the items in the list by choosing only the items that begin with
those characters (ABC).
Chapter 2. General operating information for Query for iSeries
9
The number of items shown in the list part of the display varies, depending on what form the list is in and
the amount of space used by the prompt part of the display. Sometimes a new display will appear that
shows the list. If all items in a list do not fit on the display, you can use the page keys to page forward and
backward through the list.
Selecting items in a Query for iSeries list
You can select an item from a list by doing one of the following:
v Typing the name and an option number in the first position in the list.
v Selecting an item directly from the list by typing a number next to the name in the list. By selecting an
item directly from the list by typing a number next to it, you often can select more than one item and
thus save a lot of time and typing.
You may be able to display, from a list, a long comment about a file, a record format, a file member, or a
field. Long comments may provide extensive information about their content. If a long comment is defined
for a file, a record format, a file member, or a field, you can move the cursor to its name and press F23 to
display the long comment.
Note: If the field is a result field, the entire expression defining the result field is shown as a long
comment.
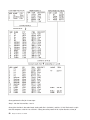
Special library names in Query for iSeries
You can specify any of the following special library names to search the associated libraries for query
definitions, files, or translation tables:
Special Library Name
Description
*CURLIB
The current library being used for your job. It is the only library searched. If no current
library is found, QGPL is searched.
*LIBL
All the libraries in the library list for your job. They are searched in the order they are
listed.
*USRLIBL
All the user libraries that are in the user part of the library list for your job. They are
searched in the order they are listed.
*ALLUSR
All the user libraries on the system that you have the authority to use and other libraries
that you have authority to use whose names begin with the letter Q. *ALLUSR does not
list certain System/36™ libraries that begin with the # character. The libraries are searched
in alphabetical order.
*ALL
All the libraries on the system that you have the authority to use. They are searched in
alphabetical order.
GENERIC*
All libraries starting with characters that precede an asterisk that you have authority to use
are searched. For example, you can specify STA* to search all libraries starting with STA.
If you specify *CURLIB in the Library prompt, Query changes it to the name of the library currently being
used in your job. That library name is displayed in place of *CURLIB.
Note: You can use only those libraries for which you have the necessary authority. If you specify a special
library name that contains libraries you do not have authority for, you will see queries in only those
libraries in that list for which you do have the authority.
10
Query for iSeries Use V5R2
Using Query for iSeries commands
A command is a statement used to request a function of the system. This means you need only
remember a command that is a few characters long instead of remembering all the individual instructions
or taking the time to go through a series of menus.
Query has four commands, which can be entered from any command line:
v STRQRY brings up the Query menu.
v WRKQRY brings up the Work with Queries display.
v Run Query (RUNQRY) runs an existing query, or you can use it to run a default query. This command
can also be embedded in CL programs so that you could, for example, run several queries overnight.
v Delete Query (DLTQRY) deletes one or several query definitions.
For detailed information about how you can use these commands, see the CL Reference information in
the iSeries Information Center.
Using the Query Utilities menu
The Query Utilities menu allows you to select Query tasks for working with queries, running queries that
have previously been defined, deleting query definitions, or working with files.
QUERY
Query Utilities
Select one of the following:
Query
1.
2.
3.
for iSeries
Work with queries
Run an existing query
Delete a query
SQL/400
10. Start SQL/400 Query Manager
Query
20.
21.
22.
23.
management
Work with query management forms
Work with query management queries
Start a query
Analyze a Query for iSeries definition
More...
Selection or command
===>
F3=EXIT F4=PROMPT F9=RETRIEVE F12=CANCEL
F16=OS/400 MAIN MENU
(C) COPYRIGHT IBM CORP. 1980, 1991.
F13=USER SUPPORT
If you select option 1 (Work with queries) and press the Enter key, the Work with Queries display is
shown. On that display, you can specify which query you want to work with and in what way. The tasks
that can be started using that display (including additional ways for running and deleting queries) are
introduced in “Using the Work with Queries display” on page 12.
If you select option 2 (Run an existing query) on the Query Utilities menu, you are shown the prompt
displays for the Run Query (RUNQRY) command. You can use this command to run a query and produce
a query report of the data selected from one or more database files. You can use this command to run an
existing query (one that is defined and stored by name on the system) or to run a “default” query (one that
is unnamed and that uses mostly system-supplied values). If you do not know the name of a query or
library, use option 1 (Work with queries) so that you can get a list of queries and libraries.
Chapter 2. General operating information for Query for iSeries
11
If you select option 3 (Delete a query) on the Query Utilities menu, you are shown the prompt display for
the Delete Query (DLTQRY) command. You can use this command to delete a query definition. If you do
not know the name of a query or library, use option 1 (Work with queries) so that you can get a list of
queries and libraries.
There are other tasks that you can do that are not part of Query but may be related to it or may be
convenient to get to from the Query Utilities menu:
v If you select option 30 to work with files, the Files (FILE) menu is displayed. From that menu, you can
do a file-related task (display, copy, delete, save, restore, or edit) or you can use a different file-related
utility such as IDDU or DFU, or a licensed program, such as the DB2 UDB for iSeries program. For
example, you can use IDDU to define and create files, and you can use either IDDU or DFU to type
data into the files.
v If you select option 31 to do an office-related task, the Office Tasks (OFCTSK) menu is displayed. From
that menu, you can choose to work with documents or folders, with office security, or with OfficeVision
or Client Access.
Using the Work with Queries display
The Work with Queries display is the major starting point for working with one or more queries at a time.
Using this display, you can select (and, therefore, start) one or more of the following primary tasks:
| v Create a new query definition.
| v Change, copy, display, or delete an existing query definition.
| v Print the definition of a query.
| v Run a query to select data from files and produce a report using that data.
Part 2 of this book describes these primary Query tasks. Creating query definitions is described in
Chapters 3 through 14, running queries is described in Chapter 15, and the remaining tasks (changing,
copying, displaying, printing, and deleting query definitions) are described in Chapter 16.
Choosing a single Query for iSeries task
To work with a query, you need to determine which query you want to work with, and you need to select
the task you want to do. To select a task, you can type the number of the task you want to do in the
Option prompt on the Work with Queries display, or if a list of query names is shown, you can type the
number of the task in the Opt column (as shown in Figure 4 on page 13). These are the tasks that you can
choose from:
Query Task
Description of Task
1=Create
Creates (defines) a new query. When this option is processed, the Define the Query
display is shown so you can start defining a query.
2=Change
Changes an existing query definition. The Define the Query display is shown for this
option also.
3=Copy
Copies an existing query definition. The Copy Queries display is shown.
4=Delete
Deletes an existing query definition. The Confirm Delete of Queries display is shown.
5=Display
Shows the definition of a query without being able to change it. (To change the query,
choose option 2.) The Define the Query display is shown.
|
|
6=Print definition
Prints a query definition. For more information, see “Printing a Query for iSeries query
definition” on page 180.
|
|
8=Run in batch
Runs a query in batch, reducing the resource drain caused by running the query
interactively.
12
Query for iSeries Use V5R2
| 9=Run
|
|
Runs a query. Query displays a report, prints a report, or puts the data into a database
file, depending on what is specified in the query definition. For information about running
queries, see Chapter 15.
Specifying a Query for iSeries query and its library
To identify the query you want to work with, you can type the name of the query (in the Query prompt) and
the name of the library (in the Library prompt) in which it is to be stored (or is already stored). Or you can
look at a list of query names or library names and then select the name you want— see “Choosing
multiple Query for iSeries tasks”.
If you specify the name of a query, Query assumes that it already exists and searches for it in the library
specified in the Library prompt. If you specified a special library name (such as *LIBL) or a generic library
name (such as ABC*), the first query found with the name you specified is used; libraries are searched in
alphabetical order (except for *LIBL and *USRLIBL).
If you are creating a query, you do not need to name it unless you want to save it for later use. For more
information on creating queries, see Chapter 3, “Creating a Query for iSeries query definition”.
Choosing multiple Query for iSeries tasks
If you position the cursor on the Query prompt and press F4 (Prompt) to show a list, the list contains the
names of all the queries that are in the library (or libraries) indicated by the Library prompt. Only the
queries and libraries for which you have the necessary authority are shown. The following display shows
some sample query names.
Work with Queries
Library . . . . . . . .
Subset . . . . . . . .
Position to . . . . . .
QGPL
__________
__________
Name, *LIBL, F4 for list
Name, generic*
Starting character(s)
Type options (and Query), press Enter.
1=Create 2=Change 3=Copy 4=Delete
8=Run in batch 9=Run
Opt Query
_ __________
_ ACCTPAYFEB
_ ACCTPAYMAR
_ ACCTRECFEB
_ ACCTRECMAR
_ INTFEB
_ INTMAR
_ INVFEB
_ INVMAR
_ PAYROLLFEB
F3=Exit
F12=Cancel
5=Display
6=Print
Opt Query
_
PAYROLLMAR
F4=Prompt
F19=Next group
F5=Refresh
F11=Display text
Figure 4. Work with Queries Display (Multiple-Column List)
|
|
|
|
|
You can type any option number (except a 1) beside the name of each query that you want to select from
the list. If selecting multiple queries, you can select and mix the options according to the types of work you
need to do. For example, if you need to run a query, delete another query, and copy a third query, you can
page through the list looking for the query names and select all three options on this display at one time.
You can also type an option number (including 1) and a query name in the top position of the list as well.
Chapter 2. General operating information for Query for iSeries
13
You can select as many as 30 queries from the list, as well as type a query name and option in the first
list position of this display. Query processes the requests in the order that they appear in the list, starting
first with the option and query that you typed in the first list position (in the input fields of the Option and
Query columns).
When you select multiple options and the list contains multiple columns of names only (such as in Figure 4
on page 13), the processing order of the columns is top to bottom and left to right. That is, Query
processes all the selected queries in the leftmost column first, then the second column, and so on.
(However, if the selected options include queries that are to be copied or deleted, Copy Queries or
Confirm Delete of Queries displays are shown when the first query with one of those options is found.
Then Query groups together all others with the same option, by library, for you to verify what you want
done.)
Working with a list of Query for iSeries queries
When you work with a list (in this case, a list of queries), Query provides several functions to help you.
Here are some possibilities:
v To see all the queries in a different library or group of libraries, you can press the Enter key after
changing the value in the Library prompt and typing blanks or an asterisk (*) in the Subset prompt. You
are shown all the queries that you have the authority to use that exist in that library or group of libraries.
(You indicate which libraries are to be checked by specifying a library name, a special library name
[such as *LIBL], or a generic library name [in the form of ABC*] in the Library prompt.)
v To see a particular subset (a smaller group) of query names, you can type a generic name (in the form
of ABC*) in the Subset prompt and press the Enter key. If you know at least the starting characters in the
name you are looking for, this function can reduce the time needed to locate it.
v To see if more than one library contains a specific query name, you can type that query name in the
Subset prompt and type *ALL in the Library prompt before you press the Enter key. You are shown all
the queries by that name for which you have the authority to use.
v To position the list to a specific name, type the name (or the starting characters in the name) in the
Position to prompt and press the Enter key. This function can also reduce the time needed to locate a
name.
v You can also use a combination of these things at the same time. For example, you could specify a
different library name, generic library name, or special library name in the Library prompt, a subset
value (of query names) in the Subset prompt, a specific query name or the starting characters of a
query name in the Position to prompt, and then press the Enter key to show the desired subset list of
query names.
These functions are described in the following topics.
Selecting a Query for iSeries query name from a list
If you are working with a list of queries, you can select a query by using one of the following methods:
v You can use the top position in the list to type the name of a query (and library name, if the Library
column is shown) you want to create or use. (To select an existing query, it must be available for
use—see “Other considerations when you are trying to locate or use a particular Query for iSeries
query” on page 17.)
If you are creating a query, you can check this list to see what names are already used before you type
a new name. Then, type the new name in the first list position (in its input field) and type a 1 next to it.
v You can work with a query (or queries) in the list by typing an option next to the query(s). (To select a
query, it must be available for use—see “Other considerations when you are trying to locate or use a
particular Query for iSeries query” on page 17.)
Using Query for iSeries list subsets
You can use the Subset prompt to see a smaller group (subset) of query names. To do so, type the
starting characters (in the form of ABC*) that identify the group of queries that you want to display, and
press the Enter key. All the queries whose names start with those characters in the specified library or
14
Query for iSeries Use V5R2
library group are shown. For example, if you typed IN* in the Subset prompt, you might see a list of query
names like: INTEREST, INTFEB, INTMARCH, INVENTORY, INVFEB, INVMARCH, and so on. (The queries are
shown alphabetically for each library.)
You can also specify a complete name (without an *) in the Subset prompt. Continuing the previous
example, if you want to see which libraries contain queries named INVENTORY, type that complete query
name in the Subset prompt.
If you want to return to the full list previously shown, blank out the subset value (or type an * as the subset
value) and press the Enter key again.
Positioning a list of Query for iSeries queries
When a list of query names is shown, they are shown in alphabetical order within each library.
You can use the special values *TOP or *BOT to position to the top or bottom of the list. If it is a long list,
you may want to move (change the position within) the list so that it starts with a particular query name.
You can do this by typing one of the following in the Position to prompt:
v All of the characters in an existing query name
v One or more of the starting characters in the name
When you press the Enter key, Query moves the list so that the fully specified name (or, in a list for a
specific library, the first name with the specified starting characters) is now shown at the top of the list.
If there is no Library column present and if there is no query name in the list that starts with those
characters, Query moves the list to the name closest to, and in front of, the position that the name would
have been in. However, if there is a Library column present and there is no query name that exactly
matches the value in the Position to prompt, the list is not repositioned.
Two other methods are also available to move through a long list of queries:
v You can use the page up and page down keys to go forward or backward through the list.
v You can use F19 (Next group) to advance to the start of the next library’s list of query names.
Using F11 to display additional information about Query for iSeries queries
When a list is displayed, you can use F11 (Display text) to alternate between showing a list of just the item
names (such as queries, fields, and so on) and showing a list of both the item’s name and the text that
describes each item. When you press F11, the text—if any was specified when the item was created or
changed—is shown next to each item name in the list. Some additional information may also be shown;
for example, when you display the text for a list of queries, the date that each of the queries was created
or last changed is also displayed.
Following is an example of how the Work with Queries display might appear when F11 is used.
Chapter 2. General operating information for Query for iSeries
15
Work with Queries
Library . . . . . . . .
Subset . . . . . . . .
Position to . . . . . .
QGPL
__________
__________
Name, *LIBL, F4 for list
Name, generic*
Starting character(s)
Type options (and Query), press Enter.
1=Create 2=Change 3=Copy 4=Delete
8=Run in batch 9=Run
Opt Query
_ __________
_ ACCTPAYFEB
_ ACCTPAYMAR
_ ACCTRECFEB
_ ACCTRECMAR
_ INTFEB
_ INTMAR
_ INVFEB
_ INVMAR
_ PAYROLLFEB
F3=Exit
F12=Cancel
5=Display
6=Print
Text
Changed
Accounts payable for February
Accounts payable for March
Accounts receivable for February
Accounts receivable for March
Customer acct interest accumulated - Feb.
Customer acct interest accumulated - March
Ending inventory for February
Ending inventory for March
Total payroll, by day, for February
F4=Prompt
F5=Refresh
F19=Next group
02-29-88
03-31-88
02-29-88
03-31-88
02-29-88
03-31-88
02-29-88
03-31-88
02-29-88
More
F11=Display names only
After you press F11, all lists on all the Query displays that use F11 are shown in the form you chose until
you press F11 again.
Selecting a library for your Query for iSeries queries
The library name indicates where you want to store a new query or where an existing query is already
stored. (If you are creating a query, you do not need to specify a library name if you do not intend to save
the query.) Also, if you decide later during query definition that you do want to save the query, you are
given another opportunity to specify (a query name and) a library name at the end of definition time.
If this is the first time you are using Query, your current library is supplied as the library name. If you do
not have a current library, QGPL is used. When you specify a different library name, a special library
name, or a generic library name, Query supplies that name the next time you use this display. You can
use the same value each time, or you can change it to a different library or library group. (See “Query for
iSeries profile information” on page 18 for more information.)
To look at or use a different library, or a list of libraries from which you can choose, do either of the
following:
v Type the name of the library, a generic library name, or a special library name in the Library prompt and
press the Enter key. A list of all the queries in that library or group of libraries for which you have the
authority to use is shown. If there are multiple libraries, the queries are listed in alphabetical order within
each library. The libraries themselves are shown in alphabetical order if *ALL, *ALLUSR, or a generic
library name is specified. If you specify *LIBL or *USRLIBL, the libraries are shown in the order that they
are listed in the library list.
If you specify a library name or special value that contains no query definitions (or none that you have
authority to use), a message is displayed indicating there were no queries.
If the list of queries is not empty but one of the libraries in the group is being used or is damaged, a
message is displayed indicating that the list may be incomplete.
v Move the cursor to the Library prompt and either leave the prompt blank or type a generic name or a
special library name, then press F4 to list the libraries. A list of the libraries that you are authorized to
use is shown.
16
Query for iSeries Use V5R2
Other considerations when you are trying to locate or use a particular Query for
iSeries query
You should be aware of other considerations when you are trying to locate or use a particular query. To
use a query:
v You must have the authority needed to use the query definition. You may need to either ask the owner
of the query, the administrator, or security officer to give you the type of authority that is necessary. For
more information about the types of authority, see “Giving authority to others to your Query for iSeries
query” on page 168.
v You must have the authority needed to use the library containing the query definition.
v The query (or the library) must not be in use in such a way that it cannot be shared. For example, if the
owner is making changes to the definition of the query or if the system operator is saving the library that
contains the query, you may need to wait a short time before you can use the query. If the Text and
Changed columns are blank in a query list with the text displayed, the query is being used.
Displaying the format of constants in Query for iSeries
If you create or change a query and specify a date or time constant in an OS/400 format or a numeric
constant with a decimal separator, that format must match the format description or separator shown on
the Display Constants Format display. To check what OS/400 format or separator you must use, press F17
from either the Select Records display or the Define Result Fields display.
Note: If you are sending queries between countries that use the comma for a decimal separator, put a
blank after each comma separating arguments in a function, such as SUBSTR or VALUE.
Display Constants Format
Query . . . . . . :
Library . . . . :
QRY1
QGPL
Option . . . . . :
CCSID . . . . . . :
CHANGE
65535
Use an SAA format to enter a date or time constant, or
use the format described by the following values.
Use the decimal separator shown.
Query definition values
Date format . . . . :
Date separator . . :
Time format . . . . :
Time separator . . :
Decimal separator . :
*MDY
/
*HMS
:
.
Press Enter to continue.
F12=CANCEL
The Display Constants Format display appears when you:
v Change a query from the Work with Queries display and either at least one date or time constant is
specified in the query definition in an OS/400 format other than the date or time format specified for
your job.
v Display a query from the Work with Queries display and your job format for the date or time is different
from an OS/400 date or time format constant that is specified in the query definition.
v Use the run-time record selection option of the RUNQRY command and your job format for the date
or time is different from an OS/400 date or time format constant specified in the query definition.
v Use the run-time record selection option with the QRYRUN procedure and your job format for the date
or time is different from an OS/400 date or time format constant specified in the query definition.
Chapter 2. General operating information for Query for iSeries
17
v Change or display a query from the Work with Queries display or use the run-time record selection
option of the RUNQRY command, and the query was defined with a numeric constant and the decimal
separator saved with the query does not match your current decimal separator.
v Press F17 from the Select Records display.
v Press F17 from the Define Result Fields display.
OS/400 date formats are MDY, YMD, DMY, and JUL. The valid OS/400 time format is HHMMSS.
Query for iSeries profile information
Query creates and maintains a query profile for each user. The profile is automatically created the first
time you use the Query utility program, and its values are updated automatically whenever you specify
certain values or press certain keys. You do not have to worry about creating or changing this profile.
You may notice that some prompts on some of the displays are already filled in when the display is first
presented to you. These values may have been obtained from your profile, because Query uses it to make
your definition tasks easier by providing certain information at the appropriate time.
The values that are stored in your Query profile are:
v
v
v
v
The library you last used on the Work with Queries display
The library you last used to specify your first file selection on the Specify File Selections display
The library you last used to specify where database file output was to be stored
Your list column mode (whether displays are to show names and text or just names only)
v Your report/layout display width (80 or 132)
v The current collating sequence option
v Your collating sequence and coded character set identifier (CCSID)
v The collating sequence table and library name
Handling Query for iSeries messages and errors
You should not worry about making errors while working with Query. Query either prompts you for needed
input or issues an error message. You can correct your errors by responding to either of these. If you want
to obtain help for any message that Query issues to you, move the cursor to the message line and press
the Help key or F1.
Some of the things that may go wrong are:
v You specify a value that is not listed as a possible choice.
v You are not authorized to use a query, file, or table that you specified, or a file is currently being used.
v You change your mind after entering something.
Changing your Query for iSeries queries
Whether you change your mind about something you have already entered because it was a mistake or
because you thought of a better way to get what you want, you will find it is very easy to change things in
Query.
If you are still creating or changing your query, you can go back to previous displays by using F12. If you
press F12 on a display, all of the new entries or changes you made on that display are ignored. Pressing
F10 on a display keeps all of your new entries or changes and shows you the previous display. You can
also return to the Define the Query display and choose the option(s) that you want to change or add.
If you define and save the query before you notice that the results are not what you want, just choose
option 2 (Change) on the Work with Queries display and change the query. When changing a query, you
18
Query for iSeries Use V5R2
select only the option(s) that need to be changed and then, when you are shown the appropriate display,
you need only type the new choices or change the incorrect ones. Everything else you defined earlier
remains defined; you do not have to redefine the whole query.
If you just want to quit, press F3 (Exit) to go to the Exit This Query display. On the Exit This Query display,
indicate whether you want to save or run the query (or do both), and then press the Enter key. Afterwards,
if you have not selected other options, the Work with Queries display appears. Press F3 to exit Query.
Chapter 2. General operating information for Query for iSeries
19
20
Query for iSeries Use V5R2
Part 2. Defining and using Query for iSeries query definitions
Chapter 3. Creating a Query for iSeries query definition . . . . .
Starting Query for iSeries query definition . . . . . . . . . . .
Selecting definition steps when defining a Query for iSeries query . .
Selecting options for a Query for iSeries query definition . . . . .
Moving through the Query for iSeries definition displays . . . . .
When you return to the Query for iSeries Define the Query display .
Considerations for creating Query for iSeries queries . . . . . . .
Selecting files, records, and fields for Query for iSeries . . . . .
Suggested sequence of tasks for creating Query for iSeries queries .
.
.
.
.
.
.
.
.
.
.
.
.
.
.
.
.
.
.
.
.
.
.
.
.
.
.
.
.
.
.
.
.
.
.
.
.
.
.
.
.
.
.
.
.
.
27
27
28
29
30
30
30
30
31
Chapter 4. Specifying and selecting files for a Query for iSeries query . . . . . . .
Specifying file selections for a Query for iSeries query . . . . . . . . . . . . . . .
Choosing a file for a Query for iSeries query . . . . . . . . . . . . . . . . .
Choosing a library for a Query for iSeries query . . . . . . . . . . . . . . . .
Choosing a member or record format for a Query for iSeries query . . . . . . . . .
Selecting multiple files for a Query for iSeries query. . . . . . . . . . . . . . .
Using file IDs for a Query for iSeries query . . . . . . . . . . . . . . . . .
Confirming your options for a Query for iSeries query . . . . . . . . . . . . . .
Removing a option for a Query for iSeries query . . . . . . . . . . . . . . .
Handling errors on the Query for iSeries Specify File Selections display . . . . . . .
Selecting files on the Query for iSeries Select File display . . . . . . . . . . . . .
Selecting file members on the Query for iSeries Select Member display . . . . . . . .
Selecting record formats on the Query for iSeries Select Record Format display . . . . .
Displaying all files selected on the Query for iSeries Display File Selections display . . . .
Joining files in a Query for iSeries query . . . . . . . . . . . . . . . . . . . .
Types of joins in a Query for iSeries query . . . . . . . . . . . . . . . . . .
How to join files in a Query for iSeries query . . . . . . . . . . . . . . . . .
Rules for joining files in a Query for iSeries query . . . . . . . . . . . . . . .
Examples of joining files in a Query for iSeries query . . . . . . . . . . . . . .
Example: Selecting matched records from all selected files in a Query for iSeries query
Example: Selecting matched records using a primary file in a Query for iSeries query .
Example: Selecting unmatched primary file records in a Query for iSeries query . . .
Sequencing secondary files for a primary join in a Query for iSeries query . . . . . .
Example: Sequencing secondary files in a Query for iSeries query . . . . . . . .
Displaying all join tests in a Query for iSeries query . . . . . . . . . . . . . . . .
Handling missing fields in a Query for iSeries query . . . . . . . . . . . . . . . .
Handling missing fields during file selection process of a Query for iSeries query . . . .
Handling missing fields when starting to change or display a Query for iSeries query . .
.
.
.
.
.
.
.
.
.
.
.
.
.
.
.
.
.
.
.
.
.
.
.
.
.
.
.
.
.
.
.
.
.
.
.
.
.
.
.
.
.
.
.
.
.
.
.
.
.
.
.
.
.
.
.
.
.
.
.
.
.
.
.
.
.
.
.
.
.
.
.
.
.
.
.
.
.
.
.
.
.
.
.
.
.
.
.
.
.
.
.
.
.
.
.
.
.
.
.
.
.
.
.
.
.
.
.
.
.
.
.
.
33
33
34
34
35
35
36
36
36
36
37
39
40
41
42
43
43
44
46
47
48
48
49
49
53
54
55
55
Chapter 5. Defining result fields in Query for iSeries . .
Creating results fields in Query for iSeries . . . . . . .
Query for iSeries result field name . . . . . . . . .
Query for iSeries expressions . . . . . . . . . . .
Query for iSeries numeric expressions. . . . . . . .
Query for iSeries character expressions . . . . . . .
Query for iSeries concatenation operation . . . . .
Query for iSeries character functions . . . . . . . .
SUBSTR Query for iSeries function . . . . . . . .
DIGITS Query for iSeries function . . . . . . . .
VALUE Query for iSeries function . . . . . . . .
VARCHAR Query for iSeries function . . . . . . .
VARGRAPHIC Query for iSeries function . . . . . .
Date, time, and timestamp expressions in Query for iSeries
.
.
.
.
.
.
.
.
.
.
.
.
.
.
.
.
.
.
.
.
.
.
.
.
.
.
.
.
.
.
.
.
.
.
.
.
.
.
.
.
.
.
.
.
.
.
.
.
.
.
.
.
.
.
.
.
57
57
58
58
59
60
60
61
61
62
62
63
65
66
© Copyright IBM Corp. 2000, 2002
.
.
.
.
.
.
.
.
.
.
.
.
.
.
.
.
.
.
.
.
.
.
.
.
.
.
.
.
.
.
.
.
.
.
.
.
.
.
.
.
.
.
.
.
.
.
.
.
.
.
.
.
.
.
.
.
.
.
.
.
.
.
.
.
.
.
.
.
.
.
.
.
.
.
.
.
.
.
.
.
.
.
.
.
.
.
.
.
.
.
.
.
.
.
.
.
.
.
.
.
.
.
.
.
.
.
.
.
.
.
.
.
.
.
.
.
.
.
.
.
.
.
.
.
.
.
.
.
.
.
.
.
.
.
.
.
.
.
.
.
.
.
.
.
.
.
.
.
.
.
.
.
.
.
.
.
.
.
.
.
.
.
.
.
.
.
.
.
.
.
.
.
.
.
.
.
.
.
.
.
.
.
.
.
.
.
.
.
.
.
.
.
.
.
.
.
.
.
.
.
.
.
.
.
.
.
.
.
.
.
.
.
.
.
.
.
.
.
.
.
.
.
.
.
.
.
.
.
.
.
.
21
Query for iSeries date . . . . . . . . . . . . . . . . . . . . .
Query for iSeries time . . . . . . . . . . . . . . . . . . . . .
Query for iSeries timestamp . . . . . . . . . . . . . . . . . .
Displaying constants format in Query for iSeries . . . . . . . . . . . .
Date, time, and timestamp arithmetic operations in Query for iSeries . . . . .
Date arithmetic operation in Query for iSeries . . . . . . . . . . . . .
Subtracting dates in Query for iSeries . . . . . . . . . . . . . . .
Incrementing and decrementing dates in Query for iSeries . . . . . . .
Converting a numeric field to a date field in Query for iSeries . . . . . .
Working with numeric dates in Query for iSeries . . . . . . . . . . .
Time arithmetic operation in Query for iSeries . . . . . . . . . . . . .
Incrementing and decrementing times in Query for iSeries . . . . . . .
Timestamp arithmetic operation in Query for iSeries . . . . . . . . . .
Durations in Query for iSeries . . . . . . . . . . . . . . . . . . .
Labeled duration in Query for iSeries . . . . . . . . . . . . . . .
Date duration in Query for iSeries . . . . . . . . . . . . . . . .
Time duration in Query for iSeries . . . . . . . . . . . . . . . .
Timestamp duration in Query for iSeries . . . . . . . . . . . . . .
Date, time, and timestamp functions in Query for iSeries . . . . . . . . . .
CHAR Query for iSeries function . . . . . . . . . . . . . . . . . .
DATE Query for iSeries function . . . . . . . . . . . . . . . . . .
DAY Query for iSeries function . . . . . . . . . . . . . . . . . .
DAYS Query for iSeries function . . . . . . . . . . . . . . . . . .
HOUR Query for iSeries function . . . . . . . . . . . . . . . . . .
MICROSECOND Query for iSeries function . . . . . . . . . . . . . .
MINUTE Query for iSeries function . . . . . . . . . . . . . . . . .
MONTH Query for iSeries function . . . . . . . . . . . . . . . . .
SECOND Query for iSeries function. . . . . . . . . . . . . . . . .
TIME Query for iSeries function . . . . . . . . . . . . . . . . . .
TIMESTAMP Query for iSeries function . . . . . . . . . . . . . . .
YEAR Query for iSeries function . . . . . . . . . . . . . . . . . .
Additional date, time, and timestamp functions in Query for iSeries . . . . .
Converting date formats in Query for iSeries . . . . . . . . . . . . . .
Converting date for output to a database file in Query for iSeries . . . . . .
Converting date for output to a display or printer in Query for iSeries . . . .
Example 1—Converting from MMDDYY to YYDDD format in Query for iSeries
Example 2—Converting from MMDDYY to YYDDD format in Query for iSeries
Example 3—Converting from YYDDD to MMDDYY format in Query for iSeries
Example 4—Converting from MMDDYY to YYDD format in Query for iSeries
General considerations when creating an expression in Query for iSeries . . . .
Column headings in Query for iSeries . . . . . . . . . . . . . . . . .
Length and decimal positions in Query for iSeries . . . . . . . . . . . .
Example of defining a result field in Query for iSeries . . . . . . . . . .
Adding or removing result fields in Query for iSeries . . . . . . . . . . .
.
.
.
.
.
.
.
.
.
.
.
.
.
.
.
.
.
.
.
.
.
.
.
.
.
.
.
.
.
.
.
.
.
.
.
.
.
.
.
.
.
.
.
.
.
.
.
.
.
.
.
.
.
.
.
.
.
.
.
.
.
.
.
.
.
.
.
.
.
.
.
.
.
.
.
.
.
.
.
.
.
.
.
.
.
.
.
.
.
.
.
.
.
.
.
.
.
.
.
.
.
.
.
.
.
.
.
.
.
.
.
.
.
.
.
.
.
.
.
.
.
.
.
.
.
.
.
.
.
.
.
.
.
.
.
.
.
.
.
.
.
.
.
.
.
.
.
.
.
.
.
.
.
.
.
.
.
.
.
.
.
.
.
.
.
.
.
.
.
.
.
.
.
.
.
.
.
.
.
.
.
.
.
.
.
.
.
.
.
.
.
.
.
.
.
.
.
.
.
.
.
.
.
.
.
.
.
.
.
.
.
.
.
.
.
.
.
.
.
.
.
.
.
.
.
.
.
.
.
.
.
.
.
.
.
.
.
.
.
.
.
.
.
.
.
.
.
.
.
.
.
.
.
.
.
.
.
.
.
.
.
.
.
.
.
.
.
.
.
.
.
.
.
.
.
.
.
.
.
.
.
.
.
.
.
.
.
.
.
.
.
.
.
.
.
.
.
.
.
.
.
.
.
.
.
.
.
.
.
.
.
.
.
.
.
.
.
.
.
.
.
.
.
.
.
.
.
.
.
.
.
.
.
.
.
.
.
.
.
.
.
.
.
.
.
.
.
.
.
.
.
.
67
67
68
69
69
70
70
71
71
71
73
73
73
73
73
73
73
74
74
74
75
75
76
76
77
77
78
78
79
79
80
80
80
80
81
81
81
82
82
83
85
85
86
86
Chapter 6. Selecting and sequencing fields in Query for iSeries . . . . . . . . . . . . . . 87
Letting Query for iSeries select and sequence fields. . . . . . . . . . . . . . . . . . . . 87
Selecting fields and specifying their sequence in Query for iSeries . . . . . . . . . . . . . . 87
Chapter 7. Selecting records in Query for iSeries .
Letting Query for iSeries select records . . . . . .
Selecting the records you want in Query for iSeries . .
Comparison fields in Query for iSeries . . . . . .
Comparison values in Query for iSeries . . . . .
Fields as values in Query for iSeries . . . . .
Character constants as values in Query for iSeries
22
Query for iSeries Use V5R2
.
.
.
.
.
.
.
.
.
.
.
.
.
.
.
.
.
.
.
.
.
.
.
.
.
.
.
.
.
.
.
.
.
.
.
.
.
.
.
.
.
.
.
.
.
.
.
.
.
.
.
.
.
.
.
.
.
.
.
.
.
.
.
.
.
.
.
.
.
.
.
.
.
.
.
.
.
.
.
.
.
.
.
.
.
.
.
.
.
.
.
.
.
.
.
.
.
.
.
.
.
.
.
.
.
.
.
.
.
.
.
.
.
.
.
.
.
.
.
.
.
.
.
.
.
.
91
91
91
92
93
94
94
Numeric constants as values in Query for iSeries. . . . . . . . . . . . . . . .
Date, time, timestamp constants as values in Query for iSeries . . . . . . . . . .
Null values in Query for iSeries . . . . . . . . . . . . . . . . . . . . . .
Comparison tests in Query for iSeries . . . . . . . . . . . . . . . . . . . . .
Date, time, or timestamp comparisons in Query for iSeries . . . . . . . . . . . .
Testing for equal (EQ) and not equal (NE) in Query for iSeries . . . . . . . . . . .
Testing for IS Null (IS) and ISNOT Null (ISNOT) in Query for iSeries . . . . . . . .
Testing for greater (GT or GE), less (LT or LE), and range (RANGE) in Query for iSeries .
Testing for values in a list (LIST NLIST) in Query for iSeries . . . . . . . . . . . .
Testing for values that are similar (LIKE NLIKE) in Query for iSeries . . . . . . . . .
Testing for DBCS LIKE (like) and NLIKE (not like) in Query for iSeries . . . . . . . .
Using more than one comparison test in Query for iSeries . . . . . . . . . . . . .
Adding and removing comparisons in Query for iSeries . . . . . . . . . . . . . .
Chapter 8. Selecting sort fields in Query for iSeries . . .
Letting Query for iSeries determine the order of records for you
Selecting the sort fields you want to use in Query for iSeries .
Additional sort considerations in Query for iSeries . . . .
.
.
.
.
.
.
.
.
.
.
.
.
Chapter 9. Selecting a collating sequence in Query for iSeries . .
Letting Query for iSeries select a collating sequence . . . . . . .
Setting your default collating sequence in Query for iSeries. . . .
Purpose of a collating sequence in Query for iSeries . . . . . . .
Collating sequence and CCSIDs in Query for iSeries . . . . . .
How a collating sequence affects Query for iSeries. . . . . . . .
Selecting a Query for iSeries collating sequence . . . . . . . .
Using the hexadecimal collating sequence in Query for iSeries . .
Using the language collating sequence for your country in Query for
Defining your own collating sequence in Query for iSeries . . . .
Selecting a translation table in Query for iSeries. . . . . . . .
Selecting a system sort sequence in Query for iSeries . . . . .
.
.
.
.
.
.
.
.
.
.
.
.
.
.
.
. 94
. 95
. 95
. 95
. 96
. 96
. 96
. 96
. 97
. 98
. 99
. . . 101
. . . 103
.
.
.
.
.
.
.
.
.
.
.
.
.
.
.
.
.
.
.
.
.
.
.
.
.
.
.
.
.
.
.
.
.
.
.
.
.
.
.
.
105
105
105
108
. . .
. . .
. . .
. . .
. . .
. . .
. . .
. . .
iSeries
. . .
. . .
. . .
.
.
.
.
.
.
.
.
.
.
.
.
.
.
.
.
.
.
.
.
.
.
.
.
.
.
.
.
.
.
.
.
.
.
.
.
.
.
.
.
.
.
.
.
.
.
.
.
.
.
.
.
.
.
.
.
.
.
.
.
.
.
.
.
.
.
.
.
.
.
.
.
.
.
.
.
.
.
.
.
.
.
.
.
.
.
.
.
.
.
.
.
.
.
.
.
.
.
.
.
.
.
.
.
.
.
.
.
111
111
111
111
112
112
113
113
114
115
116
117
.
.
.
.
.
.
.
.
.
.
.
.
.
.
.
.
.
.
.
.
.
.
.
.
.
.
.
.
.
.
.
.
.
.
.
.
.
.
.
.
.
.
.
.
.
.
.
.
.
.
.
.
.
.
.
.
.
.
.
.
.
.
.
.
.
.
.
.
.
.
.
.
.
.
.
.
.
.
.
.
.
.
.
.
.
.
.
.
.
.
.
.
.
.
.
.
.
.
.
.
.
.
.
.
.
.
.
.
.
.
.
.
.
.
.
.
.
.
.
.
.
.
.
.
.
.
.
.
.
.
.
.
.
.
.
.
.
.
.
.
.
.
.
.
.
.
.
.
.
.
.
.
.
.
.
.
.
.
.
.
.
.
.
.
.
.
.
.
.
.
.
.
.
.
.
.
.
.
.
.
.
.
.
.
.
.
.
.
.
.
.
.
.
.
.
.
.
.
.
.
.
.
.
.
.
.
.
.
.
.
.
.
.
.
.
.
119
119
119
119
120
121
122
122
124
125
125
125
125
126
126
126
126
127
127
127
127
127
128
129
Chapter 10. Specifying report column formatting in Query for iSeries
Formatting the columns of the Query for iSeriesquery report . . . . .
Column spacing in Query for iSeries reports . . . . . . . . . .
Column headings in Query for iSeries reports. . . . . . . . . .
Length and decimal positions in Query for iSeries reports . . . . .
Omitting fields from a Query for iSeries report . . . . . . . . .
Editing numeric fields in Query for iSeries reports . . . . . . . . .
Defining numeric field editing in Query for iSeries reports . . . . .
Describing numeric field editing in Query for iSeries reports . . . .
Decimal point in Query for iSeries reports . . . . . . . . . .
Thousands separator in Query for iSeries reports . . . . . . .
Show negative sign in Query for iSeries reports . . . . . . . .
Left negative sign in Query for iSeries reports . . . . . . . .
Right negative sign in Query for iSeries reports . . . . . . . .
Show currency symbol in Query for iSeries reports. . . . . . .
Left currency symbol in Query for iSeries reports . . . . . . .
Right currency symbol in Query for iSeries reports . . . . . . .
Print zero value in Query for iSeries reports . . . . . . . . .
Replace leading zeros in Query for iSeries reports . . . . . . .
Replace with option in Query for iSeries reports . . . . . . . .
Single leading zero in Query for iSeries reports . . . . . . . .
Describing date/time field editing display in Query for iSeries reports .
Date/time separator in Query for iSeries reports . . . . . . . .
Specifying an edit code in Query for iSeries reports . . . . . . .
.
.
.
.
.
.
.
.
.
.
.
.
.
.
.
.
.
.
.
.
.
.
.
.
.
.
.
.
.
.
.
.
.
.
.
.
.
.
.
.
.
.
.
.
.
.
.
.
.
.
.
.
.
.
.
.
.
.
.
.
.
.
.
Part 2. Defining and using Query for iSeries query definitions
23
Edit code in Query for iSeries reports . . . . . . .
Optional edit code modifier in Query for iSeries reports .
Specifying edit words . . . . . . . . . . . . . .
Edit word in Query for iSeries reports . . . . . . .
Edit word for summary total in Query for iSeries reports .
.
.
.
.
.
.
.
.
.
.
.
.
.
.
.
.
.
.
.
.
.
.
.
.
.
.
.
.
.
.
.
.
.
.
.
.
.
.
.
.
129
131
131
131
133
Chapter 11. Specifying report summary functions in Query for iSeries reports
Types of summary functions in Query for iSeries reports . . . . . . . . . .
Summarizing columns in Query for iSeries reports . . . . . . . . . . . . .
Location of column summary values in Query for iSeries reports. . . . . . . .
.
.
.
.
.
.
.
.
.
.
.
.
.
.
.
.
.
.
.
.
.
.
.
.
.
.
.
.
135
135
137
137
Chapter 12. Defining Query for iSeries report breaks. .
Defining a Query for iSeries report break . . . . . . .
Defining report break formatting in Query for iSeries reports
Skip to new page in Query for iSeries reports . . . .
Suppress summaries in Query for iSeries reports . . .
Break text in Query for iSeries reports . . . . . . .
.
.
.
.
.
.
.
.
.
.
.
.
.
.
.
.
.
.
.
.
.
.
.
.
.
.
.
.
.
.
.
.
.
.
.
.
.
.
.
.
.
.
.
.
.
.
.
.
139
139
143
143
143
144
reports
. . .
. . .
. . .
. . .
. . .
. . .
. . .
. . .
. . .
. . .
. . .
. . .
. . .
. . .
. . .
. . .
. . .
. . .
. . .
. . .
. . .
. . .
.
.
.
.
.
.
.
.
.
.
.
.
.
.
.
.
.
.
.
.
.
.
.
.
.
.
.
.
.
.
.
.
.
.
.
.
.
.
.
.
.
.
.
.
.
.
.
.
.
.
.
.
.
.
.
.
.
.
.
.
.
.
.
.
.
.
.
.
.
.
.
.
.
.
.
.
.
.
.
.
.
.
.
.
.
.
.
.
.
.
.
.
.
.
.
.
.
.
.
.
.
.
.
.
.
.
.
.
.
.
.
.
.
.
.
.
.
.
.
.
.
.
.
.
.
.
.
.
.
.
.
.
.
.
.
.
.
.
.
.
.
.
.
.
.
.
.
.
.
.
.
.
.
.
.
.
.
.
.
.
.
145
145
146
146
147
147
147
148
149
149
150
150
150
150
150
152
153
154
155
156
157
160
161
Chapter 14. Specifying Query for iSeries processing options . . . . . . . . . . .
Purpose of Query for iSeries processing options . . . . . . . . . . . . . . . . .
Rounding numeric field values during Query for iSeries processing . . . . . . . . . . .
Ignoring decimal data errors during Query for iSeries processing . . . . . . . . . . .
Ignoring character substitution warnings during Query for iSeries processing . . . . . . .
Using collating sequence for all character comparisons during Query for iSeries processing
.
.
.
.
.
.
.
.
.
.
.
.
.
.
.
.
.
.
163
163
164
164
165
165
Chapter 15. Exiting and running a Query for iSeries query
Ending a Query for iSeries query definition . . . . . . .
Saving a Query for iSeries query definition. . . . . . .
Storing the Query for iSeries query definition . . . . .
Describing the Query for iSeries query definition . . .
Giving authority to others to your Query for iSeries query
Running a Query for iSeries query . . . . . . . . . . .
.
.
.
.
.
.
.
.
.
.
.
.
.
.
.
.
.
.
.
.
.
167
167
167
167
168
168
169
.
.
.
.
.
.
.
.
.
.
.
.
.
.
.
.
.
.
.
.
.
.
.
.
.
.
.
.
.
.
.
.
.
.
.
.
.
.
.
.
.
.
.
.
.
.
.
.
.
.
.
.
.
.
.
.
.
.
.
.
.
Chapter 13. Selecting output type and output form in Query for iSeries
Selecting the output type and form you want in Query for iSeries reports .
Form of output of Query for iSeries reports . . . . . . . . . . .
Line wrapping in Query for iSeries reports . . . . . . . . . . . .
Wrapping width in Query for iSeries reports . . . . . . . . . . .
Record on one page in Query for iSeries reports . . . . . . . . .
Displaying wrapping widths in Query for iSeries reports . . . . . . .
Defining output to the printer in Query for iSeries reports . . . . . .
Printer device in Query for iSeries reports . . . . . . . . . . .
Form size in Query for iSeries reports . . . . . . . . . . . .
Start line in Query for iSeries reports . . . . . . . . . . . . .
End line in Query for iSeries reports . . . . . . . . . . . . .
Line spacing in Query for iSeries reports . . . . . . . . . . .
Print definition in Query for iSeries reports . . . . . . . . . . .
Specifying spooled output overrides in Query for iSeries reports . . .
Defining the printout cover page of Query for iSeries reports . . . .
Defining the page headings and footings in Query for iSeries reports .
Defining output of Query for iSeries reports to a database file. . . . .
Using an existing output file definition in Query for iSeries reports . . .
Building a new output file definition in Query for iSeries reports . . . .
Specifying an output database file for Query for iSeries reports . . .
Summary-only output of a Query for iSeries report to a database file .
Using an output database file created by Query for iSeries . . . . . .
24
Query for iSeries Use V5R2
.
.
.
.
.
.
.
.
.
.
.
.
.
.
.
.
.
.
.
.
.
.
.
.
.
.
.
.
.
.
.
.
.
.
.
.
.
.
.
.
.
.
.
.
.
.
.
.
.
.
.
.
.
.
.
.
.
.
.
.
.
.
.
.
.
.
.
.
.
.
.
.
.
.
.
.
.
.
.
.
.
.
.
.
.
.
.
.
.
.
.
.
.
.
.
.
.
.
.
.
.
.
.
.
.
.
Using function key F5 when running a Query for iSeries query . . .
Running a Query for iSeries query from the Query for iSeries menu .
Running a Query for iSeries query from the Exit This Query display .
Running a Query for iSeries query from the Work with Queries display
Running a Query for iSeries query using the RUNQRY command . .
.
.
.
.
.
.
.
.
.
.
.
.
.
.
.
.
.
.
.
.
.
.
.
.
.
.
.
.
.
.
.
.
.
.
.
169
169
169
170
171
. . . . . .
. . . . . .
. . . . . .
. . . . . .
. . . . . .
. . . . . .
. . . . . .
. . . . . .
. . . . . .
. . . . . .
. . . . . .
. . . . . .
query definition
.
.
.
.
.
.
.
.
.
.
.
.
.
.
.
.
.
.
.
.
.
.
.
.
.
.
.
.
.
.
.
.
.
.
.
.
.
.
.
.
.
.
.
.
.
.
.
.
.
.
.
.
.
.
.
.
.
.
.
.
.
.
.
.
.
.
.
.
.
.
.
.
.
.
.
.
.
.
173
173
173
173
176
176
177
178
178
179
180
181
182
Part 2. Defining and using Query for iSeries query definitions
25
Chapter 16. Working with Query for iSeries query definitions . .
Changing a Query for iSeries query definition. . . . . . . . . .
Starting changes by copying a Query for iSeries query definition .
Changes you can make to a Query for iSeries query . . . . . .
Considerations for changing Query for iSeries queries . . . . .
Changing your collating sequence on Query for iSeries queries .
Copying a Query for iSeries query definition . . . . . . . . . .
Renaming a Query for iSeries query definition . . . . . . . . .
Deleting a Query for iSeries query definition . . . . . . . . . .
Displaying a Query for iSeries query definition . . . . . . . . .
Printing a Query for iSeries query definition . . . . . . . . . .
Information printed for a Query for iSeries query definition . . . .
Example of printed record format information for a Query for iSeries
.
.
.
.
.
.
.
.
.
.
.
.
.
.
.
.
.
.
.
.
26
Query for iSeries Use V5R2
Chapter 3. Creating a Query for iSeries query definition
This chapter describes the process of creating a query (that is, defining a query definition object) that can
be used to query one or more files in the DB2® UDB for iSeries. The chapter begins with selecting option
1 (Create) on the Work with Queries display, and then it introduces the Define the Query display and the
11 possible definition steps you can use to define a query or change part of an existing query definition.
The details for each of the definition steps are described later, in Chapters 4 through 14. The details for
each of the other major tasks then follow in Chapters 15 and 16.
Starting Query for iSeries query definition
You start query definition by selecting option 1 (Create) on the Work with Queries display and, optionally,
by specifying the name of the query you want to create.
To specify a query name, you can type the name of the query (Query prompt) that you want to define, and
you can specify the name of the library (Library prompt) in which it is to be stored. Or, you can look at a
list of query names or library names to select the query name and the library name you want to use.
For example, you might specify CUSNAMQRY as the name of a query definition that you would use to query
the CUSTNAME file. If you do not specify a library name, the query is stored in the library identified in the
Library prompt (the QGPL library in this example).
Work with Queries
Type choices, press Enter.
Option
. . . . . . .
Query
. . . . . . .
Library . . . . . .
F3=Exit
_
__________
QGPL
F4=Prompt
1=Create 2=Change 3=Copy 4=Delete
5=Display 6=Print definition
8=Run in batch, 9=Run
Name, F4 for list
Name, *LIBL, F4 for list
F5=Refresh
F12=Cancel
If you are creating a query (definition), you do not need to name it unless you want to save it for later use.
(The query does not exist as a definition object on the system until you save it.) If you do name it, use the
normal rule for naming objects, which follows:
The query name must begin with an alphabetic character (A through Z, $, #, or @) and can be followed by
no more than 9 alphanumeric characters (A through Z, 0 through 9, $, #, @, ., or _).
Note: To use this query in a multilingual environment, use A-Z or 1-9.
Because most system-supplied objects on the iSeries system begin with Q, your query names should not
start with a Q.
© Copyright IBM Corp. 2000, 2002
27
If you position the cursor on the Query prompt and press F4 (Prompt) to show a list, it contains the names
of all the queries that are in the library (or libraries) indicated by the Library prompt. You can get a smaller
list by typing a generic name in the Query prompt before you press F4. The generic name shows in the
Subset prompt when the list is shown.
When you are creating a query, you can check this list to see what names are already used before you
choose a new name. Type the new name in the first list position (in its input field) and type a 1 next to it.
For more information on using lists on the Work with Queries display, see “Working with a list of Query for
iSeries queries” on page 14.
Selecting definition steps when defining a Query for iSeries query
When you specify option 1 (Create) on the Work with Queries display, you are shown the Define the
Query display (another key display) where you select one, several, or all of the 11 definition steps
(options) needed to define your query.
The only definition step that you are required to select is Specify file selections. You do not have to select
all of these definition steps—use only those that you need. Most of these steps do not have to be done in
a specific order (although the order shown is recommended when you need to use most of them). Each
step you select is a separate process that shows you one or more displays as you need them.
Define the Query
Query . . . . . . :
Library . . . . . :
QGPL
Option . . . . . :
CCSID
. . . . . :
Create
37
Type options, press Enter. Press F21 to select all.
1=Select
Opt
1
_
_
_
_
_
_
_
_
_
_
Query Definition Option
Specify file selections
Define result fields
Select and sequence fields
Select records
Select sort fields
Select collating sequence
Specify report column formatting
Select report summary functions
Define report breaks
Select output type and output form
Specify processing options
F3=Exit
F13=Layout
F5=Report
F18=Files
F12=Cancel
F21=Select all
The Define the Query display is the primary display from which you start defining your query.
From this display, you can select options that define, generally speaking, the four major parts of a
complete query definition:
v The first six options define the query itself, including the files you want to query, the fields to be used
in each file, and the records to be selected.
v The next three options define what the report is to look like, including which columns are to be
summarized and when (using report breaks).
v The second to last option defines where the report is to go and what values are to be used when it is
sent there.
v The last option defines how numeric calculation results are processed and if substitution
characters are allowed during the conversion of character fields.
28
Query for iSeries Use V5R2
Selecting options for a Query for iSeries query definition
To select options that you want to use from those listed in the Query Definition Option column, type a 1 in
the Opt (option) column beside each of those options, then press the Enter key. The displays for the
options you select are then shown one after the other so you can create those parts of the query
definition.
Following are brief descriptions of each of the definition steps.
Specify file selections
This option is required, and you use it to specify the file or files from which you want your query to
obtain information. If you specify more than one file, you are shown the displays on which you
specify how you want the files joined.
Define result fields
Use this option to define fields that do not exist in your files but you want to use in your query. For
example, your selected file(s) contains a field representing the number of weeks, but it does not
contain a field representing the number of days, and you want your report to show days, not
weeks. You can define a result field that will hold the results of a calculation that uses the number
of weeks to determine the number of days.
Select and sequence fields
Use this option to select the fields (from your selected file(s) and your result fields) that you want
to appear on your report. You also specify in what order you want them to appear.
Select records
Use this option to select records, from your selected file or files, if you only want particular records
to be included in your report.
Select sort fields
Use this option to specify what fields to sort on so that your output records appear in a particular
order (such as alphabetically or in descending or ascending order).
Select collating sequence
Use this option to select a collating sequence for your query. The collating sequence you select
can affect many different things in your query, including record selection and the order of records
when they are sorted. The collating sequence usually relates to your country’s language. You can
also specify a different language for a particular query. You can set your collating sequence
defaults while defining your first query and thereby never have to change the collating sequence
again.
Specify report column formatting
Use this option to change the column headings, column spacing, numeric editing, length, and
decimal positions for fields that appear in your report.
Select report summary functions
Use this option to specify one or more (or all) of the types of summary functions for each field in
your report: total, average, minimum value, maximum value, and count.
Define report breaks
Use this option to specify how to break your report into groups of records.
Select output type and output form
Use this option to specify if you want your output to be displayed, printed, or sent to a database
file. If you want your output printed, you also specify printer attributes. You also use this option to
specify whether you want detailed or summary-only output.
Specify processing options
Use this option to specify if you want the results of your query calculations to be truncated or
rounded, if you want decimal data errors ignored, or if you want to ignore character substitution
warnings during conversion.
Chapter 3. Creating a Query for iSeries query definition
29
You can specify one, several, or all of the options shown. To select all of them, press F21.
Moving through the Query for iSeries definition displays
For each option you select, Query shows you the definition displays for that step. (The words shown for
each option on the Define the Query display match the title of the first display shown for that definition
step.) After you specify your definition values on a display, press the Enter key to have them included in
the query definition and to go to the next display in the sequence. Whenever you need to go backward in
the sequence, press F10 (Process/previous) to keep what you have entered on a display and then show
the previous display, or press F12 (Cancel) to ignore what you have entered on a display and then show
the previous display.
After you go forward through all of the options that you need, press the Enter key to return to the Define
the Query display. Then, you can select more options, change your selections, or end the definition of this
query.
When you return to the Query for iSeries Define the Query display
When you return to this display, Query displays a > symbol beside all those definition steps that currently
have definition values that are different from the system-supplied (default) values. This is also true if you
are changing or displaying an existing definition.
Also, if you are creating or changing a definition, a message is shown to remind you to press F3 (Exit) to
save the query changes and/or run the query at this time. When you press F3, the Exit this Query display
is shown so you can specify both choices. (If you want to look at or change more definition steps first, you
can type a 1 next to each option as before, and press the Enter key.)
If there are any definition errors in the options you used, they are highlighted in reverse image when you
return to this display; you should correct the errors before you use the Exit key.
Considerations for creating Query for iSeries queries
The following are reminders, tips, and techniques for creating queries.
Selecting files, records, and fields for Query for iSeries
Query can use files created using IDDU, DDS, or the DB2 UDB for iSeries program. For a description of
file organization, see the IDDU Use book.
When you create a query, if you do not select and sequence the fields to be reported by the query, Query
selects the following:
v For reports, the first 500 of the following:
– Fields chosen as sort fields on the Select Sort Fields display, in the sequence they appear on that
display
– Result fields in the order they are defined on the Define Result Fields display
– Fields that can be used by Query in the record format(s), in the sequence they appear in the record
format(s) (those in the first file selection, followed by those from the second, and so on)
v For database output:
– All data in the record format
– Result fields defined on the Define Result Fields display
For database output, maximum record length is limited to 32 766 bytes (32 740 bytes if variable-length or
null-capable fields are part of the record). In some cases, the maximum record length will be less than
these limits.
30
Query for iSeries Use V5R2
Suggested sequence of tasks for creating Query for iSeries queries
The following is a suggested sequence of tasks to create queries:
1. Define result fields before selecting and sequencing fields.
2. Specify comparisons used for selecting records before selecting and sequencing fields.
3. Select and sequence fields and specify sort fields before you reformat columns.
4. Select sort fields before you define report breaks.
5. Press F5 to view your query results and F13 to view your report layout before and after you reformat
columns.
You can use a query to quickly sort records in a data file. Simply select the sort fields, choose database
as the output device, and specify the output database name.
Chapter 3. Creating a Query for iSeries query definition
31
32
Query for iSeries Use V5R2
Chapter 4. Specifying and selecting files for a Query for
iSeries query
This chapter describes how you select and use one or more database files that are to be queried for
information. Specifying file selections (the first option on the Define the Query display) is the first of the 11
steps that you can use to define a query. This step includes specifying (or changing) what files you want to
select for your query, seeing what files are already selected, and specifying the join characteristics when
more than one file is selected. This step also allows you to select, when necessary, file members and
record formats for the files.
Notes:
1. Although this chapter discusses this step primarily for the task of creating a query definition, most of
the information also applies to the tasks of changing or displaying an existing definition.
2. If you are creating a query, a 1 is already supplied by the system for the Specify file selection option
on the Define the Query display, and it cannot be removed. This is the only option in the definition
process that you must select when you are creating a query.
3. If you make changes to any of the file selection values in this step, Query attempts to keep whatever
parts of the definition that are still valid. For example, if a field in a file being removed from the
definition also exists in a file being added (as a replacement), the field’s uses in other parts of the
definition (such as part of the sort definition) are kept. (However, it is your responsibility to determine
whether the field in the replacement file contains the kind of information you want.)
The displays related to the file selection process are:
v File selection displays (for one or more files):
– Specify File Selections
– Select Library (optional)
– Select File (optional)
– Select Member (optional)
– Select Record Format (optional)
v File join displays (for multiple files only):
– Specify Type of Join
– Specify How to Join Files
Specifying file selections for a Query for iSeries query
The file selection process includes selecting each file from which your query will get data and also
specifying the library containing the file, the file member, and the record format (or using the values
supplied by Query when the display first appears). If you select multiple files, the process also includes
specifying the file join characteristics.
After you have selected your definition steps on the Define the Query display and you press the Enter key
or F21 (Select all), the first display that you see is the Specify File Selections display.
© Copyright IBM Corp. 2000, 2002
33
Specify File Selections
Type choices, press Enter. Press F9 to specify an additional
file selection.
File . . .
Library
Member . .
Format . .
F3=Exit
F12=Cancel
.
.
.
.
.
.
.
.
.
.
.
.
.
.
.
.
.
.
.
.
.
.
.
.
.
.
.
.
F4=Prompt
F13=Layout
__________
QGPL
*FIRST
*FIRST
Name,
Name,
Name,
Name,
F5=Report
F24=More keys
F4 for list
*LIBL, F4 for list
*FIRST, F4 for list
*FIRST, F4 for list
BOTTOM
F9=Add file
The Specify File Selections display is used to specify one or more database files that you want to query
for the data in your report. You can specify as many as 32 files to be queried, and you can assign unique
3-character identifiers to each one. (You can also specify the same file twice, if you need to join it to itself;
if you do, it counts as two files in the query definition. For example, you might specify the same file twice
but use two different record formats.)
If you are creating or changing a query definition, you should complete all the information needed for one
file selection before you start on the next one. Based on the values you enter and the key you press,
Query shows you the displays you need. The order of prompting within each file selection is: file, library,
member, and record format. (If you have not completed all the information in a file selection, several of the
F keys will not work until you supply the needed information.)
The following special values are shown in the prompts for each file selection group when it is first shown:
*FIRST (for members and record formats) and *ID (for file IDs if shown). These and others that you may
specify (like *LIBL for libraries) are changed when you press the Enter key; they are changed to the actual
values that will be used when the query is run. Special values for member names are not changed.
The initial value shown in the Library prompt of the first file selection group is the value that you used in
the file selection step in a previous query definition. For the remainder of the file selections, the initial
value is the same as is used in the first group.
Choosing a file for a Query for iSeries query
To choose a file, move the cursor to the File prompt and type the name of a file.
If you want to choose a file from a list of file names, you can press F4 (with the cursor at the File prompt).
The Select File display is shown, and on this display you can choose one or more files for your query.
Note: If the File prompt is blank before you press F4, you can select multiple files from the Select File
display; if it is not blank, you can select only one file.
Choosing a library for a Query for iSeries query
Because the files you want to select may be in different libraries, you can specify a different library name,
generic library name, or special library name for each file selection.
34
Query for iSeries Use V5R2
v If you type a generic library name (in the form of ABC*) or special library name in this prompt and press
the Enter key, that library group is searched for the file named in the File prompt. If the file is found in
one of the libraries, the name of that library replaces the special library or generic name.
v If you type a generic library name (in the form of ABC*) or a special library name and then press F4 with
the cursor in this prompt, the specified list of library names is shown on the Select Library display.
When you select the library you want from the list and press the Enter key, you return to this display
with the selected name filled in. For an explanation of these special library names, see “Special library
names in Query for iSeries” on page 10.
If you specify *CURLIB as the library name for a file selection and you do not have a current library, QGPL
replaces the *CURLIB value.
Choosing a member or record format for a Query for iSeries query
Similarly, for each file selection, if you want to choose from a list of members or record formats, move the
cursor to that prompt and press F4 to see the associated display, and select the member name (or format
name) you want to be used with that file. Then, when you return to the Specify File Selections display, that
name is shown in the prompt. If you did not select a member name, Query supplies *FIRST in the Member
prompt. If you did not select a format name, Query resolves the special default value and supplies the first
format name in the Format prompt.
Selecting multiple files for a Query for iSeries query
If you want to include additional files for your query, press F9 (Add file) each time you want another file
selection. If you have completed the previous file selections for this query, a new group of prompts is
shown for you to fill in; the File prompt is blank, and the other prompts show default values that you can
change. (However, if you have not filled in a file name for one of the file selections, F9 moves the cursor
to the blank File prompt instead of giving you a new file selection.)
Specify File Selections
Type choices, press Enter. Press F9 to specify an additional
file selection.
File . . .
Library
Member . .
Format . .
File ID .
.
.
.
.
.
.
.
.
.
.
.
.
.
.
.
.
.
.
.
.
.
.
.
.
.
.
.
.
.
.
.
.
.
.
.
EXAMPFILE
QGPL
*FIRST
*FIRST
T01
Name, F4 for list
Name, *LIBL, F4 for list
Name, *FIRST, F4 for list
Name, *FIRST, F4 for list
A-Z99, *ID
File . . .
Library
Member . .
Format . .
File ID .
.
.
.
.
.
.
.
.
.
.
.
.
.
.
.
.
.
.
.
.
.
.
.
.
.
.
.
.
.
.
.
.
.
.
.
__________
QGPL
*FIRST
*FIRST
*ID
Name, F4 for list
Name, *LIBL, F4 for list
Name, *FIRST, F4 for list
Name, *FIRST, F4 for list
A-Z99, *ID
F3=Exit
F12=Cancel
F4=Prompt
F13=Layout
F5=Report
F24=More keys
Bottom
F9=Add file
If you are working with multiple files on this display, use the page keys to move forward or backward in the
list of file selections. If you press F18 (Files), you can also see this information in a different form. F18
takes you to the Display File Selections display and shows you the names of all the files, libraries, file
members, record formats, and file IDs for all the files currently defined in this query definition.
If you try to leave the Specify File Selections display before you specify how multiple files are to be joined,
Query assumes that the type of join is a 1 (Matched records) and shows you the Specify How to Join Files
display so you can specify the necessary join test specifications.
Chapter 4. Specifying and selecting files for a Query for iSeries query
35
Using file IDs for a Query for iSeries query
File IDs are used when you select more than one file. Although Query assigns a file ID value to each file
selection, you can specify your own identifier.
Note: When you are creating a query, the File ID prompt is not shown for your first file selection.
However, if you select more than one file, you will see that Query has assigned the value T01 as
the file ID of your first file. You will have to go back and change the file ID if you want to assign
your own file ID values.
The file ID allows you to uniquely identify fields that have the same name but are in different files. You can
specify from one to three characters; the first character must be alphabetic, $, #, or @, and the last two
can be alphabetic, numeric, or $, #, or @. Examples of valid identifiers are: A, B, B03, AEX, and $99.
Note: If you are creating queries that are distributed to other systems or are used in a multilingual
environment, use only A-Z and 1-9.
If you do not specify a file ID (that is, you do not change the value *ID in the File ID prompt), Query
resolves the value *ID to the number of the file selection, if not already used, or to the lowest possible
value that is available in the range of Tnn, where nn is a number from 1 to 32.
Although file IDs are assigned to each file on the Specify File Selections display, you do not have to use
them in other parts of the query definition unless you need to use a field that has the same name in more
than one of the files in the query. You must use file IDs every time for identical field names, to ensure that
the correct field is used from the files. For all the other field names, (that is, those that occur in only one
file in the query definition), you do not need to use the file IDs.
If you decide to change a file ID, Query keeps any definition values already assigned for field selection,
sort field selection, and so on. (You must change the ID, if used, for join tests, result field expressions,
record selection values, and break text.) However, if you move a file ID to a different selection group, all
the definition values you specified are lost, even if all of the names in the from and to file selections are
the same.
Confirming your options for a Query for iSeries query
When you are creating a query definition, you see a message that asks you to verify the values you just
defined. This message appears when you press the Enter key after defining file selection values. You
should verify your choices made thus far, then either continue selecting files or end the file selection
process after confirming your choices. To end file selection, press the Enter key again.
When you are changing an existing query definition, you see a different message when you press the
Enter key, and the values that you changed are shown in reverse image. Again, you should verify your
changes and then press the Enter key a second time to actually have them changed in the definition. You
do not have to press the Enter key twice if you make no changes or if you change only member names.
Removing a option for a Query for iSeries query
Whether you are creating or changing a definition, if you decide you do not want to keep one of the files in
the definition, you can remove it by blanking out the File prompt. When you press the Enter key or F5,
F10, or F13, that file selection is removed.
By removing a file selection, you may cause an error elsewhere in your definition. This occurs if the file
you removed was used in a join test or a field from a removed file was used to define a result field.
Handling errors on the Query for iSeries Specify File Selections
display
An error message is shown when you press the Enter key, F5, F10, or F13.
v If you did not type a file name
36
Query for iSeries Use V5R2
v If you typed a file name and left blank any of the Library, Member, or Format prompts for the file
v If there is a problem with one of the values you typed
The cursor is positioned to the blank prompt or the prompt in error, and the message describes the error
for that prompt. For example, you may have typed the name of a file that you do not have the authority to
use.
If there is more than one error, you will see the next one after you have corrected the first one.
Selecting files on the Query for iSeries Select File display
The Select File display shows you a list of files from which you can select one or more files that your
query is to get data from, or you can select one to receive the output from your query. This display
appears if you position the cursor on the File prompt of a display and then press F4 (Prompt). (This
display appears only when you are creating or changing a query definition.) The following is an example of
how the Select File display might appear.
Select File
File ID . . . . : T01
Library . . . . . . .
Subset . . . . . . .
Position to . . . . .
CUSTINV
__________
__________
Name, *LIBL, F4 for list
Name, generic*
Starting character(s)
Type option (and File), press Enter.
1=Select
Opt File
_ FILE1
_ CUSTMAST_1
_ CUSTMAST_2
_ CUSTMAST_3
_ EXAMPFILE1
_ EXAMPFILE2
_ INVMAST
_ TESTFILE_A
_ TESTFILE_B
F4=Prompt
F11=Display text
F12=Cancel
F24=More keys
Bottom
At the top of the display, a field named File ID may or may not appear. The File ID field is shown only if
you came from the Specify File Selections display and pressed F4 (Prompt) in a nonblank File prompt. If
the file ID is shown, it is the file ID of the file selection group that the cursor was positioned to on the
previous display.
If the File prompt was blank and you pressed F4 on the Specify File Selections display, the File ID field is
not shown on this display, and you can then select multiple files here. If the File prompt had a name or a
generic name to get a subsetted list and you pressed F4 on the Specify File Selections display, the File ID
field is shown as Tnn on this display, and you can select only one file.
If you came from the Define Database File Output display or Specify Dependent Value Qualifiers display,
you can select only one file on this display.
The list on this display includes all files (for which you have the needed authority) that are in the library
shown at the top of the display. If you came from the Specify File Selections display, that library is the one
indicated in the Library prompt below the File prompt in which the cursor was positioned when you
pressed F4 for this list. If you specified a generic file name (in the form of ABC*) as a file name on the
Chapter 4. Specifying and selecting files for a Query for iSeries query
37
Specify File Selections display, it is used as a subset value on this display, and only file names starting
with those generic characters are included in the list. (You can specify another subset value on this display
to change the subset shown.)
You can use the Library prompt to see the files that exist in a different library or group of libraries.
If you want to select a particular library from a list of libraries, press F4 with the cursor positioned in the
Library prompt. The list that is shown contains only the libraries that you have the authority to use.
v If you press F4 when the prompt contains a library name, *LIBL, or blanks, you see the libraries that are
in the *LIBL library list.
v If you press F4 when the prompt contains a generic library name or any of the other special library
names, you see the group of libraries represented by that value.
If you do not want or need to see a list of libraries, type the name of a library, a generic library name (in
the form of ABC*), or one of the following special library names: *CURLIB, *LIBL, *USRLIBL, *ALLUSR, or
*ALL.
Note: If you type *CURLIB and you do not have a current library, QGPL is used.
After you have entered a value in the Library prompt at the top of the display, press the Enter key and a
list of the files that you are authorized to use from that library appears.
If you typed in a generic library name or special library name, a Library column appears on the display so
that you are able to determine in which library a particular file resides.
Select File
Library . . . . . . .
Subset . . . . . . .
Position to . . . . .
CUST*
__________
__________
Name, *LIBL, F4 for list
Name, generic*
Starting character(s)
Type option (and File and Library), press Enter.
1=Select
Opt File
_ __________
_ CUSTMAST_1
_ CUSTMAST_2
_ CUSTMAST_3
_ EXAMPFILE1
_ EXAMPFILE2
_ INVMAST
_ TESTFILE_A
_ TESTFILE_B
F4=Prompt
Library
__________
CUSTINV
CUSTINV
CUSTINV
CUSTINV
CUSTINV
CUSTINV
CUSTINV
CUSTINV
F11=Display text
Opt File
_
_
_
CUSTRELFEB
CUSTRELJAN
CUSTRELMAR
F12=Cancel
Library
CUSTREL
CUSTREL
CUSTREL
Bottom
F24=More keys
If a Library column is present, you can specify a library name, generic library name, or special library
name in the Library prompt in conjunction with a typed-in option number and file name to complete a file
selection. If you typed a generic name or special library name in the Library prompt, it will be resolved to
the name of the first library (in the specified group of libraries) that contains a file with that name.
To see a smaller group of file names, move the cursor to the Subset prompt and type the starting
characters followed by an asterisk (*) to identify the group you want to see, and press the Enter key. All
the files whose names begin with those characters in the specified library or library group are shown. (If no
* is used, only the file(s) with the specified name is shown.)
38
Query for iSeries Use V5R2
To return to the complete list of file names, blank out this prompt (or put an * in it) and press the Enter
key.
To move (position) the list of file names so that it starts with a particular name, move the cursor to the
Position to prompt and type all of the characters or one or more of the starting characters in the name you
want, and press the Enter key. (Do not add an * after the starting characters in this prompt.) If a specific
library name is used in the Library prompt, Query moves the list so that the first position shown contains
the first file name that starts with the characters you typed.
If there is no file name in the list that starts with those characters, Query moves the list to the name
closest to, and in front of, the position where the name would have appeared. If a special library name or
generic library name is used in the Library prompt, the list is repositioned only if the Position to prompt
value exactly matches a complete file name.
Use F11 to alternate between showing a list of only file names to showing a list of both file names and text
describing the files.
Once you have located the files you want, type a 1 beside each file name (if more than one is allowed),
including the file name in the top position in the list. If you are selecting multiple files, you can select as
many 32 files, including those previously selected for this query. Note that if join logical files are used, you
are only able to select less than 32 files because each file used in the join logical file is counted as one of
the 32 files. For example, if three physical files were joined into one join logical file, this join logical file is
counted as three files, not one.
After you have made your file selections, press the Enter key to return to the Specify File Selections
display. All the files you selected are added to the file selections, if any, that were there previously. (Any
blanked out file selections are filled in first and new ones are added at the end as needed.) The files are
added, each with its own group of file selection prompts, in the same order as they existed on the Select
File display. They are also assigned file IDs to match the number of the file selection or, if that number is
taken, to the lowest possible value that is available in the range of T01 through T32, which you can
change if you wish.
Selecting file members on the Query for iSeries Select Member display
The Select Member display appears when you position the cursor on the Member prompt of a display and
press F4 (Prompt). The Select Member display shows you a list of members and allows you to select the
one from which your query can obtain data or the one to which the output from your query is received.
This display appears only when you are creating or changing a query definition.
Chapter 4. Specifying and selecting files for a Query for iSeries query
39
Select Member
File ID . . . . . :
File . . . . . . . :
Library . . . . :
T01
EXAMPFILE1
CUSTINV
Type option (and Member), press Enter.
1=Select
Opt Member
_ __________
_ EXAMPMBR1
_ EXAMPMBR2
_ EXAMPMBR3
Bottom
F11=Display text
F12=Cancel
If you came from the Specify File Selections display or Specify Dependent Value Qualifiers display, you
can specify which member you want your query to get data from. If you came from the Define Database
File Output display, you can specify which member you want the query data to be put into.
At the top of the display, the File ID field is shown if you came here from the Specify File Selections
display. The file ID is the file identifier of the file that is shown in the File field. This file is the one for which
you want to choose a member. The Library field shows the library in which the file is stored.
The names of the member that currently exist in the file shown at the top of the display are shown in the
Member column. You can choose a member by either typing a 1 in the Opt column to the left of the
member or by typing a member name (and a 1 in the Opt column next to it) in the first position in the list.
If you specify a member name in the top position, that member must also exist at this time. If you specify
*FIRST or *LAST, the member name on the previous display is changed to that value. Then, either the first
or the last member that exists in the file at the time the query is run is the member that is used. If you
came from the Define Database File Output display, you can also specify *FILE in the first position in the
list.
You can use F11 to alternate between showing a list of only member names to showing a list of both
member names and text describing the members.
When you press the Enter key on the Select Member display, the member that you specify is then shown
in the Member prompt on the display that you return to. If you return to the previous display without
selecting or specifying a name, the previous member name or value is not changed.
Selecting record formats on the Query for iSeries Select Record
Format display
The Select Record Format display appears when you position the cursor on the Format prompt of the
Specify File Selections display and press F4 (Prompt). The Select Record Format display shows you a list
of record formats from which you can select the one you want your query to use with a selected file
member. This display appears only when you are creating or changing a definition.
40
Query for iSeries Use V5R2
Select Record Format
File ID . . . . . :
File . . . . . . . :
Library . . . . :
T01
EXAMPFILE1
CUSTINV
Type option (and Format), press Enter.
1=Select
Opt Format
_ __________
_ EXAMPFMT1
_ EXAMPFMT2
_ EXAMPFMT3
Bottom
F11=Display text
F12=Cancel
F23=Long comment
At the top of the display, the File ID field shows the file ID of the file that appears in the File field. This file
is the one for which you want to choose a record format. The Library field shows the library in which the
file is stored.
The names of the record formats that you can select for the file shown at the top of the display are shown
in the Format column. You can choose a record format by either typing a 1 in the Opt column to the left of
the record format or by typing a record format name (and a 1 in the Opt column next to it) in the first
position in the list.
If you specify a record format name in the top position, that record format must also exist at this time. If
you specify *FIRST, the format name on the previous display is changed to the actual name of the first
record format in the file. It is possible that some record formats cannot be used with certain file members,
but this is not determined until the Specify File Selections display is processed.
You can use F11 to alternate between showing a list of only record format names to showing a list of both
record format names and text describing the record formats.
When you press the Enter key, you return to the Specify File Selections display, and the name of the
format that you selected is shown in the Format prompt that you came from. If you return to the previous
display without selecting or specifying a name, the previous record format name or value is not changed.
Displaying all files selected on the Query for iSeries Display File
Selections display
The Display File Selections display appears when you press F18 (Files) from a display where F18 is listed
on the bottom of the display. The Display File Selections display shows all the files that you selected for
use in the query. For each file, this display shows you the file ID, the library containing the file, and the file
member and record format that are to be used. The information on this display is for your information only;
it cannot be changed here.
Chapter 4. Specifying and selecting files for a Query for iSeries query
41
Display File Selections
ID
T01
T02
File
EXAMPFILE1
EXAMPFILE2
Library
CUSTINV
CUSTINV
Press Enter to display the join tests.
Member
*FIRST
*FIRST
Format
EXAMPFILE1
EXAMPFILE2
Bottom
F12=Cancel
If multiple file selections are shown, you can press the Enter key to show the join type and all the join
tests for these same files. However, if you came to this display from the Specify File Selections, Change
File Selections, Specify Type of Join, or Specify How to Join Files display, the Enter key returns you to the
previous display. F12 and the Enter key (not F18) can be used to alternate between the Display Join Tests
display and this display.
Joining files in a Query for iSeries query
Once you have used the Specify File Selections display to select all the files that you want used for your
query, if more than one file was selected, you must tell Query how you want to join the files when they are
used to get data from their fields. You use the following two displays to specify all the join specifications for
your query:
v The Specify Type of Join Files display allows you to specify the type of join you want to use. There are
three ways that you can join the files for selecting the records you want.
v The Specify How to Join Files display allows you to indicate the fields to be used to join the files. You
specify which fields are to be used and how they are to be compared with fields in the other files.
For a record to be selected, the join specifications for all the files are used to determine whether a
matching record exists in each of the files joined in the query. A match occurs when, for each specified file,
the contents of its fields selected for comparison match the test condition(s) given on the Specify How to
Join Files display. Depending on whether there is a match and which type of join is specified on this
display, the records are then selected and used in the output as determined by the other join specifications
given on the Specify How to Join Files display and the record selection specifications given on the Select
Records display.
When Query determines that a record is to be selected from the specified files, it uses the data in all the
fields and files selected for the query to produce a single output record. This output record is included in
the query report or in an output database file.
42
Query for iSeries Use V5R2
Types of joins in a Query for iSeries query
Specify Type of Join
Type choice, press Enter.
Type of join . . . . . . . .
F3=Exit
F12=Cancel
F5=Report
F13=Layout
1
1=Matched records
2=Matched records with primary file
3=Unmatched records with primary file
F10=Process/previous
F18=Files
There are three types of joins, or three ways that you can select matched or unmatched records from the
specified files. You can:
v Select only records that have matching records in all the specified files.
v Select all primary records, and include all matching secondary records. Primary records exist in the
primary file. The primary file is the first file selected on the Specify File Selections display. Secondary
records exist in secondary files. Secondary files are all of the files selected after the primary file on the
Specify File Selections display. After the join is done, the record selection tests, if any, are applied to
determine which records are selected.
v Select only the primary records that have one or more unmatched secondary records, and include all
the secondary records that also match.
All three types of joins use the same join fields and join tests specified on the Specify How to Join Files
display. They also all use the other specifications in the query definition the same way to select records
and produce the output.
Use the second join type (type 2) if you want to use every record in the primary file, whether or not it has
a matching record in the secondary file(s).
Use the third join type (type 3) if you want to see which records in the primary file do not have matching
records in the secondary file(s).
How to join files in a Query for iSeries query
Use the Specify How to Join Files display to specify the join tests needed when more than one file has
been selected for your query. Use this display to tell Query how to join (combine) the files and record
formats by specifying pairs of fields with a test value; each test value indicates how those fields must
compare before Query can select the record. The result of every test in the join specifications must be true
before the matching records in each of the files are joined as one record for the record selection tests that
follow.
When comparing character values, all values must be marked with compatible CCSIDs. When comparing
SBCS character values, all values and any collating sequence to be applied must be marked with
compatible CCSIDs.
Chapter 4. Specifying and selecting files for a Query for iSeries query
43
Note: See “CCSID and join tests in Query for iSeries” on page 252 for information on how CCSIDs can
affect your join selections.
Specify How to Join Files
Type comparisons to show how file selections related, press Enter.
Tests: EQ, NE, LE, GE, LT, GT
Field
______________
______________
______________
______________
______________
Test
_____
_____
_____
_____
_____
Field
______________
______________
______________
______________
______________
Bottom
________________________________________________________________________
Field
A.NBR
A.NAME
A.ADDR
A.ZIP
B.NBR
F3=Exit
F12=Cancel
Field
B.NAME
B.PHONE
B.SERIAL#
F5=Report
F13=Layout
F10=Process/previous
F18=Files
Bottom
F11=Display text
F24=More keys
For each test, you specify two fields to be tested and the test value to be used. Look for a field in one file
that contains the same (or similar) information that can be found in a field of the other file, such as a name
or identification number. Specify the names of the fields (including their file identifiers, if needed) on either
side of the test value.
For example, if you specify the EQ (equal) test value between two fields, the test result is true if both fields
contain the same value. (The EQ value is almost always used.)
Field
A.NAME
Test
EQ
Field
B.NAME
In this example, both fields are named NAME, so the file identifiers (A and B) are included with the field
names.
Rules for joining files in a Query for iSeries query
Note: To indicate that you do not want to specify join tests, use the *ALL join. All records from one file are
joined to all records in the secondary file or files without any kind of selection.
The rules for join tests are:
v For two files to be selectively joined, they must have at least one field in common. (Note that having a
field in common does not mean that the field names are the same.) This is also true for logical
database files, even though they may be based on fields with different names in the physical file over
which the logical file is created.
v If you select option 2 (Matched records with primary file) or option 3 (Unmatched records with primary
file) on the Specify Type of Join display, the combined length of fields used in the join test must be less
than or equal to 2000 bytes. For DBCS fields, each DBCS character counts as two bytes. If fields
contain bracketed-DBCS data, the shift characters are counted in the length.
v You can only use the EQ test value to join any of your selected files to a join logical file.
v Fields in each join test must come from different files.
v You can use more than one test for a given pair of files. If you specify option 2 or 3 (both using a
primary file) in the Type of join prompt on the Specify Type of Join display, the test values must be the
same for all the tests used in that pair of files.
44
Query for iSeries Use V5R2
v A field name must be preceded by a 1- to 3-character file identifier if that field name is used in more
than one file selected for the query.
v You can specify up to 100 join tests.
v For a matched-record join, if one or both fields in a join test are null, the records are not joined.
v The data in both fields of a join test must be the same type (for example, both character), except that
date, time, or timestamp fields can be compared to SBCS character, DBCS-either, or DBCS-open fields
that contain a correct representation of a date, time, or timestamp. Dates in character fields must be
either in the date format of the query or in an SAA® format— the SAA format is recommended. Date,
time, and timestamp fields are identified by an L, T, or Z, respectively, in the Dec column of the field list.
Note: When comparing a date, time, or timestamp field with an SBCS, DBCS-either, or DBCS-open
character field, use a character field for which each value can be recognized as an SAA
formatted date, time, or timestamp. If the character field contains a correct representation of a
date, time, or timestamp but in other than an SAA format, you may get unexpected results. When
you run a query that uses a non-SAA format for date, time, or timestamp values in character
fields, and query has no setting for a non-SAA literal date value, use the CHGJOB command to
make sure your job date format and separator match the format and separator in the character
field values.
If some of the fields contain bracketed double-byte characters, you can use these DBCS fields for both
fields, or you can use an SBCS character field for one field and a DBCS-either or DBCS-open field for
the other field. Bracketed-DBCS fields are identified by a J, O, or E in the Dec column in the list of
fields. Press F11 to see the Dec column if it is not currently shown.
A DBCS-graphic field can be compared only to another DBCS-graphic field. DBCS-graphic fields are
identified by a G in the Dec column. Collating sequence is not applied to DBCS-graphic fields used in
join comparisons.
Valid comparisons for join tests are:
– Numeric field with numeric field
– SBCS character field with:
- SBCS character
- Date
- Time
- Timestamp
- DBCS-either
- DBCS-open
– Date field with:
- Date
- SBCS character
- DBCS-either
- DBCS-open
– Time field with:
- Time
- SBCS character
- DBCS-either
- DBCS-open
– Timestamp field with:
- Timestamp
- SBCS character
Chapter 4. Specifying and selecting files for a Query for iSeries query
45
- DBCS-either
- DBCS-open
– DBCS-either field with:
- SBCS character
- Date
- Time
- Timestamp
- DBCS-either
- DBCS-open
- DBCS-only
– DBCS-open field with:
- SBCS Character
-
Date
Time
Timestamp
DBCS-either
DBCS-open
DBCS-only
– DBCS-only field with:
- DBCS-either
- DBCS-open
- DBCS-only
– DBCS-graphic field with:
- DBCS-graphic
– UCS2-graphic field with:
v
v
v
v
- UCS2-graphic
Only the data fields specified in the join specifications for each file are used to join the files. For the
purposes of joining the files, the other fields in the files are ignored.
Character fields of different lengths can be joined.
A fixed-length character field can be compared to a variable-length character field. Variable-length fields
are identified by a V in the Dec column in the list of fields.
If you specified option 1, matched records, on the Specify Type of Join display, you can type *ALL in the
first four spaces of the left field, but only in the first field name position, rather than specifying any join
test. If *ALL is used, each record in the first file is joined to every record in the other files. For example,
if a file of 2000 records is joined to a file of 3000 records using *ALL, the result is a joined file of
6000000 records. Using *ALL can significantly degrade the performance of your query. If join tests are
not specified between each file, those files without a test are joined using the *ALL method.
Note: The fields you use to join the files do not have to be used in selecting the records or included in
the query report. You can use those same fields in other ways in the query definition, such as for
record selection or as part of the output of the query.
Examples of joining files in a Query for iSeries query
Consider an example where you want to join a master name and address file named RESIDENTS to a name
and telephone number file name PHONELIST.
46
Query for iSeries Use V5R2
You can obtain several different results from a file join when you use different combinations of join tests
and options on the Specify How to Join Files display.
Following are some examples of how you might use the three different types of joins. All of the examples
assume that A.NAME EQ B.NAME was specified on the Specify How to Join Files display.
Example: Selecting matched records from all selected files in a Query for iSeries
query
Type a 1 if you want records selected from each file only if they have a match with at least one record in
each and every one of the other selected files. That is, for a record to be selected, all the files must have
a matching record as determined by the join specification(s). A match occurs when, for each file used in
the query, the contents of its fields selected for comparison match the test condition(s) given on the
Specify How to Join Files display. (This type, option 1, has no primary or secondary files; all files are
treated equally.)
In this example, if you join files A and B using option 1 (Matched records), the query report contains the
following records. (The report fields and layout are not important here.)
Chapter 4. Specifying and selecting files for a Query for iSeries query
47
Example: Selecting matched records using a primary file in a Query for iSeries
query
Type a 2 if you want to include in the query output every record in the primary file and all the matching
records from all the other (secondary) files, whenever they exist. Every record in the primary file is
selected whether or not it has a match. (The primary file is always the one that was selected first in your
query definition.) Exception: if a field from the primary file used in a join test is null, the primary record is
not selected.
In this example, the RESIDENTS file is the primary file, so all of its records (numbered 1 through 6) are
included in the query report, assuming all of the records meet the selection tests on the Select Records
display. The PHONELIST file is the only secondary file being used, and it supplies a telephone number for
each primary record that it matches; the NAME field is used as the comparison test field in both files. Note
also that record 4 is included twice in the report, because Richard A Klein has two records, each with a
different telephone number, in the secondary file.
If a secondary file does not have a record that matches the join specifications of the primary file’s record,
blanks (for character fields), zeros (for numeric fields), or January 1, 0001 (for date fields) are used as
data for that secondary file’s selected fields. If these fields are included as output fields in the query report,
the substituted characters or values are used in the report. In the example, the PHONE field shows blanks
because it was coded as a character field. In the case where the fields are null-capable, the specified
default values are used as data for that secondary file’s selected fields. If a default value is not specified, a
null value is shown as a dash (-).
Note: If the secondary file was defined using DDS, values other than blanks zeros, and January 1, 0001
can be used when the DFT keyword defines default values for any of the fields. If the DFT keyword
specifies a default value for a field that is used in the query report, the default value is substituted
in the report when the secondary file does not have a matching record.
Example: Selecting unmatched primary file records in a Query for iSeries query
Type a 3 if you want to select, in the primary file, only records that lack matches in at least one secondary
file. That is, you want to select every primary record that does not have a matching record in all the
secondary files. For example, if four files were joined and only two of the three secondary files had
matching records, then a record containing the selected information in the primary and two matching
secondary files (and the default data, if any, from the unmatched secondary file) is included as a single
record in the query output.
This type of join is typically used to list records that are missing in one or more secondary files.
48
Query for iSeries Use V5R2
In our example, the RESIDENTS file is still the primary file, so only its records that do not have a matching
secondary record are included in the query report. The PHONELIST file has two such unmatched records;
the residents identified in records 2 and 6 do not have a telephone number, so there are no records for
them in the secondary file. (The NAME field is used again as the comparison test field in both files.)
As with the previous type of join, blanks (for character fields) or zeros (for numeric fields) are used as the
data for a missing record in a secondary file’s selected fields. Or, if the DDS DFT keyword was used to
define default values, those default values are used instead. (In our example, the PHONE field shows
blanks, since it was coded as a character field and no DFT value was defined for the PHONE field.)
Sequencing secondary files for a primary join in a Query for iSeries
query
The order in which you specify secondary files on the Specify File Selections display is important for some
joins.
Specifically, the order of secondary files is important if all of the following are true:
v The join type is 2 (primary matched) or 3 (primary unmatched). Both types have one primary file,
followed by secondary files.
v The query specifies three or more files in all.
v One or more secondary files do not have join tests connecting them to the primary file.
If these points apply to your query, then follow the secondary file sequence rule:
Use join tests to connect each secondary file to a file listed above it on the Specify File Selections display.
For instance, when joining four files, use a join test to connect the second file to the first, and use another
test to join the third file to the first or second file. The fourth file can be connected to any of the other files.
Example: Sequencing secondary files in a Query for iSeries query
To show how the secondary file sequence rule ensures that you get the desired results when you join
more than two files, the following example uses three files in two ways, correctly and incorrectly. The first
method, the correct method, produces five records when the files are joined. The incorrect method
produces 15 records. The only difference between the methods is that the order of the second and third
files is changed. For primary joins, Query joins files in the order indicated on the Specify File Selections
display, not in the order indicated by the join tests.
Three files named CUSTOMER, PURCHASE, and ITEM are to be joined so that a report can be produced that
lists each customer’s name and city, the item purchased (one item per line in the report), and a description
of the item. (For example, if Monique Pottier bought three items, the report should have three lines for her,
with each line listing her name, city, one item, and the item description.) If the customer did not make any
purchases, the report should include the customer once in the list with blank item and description fields.
Chapter 4. Specifying and selecting files for a Query for iSeries query
49
Correct method:
On the Specify File Selections display, type the CUSTOMER file first, the PURCHASE file second, and the ITEM
file third. Specify the file IDs A, B, and C, respectively. The join type is 2 (Matched records with primary
file). The join tests are:
A.NAME
B.ITEM
EQ
EQ
B.NAME
C.ITEM
Query performs the file join in two steps:
Step 1: Join the first two files, A and B.
Query joins the files in the order listed, starting with file A (CUSTOMER), and file B (PURCHASE). Query joins
each record in file A to any record in file B for which the NAME field in A is equal to the NAME field in B.
Because this query is join type 2 (primary matched), every record in the primary file A is included in the
join. If a record in file A (such as Martinez) has no match in B, Query joins it to a default record for file B,
which has blank values for fields. The result of step 1 in our example is a file called AB. (Note that AB is a
working file used to build the joined file that you want in your report. You cannot see file AB.)
Step 2: Join file AB to file C.
Query joins each record in file AB to every record in ITEM file C for which B.ITEM equals C.ITEM. If a record
in AB (such as Martinez) has no match in file C, Query joins it to a default record for file C, which is also
blank. This completes the join operation. Each record in primary file A is represented one or more times in
the five records.
50
Query for iSeries Use V5R2
Incorrect method:
On the Specify File Selections display, type the CUSTOMER file first, and specify the file ID as A. Type the
ITEM file second (file C), and the PURCHASE file third (file B), which is in the opposite order from the correct
method. Note that each file has the same file ID as before. Specify the join type and join tests the same
as before. This method does not follow the secondary file sequence rule because file C is not connected
by a join test to the file (A) listed above it.
Chapter 4. Specifying and selecting files for a Query for iSeries query
51
Query performs the file join in two steps:
Step 1: Join the first two files, A and C.
Query joins the files in the order listed, starting with file A (CUSTOMER), and file C (ITEM). But there is no join
test that compares a field in A to a field in C. Query joins every record in file A (one record at a time) to
52
Query for iSeries Use V5R2
every record in file C. Because there are three records in A and five records in C, the result is 15 records.
The join tests are not used in this step. The result of step 1 this time is a working file called AC.
Step 2: Join file AC to file B.
Query joins each record in file AC to every record in PURCHASE file B for which A.NAME equals B.NAME and
B.ITEM equals C.ITEM. If a record in AC (such as Martinez) has no match in B, Query joins it to a default
record for file B, which is blank. This completes the join operation.
The incorrect method produces 15 records, which is 10 too many. Each customer has five records, one for
each item description, even if the customer made no purchases. Note that if the ITEM file has 1000 records
instead of five, the correct method still selects five records, but the incorrect method selects 3000 records.
Also, the ITEM and DESCRIPT values for Martinez are not blank as they should be.
In summary, this problem does not affect queries with join type 1 (matched), queries with just two files, or
queries that use the primary file in each join test. In this example, the logical order to specify files is
CUSTOMER, PURCHASE, and ITEM, with PURCHASE in the middle because it is the connection between the
CUSTOMER and ITEM files. This logical order is also the correct order.
Displaying all join tests in a Query for iSeries query
When you press the Enter key on the Display File Selections display (see “Displaying all files selected on
the Query for iSeries Display File Selections display” on page 41), the Display Join Tests display is shown.
The information on this display is for your information only; none of the entries can be changed here. (The
following display shows some sample information.)
Display Join Tests
Type of join . . . . . . :
Field
A.NAME
Test
EQ
Matched Records
Field
B.NAME
Press Enter to continue.
Bottom
F12=Cancel
The Display Join Tests display shows:
v The type of join being used to join all the files in the query. One of three join types can be specified:
– Matched records
– Matched records with primary file
– Unmatched records with primary file
The primary file, used in the last two types, is the first file listed on the Display File Selections display.
For more information, press F11 (Search index), type joining files as the index search words, then press
the Enter key.
v The join tests being used to join the files.
Chapter 4. Specifying and selecting files for a Query for iSeries query
53
The Field columns show the fields being used to join the files. Each field name can have two parts: the
file ID and the actual name of the field, separated by a period. For example, if a field named CUSTNUM
exists in files T01 and T02 used in this query, they would be shown as T01.CUSTNUM and T02.CUSTNUM. To
find the files associated with the file IDs (such as T01), press F12 to show the Display File Selections
display.
The Test column shows the test values that determine how the files are to be joined.
Handling missing fields in a Query for iSeries query
The Fields Missing from File Definition display is shown when report fields (that is, fields used in the
report) that were in a file selection used by the query are now missing from that file selection. Fields that
are missing from files originally selected in a query can cause errors or give you bad results when the
query is run. They may have been used, for example, to define result fields or to select or sort records in
addition to being selected for output.
Fields Missing from File Definition
Query . .
Library.
File . . .
Library.
Format . .
File ID .
.
.
.
.
.
.
.
.
.
.
.
.
.
.
.
.
.
.
:
:
:
:
:
:
QRY1
LIB1
FILEA
LIBA
FMT1
T01
Option . . . . . :
Change
The following fields may have been used in the query, and were expected
in this file definition, but were not found.
Field
NAME
ADDR
PHONE
SERIAL#
Press Enter to continue recovery of query definitions.
F12=Cancel
This display is shown at least once for each file selection that has missing fields. Once you are aware that
fields are missing, you may want to press F12 (Cancel) to bypass seeing any additional displays of
missing fields. Or, if you want to see which of the other file selections may have missing fields, use the
Enter key to see each display, one after the other. You might also want to return to a previous display and
use F5 (Report) to run the query and see how the report is affected by the missing fields.
Either you must remove the fields from wherever they are used in the query definition, or you must select
different files or formats that contain those fields. Or, you can leave Query and check the files or formats
themselves. If this display appeared when you first started to change or display a query, something may
have changed in the files or formats since the query was created or last changed. For example, a record
format definition may have had one or more of its fields deleted, or an IDDU-defined file may have been
linked to a dictionary definition but is now unlinked or is linked to a different definition.
The situations that can cause this display to appear are:
v When you specify a different file selection. This can occur while you are changing a query or are
defining a new query that already has file selections specified.
v When you start to change or display an existing query definition.
54
Query for iSeries Use V5R2
Handling missing fields during file selection process of a Query for
iSeries query
While you were changing a query, or were defining a new query that already had file selections specified,
you chose the Specify file selections option on the Define the Query display. Then, on the Specify File
Selections display, you selected a file or format that does not have all of the report fields that your first
selection contained. As a result, this display was shown with the missing fields.
For this situation, when you press F12 or the Enter key, you return to the Specify File Selections display
without affecting your previous file (and format) selections. Once there: you can still confirm the file
selections and continue by pressing the Enter key (even though Query found fields missing in the current
file selections); you can specify a different file on the display and then press Enter; or you can press F12
to leave the file selections unchanged and then leave Query to go do something about the file (or format)
definitions.
If you choose to press the Enter key as soon as you return to the Specify File Selections display,
confirming that you want to use the current file selections, Query uses as much of the file, format, and field
information as it can for the file selections now in this query. It removes all the missing fields from the
query definition for some of the definition steps, such as Select and sequence fields and Select sort fields.
When you select a logical file for use with Query or DB2 UDB for iSeries programs without specifying any
sort fields, unpredictable results may occur. For example, you may not receive the logical view of the
physical file.
After Query has done all it can, it shows the Specify How to Join Files display if the query uses multiple
files and there are errors caused by missing fields; otherwise, it continues with the definition steps selected
on the Define the Query display, or it returns you to the Define the Query display. On the Define the Query
display, any other field-related definition steps affected by the missing fields are shown in reverse image.
You must select each of these definition steps, such as Define result fields and Select records, and correct
the problems caused by the missing fields. On the definition displays for the affected steps, the
expressions or selection tests that use fields that are now missing are highlighted.
Handling missing fields when starting to change or display a Query for
iSeries query
When you started to change or display an existing query (by specifying option 2 or 5 on the Work with
Queries display), one of the following occurred:
v Query determined that one or more report fields are no longer in a file or format used by the query; the
fields have been removed since the query was defined or was last changed.
v Query found a file that was unusable (for example, the query may have been migrated from another
system but a file containing the fields was not) and showed the Change File Selections display. On that
display, you selected a different file to correct that problem, but its record format does not have all of
the fields that your first selection contained.
For these two situations, when the Fields Missing from File Definition display is shown, you can either
press F12 or press the Enter key:
v If you choose to press the Enter key, you might see the Fields Missing from File Definition display again
if there are additional missing fields to be displayed for this or another file. If not, Query uses as much
of the file, format, and field information as it can for the file selections now in this query. It removes all
the missing fields from the query definition for some of the definition steps, such as the Select and
sequence fields and Select sort fields steps. When you select a logical file for use with Query or DB2
UDB for iSeries programs without specifying any sort fields, unpredictable results may occur. For
example, you may not receive the logical view of the physical file.
After Query has done all it can, it shows the Define the Query display. On it, other field-related definition
steps affected by the missing fields are shown in reverse image. You must select each of these
definition steps, such as Specify file selections, Define result fields, and Select records, and correct the
Chapter 4. Specifying and selecting files for a Query for iSeries query
55
problems caused by the missing fields. You must also ensure that none of the fields were used in break
test values on the Format Report Break display. On the definition displays for the affected steps, the
expressions or selection tests that use fields that are now missing are highlighted.
v If you press F12 (Cancel), you return to the Work with Queries display without affecting your previous
file (and field) selections. You can press the Enter key to go again (assuming you were there once) to
the Change File Selections display and select another file. Or, you can press F3 (Exit) to stop working
with queries, leave Query, and then work with the files or formats.
56
Query for iSeries Use V5R2
Chapter 5. Defining result fields in Query for iSeries
This chapter describes how you define result fields. They need to be defined in your query if the
information that you want to present in your report does not exist as a field in your selected file(s). For
example, you want your report to show the number of days, but your database file only has a field
containing the number of weeks. You can define a result field that contains the number of days by creating
an expression that performs a calculation on the number of weeks.
After you have defined a result field, you can use it like any other field that exists in your selected file(s).
You can include the result field in your output, you can use it to define another result field, you can use it
as a sort field, and so on.
While you are defining result fields, a list in the lower part of the display assists you by showing the names
of fields in the files selected for your query. If you want to see additional information about each field such
as descriptive text, length, and decimal positions, use F11 (Display text) to switch between the
multiple-column list and the single-column list. This information is very useful when you are deciding on a
result field name and when you are building your expressions. The page keys will present all the fields
available, four at a time. For more information on using F11, see “Using F11 to display additional
information about Query for iSeries queries” on page 15.
In most cases, the result fields that you define appear in your query output, but selecting them for output is
optional since some result fields are only needed as an intermediate step to obtain a final result. For
example, you might define a result field only for the purpose of selecting records, and you do not want the
result field to appear on the report.
Creating results fields in Query for iSeries
The Define Result Fields display appears if you typed a 1 next to the Define result fields option on the
Define the Query display. You use the Define Result Fields display to create the result fields that you need
for your query. (The following display has some sample fields listed in the bottom part.)
Define Result Fields
Type definitions using field names or constants and operators, press Enter.
Operators: +, -, *, /, SUBSTR, ||, DATE...
Field
Expression
Column Heading
Len Dec
__________ _________________________________ ____________________ _____ __
_________________________________ ____________________
_________________________________ ____________________
__________ _________________________________ ____________________ _____ __
_________________________________ ____________________
_________________________________ ____________________
Bottom
_________________________________________________________________________
Field
Field
Field
Field
ACCTNUMBER
STREETADDR
TELENUMBER
DATELASTPD
LASTNAME
CITY
CRLIMIT
INIT
STATE
BALDUE
COMPANY
ZIPCODE
PASTDUE
Bottom
F3=Exit
F5=Report
F9=Insert
F11=Display text
F12=Cancel
F13=Layout
F20=Reorganize
F24=More keys
To define a result field, you specify a unique name for the result field by entering a name in the Field
column on the Define Result Fields display. You cannot specify the name of a field that exists in your
selected file(s)—the list in the lower part of the display shows you these field names. To page through the
field list, position the cursor in the list part of the display and use the page keys. (A one-word indicator
© Copyright IBM Corp. 2000, 2002
57
always appears below and to the right of the list to tell you where you are in the list. More... means that
there are more items after, and possibly before, the items currently shown. Bottom means that you are at
the end of the list, but there may be more items before those currently shown.) Use F19 (Next group) to
reposition the list at the beginning of the next logical group of fields (the cursor can be anywhere when
you use F19). (The first group is selected fields, if any, and the second group is sort fields, if any. If there
are not selected fields, then the fields are grouped by file, and within each file grouping, the fields are
listed in the order in which they appear in the file definition.)
You can specify the length and number of decimal positions for a numeric result field by filling in the Len
and Dec prompts on this display, or you can have Query determine the length and decimal positions for
you by leaving the prompts blank.
You can specify a column heading for any result field. If you leave the prompt blank, the result field name
is used as the column heading for the result-field definition.
Query for iSeries result field name
Since Query result field names are similar to database field names, create them according to the following:
v Start the name with an alphabetic character (A through Z, $, #, or @) and use no more than 9
alphanumeric characters (A through Z, 0 through 9, $, #, @, or _) for the remaining characters. Do not
use blanks within the name.
Note: Use A-Z or 1-9 if this query is sent to other systems or used in a multilingual environment.
v Do not use any names from the list on the lower part of the display or the names of other result fields.
Enter an expression that creates the desired value for your result field.
Query for iSeries expressions
In Query for iSeries, an expression is a representation of a value with field names, constants, functions,
or keywords appearing alone or in combination with operators. It can be either a numeric, character
(SBCS or DBCS), date, time or timestamp expression:
v A numeric expression assigns numbers or performs an operation (calculation) on them. Numeric
expressions can contain the following operators:
+ (Addition)
− (Subtraction)
* (Multiplication)
/ (Division)
v A character expression assigns characters or performs an operation on them. Character expressions
can contain the following operators or functions:
|| (Concatenation operator)
SUBSTR (Substring function)
VALUE (Value function)
DIGITS (Digits function)
Note: See “CCSID and result field expressions in Query for iSeries” on page 252 to see how CCSIDs
are handled for the concatenation symbol.
v A date expression performs an operation on a date. Date expressions can contain the following
operators or functions:
+ (Addition)
− (Subtraction)
CHAR
DATE
58
Query for iSeries Use V5R2
DAY
DAYS
MONTH
YEAR
v A time expression performs an operation on a time. Time expressions can contain the following
operators or functions:
+ (Addition)
− (Subtraction)
CHAR
TIME
HOUR
MINUTE
SECOND
MICROSECOND
v A timestamp expression performs an operation on a timestamp. Timestamp expressions can contain
the following operators or functions:
+ (Addition)
− (Subtraction)
CHAR
TIMESTAMP
If any argument can be null, the result field can be null. If any argument is null, the result is null.
Query for iSeries numeric expressions
To define a numeric result field (that is, a result field that contains numbers) for your query, you need to
follow the rules for creating numeric expressions. A numeric expression for a result field can contain the
following, alone or in combination:
v Numeric field names (names of fields that contain numbers). You can use the names of numeric fields
listed on the lower part of the display (numeric fields have numbers shown in the Len and Dec columns)
and the names of previously defined numeric result fields. For example, you can multiply two numeric
fields and put the total in a result field named AMOUNT:
AMOUNT = QUANTITY * PRICE
v Numeric constants (any numbers such as 4 or −12.5). The rules for using numeric constants are:
– The total length can be no more than 31 digits. (For a single-precision floating-point constant, the
total length can be no more than nine digits. For a double-precision floating-point constant, the total
length can be no more than 17 digits.) This includes the digits both to the left and right of the
decimal point but does not include the decimal point. All the digits can be to the right of the decimal
point.
– Use the correct decimal separator. Press F17 to show the decimal separator that must be used (see
“Displaying the format of constants in Query for iSeries” on page 17).
– Do not use a currency symbol (like $5000), and do not use thousands separators (like 5,000).
v Numeric functions. The VALUE function returns the first value that is not null. See “VALUE Query for
iSeries function” on page 62.
Other examples of numeric expressions for a field named AMOUNT are:
QUANTITY
5
5 + 6
5 + QUANTITY
Chapter 5. Defining result fields in Query for iSeries
59
When you do more than one calculation within a numeric expression, use parentheses to tell Query in
what order to do the calculations and to make the expression easier to understand. If you use nested
parentheses for example, 60 * (A − (B + C)), the calculations are done for the innermost pair first (in the
example, B + C), then the next innermost pair, and so on. If you do not use parentheses, Query first does
multiplication and division, left to right, and then addition and subtraction, left to right. For example, (5 +
4) * 2 equals 18, but 5 + 4 * 2 equals 13.
Be aware that the result of a numeric expression, especially one containing division and multiplication
operations, is truncated or rounded depending on what you specify on the Specify Processing Options
display (see Chapter 14, “Specifying Query for iSeries processing options”). If you divide by zero, your
query may not run.
Query for iSeries character expressions
To define a character result field (that is, a result field that contains SBCS or DBCS characters) for your
query, you need to follow the rules for creating character expressions. A character expression for a result
field can contain the following, alone or in combination:
v Character field names (names of fields that contain SBCS or DBCS characters). You can use the
names of SBCS- or DBCS-character fields listed on the lower part of the display (in the Dec column,
SBCS-character fields have blanks or Vs (if variable length), DBCS-only fields have Js, DBCS-open
fields have Os, DBCS-either fields have Es, and DBCS-graphic fields have Gs) and the names of
previously defined SBCS- or DBCS-character result fields.
v Character constants (SBCS or DBCS characters enclosed in apostrophes, such as ’ABCdef123’ or
’This text includes blanks and special characters **$$’). The rules for using character constants
are:
– The character constant must be enclosed in apostrophes.
– Any combination of letters, numbers, or special characters (for example, $ or #) can be used.
– If two apostrophes are used within a character string, the two apostrophes become a single
apostrophe in the output. For example, ’October’s Profits’ becomes October’s Profits.
– Words with lowercase and uppercase letters are used exactly as typed.
– If a character constant represents a valid date, time, or timestamp, and is used with a date, time, or
timestamp field, it is considered a date, time, or timestamp constant.
– A DBCS character constant must include DBCS shift-out and shift-in characters, represented by the
characters < and > in the following example: ’<D1D2D3>’. A DBCS-graphic character constant must
be preceded by an uppercase or lowercase G, for example, G’<D1D2D3>’.
v Character operators and functions (one or more concatenation operations and character functions
SUBSTR, DIGITS, and VALUE—see “Query for iSeries character functions” on page 61).
Query for iSeries concatenation operation
Character expressions can include one or more concatenation operations. Concatenation operations must
be specified in the form:
QQ value-1 || value-2
QR
v Value-1 and Value-2 are the character fields or character constants that are to be concatenated. You
can use SBCS- and DBCS-character field names (including character result fields) and character
constants (including DBCS-open, DBCS-only, and DBCS-graphic constants). A DBCS-graphic field can
be concatenated only with another DBCS-graphic field or constant.
v Two logical OR symbols (||) make up the concatenation operator used to join the two values. (See
“CCSID and result field expressions in Query for iSeries” on page 252 to see how CCSIDs are handled
for the concatenation symbol.)
60
Query for iSeries Use V5R2
For example, if a character constant ’Dr. ’ and a character field named LASTNAME containing the value
Smith are concatenated, the result is a field containing the value Dr. Smith. Other examples of character
expressions are:
NAME
’Mr.’
’Mr.’ || NAME
FIRSTINIT || MIDINIT
If any field is null-capable, the resulting field is null-capable. If any field used in a concatenation is null, the
resulting expression is null.
Except for the case of two DBCS-open fields, if all concatenated values are either fixed-length fields or
constants, the result is a fixed-length field. The concatenation of two DBCS-open fields results in a
DBCS-open field that allows for the varying lengths that can result from concatenating DBCS-open fields.
If any field is variable-length, the result is a variable-length field.
A UCS2-graphic field can only be concatenated with another UCS2-graphic field.
The CCSID of the result is as follows:
v CCSID 65535 if any field or constant has CCSID 65535.
v Mixed CCSID if any field has a mixed CCSID.
v CCSID of a file field has precedence over result fields or constants.
v CCSID of result fields has precedence over constants.
v CCSID assigned to the result will be the CCSID of the first of the two values if both concatenated
values are fields from the file, or both are result fields.
v CCSID 65535 is assigned to a DBCS-graphic constant if the job CCSID is a single-byte CCSID with no
associated DBCS CCSID.
Query for iSeries character functions
Character expressions can include the character functions SUBSTR, DIGITS, and VALUE.
SUBSTR Query for iSeries function
The SUBSTR function returns part of a character value. The form is:
QQ SUBSTR ( value ,
offset
,length
)
QR
v Value is the name of a character field (including result fields that are already defined), a character
expression, or a character constant. It can be an SBCS or DBCS field, an SBCS constant, a
DBCS-open constant, a DBCS-only constant, or a DBCS-graphic constant. A SUBSTR operation on a
DBCS-only or DBCS-either field produces an SBCS character data type. A SUBSTR operation on a
DBCS-open field produces a DBCS-open data type. A SUBSTR operation on a DBCS-graphic field
produces a DBCS-graphic data type. If Value is a field, the CCSID of the result is the CCSID of the
field. If Value is a constant, the CCSID of the result is the associated CCSID of the job of the user who
creates the query (or of the user who changes the query, if the original CCSID was 65535).
v Offset is the starting character position within the field or character constant. An expression can also be
used for the offset.
v Length is the number of characters that make up the substring. An expression may be used for length.
You do not need to specify a length. If you do not, the resulting substring is the entire field or character
constant from Offset to the end.
You must use commas between the substring elements; blanks are allowed after the commas. If you are
sending queries between countries that use the comma for a decimal point, put a blank after the comma
separating the offset and length.
Chapter 5. Defining result fields in Query for iSeries
61
Example of a character field substring: If a character field named ALPHA containing the value ABCDEFGHI is
used in SUBSTR(ALPHA,4,3), the result is a character field containing DEF. If you do not specify a value for
Length, the result is DEFGHI.
If the Offset and Length values cause the substring to exceed the right end of the field, you will receive an
error message. If any argument can be null, the result field can be null. If any argument is null, the result
is null.
If a variable-length field is used for Value, the result is a variable-length field. If either Offset or Length is
an expression, the result is a variable-length field.
For SBCS, DBCS-open, DBCS-only, and DBCS-either fields, Offset and Length refer to bytes, including
shift-out and shift-in characters. For example, if FIELD1 contains string <A1B1C1D1E1F1>, the operation
SUBSTR(FIELD1,2,3) results in a character field containing A1B.
For DBCS-graphic fields, Offset and Length refer to the number of double-byte characters. Shift-out and
shift-in characters in a graphic constant are ignored. For example, the operation
SUBSTR(G’<A1B1C1D1E1F1>’,2,3) results in a graphic field containing B1C1D1.
DIGITS Query for iSeries function
The DIGITS function returns a character representation of a number. The form is:
QQ DIGITS ( expression )
QR
The argument must be an integer or decimal value. The result of the function is a fixed-length character
string. The CCSID of the string is the default SBCS CCSID at the application server. If the argument can
be null, the result can be null. If the argument is null, the result is a null value.
The result is a string of digits that represents the absolute value of the argument without regard to its
scale. The result does not include a sign or a decimal point. The result includes any necessary leading
zeros so that the length of the string is:
v 5, if the argument is a small binary value with no decimal positions.
v 10, if the argument is a large binary value with no decimal positions.
v The length of the argument, if the value is a packed, zoned, or binary field with decimal positions.
Example:
DIGITS(JOBCODE)
VALUE Query for iSeries function
The VALUE function can be used in any type of expression: character, numeric, date, time, or timestamp.
The VALUE function, VALUE(x,y), returns the first argument that is not null. The arguments are evaluated
in the order in which they are specified. The arguments must be compatible; character string arguments
are not compatible with numbers. X is a field and Y can be a field, value, or a list of fields or values. X can
be any data type and may be a previously defined result field or any file field.
The result can be null only if all arguments can be null; the result is null only if all arguments are null. The
X value is not checked to determine if it is null-capable.
Example:
VALUE(commission, 0)
If commission is null, the result is 0.
62
Query for iSeries Use V5R2
Note: If you are sending queries between countries that use the comma for a decimal point, put a blank
after each comma separating values in a list of numeric values.
The selected argument is converted, if necessary, to the attributes of the result. The attributes of the result
are determined as follows:
v If the arguments are dates, the result is a date. If the arguments are times, the result is a time. If the
arguments are timestamps, the result is a timestamp.
v If the arguments are constants, the CCSID of the result is the CCSID that would result if the arguments
were concatenated.
v If all arguments are fixed-length, the result is a fixed length of n, where n is the length of the longest
argument.
v If any argument is variable length, the result is variable-length with length attribute n, where n is the
length attribute of the argument with the greatest length attribute.
v If the arguments are numbers, the data type of the result is the data type that would result if the
arguments were added.
v If all arguments are DBCS-only, the result is DBCS-only.
v If the arguments are any combination of bracketed-DBCS, the result is DBCS-open.
v If the arguments are DBCS-graphic, the result is DBCS-graphic.
If X is a DBCS-graphic field, Y fields and constants must all be DBCS-graphic. If X is not a DBCS-graphic
field, no Y fields or constants may be DBCS-graphic.
The CCSID of the result is as follows:
v CCSID 65535 if any field or constant has CCSID 65535.
v Mixed CCSID if any field has a mixed CCSID.
v CCSID of a file field has precedence over result fields or constants.
v CCSID of result fields has precedence over constants.
v CCSID assigned to the result will be the CCSID of the first of the two values if both concatenated
values are fields from the file, or both are result fields.
v CCSID 65535 is assigned to a DBCS-graphic constant if the job CCSID is a single-byte CCSID with no
associated DBCS CCSID.
VARCHAR Query for iSeries function
|
|
|
|
The VARCHAR function returns a varying-length character string representation of a string. VARCHAR
supports conversion from CHARACTER to VARCHAR and UCS-2 GRAPHIC to VARCHAR. Conversion of
numeric type data is not supported. VARCHAR supports conversion from CHARACTER to VARCHAR and
UCS-2 GRAPHIC to VARCHAR. Conversion of numeric type data is not supported.
QQ VARCHAR ( expression
,
length
DEFAULT
)
QR
, ccsid
The first argument must be a string expression; it must not be DBCS-graphic data.
The second argument, if specified as a length, is the length attribute of the resulting varying-length string.
The second argument must be an integer constant between 1 and 32740 if the first argument is not
nullable or between 1 and 32739 if the first argument is nullable. If the first argument is mixed data, the
second argument cannot be less than 4. If the second argument is not specified or DEFAULT is specified,
the result length is determined as follows, where n is the length attribute of the first argument.
v If the first argument is SBCS or mixed data, the result length is n.
v If the first argument is UCS2 graphic data and the result is SBCS data, the result length is n.
Chapter 5. Defining result fields in Query for iSeries
63
v If the first argument is UCS2 graphic data and the result is mixed data, the result length is (2.5*(n-1)) +
4.
The third argument, if specified, must be a valid SBCS or mixed CCSID. If it is a SBCS CCSID, the first
argument cannot be a DBCS-either or DBCS-only string.
The result of the function is the character string that would result if the character string expression was
assigned to a varying-length host variable with a length attribute of n, where n is the length attribute of the
result. If the length attribute of the argument is greater than the length attribute of the result, truncation is
performed and no warning is returned.
The result data type is VARCHAR.
If the ccsid (third argument) is not specified:
v If the first argument is SBCS character, then the result is SBCS character. The CCSID of the result is
the same as the CCSID of the first argument.
v If the first argument is mixed (DBCS-open), DBCS-only, or DBCS-either then the result is mixed. The
CCSID of the result is the same as the CCSID of the first argument.
v If the first argument is non-UCS2 graphic, then the result is mixed. The CCSID of the result is the
associated mixed CCSID of the DBCS CCSID.
v If the first argument is UCS2 then the CCSID of the result is the job CCSID. If the job CCSID is mixed,
then the result type is mixed. If the job CCSID is SBCS, then the result is SBCS character.
If the ccsid is specified:
v The result is dependent on the specified CCSID. If ccsid is a SBCS CCSID, then the result type is
SBCS character. If ccsid is a mixed CCSID, then the result type is mixed character.
v The CCSID of the result is the ccsid.
If the first argument can be null, the result can be null; if the first argument is null, the result is the null
value.
Following are examples of using VARCHAR to convert from CHARACTER to VARCHAR and UCS-2
GRAPHIC to VARCHAR:
RESCHAR
varchar(char1,10,37)
where char1 is a character field to be converted
10 is the length of the output variable
37 is the ccsid of the output variable
RESUCS2
varchar(ucs2,8,37)
where ucs2 is a UCS-2 graphic field to be converted
8 is the length of the output variable
37 is the ccsid of the output variable
| Following are examples of using VARCHAR to convert from CHARACTER to VARCHAR and UCS-2
| GRAPHIC to VARCHAR:
|| RESCHAR
|
|
|
varchar(char1,10,37)
where char1 is a character field to be
converted, 10 is the length of the
output variable, and 37 is the CCSID
of the output variable
| RESUCS2
|
|
|
varchar(ucs2,8,37)
where ucs2 is a UCS-2 graphic field
to be converted, 8 is the length of the
output variable, and 37 is the ccsid of
the output variable
64
Query for iSeries Use V5R2
VARGRAPHIC Query for iSeries function
The VARGRAPHIC scalar function provides a way to convert:
v character data (SBCS and Mixed) to DBCS graphic.
v character data (SBCS and Mixed) to UCS2 graphic.
v UCS2 graphic to UCS2 graphic.
v DBCS graphic to UCS2 graphic.
QQ VARGRAPHIC ( expression
,
)
length DEFAULT
QR
,ccsid
The VARGRAPHIC function returns a graphic string representation of a string expression.
The first argument must be a string expression and must not be bit data.
The second argument, if specified as length, is the length attribute of the result and must be an integer
constant between 1 and 16370 if the first argument is not nullable or between 1 and 16369 if the first
argument is nullable.
If the second argument is not specified or DEFAULT is specified, the length attribute of the result is the
same as the length attribute of the first argument.
In the following rules, S denotes one of the following:
v If the string expression is a host variable containing data in a foreign encoding scheme, S is the result
of the expression after converting the data to a CCSID in a native encoding scheme.
v If the string expression is data in a native encoding scheme, S is that string expression.
If the third argument is specified, the CCSID of the result is the third argument. It must be a DBCS or
UCS2 CCSID. The CCSID cannot be 65535.
If the third argument is not specified, the CCSID of the result is determined by a mixed CCSID, let M
denote that mixed CCSID. M is determined as follows:
v If the CCSID of S is a mixed CCSID, M is that CCSID.
v If the CCSID of S is an SBCS CCSID:
– If the CCSID of S has an associated mixed CCSID, M is that CCSID.
– Otherwise the operation is not allowed.
M
930
933
935
937
939
5026
5035
Result CCSID
300
834
837
835
300
4396
4396
Description
Japanese EBCDIC
Korean EBCDIC
S-Chinese EBCDIC
T-Chinese EBCDIC
Japanese EBCDIC
Japanese EBCDIC
Japanese EBCDIC
DBCS Substitution
Character
X’FEFE’
X’FEFE’
X’FEFE’
X’FEFE’
X’FEFE’
X’FEFE’
X’FEFE’
The result of the function is a varying-length graphic string. If the expression can be null, the result can be
null. If the expression is null, the result is the null value. If the expression is an empty string or the
EBCDIC string X’0E0F’, the result is an empty string.
Chapter 5. Defining result fields in Query for iSeries
65
The actual length of the result depends on the number of characters in the argument. Each character of
the argument determines a character of the result. Regardless of the CCSID, every double-byte code point
in the argument is considered a DBCS character, and every single-byte code point in the argument is
considered an SBCS character with the exception of the EBCDIC mixed data shift codes X’0E’ and X’0F’.
v If the nth character of the argument is a DBCS character, the nth character of the result is that DBCS
character.
v If the nth character of the argument is an SBCS character that has an equivalent DBCS character, the
nth character of the result is that equivalent DBCS character.
v If the nth character of the argument is an SBCS character that does not have an equivalent DBCS
character, the nth character of the result is the DBCS substitution character.
The equivalence of SBCS and DBCS characters depends on M.
If the result is UCS2 then, each character of the argument determines a character of the result. The nth
character of the result is the UCS2 equivalent of the nth character of the argument.
Date, time, and timestamp expressions in Query for iSeries
Date, time, and timestamp data types and values can be assigned to result fields. A date, time, or
timestamp expression for a result field can contain the following, alone or in combination:
v Date, time, or timestamp field names (names of fields that contain date, time, or timestamp values)
v Character constants (SBCS or DBCS characters enclosed in apostrophes— see examples and rules
under “Query for iSeries character expressions” on page 60.)
v Date, time, and timestamp functions and operations (one or more of the following functions and
arithmetic operations):
+ (Addition)
− (Subtraction)
CHAR
CURRENT
VALUE
DATE
DAY
DAYS
MONTH
YEAR
TIME
HOUR
MINUTE
SECOND
MICROSECOND
TIMESTAMP
v Durations (a length of time, represented by a labeled duration, date duration, time duration, or
timestamp duration— see “Durations in Query for iSeries” on page 73.)
Character constants can represent date, time, or timestamp values when used with date, time, or
timestamp fields or functions. They can be used in expressions and treated like a date, time or timestamp.
For example, a date constant may be subtracted from a date field.
A date, time, or timestamp expression for a result field can contain the following either alone or in
combination:
66
Query for iSeries Use V5R2
Query for iSeries date
A date expression is a three-part value (year, month, and day) designating a point in time under the
Gregorian calendar, which is assumed to have been in effect from the year 1 A.D. 1 The year range is
0001 to 9999. The month range is 1 to 12. The day range is 1 to x, where x is 28, 29, 30, or 31,
depending on the month.
A date starts with a digit and has a length of at least 6 characters. Trailing blanks can be included.
Leading zeros can be omitted from the month and day portions. Valid formats allowed for dates are listed
in Table 1. Each format is identified by name and includes an associated abbreviation (used by the CHAR
function) and an example of its use.
Table 1. Formats for Representations of Date Data Types
Format Name
Abbreviation
Date Format
Example
International Standards
Organization
ISO
yyyy-mm-dd
1987-10-12
IBM USA Standard
USA
mm/dd/yyyy
10/12/1987
IBM European Standard
EUR
dd.mm.yyyy
12.10.1987
Japanese Industrial
Standard Christian era
JIS
yyyy-mm-dd
1987-10-12
OS/400 format
DMY
YMD
MDY
JUL
DD/MM/YY
YY/MM/DD
MM/DD/YY
YYDDD
YYYYDDD
12/10/87
87/12/10
12/10/87
87/344
1987/344
The date separator can be either
a period (.), slash (/), comma (,),
dash (-), or blank space for the
OS/400 date format data types.
Note about using SAA date format: To prevent confusion about the date value, use the Systems
Application Architecture® (SAA) date formats (ISO, USA, EUR, or
JIS) when specifying date constants in a multilingual environment or
when a query is to be displayed or changed by different people.
If the OS/400 two-digit year format is used, the range of dates is from 1940 through 2039. Any year from
40 through 99 is assumed to have a century of 19. Any year from 00 through 39 is assumed to have a
century of 20. If a value outside of that range is in a field with a two-digit year format, it will be shown on a
report as +’s. Use the CHAR function on that field specifying a SAA date format, and then select the result
field for the report.
Query for iSeries time
A time expression is a three-part value (hour, minute, and second) that designates the time of day using a
24-hour clock. The hour range is 0 to 24, while the minute and second range is 0 to 59. If the hour is 24,
the minute and second specifications are both zero.
A time data type starts with a digit and has a length of at least 4 characters. Trailing blanks can be
included; a leading zero can be omitted from the hour part of the time, and seconds can be omitted
entirely. If you choose to omit seconds, 0 seconds is assumed. Thus, 13.30 is equivalent to 13.30.00.
1. Historical dates do not always follow the Gregorian calendar. Dates between 1582-10-04 and 1582-10-15 are accepted as valid
dates although they never existed in the Gregorian calendar.
Chapter 5. Defining result fields in Query for iSeries
67
Valid formats for times are listed in Table 2. Each format is identified by name and includes an associated
abbreviation (for use by the CHAR function) and an example of its use.
Table 2. Formats for Representations of Time Data Types
Format Name
Abbreviation
Time Format
Example
International Standards Organization
ISO
hh.mm.ss
13.30.05
IBM USA Standard
USA
hh:mm am or pm
1:30 pm
IBM European Standard
EUR
hh.mm.ss
13.30.05
Japanese Industrial Standard
Christian era
JIS
hh:mm:ss
13:30:05
OS/400 format
-
HMS
13:30:05
Note: Time separators can be either a period (.), slash (/), comma (,), dash (-), or a blank space. Use the
CHGJOB command to change the OS/400 date or time format separators.
In the USA time format, the hour must not be greater than 12 and cannot be 0 except for the special case
of 00:00 AM. Using the International Standards Organization (ISO) format of the 24-hour clock, the
correspondence between the USA format and the 24-hour clock is as follows:
USA Format
24 Hour-Clock
12:01 am through 12:59 am
00.01.00 through 00.59.00
01:00 am through 11:59 am
01.00.00 through 11.59.00
12:00 pm (noon) through 11:59 pm
12.00.00 through 23.59.00
12:00 am (midnight)
24.00.00
00:00 am (midnight)
00.00.00
The system always uses 00.00.00. Only the user can enter 24.00.00.
Query for iSeries timestamp
A timestamp expression is a seven-part value (year, month, day, hour, minute, second, and microsecond)
that designates a date and time as previously defined. The time part includes a fractional specification of
microseconds.
A timestamp data type starts with a digit and has a length of at least 16 characters. The complete
representation of a timestamp has the form yyyy-mm-dd-hh.mm.ss.nnnnnn. Trailing blanks can be
included. Leading zeros can be omitted from the month, day, and hour part of the timestamp. Trailing
zeros can be truncated or omitted entirely from microseconds. You do not need to specify microseconds. A
timestamp of yyy-mm-dd-hh.mm.ss is acceptable. If you choose to omit any digit of the microseconds
portion, an implicit specification of 0 is assumed. Thus, 1990-3-2-8.30.00.10 is equivalent to
1990-03-02-08.30.00.100000.
A timestamp expression with a time of 24.00.00.000000 can be accepted.
68
Query for iSeries Use V5R2
Displaying constants format in Query for iSeries
The Display Constants Format display shows you what date or time format you must use if you specify a
date or time constant and do not use an SAA format.
Display Constants Format
Query . . . . . . :
Library . . . . :
QRY1
QGPL
Option . . . . . :
CCSID . . . . . . :
CHANGE
65535
Use an SAA format to enter a date or time constant, or
use the format described by the following values.
Use the decimal separator shown.
Query definition values
Date format . . . . :
Date separator . . :
Time format . . . . :
Time separator . . :
Decimal separator . :
*MDY
/
*HMS
:
.
Press Enter to continue.
F12=CANCEL
The Display Constants Format display appears when you:
v Change a query from the Work with Queries display and at least one date or time constant is specified
in the query definition in an OS/400 format other than the date or time format specified for your job.
v Display a query from the Work with Queries display and your job format for the date or time is different
from an OS/400 date or time format constant that is specified in the query definition.
v Use the run-time record selection option of the RUNQRY command and your job format for the date
or time is different from an OS/400 date or time format constant specified in the query definition.
v Use the run-time record selection option with the QRYRUN procedure and your job format for the date
or time is different from an OS/400 date or time format constant specified in the query definition.
v Press F17 from the Select Records display.
v Press F17 from the Define Result Fields display.
OS/400 date formats are MDY, YMD, DMY, and JUL. The valid OS/400 time format is HHMMSS.
Date, time, and timestamp arithmetic operations in Query for iSeries
Addition and subtraction operations can be performed on date, time, and timestamp values to determine
the result-field value.
Note: If an addition operand is a date, time, or timestamp value, the other operand must be a duration.
The following rules apply to date, time, and timestamp addition:
v If one operand is a date, the other operand must be either a date duration or a labeled duration of
years, months, or days.
v If one operand is a time, the other operand must be either a time duration or a labeled duration of
hours, minutes, or seconds.
v If one operand is a timestamp, the other operand must be a duration. Any duration type is valid.
Chapter 5. Defining result fields in Query for iSeries
69
Subtraction rules are different from addition rules because a date, time, or timestamp value cannot be
subtracted from a duration. Also, subtracting two date, time, or timestamp values is not the same as
subtracting a duration from a date, time, or timestamp value.
The
v If
–
–
–
–
following rules apply to date, time, and timestamp subtraction:
the first operand is a date, the second operand must either be a:
Date
Date duration
Character representation of a date
Labeled duration of years, months, or days
v If
–
–
v If
–
–
the second operand is a date, the first operand must either be a:
Date
Character representation of a date
the first operand is a time, the second operand must either be a:
Time
Time duration
– Character representation of a time
– Labeled duration of hours, minutes, or seconds
v If the second operand is a time, the first operand must either be a:
– Time
– Character representation of a time
v If the first operand is a timestamp, the second operand must either be a:
– Timestamp
– Character representation of a timestamp
– Duration
v If the second operand is a timestamp, the first operand must either be a:
– Timestamp
– Character representation of a timestamp
Date arithmetic operation in Query for iSeries
Dates can be subtracted, added to (incremented) or subtracted from (decremented).
Subtracting dates in Query for iSeries
The result of subtracting one date (DATE2) from another (DATE1) is a date duration that specifies the
number of years, months, and days between the two dates. The data type of the result is a
packed-decimal numeric. If DATE1 is greater than or equal to DATE2, DATE2 is subtracted from DATE1.
However, if DATE1 is less than DATE2, DATE1 is subtracted from DATE2, and the sign of the result is
made negative. The following procedural description clarifies the steps involved in the operation RESULT =
DATE1 - DATE2.
If DAY(DATE2) < = DAY(DATE1)
then DAY(RESULT) = DAY(DATE1) - DAY(DATE2).
If DAY(DATE2) > DAY(DATE1)
then DAY(RESULT) = N + DAY(DATE1) - DAY(DATE2)
where N = the last day of MONTH(DATE2).
MONTH(DATE2) is then incremented by 1.
If MONTH(DATE2) < = MONTH(DATE1)
then MONTH(RESULT) = MONTH(DATE1) - MONTH(DATE2).
If MONTH(DATE2) > MONTH(DATE1)
70
Query for iSeries Use V5R2
then MONTH(RESULT) = 12 + MONTH(DATE1) - MONTH(DATE2).
YEAR(DATE2) is then incremented by 1.
YEAR(RESULT) = YEAR(DATE1) - YEAR(DATE2).
For example, the result of DATE(’3/15/2000’) - ’12/31/1999’ is 215, or a duration of 0 years, 2 months, and
15 days.
Incrementing and decrementing dates in Query for iSeries
The result of adding a duration to or subtracting a duration from a date is itself a date. It must be between
January 1, 0001 and December 31, 9999 inclusive. If a duration of years is added or subtracted, only the
year portion of the date is affected.
If a duration of months is added or subtracted, only the months and years are affected. The day portion is
unchanged unless the result is not valid (September 31, for example).
Adding or subtracting a duration of days affects the day portion and possibly the month and year.
Date durations, either positive or negative, may be added to and subtracted from dates. The result is a
date that has been incremented or decremented by a specified number of years, months, and days.
When adding durations to dates, adding one month to a given date gives the same date one month later
unless that date does not exist. Then, the date is set to the last day of the later month. For example,
January 28 plus one month gives you February 28. But January 29, 30, or 31 plus one month results in
February 28 or in a leap year, February 29.
Note: If one or more months is added to a given date and the same number of months is subtracted from
the result, the final date is not necessarily the same as the original date.
Converting a numeric field to a date field in Query for iSeries
The following is a way to convert a numeric field that contains a date to a date data-type field.
In this example, the job date format is YMD and the job date separator is /. A file contains a numeric date
field call NUMDATE, length 6, which contains dates in the format MDY (month day year). The first value in
NUMDATE is 011392.
Create the following result fields:
CHARDATE
CHARDAT2
NEWDATE
DIGITS(NUMDATE)
SUBSTR(CHARDATE,5,2)||’/’||
SUBSTR(CHARDATE,1,2)||’/’||
SUBSTR(CHARDATE,3,2)
DATE(CHARDAT2)
NEWDATE contains the internal representation of year 1992 month 01 day 13. If the date is shown on the
report, it shows as 92/01/13.
Note: If the date value resulting is outside the range of 1940 through 2039, it will show as +’s on the
report. Use the CHAR function to see the correct value.
Working with numeric dates in Query for iSeries
If you are using numeric fields to represent dates, you can use arithmetic operations to manipulate the
dates without using the Query date functions. Example 1 shows a method of converting a numeric field
containing a date from MMDDYY format to YYMMDD format. Example 2 shows the reverse conversion:
YYMMDD format to MMDDYY format.
Example 1: Working with numeric dates in Query for iSeries: The following query defines a
MMDDYY numeric field conversion to a YYMMDD numeric field, which is more suitable for sorting and for
Chapter 5. Defining result fields in Query for iSeries
71
selection on specific year, month, and day values. The marked (*) lines are necessary and a sample report
follows. If you require rounding for fields in the report (instead of truncation), you can add to each of the
intermediate expressions a minus one half, as follows: MM = (MMDDYY/10000)-0.5.
Example 1
5728QU1 R03 M00 900824
Query . . . . . . . .
Library . . . . . .
Query text . . . . .
Collating sequence .
Processing options
*
Use rounding . . .
Ignore decimal data
IBM
. .
. .
. .
. .
OS/400 Query
. . . . . . .
. . . . . . .
. . . . . . .
. . . . . . .
10/04/90 14:17:45
YYMMDD02
CRP
MMDDYY to YYMMDD
Hexadecimal
Page
1
. . . . . . . . . No
errors . . . . . No (default)
Selected files
ID
File
Library
Member
Record Format
T01
MMDDYY
QTEMP
MMDDYY
MMDDYY
Result fields
Name
Expression
Column Heading Len Dec
* MM
(mmddyy/10000)
2
0
* DD
(mmddyy/100 - (mm * 100))
2
0
* YY
(mmddyy - (mm*10000 + dd*100))
2
0
* YYMMDD (yy*10000)+(mm*100)+dd
6
0
* * * * *
E N D
O F
Q U E R Y
P R I N T
* * * * *
MM DD
YY
YYMMDD MMDDYY
08 31
90
900831 083190
* * * E N D O F R E P O R T * * *
Example 2: Working with numeric dates in Query for iSeries: This example shows the reverse in
formatting— converting a numeric YYMMDD to MMDDYY. The marked (*) lines are necessary and a
sample report follows.
Example 2
Query . . . . . . . . . . . .
Library . . . . . . . . . .
Query text . . . . . . . . .
Collating sequence . . . . .
Processing options
*
Use rounding . . . . . . .
Ignore decimal data errors
Special conditions
*** All records selected by
.
.
.
.
.
.
.
.
.
.
.
.
.
.
.
.
.
.
.
.
YYMMDD01
CRP
YYMMDD to MMDDYY
EBCDIC
. . . . . No
. . . . . No (default)
default ***
Selected files
ID
File
Library
Member
Record Format
T01
YYMMDD
QGPL
JUNK
YYMMDD
Result fields
Name
Expression
Column Heading
Len Dec
* YY
(yymmdd/10000)
2
0
* MM
(yymmdd/100 - (yy * 100))
2
0
* DD
(yymmdd - (yy*10000 + mm*100))
2
0
* MMDDYY (mm*10000)+(dd*100)+yy
6
0
* * * * *
MM DD YY
08 31 90
* * * E N D
72
E N D
O F
MMDDYY YYMMDD
083190 900831
O F R E P O R T
Query for iSeries Use V5R2
Q U E R Y
* * *
P R I N T
* * * * *
Time arithmetic operation in Query for iSeries
Times can be subtracted, incremented, or decremented. The result of subtracting one time (TIME2) from
another (TIME1) is a time duration that specifies the number of hours, minutes, and seconds between the
two times.
For example, the result of TIME(’11:02:26’) − (’10:32:56’) is 2930; a duration of 0 hours, 29 minutes,
and 30 seconds.
Incrementing and decrementing times in Query for iSeries
The result of adding or subtracting a duration from time is itself a time. If a duration of hours is added or
subtracted, only the hours portion of the time is affected. The minutes and seconds remain unchanged. If
a duration of minutes is added or subtracted, only the minutes and hours if necessary are affected. Adding
or subtracting a duration of seconds affects the seconds portion and possibly the minutes and hours.
Timestamp arithmetic operation in Query for iSeries
Timestamps can be subtracted, incremented, or decremented. The result of adding or subtracting a
duration from a timestamp is a timestamp. Date and time arithmetic is the same as previously defined,
except that an overflow or underflow of hours is carried into the date portion of the result.
Durations in Query for iSeries
A duration represents a length of time. There are four types: labeled, date, time, and timestamp.
Labeled duration in Query for iSeries
A labeled duration represents a specific unit of time expressed as a number followed by one of the
following duration keywords:
YEAR, YEARS
MONTH, MONTHS
DAY, DAYS
HOUR, HOURS
MINUTE, MINUTES
SECOND, SECONDS
MICROSECOND, MICROSECONDS
A labeled duration can only be used as an operand if the other operand is of type date, time or timestamp.
For example:
HIREDATE + 2 MONTHS + 14 DAYS
is a valid expression.
HIREDATE + (2 MONTHS + 14 DAYS)
is not a valid expression. In both expressions, the labeled durations are 2 MONTHS and 14 DAYS.
Date duration in Query for iSeries
A date duration represents years, months, and days expressed as a DECIMAL (8,0) number. To be
properly interpreted, the number must have the formatyyyymmdd where yyyy represents the number of
years, mm the number of months, and dd the number of days. The result of subtracting one date value
from another, as in the expression HIREDATE — BIRTHDATE, is a date duration. Example:
HIREDATE - BIRTHDATE
Time duration in Query for iSeries
A time duration represents hours, minutes and seconds expressed as a DECIMAL (6,0) number. To be
properly interpreted , the number must have the format hhmmss where hh represents the number of
hours,mm the number of minutes, and ss the number of seconds. The result of subtracting one time value
from another is a time duration.
Chapter 5. Defining result fields in Query for iSeries
73
Timestamp duration in Query for iSeries
A timestamp duration represents a number of years, months, days, hours, minutes, seconds, and
microseconds expressed as a DECIMAL (20, 6) number. To be properly interpreted, the number must have
the format yyyymmddhhMMsszzzzzz , where yyyy , mm , dd , hh, MM , ss and zzzzzz represent,
respectively, the number of years, months, days, hours, minutes, seconds and microseconds. The result of
subtracting one timestamp value from another is a timestamp duration.
Date, time, and timestamp functions in Query for iSeries
The following functions can be performed on date, time, and timestamp values:
CHAR Query for iSeries function
The CHAR function returns a character representation of a date, time, or timestamp value. An optional
second argument dictates the SAA format for the result string. The first argument must be a date, time, or
timestamp. The second argument, if used, is the name of a character format. The form is:
QQ CHAR ( expression
,ISO
,USA
,EUR
,JIS
)
The result of the function is a fixed-length character constant. If the first argument can be null, the result
can be null. If the first argument is null, the result is null. Other rules depend on the data type of the first
argument as follows:
v If the first argument is a date:
– A format should be specified, especially if:
–
–
–
v If
–
–
–
v If
–
–
–
- The query is to be used by different users.
- The query is to be sent to a different machine.
- A date has a two-digit year format attribute and the values may not be in the range of 1940
through 2039. Use this function to see the date in a four-digit year SAA format.
If the second argument is omitted, the string format is the job format.
The result is the character string representation of the date in the format specified by the second
argument.
The result length is 10 if a format is specified, 8 if no format is specified.
the first argument is a time:
If the second argument is omitted, the string format is the job format.
The result is the character string representation of a time in the format specified by the second
argument.
The result length is 8.
the first argument is a timestamp:
The second argument is not applicable and must not be specified.
The result is the character string representation of a timestamp.
The result length is 26.
Example:
CHAR(HIREDATE,USA)
74
Query for iSeries Use V5R2
QR
DATE Query for iSeries function
The DATE function returns a date from a value. The form is:
QQ DATE ( expression )
QR
The argument must be either a:
v Timestamp
v Date
v Positive number or expression less than 3 652 059
v Valid character representation of a date
v Character representation with a length of 7
If the argument is a character representation of length 7, it must represent a valid date in the form yyyynnn
where yyyy represents the year digits and nnn represents digits between 001 and 366, signifying a day in
that year.
The result of this function is a date. If the argument can be null, the result can be null. If the argument is
null, the result is null.
v If the argument is a timestamp, the result is the date part of the timestamp.
v If the argument is a date, the result is that date.
v If the argument is a number, the result is the date that is n−1 days after January 1, 0001.
v If the argument is a character value, the result is the date represented by the character string.
Note: If the OS/400 two-digit year format is used, the range of dates is 1940 through 2039. Any year from
40 through 99 is assumed to have a century of 19. Any year 00 through 39 is assumed to have a
century of 20. If a value outside of that range is in a field with a two-digit year format, it will be
shown on a report as +’s. Use the CHAR function on that field specifying a SAA date format, and
then select the result field for the report.
Example:
DATE(STRDATE)
DAY Query for iSeries function
The DAY function returns the day part of a value. The form is:
QQ DAY ( expression )
QR
The argument must be either a:
v Date
v Timestamp
v Date duration
v Timestamp duration
The result of the function is a binary field. If the argument can be null, the result can be null. If the
argument is null, the result is null.
If the argument is a date or a timestamp, the result is the day part of the value, which is a binary field with
a value between 1 and 31.
Chapter 5. Defining result fields in Query for iSeries
75
If the argument is a date duration or a timestamp duration, the result is the day part of the value, a binary
field with a value between −99 and 99. A nonzero result has the same sign as the argument.
Example:
RESULT(DAY) = DAY(HIREDATE)
RESULT(DAY) would equal a value between 1 and 31.
DAYS Query for iSeries function
The DAYS function returns a numeric representation of a date. The form is:
QQ DAYS ( expression )
QR
The argument must be either a:
v Date
v Timestamp
v Valid character representation of a date
The result of the function is a binary field. If the argument can be null, the result can be null. If the
argument is null, the result is null.
The result is one more than the number of days from January 1, 0001 to D, where D is the date that
would occur if the DATE function were applied to the argument.
Example:
RESULT(DAY) = DAYS(CURRDATE) - DAYS(HIREDATE)
RESULT(DAY) equals a number representing the number of days between these two dates.
HOUR Query for iSeries function
The HOUR function returns the hour part of a value. The form is:
QQ HOUR ( expression )
QR
The argument must be either a:
v Time
v Timestamp
v Time duration
v Timestamp duration
The result of the function is a binary field. If the argument can be null, the result can be null. If the
argument is null, the result is null.
If the argument is a time or a timestamp, the result is the hour part of the value, which is a binary field
with a value between 0 and 24.
If the argument is a time duration or a timestamp duration, the result is the hour part of the value, which in
a binary field with a value between −99 and 99. A nonzero result has the same sign as the argument.
Example:
HOUR(TIME) where time = 12:11:22
76
Query for iSeries Use V5R2
The resulting value of HOUR would equal 12.
MICROSECOND Query for iSeries function
The MICROSECOND function returns the microsecond part of a value. The form is:
QQ MICROSECOND ( expression )
QR
The argument must be either a:
v Timestamp
v Timestamp duration
v Valid character representation of a timestamp
The result of the function is a binary field. If the argument can be null, the result can be null. If the
argument is null, the result is null.
If the argument is a timestamp, the result is the microsecond part of the timestamp, which is a binary field
with a value between 0 and 999999.
If the argument is a timestamp duration, the result is the microsecond part of the timestamp duration,
which is a binary field with a value between −999999 and 999999.
Example:
MICROSECOND(TIMESTAMP) where TIMESTAMP = 1991-10-22-12.15.23.123456
The resulting value of MICROSECOND equals 123456.
MINUTE Query for iSeries function
The MINUTE function returns the minute part of a value. The form is:
QQ MINUTE ( expression )
QR
The argument must be either a:
v Time
v Timestamp
v Time duration
v Timestamp duration
The result of the function is a binary field. If the argument can be null, the result can be null. If the
argument is null, the result is null.
If the argument is a time duration or a timestamp duration, the result is the minute part of the value, which
is a binary field with a value between &minus 99 and 99. A nonzero result has the same sign as the
argument.
Example:
MINUTE(TIMESTAMP) where TIMESTAMP = 1991-10-22-12.15.23.123456
The resulting value of MINUTE equals 15.
Chapter 5. Defining result fields in Query for iSeries
77
MONTH Query for iSeries function
The MONTH function returns the month part of a value. The form is:
QQ MONTH ( expression )
QR
The argument must be either a:
v Date
v Timestamp
v Date duration
v Timestamp duration
The result of the function is a binary field. If the argument can be null, the result can be null. If the
argument is null, the result is null.
If the argument is a date duration or a timestamp duration, the result is the month part of the value, which
is a binary field with a value between &minus 99 and 99. A nonzero result has the same sign as the
argument.
Example:
MONTH(TIMESTAMP) where TIMESTAMP = 1991-10-22-12.15.23.123456
The resulting value of MONTH equals 10.
SECOND Query for iSeries function
The SECOND function returns the seconds part of a value. The form is:
QQ SECOND ( expression )
The argument must be either a:
v Time
v Timestamp
v Time duration
v Timestamp duration
The result of the function is a binary field. If the argument can be null, the result can be null. If the
argument is null, the result is null.
If the argument is a time or timestamp, the result is the seconds part of the value, which is a binary field
with a value between 0 and 59.
If the argument is a time duration or a timestamp duration, the result is the seconds part of the value,
which is a binary field with a value between −99 and 99. A nonzero result has the same sign as the
argument.
Example:
SECOND(TIMESTAMP) where TIMESTAMP = 1991-10-22-12.15.23.123456
The resulting value of SECOND equals 23.
78
Query for iSeries Use V5R2
QR
TIME Query for iSeries function
The TIME function returns a time from a value. The form is:
QQ TIME ( expression )
QR
The argument must be either a:
v Time
v Timestamp
v Valid character representation of a time
The result of the function is a time value. If the argument can be null, the result can be null. If the
argument is null, the result is null.
v If the argument is a timestamp, the result is the time part of the timestamp.
v If the argument is a time, the result is that time.
v If the argument is a character string, the result is the time represented by the character string.
Example:
TIME(TIMESTAMP) where TIMESTAMP = 1991-10-22-12.15.23.123456
The resulting value of TIME equals 12.15.23.
TIMESTAMP Query for iSeries function
The TIMESTAMP function returns a timestamp from a value or a pair of values. The form is:
QQ TIMESTAMP ( expression
expression
)
QR
The rules for the arguments depend on whether or not the second argument is specified.
v If only one argument is specified, it must be either a:
– Timestamp
– Valid character representation of a timestamp
– Character string of length 14
Note: A character string of length 14 must be a string of digits that represents a valid date and time in
the form yyyyMMddhhmmss where yyyy is the year, MM is the month, dd is the day, hh is the
hour, mm is the minute, and ss is the seconds.
v If both arguments are specified, the first argument must be a date or a valid character representation of
a date. The second argument must be a time or a valid character representation of a time.
The result of the function is a timestamp. If either argument can be null, the result can be null. If either
argument is null, the result is null.
If both arguments are specified, the result is a timestamp with the date specified by the first argument and
the time specified by the second argument. The microsecond part of the timestamp is zero.
If only one argument is specified and it is a timestamp, the result is that timestamp. If only one argument
is specified and it is a character string, the result is the timestamp represented by that character string.
The timestamp represented by a string of length 14 has a microsecond part of zero.
Example:
Chapter 5. Defining result fields in Query for iSeries
79
RESULT(x) = TIMESTAMP(DATEFRNK,TIMEFRNK)
YEAR Query for iSeries function
The YEAR function returns a numeric representation of the year part of a value. The form is:
QQ YEAR ( expression )
QR
The argument must be either a:
v Date
v Timestamp
v Date duration
v Timestamp duration
The result of the function is a binary field. If the argument can be null, the result can be null. If the
argument is null, the result is null.
If the argument is a date or a timestamp, the result is the year part of the value, which is a binary field
with a value between 1 and 9999.
If the argument is a date duration or a timestamp duration, the result is the year part of the value, which is
a binary field with a value between −9999 and 9999. A nonzero result has the same sign as the argument.
Example:
YEAR(TIMESTAMP) where TIMESTAMP = 1991-10-22-12.15.23.123456
The resulting value of YEAR is the numeric value 1,991.
Additional date, time, and timestamp functions in Query for iSeries
Based on the system clock, the CURRENT function used with DATE, TIME, TIMESTAMP, or TIMEZONE
returns the current system value corresponding to the function used. The TIMEZONE function is used to
allow an easy conversion to Greenwich Mean Time (GMT) by subtracting CURRENT(TIMEZONE) from a
local time value.
Note: If these functions are used more than once within a Query definition, all values are based on a
single clock reading.
If your job date format is different than the format used in the query, Query for iSeries uses the job date
format. If you use CURRENT(DATE) as a break field, you may get unexpected results when the job and
query date format are different.
Example:
CURDAT = CURRENT(DATE)
CURTSP = CURRENT(TIMESTAMP)
Converting date formats in Query for iSeries
You may sometimes encounter circumstances in which you want to generate a report with the date in a
format other than the one defined when the file was created.
Converting date for output to a database file in Query for iSeries
To convert a date field to a format different from the input file, you must externally define the output file
with DDS specifying the date format for the output date field. This conversion occurs automatically.
80
Query for iSeries Use V5R2
Converting date for output to a display or printer in Query for iSeries
You can use the date functions to convert an input date field to a different format. Examples 1 and 2 show
two methods of converting a date field from the MMDDYY format to the YYDDD format. Examples 3 and 4
show the reverse conversions, from YYDDD to MMDDYY format.
Note: For ease of reading, multiple panel views are merged into single screen images.
Example 1—Converting from MMDDYY to YYDDD format in Query for iSeries
The following Define Result Fields panel defines an MMDDYY to YYDDD date conversion. The conversion
is done completely within the panel.
Define Result Fields
Type definitions using field names or constants and operators, press Enter.
Operators: +, -, *, /, SUBSTR, ||, DATE...
Field
Expression
Column Heading
Len Dec
YY________ SUBSTR(CHAR(MMDDYY),7,2)_________ ____________________ _____ __
_________________________________ ____________________
_________________________________ ____________________
CHARJAN01_ ’01/01/’ || YY___________________ ____________________ _____ __
_________________________________ ____________________
_________________________________ ____________________
JAN01_____ DATE(CHARJAN01)__________________ ____________________ _____ __
_________________________________ ____________________
_________________________________ ____________________
DDD_______ SUBSTR(DIGITS(DAYS(MMDDYY)-DAYS(J ____________________ _____ __
AN01)+1),10,3)___________________ ____________________
_________________________________ ____________________
YYDDD_____ YY_||_’/’_||_DDD_________________ ____________________ _____ __
_________________________________ ____________________
_________________________________ ____________________
_______________________________________________________________________________
Field
Text
Len Dec
MMDDYY
Date field in MMDDYY format
8 L
F3=Exit
F12=Cancel
F5=Report
F13=Layout
F9=Insert
F20=Reorganize
Bottom
F11=Display names only
F24=More keys
Example 2—Converting from MMDDYY to YYDDD format in Query for iSeries
This examples shows an alternative method for the same conversion done in example 1. The conversion
is done completely within the panel. This method requires that the date format for the current job must be
set to YYDDD. When this circumstance exists, the DATE function automatically does the conversion.
Chapter 5. Defining result fields in Query for iSeries
81
Define Result Fields
Type definitions using field names or constants and operators, press Enter.
Operators: +, -, *, /, SUBSTR, ||, DATE...
Field
Expression
Column Heading
Len Dec
YYDDD_____ DATE(MMDDYY)_____________________ ____________________ _____ __
_________________________________ ____________________
_________________________________ ____________________
__________ _________________________________ ____________________ _____ __
_________________________________ ____________________
_________________________________ ____________________
Bottom
_______________________________________________________________________________
Field
Text
Len Dec
MMDDYY
Date field in MMDDYY format
8 L
F3=Exit
F12=Cancel
F5=Report
F13=Layout
F9=Insert
F20=Reorganize
Bottom
F11=Display names only
F24=More keys
The commands to run the query in example 3 are:
CHGJOB DATFMT(*JUL)
RUNQRY QRY(YYDDD)
Example 3—Converting from YYDDD to MMDDYY format in Query for iSeries
The following Define Result Fields panel defines a YYDDD to MMDDYY date conversion. The conversion
is done completely within the panel.
Define Result Fields
Type definitions using field names or constants and operators, press Enter.
Operators: +, -, *, /, SUBSTR, ||, DATE...
Field
Expression
Column Heading
Len Dec
YY________ SUBSTR(DIGITS(YEAR(YYDDD)),9,2)__ ____________________ _____ __
_________________________________ ____________________
_________________________________ ____________________
MM________ SUBSTR(DIGITS(MONTH(YYDDD)),9,2)_ ____________________ _____ __
_________________________________ ____________________
_________________________________ ____________________
DD________ SUBSTR(DIGITS(DAY(YYDDD)),9,2)___ ____________________ _____ __
_________________________________ ____________________
_________________________________ ____________________
MMDDYY____ MM_||_’/’_||_DD_||_’/’_||_YY_____ ____________________ _____ __
_______________________________________________________________________________
Field
Text
Len Dec
YYDDD
Date field in YYDDD format
6 L
F3=Exit
F12=Cancel
F5=Report
F13=Layout
F9=Insert
F20=Reorganize
Bottom
F11=Display names only
F24=More keys
Example 4—Converting from MMDDYY to YYDD format in Query for iSeries
This example shows an alternative method for the same conversion done in example 3. The conversion is
done completely within the panel. This method requires that the date format for the current job must be set
to MMDDYY. When this circumstance exists, the DATE function automatically does the conversion.
82
Query for iSeries Use V5R2
Define Result Fields
Type definitions using field names or constants and operators, press Enter.
Operators: +, -, *, /, SUBSTR, ||, DATE...
Field
Expression
Column Heading
Len Dec
MMYYDD_____ DATE(YYDDD)_____________________ ____________________ _____ __
_________________________________ ____________________
_________________________________ ____________________
__________ _________________________________ ____________________ _____ __
_________________________________ ____________________
_________________________________ ____________________
Bottom
_______________________________________________________________________________
Field
Text
Len Dec
YYDDD
Date field in YYDDD format
6 L
F3=Exit
F12=Cancel
F5=Report
F13=Layout
F9=Insert
F20=Reorganize
Bottom
F11=Display names only
F24=More keys
The commands to run the query in example 4 are:
CHGJOB DATFMT(*MDY)
RUNQRY QRY(MMDDYY)
General considerations when creating an expression in Query for
iSeries
Following are some general rules you should use when you are creating expressions:
v Character constants that represent dates are evaluated using the date format stored in the query
definition.
v Your expression can have a single value, or it can use as many operands and operators needed to fit in
the three lines provided on the Define Result Fields display.
v Do not use a result field in select records tests or as a sort field if it may have a division by zero or
overflow result.
v You can avoid dividing by zero by doing one of the following:
– When you select records, either by means of a select/omit logical file or by means of record
selection tests on fields other than the result field, select only records that will not cause a division
by zero.
– If a dividend for the definition of a result field will always be zero, try the following change to the
expression:
Original expression--> FIELD = P / X
Revised expression---> S
= .00001
FIELD = P / (X + S)
Note: In the expression S, the number of zero digits before the 1 digit should be two more than the
decimal precision of the original expression.
– If a dividend for the definition of the result field will not be zero when the divisor is, the following
change to the expression prevents an overflow condition.
Original expression--> FIELD = P / X
Revised expression---> S
= .00001
FIELD = (P*X) / ((X*X) + S)
Chapter 5. Defining result fields in Query for iSeries
83
– If your expression performs a division operation, avoid dividing by zero by defining the denominator
as the result field just before the result field with a division. Then, for all logical OR groupings of
record selection, add a logical AND test stating the denominator must not equal zero.
v On the three lines provided, you can split a field name, numeric constant, or character string at the end
of one line and continue it at the beginning of the next. When you split a field name or a numeric
constant, do not put spaces at the end of the first line or at the beginning of the next line because
Query then treats it as two field names or numeric constants. Character constants (that is, characters
enclosed in apostrophes) can be split at any point. A DBCS character constant can be split by placing a
shift-in character in the last position of the upper line and a shift-out character in the first position of the
lower line.
v When using a field to divide, you must also select that field not equal to zero as the first selection
before any other result fields are processed, as in the following example:
v
1.
2.
3.
4.
5.
6.
AND/OR Field Test Value
ODQYSD NE 0
AND OMCRMM EQ 0
AND OMSTAT EQ ’50’
AND ODSTAT NE ’99’
AND PCT LT 90
7. AND PCT LT 90
8. AND OMUSOR LIST ’DT’ ’ET’ ’SR’ ’RT’
v To make your expressions easier to read, you can use blanks between field names and operators.
v You can create up to 100 result fields.
v Substring and concatenation operations are not allowed with date, time, timestamp or numeric fields. To
circumvent this, use the CHAR function around the date, time, or timestamp field and the DIGITS
function for numeric fields.
Query determines the data type of the result field according to the following:
If the first value in the expression is a numeric field name, a numeric constant (like the number 7 or
−3.14), or a function that returns a numeric value, then the result field is numeric.
If the SUBSTR function is used, the result field is an SBCS character field if the value is SBCS,
DBCS-only, or DBCS-either. The result field is a DBCS-open field if the value is DBCS-open. The result
field is a DBCS-graphic field if the value is DBCS-graphic. A substring of a fixed-length field can be
either a variable- or fixed-length field, depending on how you define the length and offset.
If the expression is a constant, field, or function, the data type of the result field is the data type of the
constant, field, or value returned by the function.
If the concatenation operation is used and all of the values being concatenated are DBCS-only, the
result field is DBCS-only.
If the concatenation operation is used and all of the values being concatenated are DBCS-graphic, the
result field is DBCS-graphic.
If the concatenation operation is used and one of the values being concatenated is DBCS-either, or if
the expression contains a mixture of SBCS and bracketed-DBCS fields or constants, the result field is
DBCS-open.
If a variable-length field is concatenated to either a fixed or variable-length field, the result is a
variable-length field.
If two or more fixed-length fields are concatenated, the result is a fixed-length field.
If two fixed-length DBCS fields are concatenated, the result is a variable-length field.
84
Query for iSeries Use V5R2
Column headings in Query for iSeries
If you want to specify a column heading to be used for a result field, type the heading you want on the
three lines (up to 20 characters each) of the display that correspond to your result field. The heading will
appear in your query output exactly as you enter it on the three lines.
If you do not want any heading for a result field, type *NONE in the first five positions on the first line for
that field. (You must use all capital letters, and the remainder of the line and the next two lines must be
blank.) If you do not specify either a heading or *NONE, Query uses the result field name as the column
heading.
Length and decimal positions in Query for iSeries
For character (SBCS and DBCS), date, time, and timestamp result fields, you must leave the Len and Dec
values blank. If you do not specify anything in the Len and Dec columns when you define a result field,
Query determines the length of the result field. When Query determines these values, you have fewer
things to consider when changing expressions. If you want to know the length of the result field, press F13
to see the layout of the report and count the number of 9s (numeric fields) and Xs (SBCS character fields).
If you are using a DBCS-capable display and have DBCS data, count the number of:
Double-byte Js, which represent DBCS-only data
Double-byte Os, which represent DBCS-open (mixed) data
Double-byte Es, which represent DBCS-either data
Double-byte Gs, which represent DBCS-graphic data
For date, time, or timestamp fields, look at the length of the current date, time, or timestamp in the result
field.
For numeric result fields, length is the total number of digits in the field. It includes the number of digits to
the left and right of the decimal point but not the decimal point itself. Decimal is the number of decimal
positions to the right of the decimal point. If you want to type your own value for the length, to prevent
unexpected results, you should first read “Length and decimal positions in Query for iSeries reports” on
page 120 and “Result field length and decimal positions in Query for iSeries” on page 188. Also, observe
the following:
v If you specify a value for Len, you must also specify a value for Dec (decimal positions).
v If you increase or decrease the value in Dec, you should increase or decrease the value in Len the
same amount. Also, you may need to change these values later if you make changes to the numeric
expression.
v If you leave Len and Dec blank, Query changes the value if the expression changes.
If you are creating result fields by using multiplication and division operations, you may be able to reduce
the length value if the actual data in your files will not require the maximum field size as established by
Query. For example, an inventory master file would typically have a PRICE field and a QUANTITY field. Both
fields would have to have sufficient length to handle the largest value possible. When these two fields are
multiplied to create a result field called AMOUNT, the maximum length would be the sum of the sizes of both
fields. Since items with high prices are usually stocked in low quantities, the maximum field size for AMOUNT
would probably be too large for practical use (for example, in a report).
Note: If you want to decrease the field length because you only want a certain number of positions shown
on a report, you should not change the field length on the Define Result Fields display. Change the
field length on the Specify Report Column Formatting display instead. If you specify a field length
on the Define Result Fields display, the result of an numeric expression may be truncated or
rounded, depending on what you specify on the Specify Processing Options display.
Chapter 5. Defining result fields in Query for iSeries
85
Example of defining a result field in Query for iSeries
An example of how you would create a numeric result field called DAYS using the expression WEEKS * 7
and using the report column heading Total Days is shown on the following display. The second input area
shows how you would define a character result field called GREETING with a value of ‘Have a nice day‘
and no column heading.
Define Result Fields
Type definitions using field names or constants and operators, press Enter.
Operators: +, -, *, /, SUBSTR, ||, DATE...
Field
DAYS
Expression
WEEKS * 7
Column Heading
Total
Days
Len Dec
_____ __
GREETING
’Have a nice day’
*NONE
_____ __
Bottom
_________________________________________________________________________
Field
MONTHS
WEEKS
YEAR
F3=Exit
F12=Cancel
F5=Report
F13=Layout
F9=Insert
F20=Reorganize
F11=Display text
F24=More keys
Bottom
Note: See “CCSID and result field expressions in Query for iSeries” on page 252 for information on how
CCSIDs affect result fields.
Adding or removing result fields in Query for iSeries
Adding a result field to your query definition requires positioning the cursor to the top half of the display
and using F9 to insert a blank set of result field definition lines. After you have entered the information
necessary to define your new result field or fields, they are inserted after the set where the cursor was
positioned when you pressed F9. Note that a result field must be defined before it can be used as part of
an expression to create another result field.
Once you have positioned the cursor in the top half of the display, the page down key will continue to
show you the next two field definitions until you reach the last nonblank definition in the list. Page up
shows you the previous two definitions until you reach the beginning of the list.
To remove a result field, blank out all references to the field and its definition on the Define Result Fields
display. You must remove all other occurrences of it from your query, but Query leads you to any
occurrence of that result field in other expressions or in other parts of the query definition.
86
Query for iSeries Use V5R2
Chapter 6. Selecting and sequencing fields in Query for
iSeries
This chapter describes how you select fields that you want to include in your query output and how you
indicate in what sequence the fields are to appear. They appear in a query report from left to right based
on the sequence number that you enter for each field. Query gives you the opportunity to select fields from
all your selected files and from all the result fields defined in your query.
Letting Query for iSeries select and sequence fields
If you did not type a 1 next to the Select and sequence fields option on the Define the Query display,
Query selects and sequences up to the first 500 fields available in your query. If the file(s) you have
selected contains only a few small fields that would all easily fit in 132 positions (the standard width of
printed output) and you do not care about the sequence of the output, letting Query select and sequence
fields for you makes good sense and may save you some time. Selecting only the fields you want in your
query may, however, improve the performance when the query is run.
The Select and Sequence Fields display is shown during query definition if you typed a 1 next to the
Select and sequence fields option on the Define the Query display. You can press F12 (Cancel) to return
you to the previous display if you have changed your mind and now want Query to select and sequence
fields for you. (Anything you typed on the display is ignored.)
Selecting fields and specifying their sequence in Query for iSeries
The Select and Sequence Fields display is shown below with some sample fields from a customer master
file shown in the Field column.
Select and Sequence Fields
Type sequence number (0-9999) for the names of up to 500 fields to
appear in the report, press Enter.
Seq
____
____
____
____
____
____
____
____
____
____
____
____
Field
ACCTNUMBER
COMPANY
FIRSTNAME
MIDDLEINIT
LASTNAME
STREETADDR
CITY
STATE
ZIPCODE
TELENUMBER
CRLIMIT
BALDUE
F3=Exit
F13=Layout
Seq
____
____
____
____
____
Field
PASTDUE
DATELASTPD
CURRENTDAT
YEAR
MONTH
Bottom
F5=Report
F20=Renumber
F11=Display text
F21=Select all
F12=Cancel
F24=More keys
You make your selections by specifying a sequence number from 0 through 9999 in front of each field you
want to select. Use the numbers in ascending sequence. The lowest numbered field is positioned on the
far left of your output (or is the first field in your database file). If you change your mind about the fields
you have selected, you can delete a field from the output by removing the number you specified in front of
it. To change the sequence of the selected fields, just change the numbers.
© Copyright IBM Corp. 2000, 2002
87
After making new selections or changing old ones, press the Enter key to rearrange them on the display in
the new sequence. You can then renumber them with new sequence numbers in added amounts of 10
(10, 20, 30, and so on) by pressing F20. Renumbering can make it easier to add a field within the
sequence later.
Only those fields that you have selected so far appear in your output. If you want the remaining fields
(those with no numbers to the left of them) to appear in your output and you do not particularly care how
they are arranged, press F21 (Select all). Query arranges the list beginning with those fields that you
already selected, and then it supplies sequence numbers for all of the remaining fields in the order that
they appeared in the list. (F21 is available only if you are creating or changing a query definition.)
When you make selections or change the sequence and press the Enter key, Query rearranges the fields
to match the sequence you specified and displays the message Press Enter to confirm. If you are
satisfied with the selections and sequence, press the Enter key again to end field selection. If you make
any changes before you press the Enter key, the message is shown again, and you must press the Enter
key once more to continue.
The fields are shown on the display in the following order:
1. All fields selected on this display, in the sequence specified. If no fields are selected, the fields chosen
as sort fields (if any) for this query are listed first, in the order they were given priority on the Select
Sort Fields display. (See Chapter 8, “Selecting sort fields in Query for iSeries”.)
2. Any result fields that have been defined for this query but have not been selected.
3. All other fields, in the order they exist in the record format definitions for the selected files. Fields that
are not selected from the first file are listed first, followed by those in the second file, and so on.
Following is an example of how you might select and sequence fields so that a query of the customer
master file produces a report that shows COMPANY, ACCTNUMBER, and PASTDUE in that order.
Select and Sequence Fields
Type sequence number (0-9999) for the names of up to 500 fields to
appear in the report, press Enter.
Seq
2
1
____
____
____
____
____
____
____
____
____
____
Field
ACCTNUMBER
COMPANY
FIRSTNAME
MIDDLEINIT
LASTNAME
STREETADDR
CITY
STATE
ZIPCODE
TELENUMBER
CRLIMIT
BALDUE
F3=Exit
F13=Layout
Seq
3
____
____
____
____
Field
PASTDUE
DATELASTPD
CURRENTDAT
YEAR
MONTH
Bottom
F5=Report
F20=Renumber
F11=Display text
F21=Select all
F12=Cancel
F24=More keys
If you then pressed the Enter key, the Query would rearrange the fields so that COMPANY is in the first
position in the list, ACCTNUMBER is in the second position, and PASTDUE is in the third position. You could also
press F20 so that the selected fields are renumbered in added amounts of 10.
88
Query for iSeries Use V5R2
Select and Sequence Fields
Type sequence number (0-9999) for the names of up to 500 fields to
appear in the report, press Enter.
Seq
10
20
30
____
____
____
____
____
____
____
____
____
Field
COMPANY
ACCTNUMBER
PASTDUE
FIRSTNAME
MIDDLEINIT
LASTNAME
STREETADDR
CITY
STATE
ZIPCODE
TELENUMBER
CRLIMIT
F3=Exit
F13=Layout
Seq
____
____
____
____
____
Field
BALDUE
DATELASTPD
CURRENTDAT
YEAR
MONTH
Bottom
F5=Report
F20=Renumber
F11=Display text
F21=Select all
F12=Cancel
F24=More keys
You could then select the remaining fields for output on the report by pressing F21 (Select all). Query
would then select and supply sequence numbers for the remaining fields in the order that they appeared in
the list.
Select and Sequence Fields
Type sequence number (0-9999) for the names of up to 500 fields
to appear in the report, press Enter.
Seq
10
20
30
40
50
60
70
80
90
100
110
120
Field
COMPANY
ACCTNUMBER
PASTDUE
FIRSTNAME
MIDDLEINIT
LASTNAME
STREETADDR
CITY
STATE
ZIPCODE
TELENUMBER
CRLIMIT
F3=Exit
F13=Layout
Seq
130
140
150
160
170
Field
BALDUE
DATELASTPD
CURRENTDAT
YEAR
MONTH
Bottom
F5=Report
F20=Renumber
F11=Display text
F21=Select all
F12=Cancel
F24=More keys
Another way of making your selections is to first specify the same sequence number (a 1, for example) for
all of the fields you want to select. Press the Enter key, and Query pulls all of those fields to the top of the
list. You can then specify new sequence numbers to arrange the fields in the order you want for your
report. This is particularly useful when there are too many fields to appear on a single display.
Query has the ability to show you additional information about the fields in the list area of the display. If
only the field names are shown in the list and you press F11, you see the descriptive text, the length, and
the decimal positions for the fields. For more information on using F11, see “Using F11 to display
additional information about Query for iSeries queries” on page 15. You can also display a long comment
(if one exists) for a field (or display the expression defining a result field) by moving the cursor to that field
and pressing F23.
Chapter 6. Selecting and sequencing fields in Query for iSeries
89
After you have confirmed the fields you want by pressing the Enter key a second time without making any
changes to your sequence choices, Query completes this step and takes you back to the Define the Query
display so that you can continue with other query tasks. If you previously selected more options on the
Define the Query display, Query shows you the first display for the next option.
90
Query for iSeries Use V5R2
Chapter 7. Selecting records in Query for iSeries
This chapter describes how you can perform record selection tests so that your query output contains only
selected records, such as records in which the value of a field is equal to a specified value. For example,
you want to obtain information from an employee master file about all employees whose age is equal to or
greater than 21. By using certain tests, you can select only these records from your file (and thus exclude
those who are less than 21).
This selection process involves creating comparison tests that Query uses to select the desired records.
You can specify one test or as many as 100 tests. If the result of the test or the combined result of several
tests is true, the record being tested is selected and included in your query output.
Letting Query for iSeries select records
If you did not type a 1 next to the Select records option on the Define the Query display, all of the records
from your selected files are included in your query output.
The Select Records display is shown during query definition if you typed a 1 next to the Select records
option on the Define the Query display. Press F12 (Cancel) to return to the previous display if you have
changed your mind and now want all records in your output. (Anything you typed on this display is
ignored.)
Selecting the records you want in Query for iSeries
Usually your reports are based on records that have something in common, such as a report that lists only
those items in an inventory that are in short supply. Selecting records by creating comparison tests gives
you the ability to specify that the records must contain (or not contain) particular information—in the case
of the inventory items that are in short supply, you would want in your report only those items for which the
quantity on hand is below a certain level. This type of report is usually more meaningful and easier to use
than a report that contains all of the records from a file.
To select a record, you compare the contents of one or more fields (including result fields) with one or
more specified values to see if a condition, or test, is true. For example, you want all persons with the last
name (LASTNAM) equal to ’Clarke’ to appear in your output.
Test
|
Field
|
Value
|
|
|
|
|
|
LASTNAM EQ ’Clarke’
The Select Records display lists fields you can use (including result fields) and asks you to specify your
comparisons. This display is shown below with some sample fields from a customer master file shown in
the Field column.
© Copyright IBM Corp. 2000, 2002
91
Select Records
Type comparisons, press Enter. Specify OR to start each new group.
Tests: EQ, NE, LE, GE, LT, GT, RANGE, LIST, LIKE, IS, ISNOT...
AND/OR Field
______________
____ ______________
____ ______________
____ ______________
____ ______________
____ ______________
Test
_____
_____
_____
_____
_____
_____
Value (Field, Number, or ’Characters’)
______________________________
______________________________
______________________________
______________________________
______________________________
______________________________
Bottom
________________________________________________________________________
Field
Field
Field
Field
ACCTNUMBER
STREETADDR
CRLIMIT
YEAR
COMPANY
CITY
BALDUE
MONTH
FIRSTNAME
STATE
PASTDUE
MIDDLEINIT
ZIPCODE
DATEPAID
LASTNAME
TELENUMBER
CURRENTDAT
Bottom
F3=Exit
F5=Report
F9=Insert
F11=Display text
F12=Cancel
F13=Layout
F20=Reorganize
F24=More keys
Note: The value is not limited to the length of the line on the input display. If you need more space,
continue on to the next line. You must separate all values with blanks. If one value ends at the end
of the line and you continue on to the next line, you must include a blank space before the value on
the next line. You can split DBCS character constants by placing a DBCS shift-in character in the
last position of the first line and a DBCS shift-out character in the first position of the next line.
A comparison has all of the following:
v A field to be compared
v A test
v One or more values to compare the field with
You can specify up to a maximum of 100 comparisons. Each comparison can use as many lines (up to 30
characters per line) as needed, up to a maximum of 100 lines total for all comparisons.
The Select Records display provides six input lines at a time for you to enter comparisons. If you need
more than this, press the Page Down key to get more blank input lines. If the cursor is positioned on any
of the input lines (whether you have typed a comparison on it or not), you can use the page keys to view
all of the comparisons that you have entered.
Comparison fields in Query for iSeries
In order to be tested, the field must be one of the following:
v A field that exists in your selected file(s). This can be any field, including a field that you have not
chosen to include in your output.
v A result field defined for this query.
When you specify a field in a comparison, you must put the file identifier followed by a period in front of
any field name that appears in more than one selected file in the list. For example, if the field ACCTNUMBER
exists in two of your selected files that have file IDs T01 and T02, you would have to specify
T01.ACCTNUMBER or T02.ACCTNUMBER. If you did not include the file identifier, Query would not know from
which file to get the account number needed for the comparison test. You can press F18 (Files) to see a
list of the files that you selected and the file ID associated with each file.
92
Query for iSeries Use V5R2
Comparison values in Query for iSeries
The value you compare the field with can be:
v Another field
v A numeric constant
v A character constant (SBCS or DBCS)
v A date constant
v A time constant
v A timestamp constant
The field and the value you are comparing must be compatible data types. The following are valid
comparisons for record selection tests:
v SBCS character field with:
SBCS character
DBCS-either
DBCS-open
v DBCS-either field with:
SBCS character
DBCS-either
DBCS-open
DBCS-only
v DBCS-open field with:
SBCS character
DBCS-either
DBCS-open
DBCS-only
v DBCS-only field with:
DBCS-either
v
v
v
v
DBCS-open
DBCS-only
DBCS-graphic field with:
DBCS-graphic
UCS2-graphic field with:
UCS2-graphic
Numeric field with a numeric field
Date field with:
SBCS character
Date
DBCS-either
DBCS-open
v Time field with:
SBCS character
Time
DBCS-either
DBCS-open
v Timestamp field with:
Chapter 7. Selecting records in Query for iSeries
93
SBCS character
Timestamp
DBCS-either
DBCS-open
v Any field can be compared to the keyword NULL using the IS or ISNOT test to determine if a field value
is or is not null.
Note: When comparing a date, time, or timestamp field with an SBCS, DBCS-either, or DBCS-open
character field, use a character field for which each value can be recognized as an SAA formatted
date, time, or timestamp. If the character field contains a correct representation of a date, time, or
timestamp, but in other than an SAA format, you may get unexpected results. When you run a
query that uses a non-SAA format for date, time, or timestamp values in character fields, and query
has no setting for a non-SAA literal date value, use the CHGJOB command to make sure your job
date format and separator match the format and separator in the character field values.
Usually you specify only one value per comparison. The exceptions are discussed in “Comparison tests in
Query for iSeries” on page 95.
Fields as values in Query for iSeries
If you use a field as a value (that is, in the Value column on the display), the field can be any field from
the list in the lower part of the display.
An example of a situation where you might use a field as a value is if you want only the records—from a
customer master file—with a balance due (in a field named BALDUE) greater than their credit limit (in a field
named CRLIMIT). In this example, you are comparing a field (BALDUE) with a value which is also a field
(CRLIMIT).
The fields being compared do not have to be the same length, and numeric fields do not have to have the
same number of decimal positions.
Character constants as values in Query for iSeries
A character constant is simply characters enclosed in apostrophes (for example, ’xxx’). The apostrophes
are important, because Query assumes that any group of characters not enclosed by apostrophes is a
field name. In DBCS character constants, shift-out and shift-in characters must surround DBCS data within
the apostrophes. DBCS-graphic character constants must be preceded by an uppercase or lowercase G.
For example, if you want only the records for Jan Alison, you compare the NAME field with ’Jan Alison’.
Also, note that if you do not use the apostrophes, Query tells you: Only one value is allowed for test.
The characters in the constant can be any combination of letters, numbers, or special characters (such as
*, ?, #, $, @) that might be found in the tested field. You must use apostrophes around a character
constant, even if it contains only numbers. You must also type uppercase and lowercase letters exactly as
you want them. The special characters underscore (_) and percent (%) have certain meanings when used
in a LIKE test.
If the character constant you specify contains an apostrophe, you must enter it as two apostrophes, so
Query does not think it has reached the end of the constant. For example, if you are looking for records
that list the street address as Granger’s Circle, you type the constant as ’Granger’s Circle’. Query
counts two apostrophes within a constant as a single apostrophe.
Numeric constants as values in Query for iSeries
You must not enclose a numeric constant in apostrophes. A numeric constant can be from 1 to 31 digits
long.
Do not use a currency sign (to indicate a monetary value) or a thousands separator (to indicate thousands,
millions, and so on) within a numeric constant.
94
Query for iSeries Use V5R2
Note: If you are sending queries between countries that use the comma for a decimal separator, put a
blank after each comma separating the offset and length in the SUBSTR function and between
numeric values in a list in the VALUE function. Press F17 to show which decimal separator to use
in the query (see “Displaying the format of constants in Query for iSeries” on page 17).
Date, time, timestamp constants as values in Query for iSeries
Date, time, or timestamp constants are the same as the constants used on the Define Result Fields
display. See “Date, time, and timestamp expressions in Query for iSeries” on page 66. You can see what is
allowed for OS/400 date and time formats and separators by pressing F17 (see “Displaying the format of
constants in Query for iSeries” on page 17).
Null values in Query for iSeries
Null is a valid value for all data types on record selection. IS and ISNOT are valid tests for the keyword
NULL.
Comparison tests in Query for iSeries
You can specify these tests in comparisons:
Test
Description
EQ
Equal. Use this test to determine if the contents of the field and the value are equal.
NE
Not equal. Use this test to determine if the contents of the field and the value are not equal.
GT
Greater than. Use this test to determine if the contents of the field is greater than the value.
LT
Less than. Use this test to determine if the contents of the field is less than the value.
GE
Greater than or equal. Use this test to determine if the contents of the field is greater than or equal
to the value.
LE
Less than or equal. Use this test to determine if the contents of the field is less than or equal to
the value.
RANGE
Range. Use this test to determine if the contents of the field is within a range that you have
specified for the value.
LIST
List. Use this test to determine if the contents of the field is equal to one of the values in a list.
NLIST Not List. Use this test to determine if the contents of the field is not equal to any of the values in a
list.
LIKE
Like. Use this test to determine if the contents of the field has a pattern similar to the value.
NLIKE Not Like. Use this test to determine if the contents of the field has a pattern that is not similar to
the value.
IS
Is. Use this test to determine if a field is null. The only valid value is NULL or null.
ISNOT
Is not. Use this test to determine if the contents of the field is not null.
Character fields and constants are compared character by character for all tests except LIKE, NLIKE, IS,
and ISNOT.
v If two fields or a field and a constant being compared are not the same length, Query treats the shorter
field as if it has enough blanks at the end to make both fields the same length.
v The collating sequence determines greater than and less than conditions (for GT, GE, LT, LE, and
RANGE comparisons). For more information on collating sequences, see Chapter 9, “Selecting a
collating sequence in Query for iSeries”.
Chapter 7. Selecting records in Query for iSeries
95
Date, time, or timestamp comparisons in Query for iSeries
A date, time, or timestamp value may be compared either with another value of the same data type or with
a character representation of that data type. All comparisons are chronological. The farther a point in time
is from January 1, 0001, the greater the value of that point in time.
Comparisons of time values and character representations of time values always include seconds. If the
character representation omits seconds, zero seconds are assumed. A time or timestamp value that
includes 24:00:00 is not the same as 00:00:00.
Testing for equal (EQ) and not equal (NE) in Query for iSeries
You use the equal and not equal tests to determine if the contents of a field is equal or not equal to the
value you specify.
If the test is EQ, records are selected only if the field contains data that is exactly the same as the
specified value. For example, if the only comparison is:
INTRAT EQ 18
records are selected only if INTRAT, a numeric field, contains a value equal to 18. For example, INTRAT
could contain 18., 18.00, 00018, and so on.
If the test is NE, records are selected only if the field contains data that is different than the specified
value. For example, if you want to select records that contain anything other than a value of SMITH in the
field NAME, you specify:
NAME NE ’SMITH’
It does not matter to Query if the field called NAME is defined to be longer than five characters. Query looks
for all records that do not exactly match SMITH. SMITHSON, Smith, and NEISMITH would all be selected as
names that are not equal to SMITH.
Testing for IS Null (IS) and ISNOT Null (ISNOT) in Query for iSeries
You use the IS and ISNOT tests to determine if the contents of any field is or is not null. Any field can be
compared to null using the IS or ISNOT test. Some examples of IS and ISNOT are:
NAME IS NULL
Records are selected if the field NAME contains a null value.
NAME ISNOT NULL
Records are selected if the field NAME does not contain a null value.
Testing for greater (GT or GE), less (LT or LE), and range (RANGE) in Query for
iSeries
You use the greater and less tests to determine if the contents of a field is greater than, greater than or
equal to, less than, or less than or equal to the specified value. You use the range test to determine if the
contents of a field lies within the specified range of values. In addition to using these to test numeric data,
you can also test character data.
Some examples of greater and less tests are:
v NAME GT ’SMITH’
Records are selected if the field NAME contains a value in the collating sequence greater than SMITH.
v INTRAT GE 18
Records are selected if the field INTRAT contains a value that is greater than or equal to 18.
v BALDUE LT CRLIMIT
Records are selected if the data in the field BALDUE is less than the data in the field CRLIMIT.
v BALDUE LE CRLIMIT
96
Query for iSeries Use V5R2
Records are selected if the data in the field BALDUE is less than or equal to the data in the field CRLIMIT.
When you test for RANGE, the contents of the field must be within the range of two values (greater than
or equal to the first value but less than or equal to the second) for the record to be selected. On the Select
Records display, you must specify two values in the Value column, and you must separate them by a
blank. If the first value is greater than the second value for a record, that record will not be selected.
For example, you want to select records only for the months of February through August. The field named
MONTH is a numeric field, and it contains a 1 to represent January, a 2 to represent February, a 3 to
represent March, and so on. On the Select Records display, you would specify:
Select Records
Type comparisons, press Enter. Specify OR to start each new group.
Tests: EQ, NE, LE, GE, LT, GT, RANGE, LIST, LIKE, IS, ISNOT...
AND/OR Field
MONTH_________
____ ______________
____ ______________
Test Value (Field, Number, or ’Characters’)
RANGE 2 8___________________________
_____ ______________________________
_____ ______________________________
To use the GT, GE, LT, LE, and RANGE tests for SBCS character fields and values, you may need to
know the collating sequence. The collating sequence determines what characters are greater than or less
than others. If you do not select a different one, the hexadecimal collating sequence is used and:
v Most special characters are less than letters.
v Lowercase letters are less than uppercase.
v Letters are less than numbers.
For example, the characters A, 8, &, and b would sort from low to high as follows:
&
b
A
8
For more information about selecting or defining a collating sequence, see Chapter 9, “Selecting a collating
sequence in Query for iSeries”.
Testing for values in a list (LIST NLIST) in Query for iSeries
Use the LIST, NLIST tests to determine if the content of a field is equal or not to one of the values that
you list in the Value column on the Select Records display.
Note: See “CCSID and record selection tests in Query for iSeries” on page 253 for information on
CCSIDs and how they affect the Select Records display.
When you compare a field with a list, the record is selected if the contents of the field exactly match one
of the values you specify. The values you specify in the list:
v Must be numeric constants if you are comparing a numeric field with them.
v Must be SBCS character constants if you are comparing an SBCS character field with them.
v Must be SBCS, DBCS-only, or DBCS-open character constants if you are comparing a bracketed-DBCS
field with them. (If the field being tested is a DBCS-only field, the constant can only be a DBCS-only
constant.)
v Must be DBCS-graphic character constants if you are comparing a DBCS-graphic character field with
them.
v Must be separated by blanks.
v Cannot be field names.
Chapter 7. Selecting records in Query for iSeries
97
v Must be date constants if comparing to a date field. If the list contains correct representations of a date
but in other than SAA format, you may get unexpected results. To prevent unexpected results, the list
should be in SAA format.
v Must be time constants if comparing to a time field. If the list contains correct representations of a time
but in other than SAA format, you may get unexpected results. To prevent unexpected results, the list
should be in SAA format.
v Must be timestamp constants if comparing to a timestamp field.
Your list must contain at least two values, and they need not be in any particular order. You must enclose
each character constant in apostrophes and use two apostrophes where the character constant itself
contains an apostrophe (see the name O’Grady in “Example 2: Testing for values in a list (LIST NLIST) in
Query for iSeries”).
If all of the values in the list do not fit on one line, just continue them on the next line under Value. If one
value ends in the last position of a line and you continue on the next line, you must put a blank space
before the value on the next line. You can split DBCS character constants by placing a DBCS shift-in
character in the last position of the first line and a DBCS shift-out character in the first position of the next
line.
Example 1: Testing for values in a list (LIST NLIST) in Query for iSeries: If you want to select only
records that have 04567, 00976, and 85432 in the ITEMNO field, you specify:
Select Records
Type comparisons, press Enter. Specify OR to start each new group.
Tests: EQ, NE, LE, GE, LT, GT, RANGE, LIST, NLIST, LIKE, NLIKE, IS,ISNOT
AND/OR Field
ITEMNO
____ ______________
____ ______________
Test Value (Field, Number, or ’Characters’)
LIST 04567 00976 85432
_____ ______________________________
_____ ______________________________
Example 2: Testing for values in a list (LIST NLIST) in Query for iSeries: The following tests the field
LASTNAME for a number of different last names:
Select Records
Type comparisons, press Enter. Specify OR to start each new group.
Tests: EQ, NE, LE, GE, LT, GT, RANGE, LIST, LIKE, IS, ISNOT...
AND/OR Field
LASTNAME
____ ______________
____ ______________
Test Value (Field, Number, or ’Characters’)
LIST ’Staples’ ’Thorson’ ’Smith’ ’J
_____ ones’ ’Alison’ ’O’Grady’
_____ ______________________________
Testing for values that are similar (LIKE NLIKE) in Query for iSeries
You use the LIKE test to determine if a field has a pattern that is similar to the test pattern you specify.
You use the NLIKE test to determine if a field is not similar to the test pattern that you specify. You can
use LIKE comparisons for SBCS and DBCS character fields, but specifying a LIKE or NLIKE comparison
for any other field types causes an error message.
When you use a LIKE test, a record is selected if a certain part of the field has the same characters as the
test pattern you specify for the comparison value. For example, you would use the LIKE test if you wanted
to select all records that have a last name that begins with an A.
You must enclose the test pattern in apostrophes; use two apostrophes where the test pattern itself
contains an apostrophe. If the test pattern consists of two apostrophes alone (’), it is treated as an empty
string.
98
Query for iSeries Use V5R2
You can use some special characters to represent the positions in the field that you do not care about:
v An underscore (_) means skip one character at that position and do not test for that character. Each
underscore takes the place of one character in the field.
v A percent sign (%) means skip as many characters as necessary to get to the end of the field or to the
next specified character. Each % takes the place of zero or more characters in the field. (Thus, you
need not write a test pattern that is 32 characters long just because the field is 32 characters long.)
A test pattern must be no longer than, but it can be as long as, the actual field. Query does not count a %
as a character and counts two apostrophes within a constant as one character when checking pattern
length.
For example, if you are testing for an A in the first position of the LASTNAME field, and if:
v The field length is 1, you could specify ‘A’
v The field length is 3, you could specify ‘A__’
v The field length is at least 1, you could specify ‘A%’
You would type them on the display as follows:
Select Records
Type comparisons, press Enter. Specify OR to start each new group.
Tests: EQ, NE, LE, GE, LT, GT, RANGE, LIST, LIKE, IS, ISNOT...
AND/OR Field
LASTNAME
____ ______________
____ ______________
Test Value (Field, Number, or ’Characters’)
LIKE ’A%’
_____ ______________________________
_____ ______________________________
If you are testing for an A in the last position of the field, you could specify ‘%A’. But note that if an
8-character field contained ’ANNA
’, the LIKE test would fail because the last position in the field is a
blank.
If you are testing for an E followed by an A two positions after it, and the field length is at least 3, you
could specify:
’%E_A%’
Note that if an 8-character field contained any of the following, the LIKE test would be true:
’ANNE A. ’
’EVAN E. ’
’ANNE EVA’
Note: A LIKE, NLIKE test cannot be used for a date, time, or timestamp field. Only character constants
are allowed for LIKE, NLIKE. To circumvent this, create a result field and use the CHAR function on
the date, time, or timestamp field. Then use the result field on the Select Records display.
Testing for DBCS LIKE (like) and NLIKE (not like) in Query for iSeries
DBCS LIKE or NLIKE tests can be used in the Value column of the Select Records display to select
records. The following types of LIKE patterns can be used for DBCS fields that are being tested: standard
SBCS character constants, DBCS-only character constants, DBCS-open character constants, and
DBCS-graphic character constants.
Non-DBCS character LIKE, NLIKE (not like) pattern in Query for iSeries: This pattern, which contains
no DBCS data, can be used to test DBCS-either and DBCS-open fields. Use a % sign to skip any number
of characters or none at all. Use an underscore (_) to represent any single SBCS character. Although the
LIKE pattern contains only SBCS characters, it can test DBCS-open fields that contain both DBCS data
and SBCS data, because a % sign can be used to skip over both kinds of data.
Chapter 7. Selecting records in Query for iSeries
99
DBCS-only LIKE, NLIKE (not like) pattern in Query for iSeries: This pattern, which contains only
double-byte characters, can be used for any bracketed-DBCS field, but not for a DBCS-graphic field. Start
the pattern with a shift-out character and end it with a shift-in character. Use the DBCS percent sign (%%)
to skip any number of characters or none at all. Use the DBCS underscore (__) to indicate that any
double-byte character is accepted for that position. Although the LIKE pattern contains only double-byte
characters, it can test DBCS-open fields that contain both double-byte character data and alphanumeric
data because a %% sign can skip over both kinds of data.
DBCS-open LIKE, NLIKE (not like) pattern in Query for iSeries: This pattern, which contains both
DBCS and SBCS character data, can be used only for DBCS-open fields.
v The percent sign (%) skips any number of SBCS characters or double-byte characters, or none at all. It
ignores shift-out and shift-in characters.
v The DBCS percent sign (%%) works the same way as the standard percent sign (%).
v The underscore (_) represents one SBCS character. It does not represent a double-byte, shift-out, or
shift-in character.
v The DBCS underscore (__) represents one double-byte character. It cannot be used to represent an
alphanumeric, shift-out, or shift-in character.
DBCS-Graphic LIKE, NLIKE (not like) pattern in Query for iSeries: This pattern, which contains only
double-byte characters, can be used only for a DBCS-graphic field. A DBCS-graphic test pattern must
have an uppercase or lowercase G before the apostrophe. Within the apostrophes, the pattern must start
with a shift-out character and end with a shift-in character. Use the DBCS percent sign (%%) to skip any
number of characters or none at all. Use the DBCS underscore (__) to indicate that any double-byte
character is accepted for that position.
Examples: In the following examples, %% represents the DBCS percent sign, __ represents the DBCS
underscore, s/o represents the shift-out character, s/i represents the shift-in character, and a pair of the
same SBCS characters, such as DD, represent a single DBCS character.
Example 1:
DBCSFLD1
LIKE
’s/o__DD__%%HH%%s/i’
Example 1 selects only records in which the second character in field DBCSFLD1 is DD, the first and third
characters are any double-byte characters, and at least one of the fourth through last characters is HH.
This test could be used for any bracketed-DBCS field that is at least ten characters long. This test could
also be used for a DBCS-graphic field by putting a G in front of the test pattern:
G’s/o__DD__%%HH%%s/i’
If DBCSFLD1 is a DBCS-open field, this test could select data that has alphanumeric characters, such as
‘s/oXXDDMMs/iAnns/oGGHHs/i’, for which the DBCS percent sign would skip over both double-byte
characters and alphanumeric characters before reaching HH.
Example 2:
DBCSFLD2
LIKE
’s/o%%__%%s/i’
Example 2 selects only records in which field DBCSFLD2 contains at least one double-byte character. The
DBCS underscore (__) can stand for a double-byte character, but not for an alphanumeric character. A
different value, ‘%_%’, selects records that have at least one alphanumeric character. A value of
‘s/o__________s/i’ selects those that have all double-byte characters for a field that is ten characters
long.
Example 3:
DBCSFLD3
LIKE
’s/oYY%%s/i A_o’
Example 3 selects all records in which the field DBCSFLD3 begins with the double-byte character YY and
ends with alphanumeric characters, the first of which is blank, the second of which is A, and the fourth of
which is o. This test selects fields such as ‘s/oYYs/i Amo’; ‘s/oYYZZXXs/iMary Abo’; or
‘s/oYYs/iABCs/oTTWWs/iM Aro’. It is not important that the percent between the double-byte character and
alphanumeric parts of the value is a DBCS percent; the following two values are equivalent to the one
used: ‘s/oYY%s/i A_o’ and ‘s/oYY%%s/i% A_o’.
100
Query for iSeries Use V5R2
If the test pattern consists of two apostrophes alone (’’ or G’’) or two apostrophes enclosing only DBCS
shift-out and shift-in characters (’s/os/i’ or G’s/os/i’), the test pattern is treated as an empty string.
These patterns will select records in which the field contains an empty string.
Using more than one comparison test in Query for iSeries
When you use more than one comparison, you need to tell Query how to connect them by typing a
connection in the AND/OR column. The two types of connections are:
v AND connections
v OR connections
If you do not specify anything in the AND/OR column between comparisons, Query assumes AND. All of
the comparisons that are connected by ANDs must be true for the record to be selected by that group of
comparisons.
For example, to select records for all customers with the last name of ’Clarke’ and who live in Arizona
(‘AZ’) requires an AND connection:
Select Records
Type comparisons, press Enter. Specify OR to start each new group.
Tests: EQ, NE, LE, GE, LT, GT, RANGE, LIST, LIKE, IS, ISNOT...
AND/OR Field
LASTNAME
AND
STATE
____ ______________
____ ______________
____ ______________
____ ______________
Value (Field, Number, or ’Characters’)
’Clarke’
’AZ’
______________________________
______________________________
______________________________
______________________________
Bottom
________________________________________________________________________
ACCTNUMBER
STREETADDR
CRLIMIT
YEAR
COMPANY
CITY
BALDUE
MONTH
FIRSTNAME
STATE
PASTDUE
MIDDLEINIT
ZIPCODE
DATEPAID
LASTNAME
TELENUMBER
CURRENTDAT
Bottom
F3=Exit
F12=Cancel
Test
EQ
EQ
_____
_____
_____
_____
F5=Report
F13=Layout
F9=Insert
F20=Reorganize
F11=Display text
F24=More keys
Although this example shows the AND typed in the AND/OR column, it is not necessary. (If you leave the
AND/OR column blank, Query assumes an AND connection.) Comparisons connected with one or more
ANDs are considered a group of comparisons.
The other kind of connection between comparisons is OR; that is, one or more of the comparisons (or
groups of comparisons) must be true for the record to be selected.
Because Query assumes AND connections unless told otherwise, you must specify OR in the AND/OR
column whenever you want an OR connection.
For example, to select records in which the last name is Kingsbury or the credit limit is greater than or
equal to $5,000 requires an OR connection:
Chapter 7. Selecting records in Query for iSeries
101
Select Records
Type comparisons, press Enter. Specify OR to start each new group.
Tests: EQ, NE, LE, GE, LT, GT, RANGE, LIST, LIKE, IS, ISNOT...
AND/OR Field
LASTNAME
OR
CRLIMIT
____ ______________
____ ______________
Test Value (Field, Number, or ’Characters’)
EQ
’Kingsbury’
GE
5000
_____ ______________________________
_____ ______________________________
You can use AND and OR connections together to be even more specific about which records to include
in your report. The following example selects records for customers who placed orders from November
1986, through January 1987. Note that numeric constants are used for months.
Select Records
Type comparisons, press Enter. Specify OR to start each new group.
Tests: EQ, NE, LE, GE, LT, GT, RANGE, LIST, LIKE, IS, ISNOT...
AND/OR Field
MONTH
AND
YEAR
OR
MONTH
AND
YEAR
Test
LIST
EQ
EQ
EQ
Value (Field, Number, or ’Characters’)
11 12
86
1
87
If written out, the above example looks like this:
(MONTH LIST 11,12 AND YEAR EQ 86) OR
(MONTH EQ 1 AND YEAR EQ 87)
Because using a combination of AND and OR connections can be confusing, you might want to use F5 to
look at your report and make sure your comparisons work the way you expect.
If a combination of AND and OR connections seems particularly complex, you should probably look at the
comparisons closely to see if you can use fewer connections to make the same record selection. For
example, following are two ways of selecting records for customers from Rhode Island (‘RI’) who have a
balance due from $900 to $1000 during 1986 OR 1987.
The first method uses a combination of AND and OR connections.
Select Records
Type comparisons, press Enter. Specify OR to start each new group.
Tests: EQ, NE, LE, GE, LT, GT, RANGE, LIST, LIKE, IS, ISNOT...
AND/OR Field
BALDUE
AND
STATE
AND
YEAR
OR
BALDUE
AND
STATE
AND
YEAR
____ ______________
Test
RANGE
EQ
EQ
RANGE
EQ
EQ
_____
Value (Field, Number, or ’Characters’)
900 1000
’RI’
86
900 1000
’RI’
87
______________________________
Written out, this example would look like this:
(BALDUE RANGE 900,1000, AND STATE EQ ’RI’ AND YEAR EQ 86)
OR
(BALDUE RANGE 900,1000 AND STATE EQ ’RI’ AND YEAR EQ 87)
The second method, which uses the LIST test and AND connections, selects the same records but needs
fewer lines and is easier to read:
102
Query for iSeries Use V5R2
Select Records
Type comparisons, press Enter. Specify OR to start each new group.
Tests: EQ, NE, LE, GE, LT, GT, RANGE, LIST, LIKE, IS, ISNOT...
AND/OR Field
BALDUE
AND
STATE
AND
YEAR
____ ______________
____ ______________
Test
RANGE
EQ
LIST
_____
_____
Value (Field, Number, or ’Characters’)
900 1000
’RI’
86 87
______________________________
______________________________
Bottom
Written out, the example would look like this:
(BALDUE RANGE 900,1000 AND STATE EQ ’RI’ AND YEAR LIST 86,87)
Note: CCSIDs can affect how records are selected. See “CCSID and record selection tests in Query for
iSeries” on page 253 for information on CCSIDs and how they affect record selections.
Adding and removing comparisons in Query for iSeries
The prompt part of the Select Records display only has room to show six comparisons at a time. You can
press the Page Down key to get blank input lines after the last line you typed. When you have specified
more than six comparisons, you can press the Page Up key to see the previous ones.
If you want to add another comparison between two comparisons that you have already typed, you can
press F9 to insert a blank line where you need it so that you do not have to retype everything. The new
line is added after the line on which the cursor is positioned when you press F9. You can also press F9
instead of the Page Down key to add lines as you type in comparisons.
If you change your mind about a comparison and want to remove it from the group, just use the spacebar
or Field Exit to blank it out. If you change your mind and want to remove all of your comparisons, press
F12 (Cancel). Anything that you entered on the Select Records display is then ignored.
If you have blanked out a line or two and are at the last available blank line and need more lines, you can
press F20 to reorganize the space. Query moves the blank lines to the end of the comparisons. You see
the first six comparison lines on your display and must press the Page Down key to get to the blank lines
or to the place where you want to insert a line. If you run out of space but have no blank lines to move,
you have to redesign your comparisons so that they fit into the 100-line limit.
Chapter 7. Selecting records in Query for iSeries
103
104
Query for iSeries Use V5R2
Chapter 8. Selecting sort fields in Query for iSeries
This chapter describes how you can select sort fields to control the arrangement of the data in your query
output. To Query, a sort field is a field whose contents are used to sort the output records in a particular
order. For example, if you wanted to use a customer master file to obtain a list of all your customers, you
might want those customers listed in a particular order, such as alphabetically by last name, alphabetically
by state, or both alphabetically by state and then by last name. In this case, you would need to specify
one or more sort fields to ensure that your output in is the order you want it to be in.
Letting Query for iSeries determine the order of records for you
You can let Query retrieve the data directly from the database and include it in your query without any
sorting. If the sequence of the data in your report is not important, you do not need to worry about
selecting sort fields. When running a query that does not have a sort field specified, the order in which
rows are retrieved is not guaranteed. If the order is important, you should define a sort field in the query. A
thorough knowledge of database concepts, including file type and access paths, is needed if you want to
predict the sequence of your output.
Note: When you select a logical file for use with Query or DB2 UDB for iSeries programs without
specifying any sort fields, unpredictable results may occur. For example, you may not receive the
logical view of the physical file.
If you did not type a 1 next to the Select sort fields option on the Define the Query display, the Select Sort
Fields display is not shown while you work with your query definition, and the data is not sorted when you
run the query.
If you typed a 1 next to the Select sort fields option on the Define the Query display, the Select Sort Fields
display is shown during query definition. Press F12 (Cancel) to return to the previous display if you have
changed your mind and do not want to select any sort fields. (Anything you typed on the display is
ignored.)
Selecting the sort fields you want to use in Query for iSeries
On the Select Sort Fields display, as shown below, you select the sort fields that you want by entering a
sort priority number in the Sort Prty column. You can select up to 32 sort fields from the list. (The list on
this display shows only those fields that were selected on the Select and Sequence Fields display; if no
fields were selected, the list shows all the fields.) The total length of all the sort fields cannot be greater
than 10 000 characters (that is, if you add up the lengths of the sort fields, the total cannot exceed
10 000 characters).
Based on the number you type for each field you select as a sort field, Query establishes a sort priority.
You can use any numbers from 0 to 999—use the lowest number for your highest priority sort field. If you
use numbers like 10, 20, 30, and so on, you can easily add another sort field later.
You can also specify whether you want the sort field sorted in ascending order (from lowest to highest
value) or descending order (from highest to lowest value) by typing an A (for ascending) or a D (for
descending) in the A/D column. (If you leave the A/D column blank for a field, the sort for that field is done
in ascending order.)
© Copyright IBM Corp. 2000, 2002
105
Select Sort Fields
Type sort priority (0-999) and A (Ascending) or D (Descending) for
the names of up to 32 fields, press Enter.
Sort
Prty
___
30
20
___
___
___
___
10
A/D
_
_
_
_
_
_
_
D
Field
ACCTNUMBER
INIT
LASTNAME
STREETADDR
STATE
CITY
ZIPCODE
CRLIMIT
Bottom
F3=Exit
F13=Layout
F5=Report
F18=Files
F11=Display text
F20=Renumber
F12=Cancel
F24=More keys
When you press the Enter key after typing your sort priority numbers, Query rearranges the fields on the
display in the following order:
v If fields were selected on the Select and Sequence Fields display, they are listed in the following order:
1. All sort fields (if any) previously selected on this display, in the order specified.
2. Fields selected for the query, but not selected as a sort field. These fields are listed in the order they
were specified on the Select and Sequence Fields display.
v If no fields were selected on the Select and Sequence Fields display, the fields on this display are
shown in the following order:
1. All sort fields (if any) previously selected on this display, in the order specified.
2. Any result fields that have been defined for this query.
3. All other fields, in the order they exist in the record format definitions for the selected files. Fields
from the first file are listed first, followed by those in the second file, and so on.
Query then displays a message Press Enter to confirm. so that you have a second chance to review
your sort fields and change them if you want.
To remove a sort field from your selections, blank out the number in front of that field name. It is not
necessary to renumber the other fields. To change the priorities of the sort fields, just change the numbers.
If you make any changes, press the Enter key again. The list of field names is rearranged and is shown
with the sort fields first, in the sort priority you specified followed by the remaining fields that were selected
for output. If you want to renumber the fields in added amounts of 10 (10, 20, 30, and so on), press F20.
When you are satisfied that your sort field selections are correct, press the Enter key a final time to end
sort field selection.
The following is an example of how to specify sort priorities.
Assume that you are the credit manager for the United States division of an international mail-order
company, and you want a report of customer names and addresses organized as follows:
v Customers with the highest credit limit should appear first, then the next highest, and so on.
v If two or more customers from the same state have the same credit limit, these customers should be
grouped by state.
106
Query for iSeries Use V5R2
v The states, and the customers listed for each state, should appear alphabetically.
In order to obtain the order you want, your first sort field is credit limit (CRLIMIT), in descending order (from
highest to lowest); your second sort field is state (STATE); your third sort field is last name (LASTNAME); and
your last sort field is first name (INIT).
You would complete the Select Sort Fields display as follows:
Select Sort Fields
Type sort priority (0-999) and A (Ascending) or D (Descending) for the
names of up to 32 fields, press Enter.
Sort
Prty
___
40
30
___
___
20
___
10
A/D Field
_ ACCTNUMBER
_ INIT
_ LASTNAME
_ STREETADDR
_ CITY
_ STATE
_ ZIPCODE
D CRLIMIT
Text
Account number
Customer first and middle initial
Customer last name
Street address
City
State abbreviation
Zip code
Credit limit amount
Len Dec
6
2
20
20
15
2
5
7
2
Bottom
F3=Exit
F13=Layout
F5=Report
F18=Files
F11=Display names only
F20=Renumber
F12=Cancel
F24=More keys
Notice that a D has been typed in the A/D column for the CRLIMIT field. The STATE, LASTNAME, and INIT
fields will all be sorted in ascending order (which is the order you want).
Also notice that this display shows additional information including the text, length, and decimal positions
for each field. While you are selecting sort fields you can press F11 to alternate between showing only the
names of the fields and showing both the names and additional information about the fields. For more
information about using F11, see “Using F11 to display additional information about Query for iSeries
queries” on page 15.
After pressing the Enter key, the Select Sort Fields display appears again, but this time the fields given
priority are listed first in the order specified and the fields not used as sort fields are moved to the bottom
of the list:
Chapter 8. Selecting sort fields in Query for iSeries
107
Select Sort Fields
Type sort priority (0-999) and A (Ascending) or D (Descending) for the
names of up to 32 fields, press Enter.
Sort
Prty
10
20
30
40
___
___
___
___
A/D Field
D CRLIMIT
A STATE
A LASTNAME
A INIT
_ ACCTNUMBER
_ STREETADDR
_ CITY
_ ZIPCODE
Text
Credit limit amount
State abbreviation
Customer last name
Customer first and middle initial
Account number
Street address
City
Zip code
Len Dec
7
2
2
20
2
6
20
15
5
Bottom
F3=Exit
F13=Layout
F5=Report
F18=Files
F11=Display names only
F20=Renumber
F12=Cancel
Notice that because you left the A/D column blank for the STATE, LASTNAME, and INIT fields, Query replaces
the blank with an A to show that ascending order is used.
The sort in this example provides a report that looks something like this:
Account
Last
Street
Zip
Credit
Number Init Name
Address
City
State Code Limit
------- ---- -------------- -------------- ---------- ----- ----- ------938485
583990
693829
846283
938472
029384
397267
475938
930484
192837
392859
389572
839283
493264
CA
GF
NO
JS
EJ
MA
OS
MA
BJ
CE
LL
RS
AC
JS
Johnson
Abraham
Thomas
Alison
Henning
Brown
Tyron
Doe
Hubbard
Lee
Vine
Stevens
Jones
Jones
101 2nd St.
20 Vineview
8256 1st Ave.
20749 73rd St.
1 Oil Lane
904 38th St.
1039 20th Ave.
P.O. Box 90834
10 Colusa
98 Elm St.
18940 Main St.
38 Yale Blvd.
1984 5th Ave.
P.O. Box 8910
Montvale
GA
Elk River MN
Twostone
WY
Ottawa
MN
Oiltown
TX
New York
NY
Falls
NY
Reading
CA
Junction
CA
Falls
NY
Tombstone VT
Deer Falls CO
New York
NY
New York
NY
30545
55330
82609
56342
75217
12201
14841
95685
91722
14841
05046
80226
13041
13088
9999.00
9999.00
9999.00
5000.00
5000.00
1000.00
1000.00
700.00
700.00
700.00
700.00
400.00
400.00
400.00
The highest credit limits (9999.00) are listed first, followed by the next highest. Within each group of credit
limits, the records are listed alphabetically by state. Within each group of states, the customers are listed
alphabetically by last name (such as Brown and Tyron in New York, and Doe and Hubbard in California). If
two or more customers with the same last name live in the same state and have the same credit rating,
the order of the records is determined alphabetically by first and middle initials (such as AC Jones and JS
Jones in New York).
Additional sort considerations in Query for iSeries
Numeric fields are sorted by arithmetic value.
108
Query for iSeries Use V5R2
SBCS character data in SBCS, DBCS-open, and DBCS-either fields are sorted in the order of the
hexadecimal representation of the characters or an order defined by a selected collating sequence. For
more information on collating sequences, see Chapter 9, “Selecting a collating sequence in Query for
iSeries”.
DBCS data in character fields is sorted by the hexadecimal representation of the data. The collating
sequence is not applied to DBCS data in DBCS character fields.
UCS2-graphic data is sorted by the hexidecimal representation of the data. The collating sequence is not
applied to UCS2-graphic data in UCS2-graphic fields.
Date, time, and timestamp fields are sorted in chronological order.
For all data types, null values are sorted last if the sort is in ascending order and are represented by a
dash (-). For example, for the following data:
field1
record
1
3
2
4
value
B
A
null value
null value
The sorted report looks like this:
A
B
-
Chapter 8. Selecting sort fields in Query for iSeries
109
110
Query for iSeries Use V5R2
Chapter 9. Selecting a collating sequence in Query for iSeries
This chapter describes how you select the collating sequence for your query. The collating sequence is
used for certain operations (such as sorting, comparing, and evaluating) that involve SBCS character data
in SBCS, DBCS-open, and DBCS-either character fields. A collating sequence assigns a weight to each
alphanumeric and special character so that Query knows how to perform operations on character fields
and constants.
The collating sequence is only used for SBCS character data in SBCS, DBCS-open, and DBCS-either
fields. It is not used for numeric, date, time, timestamp, DBCS-only, DBCS-graphic, or UCS2-graphic data.
Note: To provide the intended effect regardless of the hexadecimal representations of the characters in
the data, coded character set identifiers (CCSIDs) are stored with collating sequences when they
are saved. For more information about how CCSIDs affect the collating sequence used see
“CCSIDs and collating sequences in Query for iSeries” on page 248.
Letting Query for iSeries select a collating sequence
If you did not type a 1 next to the Select collating sequence option on the Define the Query display,
Query for iSeries uses the default collating sequence. If you have never saved a collating sequence
default value, your collating sequence for new queries is the hexadecimal sequence.
Setting your default collating sequence in Query for iSeries
Generally, you will use the same collating sequence for all of your queries. For most users, the language
collating sequence (provided on most systems) is the only one needed. If you select the Select collating
sequence option on the Define the Query display when you are creating or changing a query and save
your collating sequence option as a default in your query profile, all your queries can use this same
collating sequence option without you having to specify it in each query definition. (This does not mean
that you must use this same collating sequence for all of your query definitions. It just means that, if you
save the collating sequence option as a default, you do not have to select the Select collating sequence
option for every query that you create; you have to select it only when a query you are creating requires a
different collating sequence.)
After you have selected the collating sequence option that you want on the Select Collating Sequence
display, you can save your option as a default value in your query user profile by pressing F23 (Save as
default) while you are still viewing the display.
If you decide to define your own collating sequence (option 3 on the Select Collating Sequence display),
you can also save your collating sequence (as a default) on the Define Collating Sequence display by
pressing F23 while you are still viewing that display. The coded character set identifier (CCSID) of the
sequence, assumed from the CCSID of your job, is saved with the profile.
Purpose of a collating sequence in Query for iSeries
A collating sequence determines what characters come before others when operations are performed on
character fields for the purpose of:
v Selecting records
v
v
v
v
Joining files
Sorting records
Calculating the minimum and maximum values of a field
Determining when a report break occurs
© Copyright IBM Corp. 2000, 2002
111
To collate means to place items in proper sequence or to check that items are in proper sequence. For
Query for iSeries purposes, collating sequences apply to SBCS character data in SBCS, DBCS-open, or
DBCS-either fields, not numeric, date, time, timestamp, DBCS-only, or DBCS-graphic fields. The collating
sequences you can use are:
v The collating sequence provided by Query for iSeries for the language of your country.
v A collating sequence that you define.
v A translation table, created by the CRTTBL (Create Table) command, that exists in one of your libraries.
v One of the sort sequences supplied with the system. For each supported language, the system supplies
one table with unique weights for all characters and a second table with shared weights for some
characters.
Unless you select a collating sequence, the standard sequence used for collating is the same as the
numeric sequence of the hexadecimal values used to represent the characters.
Collating sequence and CCSIDs in Query for iSeries
You can define a collating sequence by assigning a sequence number to each character in a displayed
list. After renumbering in increments of 10 starting from 64 (’40’X), the assigned number for each character
is saved in the one-byte table entry at the offset that corresponds to the numeric value of the hexadecimal
representation of the character. The hexadecimal representation can be used later to retrieve the collating
weight for character data comparisons.
A CCSID is saved with a collating sequence so that the collating sequence can be converted for use with
data in a different code page. Conversion of a collating sequence is a matter of rearranging the numbers
in the table so that the appropriate collating weight is found for each character.
How a collating sequence affects Query for iSeries
Several definition steps in Query for iSeries use the selected collating sequence to determine the final
results when your query is run. A collating sequence is used:
v When you join files together by comparing an SBCS, DBCS-open, or DBCS-either character field in one
file to a character field in the other file by using the following tests:
– EQ (equal)
– NE (not equal)
– GT (greater than)
– LT (less than)
– GE (greater than or equal)
– LE (less than or equal)
v When you use comparison tests like EQ, NE, GT, LT, GE, LE, LIKE, NLIKE, LIST, NLIST, and RANGE
to select records based on SBCS, DBCS-open, or DBCS-either character field values
Note: Query for iSeries does not use the collating sequence for EQ, NE, LIST, NLIST, LIKE, and NLIKE
comparisons, or apply it to SBCS characters in DBCS fields and constants, when the Use
collating sequence for all character comparisons option is set to NO (the default for a query
from a release earlier than Version 2 Release 3) on the Specify Processing Options display.
v When you select an SBCS, DBCS-open, or DBCS-either character field for sorting records
v When you define minimum and maximum summary functions for an SBCS DBCS-open, or DBCS-either
character field
v When you define report breaks on an SBCS, DBCS-open, or DBCS-either character field
112
Query for iSeries Use V5R2
Selecting a Query for iSeries collating sequence
To select a collating sequence, you have to understand how the data exists in your files. For example, if
both uppercase and lowercase SBCS characters exist in your character fields, you have to decide if you
want uppercase and lowercase characters treated the same. Once you make this analysis, you can select
the collating sequence that produces the desired results, or you can define a collating sequence of your
own.
Select Collating Sequence
The selected collating sequence will be used for character fields when
sorting, selecting records, joining files, finding minimum and maximum
values, and determining when a control break has occurred.
Type choices, press Enter.
Collating sequence
option . . . . . . . .
1
1=Hexadecimal
2=Query for iSeries English
3=Define the sequence
4=Translation table
5=System sort sequence
For choice 4=Use translation table:
Table . . . . . . . .
__________
Name, F4 for list
Library . . . . . .
__________ Name, *LIBL, F4 for list
F3=Exit
F12=Cancel
F4=Prompt
F13=Layout
F5=Report
F17=Job sequence
F10=Process/previous
F24=More keys
Using the hexadecimal collating sequence in Query for iSeries
The standard collating sequence is the hexadecimal collating sequence. For any given CCSID, all of the
character-set characters (alphanumeric and special) are assigned a hexadecimal value. The characters
and their related hexadecimal value are called a code page. A code page is shown as a 16 by 16 matrix
as shown in Table 3.
Table 3. Example of How a Code Table Works. The value in the left column is the first half of the hexadecimal value.
The value at the top of each column is the second half of the hexadecimal value. The lowercase a in this table is at
’81’X and the uppercase A is at ’C1’X. This is an example, a real table contains all the alphanumeric and special
characters.
0
1
2
3
4
5
6
7
8
9
A
B
C
D
E
F
0
1
2
3
4
5
6
7
8
a
9
A
B
Chapter 9. Selecting a collating sequence in Query for iSeries
113
Table 3. Example of How a Code Table Works (continued). The value in the left column is the first half of the
hexadecimal value. The value at the top of each column is the second half of the hexadecimal value. The lowercase
a in this table is at ’81’X and the uppercase A is at ’C1’X. This is an example, a real table contains all the
alphanumeric and special characters.
0
1
2
3
4
5
6
7
8
9
A
B
C
D
E
F
A
C
D
E
F
When you use the hexadecimal collating sequence, the characters in a code table are ordered by
ascending hexadecimal values. An advantage of hexadecimal collating is that it distinguishes between
uppercase and lowercase letters.
For CCSID 37, the default for English language systems, the hexadecimal collating sequence is:
blank
miscellaneous characters, such as . + & % )
a through r
(tilde)
s through z
{
A through I
}
J through R
\
S through Z
0 through 9
To see what the hexadecimal collating sequence looks like, select option 3 (Define a collating sequence)
on the Select Collating Sequence display and press the Enter key. The Define Collating Sequence display
appears. Press F14 (hexadecimal sequence). Query for iSeries shows you the characters and their
sequence numbers in the hexadecimal collating sequence.
Each character with a hexadecimal value in the range ’40’X to ’FE’X is listed. You can use the page keys
to page through the list of characters. Press F11 to show the hexadecimal value of each character under
the Hex column. Use F12 to return to the Select Collating Sequence display.
If hexadecimal collating is selected, the minimum and maximum values saved in summary-only output to a
database file may differ from the corresponding values in a printed or displayed report, even though the
same job CCSID is used to run the query. This happens only if values for a minimum or maximum field
are converted to the job CCSID in order to be printed or displayed.
Using the language collating sequence for your country in Query for
iSeries
You may want to select the collating sequence provided by Query for iSeries for your country so that
character data is sorted in a more useful order for your language. In Great Britian and the United States,
the collating sequence provided (in addition to hexadecimal) is Query for iSeries English. In this sequence,
114
Query for iSeries Use V5R2
as in most Query for iSeries language sequences, each pair of uppercase and lowercase letters (such as
A and a) sort together because they share a collating weight that is distinct from the weights of other
letters.
The language collating sequence is not saved in the query definition. If you save your query and it is used
on a system with a different language, the collating sequence for the other language is used. When you
need to save the language used for collating, use option 3 (Define the sequence) on the Select Collating
Sequence display and press F15.
Defining your own collating sequence in Query for iSeries
You may want to define your own collating sequence so that character data is sorted according to your
particular needs.
For example, you have a two-digit customer account number field that has gone beyond its maximum of
99, and entries in this field after 99 are alphabetic—A1, A2, and so on. You want the alphabetic entries
sorted to follow the numeral entries. You can define your own collating sequence so that the alphabetic
data follows the numeric data for this particular query.
To define your own collating sequence, type a 3 in the Collating sequence option prompt on the Select
Collating Sequence display and press the Enter key.
Select Collating Sequence
The selected collating sequence will be used for character fields when
sorting, selecting records, joining files, finding minimum and maximum
values, and determining when a control break has occurred.
Type choices, press Enter.
Collating sequence
option . . . . . . . .
3
1=Hexadecimal
2=Query for iSeries English
3=Define the sequence
4=Translation table
5=System sort sequence
The Define Collating Sequence display is the next display you see.
Define Collating Sequence
CCSID. . . . . . . . . . . . . . :
37
Position to
Char
. . . . . . . . . . . _
Type sequence number (0-9999) for each character, press Enter.
(Use the same sequence number to have characters collate in a group.)
Sequence Char Hex
10
40
20
41
30
E1
40
60
50
’
7D
60
CA
70
a
81
70
A
C1
80
b
82
80
B
C2
Sequence Char Hex
90
c
83
90
C
C3
100
d
84
100
D
C4
110
e
85
110
E
C5
120
f
86
120
F
C6
130
g
87
130
G
C7
Sequence Char Hex
140
h
88
140
H
C8
150
i
89
150
I
C9
160
J
D1
160
j
91
170
K
D2
170
k
92
180
L
D3
180
l
93
More...
F3=Exit
F11=Chars only
F12=Cancel
F14=Hexadecimal
F15=Language sequence F16=Use default F20=Renumber F24=More keys
Collating sequence initialized from national language sequence
Chapter 9. Selecting a collating sequence in Query for iSeries
115
The CCSID of the sequence is shown at the top and is always your job CCSID. If the collating sequence
CCSID does not match your job CCSID, the previously specified or defaulted sequence is converted
before it is shown on the Define Collating Sequence display. See “CCSIDs and collating sequences in
Query for iSeries” on page 248 for more information on how CCSIDs affect the collating sequence.
You are shown a list of characters with a sequence number assigned to each character. Characters are
assigned sequence numbers beginning with 10 and incremented by 10 in ascending order. A message
stating what collating sequence is used is shown on the bottom of the display. You can use the following
sequences as a base for defining your own collating sequence:
v Hexadecimal sequence
v Query for iSeries language sequence
v Default sequence saved for your user ID
v System sequence
To do this, press F14 (Hexadecimal sequence), F15 (Language sequence), F16 (Use default), or F17
(System sequence).
Use the page keys to page through the list of characters. Certain characters cannot be displayed on some
terminals; therefore, some sequence numbers may not have a character shown beside them. Press F11
and the hexadecimal value of each character is shown even if the character cannot be displayed on your
terminal. You can use the Position to prompt to find a specific character in the list quickly. (You can enter
the hex value of the character, if you know it and if your keyboard has this feature, or the character itself.)
To define your own collating sequence, change the sequence numbers beside those characters whose
sequence you want to change. Each character must have a sequence number. You can specify the same
sequence number for two or more characters—these characters are treated as equal when operations are
performed on them.
After you have renumbered the characters in the sequence you want, press the Enter key. The list of
characters is shown in the sequence you specified. Make sure the blank character (’40’X) is still first. To
renumber the characters in this new sequence by amounts of 10, press F20. Using F20 to renumber
makes it easier to specify a new sequence later. You must press the Enter key again to confirm that this is
the sequence you want to use. The characters are renumbered, by amounts of 10, when you leave this
display.
You can also save your collating sequence as a default by pressing F23 while you are still viewing this
display.
Selecting a translation table in Query for iSeries
If your query needs a sequence that is not provided for with the available collating sequences, and
creating a user-defined collating sequence does not produce the desired results, you may find that using a
translation table will create the correct sequence for your query. Translation tables (similar to user-defined
collating sequences) are created and used to translate data. The CCSID of any translation table created in
a release prior to Version 2 Release 3 is 65535.
If you want to use a translation table, select option 4 on the Select Collating Sequence display. Enter the
table name and the library that contains the table you want. If you would like Query for iSeries to list the
existing tables for you, position the cursor to the Table prompt and press F4. An example of the Select
Translation Table display follows:
116
Query for iSeries Use V5R2
Select Translation Table
Library . . . . . . . .
Subset
. . . . . . . .
Position to . . . . . .
*LIBL
__________
__________
Name, *LIBL, F4 for list
Name, generic*
Starting character(s)
Type option (and Table and Library), press Enter.
1=Select
Opt Table
Library Text
_ __________ _________
_ QASCII
QSYS
EBCDIC TO ASCII TRANSLATE TABLE
_ QEBCDIC
QSYS
ASCII TO EBCDIC TRANSLATE TABLE
_ QLA10025S QSYS
LATIN1 CCSID 37 SHARED WEIGHTED
_ QLA10025U QSYS
LATIN1 CCSID 37 UNIQUE WEIGHTED
_ QRMASCII
QSYS
EBCDIC TO ASCII TRANSLATE TABLE FOR RM/COBOL
_ QRMEDCDI
QSYS
ASCII TO EBCDIC TRANSLATE TABLE FOR RM/COBOL
_ QSYSTRNTBL QSYS
LOWER TO UPPER CASE TRANSLATE TABLE
_ QA3BA69A3R QUSRSYS CHRID(*N 1009) TO CHRID(1150 1025) TRANSLATE
F4=Prompt
F19=Next group
More...
F11=Display names only F12=Cancel
For more information on using lists, see “Using lists in Query for iSeries” on page 9.
Selecting a system sort sequence in Query for iSeries
You can specify that the query use a system-provided sort sequence associated with a specific language.
There are two sort sequences for each language:
v One with unique weights for each character in the table.
v One with shared weights for various characters.
Note: The system provides the system sort sequences as translation tables in library QSYS. You can also
select them by name using option 4 (Translation table) on the Select Collating Sequence display.
The system sort sequences are different than the Query for iSeries language sequences (option 2 on the
Select Collating Sequence display). The Query for iSeries language sequences are not externalized
objects and can only be used with Query for iSeries definition objects. Also, the Query for iSeries
sequence for a language does not produce the same results as either of the system sort sequences for
that language. For the differences in your language, check the sequence tables. Often, the difference is
where the number characters are sorted.
To display the Select System Sort Sequence display select option 5 on the Select Collating Sequence
display and press the Enter key.
Note: In addition to 2(Unique) and 3(Shared) you can specify *HEX or a specific table with the SRTSEQ
parameter for your job.
Chapter 9. Selecting a collating sequence in Query for iSeries
117
Select System Sort Sequence
Type choices, press Enter.
Sort Sequence . . . . . 1
1=Job run
2=Unique
3=Shared
Language id . . . . . . *JOBRUN
*JOBRUN, language id, F4 for list
F3=Exit
F12=Cancel
F4=Prompt
F13=Layout
F5=Report
F18=Files
F10=Process/Previous
F23=Save as default
Job run and *JOBRUN are resolved to the sort sequence (SRTSEQ keyword) and language ID (LANGID
keyword) from the user’s job when the query is run. These are the defaults for collating sequence option 5
if no sort sequence and language ID are saved in the query user profile.
The language ID is not used when:
v You choose Job run as the sort sequence option, and
v The sort sequence of the job at run time is *HEX or a named translation table.
Unique means that each character has a unique weight. Shared means that some characters share the
same weight. For example, in the shared sequence for English, uppercase and lowercase pairs of letters
share the same weight.
Note: If a translation table or sort sequence you selected via option 4 or 5 changes, the changed version
becomes the one used for your query the next time you change or display the query. The changed
table is also used if you deferred selection until run time. If you want a specific translation table or
sort sequence permanently associated with your query you must use option 3 on the Select
Collating Sequence display. Set the SRTSEQ parameter for your job to the desired table then start
a Query for iSeries session to create or change your query, use option 3 to set the Define Collating
Sequence display, and press F17. You can use F23 to permanently associate the table with all new
queries you create.
118
Query for iSeries Use V5R2
Chapter 10. Specifying report column formatting in Query for
iSeries
The first part of this chapter describes how you control the format of your query output. You can change
the spacing before the report columns, the headings above the columns, and the report field lengths.
In the second part of this chapter, the four ways of editing numeric fields are described. Since numeric
fields of information are stored in database files without any punctuation, you can edit them so that they
are easier to read when they appear in a query report or display.
Formatting the columns of the Query for iSeriesquery report
Note: The first time that you select the Specify Report Column Formatting option, the information that is
shown on the display for column headings, field lengths, and decimal positions is taken from the
field definitions and result field definitions. If column headings are defined for the fields, they are
shown; otherwise, the field names are used as the column headings.
You can specify the following information about how the columns should appear in printed and displayed
reports:
v The number of spaces to the left of each column
v The wording of headings above the columns
v The size of the fields in the columns
Query ignores any column formatting you specify when you send detailed output to a database file.
However, if you later use that query to produce a report, the column formatting you specify is used.
Query uses the column heading (break fields only), editing, and field size that you specify for a query
when you send summary-only output to a database file. Summary-only output is described in Chapter 13,
“Selecting output type and output form in Query for iSeries reports”.
Column spacing in Query for iSeries reports
If you want to change the column spacing for a field, type a number from 0 through 99 to indicate the
number of spaces you want to appear to the left of that field column.
|
|
|
|
|
|
|
|
Unless you change the column spacing for fields, Query puts no spaces in front of the first column and
puts two blank spaces in front of all the other columns in the report. Before you specify any values, you
should be familiar with the possible effects of any changes. For example, if you ask Query to put several
blanks in front of more than one field, the new width of your output might exceed the width of the print line
on your printer, and your output may be truncated (that is, part of it may have dropped off). If this
happens, you could specify less space between the columns, or you could specify a Y (Yes) for line
wrapping on the Select Output Type and Output Form display (see Chapter 13, “Selecting output type and
output form in Query for iSeries reports”).
Column headings in Query for iSeries reports
For each field that has a column heading defined in its field definition (such as in IDDU field definitions),
that information is used by Query unless you change it. For result fields, any column headings specified on
the Define Result Fields display are also used by Query. For fields that have no headings defined, the field
names are used as the headings (in heading line 1), unless *NONE is specified in heading line 1. If you
specify *NONE, it must begin in the first position of the first heading line and must be all uppercase letters.
The remainder of the heading must be blank.
© Copyright IBM Corp. 2000, 2002
119
Each column heading appears in the report exactly as you type it. Each heading can be up to three
20-character lines, and you can use any characters you want (see the heading for the INIT field on the
following display).
Specify Report Column Formatting
Type information, press Enter.
Column headings: *NONE, aligned text lines
Field
LASTNAME
Column
Spacing
0
INIT
2
STARTTIME
2
F3=Exit
F13=Layout
F5=Report
F16=Edit
Column Heading
LASTNAME
First &
Middle
Initials
Start
Time
F10=Process/previous
F18=Files
Len Dec
30
Edit
2
6
*
Bottom
F12=Cancel
F23=Long comment
If you want the headings of all your columns to line up on the lowest heading line, you must type each one
on the display that way.
If you change a heading but decide you want to use the original heading, blank out the heading you typed.
The original (default) heading is used in the report and appears the next time you return to this display. If
you want to change the heading for a result field, you may change it on the Define Result Fields display,
as described in Chapter 5, “Defining result fields in Query for iSeries”.
Length and decimal positions in Query for iSeries reports
The length first shown for each field from a file is the length defined in the field definition. The length first
shown for each result field is the length that Query calculates for you, or is the value that you typed in the
Len column on the Define Result Fields display. Length has a different meaning for each data type:
v For SBCS character fields, length is the total number of characters in the field.
v For DBCS-only, DBCS-open, or DBCS-either fields, length is the total number of bytes in the field,
including shift-out and shift-in characters.
v For DBCS-graphic fields, length is the total number of DBCS characters in the field. Shift-out and shift-in
characters used when the field is displayed or printed are not included in the Len value.
v For numeric fields, length is the number of digits to the left and right of the decimal point, but does not
include the decimal point or any other editing characters (like a currency symbol).
v For date, time, and timestamp fields, the length is the number of characters in the formatted value,
including the separators and any other characters required by the format (for example, 12:15 am).
Timestamp is always 26 characters long.
Changing the Len value on this display affects only how the field appears in this query. The actual length
is not changed in the field definition, and the actual length is used for all other field processing done by
Query, such as sorting, report breaks, and so on. If you want to change the actual length for a result field,
you should make the changes on the Define Result Fields display rather than during formatting.
If you specify a length, the valid length values are:
v 0 through 32 766 for SBCS character fields
v 0 through 31 for numeric fields in packed, zoned, or binary form
120
Query for iSeries Use V5R2
v 0 through 9 (single-precision) or 0 through 17 (double-precision) for floating-point fields
For date, time, timestamp and DBCS fields, you cannot change the length to anything but 0, which
excludes the field from the report.
For numeric fields, if you increase or decrease the value in Dec, you should increase or decrease the
value in Len the same amount. If you change the value in Len or Dec but decide you want to use the
original field definition value, blank out the number you typed. If there is a value in the Len or Dec column
for the same field, you must blank it out also. If you blank out the values, the original length and decimal
values are used in the report.
The length and the number of decimal positions first shown for each numeric field from a file is the same
as defined in the field definition. The length and the number of decimal positions first shown for each result
field is the number that Query calculates for you, or is the number that you typed in the Len and Dec
columns on the Define Result Fields display.
For numeric fields, the number in the Dec column indicates the number of positions to the right of the
decimal point.
For non-numeric fields, the type of field is shown in the Dec column and cannot be changed:
v An all-blank Dec column identifies a fixed-length SBCS character field
v V means variable-length
v
v
v
v
J means DBCS-only
O means DBCS-open (mixed)
E means DBCS-either
G means DBCS-graphic
v L means Date
v T means Time
v Z means Timestamp
Changing the Dec value affects only how the field appears in your query output. The actual value is not
changed in the field definition. If you want to change the actual number of decimal positions for a result
field, you should make the changes on the Define Result Fields display rather than at this time.
For numeric fields, you can type your own value (0 through 31) for decimal positions, but you must not
enter a value for Dec that is greater than the length of the field.
Omitting fields from a Query for iSeries report
You can create different versions of the same basic query output by selecting all of the possible fields you
might want to include when you select and sequence fields, and then omit certain fields during the
formatting processing by entering a length of zero on the Specify Report Column Formatting display. Each
of these versions can be saved and run as separate queries.
You may also want to use a field for sorting or for a report break, but not want it to appear in the query
report. If you change the field length (Len prompt) to zero on the Specify Report Column Formatting
display, the field is not printed, displayed, or used for summary output sent to a database file. The field is
still used for sorting, record selection, report breaks, and break text insert (see the appropriate Chapters
for details).
If you type a zero in the Len column, and there is a number in the Dec column for the same field, you
must also enter a zero for the Dec column.
Chapter 10. Specifying report column formatting in Query for iSeries
121
Note: You cannot change the order of the fields on your report during the formatting process. If you
determine that you need to change the order of the fields in your output, you must go back to the
Define the Query display and choose the Select and sequence fields option (see Chapter 6,
“Selecting and sequencing fields in Query for iSeries”).
Editing numeric fields in Query for iSeries reports
The first method you should consider for editing numeric fields is to not enter any edit options and let
Query make the decisions for you. However, if this method does not provide the output results you want,
you can use one of the four edit options that are discussed in this chapter.
The Edit column on the Select Report Column Formatting display is used by Query to indicate whether or
not any numeric field editing has been defined for any of the numeric fields in your query. If an asterisk (*)
is shown for a field, there are editing override values specified in your query definition for the field; the field
values are edited in the report using those values. This column is blank for character fields and for
numeric fields that are edited using only default values. (The default or original values can be in the file
definition or in system-supplied default values used by Query.)
If you want to edit a numeric field, that is, specify numeric field editing values that will be used as part of
your query definition, position the cursor on that field and press F16 (Edit) to go to the Define Numeric
Field Editing display. Depending on the choice you make on this display, Query will present the
appropriate display to allow you to describe the remainder of your edit definition. When no numeric editing
override values are saved for a field in your query definition, the editing actually used for the field comes,
first, from the original field definition (in a file definition) or it comes, last, from system-supplied default
values.
Note: If you want to remove all override editing for a particular field (as defined in the query), press F16
here to go to the Define Numeric Field Editing display, then press F16 again there (F16 is Remove
edit there). When you press F16 to remove editing, all editing definitions for all four editing options
defined for that field are removed.
Defining numeric field editing in Query for iSeries reports
The Define Numeric Field Editing display allows you to edit any of your numeric fields, one field at a time.
Floating-point fields, however, cannot be edited.
Define Numeric Field Editing
Field . . . . . . . :
Text . . . . . . . :
Heading 1 . . . . . :
Heading 2 . . . . . :
Heading 3 . . . . . :
Length . . . . . . :
Decimal . . . . . . :
Sample . . . . . . :
-9,999.99_____________________________________________
_______________________________________________________________________________
_______________________________________________________________________________
_________________________________________
Type choice, press Enter.
Edit option . . . . .
F3=Exit
F12=Cancel
122
1
F5=Report
F13=Layout
Query for iSeries Use V5R2
1=Numeric editing choices
2=Date or time editing choice
3=Edit code
4=Edit word
F10=Process/previous
F16=Remove edit
F11=Change sample
F18=Files
The Define Numeric Field Editing display allows you to specify the type of editing you want to use to edit a
numeric field. The editing determines how the values for the field are to appear in your query report. This
is the first of two displays used to define the editing; the second display to be shown depends on which
edit option (1 through 4) you select on this display. For example, if you choose option 2, you go to the
display that allows you to specify the type of separator character you want to use in a date field.
Shown on the Define Numeric Field Editing display is the name of the numeric field to be edited, the field’s
report-related information, and an edited sample value for the field as it would appear in the report with the
editing values that are currently defined for it. The field is the one that the cursor was positioned to on the
Specify Report Column Formatting display when F16 (Edit) was pressed.
Each of the edit options are described as follows:
1=Numeric editing choices
Shows the Describe Numeric Field Editing display, on which you can describe several editing attributes
for the field. You can select the characters to be used for the decimal point, thousands separator,
negative sign, and currency symbol, and you can specify how zero values and leading zeros are to be
handled.
2=Date or time editing choice
Shows the Describe Date/Time Field Editing display, on which you can select the separator character
used for a date or time value.
3=Edit code
Shows the Specify Edit Code display, on which you can select the edit code and modifier (if any) to be
used to edit the field.
4=Edit word
Shows the Specify Edit Word display, on which you can define your own edit words (values) to be
used on the field.
If an asterisk (*) was shown in the Edit column on the Specify Report Column Formatting display, editing
override values are already defined in this query for the field. If an asterisk was shown there, then the
result of the current editing in effect for the field is shown in the Sample field on this display, and the type
of editing is indicated by the edit option currently specified in the Edit option prompt. If no asterisk was
shown there, then the sample field is edited here according to the editing specified in the field definition or
in the system-supplied default values assumed by Query.
If you press F11, you can change the value shown in the edited sample. Each time you press F11, you
can see either the largest positive number (all 9s), zero (0), or negative 1 (−1). You can change the edit
option and press F11 at the same time to see the effect of each set of editing overrides or default values.
Also, if you change the edit option number and press the Enter key, you go to the definition display for that
option where you can look at or change how the editing for that option is defined. When you press F10
(Process/previous) to return, the edited sample shows the results of the editing values for that option.
If you want to see the editing for summary totals, if any exist, use F5 (Report) or F13 (Layout).
When you first come to the Define Numeric Field Editing display for any numeric field:
v The values shown in the Text through Decimal fields for that numeric field are the same as shown on
the Specify Report Column Formatting display for that same numeric field.
v The sample shows the current editing definition of the field, done with the largest positive value (all 9s)
that the field can hold. The sample also shows how the number will appear when it is edited according
to the currently selected numeric field definition (option 1 through 4 specified in the Edit option prompt).
v If an error occurs while the number in the field is being edited, the sample is edited using the J edit
code, and an error message is shown along with the edited sample.
Chapter 10. Specifying report column formatting in Query for iSeries
123
v The Edit option value is the value last specified in the query definition, the value associated with the
field definition in the file definition (if this is a field from a file), or 1, if neither of the first two indicates its
value.
Generally, when you first come to the other four numeric field editing displays (identified on the Edit option
prompt of the Define Numeric Field Editing display), the displayed values are taken from the previously
saved values in your query definition, from the field definition in the file, and from the system-supplied
default values (in that order). Query uses edit code J as the default for edit option 3 and blank edit words
for edit option 4.
Describing numeric field editing in Query for iSeries reports
If you have determined that letting Query do the editing for you will not give you the results you want, you
can specify your own editing attributes. You do this on the Describe Numeric Field Editing display.
Describe Numeric Field Editing
Field . . . . . . :
Type choices, press Enter.
Decimal point . . . . .
Thousands separator . .
Show negative sign . .
Left negative sign .
Right negative sign .
Show currency symbol .
Left currency symbol
Right currency symbol
Print zero value . . .
Replace leading zeros .
Replace with . . . .
.
.
.
.
.
.
.
.
.
.
.
.
.
.
.
.
.
.
.
.
.
.
.
.
.
.
.
.
.
.
.
.
.
Single leading zero . . . .
F3=Exit
F13=Layout
F5=Report
F16=Remove edit
_
_
_
______
______
_
______
______
_
_
_
_
1=. 2=, 3=: 4=$
5=None
1=. 2=, 3=’ 4=Blank 5=None
Y=Yes, N=No
Y=Yes, N=No
Y=Yes, N=No
Y=Yes, N=No
1=Blanks
2=Asterisks
3=Floating currency symbol
Y=Yes, N=No
F10=Process/previous
F18=Files
F12=Cancel
This display allows you to specify the editing characteristics that you want used for a numeric field. The
editing determines how the values for the field are to appear in your query report (if the report is run when
the edit option for the field is 1). You can select the characters to be used for the: decimal point,
thousands separator, a negative sign(s), and a currency symbol(s). You can specify separate negative sign
characters and separate currency symbol characters for either side of the field’s data values. You can also
specify whether zero values are to be printed and how leading zeros are to be handled.
This display shows the name of the numeric field to be edited and the numeric field editing override and
default values that will be used in the report. The editing values shown could be from IDDU or a
system-supplied edit description.
If you blank out all the values in the prompts on this display and press the Enter key, all the values are
then set to the system-supplied default values that are assumed by Query. These values are the same
default values used for result fields when they are first defined; thus, using this method, you can specify
the same type of editing for fields from files as is used for result fields, providing consistent editing in your
report.
To remove all editing overrides for this numeric field, press F16 (Remove edit). The asterisk (*) is removed
from the Edit column on the Specify Report Column Formatting display, and the editing values that will be
used for this field in the query report are taken from the field definition or from the system-supplied default
values.
124
Query for iSeries Use V5R2
Decimal point in Query for iSeries reports
Type the option number of the character that you want used as the decimal point in this field. The option
numbers and characters are shown below, along with examples of the edited results for a numeric value of
245.87:
Option
1= .
2= ,
3= :
4= $
5=None
Example
245.87
245,87
245:87
245$87
24587
Meaning
Decimal
Decimal
Decimal
Decimal
Decimal
of Option
point is a period
point is a comma
point is a colon
point is a dollar sign
point not used
Thousands separator in Query for iSeries reports
Type the option number of the character that you want used as the thousands separator in this field. The
option numbers and characters are shown below, along with examples of the edited results for a value of
1515109:
Option
1= .
2= ,
3= ’
4=Blank
5=None
Example
1.515.109
1,515,109
1’515’109
1 515 109
1515109
Meaning of Option
Separator is a period
Separator is a comma
Separator is an apostrophe
Separator is a blank space
Separator not used
Show negative sign in Query for iSeries reports
Type a Y or N to indicate whether a negative sign is to be used with this field.
Y=Yes
A negative sign is to be shown when the value in the field is negative. The sign can be on the left or
right side of the value (or on both sides), and it can be defined differently for each side. All negative
signs take space in the report. Use the next two prompts to define from 1 to 6 characters for the
negative sign(s). (You can leave one prompt blank. If you do, no sign shows on that side of the field
and no space is taken in the report.)
N=No
A negative sign is not to be shown when the value in the field is negative. If the next two prompts
contain negative sign definitions, they are saved in this query but not used.
Left negative sign in Query for iSeries reports
Type from 1 to 6 characters that you want used as the negative sign to appear on the left of negative
values in this field. Any character that can be printed or displayed can be used. Either the blank or
underscore (_) can be used within the character string, but if you want blanks at the right end of the string
for the negative sign, you must use underscores.
Some examples of left negative signs for the negative value of 27.03 are:
Sign
CRAMT
CR AMT
CRDT:_
Edited Negative Value
-27.03
CRAMT27.03
CR AMT27.03
CRDT: 27.03
The coding for the last example must include an underscore because of the blank at the right end of the
left negative sign characters.
The position of the left negative sign depends on the value specified in the Replace with option when
leading zeros are to be replaced.
v If you specify option 1 (Blanks) or option 2 (Asterisks), the negative sign is fixed; it is always shown in
the farthest left position of the field, to the left of all the asterisks that replace all leading zeros. For
example, in a field with a length of eight digits, the edited value for 27.03 would be -****27.03 or
−
27.03.
Chapter 10. Specifying report column formatting in Query for iSeries
125
v If you specify option 3 (Floating currency symbol), then the negative sign moves (or floats), depending
on how many leading zeros it replaces, so that it is to the immediate left of the first significant digit in
the value (such as −27.03), or it is to the immediate left of the left currency symbol (such as −$27.03).
Right negative sign in Query for iSeries reports
Type from 1 to 6 characters that you want used as the negative sign to appear on the right of negative
values in this field. Any character that can be printed or displayed can be used. Either the blank or
underscore (_) can be used within the character string, but if you want blanks at the right end of the string
for the negative sign, you must use underscores. Examples of right negative signs are 27.03−, 27.03CR
AMT, and 27.03 CRDT.
Show currency symbol in Query for iSeries reports
Type a Y or N to indicate whether a currency symbol is to be used with this field.
Y=Yes
A currency symbol is to be shown with the value in the field. The symbol can be on the left or right
side of the value (or on both sides), and it can be defined differently for each side. If option 3 (Floating
currency symbol) is not specified below in the Replace with prompt (for leading zeros), then the left
currency symbol (if used) appears in a fixed position in the field. However, if option 3 is used, then any
left currency symbol specified will be a floating symbol, depending on how many leading zeros it
replaces. Use the next two prompts to define from 1 to 6 characters for the currency symbol.
N=No
A currency symbol is not to be shown with the value in the field. If the next two prompts contain
currency symbol definitions, they will be saved in this query but not used.
Left currency symbol in Query for iSeries reports
Type from 1 to 6 characters that you want used as the currency symbol to appear on the left of values in
this field. Any character that can be printed or displayed can be used, but you should not use an asterisk
(*), zero, or whatever your decimal point is (such as the period). Either the blank or underscore (_) can be
used within the character string, but if you want blanks at the right end of the string for the symbol, you
must use underscores.
Some examples of left currency symbols that might be used with a value of 45.5 are:
Symbol
L.
Kr
$
THOUS_
Edited Result
L.45.5
Kr45.5
$45.5
THOUS 45.5
Possible Use
Italy
Norway
U.S.
U.S.
This string is positioned in the same way as you typed it, unless you choose to replace the leading zeros
with the floating currency symbol. In that case, this string is moved (floats) to the immediate left of the first
significant digit.
Right currency symbol in Query for iSeries reports
Type from 1 to 6 characters that you want used as the currency symbol to appear on the right of values in
this field. Any character that can be printed or displayed can be used, but you should not use an asterisk
(*), zero, or whatever your decimal point is (such as the period). Either the blank or underscore (_) can be
used within the character string, but if you want blanks at the right end of the string for the symbol, you
must use underscores.
Some examples of right currency symbols that might be used with a value of 123.45 are:
Symbol
_BF
F
$
THOUS
>
126
Edited Result
123,45 BF
123,45 F
123.45$
123.45THOUS
123.45>
Query for iSeries Use V5R2
Possible Use
Belgium
France
U.S.
U.S.
U.S.
The right currency symbol is always in a fixed position.
Print zero value in Query for iSeries reports
When this field contains a numeric value of zero, type a Y or N to indicate whether it is to show a zero or it
is to be left blank.
Y=Yes
A numeric value of 0, when it occurs, is to be shown.
N=No
A numeric value of 0 is to be shown as all blanks; no 0 is to be shown in this field.
Replace leading zeros in Query for iSeries reports
When this field contains leading zeros, type a Y or N to indicate whether they are to be replaced by
different characters or not. Leading zeros are those zeros that appear to the immediate left of the first
significant digit (1 through 9) in the numeric value, or to the immediate left of the decimal point if the
numeric value is less than 1. For example, there are four leading zeros in the eight-digit field 000027.03,
and there are six in the eight-digit field 000000.03.
Y=Yes
Leading zeros are to be replaced by other characters (blanks or asterisks) or by a floating currency
symbol.
N=No
All leading zeros are to be shown. (If the Replace leading zeros and Replace with prompts contain
values, they will be saved in this query but not used.)
Replace with option in Query for iSeries reports
If you typed a Y for the Replace leading zeros prompt, type the option number of the character or symbol
that you want used to replace any leading zeros in the values for this field.
1=Blanks
Blank spaces are to be used to replace leading zeros (
27.03 and
.03).
2=Asterisks
Asterisks (*) are to be used to replace leading zeros (****27.03 and ******.03).
3=Floating currency symbol
The currency symbol is to be used to replace leading zeros. The symbol floats so that it appears to
the immediate left of the first significant digit in the numeric value (for example, $27.03 and $.03).
Single leading zero in Query for iSeries reports
When the numeric value in this field is less than 1, type a Y or N to indicate whether a single leading zero
is to be shown to the left of the decimal point. This prompt value is used only if a Y is specified for the
Replace leading zeros prompt.
Y=Yes
A single leading zero is to be placed to the left of the decimal point when the value is less than 1,
assuming that the length is greater than the number of decimal positions (for example, 0.03 for a
result of 3/100).
N=No
No zero is to appear to the left of the decimal point when the value is less than 1 (for example, .03 for
a result of 3/100).
Describing date/time field editing display in Query for iSeries reports
If you have selected numeric fields for your query that contain date or time values, Query provides an
easy way to specify or change the separator character that is used in the editing process.
Chapter 10. Specifying report column formatting in Query for iSeries
127
The Describe Date/Time Field Editing display allows you to specify the type of separator character that
you want used for a numeric field that contains a date or time value. The editing value determines how the
values for the date or time field are to appear in your query report (if you use option 2 as the edit option
for this field).
Describe Date/Time Field Editing
Field . . . . . . :
Type choice, press Enter.
Date/time separator . . . . .
F3=Exit
F13=Layout
F5=Report
F16=Remove edit
_
1=.
2=/
3=:
F10=Process/previous
F18=Files
4=-
5=,
F12=Cancel
When you first see this display, the edit value shown is the value previously saved in your query, is the
value from the field definition in the file description, or is the system-supplied default.
You can either change the edit value shown or you can blank it out. If you blank out the value, the
system-supplied default separator value (stored in the QDATSEP system value) is to be used, and it is
shown if you return to this display. To use this date/time edit value to edit the field, edit option 2 must be
specified on the Define Numeric Field Editing display.
Any number less than six digits long loses one date/time position on the left for each digit that it is short
(zero values become blanks). If the leading digit on the left is zero, it is replaced with a blank (for example,
if your date/time separator is a slash, the value 000829 becomes 0/08/29). To show dates without having
the leading zero truncated, use the edit word option with a leading zero or asterisk.
Only the last six digits of a numeric field are displayed when you use date/time editing (for example, if your
date/time separator is a slash, the value. 19631001 becomes 63/10/01). To display a four digit year, use
the edit word option.
Date/time separator in Query for iSeries reports
Type the option number of the character that you want used as the date or time separator in this field. The
option numbers and characters are shown below, along with examples of the edited results for a value of
100863:
Option
1= .
2= /
3= :
4= 5= ,
Example
10.08.63
10/08/63
10:08:63
10-08-63
10,08,63
Meaning of Option
Separator is a period
Separator is a slash
Separator is a colon
Separator is a hyphen
Separator is a comma
To remove all the query-defined editing values for this numeric field (for this edit option and all others),
press F16 (Remove edit).
128
Query for iSeries Use V5R2
Specifying an edit code in Query for iSeries reports
The Specify Edit Code display allows you to specify which edit code or user-defined edit description you
want used to edit each value in a numeric field. The edit code or edit description that you choose
determines how the values for the specified field are to appear in your query report (if the report is run
when the edit option for the field is 3). For certain edit codes you can also specify a modifier character to
be used as part of the editing.
The codes available are similar to the codes available to RPG/400* programmers.
To remove all the query-defined editing values for this numeric field (for this edit option and all the others),
press F16 (Remove edit).
Specify Edit Code
Field . . . . . . . . :
Type choices, press Enter.
Edit code . . . . . .
_
1-4, A-D, J-Q, W-Z, user-defined 5-9
Optional edit code
modifier . . . . .
_
1=Asterisk fill
2=Floating currency symbol
F3=Exit
F13=Layout
F5=Report
F16=Remove edit
F10=Process/previous
F18=Files
F12=Cancel
Edit code in Query for iSeries reports
Type the character that identifies the edit code or edit description that you want used to edit the values in
this field. You can specify any one of the following numbers or letters for edit codes: 1 through 4, A
through D, J through Q, or W through Z. Or you can specify any one of the user-defined edit descriptions:
5 through 9.
Most of the edit codes are shown in the following table. The other edit codes (W, X, Y, and Z) and the
user-defined edit descriptions (5 through 9) are listed after the chart.
Edit
Code
1
2
3
4
A
B
C
D
J
K
L
M
N
O
P
Q
Print
Commas
Yes
Yes
No
No
Yes
Yes
No
No
Yes
Yes
No
No
Yes
Yes
No
No
Negative
Symbol
None
None
None
None
CR
CR
CR
CR
-
-- Value in QDECFMT System Value: -Blank
I
J
Value
Value
Value
.00 or 0
,00 or 0
0,00 or 0
Blanks
Blanks
Blanks
.00 or 0
,00 or 0
0,00 or 0
Blanks
Blanks
Blanks
.00 or 0
,00 or 0
0,00 or 0
Blanks
Blanks
Blanks
.00 or 0
,00 or 0
0,00 or 0
Blanks
Blanks
Blanks
.00 or 0
,00 or 0
0,00 or 0
Blanks
Blanks
Blanks
.00 or 0
,00 or 0
0,00 or 0
Blanks
Blanks
Blanks
.00 or 0
,00 or 0
0,00 or 0
Blanks
Blanks
Blanks
.00 or 0
,00 or 0
0,00 or 0
Blanks
Blanks
Blanks
Chapter 10. Specifying report column formatting in Query for iSeries
129
Note: For all these edit codes, decimal points are always shown, and leading zeros are always
suppressed.
Query uses the J edit code as the default edit code whenever an error occurs during numeric field editing
or whenever there are no other editing values to use. If an error occurs, an error message is shown along
with the edited result produced using the J code.
For a field that does not have an edit code specified in its definition, edit code J is shown as the default
the first time you see this display for that field.
The other edit codes and edit descriptions are:
v Edit code W suppresses the three leftmost zeros of a date field that is six to eight digits long, and it
suppresses the leftmost zero of a date field that is five digits long. It also inserts slashes (/) between the
year, month, and day. The positions of the slashes depend on the number of digits in the field: nn/nnn,
nnnn/nn, nnnn/nnn, and nnnn/nn/nn.
v Edit code X shows the values in their unedited form. For example, a value of −12 is shown as 1K. You
can think of the unedited form as the character presentation of the hexadecimal string that makes up
the zoned decimal representation for the numeric value. Table 4 shows the unedited presentation form
and internal representation of numbers in zoned, packed, and binary format.
Table 4. Edit Code X Examples
Internal
Representation (How
Stored)
Format
Length/ Dec. Places
Actual Value
Unedited
Presentation
Zoned
7
549134
0549134
X’F0F5F4F9F1F3F4’
Packed
7
549134
0549134
X’0549134F’
Binary
7
549134
0549134
X’008610E’
Zoned
5/2
-319.34
3194N
X’F3F1F9F4D5’
Packed
5/2
-319.34
3194N
X’31945D’
Binary
5/2
-319.34
3194N
X’000F8337’
v Edit code Y suppresses the farthest left zero of a date field that is three to six digits long or eight digits
long, and it suppresses the two farthest left zeros of a date field that is seven digits long. It also inserts
slashes (/) between the month, day, and year. The positions of the slashes depend on the number of
digits in the field: nn/n, nn/nn, nn/nn/n, nn/nn/nn, and nnn/nn/nn, and nn/nn/nnnn.
v Edit code Z removes any plus or minus sign from a numeric field and suppresses leading zeros.
v Edit descriptions 5 through 9 are user-defined edit codes. They can be defined to use other
characters or combinations of characters to edit a numeric field.
The negative sign is on the left of the value for edit codes N through Q, and on the right of the value for
other edit codes and edit descriptions.
You must either specify an edit code here or press F12 to return to the Define Numeric Field Editing
display. (You can then specify, for example, option 4 in Edit option and then define your own edit words on
the Specify Edit Word display.)
v The only currency symbol that can be used with any of these edit codes is the one defined in the
system-supplied system value QCURSYM.
v If date/time edit code Y is specified for a field, the field must be three to eight digits long.
v If the definition of an edit code is changed (done outside of Query), the changes are reflected in all
query reports that use that edit code.
130
Query for iSeries Use V5R2
Optional edit code modifier in Query for iSeries reports
Type the character that you want used as the optional modifier for the specified edit code. If you specified
one of the edit codes W through Z or one of the edit descriptions 5 through 9 in the Edit code prompt, you
cannot specify an optional modifier in this prompt.
1=Asterisk fill
Asterisks (*) are to be used as the fill character to replace leading zeros for this field; for example,
****27.03.
2=Floating currency symbol
The currency symbol specified in the QCURSYM system value is to be used as the edit code modifier
for this field. An example is the dollar sign ($), as in $27.03.
Specifying edit words
Specifying or creating an edit word is another way to define numeric editing. It should be considered when
the first three methods do not produce the results you want.
The Specify Edit Word display allows you to specify or change the edit word(s) that you want used to edit
a numeric field. An edit word determines how all the values for the specified field are to appear in your
query report if the report is run when the edit option for this field is 4.
You can use one edit word to edit all the detailed values for the field and, if the total summary function
was specified for the field, you can use another edit word to edit the summary total values for the field.
A blank string enclosed in apostrophes appears as the default for the detailed values edit word for a field
that does not have an edit word specified in its definition.
To remove only the edit word used for this field’s summary totals, blank out the Edit word for summary
total prompt. If you want to remove both edit words defined for this field, press F16 (Remove edit). Note
that F16 removes all editing values defined in all four edit options, not just this option.
For the Edit word prompt, either you must specify an edit word or you must press F12 to return to the
Define Numeric Field Editing display. You cannot leave the Edit Word prompt blank.
If an error occurs while a field is being edited by Query, the field is edited with the J edit code, and the
field value is displayed in its edited form along with an error message.
Edit word in Query for iSeries reports
Type the character string that you want used as the edit word for this field. The character string must be
enclosed in quotation marks and the number of blanks the edit word contains must equal the number of
digits in the field, as determined by the length field shown on the display. Insert a zero or asterisk as the
first character of the edit word to prevent the truncation of leading zeros.
For example, if your edit word is
’0
/
/
’
the value of 01251960 becomes 01/25/1960. Without a leading zero or asterisk, 01251960 would appear
as 1/25/1960. To specify a blank space in the report result, use an ampersand (&).
Chapter 10. Specifying report column formatting in Query for iSeries
131
Specify Edit Word
Field . . . . . :
Length . . . . :
Decimal . . . . :
Heading 1 . . . . :
Heading 2 . . . . :
Heading 3 . . . . :
Type information, press Enter. (Put quotes around edit words.)
(Each blank replaced by a digit, each ’&’ with a blank.)
Edit word . . . . .
’ ,
, 0. -’
(These are SAMPLES only; they are not defaults.)
Edit word for
summary total . .
F3=Exit
F13=Layout
’ ,
F5=Report
F16=Remove edit
,
, 0. -’
F10=Process/previous
F18=Files
F12=Cancel
For example, if you want to define an edit word containing an eleven-digit field with no decimal positions,
and you want commas for thousands separators and CR for negative values, your edit word would be ’ ,
, , &CR’ and a value in the report would appear as 27,345,838,789 CR if it were a negative value.
You might define ’0( )& ’ as the edit word for a ten-digit telephone number that has been
formatted for ten or eleven digits on the Specify Report Column Formatting display.
The ten digit number 5079876543 would be displayed as (507) 987-6543.
The edit word might be ’
- -
’ for a nine-digit social security number, such as ’123-45-6789’.
Consider the following as you define your edit words. Each edit word is marked with the CCSID of the job
used to define it so that it can be converted for use in a job with a different CCSID. Refer to “CCSID and
column formatting and editing in Query for iSeries” on page 253 for information about how CCSIDs affect
edit words.
v If option 1 (Total) was or will be specified on the Select Report Summary Functions display to get
summary totals for the field, the J edit code is used to edit the field if you do not define an edit word in
the Edit word for summary total prompt.
v The edit word for summary function totals, if used, must have three more blank positions than the field
length indicates, but its length cannot exceed 31 digit positions. The editing positions containing
commas for thousands separators or a period for the decimal point, for example, are in addition to the
31 maximum.
v When an edit word is used, its length is considered by Query in determining the column width used in
the report for that field. If the summary total edit word is defined, but no summary total is defined for this
field, for example, then the length of the summary total edit word is ignored in determining the column
width for detailed output.
v If both edit words are defined and used, both are assumed to be aligned on the right with the last
character in each string. If they are not aligned, the ampersand (&) can be used to add blanks to one of
the edit word character strings so that they are aligned.
v If the widest edit word to be used is narrower than the column headings, the column headings are
centered over it. Otherwise, the farthest right position of the column headings is aligned with the farthest
right position of the edit word.
v If you want a single apostrophe to appear in the edited result, use two single apostrophes (’) in the edit
word.
132
Query for iSeries Use V5R2
v An edit word does not have to have a decimal digit position (to the right of the decimal point) for each
decimal digit in the field; only the total length is significant. Query does not check the two edit words to
see that they have the same number of decimal positions.
v Only the system-defined currency symbol (stored in the QCURSYM system value), can be used as a
floating currency symbol. Any other symbol specified will not float; it stays fixed in one position.
v If the length of the field or its decimal positions value changes, the edit words may no longer be correct.
In this case, Query uses the J edit code to edit the field value when necessary.
Edit word for summary total in Query for iSeries reports
If option 1 (Total) was specified on the Select Report Summary Functions display to get summary totals for
this field, you must type the character string that you want used as the summary total edit word for this
field. The character string must be enclosed in quotation marks and must have a blank position for each
digit in the field, plus three more than the length of the field shown at the top of the display, up to a
maximum of 31 positions. To specify a blank space in the report result, use an ampersand (&).
For example, if you want to define an edit word long enough for the total values for an 8-digit field with no
decimal positions, and you want commas for thousands separators, and CR for negative values, your edit
word would be ’ , , , &CR’ and a value in the report would appear as 27,345,838,789 CR if it
were a negative value.
If you do not specify an edit word here and you specify on the Select Report Summary Functions display
that the field be totaled, the J edit code is used to edit summary totals for the field.
Chapter 10. Specifying report column formatting in Query for iSeries
133
134
Query for iSeries Use V5R2
Chapter 11. Specifying report summary functions in Query for
iSeries reports
This chapter describes how to specify the summary functions for each of the selected fields in your query
output. Depending on the type of field, you can specify one or more (or all) of the types of summary
functions for each field in your report: total, average, minimum value, maximum value, and count. All of
them can be used for numeric fields, and all except total and average can be used for character (SBCS
and DBCS), date, time, and timestamp fields.
For each field for which you specify summary functions, Query calculates summary values and includes
them in the report. Query calculates these summary values at each report break (break levels 1 through 6)
defined in this query and at the end of the report (break level 0). Each type of summary is shown on a
separate line in the report, with a descriptive abbreviation shown on the left of the summary values (see
Chapter 12, “Defining Query for iSeries report breaks”).
For example, assume that your query has a numeric result field named ITEMTOT defined using the
expression QUANTITY * ITEMCOST (two numeric fields being multiplied together). These two fields are used
to calculate the cost of each item ordered in the ITEM field. You might define the following summary
functions for those fields: count for the ITEM field, total and maximum for the QUANTITY field, maximum for
the ITEMCOST field, and total and maximum for the ITEMTOT field. The following is an example of how part of
a report might look for a customer named Z Z Smith:
ITEM
Bolt
Hammer
Ruler
Screw
QUANTITY ITEMCOST
12
2
1
6
Totals for: Z Z Smith
TOTAL
21
MAX
12
COUNT 4
ITEMTOT
.10
8.50
2.00
.05
1.20
17.00
2.00
.30
8.50
20.50
17.00
Each summary function result for each field (column) is calculated and included as a summary value
(similar to a subtotal) at every defined report break and as a final summary (final total) at the end of the
report. (However, using the Define Report Break display, you can format a particular break level to
suppress the summary information. In this case, when a break occurs, a blank line and possibly break text
that includes break values, if defined, is used.)
Summary function results, if defined, can appear in all three types (displayed, printed, and database) and
both forms (detailed and summary) of output, with one exception: they cannot be included if the report is
to a database file in detailed form.
Types of summary functions in Query for iSeries reports
On the Select Report Summary Functions display, you can enter the number of one or more of the
following options to specify the types of summary functions to be used for the fields. You can specify as
many options for as many fields as you want, if they are valid for that type of field. If you type more than
one option for a field, they can be typed in any order. The order that the summaries appear in the report,
however, is the same as listed here, and cannot be changed:
1=Total
Shows the sum of the values in the field for the break level or for the whole column (numeric fields
only). Null values are ignored unless all values are null, then the total is null.
© Copyright IBM Corp. 2000, 2002
135
2=Average
Shows the average of the values in the field for the break level or for the whole column (numeric fields
only). The average is the total divided by the count (number of values that are not null used to
determine the total). If the total is null, then the average is null.
3=Minimum
Shows the lowest character or numeric value in the field for the break level or for the whole column.
The minimum of date, time, or timestamp values is based on chronological order. Null values are
ignored unless all values are null, then the minimum is null.
4=Maximum
Shows the highest character or numeric value in the field for the break level or for the whole column.
Maximum of date, time, or timestamp values is based on chronological order. Null values are ignored
unless all are null, then the maximum is null.
5=Count
Shows the total number of values that are not null in the field for each break level or for the whole
report.
When summary values are being calculated for the total, average, minimum, and maximum summary
functions, the original length and decimal position values (in the field definition) are used for the field
calculations, not the values specified for the field (if any) in the Len and Dec column of the Specify Report
Column Formatting display. Also, rounding or truncation is done in these calculations, depending on what
you specify on the Specify Processing Options display (see Chapter 14, “Specifying Query for iSeries
processing options”).
Select Report Summary Functions
Type options, press Enter.
1=Total 2=Average 3=Minimum
---Options--5 _ _ _ _
1 4 _ _ _
4 _ _ _ _
1 4 _ _ _
4=Maximum
5=Count
Field
ITEM
QUANTITY
ITEMCOST
ITEMTOT
Bottom
F3=Exit
F12=Cancel
F5=Report
F13=Layout
F10=Process/previous
F18=Files
F11=Display text
F23=Long comment
This display shows all the fields (including result fields) that are available to be used in your report. The
fields are listed in the order that they will be shown in the report:
v If fields were selected on the Select and Sequence Fields display, they would be listed on this display in
the order that they were specified (includes result fields).
v If no fields were selected on the Select and Sequence Fields display, all the fields in the query would be
shown in the following order:
1. All sort fields (if any) in their order of sort priority.
2. Any result fields not selected as sort fields.
3. All other fields, in the order they exist in the record format definitions used in the selected files.
Fields from the first file are listed first, followed by those in the second file, and so on.
136
Query for iSeries Use V5R2
Summary functions can be specified for as many of these fields as you want, as long as that type of
function is valid for that type of field.
Summarizing columns in Query for iSeries reports
The collating sequence that you select (see Chapter 9, “Selecting a collating sequence in Query for
iSeries”) for your query has an effect on different parts of your query definition. If you choose the minimum
or maximum option for one or more of the SBCS, DBCS-open, and DBCS-either character fields in your
query, the selected collating sequence is used to establish the values that appear on your report. In some
cases, blanks are the minimum or maximum value (if a record does not contain data but has blanks in that
field) and are used for your query output.
A CCSID is associated with a collating sequence. Different CCSIDs can cause different results for
MINIMUM and MAXIMUM processing. See “CCSID and summary functions in Query for iSeries” on
page 253 for information on how CCSIDs affect summary functions.
Location of column summary values in Query for iSeries reports
In a report that lists the detail information from the query, summary values are shown directly below the
column(s) for which they are specified, at the end of the report, and/or after each report break. In a report
that lists summary information only, summary values are shown directly below the column headings after
any line of break fields for report breaks. Specifying whether you want detail or summary information is
described in Chapter 13, “Selecting output type and output form in Query for iSeries reports”.
Each type of summary is shown on a separate line. The descriptive abbreviation (TOTAL, AVG, MIN, MAX,
or COUNT) for each summary is placed to the left of the summary value, and is separated from the value
by at least one space. (You cannot change the placement of this information or the order in which the
summaries are shown.)
For example, if you have a result field of TOTDUE for which you want a total and maximum value to show
on the report, and you want a count of all records in the report, your report would look something like this:
Accounts Receivable Summary
NAME
Jones
Kagy
Vine
Johnson
Alison
Henning
Stevens
Wilson
Doe
FINAL TOTALS
TOTAL
MAX
COUNT 9
TOTAL DUE
B
R
S
J
J
G
K
T
J
D
L
S
A
S
K
L
N
W
5.00
25.39
.00
140.28
36.36
1,900.50
6.90
15.00
.00
2,129.43
1,900.50
Each AVG, MIN, and MAX value is edited in the same way as the column in which it appears.
Chapter 11. Specifying report summary functions in Query for iSeries reports
137
138
Query for iSeries Use V5R2
Chapter 12. Defining Query for iSeries report breaks
This chapter describes how you define the report breaks that you want to occur in your query report.
Report breaks are used to break the report into groups of records (or lines) each time the value of a
report break field changes. The second part of this chapter describes how, for each of your report breaks,
you can control report break formatting and define break text messages.
The primary reason for defining report breaks is to provide a basis (along with your selected sort fields) for
Query to create a set of subtotals for each logical group of records in your output. An example of a logical
group of records would be all of the time records for one employee. Another example would be all of the
employee records for an entire department. A third example would be all of the sales activity records for
one inventory item.
If daily time records existed for each employee, at the end of a pay period you could have Query process
all of the records and create two kinds of groups or subtotals. To accomplish this you would have to define
two report break fields (DEPTNO and EMPNO, for example) and select the same two fields as sort fields. If you
assigned a sort priority of 10 to DEPTNO and a sort priority of 20 to EMPNO, Query would arrange the records
in groups so that they would appear on your report by employee number within department number
(starting with the lowest number employee’s records in the first or lowest department number, followed by
all the remaining in ascending sequence).
If you also defined break level 1 as DEPTNO and break level 2 as EMPNO, Query would create group or level
breaks and would print or display subtotals for each group based on what you specified for your Report
Summary functions (see Chapter 11, “Specifying report summary functions in Query for iSeries reports” for
details). If you only wanted final totals at the end of the report, you would not have to define any report
breaks in this example.
When a report break occurs for each group of records selected by the query, break text (if any) is shown
following a blank line. The break text is then followed by a separate line for each type of summary function
being used in your query. On each summary function line is the name of the function and all the summary
values calculated at that report break for all the fields using that function.
Defining a Query for iSeries report break
On the Define Report Breaks display, you select each field that you want used as a break field and you
assign to it the break level you want it to control. You can define as many as six break levels (numbered 1
through 6) and you can specify multiple break fields to control any break level, as long as you assign no
more than nine break fields for all the break levels used.
For example, you can have: only one break level with all nine fields defined as break fields for it; three
break levels with three break fields each; or a maximum of six break levels, with one field each used as
break fields for five of the levels and four fields used for one level.
If multiple break fields are defined for the same break level, a change in any one of those break fields
causes a break (or group change) level to occur for the specified break level number. This break level
change causes Query to include the appropriate summary values in your output.
A break at one level automatically causes a break at all lower break levels (the lowest level has the
highest number). For example, if all six break levels were defined, a control break occurring at level 4
would also force breaks at levels 5 and 6, and the break text and summary values for each of those three
levels (6 to 4) would be included at that point in the report.
© Copyright IBM Corp. 2000, 2002
139
Define Report Breaks
Type break level (1-6) for up to 9 field names, press Enter.
(Use as many fields as needed for each break level.)
Break
Level
1
2
3
4
5
Sort
Prty
1
2
3
4
5
Field
COMPANY
DIVISION
REGION
DEPARTMENT
EMPLOYEE
Bottom
F3=Exit
F12=Cancel
F5=Report
F13=Layout
F10=Process/previous
F18=Files
F11=Display text
F23=Long comment
An example of when you might need to define five report break levels, would be if you sequenced a group
of payroll time records by employee within department, within region, within division, and within company.
In this case you would assign the following break levels:
v Break level 1 = company
v Break level 2 = division
v Break level 3 = region
v Break level 4 = department
v Break level 5 = employee
You can use any field shown in the list to define a report break; however, in most cases, you should use
only sort fields for break fields. Generally, the break levels should be in the same order as the sort
priorities assigned to the fields. That is, the highest assignable break level (level 1) should be assigned to
a high sort priority number (where 1 is also the highest), break level 2 should be assigned to some lower
priority number, and the lowest break level used should be assigned to the lower sort priority numbers.
If you specify a field as a break field that is not also a sort field, you may get extra report breaks in your
report because if the field is not part of the sorting step, records that belong in the same group may not be
grouped together and will cause the extra breaks.
Break definitions are ignored for detail output to a database file. Refer to “Building a new output file
definition in Query for iSeries reports” on page 156 for more information on how break definitions and
summary functions are used for summary-only output to a database file.
For summary-only printed or displayed output, a line of break values is shown instead of the detail lines for
the break group. For either detail or summary-only printed or display output, one or more of the following
appears at each report break:
v A blank line to separate the summary information from the column data.
v Any break text defined for that break level, including any break values that are defined in that text.
v Any summaries (totals, averages, minimum and maximum values, and counts) that you specified on the
Select Report Summary Functions display. Columns with no break or summary values to be shown are
omitted.
v Another blank line, or if the report is printed, you can specify for any break level that a new page be
started after the summary information is printed.
140
Query for iSeries Use V5R2
v If no break fields are selected, no summary functions are selected and final summaries are suppressed.
Only a count of the records is produced.
In a name and address file, for example, you might specify that two fields named CITY and STATE be
specified as break fields. If STATE was defined as the break field for break level 1, CITY was defined as the
break field for break level 2, and both fields were specified as break values in break text for their
respective levels, then the following sample report breaks and break text might appear in a report for the
following records:
Records in file:
LNAME
Brown
Jones
Smith
.
.
.
.
Adams
.
.
.
.
.
.
.
Calva
Doe
Smith
.
.
.
.
.
CITY
Rochester
Rochester
Rochester
.
.
.
.
St Paul
.
.
.
.
.
.
.
Rochester
Rochester
Rochester
.
.
.
.
.
|
|
STATE |
MN
|
MN
|
MN
|
.
|
.
|
.
|
.
|
MN
|
.
|
.
|
.
|
.
|
.
|
.
|
.
|
NY
|
NY
|
NY
|
.
|
.
|
.
|
.
|
.
|
Lines in report:
STATE CITY
MN
Rochester
Users in Rochester MN
Count
St Paul
Users in St Paul MN
Count
All Users in MN
Count
NY
Rochester
Users in Rochester NY
Count
All Users in NY
Count
LNAME
Brown
Jones
Smith
3
Adams
1
4
Calva
Doe
Smith
3
3
If you do not specify report breaks, Query prints or displays all the records in the report, one after the
other without any additional spacing or text.
Break level 0 is another level, provided by Query, that you can use. This break level, which occurs only at
the end of the report, is used to print the final summary values for all the specified summary functions at
the end of the report.
Break level 0 has default break text (FINAL TOTALS), but it can be changed or filled with blanks if you do
not want any final total description or values.
For printed output only, Query suppresses the printing of identical field information within a field that is
defined as a break field. That is, when the contents of a break field are the same in a group of records,
only the first record in the group has that field printed. All the other records in the group do not print the
duplicate contents of that field.
See the previous name and address file example. Even though each record contains a value for the STATE
field, the value for STATE only appears in its column when the value changes.
However, for the first record at the top of every page, all the information in all report fields is printed again
for ease of reading.
Query assumes you want a blank line after any summaries, unless you specify a new page. If you display
the information rather than print it, Query ignores new page requests.
Chapter 12. Defining Query for iSeries report breaks
141
You can exclude break fields from showing in the report in column format and still use their values in the
report’s break text. That is, if you specify a 0 in the Len column of the Specify Report Column Formatting
display for a field, no column of data for the field appears in the report. But you can still specify that the
field be used as a break field so that its value, when a report break occurs, is included in the break text
defined for that level of report break.
The following are additional considerations regarding the occurrence of report breaks:
v For SBCS data in SBCS, DBCS-open, and DBCS-either character fields, a report break may not occur
even though the characters in a field may be different. For example, if the collating sequence treats
each uppercase and lowercase letter as having the same value (Aa, Bb, Cc, and so on), then no report
break occurs if the only change in a field is from A to a, for example. (Collating sequences are not used
for DBCS character data in DBCS fields.)
v For numeric fields, the actual data in the fields is used for determining report breaks, not the edited form
of the data.
v For date, time, and timestamp fields, chronological equivalency determines report breaks.
v For both character and numeric fields, the original definition size of each field is used for determining
report breaks, not any changed size that may have been specified on the Specify Report Column
Formatting display.
v If null values are found, they are grouped together.
The following are sample report breaks showing null values:
Table 5. Sample File Data
Field 1
1
1
2
2
3
null value
Field 2
AZ
AZ
XY
null value
null value
AB
If sort and report breaks are specified on Field 1 and MIN and MAX are specified on Field 2, the following
summary only report is shown:
Table 6. Summary Only Report with Null Values
Field 1
1
MIN
MAX
Field 2
AZ
AZ
2
MIN
MAX
XY
XY
3
MIN
MAX
–
–
MIN
MAX
AB
AB
FINAL TOTALS
MIN
MAX
AB
XY
142
Query for iSeries Use V5R2
Defining report break formatting in Query for iSeries reports
The Format Report Break display is used to format each of the break levels (1 through 6) that you defined
on the Define Report Break display. This display is shown once for each of the break levels that you
defined for your query. You can also specify some formatting characteristics for break level 0, which is the
‘Final Totals’ break level provided by Query. You can think of break level 0 as the group that includes all of
the selected records. Formatting information on this display affects only output to printer and output to
display.
For all break levels except break level 0, you can specify whether the report is to skip to a new page after
a particular report break occurs. For each break level (1 through 6), you can also specify whether the
summary function values are to be suppressed. You can also specify the break text (if any) that you want
included with (or instead of) any summary information. The break text appears after the column data, on
the line before any summary values.
Format Report Break
Break level
. . . . . . . :
1
Type choices, press Enter.
(Put &field in text to have break values inserted.)
Skip to new page . . . . .
N
Y=Yes, N=No
Suppress summaries . . . .
N
Y=Yes, N=No
Break text . . . . . . . .
Company
Level Field
1
COMPANY
2
DIVISION
3
REGION
F3=Exit
F13=Layout
Level Field
4
DEPARTMENT
5
EMPLOYEE
F5=Report
F18=Files
F10=Process/previous
F23=Long comment
F12=Cancel
Skip to new page in Query for iSeries reports
Type a Y or N to specify, for this break level, whether printing is to start on a new page after a report break
occurs for this break level. The summary information or break text, if any, for this break level is printed
before skipping to the next page occurs.
This prompt applies to printed reports only and is ignored for displayed reports. For break level 0, this
prompt is not shown.
Y=Yes
Query is to skip to a new page after any summary values are printed on the current page for each
report break that occurs for this break level.
N=No
Query is not to skip to a new page when a report break occurs for this break level. Instead, it is to skip
the number of lines you specify on the Define Printer Output display plus one additional line (see
Chapter 13, “Selecting output type and output form in Query for iSeries reports”).
Suppress summaries in Query for iSeries reports
Type a Y or N to specify, for this break level, whether summary values (if any summary functions were
selected) are to be suppressed. You may want to exclude summary values for level 0 (Final Totals) if they
are not needed.
Chapter 12. Defining Query for iSeries report breaks
143
N=No
Any summary values are not to be suppressed. They are to be included each time that a report break
occurs at this break level.
Y=Yes
All summary values are to be suppressed. They are not to be included for this break level.
Break text in Query for iSeries reports
Type any text that you want to appear at each report break for this break level. The text can be as long as
40 characters. The text appears ahead of any summary lines for this report break.
If you include &XXXXXX (where XXXXXX is any one of the selected fields in your query) in the text, the current
value of the field appears in place of &XXXXXX in the text in the report. For example, if you entered break
text of:
Totals for &CITY &STATE
you might get:
Totals for Glendale CA
If you entered break text of:
&FINIT&MINIT &LNAME
you might get:
JY Clarke
Notice that a blank should follow a field name. An exception is that a second field name can follow a field
name. As shown in the second example, the middle initial field, &MINIT, follows the first initial field, &FINIT,
with no blank between them. The characters /, -, or : may also follow a field name. You can also type
characters directly in front of a field name.
The field names can be uppercase, lowercase, or a mixture: &LNAME, &lname, or &Lname. Blanks at the end
of field values, such as Glendale, are dropped. Blanks in front of field values are also dropped.
Note: Any changed lengths (except 0) specified on the Specify Report Column Formatting display are
used. However, if 0 was specified for a field (to exclude the field from the report in column form),
then the originally defined length and decimal position values are used in the break text.
The inserted value appears as it would in a report column.
v Any editing or formatting specified for numeric fields is applied.
v A null value is shown as a dash (-).
v Replacement characters are used to indicate error conditions.
Query prints only part of the text if the width is not large enough on a printed report. However, field value
substitutions in the break text are either wholly included or excluded. If there is not enough room left to
print all of a value, none of it is printed.
To suppress summaries for break level 0 and prevent the FINAL TOTALS line from appearing in the report,
you must answer Y (Yes) to the Suppress summaries prompt and you must blank out the text in the
prompt for break level 0.
144
Query for iSeries Use V5R2
Chapter 13. Selecting output type and output form in Query
for iSeries reports
This chapter describes how you select where you want your query output to go, and in what form you
want it to be. You can have the output displayed, printed, or put into a database file. You can also specify
that the output is to be in detailed form (which includes all of your selected records) or in summary form
(which only includes report break data as described in Chapter 12, “Defining Query for iSeries report
breaks”).
If you do not use this definition step in defining your query, the output produced by Query is shown on
your display and is in detailed form.
If you specify that your output is to be printed or stored in a database file, Query will present additional
displays so that you can define printer or database file characteristics.
Selecting the output type and form you want in Query for iSeries
reports
You can select the output device for your query by entering one of the following choices:
1=Display
The output of your query is to be shown on your display, and it can be shown in detailed or summary
form. The output is the same as that produced by F5 (Report) during query definition. For information
on how to use the Display Report display, you can press the Help key while you are displaying your
query output.
Note: If a query is run in batch, output is sent to the printer, even though display output type is
specified.
2=Printer
The output of your query is to be printed, and it can be printed in detailed or summary form. If you
select this option, the Define Printer Output display is shown when you press the Enter key. There,
you can specify the printer to be used and other characteristics of the printed output. Other displays
related to the printed output are also shown.
Note: If a query is run in batch, output may be sent to a different printer than one you specify,
depending on the default printer specifications for batch.
3=Database file
The output of your query is to be put into a database file. If you select this option, the Define
Database File Output display is shown when you press the Enter key. There, you can specify the
name of the file and member to be used to store the output and whether the output is to be added to
the file or member or is to replace existing data in the file or member.
Both the detailed and summary forms of database file output are different from displayed or printed
output:
v For detailed output to database, report break and summary function output (if defined in the query)
is ignored; only the selected records are put in the database file. Also, if you specify that output is to
a database file, the values in the line wrapping prompts are ignored; database output records are
never wrapped. Report column formatting is ignored.
v For summary output to database, Query produces a record for each defined report break, including
one for break level zero (0). Editing values on the total fields are used.
Note that database output does not contain certain report characteristics that are used for displayed or
printed reports: column headings, column spacing, line wrapping, report break formatting, or printer
© Copyright IBM Corp. 2000, 2002
145
output definition information. If no field selections are made, Query produces all fields for a database
file. Result fields are ordered last instead of first, as they are for printed or displayed output.
Even though these characteristics may be defined in the query, they are not used unless your Output
type choice specifies either displayed or printed output. (Because the query definition can contain
definitions for all three types of output at the same time, you have the flexibility to use the same query
for more than one type of option. All you have to do is change the option and run your query again.)
Select Output Type and Output Form
Type choices, press Enter.
Output type
. . . . . .
1
1=Display
2=Printer
3=Database file
Form of output . . . . .
1
1=Detail
2=Summary only
Line wrapping . . . . .
Wrapping width . . . .
Record on one page . .
N
___
_
Y=Yes, N=No
Blank, 1-378
Y=Yes, N=No
F3=Exit
F12=Cancel
F5=Report
F13=Layout
F10=Process/previous
F18=Files
Form of output of Query for iSeries reports
Type the number of one of the following choices to select the form of output you want for your query. You
can specify that the output for the report is to be produced in detailed form or in summary form. The
detailed form includes all the records selected in the query and any summary information that was defined.
Summary information consists of report breaks, totals, averages, maximums, minimums, or counts.
1=Detail
For displayed and printed output, the report is to contain both the selected data records and all
summary information. For database file output, only the selected records are put into the file; summary
information is not.
2=Summary only
The report is to contain only the summary information provided at report breaks and at the end of the
report (final totals).
Line wrapping in Query for iSeries reports
| Type a Y or N to indicate whether lines of the report are to be wrapped whenever all the fields in the output
| record cannot fit on one line in the report. Line wrapping values are used for displayed and printed output;
| they are ignored when output is to a database file.
|
|
|
|
|
|
|
Y=Yes
The data for each output record is to be wrapped (continued on the next line of the report) whenever
the length of the record exceeds the width of the report. If a field cannot fit on the end of a line, all of
that field is carried over to the next line along with any other fields that follow it. If the column
formatted for the carried-over field would extend past the wrapping width, the field is dropped from the
report, unless it is a character field and at least one character of its value (one byte for SBCS or four
bytes for DBCS) would be displayed after truncation of the column at the wrapping width.
|
|
When line wrapping occurs, Query also wraps the field headings. The results on your report are a
line(s) of field headings followed by a line(s) of field data.
146
Query for iSeries Use V5R2
| N=No
|
The data for each output record is not to be wrapped when the length of the output record exceeds
|
the width of the report line. Instead, any extra fields on the right end of each record are dropped. If N
|
is specified, the next two prompts are ignored.
Wrapping width in Query for iSeries reports
For displayed or printed output only, you can specify a value that indicates the maximum width of the lines
in the report. Either type a value of 1 through 378 or leave this prompt blank.
Note: For DBCS-graphic fields, Query adds DBCS shift-out and shift-in characters before showing the
fields in a displayed or printed report. Variable-length DBCS values are extended to the full field
length.
If all of the fields of an output record cannot fit within the specified width of one line of the report, the field
that would exceed the specified width is started on the next line. If you leave this prompt blank, wrapping
occurs whenever the maximum width of the specified display, or printer is reached.
If you specify too small a width, some column headings, fields, or summary function values may be
truncated or dropped from the report. If such a problem occurs, you can either make changes here or to
the Column Spacing or Column Heading prompts on the Specify Report Column Formatting display. To
see the fields in which this may occur, press F13 (Layout). Error messages are shown for each field in
error.
Record on one page in Query for iSeries reports
When line wrapping can occur, you can specify whether you want to prevent records from being split
across pages of your printed report. Type a Y or N to indicate whether you want all of each record to be on
the same page in the report.
Y=Yes
Each record is to have all its fields kept together on the same page. If there is not enough room left on
the current page to contain all of its fields, the complete record is displayed or printed on the next
page.
N=No
Records that start near the end of one page are split as necessary and continued at the top of the
next page. The split occurs after the last complete field that fits on the full page, with the remainder of
the fields in the record continued on the next page.
Displaying wrapping widths in Query for iSeries reports
You can use F13 (Layout) to show the effect of various wrapping widths. If you do, you see that wrapping
is not a simple matter of continuing each formatted report line on the next line when the wrapping width is
reached:
v Page, break, and final text lines are not wrapped, and are truncated without warning if the wrapping
width is too small.
v Column headings wrap as a band of aligned lines, not individually.
v The Column spacing value specified on the Specify Report Column Formatting display for the first field
in the output is used to indent each wrapped line.
v The Column spacing value may or may not be carried over to the next line, as shown in the example
below. If a field cannot fit on the end of a line, all of that field is carried over to the next line along with
any fields that follow it. The Column Spacing value for a wrapped field may show up as blanks after the
field on the previous line, as blanks before the wrapped field, or a combination thereof.
The following example shows the original report and the report showing wrapping that occurs if the
wrapping width is set to 15.
Chapter 13. Selecting output type and output form in Query for iSeries reports
147
Original report:
Position to line . . . . .
Shift to column . . .
Line
....+....1....+....2....+....3....+....4....+....5....+..
INTEGER
CHAR
DECIMAL
NUMERIC
000001 1,000,000,001
aaaaaaaaaa 11,111,111.01
11,111,111.01
Report showing wrapping width 15:
Position to line . . . . .
Line
....+....1....+
INTEGER
CHAR
DECIMAL
NUMERIC
000001 1,000,000,001
000002 aaaaaaaaaa
000003 11,111,111.01
000004 11,111,111.01
Shift to column
. . .
Alignment for the wrapped fields is uneven in this example, because, although the Column Spacing
value for CHAR is 2, one blank appears after the INTEGER heading and field on the first line, and one
blank appears before the CHAR heading and field on the second line. The Column Spacing value for
DECIMAL is also 2, but both blanks appear after CHAR on the second line and no blanks before
DECIMAL on the third line.
v A summary function caption is used for each wrapped summary line. None of the indent space is
available for these captions. Formatting for these captions may cause additional spacing than specified
for the columns on the line.
v If the wrapping width is too small, Query may truncate or discard information that would otherwise have
appeared in the column (such as a column heading or a count summary), or even drop an entire
column from the report. Values from numeric, date, time or timestamp fields are never partially shown. A
column is dropped from the report rather than present it with no part of the value showing.
Note: Messages about truncated and dropped information appear under a displayed report or if you
press F13 to display the layout. There are no warnings about truncated or dropped information
for a printed report.
Defining output to the printer in Query for iSeries reports
The Define Printer Output display is the first of several printer output definition displays that you can use to
define where, and in what manner, your report is to be printed. This display is used to identify the printer
and some of the print characteristics of the forms (paper) used in the printer, including the length and
width of the forms, the starting and ending print lines on each page, and the line spacing between each
printed record.
148
Query for iSeries Use V5R2
Define Printer Output
Type choices, press Enter.
Printer device . . . .
*PRINT
*PRINT, name
Form size
Length . . . . . . .
Width . . . . . . .
___
132
Blank, 1-255
Blank, 1-378
Start line . . . . . .
___
Blank, 1-255
End line . . . . . . .
___
Blank, 1-255
Line spacing . . . . .
1
1, 2, 3
Print definition . . .
N
Y=Yes, N=No
F3=Exit
F12=Cancel
F5=Report
F13=Layout
F10=Process/previous
F18=Files
You can also specify whether your query definition is to be printed when the report is printed. If it is, the
values specified on this display apply to the printing of both the query report and the query definition.
These values do not apply if you print the definition using option 6 on the Work with Queries display
(which prints only the definition) or if you specify both database output and print definition (which puts the
report in the file and prints the definition).
Printer device in Query for iSeries reports
Specifies the printer device to be used to print your query report. If you type *PRINT in this prompt, the
printer currently assigned to your job is used to print the report. If you want to print your report on a
different printer, type the name of that printer device to be used.
Note: If a query is run in batch, output may be sent to a different printer than one you specify, depending
on the default printer specifications for batch.
Form size in Query for iSeries reports
This set of prompts specifies the length and width of the printer forms that are to be used to print your
query report. If you leave these prompts blank, the length and width values used are those specified in the
printer device file named QPQUPRFIL, which is the only printer device file that Query uses. You cannot
override this file with another device file.
Form length
Either type a number from 1 through 255 that indicates the number of lines per page that are available
on the printer forms to be used, or leave this prompt blank. This length should be the length of the
form itself.
Form width
Either type a number from 1 through 378 that indicates the number of print positions (characters) per
line that are available on the printer forms to be used, or leave this prompt blank. If you specify a
width greater than the width of the form, Query produces the report but truncates any fields on the
right end of the report that exceed the width of the form. If the value specified is greater than 132,
Query forces the characters per inch (CPI) value to 15 and the printer font value to *CPI in the
spooled file that is created.
This does not affect the report width shown on the Display Report display.
Chapter 13. Selecting output type and output form in Query for iSeries reports
149
If you want to increase the left margin of the report (with the left edge being print position 1), go to the
Specify Report Column Formatting display and type a larger value in the Column Spacing prompt for
the first field to be shown in the report.
Note: For DBCS-graphic fields, Query adds DBCS shift-out and shift-in characters before showing the
fields in a displayed or printed report. Variable-length DBCS values are extended to the full field
length.
Start line in Query for iSeries reports
Type a number 1 through 255 that indicates the first line to be printed on each page of your report.
Depending on what you have defined elsewhere in this query definition, the first line of page headings,
column headings, or the next record is printed on this starting line.
If you leave this prompt blank, the starting line is line 6. If you specify a starting line number, it must be no
greater than the ending line value and less than or equal to the form length value.
End line in Query for iSeries reports
Type a number 1 through 255 that indicates the last line to be printed on each page of your report.
Depending on what you have defined elsewhere in this query definition, the page footing or a record (or
part of a record, if it is wrapped) is printed on this ending line. If you specify an ending line number, it must
be greater than the starting line value and less than or equal to the form length value. If the ending line is
greater than the form length, Query prints the report using an ending value equal to the form length value.
If you leave this prompt blank, the value specified in the printer device file (named QPQUPRFIL) used by
Query determines the ending line number.
Line spacing in Query for iSeries reports
Type a number (1, 2, or 3) that indicates the kind of line spacing between records that you want used for
your report. This value controls the amount of separation (blank lines) between all but wrapped lines,
which are always single spaced. A value of 2 or 3 can make the report easier to read if line wrapping is
active and required. A default value of 1 is assumed, and a single-spaced report is printed.
1
Prints with single-spacing (no blank lines between)
2
Prints with double-spacing (one blank line between)
3
Prints with triple-spacing (two blank lines between)
Print definition in Query for iSeries reports
Type a Y or N to indicate whether you want a copy of your query definition to be printed whenever the
query report is printed. N (No) is the default.
Y=Yes
A copy of the query definition is to be printed along with the query report. The definition is printed
immediately ahead of the report.
N=No
A copy of the query definition is not to be printed when the report is printed.
Specifying spooled output overrides in Query for iSeries reports
The Define Spooled Output display is another printer output definition display used to continue defining the
print characteristics of your query report. You can specify the type of forms (paper) to be used in the
printer and the number of copies of your report to be printed. You can also specify the spooling
characteristics: whether the output is to be spooled, and whether it is to be held on the output queue to be
printed at a later time.
If you specified that both the query report and query definition are to be printed, the values on this display
apply to both of them.
150
Query for iSeries Use V5R2
Completing this display does not cause the query to immediately run and print a report. You must still use
the Exit This Query display (see Chapter 15, “Exiting and running a Query for iSeries query”).
If you have your query output spooled and if it is necessary to work with your spooled output, you can use
the Work with Spooled Files display. (You can get to that display by typing the Work With Spooled Files
(WRKSPLF) command on a command line of any menu.) For more information about spooled output files
and printer device files, see the Printer Device Programming book. For information about the values
mentioned here with this display, see the description of the Create Printer File (CRTPRTF) command
parameters in the CL Reference information in the iSeries Information Center.
Define Spooled Output
Type choices, press Enter.
Spool the output . . .
_
Blank, Y=Yes, N=No
Form type
__________
Blank, name, *STD
Copies . . . . . . . .
1
Blank, 1-255
Hold . . . . . . . . .
_
Blank, Y=Yes, N=No
F3=Exit
F12=Cancel
. . . . . .
F5=Report
F13=Layout
F10=Process/previous
F18=Files
Spool the output in Query for iSeries reports: If you want to specify whether your report is to be
spooled (as a spooled printer file) to an output queue, type a Y or N. If the output is spooled, the report can
be scheduled for more efficient printing or possibly be delayed until a later time. If you leave this prompt
blank, the value specified in the printer device file (named QPQUPRFIL) used by Query determines
whether the output is to be spooled.
When your query is run, it creates your report and sends it as a spooled printer file to an output queue.
You can specify that either the output be printed as soon as it can be scheduled, or that it be held on the
output queue until it is released at a later time.
Y=Yes
The output for your report is to be spooled and sent to an output queue. When the report is printed is
determined by the scheduling value specified in the printer device file QPQUPRFIL. The scheduling
value is specified on the SCHEDULE parameter of, for example, the CRTPRTF (Create Printer File)
command.
N=No
The output for your report is not to be spooled; it is sent directly to the printer to be printed as each
output record becomes available. This option (N=No) is not recommended; it can result in errors if the
printer is not available at run-time.
Form type in Query for iSeries reports: You probably do not need to specify this value to print your
query. If you leave this prompt blank, the value specified in the printer device file (named QPQUPRFIL)
used by Query determines which forms are to be used to print the report. If you want to print your report
on a particular type of form, type the name of the form or type the special value *STD.
v If you type the name of a form, it must be a form name that has been defined on the system. After the
query runs and the output is ready to be printed, a message appears on the console telling the operator
to change the forms in the associated printer to the forms type that you specified by name.
Chapter 13. Selecting output type and output form in Query for iSeries reports
151
v If you type *STD, the system assumes that the standard forms are already in the printer, and no
message is sent to the system operator.
Copies in Query for iSeries reports: Type a number from 1 through 255 to indicate the number of
copies of the report that you want printed. If you leave this prompt blank, the value specified in the printer
device file (named QPQUPRFIL) used by Query determines the number of copies to be printed.
Hold in Query for iSeries reports: Type a Y or N to indicate whether your report is to be printed now, or
is to be held and printed at a later time. The value in this prompt, however, is ignored if the value specified
or assumed in the Spool the output prompt is N. If you leave this prompt blank, the value specified in the
printer device file used by this printer determines whether the report is to be held or not.
If you specified that the output for your query is to be spooled when your query is run, your report is
created as a spooled printer file and sent to an output queue. You can specify either that the spooled file
be printed as soon as it can be scheduled, or that it be held on the output queue until it is released for
printing at a later time.
Y=Yes
The output for your report is to be held as a spooled printer file on an output queue. The report is not
printed until the spooled file is released for printing at a later time.
N=No
The output for your report is not held; it is printed as soon as it can be scheduled.
Defining the printout cover page of Query for iSeries reports
The Specify Cover Page display is another printer output definition display used to continue defining the
print characteristics of your query report. On this display, you can specify whether you want a cover page
to be printed for your report, and you can specify as many as four lines of text to be printed on the cover
page.
Specify Cover Page
Type choices, press Enter.
Print cover page . . .
Y
Y=Yes, N=No
Cover page title
_____________________________________________________________________________
_____________________________________________________________________________
_____________________________________________________________________________
_____________________________________________________________________________
F3=Exit
F13=Cancel
F5=Report
F13=Layout
F10=Process/previous
F18=Files
Print cover page of Query for iSeries reports: Type a Y or N to indicate whether a cover page is to be
printed at the beginning of your report.
Y=Yes
A cover page is to be printed. It will contain any text that you specify on the Cover page title prompt,
the date and time of printing, and information about your query (its name, its library name, the files
selected, and text describing the query, if any).
152
Query for iSeries Use V5R2
N=No
No cover page is to be printed for your report. If you specify text on the Cover page title prompt, it is
saved for future use.
Cover page title of Query for iSeries reports: Type the title, or title text, to be printed on your report as
a cover page. You can type as many as four full lines of text using all characters (including uppercase and
lowercase letters) that can be printed by the printer that you specified on the Define Printer Output display.
If you press F5 (Report) or F13 (Layout) to display the report or its layout, this title is not shown.
Defining the page headings and footings in Query for iSeries reports
The Specify Page Headings and Footings display is the last printer output definition display used to define
the print characteristics of your query report. On this display, you can specify whether you want page
headings and footings to be printed on all the pages of your report (except the cover page). You can also
specify whether you want to print the standard version of page heading information used by Query, print
only your own headings, or print both types. The standard page heading is used only on heading line 1 of
each page; it contains the system date and time, the current page number, and any text that you specify
here for the first heading line.
If you specify your own heading text or footing text, you can use three special codes in either one (or in
both) that cause the system date, the system time, and the current report page number to be printed
exactly where you want them in your text. These codes are provided so you can use them instead of the
standard headings and format them however you wish.
&date The system date, printed in the job’s standard date format.
&time The system time, printed in the job’s standard time format.
&page
The current page number of the report, printed without a caption (you can specify your own).
Leading zeros are replaced with blanks, and values of 1 through 9999 are printed (with no
thousands separators). However, because the page field is only four positions, the leading zeros
are shown for all pages after 9999 (to indicate that there is a 1 that is not printed in front of the 4
printed digits; page 10 000 shows as 0000, page 10 001 shows as 0001, and so on).
These codes can be used anywhere you want in the heading and footing text, and they can be used more
than once.
Specify Page Headings and Footings
Type choices, press Enter.
(Type &date, &time, and &page, or choose standard page headings.)
Print standard
page headings . . .
Y
Y=Yes, N=No
Page heading
_____________________________________________________________________________
_____________________________________________________________________________
_____________________________________________________________________________
Page footing
_____________________________________________________________________________
F3=Exit
F12=Cancel
F5=Report
F13=Layout
F10=Process/previous
F18=Files
Chapter 13. Selecting output type and output form in Query for iSeries reports
153
Print standard page headings in Query for iSeries reports: Type a Y or N to indicate whether the
system’s standard headings are to be printed on each page of your report (except for the cover page). You
must specify an N if you do not want to print the standard headings; your use of the special date, time, and
page codes does not control the printing of the standard information.
When the standard heading is used, it automatically formats and shows:
v On the top left, the current system date and time (of printing)
v On the top right, the page caption and page number (of the current page)
If you type a Y for this prompt and also specify your own heading text, Query prints the standard
information in the same locations on the first line and includes as much of your first line of heading text as
it can. Your text is centered between the standard information and is truncated on the right end if it cannot
all be used. Your other two heading lines, if any, are also centered and printed below the first line.
Note that your other two heading lines are centered on lines 2 and 3, and not with respect to your heading
text on line 1. The longest line of lines 2 and 3 is centered on its own line, then the shorter line starts at
the same position as the longest line does. Any text that cannot fit on either line is truncated.
Y=Yes
The standard heading information is to be printed on each page. Your heading text, if any, is also
printed.
N=No
The standard heading information is not to be printed. Only your heading text, if any, is printed. If you
do not specify any heading text in the Page heading prompt, no page heading information is printed.
Page heading in Query for iSeries reports: Type the text, if any, for the heading that you want printed
at the top of all the pages of your report, except for the cover page. You can type as many as three full
lines of text using all characters (including uppercase and lowercase letters) that can be printed by the
printer that you specified on the Define Printer Output display. You can also use the special codes &date,
&time, and &page wherever you want in your heading text.
If you press F5 (Report) or F13 (Layout) to display the report or its layout, this page heading is not shown.
Page footing in Query for iSeries reports: Type the text, if any, for the footing that you want printed at
the bottom of all the pages of your report, except for the cover page. You can type one full line of text
using all characters (including uppercase and lowercase letters) that can be printed by the printer that you
specified on the Define Printer Output display. You can also use the special codes &date, &time, and &page
wherever you want in your footing text.
If you press F5 (Report) or F13 (Layout) to display your report or its layout, this page footing is not shown.
Defining output of Query for iSeries reports to a database file
The Define Database File Output display is used to specify which database file is to be used to store your
query output. This display is shown because you specified option 3 (Database file) on the Select Output
Type and Output Form display. On this display, you specify the name of the file and file member, and you
indicate whether the query output is to create a new file or member, be added to an existing member, or
replace an existing file or member.
The output to be stored can be the records selected by your query (if the detailed form of output was
specified), or the output can be the summary information produced from report breaks and summary
function values defined in your query. You can also specify whether your query definition is to be printed
when your query output is stored.
154
Query for iSeries Use V5R2
For database file output, some report characteristics (although they may be defined in this query definition)
are ignored. If you later change the output type or the output form on the Select Output Type and Output
Form display, these defined characteristics can be used as specified.
The data from your query is saved in your database file in the order that the fields are specified in your
query. If you requested detailed output, but did not select fields for your query, all fields for selected
records are placed in your database file, followed by any defined result fields.
Define Database File Output
Type choices, press Enter.
(The printed definition shows the output file record layout.)
File . . . . . . . . .
Library . . . . . .
Member . . . . . . . .
QQRYOUT
QGPL
*FILE
Name, F4 for list
Name, F4 for list
Name, *FIRST, *FILE, F4 for list
Data in file . . . . .
1
1=New file, 2=Replace file
3=New member, 4=Replace member
5=Add to member
For a new file:
Authority . . . . .
*LIBCRTAUT
Text . . . . . . . .
Print definition . . .
F3=Exit
F12=Cancel
*LIBCRTAUT, *CHANGE, *ALL
*EXCLUDE, *USE
authorization list name
______________________________________________
N
F4=Prompt
F13=Layout
Y=Yes, N=No
F5=Report
F18=Files
F10=Process/previous
The following considerations apply when you define your query to put its output in a database file:
v Unless you use lists to select them, the file and library names that you specify on this display are not
checked at this time for their existence or for your authority to use them. These items are checked when
the query is run. The file is also checked to ensure that it is a database file.
v Query for iSeries cannot put data into a file while running a query that gets data from that file. Although
you can specify a file you have already selected as an input file for this query, you cannot run the query
without using file selection override.
v If summary-only output is being used and an overflow error occurs in a summary for a numeric field, 9s
are put in the summary field instead of the data. If the field contains floating-point data, then 0’s are
used instead. If the field contains date or timestamp data, then the highest possible chronological value
is used. The overflow indicator has an asterisk (*) in it when data has overflowed for any break or
summary fields.
v If you change only the value in the Library prompt, the information on the Define Database File Output
display is not saved when you define your query. If a query is run when no information is defined for
this display, the library used for output is the profile value. Changing the default value for the Library
prompt updates the Query for iSeries user’s profile value for that prompt.
v If a database file is being created or replaced, Query for iSeries builds a new file definition matching the
attributes of the query data. If a file member is being created, replaced, or added to, the existing output
file definition is not changed and the query data may be converted as it is placed in the file.
Using an existing output file definition in Query for iSeries reports
Values from a null-capable field can be placed into a field that is not null-capable. The first null value
encountered causes an error that ends output.
Values from a date, time, or timestamp field can be placed into any field of the same data type, regardless
of any differences in the format or separator.
Chapter 13. Selecting output type and output form in Query for iSeries reports
155
Note: This can cause an unwanted result if a date value outside the range 1940 through 2039 is put into
a file field that has a two-digit year format. The value will be shown as pluses (++++++) on a report.
To avoid this result, either use the CHAR function to see the data in a four-digit year format when
you query the data, or change the attributes of the file field to a four-digit year format.
The record format printed at the end of the query definition shows the field characteristics of the existing
output file.
Building a new output file definition in Query for iSeries reports
Some format and field definition information from the input file definition is copied unchanged, some is
used in algorithms for defining parts of the output definition, and some is ignored.
Even if your query only sorts or selects records from a single file, the output file definition that Query for
iSeries creates when creating or replacing a file is likely to differ from that of the input file definition. Query
for iSeries creates only physical files, and does not use everything in each input field definition when
building the format definition. For example, a long comment is not carried over from the referenced field.
Even if the expression for a result field is a field name from a single file, the output field defined for the
result field differs from that of the referenced field. Data type, size, keyboard shift (DBCS subtype), and
null capability are considered in the algorithms used to derive the result definition. Column headings, text,
editing, null value defaults, and so on, are not carried over.
Specified formatting overrides saved in the query definition are used in summary only output definitions.
The column heading, size, and expression specified to define a result field are used for detail output
definitions and (when not overridden) for break fields in summary output definitions.
Query for iSeries creates field names to avoid duplication and to reflect the nature of the function applied
in summary output.
Text and column headings for summary-function fields are created from input field names and translatable
summary function captions. The CCSID assigned depends on where the name originated. The query
definition CCSID is used for result fields and the appropriate file format definition CCSID is used for file
fields.
For result fields and summary-function fields, assignment of attributes involves more than just copying
information from a related input file field, which is what happens for most attributes for detail and break
fields.
Some assigned attributes for result fields (type, size, editing) and defined attributes for input file fields can
be determined while you are working on the definition because they are shown in field lists or presented
as initial defaults.
The layout shown for F13 may be helpful if you keep in mind that it represents characteristics of displayed
or printed output, which shows result fields first (not last) when no fields are selected, does not have
individual columns for summary function values, and applies formatting overrides to detail as well as
summary output.
The record format printed for option 6 (Print definition) shows additional information, such as the coded
character set identifier (CCSID), null capability, and the specific data type of numeric fields. For summary
output, for example, you can see that certain fields (totals, averages, counts, nonfloating-point numeric
breaks, minimums, and maximums) are zoned decimal, even if the underlying field is binary or packed.
One way to see how the file will be created without actually running a long query is to create it using
record selections that cause no records to be added. The format definition of the new file can then be
displayed to see if it is satisfactory or changed to have the attributes that you want. Displaying the format
156
Query for iSeries Use V5R2
definition is the only way to determine some of the assigned attributes, such as the allocated length for
variable length fields. Changing the format definition is the only way to specify certain attributes, such as a
preferred default for null values.
Specifying an output database file for Query for iSeries reports
File: To specify the database file that is to store your query output, you can type a file name, use the
name already shown, or press F4 (Prompt) to see a list of existing file names. If you intend to use an
existing file, you can select the one you want from the displayed list. If you intend to create a new file, the
file name you specify should not exist in the library where you want the new file stored. See Appendix A,
“Differences between Query for iSeries and Query/36” for more information.
Do one of the following:
v Type the name of the database file that is to contain the output of your query.
v Leave the file name that is shown. However, if the name is QQRYOUT, you might want to change it;
QQRYOUT is a file that others can use. They might use it and replace your data, or you might replace
theirs.
v With the cursor in the File prompt, press F4 (Prompt) to see, on the Select File display, a list of all the
files that you have the authority to use in the specified library or library list.
If you intend to use an existing file, you can select the one you want from the list.
If you want to create a new file:
– You should verify that the name you want to use is not in the list. (Note, however, that you see only
the files that you have the authority to use, and that even though a file by that name may not exist
now, it could be created before the time you actually run this query. At that time, if a file by that
name exists in the library you specified, you get an error message and you will have to change this
query definition or replace the existing file.)
– The file name must begin with an alphabetic character (A through Z, $, #, or @), and it can be
followed by no more than nine alphanumeric characters (A through Z, 0 through 9, $, #, @, ., or _);
for example, NAMEADDR or INVEN_12.
Because most system-supplied objects on the iSeries system begin with Q, your file names should
not start with a Q. Also, if you have systems in countries that use different languages, you might not
want to use $, #, or @ because they might not be translatable characters.
Library in Query for iSeries reports: Shows the name of the library that contains or will contain the
database file to be used. The initial library value shown in this prompt is: the value last used on this
display, the name of your current library (if specified), or QGPL if you have never used this display and
you do not have a current library.
If you want to use a different library than the one shown, you can type a different library name or press F4
(Prompt) to see a list of library names. Do one of the following:
v Type the name of the library that contains or will contain the file for the query output.
v If you type a generic library name (in the form of ABC*) or a special library name (*LIBL, *USRLIBL, *ALL,
or *ALLUSR), and then press F4 with the cursor in this prompt, the specified list of library names is
shown on the Select Library display. When you select the library you want from the list and press Enter,
you return to this display with the selected name filled in.
Member in Query for iSeries reports: Type the name of the member in the specified database file that
you want your output to be placed in. You can also specify *FILE (the default), *FIRST or *LAST; if one of
these is used, the value is changed to the actual member name when your query is run.
Or, with the cursor located in this prompt, you can press F4 to list the members in the file, and select one
from the list; however, if you are creating a new member, you should use a name not shown in the list.
Chapter 13. Selecting output type and output form in Query for iSeries reports
157
If you specify *FILE, *FIRST, or *LAST in this prompt, a member is created with the same name as the file
if the file is created or replaced or has no members.
If *FIRST or *LAST is used with a request to put the output into a new member of an existing file containing
members, Query for iSeries sends an error message. You need to cancel the request or replace the
member named in the message.
Data in file in Query for iSeries reports: Type the number of one of the following options to tell Query
(at the time it is running your query) how to use the file and member you specified in the File and Member
prompts:
1=New file
Creates a new file with the name specified in the File prompt and a member with the name indicated
in the Member prompt. While running the query, if Query finds a file by that name in the library
specified in the Library prompt, a message is displayed. You can either type a C (cancel) to cancel
running the query or type a G (go) to continue running, thereby indicating that the file is to be replaced
by the data from your query.
2=Replace file
Replaces the existing file named in the File prompt with the data from your query. The file and all the
members of the file are deleted, and your data is put into a new member that is named with the name
specified in the Member prompt.
3=New member
Creates a new member with the name specified in the Member prompt. While running the query, if
Query finds a member by that name or a *FIRST or *LAST member in the file specified in the File
prompt, a message is displayed. You can either type a C (cancel) to cancel running the query or type a
G (go) to continue running, thereby indicating that the member is to be replaced by the data from your
query.
4=Replace member
Replaces the existing member named in the Member prompt with the data from your query. All the
data in that member is deleted, and your data is added. If a member by that name did not exist, the
member is created and the data is put in it.
5=Add to member
Adds the data from your query at the end of the data in the existing member named in the Member
prompt. If a member by that name did not exist, the member is created and the data is put in it.
When your query data is put into a file that exists and is not being replaced, the format of the query data
must be compatible with the record format definition of the existing database file. To be compatible, the
following must be true:
v The formats must have the same number of fields.
v Corresponding fields in sequence in the formats (that is, the first, second, third fields, and so on) must
have field definitions of the same data type and, except for date, time, and timestamp data types, must
have the same length, scale, precision, and keyboard shift. Date, time, or timestamp fields need only
have the same data type — for example, both date fields.
For any of the options that replace data in existing files or members, the following also controls whether
you can replace that data. The data cannot be replaced in a file or member if:
v Other files depend on the definition of this file. For example, you cannot replace the data in a physical
database file on which other logical database files are based. You can use the Display Database
Relations (DSPDBR) command to see the relationships of a file to other files.
v You do not have the needed authority for the file to be replaced.
v The file is not a physical file or it has more than one format definition.
v The output file or member names are the same as any of the selected files or members used in your
query.
158
Query for iSeries Use V5R2
For all options, if the file does not exist in the specified library, Query tries to create that file.
Authority in Query for iSeries reports: Type the value for the kind of object authority that you want to
give to other users for your database file. (This authority value is used only if your query creates a new
file.) The values that you can specify are:
*LIBCRTAUT
Library create authority assigns the authority from the create authority (CRTAUT) value in the library
the object is being created into. The authority could be *ALL, *CHANGE, *EXCLUDE, *USE, or an
authorization list name. Your ability to use the file depends on the authority assigned.
*CHANGE
Change authority allows other users to perform all operations on the object except those limited to
the owner or controlled by object existence authority and object management authority. A user can
change or use the file in any way except to: replace or add new members, delete the file, or transfer it
to a new owner.
*ALL
All authority allows other users to perform all operations on the object except those limited to the
owner or controlled by authorization list management rights. A user can do anything with the file
(including deleting it), except for transferring it to a new owner.
*EXCLUDE
Exclude authority prevents other users from doing anything with the file. Unless given specific types
of authority, no user except its owner can use the file.
*USE
Use authority allows other users to read records in the file.
authorization list name
If you specify the name of an authorization list, its authority is used to control the ability that users
have to use the file. For more information, see the iSeries Security Reference book.
The following table shows, for each predefined type of authority, what can be done with the file:
Type of
Authority
--------*ALL
*CHANGE
*USE
*EXCLUDE
’ Create
Replace
’ New File the File
’ -------- -------’
Yes
Yes
’
Yes
No
’
Yes
No
’
Yes
No
Add New Add to Replace
Member
Member Member
------- ------ ------Yes
Yes
Yes
No
Yes
No
No
No
No
No
No
No
Note: If the authority you specify is *LIBCRTAUT, the value assigned when the object was created is
used.
Text in Query for iSeries reports: You can type a comment (text) of up to and including 50 characters
in this prompt to describe a file that Query for iSeries creates or replaces when this query is run. The
comment reminds you what the file is for when it is displayed later in a list of files. The comment is
displayed, for example, on the Select File display whenever the Text column is shown.
Print definition in Query for iSeries reports: Type a Y or N to indicate if you want a copy of your query
definition to be printed whenever the query output is stored in the database file. N (No) is the default.
Y=Yes
A copy of your query definition (and the output database file definition) is to be printed whenever the
query output is stored in the file.
N=No
A copy of the query definition is not to be printed when the query is run.
Chapter 13. Selecting output type and output form in Query for iSeries reports
159
Summary-only output of a Query for iSeries report to a database file
The data sent to a database file, when summary-only output is selected, is one of the following:
v If no summary functions or report breaks have been selected, the output is a single record containing a
count of the records selected by your query.
v If summary functions but no report breaks have been selected, the output is a single record containing
summary function values.
v If report breaks but no summary functions have been selected, the output is a record containing report
break values for each report break.
v If both summary functions and report breaks have been selected, the output is a record containing
report break values and summary function values for every report break and for the final totals.
For a better understanding of summary-only output to a database file, compare the summary database file
output with a printed report from the same query. The data produced is the same (if no summaries have
been suppressed), but the layout of the data is different. If you print the query definition for a query with
output sent to a database file, the record format layout is included.
The information in each summary-only record that is output to a database file has the following format:
v The first position of each record contains a break level number.
v The second position of each record contains an overflow indicator.
v The third position of each record begins the actual data.
The break level is a number from 0 through 6, which identifies the different report break levels output to a
record. A 0 identifies a final total (summary) record. The numbers 1 through 6 identify a report break and
correspond to the level number associated with the report break.
The overflow indicator indicates when data has overflowed in 1 or more fields in this record. The indicator
position is blank if overflow has not occurred. An asterisk (*) appears if any calculated field overflows. The
field that overflowed is filled with the maximum value for a field of that type and size (a string of asterisks
***** appears for the value in a printed or displayed report).
The output data is grouped together by field with the report break values followed by any summary
function values for the field. The data for break fields with priority lower than the current break level is
considered null. If the corresponding field in the output file is not null capable, Query for iSeries uses the
null-value defaults (like blanks for character data). Summary data is displayed or printed in the following
order: total, average, minimum, maximum, and count. If a field is totaled, Query adds 3 digits to the field
length to hold the total (up to a maximum of 31 digits). Count summary values are 7 characters long and
are zoned decimal. Break and summary values for packed and binary data are converted to zoned
decimal format when saved in a database file. Date, time, and timestamp data is saved in internal format.
DBCS-graphic data is saved without shift-out and shift-in characters.
As an example, assume you have an input file containing personnel information about all state employees.
You set up a query that requests total salary, average salary, and the number of employees in each county
and city. The query sorts on two fields: CITY within COUNTY. Report breaks are defined for these fields and
the Salary field for each county is totaled, averaged, and counted.
If you ran this query and selected summary-only output, the following seven records would be sent to a
database file:
2
2
1
2
2
1
0
|
160
|
Los Angeles
Los Angeles
Los Angeles
Orange
Orange
Orange
.........
|
Arcadia
00007000000 03500000
Glendale
00009000000 04500000
.........
00016000000 04000000
Costa Mesa 00006000000 03000000
Irvine
00008000000 04000000
.........
00014000000 03500000
.........
00030000000 03750000
|
|
|
Query for iSeries Use V5R2
0000002
0000002
0000004
0000002
0000002
0000004
0000008
|
Break level ID (1) |
|
|
|
Overflow indicator (1)
|
|
County (11) |
|
City (10)
|
|
|
|
|
|
Total salary (11.2)
|
|
|
Average salary (8.2)
|
Count (7.0)
The number in parentheses, behind the explanation of the field, is the output field length and number of
decimal positions. A blank break value is shown as a string of periods. Note that the overflow indicator
column is blank, indicating all the data fits.
Note: Truncation or rounding of averages is not considered overflow.
The report breaks for CITY (break level 2) have break values for both COUNTY and CITY. The report breaks
for COUNTY (break level 1) have break values for COUNTY only. The last record (break level 0) contains the
final totals of the summary functions and has no break values. The blanks shown between the fields are
for example purposes only; the actual database file output has no blanks between fields.
In the above example, the query had both summary functions and report breaks specified. If this query
had neither summary functions or report breaks specified, the output would be a single record (break level
0) containing a count of the records selected by the query. For example:
0
0000008
If this query had summary functions but no report breaks specified, the output would be a single record
(break level 0) containing summary function values for the records selected by the query. For example:
0
00030000000
03750000
0000008
If this query had report breaks but no summary functions specified, the output would be a record for each
report break specified. In the first example above, this would be the first six records without their summary
functions. For example:
2
2
1
2
2
1
Los Angeles Arcadia
Los Angeles Glendale
Los Angeles ........
Orange
Costa Mesa
Orange
Irvine
Orange
........
Using an output database file created by Query for iSeries
You can use a file containing the query data the way you do any other file on your system. Therefore, you
can select this file on the Specify File Selections display for another query which might possibly increase
the speed at which your new query runs because the file may now:
v Contain fewer records and data fields
v Be sorted the way you want
v Not need to be shared with other users
Chapter 13. Selecting output type and output form in Query for iSeries reports
161
162
Query for iSeries Use V5R2
Chapter 14. Specifying Query for iSeries processing options
This chapter describes how you specify processing options for running a query. The processing options
you can specify are:
v Whether the results of numeric field calculations or field length changes done for your query are to be
rounded or dropped off (truncated).
v Whether errors and bad data found in numeric fields are to be ignored.
v Whether warnings about character substitutions encountered during CCSID conversions are to be
ignored.
v Whether to use the collating sequence for all character comparisons or just those that were done in
previous releases of Query for iSeries.
Purpose of Query for iSeries processing options
The numeric processing options available on the Specify Processing Options display help you control the
precision and accuracy of your query output. Sometimes you might require that your query output be
pinpoint precise, such as if you were calculating the interest charged to a customer for credit. Sometimes
you may not care if your results are quite so precise, such as if your query calculates the approximate
percentage of customers who purchased more than $10,000 worth of your company’s products last year.
If you work in an environment in which CCSID conversions are necessary and might involve character
substitution, you can choose to either ignore or see the character substitution warnings, depending on the
data and reports you need.
You can select whether you want to use the selected collating sequence for all character comparisons.
Query for iSeries Version 2 Release 3 makes the collating sequence available for all SBCS character
comparisons. In previous releases, the EQ, NE, LIST, NLIST, LIKE, and NLIKE tests used the character
value, instead of the collating weight. (GT, GE, LT, and LE tests have always used the collating weight
when applicable.) Also in previous releases, the collating sequence was only applied to SBCS characters
in SBCS fields and constants.
Specify Processing Options
Type choices, press Enter.
Use rounding . . . . . . . . . . .
Blank, Y=Yes, N=No
Ignore decimal
data errors . . . . . . . . . .
Blank, Y=Yes, N=No
Ignore Character
substitution warnings . . . . .
Y
Y=Yes, N=No
Use collating sequence for
all character comparisons . . .
Y
Y=Yes, N=No
F3=Exit
F12=Cancel
F5=Report
F13=Layout
© Copyright IBM Corp. 2000, 2002
F10=Process/previous
F18=Files
163
Rounding numeric field values during Query for iSeries processing
You can control whether the result of numeric field calculations or field length changes should be rounded
or truncated when your query is run. By typing a Y in the Rounding prompt on the Specify Processing
Options display, all of your numeric field calculation results are rounded (if necessary) when your query is
run. By typing an N in the prompt, all of your numeric field calculation results are truncated (if necessary)
when your query is run.
Note: If your query was created on an iSeries system, a Blank is shown as the default. If Query
determines that your query was migrated from System/36, an N is used so that the query can be
processed as it was on System/36.
Whether you choose to have numeric field calculations rounded depends on how precise you require your
results to be. Initially, you need to determine how rounding or truncation will affect your results. If your
query uses several multiplication or division operations, the result of a numeric field calculation may differ
significantly whether your results are rounded or truncated. This is because rounding or truncation could
occur more than once for the field as the calculations are performed. For example, multiplying a
customer’s balance due times an interest rate may supply a result with more decimal positions than you
need or are allowed to have. If necessary, the result is rounded or truncated thus introducing a small error
in the result. Suppose that this result is then added to similar calculations for other customers. Then all of
the small errors begin to add up to a larger error. This error may or may not be significant, but it will
probably be different depending on whether you have selected rounding or truncation.
Note: If you created a result field for a numeric expression that is too small to hold the integer portion (the
numbers to the left of the decimal point) of the result, the result cannot be calculated and a decimal
data error occurs. Even if you specify N in the Rounding prompt and Y in the Ignore decimal data
errors prompt, Query stops processing if it encounters a decimal data error. The rounding option
and the ignore decimal data errors option function only for numeric data that can be calculated. See
“Specify processing options in Query for iSeries” on page 238 for a more detailed description of the
ignore decimal data errors option.
Rounding and truncation are not done just on result fields, they are also done on the average and total
summary functions on the Select Report Summary Functions display and when overriding the numeric field
length on the Specify Report Column Formatting display (such as changing from five decimal positions to
three decimal positions).
You can let Query decide whether the result of numeric field calculations or field length changes will be
rounded or truncated when your query is run. If you leave the Rounding prompt blank on the Specify
Processing Options display, Query decides whether to round or truncate the calculations based on the
environment in which the query is run. If the query is run in the OS/400 environment, the results are
rounded. If the query is run in the System/36 environment, the results are truncated.
Ignoring decimal data errors during Query for iSeries processing
By typing a Y or an N after the Ignore decimal data errors prompt, you can indicate whether you want
Query to ignore any errors it finds in numeric fields when your query is being run. For example, an A (hex
C1) in a zoned or packed-decimal numeric field is an error. If you have chosen that errors in numeric fields
be ignored, the A is changed to a 1 (hex F1). If you have chosen that errors in numeric fields not be
ignored, either an error message is displayed or the field value is shown in the output as plus signs
(++++). The error you get depends on how the field is used.
You can let Query decide whether to ignore any errors it finds in numeric fields when your query is run. If
you leave the Ignore decimal data errors prompt blank on the Specify Processing Options display, Query
decides whether to ignore decimal data errors based on the environment in which the query is run. If the
query is run in the OS/400 environment, errors are not ignored. If the query is run in the System/36
environment, errors are ignored.
164
Query for iSeries Use V5R2
Whether you choose to have decimal data errors ignored depends on whether your data contains values
that cause decimal data errors. You may want to define your query to ignore decimal data errors if the files
it uses have zoned or packed numeric fields that contain data that is not normally interpreted as zoned or
packed data. For example, some applications write blank into a zoned field when the user leaves a prompt
blank. Also, some direct files set all records to hex 40.
Ignoring decimal data errors can have a significant performance cost and should be avoided if the file
does not contain such data. If you define your query to not ignore decimal data errors, it may run faster.
Note: If your query was created on an iSeries system, a Blank is shown as the default. If Query
determines that your query was migrated from System/36, a Y is used so that the query can be
processed as it was on System/36. Ignore the character substitution warning.
Ignoring character substitution warnings during Query for iSeries
processing
The Ignore Character Substitution prompt lets you specify whether or not character substitution warnings
should be ignored when converting data or a collating sequence from one CCSID to another.
Each character field, literal, and collating sequence is associated with a CCSID. This makes it possible to
convert field and literal values to a different coding representation, and to convert collating sequences for
use with data in a different coding representation. Character conversion, when required, is automatic and
transparent to the user. CCSID conversion usually occurs when the user is running in a multilingual
environment. A unique character may be substituted during character conversion for any character in the
source coding representation that does not have a match in the target coding representation.
Y=Yes
Character substitution is ignored and no error messages are issued. Leave the default Y if your
system contains all files with the same CCSID. If you have a primary and secondary language (such
as Spanish and English), character conversion may be done. Leave the default Y if no substitution is
possible, or if you do not care if this happens. If your files have different CCSIDs and you ignore
character substitution, you may:
v See substitution characters in your output.
v Encounter unexpected matching (when differing characters are substituted).
N=No
An error message is issued if a character substitution occurs or could occur when converting from one
CCSID to another, and the request being processed is ended with output incomplete.
Using collating sequence for all character comparisons during Query
for iSeries processing
The Use collating sequence for all character comparisons prompt lets you specify whether use of the
selected collating sequence should be unrestricted.
Y=Yes
Use the selected collating sequence for all character comparisons. When you choose this option, A
equals a if they share a collating weight in the sequence regardless of the test or data type.
N=No
Do not use the selected collating sequence for EQ, NE, LIST, NLIST, LIKE, and NLIKE tests or for
SBCS data in DBCS fields or constants. This is the default for queries restored from a release prior to
Version 2 Release 3 or converted from a System/36.
Chapter 14. Specifying Query for iSeries processing options
165
166
Query for iSeries Use V5R2
Chapter 15. Exiting and running a Query for iSeries query
This chapter describes how to exit query definition and the different ways you can run your query.
Ending a Query for iSeries query definition
| When you have finished creating a query and have pressed F3 (Exit) on one of the definition displays, the
| Exit This Query display is shown.
|
|
|
|
|
|
|
|
|
|
|
|
|
|
|
|
|
|
|
|
|
|
|
||
Exit This Query
Type choices, press Enter.
Save definition . . .
Y
Y=Yes, N=No
Run option . . . . . .
1
1=Run interactively
2=Run in batch
3=Do not run
For a saved definition:
Query . . . . . . .
Library . . . . .
__________
QGPL
Name
Name, F4 for list
Text
. . . . . . .
Authority
. . . . .
____________________________________________
*LIBCRTAUT
F4=Prompt
F5=Report
F14=Define the query
*LIBCRTAUT, *CHANGE, *ALL
*EXCLUDE, *USE
authorization list name
F12=Cancel
F13=Layout
You can save a newly created query or changes to a previously saved query from either of these displays.
Saving a Query for iSeries query definition
When you save your query definition, all the values that you defined are saved with it. It is saved in the
library that you specify, and it is saved as a query definition object whose type is *QRYDFN. If this is a
new object, you are its owner, and you can specify which other users can use your query and in what way.
Like other objects, you can display information about it using the Display Object Description (DSPOBJD)
command.
Storing the Query for iSeries query definition
|
|
|
|
Query supplies a Y for the Save definition prompt on the Exit This Query display, since most of the time
you want to save a newly created query or changes to a previously saved query. You do not have to save
a query; however, if you do not save it, you lose your new query definition or changes if you choose to run
the query now.
To save a newly created query, type a query name (Query prompt) and library name (Library prompt) if
you did not already do this on the Work with Queries display. To display a list of libraries, position the
cursor on the Library prompt and press F4 (Prompt).
You do not need to supply a query name or library if you are saving changes to a previously saved query;
these names should already be filled in on the display. If you change either the query name or the library,
you create a new query with that name and library, and the original query remains unchanged.
© Copyright IBM Corp. 2000, 2002
167
Describing the Query for iSeries query definition
You can also type some descriptive text about the query. The text reminds you what the query is for when
it is displayed in a list of queries or printed on the cover page of a report. The text is displayed, for
example, on the Work with Queries display whenever the Text column is shown.
Giving authority to others to your Query for iSeries query
| You can specify the type of authority that you want to give to other users for this query definition object.
| What you specify on the Exit This Query display determines how other users can use the query. When
| saving a query after creating it, the default authority on the Exit This Query display is *LIBCRTAUT.
The values that you can specify are:
*LIBCRTAUT
Library create authority assigns the authority from the CRTAUT value in the library the object is
being created into. The authority could be *ALL, *CHANGE, *EXCLUDE, *USE, or an authorization list
name. The ability of other users to use the query file depends on the authority assigned.
*CHANGE
Change authority allows other users to perform all operations on the object except those limited to
the owner or controlled by object existence authority and object management authority. A user can
change or use the query definition in any way, except that it cannot be copied, deleted, or saved with
changes made to it.
*ALL
All authority allows other users to perform all operations on the object except those limited to the
owner or controlled by authorization list management rights. A user can do anything with the query
(including deleting it), except for transferring it to a new owner or changing the type of authority.
*EXCLUDE
Exclude authority prevents other users from doing anything with the query definition. Unless given
specific types of authority, no user except its owner can use the query definition.
*USE
Use authority allows other users to run the query or to display or print the query definition. A user
cannot copy the query definition nor save the definition with changes made to it. The query may be
selected for change and saved under a different name.
authorization list name
If you specify the name of an authorization list, its authority is used to control the access that users
have to the query. Query shows the public authority special value rather than the authorization list
name when the query is changed. You can specify an authorization list when you create a query; you
cannot put an authorization list on an existing query. For more information, see the iSeries Security
Reference book.
The following table shows, for each predefined type of authority, what can be done with the query.
Type of
Authority
--------*ALL
*CHANGE
*USE
*EXCLUDE
’ Change Copy
Delete Display Print Query
’ Query
Query Query
Query
Definition
’ ------ ----- ------ ------- ---------’
Yes
Yes
Yes
Yes
Yes
’
No
No
No
Yes
Yes
’
No
No
No
Yes
Yes
’
No
No
No
No
No
Run
Change
Query Authority
----- --------Yes
No
Yes
No
Yes
No
No
No
Note: If the authority you specify is *LIBCRTAUT, the value assigned when the object was created is
used.
168
Query for iSeries Use V5R2
Running a Query for iSeries query
Running a query consists of telling Query for iSeries to use the query definition to acquire the data you
want from selected files, to organize the data into a report format, and then to either display the report,
print it, or store it in a database file.
To run a query, you can:
v Press F5 (Report) while creating, displaying, or changing your query. This runs the query and displays
the report.
v Choose option 2 (Run an existing query) on the Query menu.
v Type a 1 (Run interactively) or a 2 (Run in batch) in the Run option prompt on the Exit This Query
display.
v Type an 8 (Run in batch) or a 9 (Run) in the Option prompt on the Work with Queries display.
v Use the Run Query (RUNQRY) command.
Using function key F5 when running a Query for iSeries query
If dependent values are not used in record selection tests, you can run a query at any time by pressing F5
(Report) while you are creating, changing, or displaying it. Your query runs immediately, the report is
displayed, and you can see what the report looks like and how any changes you make affect it.
Running a Query for iSeries query from the Query for iSeries menu
You can run an existing query by selecting option 2 (Run an existing query) on the Query menu. This
causes the RUNQRY (Run Query) command help display to appear. For more information on using the
RUNQRY command, see the CL Reference information in the iSeries Information Center and “Running a
Query for iSeries query using the RUNQRY command” on page 171 of this book.
Running a Query for iSeries query from the Exit This Query display
When you finish creating or changing a query, the Exit This Query display is shown.
Exit This Query
Type choices, press Enter.
Save definition . . .
Y
Y=Yes, N=No
Run option . . . . . .
1
1=Run interactively
2=Run in batch
3=Do not run
For a saved definition:
Query . . . . . . .
Library . . . . .
__________
QGPL
Name
Name, F4 for list
Text
. . . . . . .
Authority
. . . . .
F4=Prompt
F5=Report
F14=Define the query
|
|
|
|
_______________________________________
*LIBCRTAUT
*LIBCRTAUT, *CHANGE, *ALL
*EXCLUDE, *USE
authorization list name
F12=Cancel
F13=Layout
Query assumes that you want to save your query, so it usually supplies a Y (Yes) in response to the Save
definition prompt. Run option is a profile option, and whatever you selected the last time you exited a
query is the default until you select a different value. However, Query supplies a 3 (Do not run) for the Run
option prompt when your query has an error.
Chapter 15. Exiting and running a Query for iSeries query
169
You can run a query and get the report without saving the definition of the query only if you are running
interactively. (The query must be saved to run in batch.) However:
v If you are creating a query and choose not to save it, it runs only once and then is lost. To save your
query, you need to supply values for the Library and Query prompts. The query name must be a unique
query name in that library. If not, Query issues a message asking whether you want to replace the
existing query.
v If you are running a query in batch, you must save it in a library other than QTEMP before running the
query.
v If you are changing a query and choose not to save it, it is kept without the changes, and the newly
changed or newly entered values are used only if you run the query now. That is, if you changed an
existing definition, the report shows the results of the changes only one time. If the report is run again,
the results are based on the original definition.
To save a newly changed query, you do not need to supply a library name and query name; if you do,
the original query remains unchanged, and a new query is created with the changes you made. Type
the name of the library in which the query is to be saved. Only an actual library name or *CURLIB can be
specified for the Library prompt. However, if you want to first see a list of libraries from which you can
select one, do the following: move the cursor to this prompt, type a special library name (such as *LIBL)
or a generic library name (in the form of ABC*), and press F4 (Prompt).
If you choose to run the query interactively, type 1 (Run interactively) in the Run option prompt and press
the Enter key. Query shows the report on your display, prints the report on a printer, or places the data
from the query in a database file. For more information on selecting an output device, see Chapter 13,
“Selecting output type and output form in Query for iSeries reports”.
If you choose to submit the query to batch processing, type a 2 (Run in batch) in the Run option prompt
and press the Enter key. The query is submitted to the job queue specified in the job description for your
user profile.
You can create a query for a file member that does not contain any data. If you run the query, no data
shows in the report or is placed in a database file. However, you can press F13 (Layout) on the Exit This
Query display to check your report layout.
Running a Query for iSeries query from the Work with Queries display
From the Work with Queries display, you can only run a query that has been previously saved. The query
runs exactly as it was defined. If you want to change anything about the output device, you must first
change the query and then run it.
To run a query from the Work with Queries display:
1. Select option 8 (Run in batch) to submit the query to the job queue specified in the job description for
your user profile.
2. Select option 9 (Run) to run the query interactively.
3. Type the name of the query. If you do not know the name of the query, “Selecting a Query for iSeries
query name from a list” on page 14 tells you how to see a list of query names.
4. Type the name of the library in which the query is stored. Query assumes it is stored in the library for
your last Query work session or in your current library. If you do not have a current library, Query
assumes it is stored in QGPL. You can change the assumed library name. If you do not know the
name of the library, “Selecting a library for your Query for iSeries queries” on page 16 tells you how to
display a list of library names.
5. Press the Enter key.
170
Query for iSeries Use V5R2
Work with Queries
Type choices, press Enter.
Option
. . . . . . .
Query
. . . . . . .
Library . . . . . .
F3=Exit
F4=Prompt
_
__________
QGPL
1=Create 2=Change 3=Copy 4=Delete
5=Display 6=Print definition
8=Run in batch 9=Run
Name, F4 for list
Name, *LIBL, F4 for list
F5=Refresh
F12=Cancel
Query displays a report, prints a report, or puts the data into a database file, depending on what is
specified on the Select Output Type and Output Form display. For more information on selecting an output
device, see Chapter 13, “Selecting output type and output form in Query for iSeries reports”.
Query uses current data each time a query is run. For example, if a customer’s address changes in the
file, the new address appears in the data produced when the query is run. However, if definition of data
has changed since the query was created or last changed, the report created by the query may not show
these changes. For example, assume you want to run a query that does not have column headings
specified. The query then uses column headings defined by IDDU. If the IDDU column headings have
been changed since the query was created or last changed, the query may not use the new headings.
When you change a query, Query updates the query with the current IDDU definitions. If you save the
query, any IDDU changes are saved with it. Therefore, you can make sure you have the current definitions
when you want to run the query from the Work with Queries display by selecting option 2 (Change)
instead of option 9 (Run). You can then save the query without actually making any changes by doing the
following:
v Press F3 on the Define the Query display.
v Choose to save the definition and run the query on the Exit This Query display.
IDDU definitions are explained in the IDDU online information.
Running a Query for iSeries query using the RUNQRY command
You can use the RUNQRY command to run a query. The output can be displayed, printed, or stored in
another database file. If the query contains dependent values, you must use the option for specifying run
time record selection and supply the values that would ordinarily come from a record in a different file or
query.
The RUNQRY command can be used three different ways: to run an existing query (one that has already
been created), to run an existing query with some of its definition values changed by values you specify on
this command, or to run a default query based only on the parameter values specified on this command.
(You supply parameters values to give Query information it needs, such as the query name, the library in
which the query is stored, where to send the output, and so on.)
For detailed information on the RUNQRY command, its parameters, how to use it, and some examples,
see the CL Reference information in the iSeries Information Center.
Chapter 15. Exiting and running a Query for iSeries query
171
Following are some suggestions for using the RUNQRY command:
v If you want to use an existing query without changing the file or files to query, specify only a query and
library name (without an input file name). This runs the query exactly as it was defined.
v If you want to run a default query on a file, specify only an input file name. This produces a report
showing the information contained in the first 500 fields of each record.
v If you want to run a changed version of an existing query, specify a query name and the appropriate
parameters to change the definition to what you want. The parameter values you specify on this
command override the corresponding values in the existing query definition, but only when the
command is processing (that is, the changes are not permanently made to the query definition).
v If you specify both a query name and an input file name, the files specified by the input file name
parameter override the file name(s) specified in the query definition. Therefore, if multiple files (and
members) are defined in the query definition and you want to change one or two of them, you must
specify *SAME for the file selections that do not change and specify the values for the ones you want to
override.
When you run a saved query you might not get the results you expected. The items in the following list
can dynamically affect how a query runs or how the data is formatted:
v The language ID or sort sequence of the job (if the query takes them from the current job) is different
than when the query was defined.
v The format of the job date.
v The default for numeric editing for the language.
v The system decimal positions processing value.
v The system currency symbol.
v File overrides may be in effect.
v The job CCSID.
v The Query for iSeries language installed (if the query specifies option 2 on the Select Collating Options
display.
v The printer file definition.
v The attributes of the workstation you are using to display the report.
172
Query for iSeries Use V5R2
Chapter 16. Working with Query for iSeries query definitions
This chapter describes the ways you can work with your query once it has been created and saved in a
library. In addition to running your query:
v You can change the results of your query output by making changes to your query definition.
v You can copy your query definition to the same or another library. You might do that so that other users
can have their own copy to work with.
v You can delete one or more of your query definitions that are no longer needed.
v You can rename your query by using a new name when you copy it. You then can delete the old query.
v You can display the definition of your query without being able to make any changes to it.
v You can print your query definition. You might do that if you want a printed copy for documentation
purposes.
Changing a Query for iSeries query definition
You can change a previously saved query by using option 2 (Change) on the Work with Queries display.
You can supply a query and library name on the display, or you can select a query from a list. (For more
information about using lists, see “Using lists in Query for iSeries” on page 9.)
Changing a query is almost the same process as creating a query. You choose the definition steps on the
Define the Query display for which you want to change query definition values. When the definition step
displays appear, the prompts are already filled in. To change the query, all you need to do is change or
delete the values in the prompts.
When you have finished changing a query, you can run it, save it, run it and save it, and so on.
Starting changes by copying a Query for iSeries query definition
You may find it helpful to use option 3 (Copy) on the Work with Queries display before you change a
query. If you copy the query you want to change, the original is not affected by the changes you make.
Then, should you decide that you would rather have your query as it was originally defined, you do not
have to change everything back. You can delete the changed query (as explained later in this chapter) and
keep the original.
If, however, after running and testing the changed query, you decide you want to keep the changes, you
can delete the unchanged original query.
Changes you can make to a Query for iSeries query
In general, you can make two kinds of changes to a query. You can change:
v What data is reported by changing the record and or field selection
v The characteristics of the report (or output) by changing the formatting, the summarizing, or the report
breaks
Each type of change may require that you select several definition steps on the Define the Query display
by typing a 1 in the Opt column next to the definition steps you want to change.
© Copyright IBM Corp. 2000, 2002
173
Define the Query
Query . . . . . . : QRY1
Library . . . . . : QGPL
Option
CCSID
. . . . . :
. . . . . :
Change
37
Type options, press Enter. Press F21 to select all.
1=Select
Opt
_
_
_
_
_
_
_
_
_
_
Query Definition Option
> Specify file selections
Define result fields
> Select and sequence fields
Select records
Select sort fields
Select collating sequence
> Specify report column formatting
Select report summary functions
Define report breaks
Select output type and output form
Specify processing options
F3=Exit
F13=Layout
F5=Report
F18=Files
F12=Cancel
F21=Select all
The options currently defined for your query are shown with a > to the left of the option. You can change
these and define additional options. You can choose as many options as you want from this display. Each
of these options and their associated displays are described in previous chapters.
Each option has its own corresponding display(s), on which you can make specific changes. The displays
for the options you select are shown to you in the order they appear on the Define the Query display.
If you decide you do not want an option that has already been defined, do the following:
1. Select that option on the Define the Query display.
2. Blank out any prompts that are completed for that option display.
If you decide not to change anything on an option display once you see it, just press the Enter key without
changing anything and continue. If you have changed the display and decide you would rather have it the
way it was, press F12 (Cancel).
Pressing F12 does not “undo” the result of pressing F23 (Save as default). Also, changes Query must
keep as a result of your pressing the Enter key (or F10 or F3) to get to a different display cannot be
canceled later by pressing F12. All other changes you make can be canceled by pressing F12. The
following exceptions to this rule let you cancel all changes for your most recent work on an entire definition
option by pressing F12 after returning from a secondary prompt display to the primary prompt display on
which the secondary display depends:
v Join tests are canceled with file selections.
v Dependent value qualifiers are canceled with record selection tests.
v Editing changes are canceled with column formatting changes.
v Break level formatting changes are canceled with break field selections (level definitions).
If you decide you do not want to keep the changes you have made on previous displays, press F3 to end
the revision and type an N (No) for the Save definition prompt on the Exit This Query display.
When you are working at a display, you can press the Help key to see the on-line help information that
briefly describes how to specify the choices for that option. You can also press F5 or F13 to see how the
changes affect the report the query produces.
174
Query for iSeries Use V5R2
When you finish making changes on all the displays you want to change, Query returns you to the Define
the Query display, where the options now defined for your query are shown with a > to the left of the
option. You can choose more options to make more changes, or you can press F3 to end the process of
changing the query.
From the Exit This Query display, you can do either or both of the following:
v Save the query definition with the changes you have made.
v Run the query with the changes you have made.
Exit This Query
Type choices, press Enter.
Save definition . . .
Y
Y=Yes, N=No
Run option . . . . . .
1
For a saved definition:
Query . . . . . . .
Library . . . . .
1=Run interactively
2=Run in batch
3=Do not run
__________
________
Name
Name, F4 for list
Text . . .
Authority . . . . .
F4=Prompt
F5=Report
__________________________________________
*LIBCRTAUT *LIBCRTAUT, *CHANGE, *ALL
*EXCLUDE, *USE
authorization list name
F13=Layout
F14=Define the query
You can change any combination of the Query, Library, and Text prompts. If you save the query definition,
these changes have the following effects:
Query Name and/or
Library Name Changed
Query Name and
Library Name Unchanged
Existing query is not changed
New query created with new name and/or in different
library
Text and authority applies to new query
Existing query is changed
New query definition replaces existing definition
Text and authority applies to new definition of the query
If you are replacing a query, you cannot specify authorization list name authority; you must use one of the
special names (*CHANGE, *ALL, *EXCLUDE, or *USE) or blanks (no change).
If you choose not to save the query definition, changes to the following prompts have the following effects:
Prompt Changed
Effect
Query name
Library name
Text
None
None
Text prints on cover page if you choose to run the query and printer is the
selected output device
None
Authority
Chapter 16. Working with Query for iSeries query definitions
175
Considerations for changing Query for iSeries queries
To make changes to your query, choose the correct options on the Define the Query display. Refer to the
appropriate chapters or appendixes in this guide for information and considerations on how to enter the
definitions that you want. Each query is saved with a CCSID. You cannot change a query if your job
CCSID is not compatible with the query CCSID (one of the CCSIDs is 65535 or they are the same).
Note: See “Changing a Query for iSeries query” on page 250 for more information on how CCSIDs affect
processing a query.
Changing your collating sequence on Query for iSeries queries
A change in your collating sequence can affect join tests, record selection tests, and sorts involving SBCS
data in SBCS, DBCS-open, and DBCS-either character fields. The extent of the effect depends on the
test.
Changing the setting of the Use Collating Sequence processing option can change your results. If you set
the processing option to Yes, the EQ, NE, LIST, NLIST, LIKE, and NLIKE tests compare character collating
values. These tests compare the hexadecimal character codes if you set the option to No.
Note: The Use Collating Sequence option does not affect your output when the collating sequence is set
to *HEX.
LT, LE, GT, GE, and RANGE tests compare collating sequence values regardless of how you set the
processing option. A change to your collating sequence can change the records that these tests select. A
change to the collating sequence can also affect your query’s minimum and maximum summary values,
the location of report breaks, and the order of selected records (if you use a field containing SBCS
character data for sorting).
For example, you have 2 collating sequences. In one, the character E has a higher sequence number than
e, and in the other, the two characters have equal (shared) sequence numbers. In one record, field NAME1
has a value of LEE, and field NAME2 has a value of Lee. Table 7 and Table 8 show the results of comparing
the strings (NAME1 and NAME2) using various tests for a collating sequence with:
v
v
v
v
Unique weights used in all tests
Shared weights used in all tests
Unique weights not used in EQ and NE tests
Shared weights not used in EQ and NE tests
Table 7 applies when all data is SBCS. Table 8 applies when some or all of the data is DBCS.
Table 7. Effect of Collating Sequence and Processing Option on Selection. Both NAME1 and NAME2 are SBCS data.
Yes means the record under test is selected. No means it is not selected.
Test
ColSeq=YES Unique
Weights
ColSeq=YES Shared
Weights
ColSeq=NO Unique
Weights
ColSeq=NO Shared
Weights
NAME1 EQ NAME2
No
Yes
No
No
NAME1 GE NAME2
Yes
Yes
Yes
Yes
NAME1 GT NAME2
Yes
No
Yes
No
NAME1 NE NAME2
Yes
No
Yes
Yes
NAME1 LE NAME2
No
Yes
No
Yes
NAME1 LT NAME2
No
No
No
No
176
Query for iSeries Use V5R2
Table 8. Effect of Collating Sequence and Processing Option on Selection. Either or both NAME1 and NAME2 are
DBCS data. Yes means the record under test is selected. No means it is not selected.
Test
ColSeq=YES Unique
Weights
ColSeq=YES Shared
Weights
ColSeq=NO Unique
Weights
ColSeq=NO Shared
Weights
NAME1 EQ NAME2
No
Yes
No
No
NAME1 GE NAME2
Yes
Yes
Yes
Yes
NAME1 GT NAME2
Yes
No
Yes
Yes
NAME1 NE NAME2
Yes
No
Yes
Yes
NAME1 LE NAME2
No
Yes
No
No
NAME1 LT NAME2
No
No
No
No
Copying a Query for iSeries query definition
There are many reasons for copying a query. Following are some of the most common:
v To copy a query from someone else’s library into your library.
v To copy a query you keep in a test library for experimenting with different files, record formats, and
query features. When you have a query you want to use, you can copy it into your library and keep the
original in the test library for further experiments.
v To copy a query so that you can change it without changing the original.
v To rename a query or move a query to another library by copying the query to the other library and then
deleting the query from the original library.
You can copy a previously saved query by using option 3 (Copy) on the Work with Queries display. You
can type the name of the query (and its library) on the display, or you can, from a list of queries, type a 3
next to the query(s) that you want to copy. (For more information about using lists, see “Using lists in
Query for iSeries” on page 9.)
After you press the Enter key, the Copy Queries display appears. (The following display has some sample
information typed in.)
Copy Queries
From library
. . . . . . :
TESTLIB
Type choices, press Enter.
To library . . . . . . .
Replace query . . . . . .
__________ Name, F4 for list
N
Y=Yes, N=No
To rename copied query, change To Query name.
From Query To Query
ACCTRECFEB __________
INVENTFEB
__________
MAILADDR
__________
PAYROLLFEB __________
F3=Exit
F4=Prompt
F20=Cancel copy in error
F9=Reset
F12=Cancel
To place the copy in a library other than the library that contains the original query, type a different library
name in the To library prompt. If you do not know the name of the library that should receive the copy, you
can use F4 (Prompt) to select a library from a list.
Chapter 16. Working with Query for iSeries query definitions
177
To place the copy in the same library as the original, do not type anything in the To library prompt.
Then select a choice in the Replace query prompt:
v Type a Y if you want the copy to replace a query that has the same name in the library.
v Leave the N in the prompt if you want to copy the query to the library only if no other query with the
same name already exists in the library.
To rename the query(s), type the new name(s) in the To Query column. If you place the copy in the same
library as the original query, you must type a new name for the copy. If you place the copy in a different
library, you can rename it, or you can use the original query name.
When you are finished typing information on the Copy Queries display, press the Enter key. If Query finds
no errors while copying the queries, all the queries are copied. If you did not select any other options from
the Work with Queries display (such as change, delete, display, and so on), you return to the Work with
Queries display. If you selected the queries to be copied from a list of queries in a specific library and did
not copy the queries to a different library, the names of both the original and copied queries are included
in the list.
If Query finds an error while copying the queries, the list of queries being copied is shown and an error
message appears at the bottom of the display. The query that has the error is highlighted and appears at
the top of the list. Any queries that were before that query in the list have already been copied. You can do
either of the following:
v Press F9 (Reset) without pressing the Enter key. The copy process is canceled for all remaining
queries, including the query in error.
v Press F20 (Cancel copy in error) without pressing the Enter key. The query in error is not copied. To
continue copying the remaining queries, press the Enter key. If an error is found while copying one of
the remaining queries, another error message is shown and the list is shown again with that query listed
first and highlighted.
Renaming a Query for iSeries query definition
If you want to rename a query, do the following:
1. Copy the query, giving the copied query a new name.
2. Delete the original query.
These tasks are options on the Work with Queries Display and are described in other sections of this
chapter.
Deleting a Query for iSeries query definition
When you no longer need a query, you can delete (remove) it from the library. Once you delete a query,
you cannot get it back, so it is a good idea to check a query definition before you delete it. If you delete a
query from the Work with Queries display, you can use F11 to display text about the query. If there is no
text, or if it does not include enough information to help you, you can display or print the query definition.
These tasks are described later in this chapter.
You can delete a previously saved query by:
v Using the Delete Query (DLTQRY) command. For more information on using the DLTQRY command,
see the CL Reference information in the iSeries Information Center.
v Selecting option 3 (Delete a query) on the Query menu. This causes the DLTQRY (Delete Query)
command help display to appear. For more information on using the DLTQRY command, see the CL
Reference information in the iSeries Information Center.
v Using option 4 (Delete) on the Work with Queries display. You can type the name of the query (and its
library) on the display, or you can, from a list of queries, type a 4 next to the query(s) that you want to
178
Query for iSeries Use V5R2
delete. (For more information about using lists, see “Using lists in Query for iSeries” on page 9.) Then
press the Enter key. The Confirm Delete of Queries display appears.
Confirm Delete of Queries
From library
. . . . :
MYLIB
Press Enter to confirm your choices for 4=Delete.
Press F12 to return to change your choices.
Query
ACCTRECJAN
INVENTJAN
MAILADDR
PAYROLLJAN
TESTQUERY1
TESTQUERY2
F9=Reset
F12=Cancel
F20=Cancel delete in error
This display shows the query name(s) you chose to delete. (The above display shows some sample
information.) Carefully check the names.
If you are sure you want to delete the queries listed, press the Enter key. The queries are deleted. If
you selected the queries to be deleted from a list of queries, the deleted query name(s) are no longer
included when you return to the Work with Queries display.
If you decide you do not want to delete one of the queries shown, press F12 (Cancel) to return to the
Work with Queries display without deleting any queries. The list of queries is still displayed and you can
change any of your selections.
If Query finds an error while deleting the queries, the list of queries being deleted is shown and an error
message appears on the bottom of the display. The query that has the error is highlighted and appears at
the top of the list. Any queries that were before that query in the list have already been successfully
deleted. You can do either of the following:
v Press F9 (Reset) without pressing the Enter key. The delete process is canceled for all remaining
queries, including the query in error.
v Press F20 (Cancel delete in error) without pressing the Enter key. The query in error is not deleted, but
the delete process continues for the remaining queries. If an error is found while deleting one of the
remaining queries, another error message is shown and the list is shown again with that query listed
first and highlighted.
Displaying a Query for iSeries query definition
When you display a query, Query does not allow you to make any changes. Each query is saved with a
CCSID. You cannot display a query if your job CCSID is not compatible with the query CCSID. They are
compatible if one CCSID is 65535, the job and query CCSIDs are the same, or one can be converted to
the other.
Note: See “Displaying a Query for iSeries query” on page 249 for more information on CCSIDs and how
they affect processing a query.
Chapter 16. Working with Query for iSeries query definitions
179
If you display a query and decide you want to change it, you have to return to the Work with Queries
display and use option 2 (Change). You can print the information you see when you display a query,
although the information will be in a different form. See “Printing a Query for iSeries query definition”. You
may be able to print the definition of a query that you cannot change or display.
You can display a previously saved query by using option 5 (Display) on the Work with Queries display.
You can type the name of the query (and its library) on the display, or you can, from a list of queries, type
a 5 next to the query that you want to display. (For more information about using lists, see “Using lists in
Query for iSeries” on page 9.)
After you press the Enter key, the Define the Query display appears. All the options that were defined for
the query are shown with a > to the left of the option. To look at how the options are defined, you can
either:
1. Use F21 to look at displays for all the options (even those that are not defined for this query).
2. Type a 1 in the Opt column beside the options you want to look at.
You can press F5 while displaying a query to see how a report would look if you ran the query and
displayed or printed a report.
Note: There are circumstances under which the display you see when you press F5 may differ from the
display you would see during a normal running of the query. For example, if the collating table
selected for option 4 has been changed since the query was saved, the F5 display will show the
change, but the RUNQRY display will not.
When you have finished looking at a display for an option and are ready to look at the displays for the
next option, press the Enter key. When you have seen displays for all the options you selected, you return
to the Define the Query display. You can look at the same options again, or choose to display different
options. Whenever you decide you are finished displaying this query definition, you can either:
1. Press F12 as many times as necessary to return to the Work with Queries display.
2. Press F3 to work with any remaining queries, if you selected more than one query from a list on the
Work with Queries display. You return to the Work with Queries display if you were finished working
with all the queries you selected on that display.
Note: You may not be able to display a query if the file definition has been changed since the query was
last used or displayed. Changing the query or the file definition may make it possible to display the
query. You also may not be able to use certain command and function keys while you are
displaying because they are available only when you create or change a query.
Printing a Query for iSeries query definition
You can print the query definition. The printout tells you what information the query uses to prepare a
report or create a file. You can see the same information on your display by selecting option 5 (Display) on
the Work with Queries display, but the information will be in a different form.
You can print the query definition using any of the following methods:
v Use option 6 (Print definition) on the Work with Queries display. You can type the name of the query
(and its library) on the display, or you can, from a list of queries, type a 6 next to the query name that
you want to print the definition for. (For more information about using lists, see “Using lists in Query for
iSeries” on page 9.)
v Specify to print the definition on either the Define Printer Output display or the Define Database File
Output display and then run the query. These displays are described in Chapter 13.
v Specify to print the definition when you use the Run Query (RUNQRY) command to run the query. For
more information on the RUNQRY command, see “Running a Query for iSeries query using the
RUNQRY command” on page 171.
180
Query for iSeries Use V5R2
When you select option 6 (Print definition) on the Work with Queries display and press the Enter key, the
query definition is printed immediately.
Information printed for a Query for iSeries query definition
The printout includes the following information:
v A header at the top of each page. This header lists information about the system you are using and
when the definition was printed.
v The query name and CCSID.
v The library name.
v Any text about the query.
v Constants attributes (decimal point separator, date format and separator, time format and separator).
v
v
v
v
The processing options.
Collating sequence information.
Assorted warnings.
The file identifier(s). For each file identifier, the printout includes the following:
– The file name
– The name of the library
– The name of file member
– The record format selected for the file
v The join tests, if more than one file is used, and the type of join used.
v
v
v
v
v
Any result fields, their expressions, length and decimal positions, and column headings.
Record selection tests.
Selected fields, their sequence, sort priority and sort type, and any text.
Column formatting and summarizing.
Any report breaks.
v The selected output type:
– If the report is to be printed, printer information is shown.
– If the output is to be put in a database file, database file information and the field layout are shown.
v The form of output selected, detailed or summary-only, and wrapping specifications.
If you print the definition using option 6 (Print definition) on the Work with Queries display, the printout
includes information about any output type selected for the query. For example, if database file output was
selected when the query was created and the query was later changed so that the output is to be printed,
the printout of the query definition would include both database file and printer information. If you print the
definition using any method except option 6, only current information is printed.
If you print the query definition while using the RUNQRY command (by specifying the PRTDFN(YES)
parameter), the information in the printed definition reflects any temporary changes that you specify using
the RUNQRY parameters or choices that Query for iSeries resolves at run time. For example, you might
specify an input file name, make changes to the record selection tests, specify a different type of output, or
define your query to use the running job’s sort sequence. There might be missing information, when
compared to an option 6 listing, because Query for iSeries did not need to use all the selected fields to run
the query.
In addition to information about the query definition, if the query produces output to a database file, a
description of the record format layout is also printed.
Chapter 16. Working with Query for iSeries query definitions
181
Example of printed record format information for a Query for iSeries
query definition
The following is an example of one particular part of the query definition (the record format layout for the
database output file) that can be printed when the query is run. The information shown below is printed
only if the query is defined for database file output and, in this case, when it sends summary-only output to
the database file.
Output file record format
Output record length . . . .
Output CCSID value . . . . .
Field list:
Field
Begin
Len
BREAKLVL
1
1
OVERFLOW
2
1
TM1USA
3
8
DT1EUR
6
10
TS1
10
26
PK2
20
8
ZD3
28
8
ID1
36
3
VC1
39
8
C1
49
10
DBCSOPEN
59
8
DBCSEITH
67
8
DBCSONLY
75
8
DBCSGRPH
83
8
DBCVOPEN
89
8
DBCVEITH
99
8
DBCVONLY
109
8
DBCVGRPH
119
8
IBM Query for iSeries
. . . . .
. . . . .
128
37
Dec
Data Type
Character
Character
Time
Date
Timestamp
Zoned decimal
Zoned decimal
Character
Variable character
Character
DBCS capable
DBCS capable
DBCS capable
Graphic
Variable DBCS
Variable DBCS
Variable DBCS
Variable graphic
Null
T
L
Z
2
2
V
O
E
J
G
OV
EV
JV
GV
Y
Y
92-01-15
10:36:31
Text
BREAK LEVEL
OVERFLOW FLAG
FMT SYS
FMT SYSTEM
FMT SYSTEM
ID FIELD
’ EMPTY STRING DFT
CHAR DFT *NULL
DBCS OPEN
DBCS EITHER
DBCS ONLY
DBCS GRAPHIC
DBCS OPEN VAR.
DBCS EITHER VAR.
DBCS ONLY VAR.
DBCS GRAPHIC
v The Output CCSID Value is the CCSID of the entire query. This line is not printed if the CCSID is
65535. If the query contains multiple CCSIDs, a CCSID column shows the CCSID of each field.
v The Field column shows the fields that exist in the output records. Each data field in the record output is
assigned a name equal to the field name as it exists in the query definition. If two or more fields in the
record output have identical field names (this occurs if one or more summary functions are specified for
a field or when files are joined), the first six characters of the field name are used plus a two-digit
number is added that corresponds to the summary function (01=Total, 02=Average, 03=Minimum,
04=Maximum, and 05=Count).
For example, if minimum and maximum summary functions were specified in the query definition for the
FMT field, two fields named FMT03 and FMT04 would appear in the record output; they would contain the
minimum value for the FMT field (FMT03) and the maximum value for the FMT field (FMT04). This naming is
true only in this simple case. Actual naming varies with different queries.
v The Begin column shows the starting byte of the field within the record. For example, the field named
ZD3 starts at byte 28.
v The Len and Dec columns show the length and decimal positions for each field. For example, the field
named PK2 has a length of eight with two decimal positions.
Note: What is shown on the report is the printed output length after formatting, not the
internal-database field length. You cannot add the length to the begin position and get the
beginning position of the next field.
v For nonnumeric fields, the Dec column shows the type of data that is contained in the column:
Blank means fixed-length character
V means variable-length character (SBCS or DBCS)
J means DBCS-only
O means DBCS-open (mixed)
182
Query for iSeries Use V5R2
E means DBCS-either
G means DBCS-graphic
L means Date
T means Time
Z means Timestamp
v The Null column shows whether the field is null capable (Y) or not (blank).
v The Data Type column shows the data type for each field.
v The Text column shows the comment (if it exists) for each field. If the field is for a summary function,
the text shown is the field name (without any added numbers) followed by the type of summary function.
v The CCSID column (if shown) appears when multiple CCSIDs are represented and shows the CCSID
for each field.
Chapter 16. Working with Query for iSeries query definitions
183
184
Query for iSeries Use V5R2
Part 3. Advanced information about Query for iSeries
Chapter 17. Additional information about Query for iSeries for programmers . . . .
Files with different record formats in Query for iSeries . . . . . . . . . . . . . .
File sharing considerations in Query for iSeries . . . . . . . . . . . . . . . . .
Overriding database files in Query for iSeries. . . . . . . . . . . . . . . . . .
DBCS considerations when defining result fields in Query for iSeries . . . . . . . . .
Joining files in Query for iSeries . . . . . . . . . . . . . . . . . . . . . .
Using *ALL in Query for iSeries . . . . . . . . . . . . . . . . . . . . . .
Using fields other than sort fields for report breaks in Query for iSeries . . . . . . . .
Result field length and decimal positions in Query for iSeries . . . . . . . . . . . .
Tips for dealing with presentation length and decimal positions in Query for iSeries. . .
Length and decimal positions used for internal numeric calculations in Query for iSeries .
Addition and subtraction in Query for iSeries . . . . . . . . . . . . . . . .
Multiplication in Query for iSeries . . . . . . . . . . . . . . . . . . . .
Division in Query for iSeries . . . . . . . . . . . . . . . . . . . . . .
Example: Increasing the decimal precision for result fields in Query for iSeries . . . .
Selecting records (ignoring field case) in Query for iSeries . . . . . . . . . . . .
© Copyright IBM Corp. 2000, 2002
.
.
.
.
.
.
.
.
.
.
.
.
.
.
.
.
.
.
.
.
.
.
.
.
.
.
.
.
.
.
.
.
.
.
.
.
.
.
.
.
.
.
.
.
.
.
.
.
.
.
.
.
.
.
.
.
.
.
.
.
.
.
.
.
187
187
187
187
187
188
188
188
188
188
189
189
189
189
190
191
185
186
Query for iSeries Use V5R2
Chapter 17. Additional information about Query for iSeries for
programmers
This chapter provides additional information which may be of interest to programmers.
Files with different record formats in Query for iSeries
You can use a file that has more than one record format; however, you can use only one record format at
a time. If an application you are designing requires processing of different record formats in the same file
at the same time, you should consider using the RPG/400 or COBOL/400* programming language.
For example, if customer names are in one record format and the amount each customer owes is in a
different record format in the same file, a single query cannot print the names of all customers who owe
more than $500. For Query to select records from both record formats, the selection values—customer
name and amount owed—must exist in one record format (that is, the physical disk record must reflect
both customer name and amount owed fields).
Note: This could be accomplished in a single query by joining the file to itself. However, the record
formats must all contain a common field. For more information on joining files, see “Joining files in a
Query for iSeries query” on page 42
File sharing considerations in Query for iSeries
Other application programs can read and update a file at the same time Query is creating a report from
the file, and two or more Query definitions can refer to the same file at the same time.
Overriding database files in Query for iSeries
Your query run results cannot be predicted if you use the Override with Database File (OVRDBF)
command to override a database file. Query allows you to use the OVRDBF command, but problems may
occur because record formats and file members selected for the overridden file may not correspond to the
new file.
DBCS considerations when defining result fields in Query for iSeries
If you use the SUBSTR function on a DBCS-only or DBCS-either field, the result field is an SBCS
character field. If you use the SUBSTR function on a DBCS-graphic field, the result field is a
DBCS-graphic field. With a DBCS-open field, the result is a DBCS-open field.
If you concatenate DBCS-only fields or DBCS-only constants (or both), the result field is a variable-length
DBCS-only field.
If you concatenate DBCS-open fields, the result field is a variable-length DBCS-open field.
If you concatenate a DBCS-only, DBCS-open, or DBCS-either field or constant (or both) with an SBCS
character field or constant, the result field is a variable-length DBCS-open field.
If you use DBCS-graphic fields or constants in a concatenation operation, all fields and constants must be
DBCS-graphic.
If you use UCS2-graphic fields in a concatenation operation, all fields must be UCS2-graphic.
© Copyright IBM Corp. 2000, 2002
187
Joining files in Query for iSeries
For joining files (type of join):
v Type 1 join is the same as for Query/36 (on System/36).
v Type 2 join selects all the records in a primary file and records in the secondary files that match the
primary records. (It selects the matches.)
v Type 3 join selects only the records in a primary file that have no matching records in the secondary
files. (It selects the exceptions.)
For a complete description and examples of each type of join, refer to “Joining files in a Query for iSeries
query” on page 42.
Using *ALL in Query for iSeries
You should be wary of using an *ALL join because it can return a large number of records. Refer to
“Joining files in a Query for iSeries query” on page 42 in this guide for more information. You can use *ALL
for your join if you are creating a database file with field extension using a one-record pad file, or there are
few records in any of the files being joined and you want all of the formats combined.
Using fields other than sort fields for report breaks in Query for
iSeries
The fields you use for sorting may not be meaningful in a report, so you may want to use fields other than
sort fields for break fields. For example, a field containing the customer name portion of a mailing label
may be used as the break field, while an arbitrarily assigned (also unique) customer ID is used for sorting.
Since customer name is a break field, it can be inserted in break text or placed in a summary-only
database file.
Result field length and decimal positions in Query for iSeries
Query determines the presentation length and number of decimal positions for result fields when it creates
them in the report. These values are satisfactory for most users. The following sections suggest when, and
how, the user should specify length and decimal positions. See “Length and decimal positions in Query for
iSeries reports” on page 120 and “Length and decimal positions in Query for iSeries” on page 85 for further
information.
Tips for dealing with presentation length and decimal positions in
Query for iSeries
In certain situations, the length that Query determines for the result field is larger than necessary. For
example, for result field RESULT10:
Result Field
RESULT10
--- Values and Operands --9
+
9
+
9
+
9
+
9
Layout
999999
Query assigns length 6 to result field RESULT10. Since the result in RESULT10 is 45, only a length of 2 is
needed. You could specify a 2 in Len column and a 0 in the Dec column on the Define Result Fields
display for this result field.
Similarly, for result field RESULT11:
Result Field
RESULT11
--- Values and Operands ---
Layout
N1 + N2 + N3 + N5 + N5
99999
If fields N1 through N5 each have a length of 1, Query assigns a length of 5 to RESULT11, but a length of 2
is long enough.
188
Query for iSeries Use V5R2
In calculations involving many large fields, you can control your results better by breaking the expression
into parts, calculating each part as a separate result field. Then you can use these result fields in an
expression to calculate the result field you want. You can specify length and decimal positions for the
intermediate result fields to minimize the length of the final result field.
For example:
X12 = (1.2998 − P − Q)/((R + S) * (T − U)) + 6
Instead of defining result field X12 in one step as above, you could do it in three:
X12PART1 = 1.2998 − P − Q
X12PART2 = (R + S) * (T − U)
X12 = X12PART1/X12PART2 + 6
If the user knows that X12PART1, for example, is always a number between 0 and 1.2998, the user can
specify 5 for Len and 4 for Dec (on the Define Result Fields display) for X12PART1. This decreases the
length of X12.
Length and decimal positions used for internal numeric calculations in
Query for iSeries
The following formulas define the maximum length and decimal positions used internally by Query for
decimal calculations for numeric result fields. The maximum length and decimal positions do not
necessarily correspond with the presentation length and decimal positions assigned by Query. The
symbols p and d denote the length and decimal positions of the first operand. The symbols p1 and d1
denote the length and decimal positions of the second operand.
Addition and subtraction in Query for iSeries
The maximum length for the result field:
min(31,max(p-d,p1-d1)+max(d,d1)+1).
The maximum decimal positions:
max(d,d1).
Multiplication in Query for iSeries
The maximum length for the result field:
min(31,p+p1)
The maximum decimal positions:
min(31,d+d1).
Division in Query for iSeries
The maximum length for the result field:
31
The maximum decimal positions:
31-p+d-d1.
Chapter 17. Additional information about Query for iSeries for programmers
189
Example: Increasing the decimal precision for result fields in Query for
iSeries
Figure 5 has a result field with a current maximum precision of 31 (length) and 2 (decimal positions). The
decimal precision was derived from the calculation 31-29+9-9.
Define Result Fields
Type definitions using field names or constants and operators, press Enter.
Operators: +, -, *, /, SUBSTR, ||, DATE...
Field
Expression
Column Heading
RESULTA___ PRN299A/PRN299B__________________ ____________________
_________________________________ ____________________
_________________________________ ____________________
Len
__
Dec
__
__________ _________________________________ ____________________
_________________________________ ____________________
_________________________________ ____________________
__
__
__________ _________________________________ ____________________
_________________________________ ____________________
_________________________________ ____________________
__
__
Bottom
_______________________________________________________________________________
Field
Text
Len Dec
PRN299A
Field with precision of 29,9
29
9
PRN299B
Field with precision of 29,9
29
9
Bottom
F3=Exit
F5=Report
F9=Insert
F11=Display names only
F12=Cancel
F13=Layout
F20=Reorganize
F24=More keys
Figure 5. Decimal Precision Using Default
Note: The presentation length for RESULTA a would be 31,9. You can see this by pressing ″F13=Layout″.
To increase the decimal precision for the result field (RESULTA):
1. Assign each input field (PRN299A, PRN299B) directly to a result field.
2. Replace the input fields used in the original result field expression with the new result fields
(RESULT269, RESULT295).
3. Change the corresponding length (Len) and decimal positions (Dec) for the new result fields so that
the decimal precision sufficiently increases (see the previously listed formulas) for the original result
field (RESULTA).
In Figure 6 on page 191the RESULTA decimal precision is changed from 2 to 9. The new decimal
precision was derived from the calculation 31-26+9-5.
190
Query for iSeries Use V5R2
Define Result Fields
Type definitions using field names or constants and operators, press Enter.
Operators: +, -, *, /, SUBSTR, ||, DATE...
Field
Expression
Column Heading
RESULT269_ PRN299A__________________________ ____________________
_________________________________ ____________________
_________________________________ ____________________
Len
26
Dec
_9
RESULT295_ PRN299B__________________________ ____________________
_________________________________ ____________________
_________________________________ ____________________
29
_5
RESULTA___ RESULT269/RESULT295______________ ____________________
_________________________________ ____________________
_________________________________ ____________________
__
__
Bottom
_______________________________________________________________________________
Field
Text
Len Dec
PRN299A
Field with precision of 29,9
29
9
PRN299B
Field with precision of 29,9
29
9
Bottom
F3=Exit
F5=Report
F9=Insert
F11=Display names only
F12=Cancel
F13=Layout
F20=Reorganize
F24=More keys
Figure 6. Changing Decimal Precision
Selecting records (ignoring field case) in Query for iSeries
To select records ignoring the case, do one of the following:
v Define your own collating sequence such that uppercase and lowercase letters have the same weight.
v Use a system sort sequence with shared collating weights.
You must also set the Use collating sequence for all character comparisons option in the Select
Processing Options display to YES. If for some reason you cannot set this option, you will have to use an
EQ (equal) test alternative such as RANGE or a combination of LE (less than or equal) and GE (greater
than or equal). (This works only if there is no DBCS data involved.)
Note: Changing your collating sequence affects sorting, minimum, maximum, and report breaks. See
“CCSID conversions for Query for iSeries options and functions” on page 249 for more information
about how CCSIDs affect sorting, minimum, maximum, and report breaks.
Chapter 17. Additional information about Query for iSeries for programmers
191
192
Query for iSeries Use V5R2
Part 4. Appendixes
© Copyright IBM Corp. 2000, 2002
193
194
Query for iSeries Use V5R2
Appendix A. Differences between Query for iSeries and
Query/36
This appendix describes the differences between Query for iSeries and Query/36. The Query for iSeries
differences described in this appendix are limited to the differences that may cause you some
inconvenience if you did not know about them before working with Query for iSeries. This appendix
defines these differences as:
v Conceptual
v Operational
v Command
v Migration
Conceptual Differences
The following list identifies the concepts that are different on the iSeries system along with an explanation
of the differences as they apply to the listed concepts:
Subroutines
Queries were subroutine members in a library on System/36. On the iSeries system, queries are a
unique object type called a query definition (*QRYDFN) stored within a library. This change is
important to understand since some System/36 commands that work with subroutines may not
work on the iSeries system.
Files
Files are stored in libraries on the iSeries system, so a library name needs to be specified for
Query for iSeries in order for a file to be located. System/36 did not store files in libraries.
Operational Differences
The following list identifies the operations that are different on the iSeries system along with an
explanation of the differences as they apply to each listed item:
Linked files
If an IDDU-defined file that is migrated from System/36 is not linked, you can still run a query
against the file. However, the file will show as a one-field file (that is, if you were to run a default
query against the file, the file would appear as though all of the fields were run together).
File IDs
In Query/36, file IDs are one of the letters A through E. If a Query/36 query is migrated to the
iSeries system, all file IDs for files selected for that query remain the same. All files selected for a
query on Query for iSeries have a 1- to 3-character file ID that you specify, or it defaults to Tnn,
where nn is in the range of 01 to 32.
Joining files
In Query/36, you can join up to five files, and only one type of file join (matched records) is
allowed. In Query for iSeries, you can join up to 32 files, and three types of file join are allowed:
v Matched records
v Matched records with primary file
v Unmatched records with primary file
In Query/36, the maximum combined length of character fields used to join files is 120; in Query
for iSeries, the maximum is 2000.
Report breaks
Report breaks for printed requests may be different in spacing. In Query/36, the report skips one
line for report breaks unless it is defined to skip to a new page or defined to use double or triple
© Copyright IBM Corp. 2000, 2002
195
spacing. In Query for iSeries, the report skips an extra line for report breaks unless it is defined to
skip to a new page. This means the first detail line after a control break has an extra blank line
printed between it and the last detail line before the break.
Character fields
In Query/36, character fields that were defined in IDDU with a length greater than 256 bytes were
truncated at 256 bytes. Query for iSeries supports character fields up to 32 766 bytes in length.
Record selection tests that use these fields will now use the entire field for the comparisons
instead of just the first 256 bytes.
Sort sequence
If no sorting was specified in the query, the order in which records are printed in the report may be
different than the order they were printed in Query/36. Also, if sorting is specified but the field(s)
being sorted contain the same value in multiple records, the order in which these records appear
may be different from Query/36.
Result fields
Result fields that use multiplication or division operations in Query for iSeries may have a slightly
different result in the farthest right decimal positions as compared to Query/36. This occurs
because multiplication and division are carried out to a much greater precision in Query for
iSeries.
Calculation results
The results of multiplication and division operations are truncated according to the field length for
queries that are migrated from System/36. For queries defined using Query for iSeries, you can
specify that the results of multiplication and division operations be either truncated or rounded.
Output to file
When the output of a query is being sent to a file, Query for iSeries builds the file as a database
file with a definition. It is no longer necessary to build the IDDU definition and link that definition to
the file, as was needed on Query/36, unless the QRY or QRYRUN procedure was used to run the
query.
Summary-only output
When sending summary-only output to a file using Query for iSeries, each report break field
whose break level number is greater than the break level that this record was created for will
contain blanks for character fields and zeros for numeric fields. On System/36, these fields
contained binary zeros. The iSeries system operates this way to avoid putting incorrect data into
numeric fields.
Library default
The library default for the input file on the Specify File Selections display and the output file on the
Define Database File Output display is the library that was set up at configuration time for the
System/36 environment files.
Decimal data
In Query/36, decimal data errors were tolerated. When running a query using Query for iSeries,
decimal data errors are tolerated depending on the value specified on the Processing Options
display. For default queries and queries without the specified processing option value, Query
tolerates decimal data errors in the System/36 environment and does not tolerate them in the
OS/400 environment. See Chapter 14, “Specifying Query for iSeries processing options”, for more
information.
Message response
On System/36, a user could have an automatic response file set up to handle Query/36
messages. An automatic response file of this type does not handle Query for iSeries messages.
Printing
Printing with spooling set to N=NO does not operate the same on the OS/400 as it did on the
System/36. For more information see the Printer Device Programming book.
196
Query for iSeries Use V5R2
Command differences between System/36 and Query for iSeries
commands
The following table lists the System/36 Query commands and the equivalent OS/400 system commands (if
appropriate) plus some system commands that work with queries:
System/36
OS/400 System
QRY
WRKQRY
QRYRUN
RUNQRY
REMOVE
DLTQRY
FROMLIBR
SAVOBJ
HELP QUERY STRQRY
LIBRLIBR
CRTDUPOBJ
TOLIBR
RSTOBJ
Migration differences between System/36 and Query for iSeries
definitions
Query for iSeries definitions cannot be migrated to System/36.
Appendix A. Differences between Query for iSeries and Query/36
197
198
Query for iSeries Use V5R2
Appendix B. Practice exercise for Query for iSeries query
To do an exercise using query, you must first have a file set up with some data. This exercise takes you
through the following steps before you actually create a query:
v Creating an IDDU definition
v Creating a database file
v Entering data
If you already have a file on the system with data that you can use, you may want to skip directly to the
section on creating a query. If you do not care what type of data you are working with, you can create a
query that uses data from the QGPL library. This exercise is described in the last section of this appendix,
“Query for iSeries query exercise: Creating an advanced query” on page 215.
Query for iSeries query exercise: Creating an IDDU definition
In the following example, you are shown how to create the definitions for a name and address file. The
definitions are organized to be used with the work you can do in the data file utility task in the ADTS/400:
Data File Utility book.
1. You can type STRIDD (for the Start IDDU command) on any command line. Or you can go to the IDDU
main menu by choosing the IDDU option from either the Files menu or the Decision Support menu.
The Decision Support menu appears if you select option 2 (Office tasks) on the OS/400 Main Menu
and then option 3 (Decision support) on the Office Tasks menu.
2. Create a data dictionary by choosing option 2 (Work with data dictionaries) on the IDDU menu and
pressing the Enter key. (You do not need to do this if one exists in a library you can use. If a data
dictionary exists that you can use, go to step 6.)
3. Choose option 1 (Create) on the display, type the name of the library that will contain the dictionary,
and press the Enter key.
If you attempt to create a data dictionary and the named library does not exist, a message is
displayed that says Library not found. Press Enter to create. If you press the Enter key, you will
see the Create Library display. From this display you can create the library that will contain the data
dictionary. When you finish creating a library, you will continue to the Create Data Dictionary display.
4. On the Create Data Dictionary display, the name of the library appears as the name of the dictionary.
Later in this exercise, we will use a dictionary name of SYSDIC; you can replace SYSDIC with the name
of another dictionary.
5. You can accept the system-supplied values and press the Enter key. You also can type a brief
description in the Text prompt and choose to enter a long comment. If you type 1 (Select) in the Long
comment prompt, you are shown the Edit Long Comment display where you can type detailed
information about the dictionary. The dictionary is created when you end your work and press the
Enter key on that display.
The iSeries system can take some time to create the dictionary. It shows you a message when the
dictionary has been created. Then press F12 (Cancel) on the Work with Data Dictionary display to
return to the IDDU main menu.
6. Choose option 1 (Work with data definitions) on the IDDU main menu,
IDDU
Interactive Data Definition Utility (IDDU)
Select one of the following:
1. Work with data definitions
and press the Enter key.
© Copyright IBM Corp. 2000, 2002
199
7. You will name the file definition first, so select option 3 (File). (The name SYSDIC appears in the Data
dictionary prompt on the following display; what you see on your display is the name of the data
dictionary you just created, or the name of the data dictionary you last used. You may change the
data dictionary.)
Select Definition Type
Type choices, press Enter.
Definition type . . . . . . .
3
1=Field
2=Record format
3=File
Data dictionary . . . . . . .
SYSDIC
Name, F4 for list
Then press the Enter key.
8. When you see the Work with File Definitions display, choose option 1 (Create) and name the new file
definition. (We have used NAMEADDR as an example of a file definition name.)
Work with File Definitions
Dictionary. . . . . . . :
SYSDIC
Position to . . . . . . .
_____________ Starting characters
Type options (and File Definition), press Enter.
1=Create 2=Change 3=Copy 4=Delete
6=Print
7=Rename 8=Display where used
File
Opt Definition
Then press the Enter key.
9. When you see the Create File Definition display, select option 2 (Create single format) and accept the
system-supplied record format name (the system uses the file definition name and adds the letter R
to the end). You can type brief descriptive information in the Text prompt, as we have. Do not specify
anything in the Long comment prompt.
Create File Definition
Definition. . . . . . . :
NAMEADDR
Dictionary. . . . . . :
SYSDIC
Type choices, press Enter.
Record formats
option
. . . . . . . 2
1=Create and/or select formats
2=Create default format
and select fields
For choice 2=Create default format:
Format . . . . . . . default____ Name
Select key field
sequence . . . . . . N
Y=Yes, N=No
Long comment
1=Select, 4=Remove
Text
. . . . . _
. . . . . . . . .
practice definition for DFU and Query
Then press the Enter key.
10. You are now ready to create the field definitions that will be used by the record format definition you
just named. Name the first field definition by typing LASTNAME in the Field prompt. Use the sequence
number 10 that is already supplied on the display. Do not press the Enter key yet.
200
Query for iSeries Use V5R2
Create and Select Field Definitions
Definition. . . . . . :
NAMEADDRR
Dictionary. . . . . . :
SYSDIC
Position to . . . . . . . __________ Field, sequence (0-99999)
Type sequence numbers (0-99999), (and Field), press Enter.
Type field, press F6 to create.
Seq
10
Field
End
Seq
Field
End
Seq Field
End
LASTNAME
Now press F6. You will complete the description of the LASTNAME field definition (as well as naming
and describing the remainder of the field definitions) from the next display.
11. Complete the LASTNAME field description with its type, size, and any other descriptors, according to the
table shown below. Then name and describe the remainder of the field definitions.
Field Name
LASTNAME
FIRSTNAME
ADDRESS1
ADDRESS2
CITY
STATE
ZIP
AMOUNT
Field Type
Character
Character
Character
Character
Character
Character
Character
Numeric, 2 decimal positions
Size
15
10
20
20
15
2
9
6
Text
Last name
First name
Address line 1
Address line 2
City
State
Zip code
Amount
Create Field Definitions
Type information, press Enter to create.
Field type (size) . . : 1=Character (1-32766)
2=Numeric (1-31, decimal positions 0-31)
3=DBCS (4-32766, mixed; 1-16383, graphic)
4=Date/Time (no size)
More options. . . . . : Y=Yes
-------Field--------- Dec More
Name
Type Size Pos Opt
Text
LASTNAME
FIRSTNAME
ADDRESS1
ADDRESS2
CITY
STATE
ZIP
AMOUNT
Last name
First name
Address line 1
Address line 2
City
State
Zip code
Amount
1
1
1
1
1
1
1
2
15
10
20
20
15
2
9
6
__
__
__
__
__
__
__
2
_
_
_
_
_
_
_
_
12. When you have completed specifying the field characteristics, press the Enter key. The Create Field
Definitions display is shown again, and your fields have been created.
Appendix B. Practice exercise for Query for iSeries query
201
Create Field Definitions
Type information, press Enter to create.
Field type (size) . . : 1=Character (1-32766)
2=Numeric (1-31, decimal positions 0-31)
3=DBCS (4-32766, mixed; 1-16383, graphic)
4=Date/Time (no size)
More options. . . . . : Y=Yes
-------Field--------- Dec More
Name
Type Size Pos Opt
Text
__________ _
__________ _
__________ _
_____________________________________________
_____________________________________________
_____________________________________________
_____ __
_____ __
_____ __
_
_
_
Press the Enter key without making any changes to the display.
13. When you see the Create and Select Field Definitions display,
Create and Select Field Definitions
Definition............: NAMEADDRR
Dictionary............: SYSDIC
Position to . . . . . . . __________ Field, sequence (0-99999)
Type sequence numbers (0-99999), (and Field), press Enter.
Type field, press F6 to create.
Seq
Field
Seq
10
10
10
10
10
10
10
10
Field
LASTNAME
FIRSTNAME
ADDRESS1
ADDRESS2
CITY
STATE
ZIP
AMOUNT
End
Seq
Field
End
Seq Field
End
End
15
25
45
65
80
82
91
95
verify that the field names are arranged in the proper sequence. (When sequence numbers are the
same, the arrangement of the field names on the display determines the sequence of use in the
record.) If a field is out of sequence, type the necessary sequence numbers to indicate the correct
arrangement, and press the Enter key. When the fields are in the proper sequence, press the Enter
key without making any changes to the display.
14. You will then see the Work with File Definitions display where
Work with File Definitions
Dictionary. . . . . . . :
SYSDIC
Position to . . . . . . .
_____________ Starting characters
Type options (and File Definition), press Enter.
1=Create 2=Change 3=Copy 4=Delete
6=Print
7=Rename 8=Display where used
File
Opt Definition
202
Query for iSeries Use V5R2
you press F3 (Exit) without making any changes to the display.
You are finished creating the definitions describing a database file. The instructions to create the file
and to enter data into the file are described in the following sections.
Query for iSeries query exercise: Creating a database file
After you have completed creating the necessary file definitions, you can create the database file using the
Work with Database Files display. You can get to this display either from the main IDDU menu or by
entering the Work With DB Files Using IDDU (WRKDBFIDD) command.
You can create as many files as you require by entering a new file name each time you return to the
display. These file names might have a level of authority previously assigned to them (authority holder).
This affects the authority that you can assign.
To create a database file, do the following:
1. Choose option 3 (Work with database files) from the IDDU menu (or type WRKDBFIDD on a command
line).
2. On the Work with Database Files display, choose option 1 (Create), name the new file, and specify the
library that will contain the file.
Work with Database Files
Library . . . . . . .
Position to . . . . .
default___ Name,F4 for list
__________ Starting characters
Type options (and Database file), press Enter.
1=Create 2=Enter data
Database
Opt File
Database
Opt File
Database
Opt File
Database
Opt File
3. Press the Enter key. The Create Database File display is shown with the names of the new file and its
library.
On this display, specify NAMEADDR for the file definition, SYSDIC for the dictionary (or the name of the
dictionary you created in the previous section of this appendix), and *CHANGE for the authority others
have to this file.
Create Database File
File . . . :
NAMEADDR
Library . . . . :
YOURLIB
Type choices, press Enter.
Related definition information:
File definition
. . . . . .
NAMEADDR
Name, F4 for list
Dictionary . . . . . . . . .
SYSDIC
Name, F4 for list
Authority
*CHANGE
*LIBCRTAUT, *ALL, *CHANGE
*USE, *EXCLUDE
Authorization list name
. . . . . . . . .
4. Press the Enter key to create the file. When the file is created, the system automatically links the file to
its file definition.
Press F3 (Exit) to return to the IDDU menu.
Query for iSeries query exercise: Entering data
To enter data into the file, do the following:
Appendix B. Practice exercise for Query for iSeries query
203
1. Choose option 3 (Work with database files) from the IDDU menu (or type WRKDBFIDD on a command
line).
2. On the Work with Database Files display, specify option 2 (Enter data), NAMEADDR for the file name, and
your library for the library name.
Work with Database Files
Library . . . . . . .
Position to . . . . .
default___ Name,F4 for list
__________ Starting characters
Type options (and Database file), press Enter.
1=Create 2=Enter data
Database
Opt File
Database
Opt File
Database
Opt File
Database
Opt File
3. Press the Enter key. The Work with Data in a File display is shown.
WORK WITH DATA IN A FILE
Format . . . . :
NAMEADDR
Mode . . . . :
File . . . . :
ENTRY
NAMEADDR
LASTNAME:
FIRSTNAME:
ADDRESS1:
ADDRESS2:
CITY:
STATE:
ZIP:
AMOUNT:
F3=Exit
F9=Insert
F5=Refresh
F10=Entry
F6=Select format
F11=Change
4. Type the information shown on the following display, but do not press the Enter key. After you have
typed in the amount, press the Field Exit key first and then press the Enter key.
204
Query for iSeries Use V5R2
WORK WITH DATA IN A FILE
Format . . . . :
NAMEADDR
LASTNAME:
FIRSTNAME:
ADDRESS1:
ADDRESS2:
CITY:
STATE:
ZIP:
AMOUNT:
Mode . . . . :
File . . . . :
ENTRY
NAMEADDR
SIMPSON
FRANK
1722 ORANGE STREET
RIDGEWAY
CA
72430
9998
F3=Exit
F9=Insert
F5=Refresh
F10=Entry
F6=Select format
F11=Change
5. The Work with Data in a File display is shown again, but the fields are blank, ready for you to continue
adding more data.
6. Continue adding the following data to the Work with Data in a File display:
LASTNAME
FIRSTNAME ADDRESS1
Daye
Ben
Patterson
Tammy
Barker
Rick
Sedgewick
Lillian
Skoggen
Linda
Golinero
Sebastin
Lien
Sue
Sedgewick
Leona
Skoggen
Charles
ADDRESS2
1312 Elm
Apt C
Street
4 Ridgeview
Court
1432 Le
Grand Blvd
200 Park
Lane
Circle Court
NE
7196 Thomas
Street
469 Jackson
Street
21st Cannery Apt 43
Row
401 Abbey
Road
CITY
STATE
ZIP
AMOUNT
Marshill
AK
77901
456
Marshill
AK
77901
501
Emmerson
LA
71282
938
Emmerson
LA
71282
25
Truman
NC
57432
764
Highpoint
MN
55909
00
Ridgeway
CA
72430
00
Emmerson
LA
71282
45
Truman
NC
57432
629
7. After you have added all your data and the Work with Data in a File display is shown with blank fields,
press F3 (Exit). The End Data Entry display is shown.
Appendix B. Practice exercise for Query for iSeries query
205
End Data Entry
Number of records processed
Added . . . . . :
Changed . . . . :
Deleted . . . . :
10
0
0
Type choice, press Enter.
End data entry
. . . . . . .
Y
Y=Yes, N=No
You do not need to change anything on this display. Press the Enter key.
8. The Work with Database Files display is shown.
Work with Database Files
Library . . . . . . .
Position to . . . . .
default__ Name,F4 for list
__________ Starting characters
Type options (and Database file), press Enter.
1=Create 2=Enter data
Database
Opt File
Database
Opt File
Database
Opt File
Database
Opt File
F3=Exit
F4=Prompt
F5=Refresh
F11=Display text
F12=Cancel F21=Work with definitions
F22=Work with data dictionaries
Data for file NAMEADDR in YOURLIB was changed.
A message on the bottom of the display tells you that data in your file was changed.
9. Press F3 (Exit), and you see the menu that you started from.
An audit log is automatically printed showing all the data you entered.
Query for iSeries query exercise: Creating and running a query
In the following exercise, you create and change a query that produces a report that lists all the
information in the file NAMEADDR or any other file that may already exist on your system. NAMEADDR is a file
definition that you created in the previous example using IDDU.
NAMEADDR contains names and addresses and includes the following information:
v Last name
v First name
v Address 1
v Address 2
v City
v State
v Zip code
206
Query for iSeries Use V5R2
v Amount
After you create and save the query, you run it as it exists and then change the query and run it again.
Query for iSeries query exercise: Creating a query
In this exercise, you create a query that lists on your display all the information in the file NAMEADDR in the
order the information exists in the file.
This exercise asks you to save the query you create in a library. You will probably want to use your own
library. If you do not have a library or do not know how to create one, see the person responsible for
libraries on your system.
1. Go to the Work with Queries display by typing WRKQRY on any command line.
2. On the Work with Queries display type a 1 (Create) for the Option prompt, xxxQRY for the Query
prompt (using your initials instead of xxx), and the name of your library for the Library prompt.
Work with Queries
Type choices, press Enter.
Option
. . . . . . .
Query
. . . . . . .
Library . . . . . .
F3=Exit
1
KJOQRY
YOURLIB
F4=Prompt
1=Create, 2=Change, 3=Copy, 4=Delete
5=Display, 6=Print definition
8=Run in batch, 9=Run
Name, F4 for list
Name, *LIBL, F4 for list
F5=Refresh
F12=Cancel
3. Press the Enter key. The Define the Query display is shown.
Define the Query
Query . . . . . . :
KJOQRY
Library . . . . . :
YOURLIB
Option . . . . . :
CCSID . . . . . . :
CREATE
37
Type options, press Enter. Press F21 to select all.
1=Select
Opt
1
_
_
_
_
_
_
_
_
_
_
Query Definition Option
Specify file selections
Define result fields
Select and sequence fields
Select records
Select sort fields
Select collating sequence
Specify report column formatting
Select report summary functions
Define report breaks
Select output type and output form
Specify processing options
F3=Exit
F13=Layout
F5=Report
F18=Files
F12=Cancel
F21=Select all
Appendix B. Practice exercise for Query for iSeries query
207
Notice that Query has already supplied a 1 for the Specify file selections option on this display. This
is because whenever you create a query, you must specify a file, but you do not have to select any
other options on this display.
4. Press the Enter key, and the Specify File Selections display is shown.
Specify File Selections
Type choices, press Enter. Press F9 to specify an additional
file selection.
File . . .
Library
Member . .
Format . .
.
.
.
.
.
.
.
.
F3=Exit
F12=Cancel
.
.
.
.
.
.
.
.
.
.
.
.
.
.
.
.
.
.
.
.
__________
QGPL
*FIRST
*FIRST
F4=Prompt
F13=Layout
Name,
Name,
Name,
Name,
F4 for list
*LIBL, F4 for list
*FIRST, F4 for list
*FIRST, F4 for list
F5=Report
F24=More keys
F9=Add file
BOTTOM
This display is where you tell Query what database file(s) you want to query for the data in your
report.
5. Type NAMEADDR for the File prompt, the name for the library that contains the file for the Library
prompt, and leave the Format and Member prompts as they are shown.
Specify File Selections
Type choices, press Enter. Press F9 to specify an additional
file selection.
File . . .
Library
Member . .
Format . .
F3=Exit
F12=Cancel
.
.
.
.
.
.
.
.
.
.
.
.
.
.
.
.
.
.
.
.
.
.
.
.
.
.
.
.
F4=Prompt
F13=Layout
NAMEADDR
YOURLIB
*FIRST
NAMEADDRR
Name,
Name,
Name,
Name,
F5=Report
F24=More keys
F4 for list
*LIBL, F4 for list
*FIRST, F4 for list
*FIRST, F4 for list
F9=Add file
6. Press the Enter key. The Specify File Selections display is shown again with the message Select
file(s), or press Enter to confirm. displayed at the bottom.
208
Query for iSeries Use V5R2
Specify File Selections
Type choices, press Enter. Press F9 to specify an additional
file selection.
File . . .
Library
Member . .
Format . .
.
.
.
.
.
.
.
.
.
.
.
.
.
.
.
.
.
.
.
.
.
.
.
.
.
.
.
.
NAMEADDR
YOURLIB
*FIRST
NAMEADDRR
Name,
Name,
Name,
Name,
F3=Exit
F4=Prompt
F5=Report
F12=Cancel
F13=Layout
F24=More keys
Select file(s), or press Enter to confirm.
F4 for list
*LIBL, F4 for list
*FIRST, F4 for list
*FIRST, F4 for list
F9=Add file
7. Press the Enter key. The Define the Query display is shown with the message Select options, or
press F3 to save or run the query. displayed at the bottom.
Define the Query
Query . . . . . . :
KJOQRY
Library . . . . . :
YOURLIB
Option . . . . . :
CCSID . . . . . . :
CREATE
37
Type options, press Enter. Press F21 to select all.
1=Select
Opt
_
_
_
_
_
_
_
_
_
_
_
Query Definition Option
> Specify file selections
Define result fields
Select and sequence fields
Select records
Select sort fields
Select collating sequence
Specify report column formatting
Select report summary functions
Define report breaks
Select output type and output form
Specify processing options
F3=Exit
F5=Report
F12=Cancel
F13=Layout
F18=Files
F21=Select all
Select options, or press F3 to save or run the query.
The Specify file selections option has a > shown in the Opt column to indicate that it is a previously
defined option.
8. Press F3 (Exit). The Exit This Query display is shown.
Query supplies a Y (Yes) in the Save definition prompt and a 1 (Run interactively) in the Run option
prompt because it assumes you want to both save the query definition object and run the query.
Leave these defaults in both prompts.
9. Type Lists customer names and addresses for the Text prompt.
10. Type *CHANGE for the Authority prompt.
Appendix B. Practice exercise for Query for iSeries query
209
Exit This Query
Type choices, press Enter.
Save definition . . .
Y
Y=Yes, N=No
Run option . . . . . .
1
1=Run interactively
2=Run in batch
3=Do not run
For a saved definition:
Query . . . . . . .
Library . . . . .
KJOQRY
YOURLIB
Name
Name, F4 for list
Text
. . . .
Authority
F4=Prompt
. . . . .
Lists customer names and addresses
*CHANGE
F5=Report
*LIBCRTAUT, *ALL, *CHANGE,
*EXCLUDE, *USE
authorization list name
F13=Layout
F14=Define the query
11. Press the Enter key to save the query definition object and run the query.
The report produced by the query is shown on your display:
Display Report
Query . . . :
YOURLIB/KJOQRY
Report width . . . . . : 117
Position to (Line) . . . .
______
Shift to column . . . . . .
_____
Line ....+....1....+....2....+....3....+....4....+....5....+....6....+....7...
LASTNAME
FIRSTNAME ADDRESS1
ADDRESS2
000001 SIMPSON
FRANK
1722 ORANGE STREET
000002 DAYE
BEN
1312 ELM STREET
APT C
000003 SEDGEWICK
LILLIAN
200 PARK LANE
000004 LIEN
SUE
469 JACKSON STREET
000005 PATTERSON
TAMMY
4 RIDGEVIEW COURT
000006 SKOGGEN
LINDA
CIRCLE COURT NE
000007 SEDGEWICK
LEONA
21ST CANNERY ROW
APT 43
000008 BARKER
RICK
1432 LE GRAND BLVD
000009 GOLINERO
SEBASTIN
7196 THOMAS STREET
000010 SKOGGEN
CHARLES
401 ABBEY ROAD
****** ******** End of report ********
F3=Exit
F12=Cancel
F19=Left
F20=Right
F21=Split
F22=Width
Bottom
The report lists all the information in the file NAMEADDR. The data, including column headings, was
defined to the system using IDDU.
Press F20 (Right) to see the right side of the report.
12. Press F3 (Exit). The Work with Queries display is shown.
A message is shown on the bottom of the display confirming that the query was processed
successfully.
210
Query for iSeries Use V5R2
Work with Queries
Type choices, press Enter.
Option
. . . . . . .
Query
. . . . . . .
Library . . . . . .
_
KJOQRY
YOURLIB
1=Create, 2=Change, 3=Copy, 4=Delete
5=Display, 6=Print definition
8=Run in batch 9=Run
Name, F4 for list
Name, *LIBL, F4 for list
F3=Exit
F4=Prompt
F5=Refresh
Query option processing completed successfully.
F12=Cancel
Query for iSeries query exercise: Changing a query
If you want a report of only those customers who live in the state of Louisiana, you need to change the
query to list customers from that state only.
1. Type a 2 (Change) for the Option prompt on the Work with Queries display.
2. Type xxxQRY (where xxx are your initials) for the Query prompt if xxxQRY is not shown as the query
name.
3. Type the library name you used in the previous exercise for the Library prompt, if that is not the
library name already shown.
Work with Queries
Type choices, press Enter.
Option
. . . . . . .
Query
. . . . . . .
Library . . . . . .
2
KJOQRY
YOURLIB
1=Create, 2=Change, 3=Copy, 4=Delete
5=Display, 6=Print definition
8=Run in batch 9=Run
Name, F4 for list
Name, *LIBL, F4 for list
F3=Exit
F4=Prompt
F5=Refresh
Query option processing completed successfully.
F12=Cancel
4. Press the Enter key. The Define the Query display is shown.
5. Type a 1 for the Select records prompt.
Appendix B. Practice exercise for Query for iSeries query
211
Define the Query
Query . . . . . . :
KJOQRY
Library . . . . . :
YOURLIB
Option . . . . . :
CCSID . . . . . . :
CHANGE
37
Type options, press Enter. Press F21 to select all.
1=Select
Opt
_
_
1
_
_
_
_
_
_
_
Query Definition Option
> Specify file selections
Define result fields
Select and sequence fields
Select records
Select sort fields
Select collating sequence
Specify report column formatting
Select report summary functions
Define report breaks
Select output type and output form
Specify processing options
F3=Exit
F13=Layout
F5=Report
F18=Files
F12=Cancel
F21=Select all
6. Press the Enter key. The Select Records display is shown.
Select Records
Type comparisons, press Enter. Specify OR to start each new group.
Tests: EQ, NE, LE, GE, LT, GT, RANGE, LIST, LIKE, IS, ISNOT...
AND/OR Field
______________
____ ______________
____ ______________
____ ______________
____ ______________
____ ______________
Test
_____
_____
_____
_____
_____
_____
Field
LASTNAME
FIRSTNAME
ADDRESS1
ADDRESS2
CITY
Text
Last name
First name
Address line 1
Address line 2
City
F3=Exit
F12=Cancel
F5=Report
F13=Layout
Value (Field, Number, or ’Characters’)
______________________________
______________________________
______________________________
______________________________
______________________________
______________________________
Bottom
Len Dec
15
10
20
20
15
F9=Insert
F20=Reorganize
F11=Display names only
F24=More keys
The fields in the file NAMEADDR are listed on the bottom portion of this display. (If your display is not in
single-column list format, that is the Text, Len, and Dec prompts are not shown, press F11.) You can
move your cursor to any place in the list and press the Page Down key to see more field names.
7. Complete the Field, Test, and Value columns on the display as follows:
212
Query for iSeries Use V5R2
Select Records
Type comparisons, press Enter. Specify OR to start each new group.
Tests: EQ, NE, LE, GE, LT, GT, RANGE, LIST, LIKE, IS, ISNOT...
AND/OR Field
STATE
____ ______________
____ ______________
____ ______________
____ ______________
Field
LASTNAME
FIRSTNAME
ADDRESS1
ADDRESS2
CITY
F3=Exit
F12=Cancel
Test
EQ
_____
_____
_____
_____
Value (Field, Number, or ’Characters’)
’LA’
______________________________
______________________________
______________________________
______________________________
Bottom
Text
Last name
First name
Address line 1
Address line 2
City
F5=Report
F13=Layout
Len Dec
15
10
20
20
15
More...
F11=Display names only
F24=More keys
F9=Insert
F20=Reorganize
This tells Query for iSeries to test the field named STATE in each record for the value LA. Only records
with that value will be included in your report. (If you are using a unique weight system sort sequence
table or *HEX, make sure you type it as ’LA’ because the apostrophes tell the program that LA is
what the field contains and not the field name. You must also type this value in all uppercase letters
because that is the way it is specified in the field. If you have any doubt about the case of the data in
the database, you should use a shared weight table.)
8. Press F5 (Report) to run the query and show the report. F5 lets you see the effect your query
changes have on the report before you actually save those changes.
The report appears listing only customers in Louisiana (only the left portion of the report is shown on
the following display):
Display Report
Report width . . . . . :
117
Position to line . . . . . ______
Shift to column . . . . . .
_____
Line ....+....1....+....2....+....3....+....4....+....5....+....6....+....7...
LASTNAME
FIRSTNAME ADDRESS1
ADDRESS2
000001 SEDGEWICK
LILLIAN
200 PARK LANE
000002 SEDGEWICK
LEONA
21ST CANNERY ROW
APT 43
000003 BARKER
RICK
1432 LE GRAND BLVD
****** ******** End of Report ********
F3=Exit
F12=Cancel
F19=Left
F20=Right
F21=Split
Bottom
F22=Width 80
9. Press F20 to display the right portion of the report.
Appendix B. Practice exercise for Query for iSeries query
213
Display Report
Report width . . . . . :
117
Position to line . . . . . ______
Shift to column . . . . . .
_____
Line ....+....1....+....2....+....3....+....4....+....5....+....6....+....7...
ADDRESS2
CITY
STATE ZIP
AMOUNT
000001
EMMERSON
LA
71282
.25
000002
APT 43
EMMERSON
LA
71282
.45
000003 VD
EMMERSON
LA
71282
9.38
****** ******** End of Report ********
F3=Exit F12=Cancel F19=Left
Last column of report.
F20=Right
F21=Split
Bottom
F22=Width 80
10. Press F3 (Exit), F12 (Cancel), or the Enter key to return to the Select Records display. Then press F3
(Exit). The Exit This Query display is shown.
Exit This Query
Type choices, press Enter.
Save definition . . .
Y
Y=Yes, N=No
Run option . . . . . .
1
1=Run interactively
2=Run in batch
3=Do not run
Query . . . . . . .
Library . . . . .
KJOQRY
YOURLIB
Name
Name, F4 for list
Text
Lists customer names and addresses
For a saved definition:
Authority
F4=Prompt
. . . . . .
. . . . .
F5=Report
*CHANGE
*LIBCRTAUT, *CHANGE, *ALL
*EXCLUDE, *USE
authorization list name
F13=Layout
F14=Define the query
You can use this display to run the query with the changes you made. You can also choose to make
the query changes either permanent or for this time only. Because you may never again want a report
that lists only customers in Louisiana, you may not want to make the changes permanent. And
because you have already used F5 to run the query and see the report, you do not want to run the
query again.
11. Fill in the Exit This Query display as follows:
214
Query for iSeries Use V5R2
Exit This Query
Type choices, press Enter.
Save definition . . .
N
Y=Yes, N=No
Run option . . . . . .
3
1=Run interactively
2=Run in batch
3=Do not run
Query . . . . . . .
Library . . . . .
CEBQRY
YOURLIB
Name
Name, F4 for list
Text
. . . . .
Lists customer names and addresses
Authority
. . . . .
*CHANGE
For a saved definition:
F4=Prompt
F5=Report
*LIBCRTAUT, *CHANGE, *ALL
*EXCLUDE, *USE
authorization list name
F13=Layout
F14=Define the query
12. Press the Enter key. The Work with Queries display is shown.
Work with Queries
Type choices, press Enter.
Option
. . . . . . .
Query
. . . . . . .
Library . . . . . .
CEBQRY
YOURLIB
1=Create, 2=Change, 3=Copy, 4=Delete
5=Display, 6=Print definition
8=Run in batch 9=Run
Name, F4 for list
Name, *LIBL, F4 for list
F3=Exit
F4=Prompt
F5=Refresh
Query option processing completed successfully.
F12=Cancel
To sign off the system or use it for something other than Query, press F3 (Exit) to return to the menu
from which you chose to use Query.
Query for iSeries query exercise: Creating an advanced query
In the following example, you create a file named QRYFILE by using the Display Object Description
(DSPOBJD) command. The file contains descriptions of all the objects that currently reside in the QGPL
library. Then, using several of Query’s definition step options, you create a query definition that obtains
information from QRYFILE and creates a report showing that information.
Note: This example does not explain the DSPOBJD command and its parameters. For additional
information, see the CL Reference information in the iSeries Information Center.
Appendix B. Practice exercise for Query for iSeries query
215
1. On the command line of the OS/400 Main Menu, type the DSPOBJD command as shown on the
following display and press the Enter key. This creates the file named QRYFILE and puts it in the
library QGPL.
Note: When you type *ALL for the OBJTYPE parameter, you must include a space after *ALL or you
will receive an error message. You must type in the entire command exactly as it appears on
the display that follows.
MAIN
OS/400 Main Menu
Select one of the following:
1.
2.
3.
4.
5.
6.
7.
8.
9.
System:
RCH38342
User tasks
Office tasks
General system tasks
Files, libraries, and folders
Programming
Communications
Define or change the system
Problem handling
Display a menu
90. Sign off
Selection or command
===> DSPOBJD OBJ(QGPL/*ALL) OBJTYPE(*ALL ) OUTPUT(*OUTFILE) OUTFILE(QGPL/QRYFIL
E)
F3=Exit F4=Prompt F9=Retrieve F12=Cancel
F13=User support
F23=Set initial menu
(C) COPYRIGHT IBM CORP. 1980, 1991.
2. Type WRKQRY on the command line and press the Enter key.
MAIN
OS/400 Main Menu
Select one of the following:
1.
2.
3.
4.
5.
6.
7.
8.
9.
System:
RCH38342
User tasks
Office tasks
General system tasks
Files, libraries, and folders
Programming
Communications
Define or change the system
Problem handling
Display a menu
90. Sign off
Selection or command
===> WRKQRY
F3=Exit F4=Prompt
F23=Set initial menu
F9=Retrieve
F12=Cancel
F13=User support
3. The Work with Queries display is shown. On this display, choose option 1 (Create). Then name your
query by typing a name in the Query prompt, and specify the library where your query will be stored
by typing a name in the Library prompt. Press the Enter key.
216
Query for iSeries Use V5R2
Work with Queries
Type choices, press Enter.
Option
. . . . . . .
Query . . . . . . . .
Library . . . . . .
F3=Exit
F4=Prompt
1
1=Create, 2=Change, 3=Copy, 4=Delete
5=Display, 6=Print definition
8=Run in batch 9=Run
QNAME
YOURLIB
Name, F4 for list
Name, *LIBL, F4 for list
F5=Refresh
F12=Cancel
(C) COPYRIGHT IBM CORP. 1988, 1991
4. On the Define the Query display, select definition steps Select and sequence fields, Select records,
Select sort fields, Specify report column formatting, Select report summary functions, and Define
report breaks by typing a 1 to the left of each of them. (Notice that Specify file selections is already
selected for you.) Press the Enter key.
Define the Query
Query . . . . . . :
Library . . . . :
QNAME
YOURLIB
Option . . . . . :
CCSID . . . . . . :
CREATE
37
Type options, press Enter. Press F21 to select all.
1=Select
Opt
1
1
1
1
1
1
1
Query Definition Option
Specify file selections
Define result fields
Select and sequence fields
Select records
Select sort fields
Select collating sequence
Specify report column formatting
Select report summary functions
Define report breaks
Select output type and output form
Specify processing options
F3=Exit
F13=Layout
F5=Report
F18=Files
F12=Cancel
F21=Select all
Query presents the selected definition step displays to you in the order in which they are listed on the
Define the Query display.
5. On the Specify File Selections display, which is the first display shown after the Define the Query
display, type QRYFILE in the File prompt and QGPL in the Library prompt. The Member and Format
prompts already are filled in for you. Press the Enter key.
Appendix B. Practice exercise for Query for iSeries query
217
Specify File Selections
Type choices, press Enter. Press F9 to specify an additional
file selection.
File . . .
Library
Member . .
Format . .
.
.
.
.
.
.
.
.
F3=Exit
F12=Cancel
.
.
.
.
.
.
.
.
.
.
.
.
.
.
.
.
.
.
.
.
QRYFILE
QGPL
*FIRST
*FIRST
F4=Prompt
F13=Layout
Name,
Name,
Name,
Name,
F4 for list
*LIBL, F4 for list
*FIRST, F4 for list
*FIRST, F4 for list
F5=Report
F24=More keys
F9=Add file
The message Select file(s), or press Enter to confirm. appears.
Specify File Selections
Type choices, press Enter. Press F9 to add.
File . . .
Library
Member . .
Format . .
.
.
.
.
.
.
.
.
.
.
.
.
.
.
.
.
.
.
.
.
.
.
.
.
.
.
.
.
QRYFILE
QGPL
*FIRST
QLIDOBJD
Name,
Name,
Name,
Name,
F3=Exit
F4=Prompt
F5=Report
F12=Cancel
F13=Layout
F24=More keys
Select file(s), or press Enter to confirm.
F4 for list
*LIBL, F4 for list
*FIRST, F4 for list
*FIRST, F4 for list
F9=Add file
Press the Enter key again.
6. The next display to appear is the Select and Sequence Fields display.
218
Query for iSeries Use V5R2
Select and Sequence Fields
Type sequence number (0-9999) for the names of up to 500 fields to
appear in the report, press Enter.
Seq
Field
ODDCEN
ODDDAT
ODDTIM
ODLBNM
ODOBNM
ODOBTP
ODOBAT
ODOBFR
ODOBSZ
ODOBTX
ODOBLK
ODOBDM
F3=Exit
F13=Layout
Seq
F5=Report
F20=Renumber
Field
ODCCEN
ODCDAT
ODCTIM
ODOBOW
ODSCEN
ODSDAT
ODSTIM
ODSCMD
ODSSZE
ODSSLT
ODSDEV
ODSV01
Seq
F11=Display text
F21=Select all
Field
ODSV02
ODSV03
ODSV04
ODSV05
ODSV06
ODSV07
ODSV08
ODSV09
ODSV10
ODSVMR
ODRCEN
ODRDAT
More...
F12=Cancel
F24=More keys
If your display is in multiple-column format (that is, if the Text, Len, and Dec columns are not shown),
press F11 (Display text) to show some additional information about the fields in the list. Select the
fields ODLBNM, ODOBTP, ODOBAT, ODOBSZ, and ODOBTX by typing the numbers 1 through 5 to the left of
them as shown below. The fields you select are the fields that will appear in your query report, in the
order that you specify (ODLBNM will appear first, followed by ODOBPT, and so on).
Note: You must select fields that you plan to sort on.
Select and Sequence Fields
Type sequence number (0-9999) for the names of up to 500 fields to
appear in the report, press Enter.
Seq
1
2
3
4
5
Field
ODDCEN
ODDDAT
ODDTIM
ODLBNM
ODOBNM
ODOBTP
ODOBAT
ODOBFR
ODOBSZ
ODOBTX
ODOBLK
ODOBDM
F3=Exit
F13=Layout
Text
DISPLAY CENTURY
Display date: Format- MMDDYY
DISPLAY TIME
LIBRARY
OBJECT
OBJECT TYPE
OBJECT ATTRIBUTE
Storage freed: 0-Not freed,1-Freed
OBJECT SIZE
TEXT DESCRIPTION
Object locked: 0-Not locked,1-Locked
Object damaged: 0-Not damaged,1-Damaged
F5=Report
F20=Renumber
F11=Display names only
F21=Select all
Len Dec
1
6 x
6
10
10
8
10
1
10
0
50
1
1
More...
F12=Cancel
F24=More keys
Press the Enter key. Query rearranges the fields on the display so that the fields you selected are
shown at the top of the list in the order that you specified. The message Press Enter to confirm. is
also shown.
Appendix B. Practice exercise for Query for iSeries query
219
Select and Sequence Fields
Type sequence number (0-9999) for the names of up to 500 fields to
appear in the report, press Enter.
Seq
1
2
3
4
5
Field
ODLBNM
ODOBTP
ODOBAT
ODOBSZ
ODOBTX
ODDCEN
ODDDAT
ODDTIM
ODOBNM
ODOBFR
ODOBLK
ODOBDM
Text
LIBRARY
OBJECT TYPE
OBJECT ATTRIBUTE
OBJECT SIZE
TEXT DESCRIPTION
DISPLAY CENTURY
Display date: Format- MMDDYY
DISPLAY TIME
OBJECT
Storage freed: 0-Not freed,1-Freed
Object locked: 0-Not locked,1-Locked
Object damaged: 0-Not damaged,1-Damaged
F3=Exit
F5=Report
F13=Layout
F20=Renumber
Press Enter to confirm.
F11=Display names only
F21=Select all
Len Dec
10
8
10
10
0
50
1
6
6
10
1
1
1
More...
F12=Cancel
F24=More keys
Press the Enter key again.
7. The next display shown is the Select Records display. Here, you specify which records you want
included in your report.
Select Records
Type comparisons, press Enter. Specify OR to start each new group.
Tests: EQ, NE, LE, GE, LT, GT, RANGE, LIST, LIKE, IS, ISNOT...
AND/OR Field
Test
Value (Field, Number, or ’Characters’)
Bottom
Field
ODLBNM
ODOBTP
ODOBAT
ODOBSZ
ODOBTX
F3=Exit
F12=Cancel
Text
LIBRARY
OBJECT TYPE
OBJECT ATTRIBUTE
OBJECT SIZE
TEXT DESCRIPTION
F5=Report
F13=Layout
F9=Insert
F20=Reorganize
Len Dec
10
8
10
10
0
50
More...
F11=Display names only
F24=More keys
For your report, you want all records for objects with an object type of either *FILE or *PGM. Type the
information in the Field, Test, and Value columns as shown in the following display. Do not press the
Enter key just yet.
220
Query for iSeries Use V5R2
Select Records
Type comparisons, press Enter. Specify OR to start each new group.
Tests: EQ, NE, LE, GE, LT, GT, RANGE, LIST, LIKE, IS, ISNOT...
AND/OR Field
ODOBTP
Test
LIST
Value (Field, Number, or ’Characters’)
’*FILE’ ’*PGM’
Bottom
Field
ODLBNM
ODOBTP
ODOBAT
ODOBSZ
ODOBTX
F3=Exit
F12=Cancel
Text
LIBRARY
OBJECT TYPE
OBJECT ATTRIBUTE
OBJECT SIZE
TEXT DESCRIPTION
F5=Report
F13=Layout
F9=Insert
F20=Reorganize
Len Dec
10
8
10
10
0
50
More...
F11=Display names only
F24=More keys
8. Now display your report by pressing F5 (Report). The Display Report display appears showing your
query report, which is based on the query you have defined up to this point. (The information you see
on your display depends on the objects that are currently in QGPL on your system. What you see
may not match what is shown in the display that follows.)
Display Report
Report width . . . . . :
100
Position to line . . . . .
Shift to column . . . . . .
Line ....+....1....+....2....+....3....+....4....+....5....+....6....+....7...
LIBRARY
OBJECT
OBJECT
OBJECT TEXT DESCRIPTION
TYPE
ATTRIBUTE
SIZE
000001 QGPL
*PGM
CLP
14,336
B & R Example - Page 2
000002 QGPL
*PGM
CLP
16,384
B & R Example - page 2
000003 QGPL
*FILE
PF
8,192
000004 QGPL
*FILE
PF
1,024 Default source data ba
000005 QGPL
*FILE
PF
1,024 Default source data ba
000006 QGPL
*FILE
PF
16,384 Default source data ba
000007 QGPL
*FILE
DKTF
2,560 Default diskette data
000008 QGPL
*FILE
DKTF
2,560 Default source diskett
000009 QGPL
*FILE
PF
1,024 Default source data ba
000010 QGPL
*FILE
PF
140,288 RSTS36FLR COMMAND
000011 QGPL
*FILE
PRTF
2,048 Default spool output p
000012 QGPL
*FILE
PRTF
2,048 Default spool print fi
000013 QGPL
*FILE
PRTF
2,048 Default spool print fi
000014 QGPL
*FILE
PF
38,912 Outfile for DSPOBJD
000015 QGPL
*FILE
PF
16,384
More...
F3=Exit F12=Cancel F19=Left F20=Right F21=Split F22=Width 80
On the bottom far right side of the display, the message More... appears. This means that all of the
report does not fit on the display, so if you want to see all of the report, you can use the page keys or
F20 (Right) and F19 (Left) to page through the report (both left to right and top to bottom). When you
have finished looking at the report, press F3 (Exit) to return to the Select Records display.
Appendix B. Practice exercise for Query for iSeries query
221
Select Records
Type comparisons, press Enter. Specify OR to start each new group.
Tests: EQ, NE, LE, GE, LT, GT, RANGE, LIST, LIKE, IS, ISNOT...
AND/OR Field
ODOBTP
Test
LIST
Value (Field, Number, or ’Characters’)
’*FILE’ ’*PGM’
Bottom
Field
ODLBNM
ODOBTP
ODOBAT
ODOBSZ
ODOBTX
F3=Exit
F12=Cancel
Text
LIBRARY
OBJECT TYPE
OBJECT ATTRIBUTE
OBJECT SIZE
TEXT DESCRIPTION
F5=Report
F13=Layout
Len Dec
10
8
10
10
0
50
F9=Insert
F20=Reorganize
More...
F11=Display names only
F24=More keys
On the Select Records display, press the Enter key.
9. The next display to appear is the Select Sort Fields display. Here you specify which fields you want
Query to use to sort the selected records for your report. You want the records sorted first by object
type and then by object size, so type a 1 next to ODOBTP and a 2 next to ODOBSZ as shown below.
Select Sort Fields
Type sort priority (0-999) and A (Ascending) or D (Descending) for
the names of up to 32 fields, press Enter.
Sort
Prty A/D Field
ODLBNM
1
ODOBTP
ODOBAT
2
ODOBSZ
ODOBTX
Text
LIBRARY
OBJECT TYPE
OBJECT ATTRIBUTE
OBJECT SIZE
TEXT DESCRIPTION
Len Dec
10
8
10
10
0
50
Bottom
F3=Exit
F13=Layout
F5=Report
F18=Files
F11=Display names only
F20=Renumber
F12=Cancel
F24=More keys
Press the Enter key. Query rearranges the fields on the display so that the fields you selected for
sorting appear at the top of the list, in the order you specified. The message Press Enter to
confirm. is also displayed.
222
Query for iSeries Use V5R2
Select Sort Fields
Type sort priority (0-999) and A (Ascending) or D (Descending) for
the names of up to 32 fields, press Enter.
Sort
Prty A/D Field
1 A ODOBTP
2 A ODOBSZ
ODLBNM
ODOBAT
ODOBTX
Text
OBJECT TYPE
OBJECT SIZE
LIBRARY
OBJECT ATTRIBUTE
TEXT DESCRIPTION
Len Dec
8
10
0
10
10
50
Bottom
F3=Exit
F5=Report
F13=Layout
F18=Files
Press Enter to confirm.
F11=Display names only
F20=Renumber
F12=Cancel
F24=More keys
Press the Enter key again.
10. The next display is the Specify Report Column Formatting display. It is here that you specify column
spacing, column headings, and other report formatting options.
Specify Report Column Formatting
Type information, press Enter.
Column headings: *NONE, aligned text lines
Field
ODLBNM
Column
Spacing
0
ODOBTP
2
OBJECT
TYPE
ODOBAT
2
OBJECT
ATTRIBUTE
Column Headings
LIBRARY
Len Dec
10
Edit
8
10
More...
F3=Exit
F13=Layout
F5=Report
F16=Edit
F10=Process/previous
F18=Files
F12=Cancel
F23=Long comment
Query supplies much of this information for you. Change the column heading for the ODLBNM field so
that it reads NAME OF LIBRARY instead of LIBRARY.
Appendix B. Practice exercise for Query for iSeries query
223
Specify Report Column Formatting
Type information, press Enter.
Column headings: *NONE, aligned text lines
Field
ODLBNM
Column
Spacing
0
ODOBTP
2
OBJECT
TYPE
ODOBAT
2
OBJECT
ATTRIBUTE
Column Headings
NAME OF
LIBRARY
Len Dec
10
Edit
8
10
More...
F3=Exit
F13=Layout
F5=Report
F16=Edit
F10=Process/previous
F18=Files
F12=Cancel
F23=Long comment
Press the Enter key.
11. The next display you see is the Select Report Summary Functions. By specifying options on this
display, you can have selected fields summarized in your report—that is, for a selected field, you can
specify that a total, average, minimum, maximum, and (or) count be included in your report.
Select Report Summary Functions
Type options, press Enter.
1=Total 2=Average 3=Minimum
---Options--- Field
_ _ _ _ _ ODLBNM
_ _ _ _ _ ODOBTP
_ _ _ _ _ ODOBAT
_ _ _ _ _ ODOBSZ
_ _ _ _ _ ODOBTX
4=Maximum
5=Count
Text
LIBRARY
OBJECT TYPE
OBJECT ATTRIBUTE
OBJECT SIZE
TEXT DESCRIPTION
Len Dec
10
8
10
10
0
50
Bottom
F3=Exit
F12=Cancel
F5=Report
F13=Layout
F10=Process/previous
F18=Files
F11=Display text only
F23=Long comment
Specify that you want all the summary functions (total, average, minimum, maximum, and count) for
the field ODOBSZ by typing 1 through 5 next to the field as shown in the following display.
224
Query for iSeries Use V5R2
Select Report Summary Functions
Type options, press Enter.
1=Total 2=Average 3=Minimum
---Options--- Field
ODLBNM
ODOBTP
ODOBAT
1 2 3 4 5 ODOBSZ
ODOBTX
4=Maximum
5=Count
Text
LIBRARY
OBJECT TYPE
OBJECT ATTRIBUTE
OBJECT SIZE
TEXT DESCRIPTION
Len Dec
10
8
10
10
0
50
Bottom
F3=Exit
F12=Cancel
F5=Report
F13=Layout
F10=Process/previous
F18=Files
F11=Display text only
F23=Long comment
Press the Enter key.
12. The next display to appear is the Define Report Breaks display. On this display you specify which
fields you want used as break fields. Report breaks are used to break the report into groups of
records each time the value of the report break field changes.
Define Report Breaks
Type break level (1-6) for up to 9 field names, press Enter.
(Use as many fields as needed for each break level.)
Break
Level
Sort
Prty Field
ODLBNM
10 ODOBTP
ODOBAT
20 ODOBSZ
ODOBTX
Text
LIBRARY
OBJECT TYPE
OBJECT ATTRIBUTE
OBJECT SIZE
TEXT DESCRIPTION
Len Dec
10
8
10
10
0
50
Bottom
F3=Exit
F12=Cancel
F5=Report
F13=Layout
F10=Process/previous
F18=Files
F11=Display names only
F23=Long comment
Specify break level 1 for the field named ODOBTP by typing a 1 to the left of it in the Break Level
column.
Appendix B. Practice exercise for Query for iSeries query
225
Define Report Breaks
Type break level (1-6) for up to 9 field names, press Enter.
(Use as many fields as needed for each break level.)
Break
Level
1
Sort
Prty Field
ODLBNM
10 ODOBTP
ODOBAT
20 ODOBSZ
ODOBTX
Text
LIBRARY
OBJECT TYPE
OBJECT ATTRIBUTE
OBJECT SIZE
TEXT DESCRIPTION
Len Dec
10
8
10
10
0
50
Bottom
F3=Exit
F12=Cancel
F5=Report
F13=Layout
F10=Process/previous
F18=Files
F11=Display names only
F23=Long comment
Press the Enter key.
13. On the next display, Format Report Break, you specify the formatting you want for the report break
you defined. Note that the value in the Break level prompt is zero. You can use break level 0 to print
the final summary values for all specified summary functions at the end of the report. For this
example, do not change anything on this display. Just press the Enter key.
Format Report Break
Break level
. . . . . . . :
0
Type choices, press Enter.
(Type &field in text to have break values inserted.)
Suppress summaries . . . .
N
Break text . . . . . . . .
FINAL TOTALS
Y=Yes, N=No
Level Field
1
ODOBTP
F3=Exit
F13=Layout
F5=Report
F18=Files
F10=Process/previous
F23=Long comment
F12=Cancel
On the next display you see that the Break level prompt has been filled in with a 1. Here you format
the report break for break level 1. In the Break text prompt, type in Break text for object type. This
text will occur in the report every time a report break occurs for this break level.
226
Query for iSeries Use V5R2
Format Report Break
Break level
. . . . . . . :
1
Type choices, press Enter.
(Type &field in text to have break values inserted.)
Skip to new page . . . . .
N
Y=Yes, N=No
Suppress summaries . . . .
N
Y=Yes, N=No
Break text . . . . . . . .
Break text for object type
Level Field
1
ODOBTP
F3=Exit
F13=Layout
F5=Report
F18=Files
F10=Process/previous
F23=Long comment
F12=Cancel
Press the Enter key.
You are finished with all of the definition steps that you selected earlier, so the Define the Query
display appears again. (The definition steps you selected earlier are now indicated with a > symbol to
the left of them.)
Define the Query
Query . . . . . . :
Library . . . . :
QNAME
YOURLIB
Option . . . . . :
CCSID . . . . . . :
CREATE
37
Type options, press Enter. Press F21 to select all.
1=Select
Opt
Query Definition Option
> Specify file selections
Define result fields
> Select and sequence fields
> Select records
> Select sort fields
Select collating sequence
> Specify report column formatting
> Select report summary functions
> Define report breaks
Select output type and output form
Specify processing options
F3=Exit
F5=Report
F12=Cancel
F13=Layout
F18=Files
F21=Select all
Select options, or press F3 to save or run the query.
14. Now display your report by pressing F5 (Report). The Display Report display appears showing your
finished query report. (The information you see on your display depends on the objects that are
currently in QGPL on your system. What you see may not match what is shown in the display that
follows.)
Appendix B. Practice exercise for Query for iSeries query
227
Display Report
Report width . . . . . :
104
Position to line . . . . .
Shift to column . . . . . .
Line ....+....1....+....2....+....3....+....4....+....5....+....6....+....7...
NAME OF
OBJECT
OBJECT
OBJECT TEXT DESCRIPTION
OBJECT
TYPE
ATTRIBUTE
SIZE
000001 QGPL
*FILE
PF
1,024 Default source dat
000002 QGPL
*FILE
PF
1,024 Default source dat
000003 QGPL
*FILE
PF
1,024 Default source dat
000004 QGPL
*FILE
PF
1,024 Default source dat
000005 QGPL
*FILE
PF
1,024
000006 QGPL
*FILE
DSPF
1,536
000007 QGPL
*FILE
PRTF
2,048 Default spool outp
000008 QGPL
*FILE
PRTF
2,048 Default spool prin
000009 QGPL
*FILE
PRTF
2,048 Default spool prin
000010 QGPL
*FILE
TAPF
2,048 Default tape data
000011 QGPL
*FILE
TAPF
2,048 Default source tap
000012 QGPL
*FILE
DKTF
2,560 Default diskette d
000013 QGPL
*FILE
DKTF
2,560 Default source dis
000014 QGPL
*FILE
PF
8,192
000015 QGPL
*FILE
PF
8,192
More...
F3=Exit F12=Cancel F19=Left F20=Right F21=Split F22=Width 80
On the bottom far right side of the display, the message More... appears. This means that all of the
report does not fit on the display. Use the page keys or F20 (Right) and F19 (Left) to page through
the report (both left to right and top to bottom) so that you can see the breaks and summaries in the
report.
When you have finished looking at the report, press F3 (Exit) to return to the Define the Query
display.
Define the Query
Query . . . . . . :
Library . . . . :
QNAME
QGPL
Option . . . . . :
CCSID . . . . . . :
CREATE
37
Type options, press Enter. Press F21 to select all.
1=Select
Opt
Query Definition Option
> Specify file selections
Define result fields
> Select and sequence fields
> Select records
> Select sort fields
Select collating sequence
> Specify report column formatting
> Select report summary functions
> Define report breaks
Select output type and output form
Specify processing options
F3=Exit
F5=Report
F12=Cancel
F13=Layout
F18=Files
F21=Select all
Select options, or press F3 to save or run the query.
Press F3 (Exit).
15. The Exit This Query display is shown. On this display, change the Save definition prompt to N (No)
and the Run option prompt to 3 (Do not run) if you do not want to save the query or run it again.
228
Query for iSeries Use V5R2
Exit This Query
Type choices, press Enter.
Save definition . . .
N
Y=Yes, N=No
Run option . . . . . .
3
1=Run interactively
2=Run in batch
3=Do not run
For a saved definition:
Query . . . . . . .
Library . . . . .
QNAME
QGPL
Name
Name, F4 for list
*CHANGE
*LIBCRTAUT, *CHANGE, *ALL
*EXCLUDE, *USE
authorization list name
Text
. . . . . . .
Authority
F4=Prompt
. . . . .
F5=Report
F13=Layout
F14=Define the query
Press the Enter key.
16. The Work with Queries display appears, showing the message Query option processing completed
successfully.
Work with Queries
Type choices, press Enter.
Option
. . . . . . .
Query . . . . . . . .
Library . . . . . .
QNAME
QGPL
1=Create, 2=Change, 3=Copy, 4=Delete
5=Display, 6=Print definition
8=Run in batch 9=Run
Name, F4 for list
Name, *LIBL, F4 for list
F3=Exit
F4=Prompt
F5=Refresh
F12=Cancel
Query option processing completed successfully.
Now you can return to the OS/400 Main Menu by pressing F3 (Exit) to complete your work with this
example.
Appendix B. Practice exercise for Query for iSeries query
229
230
Query for iSeries Use V5R2
Appendix C. Query for iSeries performance tips and
techniques
This appendix provides guidelines for improving the performance of the Query for iSeries product. These
guidelines help you better understand how Query works and which key items to keep in mind for
performance when designing or changing a query.
This appendix does not discuss all variations of queries, but instead provides tips and techniques that help
with the majority of queries running on the iSeries system. You need to determine which tips and
techniques apply to your own particular queries.
The information in this appendix is divided into the following sections:
v Introduction to Query Processing
v File Definitions and Data
v Defining Queries
v Using Join Operations
v Miscellaneous Tips and Techniques
v Query Status Messages
Introduction to Query for iSeries query processing
Query processing involves the following stages:
v Validating the query and evaluating the best method for retrieving the requested data
v Performing the input/output (I/O) for this data
v Presenting the data in the requested format
Query often overlaps these stages to provide the best possible response time.
In the first stage of running a query, called optimization, Query determines the fastest way to process a
query. An access plan results and is used to perform the actual I/O for the query.
Optimization includes factors such as file size, selection tests, and sort tests. However, the main
performance element for both optimization and I/O is the use of keyed sequence access paths for the files
selected by the query.
Keyed sequence access paths in Query for iSeries
A keyed sequence access path describes the order in which records in a database file are read. Use the
Create Logical File (CRTLF) command to create access paths with keys specified in the data description
specifications (DDS).
During optimization, Query uses existing keyed sequence access paths to obtain an approximation of the
number of records the query will return. This information is needed in the optimization itself. Also, Query
uses existing access paths, if possible, to do the required I/O. Depending on the circumstances, Query
may choose to build a temporary access path to complete the query request.
Without existing access paths, Query either must read every record in each file to determine if it meets the
values in the query or build a temporary access path if Query requires one. These options can be
expensive in terms of processing unit, I/O, and storage requirements and can result in longer response
times.
© Copyright IBM Corp. 2000, 2002
231
Note: Having existing access paths is important because a temporary access path created by Query is
not saved. It must be created each time that particular query is run.
Select/omit access paths in Query for iSeries
Use the CRTLF command to create access paths with select/omit tests specified in the DDS.
Specify the select/omit tests in such a way that they match part or all of the selection tests from one or
more queries. Specifying an existing access path should improve performance because Query then does
not have to find or build a usable access path.
Using a select/omit access path also can save time when defining a query because the selection and sort
tests specified in the access path need not be repeated in the query definition.
Note:
Query may use a select/omit access path even if it is not specifically named in the Specify file
selections portion of the query itself. However, if the select/omit access path is created with the
Dynamic Selection (DYNSLT) keyword in the DDS, there is no performance gain over
nonselect/omit access paths.
The select/omit access path can be used if it is a superset of the selection criteria. For example, if
the selection criteria specifies an action path 'X GT 45' and a select/omit access path (logical file)
exists with a selection of 'X GT 40', then the existing logical file may be chosen by the optimizer.
Considerations for creating access paths in Query for iSeries
Not all access paths can be used by all queries, so create access paths that you use often, either by one
query that is run a great deal or by several queries that can all share the same access path. To determine
which access paths that Query can use and other general tips on how to define your Queries to improve
performance, see “Defining queries for Query for iSeries” on page 234.
Creating a minimum number of access paths is important for these reasons:
v Any change to a field in a database results in updating all access paths keyed on that field as well. This
can be expensive in terms of performance for a large number of access paths.
v Backup and restore time may increase considerably if a large number of access paths are saved along
with the files.
In addition to the tips provided in this section, there are two other general guidelines that may help you
determine whether an access path can be used for a particular file:
v If the query selects over 20% of the total number of records in the file, it generally does not use an
access path for that file. Instead, it accesses the records sequentially. However, if the query contains
sort tests, an existing access path may be used or a temporary access path may be created even if the
20% guideline is true. The optimizer usually chooses to implement the sort using sequentially read
records instead of an access path.
v Query does not usually create and use access paths for small files. Although “small” in this case is
defined as files with approximately 1000 records, this is not a rule, just a general guideline. However, if
sort tests exist in the query, an existing access path may be used, or a temporary access path may be
created for the file. The optimizer usually chooses to implement the sort using sequentially read records
instead of an access path.
Access plans in Query for iSeries
When you save a query definition (whether it is for a new query or a revised query definition), an access
plan reflecting the best method for accessing the data is saved along with it.
232
Query for iSeries Use V5R2
Each time you run a saved query, Query validates the access plan by checking that the files and access
paths named in the plan still exist.
If it is valid, Query uses that plan to access the data. This can result in a significant performance gain,
when compared with running queries without stored access plans, because Query does not have to
validate the access path when running a stored query. However, the difference may not be significant for
some queries if this validation is only a small part of the processing time.
If the access plan is not valid, Query tries to find the best access plan to use in accessing the data, and
performance may be affected.
The saved access plan is not used if you:
v Override the output form when date, time, or timestamp data is included
v Override the output type from display to printer or database file or vice versa
v Use a query from a prior release
v Override an input file (OVRDBF command)
v Override a file selection using the run query (RUNQRY) command
v Run a query with language sequence collating on a system with a different national language. This
applies if Use Collating Sequence for all Character Comparisons processing option is set to NO.
v Run a query with a change in weighting values or CCSID of the collating sequence selected at run time.
This applies if Use Collating Sequence for all Character Comparisons processing option is set to NO.
v OS/400 forced a rebuild due to system program changes (PTFs).
Note: In some cases, when you press ENTER (to save a query), it may take longer than expected to
save the query because the system is defining an access plan for the query. However, once the
access plan is defined for the query, the performance advantage can be significant for both the
individual query response time and the system in general, especially if the query is run often.
Updating access plans in Query for iSeries
To update an access plan for a saved query, enter the change option for that query and save it again. (You
do not need to make any changes.) This allows Query to update the access plan to reflect any changes. If
you have a large number of saved queries, it is useful to understand which queries are affected by which
access path changes. Then you do not have to change and save all the queries when a change is made
to one or more access paths.
Access plans for stored queries are not updated to reflect access paths that were deleted or created since
the last time the query was saved. Query notes these kinds of changes when it validates the access plan
and reoptimizes. Although the reoptimization may find a better method of accessing the data, this better
method is not automatically updated in the access plan. This means that the next time the query is run,
reoptimization occurs again because the access plan still reflects the original method chosen at the time
the query was saved.
File definitions and data in Query for iSeries
This section lists considerations for defining files and the actual data in the files.
File definitions in Query for iSeries
Note whether numeric field definitions within a database file on the iSeries system are in the zoned or
packed decimal format. The iSeries system performs arithmetic operations using the packed decimal
format.
In the packed decimal format, two digits are stored in each byte, except the low-order byte. The low-order
four digits of the low-order byte contain the sign of the number. For example, the binary representation of
+123 in the packed decimal format is 0001 0010 0011 1111. In the zoned decimal format, the digits are
Appendix C. Query for iSeries performance tips and techniques
233
stored in the low-order four bits of each byte. The high-order four bits of the low-order byte contain the
sign. The high-order four bits of all other bytes contain all 1s (1111). For example, the binary
representation of +123 in zoned decimal format is 1111 0001 1111 0010 1111 0011.
If a file contains numeric fields defined as zoned (which is common on files migrated from a System/36),
the iSeries system converts the fields from zoned to packed for the arithmetic operation and then converts
them back to zoned when the resulting value is returned to the program.
When the program is Query, this means that running a query involving zoned numeric fields requires
additional processing unit time and possibly somewhat longer response times. If you are concerned about
this aspect of performance, consider converting your files to use packed fields instead of zoned. However,
make this decision carefully, especially if the conversion has a major affect on your operation.
When creating a new file on the iSeries system, define numeric fields as packed, with the length of these
fields being an odd number of characters. If the length of the field is declared as an even number, the first
four bits of the first byte in the field are not used, but the system still checks these four bits to ensure that
no overflow has occurred. If you declared the field as an odd length, this checking does not occur. The
system uses additional processing time when numeric fields have even lengths.
File data considerations for Query for iSeries
Decimal data errors may show up with files that have migrated from the System/36. The System/36
applications sometimes place blanks in numeric fields instead of leading zeros (the blanks result in errors
when processed on the iSeries system). You should identify and correct decimal data errors to obtain
optimal query performance. See “Defining queries for Query for iSeries” on page 234 for more information.
You can identify and correct numeric field errors by using the Programmer’s Tool Kit PRPQ that is
available for the iSeries system. The files you analyze or correct with this tool kit must be externally
described database files. Ensure that all applications (especially those migrated from the System/36) are
corrected so they do not continue to insert data with these kinds of errors.
Defining queries for Query for iSeries
This section provides tips and techniques for defining or changing queries on a single database file.
Operations involving multiple files are covered in “Using join operations in Query for iSeries” on page 238.
The information in this section relates to the Define the Query display. See “Selecting definition steps
when defining a Query for iSeries query” on page 28 for details.
Query for iSeries performance when designing or changing queries
When you design or change queries, view the results of the query in one of the following ways:
v Press F5 (Report) on the Define the Query display to run the query and show the results of the report
as it is designed up to that point.
v Press F13 (Layout) on the Define the Query display to see an example of the layout, including column
headings, a sample detail record, any report break text, and any summary functions defined for the
query.
Note: Use F13 instead of F5 as much as possible because since F5 requires more processing unit time,
I/O, and generally takes longer than F13. In either case, use output type option 1 (Display) while
viewing the results.
To improve performance when going from one display to the next, view the lists without their
accompanying text as much as possible. Query uses extra processing unit time and possibly some I/O to
234
Query for iSeries Use V5R2
retrieve the text for each field. Also, showing the text for each field results in fewer fields being shown on
each display so you have to page through more displays to retrieve the fields you need to view. This is
also true for query, file, member, and format lists.
Define result fields in Query for iSeries
Labeled durations are added or subtracted in left to right order. This could make a difference in your
results. For example, adding 1 MONTH + 1 DAY could give a completely different result than adding 1 DAY +
1 MONTH Jan 28 + 1 DAY + 1 MONTH gives -> Jan 29 then Feb 28. Jan 28 + 1 MONTH + 1 DAY gives->
Feb 28 then Mar 1.
Define numeric result fields with odd lengths instead of even lengths to reduce system processing unit
time when using these fields. See “File definitions and data in Query for iSeries” on page 233 for details.
Avoid defining a result field using division by zero. Although the system processes the query with this
present, each divide by zero operation causes error handling by the system that is expensive in terms of
processing unit and overall response time.
Avoid defining a result field that causes an overflow condition. Overflow occurs when a field is larger than
its specified length. When overflow occurs, Query shows these result fields with the ‘+’ character on the
report.
Avoid defining variable-length character fields. Use numeric constants for the offset and length of a
SUBSTR function.
Select and sequence fields in Query for iSeries
This option allows you to control which fields appear in a report and where they appear within a report
record. To prevent unnecessary disk I/O by Query, select only the fields you need. Also, additional
unneeded fields make a report less readable. If you want to use most of the fields, use F21 (Select All) to
show all fields, then delete the sequence numbers from the fields you do not need.
Note: If you select no fields, Query for iSeries (as a default) picks up to the first 500 fields in the file.
Avoid this type of operation because it causes unnecessary disk I/O.
Avoid using variable-length fields and null-capable fields. Both of these attributes require extra processing.
Select records in Query for iSeries
Specify record selection tests using fields that match key fields of existing access paths or to create
access paths that match often-used record selection tests. Query attempts to use an existing access path
if at least some of the record selection tests match the first key field of that access path.
For example, assume there is a file X with fields A, B, C, and D. An access path exists over this file using
the key fields A, B, and D, in that order. For any query with record values using field A, Query considers
using this access path. However, if the record selection does not involve field A, the access path is not
used. For instance, if the record test is A EQ 3, the access path can be used. If the query contains record
selection tests involving only fields B or D (for example, B EQ 5 or D EQ 8), this access path cannot be
used.
Performance improves if more of the selection tests match more key fields in the same access path. This
allows the access path to reduce the number of records selected. As an example (using file X again), if the
record tests are A EQ 3 AND B EQ 5 AND D GT 8, the access path can be used to find records matching all
three of these values.
Appendix C. Query for iSeries performance tips and techniques
235
Note: If there is no existing access path matching some of the record selection tests, Query does not
build an access path solely for purposes of selection. Query reads each record and selects those
that qualify.
If you request a particular query often, consider creating an access path with select/omit tests to match
that query. See “Select/omit access paths in Query for iSeries” on page 232 for more information on this
subject.
Existing access paths are only used for OR conditions involving the same field specified in the selection
tests.
One type of record selection is to use the % symbol with the LIKE operator as a generic search or scan
(also known as a wildcard scan). If the generic scan starts in the first position of a field (for example,
%ABC), Query cannot use any existing access paths for that portion of the record selection. However, if
the generic scan starts after the first position (for example, ABC%), Query can use any qualifying access
paths over the field specified in this type of record selection.
Select sort fields in Query for iSeries
Query, in most cases, needs an access path to sequence the selected records when sort fields are
specified. If an access path does not exist, Query creates a temporary access path at run time or uses a
sort to order the records. A sort routine is used when the optimizer determines that the sort routine
provides better performance. If a temporary access path is used, it is deleted after the query has finished
running, so each run of the query requires another build of the access path. For this reason, always
consider whether you really need sort fields for the query.
Consider creating access paths that match the sort tests for queries that you use often and for queries
where the access path build time is excessively long. Query attempts to use an existing access path if all
the sort fields from the query match the high order key fields from the access path. This way you can
avoid excessive building of access paths for queries with sort tests.
As an example, assume file Z has fields A, B, C, and D. Also assume there are six access paths built over
this file that have the following keys specified in this order:
1. Access path #1 has key field A
2. Access path #2 has key fields A and B
3.
4.
5.
6.
Access
Access
Access
Access
path
path
path
path
#3
#4
#5
#6
has
has
has
has
key
key
key
key
fields A and C
fields A, B, and C
fields B, A, and C
fields A, B, C, and D
Now if you run a query that is defined to sort on key fields A, B, and C, only access paths #4 and #6 are
considered by Query during optimization. Access paths #1, #2, and #3 are not used because it is
inefficient for Query to read the records again and sort on the additional keys. It is more efficient for Query
to build and use an access path containing all the sort and selection tests. Access path #5 is not
considered because the sorted keys are not in the correct order.
If a particular query is requested often, consider creating an access path with select/omit tests to match
that query. See “Select/omit access paths in Query for iSeries” on page 232 for more information on this
subject.
If you have sort tests that you use often, another option (besides creating access paths) is to use Query to
sort the records in a database file in the desired order. Query can then be run against this file with no sort
tests, if the queries are looking for data sorted as it appears in the file. To perform this function, select the
desired sort fields from the file, choose database as the output device (option 3 on the Select Output Type
and Output Form display), and specify the output database file name, which must be different from the
236
Query for iSeries Use V5R2
input or original file name. This produces a new database file containing the sorted records. The time
required to produce the sorted records may vary, depending on whether Query has to build an access
path to do the sort.
Consider these items before performing this type of operation:
v Any changes to the original file are not automatically reflected in the sorted file unless you provide for
this with some type of additional maintenance. For this reason, you may want to limit the use of this
option to those files that are infrequently changed.
v If an access path is built over an unsorted field in the sorted file, use of this access path by Query
results in records being returned in an unsorted order. Limit building access paths over a sorted file
unless the access paths are built over sorted fields in that file.
If possible, avoid sorting on defined result fields. This can be an expensive operation in terms of
performance, since Query must build an access path to satisfy this type of request.
Select collating sequence in Query for iSeries
Use this option to specify an alternative collating sequence. For example, you may want to change a query
so that all lowercase letters sort before uppercase letters. If you specify an alternative collating sequence
and the query contains character sort keys, Query cannot use existing access paths and must build an
access path to do the sort.
Note: Using an alternative collating sequence does not affect numeric, DBCS-only, DBCS-graphic, date,
time, or timestamp sort fields.
Using job-run collating sequence choices can cause a query to take longer to run.
Do not use a collating sequence if it is not needed. If your query involves only numeric fields, change a
defaulted collating sequence other than hexadecimal to hexadecimal.
A unique-weight sort sequence table might require less processing than a shared-weight table because it
can be ignored for comparisons that do not involve evaluating relative order.
Specify report summary functions in Query for iSeries
Access paths do not help performance for summary functions, so you do not need to consider creating
access paths solely for this type of function. However, if the query has selection or sort tests specified
along with summary functions, an access path matching these values may help improve the overall
performance of the query.
If you are familiar with the use of the DB2 UDB for iSeries program on the iSeries system, consider the
use of DB2 UDB for iSeries views for Query summary functions. The DB2 UDB for iSeries program allows
you to create views based on summary functions against the fields in a file. For example, you can build an
DB2 UDB for iSeries view to contain the sum and average for a field in a file. The performance advantage
of an DB2 UDB for iSeries view can be significant for Query summary functions, especially in terms of
reduced response times. To use a view, specify the name of the view as the file to be selected.
Select output type and output form in Query for iSeries
If you only need to view the summary records, specify this on the Select Output Type and Output Form
display. This eliminates the unnecessary time it takes to page through the detail records.
If you are only interested in viewing the first display or two of results from a query, you may choose to
view results to a display instead of a printer or database file. Query provides the first display of data as
quickly as possible, so viewing one display from the work station is generally much quicker than waiting for
the query to generate all results to a printer or a database file.
Appendix C. Query for iSeries performance tips and techniques
237
However, if the data you want to view is at the end of the searched records, it may take longer than
anticipated to display those records. This may also be true when paging down to access more data (even
if the first display did appear quickly) if the additional data is located much further into the file. If Query has
to build a large access path prior to retrieving data it takes longer to reach the first display.
Specify output type 1 (Display) and output form 1 (Detail) for a multi-copy query. Specify output type 2
(Printer) for a column list query.
Specify processing options in Query for iSeries
The key option on the Specify Processing Options display is whether to ignore decimal data errors (see
“File definitions and data in Query for iSeries” on page 233 for a description of decimal data errors). If
decimal data errors are ignored, Query cannot use any existing access paths for that file and has to build
an access path if one is required for the query, and additional processing is required to handle any fields
with decimal data errors.
If decimal data errors are not ignored, Query stops processing if it encounters a decimal data error.
However, if Query does not encounter any decimal data errors during processing, it can use existing
access paths and runs normally.
Note: This handling of decimal data errors only affects queries that use numeric fields. Queries that use
only character fields are not affected by this option.
When specifying whether to ignore decimal data errors, you have these choices:
v Y (Yes) means ignore decimal data errors.
v N (No) means do not ignore decimal data errors.
v Leaving the Ignore Decimal Data Errors field blank means Query chooses either Y or N, depending on
the environment in which you are running the query.
If the query is run in the System/36 environment, Query uses Y and decimal data errors are ignored. If
the query is run in the System/38 environment or OS/400 environment, Query uses N and decimal data
errors are not ignored. The System/36 environment uses Y because decimal data errors were always
ignored on the System/36. Because access paths cannot be used when Y (the default) is used in the
System/36 environment, there may be substantial performance differences between the environments if
the default is used.
You may want to consider eliminating decimal data errors to make sure you can use existing access paths
and to eliminate the extra processing needed to handle these errors. Use the Programmer’s Tool Kit
PRPQ that is available for the iSeries system. If you cannot eliminate the decimal errors, you may want to
choose Y (or use RUNQRY in the System/36 environment to get Y to default) to make your query run
faster. Even if it is necessary to build a new access path, this may take less time than diagnosing decimal
data errors.
Using join operations in Query for iSeries
Queries involving join operations have special considerations relating to performance. Although the
performance tips listed prior to this may apply to individual files within a join, Query must consider all the
values involving all the files to be joined and then make a decision on how best to proceed with the query.
One of the key concepts of joins is that of primary and secondary files. The primary file is the first file
used in the join while the secondary files are those that are joined to the primary.
You can select one of three types of join operations when defining a join query:
Option 1—Matched records
A record from the primary file is selected only if there is a match with every secondary file
specified.
238
Query for iSeries Use V5R2
Option 2—Matched records with primary file
A record from the primary file is selected regardless of whether there is a match with any of the
secondary files. The selection of primary records is dependent on the select/omit criteria specified
on the Select Records display. Only primary records that meet those criteria are selected.
Select/omit criteria specified against secondary files may cause a record from the primary file not
to be selected.
Option 3—Unmatched records with primary file
A record from the primary file is selected only if there are no-matches with all of the secondary
files.
For option 2 and option 3 joins, which file is listed as the primary and which as the secondary is important
to the end result produced by the query, since ordering these files differently can produce different results.
However, the order is not important for option 1 joins since the same result occurs regardless of the order
in which files are placed.
This difference is important when considering how Query performs a join. Since the order of the files in an
option 1 join is not important, running this type of query may result in Query choosing a different ordering
of the files to gain better performance at run time. For example, if a query defines file A as the primary and
file B as the secondary, at run time Query may actually decide to use file B as the primary if it provides
better overall performance for the query. In options 2 and 3, however, Query cannot rearrange the order of
the files since this can produce different results, so the primary and secondary files always remain as
listed in the query definition.
Note: Although Query may choose to rearrange the order of the files at run time for an option 1 join,
Query never alters the actual query definition.
Performance tips for join operations in Query for iSeries
For all join operations, Query requires the use of an access path over each of the secondary files in the
join. If no usable access paths exist, Query builds them as needed. For this reason, if a particular join
query is run often or if several join queries use the same sort or join selection tests, consider building
access paths that match these values so Query does not have to build them each time you run the
queries.
Note: Query does not require an access path on the primary file unless there are sort fields selected from
this file.
It is important to build access paths to match join selection tests you use often. The access path or paths
should match the fields selected from the secondary files. For example, if the join selection test is T01.A
EQ T02.A, an access path is required over T02.A. For an option 1 join, Query may decide to switch the
order of the files and also internally switch the order of the join selection to match the new order. In this
case, the previously created access path may not be used. For an option 2 or 3 join, however, Query does
not switch the order of the files, so existing access paths that match the join selection tests on the
secondary file should be usable for the join.
Use as many record selection and join selection tests as possible on all files to be joined to narrow down
the number of records that will result from the join operation. This significantly reduces the amount of I/O
required to run the query.
If possible, limit using *ALL on the Specify How to Join Files display. If *ALL is used, the number of joined
records produced could be large. For example, if you use *ALL to join a file containing 2000 records with a
file of 3000 records, the end result would be 6000000 joined records. A large amount of I/O would be
required, resulting in a long response time and some degradation in overall system performance.
Appendix C. Query for iSeries performance tips and techniques
239
Be careful with using the “NE” comparison between fields from different files on the Specify How to Join
Files display. This could result in a large number of records being selected and a large amount of I/O
being performed.
Query runs more efficiently when the files are ordered from smallest to largest. In this case, smallest
means the file from which the fewest records are selected for the join. Although this can be the file with
the least records, in some cases a very large file can be used if only a few records are chosen from that
file.
For an option 1 join, Query attempts to order the files from smallest to largest, depending on the number
of records selected from each. For an option 2 or 3 join, list the files in this order to achieve more efficient
processing.
For an option 2 or 3 join, try to make the files listed first as small as possible by using both join and record
selection tests. For example, if the join selection tests is T01.A EQ T02.A AND T02.A GT 100, it would be
more efficient to change this to T01.A EQ T02.A AND T01.A GT 100. For an option 1 join, apply as many
selection tests as possible to all the files, since you cannot determine which one Query will choose as the
primary.
If sort tests must be specified from multiple files for an option 1 join or a secondary file in an option 2 or 3
join, using both record selection and join selection tests becomes important. The smaller the number of
records selected, the fewer that have to be copied into the temporary file for the sort, thus saving on
processing unit, I/O, and response times.
If you are experiencing severe performance problems when joining large files, either try to avoid this type
of operation, or use selection tests to narrow down the number of records being joined.
If you need to join large files and can use record selection tests, run Query against the file or files
requiring the record selection and put the output to a database file (option 3 on the Select Output Type
and Output Form display). Use this output file to join with the other files. However, this approach may
result in using “old” data, since the output to the database file may be an older version by the time the join
query using this file is run. Also, since no access paths exist over this output file (unless you build them),
Query must build one at run time if it is required.
Miscellaneous tips and techniques for Query for iSeries
This section lists miscellaneous tips and techniques designed to assist you when using Query.
Batch processing for Query for iSeries
Consider submitting queries to batch processing whose results you do not need immediately. For instance,
a query that generates printed reports that will not be used until later is a good candidate to submit to
batch. This frees your terminal for other tasks instead of waiting for the query to finish running. Also, a
properly tuned system is better at balancing system resources (processing unit time, storage, I/O) between
jobs if a query that normally uses a lot of resource is submitted to batch rather than run interactively.
The steps to submit a query to batch vary depending on the environment you operate in. In the System/36
environment, press F6 (Put on job queue) to submit a query to batch from the prompt display for
QRYRUN. This key is allowed after you specify printer or disk as the output type and press the Enter key.
If you are not in the System/36 environment, use the Submit Job (SBMJOB) command to submit a batch
job containing a Run Query (RUNQRY) command. From the iSeries system, use the Work with Queries or
Exit this Query display to submit queries to batch. See Appendix D, “Preventing users from running Query
for iSeries queries interactively” on page 243. For more information on these commands, see the CL
Reference information in the iSeries Information Center.
240
Query for iSeries Use V5R2
Query for iSeries performance tuning
A properly tuned system provides much better overall performance than one in which performance tuning
has not been used. However, there are many factors to consider when properly tuning the system to meet
your needs. See the Work Management topic for details. In addition, the Performance Tools for iSeries
book explains how to monitor and understand overall system performance. Use these guides together to
help improve overall system performance.
If possible, limit the number of ad hoc queries in order to avoid unnecessary access path builds.
Determine which queries are used most often, then create access paths for these queries and save the
query definitions. Most users can then operate out of this fixed set of queries and experience much better
response time and overall system performance than if everyone runs queries in an ad hoc manner.
Limit access to the Query product on the system to those people who have an understanding of Query
performance and how to best use it. This eliminates costly ad hoc queries that can severely affect other
users. Have new users read through this guide to introduce them to Query before giving them access to
the product.
Consider removing unused data from the files that are actively used and placing it in separate saved files.
This significantly reduces the amount of time and resources spent by Query searching through the active
files or building access paths over them.
Ensure that all available performance PTFs are applied to the system. This not only includes PTFs
applying directly to Query, but also others that may apply to overall system performance as well.
Pay attention to the performance optimization messages that are available in debug mode (use STRDBG
before running your query). These messages may help you determine how you can change the query
definition so it will run faster.
Query for iSeries migration considerations N to N-1
When query creates a database file that includes a date, time, timestamp, variable-length, or null-capable
field, a bit is set that states that this file cannot be used with a release prior to Version 2 Release 1
Modification 1. When query creates a database file that includes a DBCS-graphic field, a bit is set that
states that this file cannot be used with a release prior to Version 2 Release 2 Modification 0.
Notes:
1. If you run a query that contains date, time, or timestamp data types on a release prior to Version 2
Release 1 Modification 1, one of the following two things may happen:
v No records are selected
v Results are in error
2. A query that uses a DBCS-graphic constant will not run on a release prior to Version 2 Release 2
Modification 0.
Query for iSeries status messages
When you run a query interactively, status messages may appear at the bottom of your display to let you
know what is happening. For long-running queries, these messages can help determine which stages of
the query take the most time to run. Once this is determined, it may be easier to decide which of the
previously listed tips and techniques apply. This section lists the status messages that may appear when
running a query.
Query running. Building access path for file X in Y.
This message indicates Query has determined an access path is required to run this query, but no
existing access path meets the needed values. Query builds an access path and displays this
message while the access path is being built. Notice how long this message appears on the
Appendix C. Query for iSeries performance tips and techniques
241
display and also the total amount of time it takes the query to run. If a significant portion of the
query run time is spent building an access path, attempt to use the tips and techniques previously
listed on using access paths.
Query running. Building access path from file X in Y.
This message indicates Query is building an access path from an existing access path. Generally,
the appearance of this message is not an indication of a performance problem, but instead should
be viewed as a positive indication because Query is using an existing access path for the
operation.
Query running. Creating copy of file X in Y.
This message indicates that Query is copying one of the files in the query to a temporary file. This
occurs in the following cases:
v A multi-format logical file is specified
v A join logical file is specified with a join type that does not match the query’s join type
v A complex SQL View is specified
If the temporary file is created for a join as described above, try to avoid this type of operation.
Refer to “Using join operations in Query for iSeries” on page 238 for more information on this item.
If this message occurs because the total length of the sort fields is greater than 2000 bytes, this
may be reason for concern. For more information on this, refer to “Select sort fields in Query for
iSeries” on page 236.
Query running. Sorting copy of file *N in *N.
This message appears either when the combined length of the sort fields exceeds 2000 bytes or
when Query has chosen to use a sort routine rather than create an access path to achieve better
performance. This indicates that Query is performing its own sort routine on the temporary file that
was just created.
Query for iSeries debug mode messages
Query for iSeries issues performance optimization messages when running in debug mode (STRDBG).
When running in debug mode, you also get such things as optimization messages and diagnostic details
for mapping errors that do not end the job.
242
Query for iSeries Use V5R2
Appendix D. Preventing users from running Query for iSeries
queries interactively
The system administrator can restrict users from running queries interactively. When this restriction is
applied, users cannot:
v Use option 9 (Run) on the Work With Queries display.
v Press F5 (Report) to display the report on-screen.
v Use option 1 (Run interactively) on the Exit this Query display.
v Run the QRYRUN procedure interactively.
v Run the Run Query (RUNQRY) command interactively.
If a user attempts to run a query interactively, and is restricted from doing so, an error message appears.
A user cannot run a query interactively when:
v The authority for the RUNQRY command is changed so the user is no longer authorized to it. This may
affect the ability of the user to run in batch (see note below on allowing one or more users to have
different run capabilities).
v The RUNQRY command is changed to no longer support being run interactively.
To prevent a user from running a query interactively:
v Use the Change Command (CHGCMD) command to remove *INTERACT from the ALLOW (where
allowed to run) parameter. ALLOW(*PGM) is not allowed in RUNQRY.
v Change the authority for the RUNQRY command to state which users have authority to this command.
Note: To allow one or more users to have different run capabilities than what is specified for the
RUNQRY command in QSYS:
1. Create a duplicate object of the RUNQRY command and place it in a library other than
QSYS.
2. Make the needed changes to restrict the use of the RUNQRY command in QSYS.
3. Place the library containing the new RUNQRY command, that is, the version that allows
users to run interactively, ahead of QSYS in the library list of the users who need to run
queries interactively.
Note: If you add a new release of the operating system, you may need to redefine the RUNQRY
command parameters.
© Copyright IBM Corp. 2000, 2002
243
244
Query for iSeries Use V5R2
Appendix E. Coded character set identifiers (CCSIDs) in
Query for iSeries
This appendix contains information about coded character set identifiers or CCSIDs. This information will
help you understand CCSIDs and why they are important to Query for iSeries.
A CCSID is a 2-byte (unsigned) integer that uniquely identifies an encoding scheme and one or more pairs
of character sets and code pages. A CCSID can be assigned to each query definition, data field, and
collating sequence. A CCSID can also be assigned to individual items in a file record format definition,
such as the column heading, text description, edit word, or long comment for a field.
CCSID-marked data can be converted so that it looks the same in languages that use the same character
set or superset of the character set (see Figure 7 on page 246). Data will not look the same without
conversion if the code pages differ. The hexadecimal value for a graphic character (a character that is
displayed or printed) in one language may be different than the value for the equivalent character in
another language. The problem does not end with displaying and printing. If data is collated using a
sequence prepared from characters in a different code page, or if data in different code pages is
compared without being converted, the result will seem incorrect.
© Copyright IBM Corp. 2000, 2002
245
Figure 7. Working with and without CCSID Conversion. Conversion, when necessary and possible, is done
automatically by the system.
Query for iSeries recognizes when conversion of data, collating sequences, and text is needed, and
performs the conversion. The system notifies you if the conversion fails. You may not be able to work on a
query or run a saved query depending on the CCSIDs involved. Four conditions can result from CCSID
comparisons:
v They match identically, which means no conversion is necessary.
v They are compatible, which means complete conversion is possible.
v They are compatible with substitution, which means conversion is possible but substitution characters
might be used. Substitution characters, depending on where they occur, can give unpredictable results,
particularly in sorting and testing character fields.
v They are incompatible, which means conversion is impossible.
This appendix explains how CCSIDs affect what Query for iSeries does in specific circumstances. For
more information, see the Query for iSeries section of the National Language Support topic.
246
Query for iSeries Use V5R2
CCSID marking in Query for iSeries
The following bulleted objects contain CCSID tags used by query processing. Each item inherits its CCSID
from the containing item unless marked with an asterisk. An asterisk indicates that the object has its own
CCSID tag. The bulleted items inherit their CCSID from the user profile or job, unless specifically changed.
Numbers in parentheses refer to notes explaining how you can determine CCSID values for the item.
v Query definition ( 1, 6) *
Override column heading ( 5)
Override edit word ( 5)
Constant in expression ( 8)
Constant in value for record selection test ( 8)
Result field name ( 5)
Concatenation symbols ||
First 50 positions in expression, used as result field text ( 5)
Result field column heading ( 5)
Break text
Final totals text (found at break level 0)
Cover page text
Page heading text
Page footing text
Collating sequence (user-defined, or snapshot of translation table, or system sort sequence) ( 2, 7,
8) *
v Translation table and system sort sequence
Collating sequence ( 8 9) *
v Query user profile
Collating sequence (user-defined default) ( 7, 8) *
v Query program object containing preconfigured language sequences. That is, the module that contains
the sequences for option 2 on the Select Collating Sequence display.
Collating sequence (for language) ( 7, 8) *
v Job description ( 8) *
Data (in printer or display buffers)
Collating sequence (job) *
v File definition *
– File record format ( 8) *
- Text about the format *
- Data (in members) * ( 3, 5)
- Field
v
v
v
v
v
v
v
v
Name ( 5)
(Original) Column heading ( 5) *
(Original) Edit word ( 5) *
Text about the field ( 5) *
Long comment *
Null default
Data (in members)
Sort sequence for * file ( 4, 5, 8) *
– File member
Appendix E. Coded character set identifiers (CCSIDs) in Query for iSeries
247
- Text about the member *
- Data (the CCSID tag or tags are in the format definition)
Notes:
1. The CCSID of the query definition is shown on displays that show the query name, like the Define the
Query display.
2. The CCSID of the user-defined collating sequence is shown on the Define Collating Sequence display.
3. The CCSID of the character data in an output file is shown on a line above the record format in a
printed query definition if all the character-data CCSIDs match (single and mixed-byte versions of a
CCSID are considered matching).
4. The CCSIDs of the character fields in an output file are shown in a column of the record format in a
printed query definition if individual CCSIDs do not match.
5. When text parts from an input file definition, such as column headings, field text, and file definition text,
are used to create an output file definition, the CCSIDs of those parts are carried over to the output file
definition. The CCSIDs of fields are also carried over. You can use the Display File Field Description
(DSPFFD) command to determine the CCSID of fields. You can dump the file to determine the CCSID
of field text or file definition text.
6. The original CCSID of the query definition is shown in an informational message on the Define the
Query display. If this CCSID is 65535 and the CCSID shown at the top of the display differs, text and
constants in the query definition will start to be treated as though marked with the latter CCSID.
7. The original CCSID of the collating sequence used to initialize the Define Collating Sequence display is
shown in the second level text of the informational message about how the sequence was initialized. If
this CCSID is 65535 and the CCSID shown at the top of the display differs, the sequence, whether or
not you reorder it, will start to be treated as though marked with the latter CCSID.
8. Some diagnostic messages about CCSID conversion problems show the incompatible CCSIDs.
9. The CCSID of the collating sequence resolved for the current collating choices is shown in a message
at the bottom of the Select Collating Sequence display.
CCSIDs and collating sequences in Query for iSeries
Within Query for iSeries you can specify hexadecimal (the default), the language sequence, a user-defined
sequence, a translation table, or system sort sequence to specify a collating sequence. The collating
sequence is used for join tests, record selection, sorting, grouping report-breaks, and determining
minimum and maximum values. Collating sequence tables are only used for SBCS characters.
A CCSID is associated with each of the collating sequences supported by Query for iSeries. Query for
iSeries assumes that a translation table has a CCSID of 65535. A user-defined sequence has the job
CCSID of the defining user.
Note: If you select the hexadecimal sequence or use a collating sequence with a CCSID of 65535 for
ordering marked data, the results you get may seem inconsistent. For example:
v The value that sorts to the lowest position may not be the minimum summary value for a
displayed or printed column. This can happen because sort comparisons are done before, and
minimum comparisons after, any conversion to the job CCSID occurs.
v The minimum and maximum values saved in summary-only output to a database file may differ
from the corresponding values in a printed or displayed report, even though the same job CCSID
is used to run the query. This happens only if values for a minimum or maximum field are
converted to the job CCSID in order to be printed or displayed.
When you save a user-defined collating sequence as the default in your Query profile, the job CCSID is
saved with it. If you choose to save the language option as your default, only the option is saved in the
profile—not the language sequence or its CCSID.
248
Query for iSeries Use V5R2
Note: The query profile, user-defined collating sequence default, and CCSID are only updated if you
press F23 from the Define Collating Sequence display to save the sequence.
Query for iSeries language sequences
Following are the language sequences that are supported by Query for iSeries.
Table 9. Language Code-Page CCSIDs
Country or Version
Code Page
CCSID
Belgian Dutch
Belgian French
Canadian English
Canadian French
Danish NLV
Dutch NLV
Finnish NLV
French MNCS
French NLV
German MNCS
German NLV
Icelandic
Italian MNCS
Italian NLV
Norwegian NLV
Portuguese NLV
Portuguese MNCS
Spanish MNCS
Spanish NLV
Swedish NLV
Swiss French MNCS
Swiss German MNCS
Swiss Italian MNCS
United Kingdom
United States English
00500
00500
00037
00500
00277
00037
00278
00500
00297
00500
00273
00871
00500
00280
00277
00037
00500
00500
00284
00278
00500
00500
00500
00285
00037
500
500
37
500
277
37
278
500
297
500
273
871
500
280
277
0037
500
500
284
278
500
500
500
285
37
Notes:
1. MNCS means multinational character set
2. NLV means national language version
CCSID conversions for Query for iSeries options and functions
You may get a diagnostic message or unexpected result when you select a Query for iSeries option or
press a function key that requires a conversion from one CCSID to another. The following may help you
understand what conversions may be needed to satisfy various requests and what happens when such a
conversion fails.
Displaying a Query for iSeries query
The following table shows how different combinations of job and query CCSIDs affect displaying a query
and how constants are treated. You can display the query definition if the process (job) CCSID and the
query definition CCSID match, if either is marked with a CCSID of 65535 (do not convert), or if the query
definition is not marked. In Table 10 on page 250, 37 is the English CCSID and 65535 is a CCSID that
blocks conversion.
Appendix E. Coded character set identifiers (CCSIDs) in Query for iSeries
249
Table 10. How CCSIDs Affect Displaying a Query
Job CCSID
Query CCSID
Constants Processed as Marked
with CCSID
37
65535
37
65535
37
37
37
65535
No tag
No tag
37
37
65535
65535
65535
Changing a Query for iSeries query
You can change the query definition if the process (job) CCSID and the query definition CCSID match, if
either is marked with a CCSID of 65535 (do not convert), or if the query definition is not marked.
Table 11 shows when a query can be changed and how the constants are treated.
Table 11. How CCSIDs Affect Changing a Query
Job CCSID
Query CCSID
Constants Processed as Marked
with CCSID
37
65535
37
65535
37
37
37
37
65535
No tag
No tag
500
37
37
37
65535
37
Cannot change
Getting a list of objects with text in Query for iSeries
No conversion is done when query gets text descriptions for queries, translation tables, files, or libraries
because these text descriptions cannot be marked with a CCSID.
If the descriptive text is not displayed in a list display, press F11.
Defining a Query for iSeries query
You may see CCSID related diagnostic messages in a definition you are either creating, changing, or
displaying. See “CCSIDs and Query for iSeries query definition items” on page 252 for more information.
Defining a collating sequence in Query for iSeries
If a collating sequence CCSID does not match your job CCSID and neither CCSID is 65535, the collating
sequence CCSID is converted to your job CCSID before the Define Collating Sequence display is
initialized. If a translation table cannot be converted, it is not used, regardless of the choice in the Ignore
character substitution prompt.
If you are creating or changing a collating sequence and select option 3 on the Select Collating Sequence
display, Query for iSeries assumes that you are starting work on a new sequence. Query for iSeries looks
at the following list and selects the first existing sequence that either requires no conversion or can be
converted (without character substitution) to your job CCSID.
v
v
v
v
The
The
The
The
250
previously defined sequence for this query
user-defined default sequence from the query-user’s profile
language sequence for your system
hexadecimal sequence
Query for iSeries Use V5R2
For example, the language sequence is used to initialize the Define Collating Sequence display if there is
no previously defined sequence for the query and the default sequence from the query-user’s profile is
converted with warnings about the use of substitution characters.
Query for iSeries warns you on the Select Collating Sequence display when the sequence previously
defined for this query cannot be converted. You can find out why the language sequence or a user-defined
default sequence was not used by pressing F15 (Language sequence) or F16 (Use default) on the Define
Collating Sequence display.
Getting a list of formats or members with text in Query for iSeries
If a member or format-text description cannot be converted to the job CCSID, blanks are shown.
If the descriptive text is not displayed in a list display, press F11.
Saving a Query for iSeries query definition
Conversion may be required when an access plan is built to be saved with the query. This can cause
previously undetected compatibility problems, and you are asked to confirm saving the query definition
with errors.
Running a Query for iSeries query
Each position of every value that cannot be converted to the job or document CCSID is printed or
displayed as a plus sign (+). Each position of a text string that cannot be converted is printed or displayed
as a dot (.). An edit word that cannot be converted is ignored (edit code J is used instead). This happens
regardless of the method used to run the query.
| Note: The job CCSID is the CCSID of the job. It can be changed by the command CHGJOB CCSID().
Neither data nor text is converted when the output is directed to an existing file. If a field receiving data
has a different CCSID, output processing stops with a diagnostic before any records are added.
If you have done an override to a database file selected for input, Query for iSeries uses the new file
information, including the CCSID markings. This can cause the same kind of errors that would be
diagnosed at definition time.
If you do nothing to cause the access plan to be rebuilt (see “Access plans in Query for iSeries” on
page 232), you can get errors if a file is replaced with a file in a format that requires no level check, but
has different CCSID characteristics.
Running a default query in Query for iSeries
When you run the default query for a file, the job or document CCSID and other conversions can fail. For
example, the file could be a logical file involving concatenation of fields with different CCSIDs or you may
be using a query profile with an incompatible collating sequence default.
Selecting records at run time in Query for iSeries
You can do run-time record selection if the process (job) CCSID and the query definition CCSID are the
same, if either is marked with a CCSID of 65535 (do not convert), or if the query definition is not marked.
Table 12 on page 252 shows when record selections can be changed at run time and how the constants
are treated.
Appendix E. Coded character set identifiers (CCSIDs) in Query for iSeries
251
Table 12. How CCSIDs Affect Run-Time Record Selection
Job CCSID
Query CCSID
Constants Treated as CCSID
37
65535
37
65535
37
37
37
37
65535
No tag
No tag
500
37
37
37
65535
37
Not allowed
CCSIDs and Query for iSeries query definition items
Query for iSeries warns you about some CCSID compatibility problems as you are working on a query
definition but some problems are not diagnosed until the query is run. To understand the results, you need
to know:
v How CCSIDs are assigned to constants and expressions
v The order in which conversions and comparisons are performed
v Whether the check looks at the data or just the CCSID marking
The following topics present some of this information by query definition item. Refer to “CCSID
compatibility considerations in Query for iSeries” on page 254 for information on specific pairs of marked
items.
CCSID and file selections in Query for iSeries
If a format that you specify when you are working on a query definition has any text that cannot be
converted to the CCSID of your job, you see an error message telling you to select a different file or
format.
If you have done an override to a database file, query uses the new file information, including the CCSID
markings. This could cause the same kind of errors that would ordinarily be diagnosed at definition time.
CCSID and join tests in Query for iSeries
If fields in a join test have different CCSIDs, a conversion to a compatible CCSID is done. If the two fields
do not have the same CCSID and cannot be converted, or if any collating sequence to be used cannot be
converted, you see an error message.
CCSID and result field expressions in Query for iSeries
Query for iSeries users in countries other than the United States should type field names and keywords
(for example, SUBSTR) in uppercase to ensure correct results. The CCSID of the result field depends on
the fields used to define the result. At create time, the system assumes constants are marked with the job
CCSID. At change time, the system assumes constants are in the job CCSID of the changing user if the
create time CCSID is 65535. If one field is specified, the result field has the CCSID of that field. If values
with different CCSIDs are specified, the result field has a CCSID based on the order of the values and
type of the expression.
Field and constant values that are not in the CCSID of the expression must be converted. If fields or
constants used in expressions have CCSIDs that are not compatible, a message is sent to the user.
For a concatenation symbol you can type:
v Two vertical bars.
v The hexadecimal value of two vertical bars in CCSID 37 (’4F4F’X).
v Two of the characters that have hexadecimal representation 4F in the CCSID of the query.
252
Query for iSeries Use V5R2
CCSID and result field column headings in Query for iSeries
A column heading in a result field definition is converted, if necessary, to the job or document CCSID when
it is passed back to the document or shown in a report. Dots (...) are shown if the conversion fails.
CCSID and sort fields in Query for iSeries
If the CCSID of the sort field is different from the collating sequence CCSID, the sequence is converted to
the field CCSID. If the conversion fails, an error message is sent to the user.
CCSID and record selection tests in Query for iSeries
Query for iSeries users in countries other than the United States should type field names and keywords
(for example, NULL) in uppercase to ensure correct results.
At create time, the constants are assumed to be in the job CCSID. At change time, the constants are
assumed to be in the job CCSID of the changing user if the create time CCSID is 65535. If the fields or
constants used do not have compatible CCSIDs, or if any collating sequence table to be used cannot be
converted, you see an error message.
CCSID and summary functions in Query for iSeries
Conversions are performed as needed to evaluate the minimum and maximum functions selected for
character fields. For displayed or printed output, evaluation occurs after the data is converted to the job or
document CCSID after records are sorted. Minimum and maximum function evaluation is done on
unconverted data for summary output to a database file. Any conversion needed to put the results into an
existing file is done later.
If a collating sequence is involved, it is converted as needed to the CCSID in which the data is being
evaluated. If a conversion error occurs while the collating sequence is being converted, you see an error
message. This happens only while a query is running.
CCSID and column formatting and editing in Query for iSeries
Column headings and edit words are converted, if necessary, to the document or job CCSID when passed
back to a document or shown in a report. Dots are used if the conversion fails. For an edit word, this
forces an error that causes edit code J to be used.
CCSID and report breaks in Query for iSeries
Conversions are performed as needed to evaluate the report break functions selected for character fields.
For displayed or printed output, evaluation occurs after the data is converted to the job or document
CCSID after records are sorted. Report break evaluation is done on unconverted data for summary output
to a database file. Any conversion needed to put the results into an existing file is done later.
If a collating sequence is involved, it is converted as needed to the CCSID in which the data is being
evaluated. If a conversion error occurs while the collating sequence is being converted, you see an error
message. This happens only while a query is running.
CCSID and break and final text in Query for iSeries
Break text is converted, if necessary, to the document or job CCSID when passed back to a document or
shown in a report. Dots are used if the conversion fails.
CCSID and cover page, page headings and footings in Query for
iSeries
Page text is converted, if necessary, to the document or job CCSID when passed back to a document or
shown in a report. Dots are used if the conversion fails.
Appendix E. Coded character set identifiers (CCSIDs) in Query for iSeries
253
CCSID compatibility considerations in Query for iSeries
CCSID marking makes it possible for conversions to be performed before presentation of marked material
or use of marked material in comparisons, but can also restrict the use of various combinations of marked
items. The following tables show what can occur when pairs of items are marked with different CCSIDs,
neither of which is 65535.
Table 13 shows what happens at definition time if item 1 cannot be converted to the CCSID for Item 2.
Table 13. CCSIDs Not Compatible-Definition-Time Consequences
Item 1
Item 2
Consequence
Long comment
Format text
Format text
Job
Job
Job
Member text
Original column heading
Original edit word
Collating sequence
Job
Job
Job
Job
Diagnostic shown (not long comment) for F23.
Format text shown blank on Select Format display.
Format cannot be specified for file selection. Error
diagnosed and displayed on Specify File Selections,
Change File Selections, or File Selection Status displays.
Member text shown blank on Select Member display.
Format cannot be specified for file selection.
Format cannot be specified for file selection.
Cannot use sequence to initialize Define Collating
Sequence display (substitution character involvement is
always treated as an error in this case). The
consequence depends on the origin of the collating
sequence and what you are doing.
(sequence origin)
consequence
(user-defined)
after a warning, prompt bypassed in display
mode
(user-defined)
after a warning, prompt initialized from other
source for first showing in change mode
(language sequence)
F15 request rejected
(user-defined default)
F16 request rejected.
Collating sequence
Field
Field 2
Field 1
Field 2/constant
Field 1
Collating sequence
Constant
254
Query for iSeries Use V5R2
(job sequence)
F17 request rejected.
Cannot perform comparison for join. Error diagnosed and
displayed on Specify How to Join display or indicated on
Define the Query or Exit the Query displays.
Cannot perform comparison for join. Error diagnosed and
displayed on Specify How to Join display or indicated on
Define the Query or Exit This Query display.
Cannot derive expression CCSID. Error diagnosed and
displayed on Define Result Fields display or indicated on
Define the Query or Exit This Query display. (Can occur
when Query definition constant inherits job CCSID of
changing user.)1
Cannot perform comparison for record selection. Error
diagnosed and displayed on Select Records display or
indicated on the Define the Query or Exit this Query
display. (Can occur when Query definition constant
inherits job CCSID of changing user.)1
Table 13. CCSIDs Not Compatible-Definition-Time Consequences (continued)
Item 1
Item 2
Consequence
Collating sequence
Field
Field 2/constant
Field 1
Field 2/constant
Field 1
Cannot perform comparison for record selection. Error
diagnosed and displayed on Select Records display or
indicated on the Define the Query or Exit this Query
display. (Can occur when Query definition constant
inherits job CCSID of changing user.)
Cannot perform comparison for record selection. Error
diagnosed and displayed on Select Records display or
indicated on the Define the Query or Exit this Query
display. (Can occur when Query definition constant
inherits job CCSID of changing user.)1
Cannot calculate expression for key field when building
access plan. Save request rejected; user must submit
request again to save with newly discovered error.1
1. This can happen when you specify that character substitution warnings not be ignored on the Specify Processing
Options display.
Table 14 shows what happens at run time if Item 1 cannot be converted to the CCSID for Item 2.
Table 14. CCSIDs Conversion Problems-Run-Time Consequences
Item 1
Item 2
Consequence
Field 2
Field 1
Field 2/constant
Field 1
Field data
Collating sequence
Field 2/constant
Field 1
Field 2
Field 1
Field data
Column heading
Job
Job
Edit word
Job
Break text
Job
Cover page
Final text
Job
Job
Page heading
Job
Page footing
Job
Collating sequence
Field
Cannot perform comparison for join. Run request
rejected.
Cannot perform comparison for record selection. Run
request rejected.1
Cannot perform comparison involving dependent value.
Run request fails. No column list results returned.
Cannot calculate expression for key field when building
access plan. Run request fails.1
Cannot convert data to CCSID of receiving record field.
Run request fails. (No records added to new file or
member.)1
Cannot display or print field values. Run request fails.1
Column heading line shown as dots in displayed or
printed report.
J edit code used, not edit word, in displayed or printed
report.
Text line segment shown as dots in displayed or printed
report.
Cover page shown as dots in displayed or printed report.
Text line segment shown as dots in displayed or printed
report.
Page heading text shown as dots in displayed or printed
report.
Page footing text shown as dots in displayed or printed
report.
Cannot perform break, minimum, or maximum on field
for:
v Summary-only output to database
v A user with job CCSID 65535, to printer or display
The run request fails for database or printer output. For
displayed output, the run request continues, but all values
and summaries are shown as replacement strings (+++).
Appendix E. Coded character set identifiers (CCSIDs) in Query for iSeries
255
Table 14. CCSIDs Conversion Problems-Run-Time Consequences (continued)
Item 1
Item 2
Collating sequence
Job
Consequence
Cannot convert table for performing break, minimum, or
maximum for field. The run request fails for printer output.
For displayed output, the run request continues, but all
values and summaries are shown as replacement strings
(+++).
Note: For output to display, Query uses a single diagnostic message to warn you to look for unwanted dots and
missing edit word text. There is no warning when you print a report.
1. This can happen when you specify that character substitution warnings not be ignored on the Specify Processing
Options display.
Table 15 shows what happens at run time when items are marked with compatible substitution CCSIDs,
but conversion of Item 1 to the CCSID of Item 2 requires use of a substitution character for some value,
and character substitution warnings are not ignored.
Table 15. Compatible with Substitution CCSIDs, Conversion Failure-Run-Time Consequences
Item 1
Item 2
Consequence
Field 2
Field 1
Field 2/constant
Field 1
Field 2/constant
Field 1
Field 2/constant
Field 1
Field 2/constant
Field 1
Field data
Job
Collating sequence
Job
Collating sequence
Field
Cannot perform comparison for join. Run ended (output is
incomplete).1
Cannot perform comparison for record selection. Run
ended (output is incomplete).1
Cannot calculate result field value for sorting. Run ended
(no records returned).1
Cannot calculate result field value for use in record
selection (the error could occur for the tested field or test
value). Run ended (output is incomplete).1
Cannot calculate result field value for output.
Replacement string displayed or printed for value and for
any subsequent break, minimum, or maximum value for
the field. Output to database ended (output is incomplete;
possibly some, but not all, records added).1
Cannot convert selected field value to the job CCSID,
therefore it cannot be displayed or printed. Replacement
string displayed or printed for value and for any
subsequent break, minimum, or maximum value for the
field.1
Cannot perform break, minimum, or maximum on value
converted for display or print. Run request ended for print
(output is incomplete). Replacement string displayed for
value and for any subsequent break, minimum, or
maximum value for the field.1
Cannot perform break, minimum, or maximum for
displayed or printed output for a user with job CCSID
65535, or for summary only to database. Output is
incomplete for printer or database. Replacement string
displayed for value and for any subsequent break,
minimum, or maximum value for the field.1
1. This can happen when you specify that character substitution warnings not be ignored on the Specify Processing
Options display.
Table 16 on page 257 shows the different options allowed for several combinations of process (job) and
Query definition CCSIDs. The capital letters A and B represent different CCSIDs neither of which is 65535.
The queries with no tags are from a previous release.
256
Query for iSeries Use V5R2
Table 16. How CCSIDs Affect Query Use
Job CCSID
Query CCSID
Run Query
allowed
Change Query
allowed
Run time record
selection
Display Query
allowed
A
A
65535
A
65535
A
A
65535
A
B
No tag
No tag
Yes
Yes
Yes
Yes
Yes
Yes
Yes
Yes1
Yes
No1
Yes
Yes1
Yes
Yes1
Yes
No1
Yes
Yes1
Yes
Yes1
Yes
No1
Yes
Yes1
1. Either a warning or request ending message is issued.
Appendix E. Coded character set identifiers (CCSIDs) in Query for iSeries
257
258
Query for iSeries Use V5R2
Bibliography
The following OS/400 books contain information
you may need. The books are listed with their full
title and base order number.
v ADTS/400: Data File Utility, SC09-1773-00,
provides the application programmer or
programmer with information about using the
Application Development Tools data file utility
(DFU) to create programs to enter data into
files, update files, inquire into files, and run
DFU programs.
v Backup and Recovery, SC41-5304-06,
describes the recovery features of the iSeries
system.
v The Backup, Recovery and Availability topic
under Systems Management in the Information
Center describes the basic backup features of
the iSeries system.
v Printer Device Programming, SC41-5713-05,
provides the application programmer and
system operator with information to understand
and control printing.
v IBM Personal Computer Disk Operating System
Reference SC21-8090, provides personal
computer users with information on how to use
DOS on their personal computer.
v The Globalization Overview topic in the
Information Center contains information about
the national language support (NLS) function on
the iSeries.
v
v
v
v
commands to request functions of the OS/400
program and of the various languages and
utilities.
Performance Tools for iSeries, SC41-5340-01,
provides the programmer with information about
what Performance Tools/400 are, gives an
overview of the tools, and tells how to manage
system performance.
The Work Management topic in the Information
Center provides the programmer with
information about how to create and change a
work management environment.
iSeries Security Reference, SC41-5302-06,
provides the programmer (or someone who is
assigned the responsibilities of a security
officer) with detailed information for planning a
setting up security on the system.
IDDU Use, SC41-5704-00, provides the
administrative secretary or business
professional with detailed information on how to
use OS/400 interactive data definition utility
(IDDU) to describe data dictionaries, files, and
records to the system. Advanced information
about using IDDU to work with files created on
other systems and information about error
recovery and problem prevention is provided for
programmers.
v Programmer’s Tool Kit PRPQ, 5799DAG,
contains information programmers can use to
correct field and data errors on the iSeries
system.
v CL Programming, SC41-5721-05, provides an
application programmer or programmer with a
wide-ranging discussion of OS/400
programming topics, including a general
discussion of objects and libraries, control
language (CL) programming, controlling flow
and communicating between programs, working
with objects in CL programs, and creating CL
programs.
v The Control Language (CL) Reference
information in the Programming category of
the iSeries Information Center provides the
application programmer with a description of the
OS/400 control language (CL) and its
commands. Each command description
includes a syntax diagram, parameters, default
values, keywords, and an example. This
information should be used to refer to the CL
© Copyright IBM Corp. 2000, 2002
259
260
Query for iSeries Use V5R2
Notices
This information was developed for products and services offered in the U.S.A. IBM may not offer the
products, services, or features discussed in this document in other countries. Consult your local IBM
representative for information on the products and services currently available in your area. Any reference
to an IBM product, program, or service is not intended to state or imply that only that IBM product,
program, or service may be used. Any functionally equivalent product, program, or service that does not
infringe any IBM intellectual property right may be used instead. However, it is the user’s responsibility to
evaluate and verify the operation of any non-IBM product, program, or service.
IBM may have patents or pending patent applications covering subject matter described in this document.
The furnishing of this document does not give you any license to these patents. You can send license
inquiries, in writing, to:
IBM Director of Licensing
IBM Corporation
500 Columbus Avenue
Thornwood, NY 10594
U.S.A.
For license inquiries regarding double-byte (DBCS) information, contact the IBM Intellectual Property
Department in your country or send inquiries, in writing, to:
IBM World Trade Asia Corporation
Licensing
2-31 Roppongi 3-chome, Minato-ku
Tokyo 106-0032, Japan
The following paragraph does not apply to the United Kingdom or any other country where such
provisions are inconsistent with local law: INTERNATIONAL BUSINESS MACHINES CORPORATION
PROVIDES THIS PUBLICATION “AS IS” WITHOUT WARRANTY OF ANY KIND, EITHER EXPRESS OR
IMPLIED, INCLUDING, BUT NOT LIMITED TO, THE IMPLIED WARRANTIES OF NON-INFRINGEMENT,
MERCHANTABILITY OR FITNESS FOR A PARTICULAR PURPOSE. Some states do not allow disclaimer
of express or implied warranties in certain transactions, therefore, this statement may not apply to you.
This information could include technical inaccuracies or typographical errors. Changes are periodically
made to the information herein; these changes will be incorporated in new editions of the publication. IBM
may make improvements and/or changes in the product(s) and/or the program(s) described in this
publication at any time without notice.
Any references in this information to non-IBM Web sites are provided for convenience only and do not in
any manner serve as an endorsement of those Web sites. The materials at those Web sites are not part of
the materials for this IBM product and use of those Web sites is at your own risk.
Licensees of this program who wish to have information about it for the purpose of enabling: (i) the
exchange of information between independently created programs and other programs (including this one)
and (ii) the mutual use of the information which has been exchanged, should contact:
IBM Corporation
Software Interoperability Coordinator
3605 Highway 52 N
Rochester, MN 55901-7829
U.S.A.
Such information may be available, subject to appropriate terms and conditions, including in some cases,
payment of a fee.
© Copyright IBM Corp. 2000, 2002
261
The licensed program described in this information and all licensed material available for it are provided by
IBM under terms of the IBM Customer Agreement, IBM International Program License Agreement, or any
equivalent agreement between us.
If you are viewing this information softcopy, the photographs and color illustrations may not appear.
Trademarks
The following terms are trademarks of International Business Machines Corporation in the United States,
other countries, or both:
Application System/400
AS/400
DB2
e (logo)
IBM
iSeries
iSeries 400
Operating System/400
OS/400
SAA
System/36
Systems Application Architecture
400
Other company, product, and service names may be trademarks or service marks of others.
262
Query for iSeries Use V5R2
Index
Special Characters
*ALL authority 159, 168
*ALL join 44, 188
*ALL special library name 10
*ALLUSR special library name 10
*CHANGE authority 159, 168
*CURLIB special library name 10
*EXCLUDE authority 159, 168
*LIBCRTAUT authority 159, 168
*LIBL special library name 10
*QRYDFN (query definition)
object 5
*USE authority 159, 168
*USRLIBL special library name 10
|| (concatenation) operator 60
A
access path
creating 232
floating point fields 236
keyed sequence
definition 231
select/omit 232
size limitations 236
access plan
description 232
updating 233
adding
file selections 35
record selection test (comparison) 103
result field 86
ALL join 188
AND connection
record selection test 101
argument rules
function
char 74
concatenation 60
DATE 75
day 75
days 76
digits 62
hour 76
microsecond 77
minute 77
month 78
second 78
SUBSTR function 61
time 79
timestamp 79
year 80
ascending sequence
sorting records 105
assumed values 7
authority
for query database file output 159
© Copyright IBM Corp. 2000, 2002
authority (continued)
giving to others for your query 168
security 159
authorization list name authority 159, 168
average summary function
date, time, and timestamp value 136
null value 136
B
batch processing
choosing a query task 12
performance recommendations 240
bibliography 259
bracket characters
DBCS (double-byte character set) 9
bracketed DBCS data
Display Report Layout display 8
length restrictions 44
LIKE comparison test 99
LIKE, NLIKE pattern
special characters 100
NLIKE (not like) comparison test 99
rules for join tests 45
break
level 139
text
CCSID (coded character set identifier) 253
defining report break formatting 144
break, report
definition 139
differences between Query/36 and Query for
iSeries 196
example 140
C
CCSID (coded character set identifier)
break text 253
changing query 250
table 250
collating sequence 112, 256
conversion 248, 249
DBCS character field 248
default 248
defining 114
hexadecimal 248
language 248
SBCS character field 248
selecting 112
translation table 248
user-defined 248
column formatting 253
compatibility for conversions 254
concatenation
results 61
cover page 253
114
263
CCSID (coded character set identifier) (continued)
definition 246
displaying 17
displaying query 249
edit word 132
file selection 252
footing 253
join tests 252
language code page 256
marking 247, 254
page heading 253
query
options list 256
running 256
table 256
query display
table 249
record selection 253
report break 253
result field 252
run-time record selection 251
Select Records display 97
sort field 253
summary function 253
translation table 116
VALUE function
results 63
changing query
CCSID (coded character set identifier) 250
definition 12
changing query definition 173, 211
CHAR function
argument rules 74
syntax diagram 74
character
constant 60
record selection test 94
expression
result fields 60
field 60
name 60
character comparisons 165
character constant
declaring 94
rules for using 60
shift-in character 60
shift-out character 60
character data
Display Report Layout display 8
character field 248
differences between Query/36 and Query for
iSeries 196
substring
example 61
valid comparisons 46
character field name
valid entries 60
value
description 61
character result field
rules for creating 60
264
Query for iSeries Use V5R2
character set support
UCS2 level 1 4
character substitution warning 165
checking query results 8
choices
selecting options 29
CL (control language) 5
creating database files 5
code
Dec field
E 121
J 121
L 121
O 121
T 121
V 121
Z 121
edit 129
L, T, or Z
join test 45
code page
definition 114
example 114
coded character set identifier (CCSID)
break text 253
changing query 250
collating sequence 112, 256
conversion 249
DBCS character field 248
default 248
defining 114
hexadecimal 248
language 248
SBCS character field 248
selecting 111, 114
translation table 248
user-defined 248
column formatting 253
compatibility for conversions 254
cover page 253
definition 246
displaying format 17
displaying query 249
edit word 132
file selection 252
footing 253
join test 252
language code-page 256
marking 247, 254
page heading 253
query
options list 256
running 256
table 256
query display
table 256
record selection 253
report break 253
result field 252
run-time record selection 251
Select Records display 97
coded character set identifier (CCSID) (continued)
sort field 253
summary function 253
translation table 116
collating sequence 87, 111, 112, 249
affecting query 112, 165
CCSID (coded character set identifier) 114
collating sequence 256
default 248
hexadecimal 248
language 248
translation table 248
user-defined 248
considerations when changing for query 176
date, time, or timestamp fields 112
default 111
defining your own 115
English language default 113
hexadecimal 113, 114
language sequence 114
performance recommendations 237
purpose 111
selecting 111, 113
setting default 111
system sort sequence 117
translation table 116
using for character comparisons 165
collating sequence affects 112
collating sequence and comparisons
EQ 112
GE 112
GT 112
LE 112
LIKE 112
LIST 112
LT 112
NE 112
NLIKE 112
NLIST 112
RANGE 112
column
formatting for report spacing 119
heading for report 119
heading result field 85
spacing for reports 119
summarizing in reports 137
column formatting
CCSID (coded character set identifier) 253
column heading
specifying 85
command
Create Table (CRTTBL) 112
creating database files 5
CRTTBL (Create Table) 112
Delete Query (DLTQRY) 11, 178
DLTQRY (Delete Query) 11, 178
Override with Database File (OVRDBF) 187
OVRDBF (Override with Database File) 187
Query
deleting 11
running 11
command (continued)
Query/36 procedure equivalents 197
Run Query (RUNQRY) 11, 171
RUNQRY (Run Query) 11, 171
Start Query (STRQRY) 7, 11
STRQRY (Start Query) 7, 11
Work with Query (WRKQRY) 7, 11
WRKQRY (Work with Query) 7, 11
comparison 92
date 96
field 92
test 92
time 96
timestamp 96
value 93
comparison test
EQ (equal) 95, 96, 165
GE (greater than or equal) 95, 96, 165
GT (greater than) 95, 96, 165
IS (is) 95, 96
ISNOT (is not) 95, 96
LE (less than or equal) 95, 96, 165
LIKE (like) 165
DBCS 99
similar patterns 95, 98
LIST (list) 95, 97, 165
LT (less than) 95, 96, 165
NE (not equal) 95, 96, 165
NLIKE (not like) 95, 98, 165
NLIST (not list) 95, 97, 165
comparisons and collating sequence
EQ 112
GE 112
GT 112
LE 112
LIKE 112
LIST 112
LT 112
NE 112
NLIKE 112
NLIST 112
RANGE 112
compatibility
conversions 254
concatenation 60
DBCS-graphic field
limitations 60
mixing DBCS fields and SBCS fields
results 187
Confirm Delete of Queries display 179
confirming selection
creating or changing query definition 36
connection
record selection test (AND and OR) 101
constant
character 60
DBCS 60
record selection test 94
result fields 60, 66
date, time, and timestamp
record selection test 95
Index
265
constant (continued)
graphic
migration 241
numeric
record selection test 94
result field 59
control language (CL) 5
creating database files 5
Copy Queries display 177
copying
query definition 173, 177
count summary function
null value 136
cover page
CCSID (coded character set identifier) 253
defining for printout 152
Create and Select Field Definitions display
(IDDU) 200, 202
Create Field Definitions display (IDDU) 201
Create File Definition display (IDDU) 200
creating
access path 232
database file
description 5
example 203
expression
general rules 83
query definition
advanced example 215
considerations 30
example 206
suggested sequence of tasks 31
Work with Queries display 12, 27
result field 57
currency symbol
edited numeric field 126
CURRENT function 80
D
data
entering 203
data description specifications (DDS)
introduction 5
data file utility (DFU) 4
data type
date 66
Dec column
E 182
J 182
L 182
O 182
T 182
V 182
Z 182
time 66
timestamp 66
database file
creating
example 203
266
Query for iSeries Use V5R2
database file (continued)
output
maximum record length 30
output to
differences between Query/36 and Query for
iSeries 196
overriding 187
database, relational
definition 5
date
arithmetic operation 70
converting numeric to date 71
decrementing 71
incrementing 71
numeric dates, working with 71
comparison 96
constant
record selection test 95
data type 67
description 66, 67
DATE function 75
displaying format 17, 69
EUR 67
format separator 67
function
CURRENT(DATE) 80
ISO 67
JIS 67
LOCAL 67
OS/400 format 67
sort considerations 108
USA 67
value
length 120
date and time format
EUR 67
ISO 67
JIS 67
LOCAL 67
OS/400 format 67
USA 67
date arithmetic operation
addition rules 69
subtraction rules 70
date data
Display Report Layout display 8
date duration 73
date field
collating sequence 112
release restrictions 241
date field name 66
DATE function
argument rules 75
syntax diagram 75
date value
arithmetic 69
length 120
date, time, and timestamp field
collating sequence
minimum or maximum values 112
date, time, and timestamp field (continued)
migrating
N to N-1 241
date, time, and timestamp value
average summary function 136
comparing to null 96
IS, ISNOT test 96
total summary function 135
date/time field
editing 127
separator 128
DAY function
argument rules 75
syntax diagram 75
DAYS function
argument rules 76
syntax diagram 76
DB2 UDB for iSeries program
relational database terms
file 5
relationship to OS/400 terms 5
DB2 UDB for iSeries views 237
DBCS (double-byte character set)
bracket characters 9
character constant
shift-in character 60
shift-out character 60
defining result fields
considerations 187
Display Report Layout display 8
LIKE comparison test 99
NLIKE (not like) comparison test 99
pictograph 4
rules for join tests 45
shift-in character 60
shift-out character 60
sorting character data 111
space requirements 9
symbolic characters 4
DBCS (double-byte Character set)
data representation 8
DBCS-either field 8
DBCS-graphic field 9, 45
character constant
requirements 60
concatenation
limitations 60
LIKE, NLIKE pattern
special characters 100
release restrictions 241
DBCS-only field 8
DBCS-open field 8
LIKE, NLIKE pattern
special characters 100
DDS (data description specifications)
introduction 5
Dec column
data type
E 45, 182
G 45
J 45, 182
Dec column (continued)
data type (continued)
L 182
O 45, 182
T 182
V 182
Z 182
Dec field
code
E 121
J 121
L 121
O 121
T 121
V 121
Z 121
decimal
data error
migration from System/36 234
processing 238
point edited numeric fields 125
position
fields in a report 120
for result field 188
result field 85
decimal data
differences between Query/36 and Query for
iSeries 196
decimal data error
ignoring 164
decimal positions and length
used for internal numeric calculations 189
decimal precision for result fields 190
decimal separator
displaying format 17
default
collating sequence
hexadecimal 248
saving 111
determining order of records for query 105
field selection and sequencing for query 87
record selection for query 91
default values 7
Define Collating Sequence display 115
Define Database File Output display 155
Define Numeric Field Editing display 122
Define Printer Output display 148
Define Report Breaks display 139
Define Result Fields display 57
Define Spooled Output display 151
Define the Query display 28
defining
result field 57
your own collating sequence 115
definition
CCSID (coded character set identifier) 246
code page 114
deleting query
DLTQRY command 11
expression 58
query 176
Index
267
definition (continued)
changing 30, 173
changing (example) 211
copying 177
copying before changing 173
creating 27, 30
creating (example) 206
deleting 179
displaying 179
DLTQRY command 178
information printed 181
migrating restriction 197
naming 27
printing 180
renaming 178
running 8
saving 167
selecting files 33
specifying authority 168
definition display
moving through 30
definition step
description 29
selecting on Define the Query display 28
Delete Query (DLTQRY) command 11, 178
deleting
file selections from a query 36
query definition
DLTQRY command 178
Query for iSeries menu 11
Query menu 178
Work with Queries display 12, 179
descending sequence
sorting records 105
Describe Date/Time Field Editing display 128
Describe Numeric Field Editing display 124
describing
numeric field editing 124
detailed output 145
DFU (data file utility) 4
differences between Query/36 and Query for iSeries
commands 195
maximum length of character fields 195
number of files that can be joined 195
operational
joining files 195
types of joins 195
DIGITS function
argument rules 62
syntax diagram 62
display
Confirm Delete of Queries 179
Copy Queries 177
Create and Select Field Definitions (IDDU) 200, 202
Create Field Definitions (IDDU) 201
Create File Definition (IDDU) 200
Define Collating Sequence 115
Define Database File Output 155
Define Numeric Field Editing 122
Define Printer Output 148
Define Report Breaks 139
268
Query for iSeries Use V5R2
display (continued)
Define Result Fields 57
Define Spooled Output 151
Define the Query 28
Describe Date/Time Field Editing 128
Describe Numeric Field Editing 124
Display Date Format 69
Display File Selections 42
Display Join Tests 53
Display Report Layout 8
Exit This Query 167, 169
Fields Missing from File Definition 54
Format Report Break 143
IDDU main (system) menu 199
Select and Sequence Fields 87
Select Collating Sequence 113
Select Definition Type (IDDU) 200
Select File 37
Select Member 40
Select Record Format 41
Select Records 92
Select Report Summary Functions 136
Select Sort Fields 105
Select Translation Table 116
selecting for query output 145
Selecting Output Type and Output Form 146
Specify Cover Page 152
Specify Edit Code 129
Specify Edit Word 131
Specify File Selections 33
Specify How to Join Files 44
Specify Page Headings and Footings 153
Specify Processing Options 163
Specify Report Column Formatting 120
Specify Type of Join 43
System Sort Sequence 118
time format 69
Work with Database Files (IDDU) 203
Work with File Definitions (IDDU) 200, 202
Work with Queries 171
display date and time format
F17 function key 18, 69
Display File Selections display 42
Display Join Tests display 53
Display Report display 8
Display Report Layout display 8
displaying
files selected for a query 41
format
date 17
decimal separator 17
time 17
join tests 53
lists 9
query 249
query definition 12, 179
query output 145
report layout using F13 8
report using F5 8, 169
text about items in a list 15
dividing by zero (0)
example 83
DLTQRY (Delete Query) command
double-byte character set (DBCS)
bracket characters 9
character constant
shift-in character 60
shift-out character 60
data representation 8
pictograph 4
shift-in character 60
shift-out character 60
sorting character data 111
space requirements 9
symbolic characters 4
duration
date 73
labeled 73
time 73
timestamp 74
11, 178
E
edit code
modifier 131
numeric fields 129
specifying 129
edit word
different CCSIDs 132
numeric field 131
specifying 131
editing numeric field
defining 122
describing editing
currency symbol 126
date/time field 127
date/time separator 128
decimal point 125
negative sign 125
replacing leading zero 127
thousands separator 125
specifying edit code 129
specifying edit word 131
EE (double-byte E) 8
ending query definition 167
entering data 203
EQ (equal) comparison test 95, 96, 165
error
handling 18
ignoring in numeric field 164
Specify File Selections display 36
EUR (IBM European standard)
date and time 67
example
changing query definition 211
code page 114
connecting record selection test 101
creating database file 203
creating query definition 206, 215
defining result field 86
IDDU definition 199
example (continued)
running query 206
selecting and sequencing field 88
selecting sort field 106
exercise
Query 199
Exit This Query display 167, 169
exiting
Query for iSeries 7, 167
expression
character
definition 58
considerations when creating 83
creating 83
date
definition 58
date data type 68
numeric
definition 58
result field
character 60
creating 83
numeric 59
spanning lines 84
time
definition 59
time data type 68
timestamp
definition 59
timestamp data type 68
F
field
character
differences between Query/36 and Query for
iSeries 196
using result fields 60
comparison 92
date
expressions 66
using result fields 66
DBCS 4, 45
brackets 9
Display Report Layout display 8
expressions 60
field naming convention 4
length(graphic) 120
LIKE comparison test 99
migration(graphic) 241
NLIKE (not like) comparison test 99
printed record format 182
rules for join tests 45
rules for join tests(graphic) 45
selecting records 93
shift-out and shift-in characters 9
definition 3
editing
defining numeric 122
describing numeric 124
floating-point 8
Index
269
field (continued)
length and decimal position in report 120
missing from file definition
during file selection process 55
starting to change or display a query 55
name
numeric 59
null 8
numeric
editing 122
using in result fields 59
omitting from report 121
result
creating 57
DBCS 187
decimal precision 190
defining 57
differences between Query/36 and Query for
iSeries 196
naming 58
tips and techniques 235
selecting for query 87, 235
selection
default 87
sequencing for query 87, 235
sort
example of how used 106
performance recommendations 236
selecting for query 105, 236
specifying ascending or descending
sequence 105
time
expressions 66
using result fields 66
timestamp
expressions 66
using result fields 66
value record selection test 94
Fields Missing from File Definition display 54
file
adding for query 35
database
creating example 203
defining for query output 154
definition 3
deleting file selection from a query 36
differences between Query/36 and Query for
iSeries 195
displaying selections for a query 41
ID (identifier) 36
identifier (ID)
differences between Query/36 and Query for
iSeries 195
using in a query definition 36
joining
differences between Query/36 and Query for
iSeries 195
secondary file sequence rule 49
selecting 47
selecting matched records using a primary
file 48
270
Query for iSeries Use V5R2
file (continued)
joining (continued)
selecting unmatched primary file records 48
sequencing secondary files for a primary join 49
specifying join selections 42
linked
differences between Query/36 and Query for
iSeries 195
logical 5, 55
multiple record formats 187
output to database
differences between Query/36 and Query for
iSeries 196
overriding 187
physical 5
primary 43
relational database 5
secondary 43
Select Member display 39
Select Record Format display 40
selecting file members
Specify File Selections display 35
selecting for a query
Select File display 37
Specify File Selections display 33
selecting for query output 145
sharing 187
Specify File Selections display 35
structure example 3
file ID (identifier) 36
file selection
CCSID (coded character set identifier) 252
footing
printing on a report 153
format 187
Format Report Break display 143
formatting
report break 143
report column spacing 119
function
average summary
date, time, and timestamp value 135
null value 135
CHAR
argument rules 74
syntax diagram 74
count summary
null value 135
DATE
argument rules 75
syntax diagram 75
DAY
argument rules 75
syntax diagram 75
DAYS
argument rules 76
syntax diagram 76
DIGITS
argument rules 62
syntax diagram 62
function (continued)
HOUR
argument rules 76
syntax diagram 76
introduction 5
MICROSECOND
argument rules 77
syntax diagram 77
minimum summary
null value 135
MINUTE
argument rules 77
syntax diagram 77
MONTH
argument rules 78
syntax diagram 78
SECOND
argument rules 78
syntax diagram 78
SUBSTR (substring) 61
substring
argument rules 60
summary
average 135
CCSID (coded character set identifier)
count 135
location on report 137
maximum 135
minimum 135
performance recommendations 237
report 237
summarizing columns 137
total 135
types 135
TIME
argument rules 79
syntax diagram 79
TIMESTAMP
argument rules 79
syntax diagram 79
total summary
date, time, and timestamp value 135
null value 135
VALUE 62
VARCHAR 63
VARGRAPHIC 65
YEAR
argument rules 80
syntax diagram 80
function key
F10
showing previous display 18
F11
displaying additional information 15
F12
canceling changes made 18
F13
using to display report layout 8
F17
display date and time format 18, 69
function key (continued)
F21
to select all 30
F23
set collating sequence default 111, 116
using to display a long comment 10
F4
using to obtain a list 9
F5
displaying report 169
using to display report 8
introduction to using 8
G
GE (greater than or equal) comparison test 95, 96,
165
generic name 9
GG (double-byte G) 9
GT (greater than) comparison test 95, 96, 165
H
253
heading
column in report 119
report 153
result field 85
hexadecimal
CCSID 114
collating sequence 113, 114
HOUR function
argument rules 76
syntax diagram 76
how a collating sequence affects Query for iSeries
how to join files 43
112
I
IBM European standard (EUR)
date and time 67
IBM USA standard (USA)
date and time 67
ID (identifier)
differences between Query/36 and Query for
iSeries 195
file 36
Using in a query definition 36
IDDU (interactive data definition utility)
data dictionary 4
definition 199
example
creating IDDU definition 199
introduction 4
main (system) menu 199
identifier (ID)
differences between Query/36 and Query for
iSeries 195
file 36
Using in a query definition 36
Ignore Character Substitution display 165
ignoring decimal data error 164
Index
271
increasing the decimal precision 190
information for programmers, advanced 187
interactive data definition utility (IDDU)
data dictionary 4
definition 199
example
creating IDDU definition 199
introduction 4
main (system) menu 199
interactive processing
limiting 243
restricting 243
internal numeric calculations
length and decimal positions 189
International Standards Organization (ISO)
date and time 67
introduction to Query
concepts 3
IS (is) comparison test 95, 96
ISNOT (is not) comparison test 95, 96
ISO (International Standards Organization)
date and time 67
J
Japanese Industrial Standard (JIS)
date and time 67
JIS (Japanese Industrial Standard)
date and time 67
JJ (double-byte J) 8
join operation
performance recommendations 239
join selection tests
definition 231
join test
CCSID (coded character set identifier) 252
code
L, T, or Z 45
data restrictions 45
displaying 53
specifying 43
valid comparisons 45
joining files 42
advanced information for 188
description 43
differences between Query/36 and Query for
iSeries 195
example
selecting matched records for all selected
files 47
selecting matched records using a primary
file 48
selecting unmatched primary file records 48
sequencing secondary files for a primary join 49
how to join 43
matched records join 43
matched records with primary file join 43
rules 44
secondary file sequence rule 49
types of join 43
unmatched records with primary file join 43
272
Query for iSeries Use V5R2
K
key
function 8
Print 9
keyed sequence access path
definition 231
L
L, T, or Z
join test 45
labeled duration
definition 73
labeled duration
adding 235
subtracting 235
language code-page CCSIDs 256
language collating sequence query 114
layout
displaying report 8
LE (less than or equal) comparison test 95, 96, 165
leading zero
replacing 127
length
fields in a report 120
result field 85, 188
length and decimal positions
used for internal numeric calculations 189
level, break 139
library
definition 5
selecting for file selection 34
selecting from list 10
selecting items from list
Work with Queries display 16
special names 10
library default
S/36 environment 196
LIKE (like) comparison test 165
DBCS 99
similar patterns 95, 98
LIKE pattern
DBCS-graphic 100
DBCS-only 100
DBCS-open 100
non-DBCS character 99
linked file
differences between Query/36 and Query for
iSeries 195
list
(LIST) comparison test 95
displaying 9
generic name
using to obtain a subset list 14
library (*LIBL) 10
names of queries
Work with Queries display 14
NOT LIST comparison test 95
positioning
Work with Queries display 15
list (continued)
selecting items
how 10
library name 10
queries 10
query name 10
selecting items from 16
library 14
subset
Work with Queries display 14
LIST (list) comparison test 95, 97, 165
LOCAL time standard
date and time 67
logical file
definition 5
using with Query or DB2 UDB for iSeries
programs 55
long comment
using F23 to display 10
LT (less than) comparison test 95, 96, 165
M
marking
CCSID (coded character set identifier) 247
matched records join
use every record 43
matched records with primary file join 43
field length restrictions 44
maximum record length
database output 30
maximum summary function
null value 136
member
selecting for file selection 35, 39
menu
IDDU (interactive data definition utility) 199
Query for iSeries Utilities 11
merge
column spacing exception 119
message
Query for iSeries 18
Query for iSeries status 241
message response
differences between Query/36 and Query for
iSeries 196
MICROSECOND function
argument rules 77
syntax diagram 77
migrating query definition
restriction 197
migration
N to N-1 241
minimum summary function
null value 136
MINUTE function
argument rules 77
syntax diagram 77
MONTH function
argument rules 78
syntax diagram 78
moving
through definition display 30
multilingual environment
result field
naming conventions 58
multiple
Query for iSeries task 13
selecting files for a query 35
N
name
generic 9
numeric field 59
query definition 27
result field 58
special library 10
naming conventions
result field
multilingual environment 58
NE (not equal) comparison test 95, 96, 165
negative sign
editing numeric field 125
NLIKE (not like) comparison test 95, 98, 165
NLIST (not list) comparison test 95, 165
null field
*ALL join 44
joining 45
types 8
null value
average summary function 136
count summary function 136
maximum summary function 136
minimum summary function 136
record selection test 95
total summary function 135
null-capable field
release restrictions 241
numeric
calculations
length and decimal positions 189
constant
record selection test 94
rules for using 59
expression 58
field
converting to a date 71
describing editing 124
editing 122
ignoring error in during processing 164
length and decimal positions 85, 189
numeric dates, working with 71
rounding during processing 164
using in result fields 59
operators 58
numeric expression
result field 59
numeric field 233, 234
numeric formats
packed decimal 233
zoned decimal 233
Index
273
O
object
DB2 UDB for iSeries program 5
query definition 5
omitting field from report 121
OO (double-byte O) 8
operator
concatenation (||) 60
null value 60
numeric 58
optimization
definition 231
OR condition
specifying selection tests 236
OR connection
record selection test 101
output
database file
defining 154
specifying 145
detailed 145
display 145
form
selecting 145, 237
printer 145, 148
summary only
differences between Query/36 and Query for
iSeries 196
specifying 145
to database file
differences between Query/36 and Query for
iSeries 196
type
selecting 145, 237
Override with Database File (OVRDBF) command 187
overriding
database files 187
spooled output 150
OVRDBF (Override with Database File) command 187
Q
P
packed decimal fields 233
page footing
CCSID (coded character set identifier)
defining 154
page heading
CCSID (coded character set identifier)
defining 154
performance
designing or changing queries 234
tips and techniques 231
performance tuning
recommendations 241
physical file
definition 5
pictograph
DBCS (double-byte character set) 4
position to prompt 15
practice exercises 199
274
precision
result fields 190
primary file
definition 238
used in file join operations 43
primary record
select/omit criteria 43
Print key 9
printer
defining printout cover page 152
selecting for query output 145, 148
specifying page heading and footing 153
specifying spooled output override 150
printing
differences between Query/36 and Query for
iSeries 196
display 9
query definition 12, 180
processing option
differences between Query/36 and Query for
iSeries 196
ignoring decimal data error 164
purpose 163
rounding numeric field values 164
specifying 238
processing options
character comparisons 176
collating sequence 176
profile
Query for iSeries 18
programming considerations 187
prompt
description 7
position to
Work with Queries display 15
specifying library name 13
specifying query name 13
subset
Work with Queries display 14
Query for iSeries Use V5R2
253
253
query
defining tips 234
running 169
Query
practice exercises 199
query definition
changing 30
example 211
explanation 173
considerations when changing 176
copying 177
copying before changing 173
creating
advanced example 215
example 206
Work with Queries display 27
Define the Query display 28
definition 5
deleting 178
query definition (continued)
DLTQRY command 11, 178
Query for iSeries Utilities menu 11
Work with Queries display 178
displaying 179
exiting 167
information printed 181
migrating restriction 197
naming 27
naming restrictions
multilingual environment 27
printing 180
Query for iSeries menu
deleting from 11
renaming 178
running 8
saving 167
selecting files 33
selecting from list 10
selecting options 29
specifying authority 168
Query for iSeries
command 11
definition 3
differences from Query/36 195
error 18
exiting 7, 167
how a collating sequence affects 112
introduction
description 3
language sequences 249
menu
getting to 7
using 11
message 18
multiple query tasks 13
profile 18
starting 7, 11
task
choosing 13
description 5
illustration 6
tips and techniques 231
working with 11
query processing 231
R
RANGE (range) comparison test 95, 96
record
definition 3
determining order for query 105
matched 238
selection
CCSID (coded character set identifier)
connecting example 101
default 91
test 94, 95
selection test
adding 103
connecting with AND and OR 101
251
record (continued)
selection test (continued)
DBCS LIKE 99
DBCS NLIKE (not like) 99
EQ (equal) 95, 96
GE (greater than or equal) 95, 96
GT (greater than) 95, 96
IS (is) 95
ISNOT (is not) 95
LE (less than or equal) 95, 96
LIKE (like) 95, 98
LIST (list) 95, 97
LT (less than) 95, 96
NE (not equal) 95, 96
NLIKE (not like) 95, 98
NLIST (not list) 95
RANGE (range) 95, 96
removing 103
unmatched 239, 241
record format 187
definition 3
printing example 182
selecting for file selection
Select Record Format display 40
Specify File Selections display 35
record selection
CCSID (coded character set identifier) 253
record selection test
definition 231
OR condition 236
performance recommendations 235
related printed information 259
relational database file 5
removing
record selection test (comparison) 103
result field 86
renaming query definition 178
report
break
case sensitivity 142
CCSID (coded character set identifier) 253
defining 139
definition 139
differences between Query/36 and Query for
iSeries 196
example of defining 140
fields other than sort fields 188
formatting 143
levels 139
text 144
column formatting
heading 119
length and decimal position for field 120
spacing 119
field 54
omitting 121
missing 54
output
database file 145, 154
display 145
printer 145, 148
Index
275
report (continued)
summary function 237
specifying 135
types 135
using F13 to display layout 8
using F5 to display 8, 169
restriction
migration definitions 197
result field
adding 86
CCSID (coded character set identifier) 252
character 60
character constant 60, 66
column heading 85
concatenation (||) operation 60
creating 57
date 66
decimal position 85, 188
defining
DBCS 187
unique name 57
differences between Query/36 and Query for
iSeries 196
example of defining 86
expression
character 60
numeric 59
operator 58
length 85, 188
multilingual environment
naming conventions 58
naming 58
numeric constant 59
numeric fields 59
other data types 68
removing 86
SUBSTR (substring) function 61
time 66
timestamp 66
tips and techniques 235
result fields
decimal precision 190
results
checking query 8
returning to Define the Query Display 30
rounding numeric field value 164
rule
function
char 74
concatenation 60
DATE 75
day 75
days 76
digits 62
hour 76
microsecond 77
minute 77
month 78
second 78
SUBSTR (substring) function 61
time 79
276
Query for iSeries Use V5R2
rule (continued)
function (continued)
timestamp 79
value 62
year 80
joining files 44
Run Query (RUNQRY) command 11, 171
run-time record selection
CCSID (coded character set identifier) 251
running query 8
example 206
Exit This Query display 169
interactively
limiting 243
Query for iSeries menu 169
Query Utilities menu 11
RUNQRY (Run Query) command 171
using F5 169
with a different language 115
Work with Queries display 13, 170
RUNQRY (Run Query) command 11, 171
S
saving query definition 167
SECOND function
argument rules 78
syntax diagram 78
secondary file
definition 238
multiple join file considerations 49
used in file join operations 43
secondary file sequencing rule
example of correct method 50
example of incorrect method 51
rules for correct joins 49
Select and Sequence Fields display 87
Select Collating Sequence display 113
Select Definition Type (IDDU) display 200
Select File display 37
Select Member display 40
Select Record Format display 41
Select Records display
CCSID (coded character set identifier) 97
comparison field 92
comparison tests 91
select/omit criteria 43
Select Report Summary Functions display 136
Select Sort Fields display 105
Select System Sort Sequence display 118
Select Translation Table display 116
select/omit access path 232
select/omit criteria
primary records 43
selecting
collating sequence 111, 113
field for query 87
performance recommendations 235
files for a query
Select File display 37
Specify File Selections display 33
selecting (continued)
items from list 10
library for file selection 34
matched records
primary file 48
selected files 47
members for file selection
Select Member display 39
Specify File Selections display 35
options
query definition 29
output type and output form 145
queries from a list
Work with Queries display 14
record for query 91
record format for file selection
Select Record Format display 40
Specify File Selections display 35
sort field for query 105
system sort sequence 117
translation table 116
selecting and sequencing field
example 88
Selecting Output Type and Output Form display 146
selecting record
connecting example 101
performance recommendations 235
selecting records to join
ignoring field case 191
selection test
definition 231
OR condition 236
record
example 101
sequence 87
collating
changing for query 176
default 87
hexadecimal 113
language 114
purpose 111
selecting translation table 116
setting default 111
system sort 117
user defined 115
sequencing
fields for query 87
query 87
secondary files for a join 49
sharing files 187
shift-in character
DBCS (double-byte character set) 60
shift-out character
DBCS (double-byte character set) 60
single-byte character set (SBCS) field 4
sort
field
CCSID (coded character set identifier) 253
collating sequence consideration 108
date, time, timestamp 108
example of how used 106
sort (continued)
field (continued)
null values 108
performance recommendations 236
priority number 105
selecting for query 105, 236
specifying ascending or descending
sequence 105
sequence
differences between Query/36 and Query for
iSeries 196
sorting DBCS character data 111
special library names 10
Specify Cover Page display 152
Specify Edit Code display 129
Specify Edit Word display 131
Specify File Selections display 33
Specify How to Join Files display 44
Specify Page Headings and Footings display 153
Specify Processing Options display 163
Specify Report Column Formatting display 120
Specify Type of Join display 43
spooled output override 150
Start Query (STRQRY) command 7, 11
starting Query 7
status message
Query for iSeries 241
STRQRY (Start Query) command 7, 11
subroutine
differences between Query/36 and Query for
iSeries 195
subset prompt
Work with Queries display 14
SUBSTR (substring) function
argument rules 61
null values 61
syntax diagram 61
SUBSTR (substring) operator
argument rules 62
DBCS fields
result field 187
null values 62
syntax diagrams 62
summary function
average 136
CCSID (coded character set identifier) 253
column summary values
location on report 137
count 136
maximum 136
minimum 136
performance recommendations 237
report 237
summarizing columns 137
total 135
types 135
summary-only output
database file 145, 160
differences 196
support
UCS2 level 1 character set 4
Index
277
symbolic character
DBCS (double-byte character set) 4
system administrator guidelines 243
system sort sequence 117
T
test
displaying 53
test pattern
DBCS LIKE 99
DBCS-graphic field
empty string 100
declaring 98
empty string 98
non-DBCS
special characters 99
special characters 98
test, join
CCSID (coded character set identifier)
code
displaying 43
L, T, or Z 43
specifying 43
text, break 144
thousands separator
numeric fields 125
time
arithmetic operation
decrementing 73
incrementing 73
subtraction 73
comparison 96
constant
record selection test 95
data type
description 66, 67
displaying format 17, 69
EUR 67
function
CURRENT(TIME) 80
CURRENT(TIMEZONE) 80
ISO 67
JIS 67
LOCAL 67
OS/400 format 67
sort considerations 108
USA 67
value
length 120
time arithmetic operation
addition rules 69
subtraction rules 70
time data
Display Report Layout display 8
time duration 73
time field
collating sequence 112
release restrictions 241
time field editing 127
time field name 66
278
Query for iSeries Use V5R2
252
TIME function
argument rules 79
syntax diagram 79
time value
arithmetic 69
timestamp
arithmetic operation
addition rules 73
decrementing 73
incrementing 73
subtraction 70, 73
comparison 96
constant
record selection test 95
data type
description 66, 68
function
CURRENT(TIMESTAMP) 80
sort considerations 108
value
length 120
timestamp data
Display Report Layout display 8
timestamp duration 74
timestamp field
collating sequence 112
release restrictions 241
timestamp field name 66
TIMESTAMP function
argument rules 79
syntax diagram 79
timestamp value
arithmetic 69
tips and techniques
using Query 231
total summary function
date, time, and timestamp value 135
null values 135
translation table
CCSID (coded character set identifier)
selecting for collating sequence 116
116
U
UCS2 level 1 support 4
unmatched records with primary file join
field length restrictions 44
records in primary file without matching records
USA (IBM USA standard)
date and time 67
user-defined collating sequence 115
using collating sequence 165
V
value
comparison 93
default 93
null
record selection test
VALUE function 62
95
43
value length
date 120
time 120
timestamp 120
VARCHAR function 63
VARGRAPHIC function 65
variable-length field
release restrictions 241
verifying choice
creating or changing query definition
viewing queries on display 8
36
W
word, edit
numeric field 131
Work with Database Files display (IDDU) 203
Work with File Definitions display (IDDU) 202
Work with File Definitions Display (IDDU) 200
Work with Queries display
getting to 7
introduction 12
listing names of queries 14
running query 170
Work with Query (WRKQRY) command 11
Work With Query (WRKQRY) command 7
working with Query 7
WRKQRY (Work with Query) command 7, 11
Y
YEAR function
argument rules 80
syntax diagram 80
Z
zero, dividing by
example 83
zoned decimal fields
233
Index
279
280
Query for iSeries Use V5R2
Printed in U.S.A.
SC41-5210-04