1
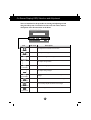
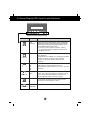
ENGLISH
6633 - 4LE
E52 Color Monitor
User Guide
First Edition (May / 2002)
Note : For important information, refer to the Monitor Safety and Warranty manual that
comes with this monitor.
This publication could contain technical inaccuracies or typographical errors. Changes are
made periodically to the information herein; these changes will be made in later editions.
IBM may make improvements and/or changes in the product(s) and/or program(s) at any
time.
It is possible that this publication may contain reference to, or information about, IBM
products (machines and programs), programming, or services that are not announced in
your country.
Requests for copies of this publication and for technical information about IBM products
should be made to your IBM Authorized Dealer or IBM Retailer.
No part of this publication may be reproduced or distributed in any form or by any means
without prior permission in writing from the International Business Machines Corporation.
© Copyright International Business Machines Corporation 2002. All rights reserved.
Note to U.S. Government Users -- Documentation related to restricted rights -- Use,
duplication or disclosure is subject to restrictions set forth in GSA ADP Schedule Contract
with IBM Corp.
Notices
References in this publication to IBM products, programs, or services do not imply that IBM
intends to make these available in all countries in which IBM operates. Any reference to an
IBM product, program or service is not intended to state or imply that only IBM’s product,
program, or service may be used. Any functionally equivalent product, program, or service
that does not infringe any of IBM’s intellectual property rights or other legally protectable
rights may be used instead of the IBM product, program, or service. Evaluation and
verification of operation in conjunction with other products, programs, or services, except
those expressly designated by IBM, are the user’s responsibility.
IBM may have patents or pending patent applications covering subject matter in this
document. The furnishing of this document does not give you any license to these patents.
Trademarks
The following terms, used in this publication, are trademarks or service marks of the IBM
Corporation in the United States, other countries, or both:
HelpCenter
IBM
ENERGY STAR is a U.S. Govt. registered trademark.
Microsoft, Windows, and Windows NT are trademarks of Microsoft Corporation in the United
States, other countries, or both.
Other company, product, and service names may be trademarks or service marks of others.
Table of Contents
Precautions.......................................................................................A2
Workplace Preparation .................................................................A2
Working Practices .........................................................................A2
Monitor Driver Installation............................................................A4
Driver installation for Windows 95 or Windows 98 ......................A4
Driver installation for Windows 2000 or Windows Me .................A5
Driver installation for Windows XP ...............................................A6
Control Panel Function...................................................................A7
Front Panel Controls......................................................................A7
On Screen Display (OSD) Control Adjustment........................A8
On Screen Display (OSD) Selection and Adjustment...............A9
Troubleshooting .....................................................................A13
Specifications.........................................................................A15
Specifications..............................................................................A15
Preset Modes (Resolution) ...........................................................A16
Service Information .....................................................................A16
A1
Precautions
Workplace Preparation
Positioning the Monitor
Choose a suitable place to position the monitor where it is not near
fluorescent desk lighting or any equipment that produces magnetic fields
that could cause interference. Ensure that the furniture or equipment can
support the weight of the monitor. Allow at least 50mm (2 in.) ventilation
space around the monitor.
Height
Position the monitor so that the top of the screen is slightly below your
eye level when you sit at your workstation.
Orientation
- Choose a position that gives the least reflection from lights and
windows, usually at a right angle to any windows.
- Position the monitor directly in front of you so that you do not have to
twist your body.
- Tilt the monitor to a comfortable viewing angle.
Working Practices
Rest
Take regular breaks. Vary your posture, and stand up and stretch
occasionally as prolonged use of computer workstations can be tiring.
Back
Sit back in the chair and use the back rest.
Hands
Use a light touch on the keyboard, keeping your hands and fingers
relaxed. Allow a space in front of the keyboard to rest your wrists when
not typing. Consider using a wristpad.
Eyesight
Working with monitors, in common with any prolonged close work, can
be visually demanding. Look away from the screen periodically and have
your eyesight checked regularly.
A2
Precautions
Screen settings
Set the screen brightness and contrast to a comfortable level. You may
have to adjust this as the lighting changes during the day. Many
application programs let you select color combinations which can help
you to view in comfort.
Power Cord
For safe operation, use the power cord supplied with the unit.
Notes
Do not install the monitor in a location near heat sources such as
radiators or air ducts, or in a place subject to direct sunlight, or
excessive dust or mechanical vibration or shock.
Save the original shipping carton and packing materials, as they will
come in handy if you ever have to ship your monitor.
To keep the monitor looking new, periodically clean it with a soft cloth.
Stubborn stains may be removed with a cloth lightly dampened with a
mild detergent solution. Never use strong solvents such as thinner,
benzene, or abrasive cleaners, since these will damage the cabinet. As
a safety precaution, always unplug the monitor before cleaning it.
A3
Monitor Driver Installation
Driver installation for Windows 95 or Windows 98
To use the Plug and Play feature in Microsoft®Windows®95 or
Windows 98, files should be loaded from the IBM Monitor CD.
1. Turn off the computer and all attached devices.
2. Ensure that the monitor is connected correctly.
3. Turn on the monitor and then the system unit. Allow the system to
boot into Windows 95 or Windows 98.
Your computer’s Plug and Play code may warn you that your system
hardware has changed. This means that it has detected your new
monitor for the first time.
4. Open the DISPLAY PROPERTIES window by clicking START, SETTINGS,
CONTROL PANEL and then double - clicking on the DISPLAY icon.
5. Click the SETTINGS tab.
• In case of Windows 95 :
6 - 1.Click the CHANGE DISPLAY TYPE button.
2.Click the CHANGE MONITOR TYPE button.
• In case of Windows 98 :
6 - 1.Click the ADVANCED button.
2.Click the MONITOR tab.
3.Open the UPGRADE DEVICE DRIVER WIZARD window by clicking on
CHANGE button and then select the NEXT button.
4.Click the “Display a list of the known drivers for this device so that
I can choose a specific driver” and then select the NEXT button.
7. Insert the IBM Monitor CD into the CD drive: and click the HAVE DISK
button.
8. Click OK.
9. Ensure that the CD drive letter is selected.
10. Choose IBM E52 monitor and Click OK. The files will be copied from
the CD to your hard disk drive.
11. Close all open windows and remove the CD.
12. Restart the system.
The system will automatically select the maximum refresh rate and
corresponding Color Matching Profiles.
A4
Monitor Driver Installation
Driver installation for Windows 2000 or Windows Me
To use the Plug and Play feature in Microsoft Windows 2000 or
Microsoft Windows Millennium Edition(Me) files should be loaded
from the IBM Monitor CD.
1. Turn off the computer and all attached devices.
2. Ensure that the monitor is connected correctly.
3. Turn on the monitor and then the system unit. Allow the system to
boot into Windows 2000 or Windows Me.
4. Open the DISPLAY PROPERTIES window by clicking START, SETTINGS,
CONTROL PANEL and then double - clicking on the DISPLAY icon.
5. Click the SETTINGS tab.
6. Click the ADVANCED button.
7. Click the MONITOR tab.
8. Click the PROPERTIES button.
9. Click the DRIVER tab.
10. Open the UPGRADE DEVICE DRIVER WIZARD window by clicking on UPDATE
DRIVER and then Click the NEXT button.
11. Select the “Display a list of the known drivers for this device so that I
can choose a specific driver” and then Click the NEXT button.
12. Insert the IBM Monitor CD into the CD drive: and click the HAVE DISK
button.
13. Click OK.
14. Ensure that the CD drive letter is selected.
15. Choose IBM E52 monitor and Click OK. The files will be copied from
the CD to your hard disk drive.
16. Close all open windows and remove the CD.
17. Restart the system.
The system will automatically select the maximum refresh rate and
corresponding Color Matching Profiles.
A5
Monitor Driver Installation
Driver installation for Windows XP
To use the Plug and Play feature in Microsoft Windows XP files should
be loaded from the IBM Monitor CD.
1. Turn off the computer and all attached devices.
2. Ensure that the monitor is connected correctly.
3. Turn on the monitor and then the system unit. Allow the system to
boot into Windows XP.
4. Open the DISPLAY PROPERTIES window by clicking START, SETTINGS,
and then double - clicking on the DISPLAY icon.
5. Click the SETTINGS tab.
6. Click the ADVANCED button.
7. Click the MONITOR tab.
8. Click the PROPERTIES button.
9. Click the DRIVER tab.
10. Open the HARDWARE UPDATE WIZARD window by clicking on UPDATE
DRIVER and then Click the NEXT button.
11. Select the “Install from a list or Specific location(Advanced)” and then
Click the NEXT button.
12. Insert the IBM Monitor CD into the CD drive: and click the HAVE DISK
button.
13. Click OK.
14. Ensure that the CD drive letter is selected.
15. Choose IBM E52 monitor and Click OK. The files will be copied from
the CD to your hard disk drive.
16. Close all open windows and remove the CD.
17. Restart the system.
The system will automatically select the maximum refresh rate and
corresponding Color Matching Profiles.
CONTROL PANEL
A6
Control Panel Functions
Front Panel Controls
MENU
SELECT
Control
Function
Power Button
Use this button to turn the monitor on or off.
Power Indicator
This Indicator lights up green when the monitor
operates normally. If the monitor is in power saving
mode, this indicator color changes to amber.
MENU Button
Use this button to enter or exit the on screen
display.
Buttons
SELECT Button
Use these buttons to choose or adjust items in
the on screen display.
Use this button to enter a selection in the on
screen display.
A7
On Screen Display (OSD) Control Adjustment
Screen Adjustment
NOTE
Allow the monitor to stabilize for at least 30 minutes before making image adjustments.
To make adjustments in the On Screen Display, follow these steps:
Press the MENU Button, then the main menu of the OSD appears.
To access a control, use the
or
Buttons. When the icon you want
becomes highlighted, press the SELECT Button.
Use the
Buttons to adjust the item to the desired level.
Accept the changes by pressing the SELECT Button.
Exit the OSD by pressing the MENU Button.
A8
On Screen Display(OSD) Selection and Adjustment
The following table indicates all the On Screen Display control, adjustment,
and setting menus.
Main menu
Icon
Main menu
Contrast
H Moire
Brightness
V Moire
H Position
COLOR
9300
6500
H Size
K
V Position
V Size
RGB
Pincushion
Recall
Pin Balance
Reset
Parallelogram
Language
Trapezoid
OSD Time
: Adjustable
Video Level
U
Icon
Degauss
Information
A9
On Screen Display(OSD) Selection and Adjustment
You were introduced to the procedure of selecting and adjusting an item
using the OSD system. Listed below are the icons, icon names, and icon
descriptions of the all items shown on the Menu.
1 0 2 4 X 7 6 8 / 7 5 H z
C O N T R A S T
5 0
U
Icon
Sub menu
Description
To adjust the contrast of the screen.
CONTRAST
To adjust the brightness of the screen.
BRIGHTNESS
To move image left and right.
H POSITION
To adjust image width.
H SIZE
To move image up and down.
V POSITION
To adjust image height.
V SIZE
To correct a concave or convex bowing of the
image.
PINCUSHION
To correct the balance of both sides bowing.
PIN BALANCE
To correctly adjust the skew of the image.
PARALLELOGRAM
To correct geometric distortion.
TRAPEZOID
A10
On Screen Display(OSD) Selection and Adjustment
1 0 2 4 X 7 6 8 / 7 5 H z
H
M O I R E
5 0
U
Icon
Sub menu
This item allows you to reduce the degree of moire.
(Moire is caused by interference Horizontal Scan
Line with the periodical dot screen). It is normally
OFF(H:0/V:0).
The moire adjustments may affect the focus of the
screen.
Moire adjustments may shake slightly while the
moire reduction function is on.
H MOIRE
V MOIRE
COLOR
9300
Slightly bluish white.
6500
Slightly reddish white.
K
RGB
• OK
• CANCEL
RECALL
Description
Select the screen temperature which you prefer
among reddish or bluish or any color in between.
Set your own color levels.
You can use this function to reload the modified parameters
for screen display operation, as specified by the user after
purchase: Position, Size, Side Pincushion, Side Pincushion
Balance, Parallelogram, Trapezoid (These recalled options
may differ depending on the mode selected: Preset, User,
or New).
If you don’t want to recall the monitor to these
modified settings, use the
button to select
CANCEL and then press the SELECT button.
A11
On Screen Display(OSD) Selection and Adjustment
1 0 2 4 X 7 6 8 / 7 5 H z
H
M O I R E
5 0
U
Icon
Sub menu
• OK
• CANCEL
RESET
• 5
• 10
• 20
• 30
• 60
Set the OSD time, i.e. the length of time a menu
will remain on-screen before it shuts off
automatically. Adjust the time to 5, 10, 20, 30 or 60
seconds.
• 0.7V
• 1.0V
This item is used to select the monitor's input signal
level. The normal level used for most PCs is 0.7V.
If the screen becomes suddenly washed-out or
blurred, please select 1.0V and try again.
VIDEO LEVEL
U
To manually demagnetize the screen to avoid
showing incorrect images or colors.
DEGAUSS
INFORMATION
Return to all factory default settings except "LANGUAGE":
Brightness, Contrast, Color 9300, Video Level, OSD Time,
Moire (These reset options may differ depending on the
mode selected: Preset, User, or New).
If you don’t want to reset the monitor, use the
button to select CANCEL and then press
the SELECT button.
To choose the language in which the control names
are displayed.
OSD Menus are available in 11 languages: English,
German, French, Spanish, Italian, Swedish,
Finnish, Portuguese, Korean, Chinese and
Russian.
LANGUAGE
OSD TIME
Description
• PRESET MODE
• USER MODE
To inform users of preset and user mode data.
A12
Troubleshooting
No image appears
Is the power cord of the
monitor connected?
Check and see if the power cord is connected properly to
the power outlet.
Is the power indicator light
on?
Press the Power button.
Is the power on and the
power indicator green?
Adjust the brightness and the contrast.
Is the power indicator
amber?
If the monitor is in power saving mode, try moving the
mouse or pressing any key on the keyboard to bring up
the screen.
Do you see an "OUT OF
FREQUENCY" message
on the screen?
This message appears when the signal from the PC
(video card) is out of horizontal or vertical frequency
range of the monitor. See the 'Specifications' section of
this manual and configure your monitor again.
Do you see a "SELF
DIAGNOSITICS" message
on the screen?
This message appears when the signal cable between
your PC and your monitor is not connected. Check the
signal cable and try again.
The screen is flickering.
Is the vertical frequency
less than 70Hz or is your
monitor set to the
interlaced mode?
Set the vertical frequency to 72Hz or higher, and
consult the video card user manual for instructions on
converting to a non-interlaced mode.
(You can set this option under the Display icon of the
Control Panel.)
Do you have any
magnetic material such
as adapter, or highvoltage line near to your
monitor?
Remove magnetic sources, such as power
adapters, speakers, or high-voltage lines, away from
the monitor.
Do you hear a "~ding"
sound while the monitor
is flickering?
Use the normal degaussing function. This function
clears the screen and reduces any screen blur that
may occur due to the surrounding magnetic field. The
screen may flicker for about 5 seconds, accompanied
by a "~ding" sound.
A13
Troubleshooting
The screen color is not normal.
Do you see basic
discoloration (16 colors)?
Is the screen color unstable
or monochrome?
Do you see a partial
blurring on the screen?
Set the color depth to 256 colors or higher: use 'Control
Panel' 'Display' 'Settings' 'Color Palette'
Check the connection of the signal cable.
This happens due to interference from surrounding
magnetic fields, as created when speakers, steel
structures, or high-voltage lines are placed near the
monitor. Remove any such materials from the
immediate vicinity and use the DEGAUSS icon on the
screen adjustment menu to fix the screen.
I see an after-image on the screen.
Do you see the after-image
even when you turn off
the monitor?
A premature aging of the monitor pixels may cause the
prolonged display of a single image on the screen. Be
sure to use a screen saver to maximize the service life of
the monitor.
I see waves on the screen.
Do you see the wave
directly on the screen?
This occurs in inverse proportion to the screen focus,
which can be caused by a particular frequency or video
card. Brighten the screen and use the 'MOIRE' icon on
the screen adjustment menu to adjust the screen.
Have you installed the monitor driver?
Have you installed the
monitor driver?
Be sure to install the monitor driver from the IBMMonitor
CD that comes with your monitor.
A14
Specifications
Picture Tube
Sync Input
Video Input
Plug & Play
Power
Consumption
Dimensions
&Weight
(with tilt/ swivel
stand)
Power Input
Environmental
Conditions
Tilt/Swivel Stand
Signal cable
Power cord
Regulations
15 inches (13.7 inches viewable)
90 degree deflection
0.28mm diagonal, 0.25mm horizontal dot pitch
AGAS(Anti-Glare Anti-Static) coating
Horizontal Freq. 30 - 61kHz (Automatic)
Vertical Freq.
50 - 120Hz (Automatic)
Input Form
Separate TTL, Positive/Negative
Signal Input
15 pin D-Sub Connector
Input Form
Separate, RGB Analog, 0.7Vp-p/75 ohm, Positive
Resolution(max) 1024 x 768@75Hz
DDC 2B
≤ 75 W
Normal
≤ 5W
Active Off
Power Off
≤ 5W
Width
35.6 cm / 14.0 inches
Height
37.1 cm / 14.6 inches
Depth
39.5 cm / 15.6 inches
Net
11.7 kg (25.79 lbs)
AC 100-240V 50/60Hz 1.5A
Operating Conditions
Temperature
0˚C to 40 ˚C
Humidity
10 % to 90 % non-Condensing
Storage Conditions
Temperature
-20˚C to 60 ˚C
Humidity
5 % to 90 % non-Condensing
Detached
Attached
Detached
MPR-II
A15
Specifications
Preset Modes (Resolution)
Display Modes (Resolution)
1
2
3
4
5
6
7
VESA
VESA
VESA
VESA
VESA
VESA
VESA
Horizontal Freq. (kHz)
Vertical Freq. (Hz)
31.47
37.50
43.27
31.47
46.88
53.68
60.02
60
75
85
70
75
85
75
640 x 480
640 x 480
640 x 480
720 x 400
800 x 600
800 x 600
1024 x 768
Service Information
The following parts are for use by IBM services, or IBM authorized
dealers, to support customer warranty. Parts are for service use only.
PART
NUMBER
DESCRIPTION
31P8133
31P8134
E52 FRU MONITOR
E52 FRU - Tilt/Swivel
MACHINE
TYPE
6633
A16
MODEL
COLOR
4LE
Stealth Black
Stealth Black