1
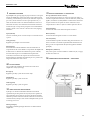
BassKick Series
1.1
Manual
deutsch
english
espaÑol
franÇais
italiano
BassKick 100
Herzlich Willkommen!
Fetter, bandfähiger Bass-Sound, flexibel und doch einfach zu bedienen,
transportfreundliches Combo-Format, aber mit dem Punch eines ausgewachsenen Stacks. Und das ganze zu einem geldbeutelschonenden
Preis. Das waren die Vorgaben für unsere Ingenieure um Bass-Combos
zu erschaffen, die im Proberaum und auf der Bühne für tolle Soundergebnisse und Wohlbefinden sorgen.
Wir möchten Dir zur Wahl eines Combos gratulieren, der alle diese
Vorgaben erfüllt, und wünschen Dir viele Jahre Spaß mit Deinem BassKick™.
Dein Hughes & Kettner-Team
Inhalt
1
2
3
4
5
6
7
8
Preamp
Equalizer
Poweramp
Weitere Anschlüsse und Bedienelemente
Standard Setup / Verkabelung
Troubleshooting
Wartung und Pflege
Technische Daten
Wichtig:
Bitte lies vor der Inbetriebnahme
unbedingt die Sicherheitshinweise
auf den Seiten 20-22!
2
BassKick 100
1
4
Bei der Gesamtkonzeption eines Bassamps spielt der Preamp eine
zentrale Rolle. Als Interface zwischen dem Bassisten und seinem
Instrument auf der einen, und der Leistungselektronik auf der
anderen Seite, entscheidet er maßgeblich über das Spielgefühl und
die klangliche Bandbreite. Die Eingänge des BK 100 basieren auf dem
Tube-Touch-Circuit™, einer außergewöhnlich übersteuerungsfesten
Schaltung, die für ein bemerkenswert natürliches, direktes
Spielgefühl sorgt. Ein unharmonisches Clipping ist dabei nahezu
ausgeschlossen.
Fx Loop:
Der Einschleifweg für Effekte ist seriell ausgeführt, in der SignalKette liegt er nach dem Equalizer und vor dem LINE OUT. Das heißt,
am LINE OUT werden auch eingeschleifte Effekte ausgegeben. Da
das Signal das Effektgerät seriell durchläuft, wird der Effektanteil am
Effektgerät selbst eingestellt.
Input:
Eingangsbuchse zum Anschluss von Bässen mit aktiver oder passiver
Elektronik
Return:
Verbinde den Ausgang des Effektgerätes mit diesem Eingang.
Preamp
Send:
Verbinde diesen Ausgang mit dem Eingang des Effektgerätes.
Line Out:
Der symmetrische Line-Ausgang gibt das Vorstufensignal inklusive
Gain:
Regler zur Anpassung des Eingangspegels.
Effekte wieder. Er befindet sich schaltungstechnisch vor der Endstufe
und ist daher unabhängig von der Einstellung des MASTER-Reglers.
Headphones:
Diese Buchse dient zum Anschluss eines Kopfhörers. Bei Belegung
der Buchse wird der Lautsprecherausgang abgeschaltet.
5
deutsch
Punch:
Der PUNCH-Button schaltet eine spezielle Filterung vor den EQ.
Das Klangverhalten des Filters entspricht dem eines klassischen
Röhrenamps. Anders als bei herkömmlichen Vorfilterungen, bei
denen ein Mid-Cut unweigerlich zu einem Verlust an Lautheit führt,
ist der Frequenzgang der PUNCH-Funktion so abgestimmt, dass
keine Veränderung des Gesamtpegels spürbar wird.
2
Weitere Anschlüsse und Bedienelemente
Standard Setup /Verkabelung
Equalizer
Mit dem Equalizer bestimmst Du den Klangcharakter Deines
Bassamps.
Bass:
Regler zur Absenkung und Anhebung tiefer Frequenzen.
Mid:
Regler zur Absenkung und Anhebung der Mitten.
Treble:
Regler zur Absenkung und Anhebung der Höhen.
3
Poweramp
DynaClip™ ist eine dynamische Limiterfunktion, die speziell
für eine verbesserte Bass-Performance entwickelt wurde. Die
Energieausnutzung im tieffrequenten Bereich wird optimiert, die
akustische Leistung steigt. Die DynaClip™- Endstufe gibt in den
allermeisten Bühnensituationen das beruhigende Gefühl, noch etwas
in Reserve zu haben.
Master:
Der MASTER-Regler bestimmt die Gesamtlautstärke des Amps
3
BassKick 100
6
Troubleshooting
Der Verstärker lässt sich nicht einschalten.
• Es liegt keine Netzspannung an. Überprüfe den korrekten
Anschluss der Netzverbindungen.
• Die Netzsicherung ist defekt. Bitte lasse die Netzsicherung durch
eine neue Sicherung mit entsprechendem Wert ersetzen. Wende
Dich bei erneutem Defekt an Deinen BassKick™-Fachhändler.
• Prüfe vor Anschluss des Amps an das Stromnetz immer die
vorhandene Netzspannung. Kontaktiere im Zweifelsfall den
Bühnentechniker, Hausmeister o.ä.
• Versuche bitte keine „do it yourself” Reparaturen! Auch der
Tausch interner Sicherungen sollte von einem erfahrenen
Techniker vorgenommen werden.
• Die Reinigung der Gehäuseoberfläche oder der Metallflächen
wird am besten mit einem weichen trockenen Tuch
Der Verstärker ist korrekt verkabelt, aber es ist nichts zu hören.
vorgenommen. Auf keinen Fall Alkohol oder andere
• GAIN oder MASTER sind nicht aufgedreht.
Lösungsmittel verwenden!
• Ein eingeschleiftes Effektgerät ist nicht eingeschaltet bzw. nicht
korrekt verkabelt. Überprüfe den Effektweg.
• Ein Kopfhörer ist eingesteckt, so dass der Lautsprecher
abgeschaltet wird. Ziehe den Kopfhörerstecker zur
8
Technische Daten
Wiedergabe über den internen Speaker ab.
Sicherheitsrelevante Daten
Beim Benutzen der LINE OUT Buchse entsteht ein Brummgeräusch.
Netzeingangsspannungen: 240V, 220-230V, 120V, 100V
• Ein elektrisches /magnetisches Wechselfeld streut auf die Leitung
Primär-Sicherungen: 240 V
T1A
ein. Benutze ein besseres Kabel und versuche durch anderes
220-230 V
T1A
Verlegen der Leitung die Einstreuung zu minimieren. Hilft dies
120 V
T2A
nicht, empfiehlt sich die Benutzung einer DI-Box.
100 V
T2A
• Über die Erdung der verbundenen Geräte entsteht eine
Sekundär-Sicherungen:
2 x T2,5A
Brummschleife. Unterbreche in keinem Fall die Schutzleiter der
Leistungsaufnahme:
255 Watt
Geräte, sondern betreibe, wenn möglich, beide Geräte an einem
Ungebungstemperatur im Betrieb:
0-35 Grad Celsius
gemeinsamen Netzverteiler! Ist das nicht möglich, muss die
Verbindung mittels einer DI-Box galvanisch getrennt werden.
Eingänge
Buchse:
Klinke, unsymmetrisch
der PA völlig verzerrt.
Eingangsimpedanz:
1 MOhm
• Der Eingang des Pultes ist nicht auf Linepegel geschaltet. Schalte
Empfindlichkeit:
-23,5 dBV
Beim Anschluss eines Mischpultes am LINE OUT ist das Signal auf
INST. INPUT:
den Eingang des Pultes auf Linepegel um. Sollte dies nicht möglich
sein, so belege einen unsymmetrischen (Line-) Eingang am Pult
FX LOOP- Return:
max. Eingangspegel:
+9,3 dBV
Buchse:
Klinke, unsymmetrisch
Eingangsimpedanz:
48 kOhm
Der Amp erscheint zu leise.
max. Empfindlichkeit:
-6 dBV
• Ein im Effektweg betriebenes Gerät verursacht Pegelverluste. Das
max. Eingangspegel:
+ 13,6 dBV
Effektgerät muss mittels seiner Input/Output Regler ausgepegelt
werden.
Ausgänge
Buchse:
Klinke, unsymmetrisch
Der Amp klingt zu dumpf
FX LOOP- Send:
Ausgangsimpedanz:
220 Ohm
• Der Hochtöner ist abgeschaltet
Ausgangspegel:
- 6 dBV
Buchse:
Klinke, unsymmetrisch
Ausgangsimpedanz:
220 Ohm
LINE OUT:
7
Wartung und Pflege
Ausgangspegel:
0 dBV
Stereo-Klinke
Die BassKick™ Amps sind wartungsfrei. Dennoch gibt es einige
Kopfhörer:
Buchse:
Grundregeln, deren Einhaltung die hohe Lebensdauer Deines Amps
sichern:
Speakerbestückung:
Impedanz:
8-200 Ohm
1 x 15" Eminence Bass, 4 Ohm
• Sorge immer für eine technisch einwandfreie Geräteperipherie!
Trennfrequenz:
5 kHz
1 x Leson Keramik-Hochtöner, 4 Ohm
• Sorge stets für freie Luftzirkulation an den Kühlflächen Deines
Amps.
• Vermeide in jedem Fall starke mechanische Erschütterungen,
extreme Hitze und das Eindringen von Staub und Nässe.
• Beachte peinlich genau die Spezifikationen von
Zusatzgeräten. Schließe nie Ausgänge mit zu großem Pegel
(z.B. Endstufen) an die Eingänge des Amps an.
4
Abmessungen und Gewicht
Maße (B x H x T):
498 x 565 x 355 mm
Gewicht:
25,5 kg
55 lbs
BassKick 100
Welcome!
Fat, band-capable bass sound, flexible, however simple to operate,
transport-friendly combo format, however with the punch of a
grown-up stack. And that all at a purse-friendly price. Those were the
defaults for our engineers in order to create bass combos that care for
great sound results and well-being in the rehearsal room as well as on
stage.
We would like to congratulate you on the choice of a combo that
meets all defaults and wish you many years of fun with your
BassKick™.
Your Hughes & Kettner team
index
1
2
3
4
5
6
7
8
Preamp
Equalizer
english
Power amp
Further connections and
operating elements
Standard set-up / cabling
Troubleshooting
Maintenance and care
Technical data
Important:
Before powering up please read the
Important Safety Instructions on pages 20-22!
5
BassKick 100
1
passes through the effects pedal in a serial way, the effect share is
In the overall design of a bass amp, the preamp plays a central role.
adjusted at the effects pedal itself.
Preamp
As interface between the bass player and his instrument on the one
side and the power electronics on the other side, it is decisive for the
Send:
feeling when playing and the tonal bandwidth. The inputs of the
Connect this output with the input of the effects pedal.
BK 100 are based on the Tube-Touch-Circuit™, an exceptional
overdrive-resistant circuit that provides for a remarkably natural,
Return:
direct playing feeling. Thereby, an inharmonious clipping is almost
Connect the output of the effects pedal with this input.
excluded.
Line Out:
Input:
The symmetrical line output reproduces the preamplifier signal
Input socket for connecting basses with active or passive electronics.
including effects. As far as the circuit is concerned, it is located before
the power amplifier and it is thus independent of the setting of the
MASTER controller.
Gain:
Controller for adjusting the input level.
Headphones:
Punch:
This socket serves for the connection of headphones. If the socket is
The PUNCH button connects a special filtering before the EQ. The
assigned, the speaker output is switched off.
tone behaviour of the filter corresponds to that of a classical tube amp.
Different from usual pre-filtrations in which a mid-cut does inevitably
lead to a loss of volume, the frequency response of the PUNCH
5
Standard set-up/cabling
6
Troubleshooting
function is adjusted in such a way that no change of the overall level
is noticeable.
2
Equalizer
By means of the equalizer, you determine the tonality of your bass amp.
Bass:
Controller for increasing and decreasing low frequencies.
Mid:
Controller for increasing and decreasing the mids.
Treble:
Controller for decreasing and increasing the heights.
3
Power amp
DynaClip™ is a dynamic limiter function that has particularly been
developed for an improved bass performance. The energy utilisation
in the deep frequency area is optimised, the acoustic performance is
improved. In the greatest part of all stage situations, the DynaClip™
power amplifier gives the comforting feeling to have something in
reserve.
Master:
The MASTER controller determines the overall volume of the amp.
The amplifier can’t be switched on.
• No mains voltage is applied. Check whether the mains connections
are established correctly.
• The mains fuse is defect. Please have the mains fuse replaced by a
new fuse with the corresponding value. In case of a new defect
4
Further connections
and operating elements
please contact your BassKick™ specialist dealer.
Fx Loop:
The amplifier is cabled correctly but there is no sound.
The loop for effects is designed serially, in the signal chain, it is
• GAIN or MASTER are not turned up.
situated after the equalizer and before the LINE OUT. That means
• A looped in effects pedal is not switched on or not cabled correctly.
that also looped effects are displayed at the LINE OUT. As the signal
6
Check the loop.
BassKick 100
• A headset is plugged in so that the speaker is switched off.
8
Technical Data
Plug off the headset to play via the internal speaker.
Security Specifications
When using the LINE OUT socket, there is a humming noise.
Mains input voltages: 240V, 220-230V, 120V, 100V
• An electrical / magnetic alternating field intersperses onto the
Primary fuses:
240V
T1A
conduit. Use a better cable and try to minimise the interspersion by
220-230V
T1A
another passing of the conduit. If this does not help, the utilisation
120V
T2A
of a DI box is recommended.
• Due to the earthing of the connected devices, a hum pick-up
100V
T2A
Secondary fuses:
2 x T2,5A
emerges. Do in no case interrupt the ground wire of the devices but
Power consumption:
255 watts
do, if possible, operate both devices at one joint power distribution!
Ambient air temperature in operation:
0-35 degrees Celsius
If this is not possible, the connection must be separated galvanically
by means of a DI box.
Inputs
INST. INPUT:
Socket:
Jack, unsymmetrical
When connecting a mixer at the LINE OUT, the signal on the PA is
Input impedance:
1 MOhm
completely distorted.
Sensibility:
- 23,5 dBV
• The input of the mixer is not switched to line level. Switch the
input of the mixer to line level. If this is not possible, assign an
FX LOOP-Return:
unsymmetrical (line) input at the mixer.
max. input level:
+ 9,3 dBV
Socket:
Jack, unsymmetrical
Input impedance:
48 kOhm
The amp is too quiet.
max. sensibility:
- 6 dBV
• A device that is operated in the loop causes level losses. The effects
max. input level:
+13,5 dBV
Socket:
Jack, unsymmetrical
pedal must be levelled by means of its input/output controller.
Outputs
The amp sounds too dull
FX LOOP-Send:
• The tweeter is switched off
220 Ohm
Output level:
- 6 dBV
LINE OUT:
Socket:
Output impedance:
Jack, unsymmetrical
220 Ohm
Output level:
0 dBV
Headphones:
Socket:
Stereo jack
Impedance:
8-200 Ohm
Speaker equipment:
1 x 15" Eminence Bass, 4 Ohm
Cutoff frequency:
5 kHz
Maintenance and care
The BassKick™ amps are maintenance-free. There are, however, some
basic rules, the compliance with which secures the high useful life of
your amp:
• Do always provide for a technically unobjectionable device periphery!
• Do always provide for free air circulation at the cooling surface of
your amp.
1 x Leson ceramics tweeter, 4 Ohm
• Do in any case avoid heavy mechanical shocks, extreme heat and
the permeation of dust and moisture.
• Do meticulously observe the specifications of additional devices.
Dimensions (w,h,d) and weight:
Do never connect outputs with too large levels (e.g. power
Dimensions:
498 x 565 x 355 mm
amplifiers) to the inputs of the amp.
Weight:
25.5 kg
• Do always check the existing mains voltage before connecting
55 lbs
the amp to the mains supply. In case of doubt, contact the stage
technician, caretaker or similar persons.
• Please do never try to repair your amp yourself! Even the exchange
of internal fuses should be carried out by an experienced technician
only.
• The housing surface or the metal surfaces are at best cleaned with a
soft dry cloth. Do in no case use alcohol or other solvents!
7
english
7
Output impedance:
BassKick 100
¡Bienvenidos!
Sonido bajo (bass-sound) más gredo y más apto para banda, flexible
y aun fácil de manejar, formato combinado fácil de transportar, pero
con la fuerza (punch) de una columna (stack) pura. Y todo a un precio
cómodo para el bolsillo. Estas fueron las especificaciones de nuestros
ingenieros para lograr combinados de bajos (bass-combos) que se
ocupen de resutlados de sonido y bienestar excelentes en el recinto de
pruebas y en el escenario.
Le queremos felicitar por haber elegido un combinado (combo), que
cumpla con todas estas especificaciones y le deseamos que se diverta
con su BassKick™.
Su equipo de Hughes & Kettner
contenido
1
2
3
4
5
6
7
8
preamplificador
ecualizador
amplificador de potencia
Otras conexiones y controles
ConfiguraciÓn estÁndar / cableado
localizaciÓn de averÍas
Mantenimiento y cuidados
Datos tÉcnicos
Importante:
¡Por favor antes de la puesta en servicio
debes leer neces ariamente las instrucciones
de seguridad en las páginas 20-22!
8
BassKick 100
1
4
El preamplificador (preamp) juega un papel central en la concepción
Fx Loop (antinodo de efectos sonoros):
total de un amplificador de bajos (bassamp). Como interfaz entre el
La vía de inserción para efectos es serial, en la cadena de señales se
contrabajo y su instrumento por un lado y la electrónica de potencia
encuentra después del ecualizador y antes de LINE OUT (salida). Esto
por el otro, decide el mismo acerca de la percepción al tocar y el
significa, en LINE OUT (salida) también se emiten efectos insertados.
ancho de banda del sonido. Las entradas del BK 100 se basan en el
Ya que la señal recorre el aparato de efectos de manera serial, el
Tube-Touch-Circuit™, una conmutación extraordinaria resistente a
componente de los efectos se ajusta en el mismo aparato de efectos.
preamplificador
Otras conexiones y controles
la saturación que se ocupa de una percepción al tocar naturalmente
notable y directa. Con lo cual casi se descarta un recorte (clipping)
Send (transmitir):
inarmócico.
Conectar esta salida con la entrada del aparato de efectos.
Input (entrada):
Return (retorno):
Conector de entrada para la conexión de bajos con electrónica activa
Conectar la salida del aparato de efectos con esta entrada.
o pasiva.
Line Out (salida):
Gain (ganancia):
La salida simétrica reproduce la señal de baja potencia inclusive con
Regulador para adaptar el nivel de entrada.
efectos. La misma se encuentra esquemáticamente delante del nivel
final y por ello es independiente del ajuste del regulador MASTER
Punch (fuerza):
(principal).
El botón PUNCH conmuta un filtrado antes del ecualizador. El
comportamiento del sonido del filtro corresponde al del amplificador
Headphones (audífonos):
de tubos clásico. A diferencia de las filtraciones previas comunes,
Este jack sirve para conectar un audífono. Al utilizar el jack, se apaga
donde un Mid-Cut provoca inevitablemente una pérdida de
la salida de los altavoces.
sonoridad, la característica de respuesta de reverberación de la
función PUNCH se determina de tal manera que no se puede sentir
ninguna modificación de todo el nivel.
2
5
ConfiguraciÓn estÁndar / cableado
ecualizador
Con el ecualizador determinas tú el carácter del sonido de tu
amplificador de bajos (bassamp).
Bass (bajos):
Regulador para bajar y subir las frecuencias bajas.
espaÑol
Mid (medios):
Regulador para bajar y subir los medios.
Treble (agudos):
Regulador para bajar y subir los agudos.
3
amplificador de potencia
DynaClip™ es una función limitadora dinámica desarrollada
especialmente para una potencia de bajos mejorada. Se optimiza el
aprovechamiento de la energía en el rango de frecuencia profundo,
aumenta la potencia acústica. En todas las situaciones de escenarios,
el nivel final de DynaClip™ da la sensación tranquilizadora que aun
se tiene algo de reserva.
Master (principal):
El regulador MASTER (principal) determina el volumen total del
amplificador.
9
BassKick 100
6
localizaciÓn de averÍas
• Respetar minuciosamente las especificaciones de los aparatos
No se puede encender el preamplificador.
adicionales. Nunca conectar las salidas con niveles muy altos
• No hay corriente de la red. Controlar la conexión correcta de las
conexiones de la red.
• El fusible de la red está defectuoso. Cambiar el fusible de la red por
un fusible nuevo con el valor correspondiente. En caso de repetirse
el defecto, comunicarse con su representante especializado de
BassKick™.
(p.ej. niveles finales) a las entradas del amplificador.
• Antes de conectar el amplificador a la red eléctrica, controlar
siempre la tensión de red disponible. En caso de duda, comunicarse
con el técnico de escenarios, el conserje o similar.
• ¡No intentar reparar al estilo “hágalo usted mismo”! El cambio
de los fusibles internos también lo debería de hacer un técnico con
experiencia.
El preamplificador está cableado correctamente, pero no se oye nada.
• Limpiar la superficie de la caja o las superficies de metal mejor con
• GAIN o MASTER no están abiertos.
un trapo seco suave. ¡De ninguna manera utilizar alcohol ni otros
• Un aparato de efectos insertado no está encendido y/o no está
solventes!
cableado correctamente. Controlar la vía del efecto.
• Hay un audífono conectado, por lo tanto el altavoz está apagado.
Desconectar el enchufe del audífono para reproducir a través del
8
Datos tÉcnicos
altavoz interno.
Datos relevantes para la seguridad
Al utilizar el jack LINE OUT (salida), se crea un zumbido.
Tensiones de red:
240V, 220-230V, 120V, 100V
• Un campo alternativo eléctromagnético perturba en el cable.
Fusibles primarios:
240 V
T1A
Utilizar un cable de mejor calidad e intentar minimizar la
220-230 V
T1A
perturbación con un cableado diferente. Si no ayuda, se recomienda
120 V
T2A
utilizar una DI-Box.
• A través de la puesta a tierra de los aparatos conectados se crea un
100 V
T2A
Fusibles secundarios:
2 x T2,5A
zumbido. ¡De ninguna manera interrumpir los conductores de
Consumo de energía:
255 vatios
puesta a tierra de los aparatos, sino manejar en lo posible ambos
Temperatura ambiente
aparatos en un distribuidor de potencia común! Si esto no fuera
en funcionamiento:
posible, se tiene que separar la conexión galvánicamente mediante
una DI-Box.
Entradas
Entrada inst.:
0-35 grados Celsius
Conector:
Jack, asimétrico
Al conectar un pupitre de mezcla a la salida (LINE OUT) la señal
Impedancia de entrada: 1 Mohmios
del preamplificador está totalmente distorsionada.
Sensibilidad:
• La entrada del pupitre no está conmutada a nivel de línea.
Nivel máx. de entrada:
+ 9,3 dBV
Conector:
Jack, asimétrico
Conmutar la entrada del pupitre a nivel de línea. Si esto no fuera
FX LOOP- Return:
posible, ocupar una salida (de línea) asimétrica en el pupitre.
- 23,5 dBV
Impedancia de entrada: 48 kohmios
El volumen del amplificador parece muy bajo.
Sensibilidad máx.:
-6 dBV
Nivel máx. de entrada:
+13,5 dBV
Conector:
Jack, asimétrico
Impedancia de salida:
220 ohmios
• Un aparato manejado en la vía del efecto causa pérdidas de nivel.
Desnivelar el aparato de efectos con un regulador de entrada/salida
Salidas
(input/output).
FX LOOP- Send:
El amplificador suena muy sordo.
• Los tonos agudos están apagados.
7
Mantenimiento y cuidados
LINE OUT (salida):
Audífonos:
Los amplificadores BassKick™ no necesitan de mantenimiento. Sin
embargo, hay algunas reglas básicas cuyo cumplimiento asegura la
Elementos de
máxima duración de su amplificador:
los altavoces:
• ¡Ocuparse siempre que la periferia de aparatos sea técnicamente
Frecuencia de
Nivel de salida:
- 6 dBV
Conector:
Jack, asimétrico
Impedancia de salida:
220 ohmios
Nivel de salida:
0 dBV
Conector:
Impedancia:
Jack stereo
8-200 ohmios
1 x 15" Eminence Bass, 4 ohmios
1 x tonos altos de cerámica Leson, 4 ohmios
perfecta!
separación:
5 kHz
• Ocuparse siempre de la circulación de aire fresco en las superficies
de enfriamiento del amplificador.
• Evitar en todos los casos sacudidas mecánicas fuertes, altas
temperaturas extremas y la entrada de polvo y humedad.
Datos mecÅnicos
Medidas :
498 x 565 x 355 mm
Peso:
25,5 kg
55 lbs
10
BassKick 100
Bienvenue !
Un son de basse puissant et idéal pour jouer dans un groupe, un
appareil souple et facile à manipuler, un combo facile à transporter et
possédant cependant le punch d’un véritable stack. Et le tout pour un
prix qui ravira votre porte-monnaie. Voilà les critères que se sont fixés
nos ingénieurs lors de la conception de nos combos basses, pour vous
garantir le meilleur son et le plus grand plaisir, aussi bien dans les
salles d’enregistrement que sur la scène.
Nous vous remercions d’avoir opté pour un combo qui regroupe
tous ces critères et vous souhaitons d’excellents moments avec votre
BassKick™.
L’équipe de Hughes & Kettner
Contenu
1
2
3
4
5
6
7
8
PrÉampli
Egaliseur
Poweramp
Autres connexions et
ÉlÉments de commande
RÉglages standard / cÂblage
DÉpistage des pannes
Maintenance et entretien
franÇais
CaractÉristiques techniques
Attention:
Avant la mise en fonction de l’appareil, il est
fortement recommandé de prendre connaissance
des mesures de prudence présentées aux pages
20-22 !
11
BassKick 100
1
4
Lors de la conception générale d’un ampli de basses, le préampli joue
Fx Loop:
un rôle capital. En tant qu’interface entre le bassiste et, d’une part, son
La boucle d’effet est de type série ; dans la chaîne de signaux, elle se
instrument, et d’autre part, l’électronique de puissance, le préampli a
trouve après l’égaliseur et avant la sortie LINE OUT. Ceci signifie que
un effet considérable sur les sensations du musicien et sur la sonorité
même des effets incorporés sont présents au niveau de la sortie LINE
et la largeur de bande. Les entrées du BK 100 reposent sur le Tube-
OUT. Etant donné que le signal traverse le processeur d’effets en série,
Touch-Circuit™, un circuit incroyablement résistant aux saturations et
la proportion d’effets est réglée directement sur le processeur d’effets.
Preamp
Autres connexions
etéÉlÉments de commande
garantissant au musicien des sensations remarquablement naturelles
et directes. Tout écrêtage disharmonique est ainsi exclus.
Send:
Reliez cette sortie à l’entrée du processeur d’effets.
Input:
Connecteur femelle d’entrée permettant de connecter des basses
Return:
possédant des composants électroniques actifs ou passifs.
Reliez la sortie du processeur d’effets à cette entrée.
Gain:
Line Out:
Potentiomètre servant à régler le niveau d’entrée.
La sortie Line symétrique retransmet le signal préamplifié, effets
inclus. Pour des raisons techniques, elle se situe avant l’étage de
Punch:
puissance et n’est par conséquent pas influencée par le réglage du
Le bouton PUNCH permet d’effectuer un filtrage spécial avant
potentiomètre MASTER.
l‘égaliseur. Le comportement sonore du filtre correspond à celui d’un
ampli à tubes classique. Contrairement aux préfiltrages traditionnels
Headphones:
avec lesquels un Mid-Cut entraîne inévitablement une perte de
Ce connecteur femelle sert à brancher un casque. Lorsqu’un casque
volume sonore, la réponse en fréquence de la fonction PUNCH est
est branché à cette prise, la sortie haut-parleurs est désactivée.
réglée de sorte que toute modification du niveau général ne soit pas
perceptible.
2
5
RÉglages standard / cÂblage
6
DÉpistage des pannes
Egaliseur
L’égaliseur vous permet de régler la tonalité de votre ampli de basses.
Bass:
Potentiomètre servant à atténuer ou à accentuer les basses fréquences.
Mid:
Potentiomètre servant à atténuer ou à accentuer les médiums.
Treble:
Potentiomètre servant à atténuer ou à accentuer les aigus.
3
Poweramp
La technologie DynaClip™ a la même fonction qu’un limiteur
dynamique. Elle a spécialement été conçue pour améliorer les
performances des basses. L’utilisation de l’énergie dans les basses
fréquences est optimisée, ce qui permet d’améliorer les performances
acoustiques. Dans la plupart des situations scéniques, l’étage de
puissance DynaClip™ donne l’impression rassurante d’avoir encore
des réserves de puissance.
Master:
Impossible de mettre en marche l’ampli.
Le potentiomètre MASTER sert à régler le volume général de l’ampli
• L’ampli n’est pas alimenté. Vérifiez si le cordon secteur est bien
branché.
• Le fusible secteur est défectueux. Faites le remplacer par un fusible
neuf possédant la valeur requise. En cas de nouveau problème,
contactez votre revendeur BassKick™.
12
BassKick 100
L’ampli est correctement branché mais aucun son n’est audible.
• Les potentiomètres GAIN ou MASTER sont sur 0.
• Un processeur d’effets raccordé n’est pas allumé ou il n’est pas
branché correctement. Vérifiez la boucle des effets.
faîtes appel à un technicien qualifié.
• Nettoyez les surfaces du boîtier ou les surfaces métalliques de
préférence avec un chiffon doux et sec. Ne jamais utiliser d’alcool
ou d’autres solvants !
• Un casque est branché si bien que le haut-parleur est désactivé.
Débranchez le casque pour restituer le son via le haut-parleur
interne.
L’utilisation de la prise LINE OUT provoque un ronflement.
• Un champ électrique / magnétique provoque des interférence sur la
8
CaractÉristiques techniques
ligne. Utilisez un câble de meilleure qualité et essayez de réduire les
interférences en posant la ligne différemment. Si vous n’obtenez pas
CaractÉristiques significatives pour la sÉcuritÉ
de résultat, utilisez une boîte à entrée numérique.
Tensions secteur :
• La mise à la terre des appareils connectés crée une boucle de
240 V, 220-230 V, 120 V, 100 V
Fusibles primaires:
240V
T1A
ronflement. Ne supprimez en aucun cas les conducteurs de
220-230V
T1A
protection des appareils et branchez si possible les deux appareils à
120V
T2A
100V
T2A
un répartiteur commun! Si cela n’est pas possible, la connexion doit
être isolée électriquement par une boîte à entrée numérique.
Fusibles secondaires:
2 x T2,5A
Puissance absorbée:
255 Watts
Lors du branchement d’une table de mixage à la sortie LINE OUT,
Température ambiante
le signal est distordu.
en marche :
0-35 degrés Celsius
• L’entrée de la table de mixage n’est pas reliée au niveau Line.
Commutez l’entrée de la table de mixage sur le niveau Line. Si cela
EntrÉes
n’est pas possible, branchez une entrée (Line) asymétrique à la table
INST. INPUT:
de mixage
Prise :
jack, asymétrique
Impédance d’entrée :
1 MOhm
Sensibilité :
- 23,5 dBV
Niveau d’entrée maxi. :
Prise :
+ 9,3 dBV
jack, asymétrique
de niveau. Le processeur d’effets doit être équilibré à l’aide de ses
Impédance d’entrée :
48 kOhms
potentiomètres Input/Output.
Sensibilité maxi. :
-6 dBV
Niveau d’entrée maxi. :
+13,6 dBV
Prise :
jack, asymétrique
Impédance de sortie :
220 Ohms
L’ampli semble trop silencieux.
• Un appareil branché sur la boucle d’effets entraîne des pertes
FX LOOP-Return:
L’ampli produit un son trop sourd
• Les aigus sont désactivés
Sorties
FX LOOP- Send:
7
Niveau de sortie :
- 6 dBV
Prise :
jack, asymétrique
vous prolongerez sensiblement la durée de vie de votre ampli en
Impédance de sortie :
220 Ohms
respectant quelques règles élémentaires:
Niveau de sortie :
0 dBV
Prise :
jack stéréo
Impédance :
8-200 Ohms
Maintenance et entretien
Les amplis BassKick™ ne nécessitent aucun entretien. Néanmoins,
LINE OUT:
Casques:
• Utilisez toujours des appareils périphériques en parfait état de
marche!
haut-parleur:
surfaces de refroidissement de l’ampli.
• Evitez impérativement d’exposer l’appareil à de fortes vibrations
mécaniques, à des chaleurs extrêmes, aux poussières et à l’humidité.
franÇais
• Veillez toujours à maintenir dégagées les grilles d’aération des
Composants du
Eminence Bass 1 x 15“, 4 Ohms
1x tweeter céramique Leson, 4 Ohms
Fréquence de
coupure:
5 kHz
• Soyez particulièrement vigilant concernant les spécifications des
appareils supplémentaires. Ne branchez jamais des sorties à niveau
CaractÉristiques mÉcaniques
trop élevé (par exemple des étages de puissance) aux entrées de
Dimensions (l,h,p) :
498 x 565 x 355 mm
l’ampli.
Poids:
25,5 kg
• Vérifiez toujours la tension secteur avant de brancher l’ampli. En
55 lbs
cas de doute, contactez le technicien de scène, le responsable de la
salle, etc.
• N’essayez pas de réparer vous-même l’appareil en cas de
problèmes! Même pour le remplacement de fusibles internes,
13
BassKick 100
Benvenuti!
Un suono di basso (bass-sound) forte, adatto per la band, flessibile
e anche facile da usare, formato combinato facile da trasportare, ma
con la forza (punch) di uno stack sviluppato. E tutto ciò ad un prezzo
assolutamente conveniente. Queste erano le direttive per i nostri
ingegneri per creare le combinazioni di basso (bass-combos), che
garantiranno dei risultati di suono e il benessere eccellente nella sala
prove e sul palcoscenico.
Desideriamo farti i complimenti per la scelta di un combinato,
che esaudisce tutte queste direttive, e ti auguriamo molti anni di
divertimento con il tuo BassKick™.
Il tuo team Hughes & Kettner
Indice
1
2
3
4
5
6
7
8
preamplificatore
Equalizzatore
amplificatore di potenza
Altri collegamenti e elementi di
controllo
Configurazione standard/
collegamento dei cavi
Ricerca e soluzioni di eventuali problemi
Manutenzione e pulizia
Dati tecnici
Importante:
Prima di utilizzare lo strumento leggete attentamente gli avvisi di
sicurezza su pagina 20-22!
14
BassKick 100
1
4
Nella concezione totale di un amplificatore di bassi (bassamp), il
Fx Loop:
preamp ha un ruolo centrale. Come interfaccia tra il bassista e il suo
Il loop-effetti è eseguito serialmente, nella catena dei segnali è
strumento da una parte, e l’elettronica di potenza dall’altra, esso
posizionato dopo l’equalizzatore e prima del LINE OUT. Ciò significa,
decide in modo determinante il feeling nel suonare e la larghezza
che anche nel LINE OUT vengono emessi gli effetti loop. Poiché il
della banda sonora. Le entrate del BK 100 si basano sul Tube-
segnale attraversa il processore serialmente, la quota degli effetti
Touch-Circuit™, un circuito straordinariamente resistente alla
viene regolata usando gli appositi controlli del processore di segnale.
preamplificatore
Altri collegamenti e elementi
di controllo
sovramodulazione, che rende possibile un feeling nel suonare lo
strumento notevolmente naturale e diretto. Un clipping disarmonico è
Send:
praticamente quasi escluso.
collega questa uscita con l’entrata del processore di segnale.
Input:
Return:
presa d’entrata per il collegamento dei bassi con elettronica attiva o
collega l’uscita del processore di segnale con questa entrata.
passiva
Line Out:
Gain:
l’uscita Line simmetrica dà il segnale della sezione di
controllo per l’adattamento del livello d’entrata
preamplificazione, incluso gli effetti. Nella catena del segnale
l’uscita si trova davanti alla sezione finale ed è perciò indipendente
Punch:
dall’impostazione del controllo del master.
il tasto punch connette un filtraggio speciale davanti alla sezione
EQ. Il comportamento del suono del filtro corrisponde a quello
Headphones:
di un amplificatore valvolare classico. Diversa dai prefiltraggi
questa presa serve per il collegamento delle cuffie. Con l’occupazione
convenzionali, nei quali un Mid-Cut porta immancabilmente ad
della presa viene spenta l’uscita dell’altoparlante.
una perdita sonora, la risposta in frequenza della funzione punch è
sintonizzata in modo tale, da non alterare livello del segnale totale.
2
5
Configurazione standard/
collegamento dei cavi
Equalizzatore
Con l’equalizzatore definisci tu il carattere del suono del tuo
amplificatore del basso.
Bass:
controllo per la diminuzione e l’aumento di frequenze basse.
Mid:
controllo per la diminuzione e l’aumento dei medi.
Treble:
controllo per la diminuzione e l’aumento degli alti.
3
amplificatore di potenza
DynaClip™ è una funzione dinamica di limitazione, che è stata
sviluppata specificamente per una performance del basso migliorata.
Lo sfruttamento d’energia nella zona di bassa frequenza viene
ottimizzato, la prestazione acustica aumenta. Il livello finale del
DynaClip™ offre, nella maggior parte delle situazioni di palcoscenico,
il sentimento tranquillizzante di avere ancora qualcosa nella riserva.
italiano
Master:
il controllo del master definisce il volume totale dell’amplificatore.
15
BassKick 100
6
Ricerca e soluzioni di eventuali problemi
L’amplificatore non si accende.
• Non c’è una tensione di rete. Controlla il cavo di alimentazione e
verifica che sia collegato correttamente.
• Il fusibile di rete è difettoso. Per favore fai sostituire il fusibile di rete
con un fusibile nuovo con i valori corrispondenti. Rivolgiti in caso
di ulteriori difetti al tuo rivenditore specializzato BassKick™.
• Prima del collegamento dell’amplificatore, controlla alla rete
elettrica la tensione di rete presente. In caso di dubbio contatta il
tecnico del palcoscenico, il custode o simili.
• Non provare per favore delle riparazioni “do it yourself”! Anche il
cambio di fusibili interni deve essere effettuato da tecnici esperti.
• La pulizia della superficie della cassa o delle superfici di metallo
viene effettuata al meglio con un panno morbido asciutto. Non
utilizzare in nessun caso alcool o altri solventi!
L’amplificatore è cablato correttamente, ma non si sente niente.
• Controlla le posizioni dei controlli GAIN o MASTER.
• Un processore di segnale non è acceso o non è cablato correttamente.
8
Dati tecnici
Controlla il loop- effetti.
• Controlla l’uscita cuffie. Se hai collegato le cuffie, l’uscita speaker
data rilevanti per la securitÀ
rimane muta. Togli la presa delle cuffie per l’esecuzione tramite lo
Tensioni di rete:
240V, 220-230V, 120V, 100V
speaker interno.
Fusibili primari:
240V
Utilizzando il LINE OUT si sente un ronzio.
• Un campo alternativo elettrico / magnetico interferisce la linea. Usa
T1A
120 V
T2A
100 V
T2A
un cavo migliore e cerca di minimizzare l’interferenza tramite un
Fusibili secondari:
2 x T2,5A
altro collocamento della linea. Se ciò non aiuta si consiglia l’utilizzo
Consumo d’energia:
255 Watt
di una box DI.
Temperatura ambiente
• Tramite lo scarico a terra degli apparecchi collegati si crea un
in funzionamento:
T1A
220-230 V
0-35 gradi Celsius
ciclo di ronzio. Non interrompere in nessun caso i conduttori di
protezione degli apparecchi, bensì fai funzionare possibilmente
i due apparecchi su un distributore di rete comune! Se ciò non è
Entrate
possibile, il collegamento deve essere interrotto in modo galvanico
INST. INPUT:
per mezzo di una box DI.
Collegando un mixer al LINE OUT il segnale sul PA è
completamente distorto.
• L’entrata del mixer non è sintonizzato sul livello Line. Sintonizza
FX LOOP- Return:
presa:
jack, asimmetrico
impendenza d’entrata:
sensibilità:
1 MOhm
- 23,5 dBV
livello max. d’entrata:
+ 9,3 dBV
presa:
jack, asimmetrico
l’entrata del mixer sul livello Line. Se ciò non dovesse essere
impendenza d’entrata:
48 kOhm
possibile, allora usa un’entrata (Line) asimmetrica del mixer.
sensibilità max.:
- 6 dBV
livello max. d’entrata:
+13,5 dBV
presa:
jack, asimmetrico
impendenza d’uscita:
220 Ohm
L’amplificatore sembra troppo basso
• L’apparecchio utilizzato nel loop-effetti crea una perdita del
livello. Il processore di segnale deve essere regolato per mezzo di
Uscite
FX LOOP- Send:
un controllo Input/Output.
L’amplificatore ha un suono troppo cupo
LINE OUT:
• Gli acuti sono spenti.
7
Cuffie:
Manutenzione e pulizia
livello d’uscita:
- 6 dBV
presa:
jack, asimmetrico
impendenza d’entrata:
220 Ohm
livello d’uscita:
0 dBV
presa:
jack stereo
impendenza:
8-200 Ohm
Gli amplificatori BassKick™ sono esenti da manutenzione. Tuttavia ci
Elementi dello
sono delle regole di base, il quale rispetto assicura la lunga durata del
tuo amplificatore:
speaker:
1 x 15" Eminence Bass, 4 Ohm
1 x acuto in ceramica Leson, 4 Ohm
• fai in modo di avere sempre una periferia degli apparecchi
frequenza di taglio:
5 kHz
tecnicamente perfetta!
• Fai in modo che ci sia sempre una circolazione d’aria sulla superficie
di raffreddamento del tuo amplificatore.
• Evita in ogni caso delle forti scosse meccaniche, calore estremo e
l’inserimento di polvere e bagnato.
• Osserva minuziosamente le specificazioni di apparecchi
supplementari. Non collegare mai le uscite alle entrate con troppo
livello (ad esempio livello finale) dell’amplificatore.
16
Massa e Peso:
498 x 565 x 355 mm
25,5 kg
55 lbs
BassKick 100
17
BassKick 100
18
BassKick 100
19
united states
deutsch
IMPORTANT SAFETY INSTRUCTIONS
BEFORE CONNECTING, READ INSTRUCTIONS
WICHTIGE SICHERHEITSHINWEISE!
BITTE VOR GEBRAUCH LESEN UND FÜR SPÄTEREN GEBRAUCH AUFBEWAHREN!
• Read all of these instructions!
• Save these instructions for later use!
• Follow all warnings and instructions marked on the product!
• Do not use this product near water, i.e. bathtub, sink, swimming pool, wet basement, etc.
• Do not place this product on an unstable cart, stand or table. The product may fall, causing
serious damage to the product or to persons!
• Slots and openings in the cabinet and the back or bottom are provided for ventilation; to
ensure reliable operation of the product and to protect it from overheating, these openings
must not be blocked or covered. This product should not be placed in a built-in installation
unless proper ventilation is provided.
• This product should not be placed near a source of heat such as a stove, radiator, or
another heat producing amplifier.
• Use only the supplied power supply or power cord. If you are not sure of the type of
power available, consult your dealer or local power company.
• Do not allow anything to rest on the power cord. Do not locate this product where persons
will walk on the cord.
• Never break off the ground pin on the power supply cord.
• Power supply cords should always be handled carefully. Periodically check cords for cuts
or sign of stress, especially at the plug and the point where the cord exits the unit.
• The power supply cord should be unplugged when the unit is to be unused for long
periods of time.
• If this product is to be mounted in an equipment rack, rear support should be provided.
• This product should be used only with a cart or stand that is recommended by
Hughes & Kettner.
• Never push objects of any kind into this product through cabinet slots as they may touch
dangerous voltage points or short out parts that could result in risk of fire or electric
shock. Never spill liquid of any kind on the product.
• Do not attempt to service this product yourself, as opening or removing covers may
expose you to dangerous voltage points or other risks. Refer all servicing to qualified
service personnel.
• Clean only with dry cloth.
• Do not defeat the safety purpose of the polarized or grounding-type plug. A polarized
plug has two blades with one wider than the other. A grounding type plug has two blades
and a third grounding prong. The wide blade or the third prong are provided for the
safety. If the provided plug does not fit into your outlet, consult an electrician for
replacement of the obsolete outlet.
• Unplug this product from the wall outlet and refer servicing to qualified service personnel
under the following conditions:
• When the power cord or plug is damaged or frayed.
• If liquid has been spilled into the product.
• If the product has been exposed to rain or water.
• If the product does not operate normally when the operating instructions are followed.
• If the product has been dropped or the cabinet has been damaged.
• If the product exhibits a distinct change in performance, indicating a need of service!
• Adjust only these controls that are covered by the operating instructions since improper
adjustment of other controls may result in damage and will often require extensive work
by a qualified technician to restore the product to normal operation.
• Exposure to extremely high noise levels may cause a permanent hearing loss.
• Individuals vary considerably in susceptibility to noise induced hearing loss, but nearly
everyone will lose some hearing if exposed to sufficiently intense noise for a sufficient
time. The U.S. Government´s Occupational Safety and Health Administration (OSHA) has
specified the following permissible noise level exposures:
• Das Gerät wurde von Hughes & Kettner gemäss IEC 60065 gebaut und hat das Werk in
sicherheitstechnisch einwandfreiem Zustand verlassen. Um diesen Zustand zu erhalten
und einen gefahrlosen Betrieb sicherzustellen, muss der Anwender die Hinweise und die
Warnvermerke beachten, die in der Bedienungsanleitung enthalten sind. Das Gerät
entspricht der Schutzklasse I (schutzgeerdet).
Duration Per Day In Hours
8
6
4
3
2
1½
1
½
¼ or less
Sound Level dBA, Slow Response
90
92
95
97
100
102
105
110
115
• According to OSHA, any exposure in excess of the above permissible limits could result in
some hearing loss.
• Ear plug protectors in the ear canals or over the ears must be worn when operating this
amplification system in order to prevent a permanent hearing loss if exposure is in excess
of the limits as set forth above. To ensure against potentially dangerous exposure to high
sound pressure levels, it is recommended that all persons exposed to equipment capable
of producing high sound pressure levels such as this amplification system be protected by
hearing protectors while this unit is in operation.
• Fuses: Replace with IEC 127 (5 x 20 mms) type and rated fuse for best performance only
TO PREVENT THE RISK OF FIRE AND SHOCK HAZARD, DO NOT EXPOSE THIS
APPLIANCE TO MOISTURE OR RAIN. DO NOT OPEN CASE; NO USER SERVICE-ABLE
PARTS INSIDE.
REFER SERVICING TO QUALIFIED SERVICE PERSONNEL.
DIE SICHERHEIT, ZUVERLÄSSIGKEIT UND LEISTUNG DES GERÄTES WIRD VON
HUGHES & KETTNER NUR DANN GEWÄHRLEISTET, WENN:
• Montage, Erweiterung, Neueinstellung, Änderungen oder Reparaturen von
Hughes & Kettner oder von dazu ermächtigten Personen ausgeführt werden.
• die elektrische Installation des betreffenden Raumes den Anforderungen von IEC (ANSI)Festlegungen entspricht.
• das Gerät in Übereinstimmung mit der Gebrauchsanweisung verwendet wird.
WARNUNG:
• Wenn Abdeckungen geöffnet oder Gehäuseteile entfernt werden, ausser wenn dies von
Hand möglich ist, können Teile freigelegt werden, die Spannung führen.
• Wenn ein Öffnen des Gerätes erforderlich ist, muss das Gerät von allen Spannungsquellen
getrennt sein. Berücksichtigen Sie dies vor dem Abgleich, vor einer Wartung, vor einer
Instandsetzung und vor einem Austausch von Teilen.
• Ein Abgleich, eine Wartung oder eine Reparatur am geöffneten Gerät unter Spannung darf
nur durch eine vom Hersteller autorisierte Fachkraft (nach VBG 4) geschehen, die mit den
verbundenen Gefahren vertraut ist.
• Lautsprecher-Ausgänge, die mit dem IEC 417/5036-Zeichen (Abb.1, s.unten) versehen sind
können berührungsgefährliche Spannungen führen. Deshalb vor dem Einschalten des
Gerätes Verbindung nur mit dem vom Hersteller empfohlenen Anschlusskabel zum
Lautsprecher herstellen.
• Alle Stecker an Verbindungskabeln müssen mit dem Gehäuse verschraubt oder verriegelt
sein, sofern möglich.
• Es dürfen nur Sicherungen vom Typ IEC 127 und der angegebenen Nennstromstärke
als Ersatz verwendet werden.
• Eine Verwendung von geflickten Sicherungen oder Kurzschliessen des Halters ist
unzulässig.
• Niemals die Schutzleiterverbindung unterbrechen.
• Oberflächen, die mit dem „HOT“-Zeichen (Abb.2, s.unten) versehen sind, Rückwände
oder Abdeckungen mit Kühlschlitzen, Kühlkörper und deren Abdeckungen, sowie Röhren
und deren Abdeckungen können im Betrieb erhöhte Temperaturen annehmen und sollten
deshalb nicht berührt werden.
• Hohe Lautstärkepegel können dauernde Gehörschäden verursachen. Vermeiden Sie
deshalb die direkte Nähe von Lautsprechern, die mit hohen Pegeln betrieben werden.
Verwenden Sie einen Gehörschutz bei dauernder Einwirkung hoher Pegel.
NETZANSCHLUSS:
• Das Gerät ist für Dauerbetrieb ausgelegt.
• Die eingestellte Betriebsspannung muss mit der örtlichen Netzspannung übereinstimmen.
• Achtung: Der Netzschalter des Gerätes muss in OFF-Position stehen, wenn das Netzkabel
angeschlossen wird.
• Der Anschluss an das Stromnetz erfolgt mit dem mitgelieferten Netzteil oder Netzkabel.
• Netzteil: Eine beschädigte Anschlussleitung kann nicht ersetzt werden. Das Netzteil darf
nicht mehr betrieben werden.
• Vermeiden Sie einen Anschluss an das Stromnetz in Verteilerdosen zusammen mit vielen
anderen Stromverbrauchern.
• Die Steckdose für die Stromversorgung muss nahe am Gerät angebracht und leicht
zugänglich sein.
AUFSTELLUNGSORT:
• Das Gerät sollte nur auf einer sauberen, waagerechten Arbeitsfläche stehen.
• Das Gerät darf während des Betriebs keinen Erschütterungen ausgesetzt sein.
• Feuchtigkeit und Staub sind nach Möglichkeit fernzuhalten.
• Das Gerät darf nicht in der Nähe von Wasser, Badewanne, Waschbecken, Küchenspüle,
Nassraum, Swimmingpool oder feuchten Räumen betrieben werden. Keine mit Flüssigkeit
gefüllten Gegenstände -Vase, Gläser, Flaschen etc. auf das Gerät stellen.
• Sorgen Sie für ausreichende Belüftung der Geräte.
• Eventuelle Ventilationsöffnungen dürfen niemals blockiert oder abgedeckt werden. Das
Gerät muss mindestens 20 cm von Wänden entfernt aufgestellt werden. Das Gerät darf nur
dann in ein Rack eingebaut werden, wenn für ausreichende Ventilation gesorgt ist und die
Einbauanweisungen des Herstellers eingehalten werden.
• Vermeiden Sie direkte Sonneneinstrahlung sowie die unmittelbare Nähe von Heizkörpern
und Heizstrahlern oder ähnlicher Geräte.
• Wenn das Gerät plötzlich von einem kalten an einen warmen Ort gebracht wird, kann sich im
Geräteinnern Kondensfeuchtigkeit bilden. Dies ist insbesondere bei Röhrengeräten zu beachten.
Vor dem Einschalten solange warten bis das Gerät Raumtemperatur angenommen hat.
• Zubehör: Das Gerät nicht auf einen instabilen Wagen, Ständer, Dreifuß, Untersatz oder Tisch
stellen. Wenn das Gerät herunterfällt, kann es Personenschäden verursachen und selbst
beschädigt werden. Verwenden Sie das Gerät nur mit einem vom Hersteller empfohlenen
oder zusammen mit dem Gerät verkauften Wagen, Rack, Ständer, Dreifuß oder Untersatz.
Bei der Aufstellung des Gerätes müssen die Anweisungen des Herstellers befolgt und
muss das vom Hersteller empfohlene Aufstellzubehör verwendet werden. Eine Kombination
aus Gerät und Gestell muss vorsichtigt bewegt werden. Plötzliches Anhalten, übermässige
Kraftanwendung und ungleichmässige Böden können das Umkippen der Kombination aus
Gerät und Gestell bewirken.
• Zusatzvorrichtungen: Verwenden Sie niemals Zusatzvorrichtungen, die nicht vom Hersteller
empfohlen wurden, weil dadurch Unfälle verursacht werden können
• Zum Schutz des Gerätes bei Gewitter oder wenn es längere Zeit nicht beaufsichtigt oder
benutzt wird, sollte der Netzstecker gezogen werden. Dies verhindert Schäden am Gerät
aufgrund von Blitzschlag und Spannungsstössen im Wechselstromnetz.
Abb.1
20
Abb.2
english
IMPORTANT ADVICE ON SAFETY!
PLEASE READ BEFORE USE AND KEEP FOR LATER USE!
• The unit has been built by Hughes & Kettner in accordance with IEC 60065 and left the
factory in safe working order. To maintain this condition and ensure non-risk operation,
the user must follow the advice and warning comments found in the operating
instructions. The unit conforms to Protection Class 1 (protectively earthed).
HUGHES & KETTNER ONLY GUARANTEES THE SAFETY, RELIABILITY AND
EFFICIENCY OF THE UNIT IF:
• Assembly, extension, re-adjustment, modifications or repairs are carried out by
Hughes & Kettner or by persons authorized to do so.
• The electrical installation of the relevant area complies with the requirements of IEC
(ANSI) specifications.
• The unit is used in accordance with the operating instructions.
• The unit is regularly checked and tested for electrical safety by a competent technician.
WARNING:
• If covers are opened or sections of casing are removed, except where this can be done
manually, live parts can become exposed.
• If it is necessary to open the unit this must be isolated from all power sources. Please take
this into account before carrying out adjustments, maintenance, repairs and before
replacing parts.
• The appliance can only be insulated from all power sources if the mains connection is
unplugged.
• Adjustment, maintenance and repairs carried out when the unit has been opened and is
still live may only be performed by specialist personnel who are authorized by the
manufacturer (in accordance with VBG 4) and who are aware of the associated hazards.
• Loudspeaker outputs which have the IEC 417/5036 symbol (Diagram 1, below) can carry
voltages which are hazardous if they are made contact with. Before the unit is switched on,
the loudspeaker should therefore only be connected using the lead recommended by the
manufacturer.
• Where possible, all plugs on connection cables must be screwed or locked onto the casing.
• Replace fuses only with IEC 127 type and specified rating.
• It is not permitted to use repaired fuses or to short-circuit the fuse holder.
• Never interrupt the protective conductor connection.
• Surfaces which are equipped with the „HOT“ mark (Diagram 2, below), rear panels or
covers with cooling slits, cooling bodies and their covers, as well as tubes and their covers
are purposely designed to dissipate high temperatures and should therefore not be touched.
• High loudspeaker levels can cause permanent hearing damage. You should therefore
avoid the direct vicinity of loudspeakers operating at high levels. Wear hearing protection
if continuously exposed to high levels.
MAINS CONNECTION:
• The unit is designed for continuous operation.
• The set operating voltage must match the local mains supply voltage.
• Caution: The unit mains switch must be in position OFF before the mains cable is connected.
• The unit is connected to the mains via the supplied power unit or power cable.
• Power unit: Never use a damaged connection lead. Any damage must be rectified by a
competent technician.
• Avoid connection to the mains supply in distributor boxes together with several other
power consumers.
• The plug socket for the power supply must be positioned near the unit and must be easily
accessible.
PLACE OF INSTALLATION:
• The unit should stand only on a clean, horizontal working surface.
• The unit must not be exposed to vibrations during operation.
• Keep away from moisture and dust where possible.
• Do not place the unit near water, baths, wash basins, kitchen sinks, wet areas, swimming
pools or damp rooms. Do not place objects containing liquid on the unit - vases, glasses,
bottles etc.
• Ensure that the unit is well ventilated.
• Any ventilation openings must never be blocked or covered. The unit must be positioned
at least 20 cm away from walls. The unit may only be fitted in a rack if adequate
ventilation is ensured and if the manufacturer’s installation instructions are followed.
• Keep away from direct sunlight and the immediate vicinity of heating elements and
radiant heaters or similar devices.
• If the unit is suddenly moved from a cold to a warm location, condensation can form
inside it. This must be taken into account particularly in the case of tube units. Before
switching on, wait until the unit has reached room temperature.
• Accessories: Do not place the unit on an unsteady trolley, stand, tripod, base or table. If the
unit falls down, it can cause personal injury and itself become damaged. Use the unit only
with the trolley, rack stand, tripod or base recommended by the manufacturer or purchased
together with the unit. When setting the unit up, all the manufacturer’s instructions must be
followed and the setup accessories recommended by the manufacturer must be used. Any
combination of unit and stand must be moved carefully. A sudden stop, excessive use of force
and uneven floors can cause the combination of unit and stand to tip over.
• Additional equipment: Never use additional equipment which has not been recommended
by the manufacturer as this can cause accidents.
• To protect the unit during bad weather or when left unattended for prolonged periods, the
mains plug should be disconnected. This prevents the unit being damaged by lightning
and power surges in the AC mains supply.
Diagram 1 Diagram 2
espaÑol
¡INDICACIONES DE SEGURIDAD IMPORTANTES!
¡LÉANSE ANTES DE UTILIZAR EL APARATO Y GUARDENSE PARA SU USO
POSTERIOR!
• El aparato ha sido producido por Hughes & Kettner según el IEC 60065 y salió de
la fábrica en un estado técnicamente perfecto. Para conservar este estado y asegurar
un funcionamiento sin peligros el usuario debe tener en cuenta las indicaciones y
advertencias contenidas en las instrucciones de manejo. El aparato corresponde a la clase
de protección l (toma de tierra protegida).
• LA SEGURIDAD, LA FIABILIDAD Y EL RENDIMIENTO DEL APARATO SOLO ESTAN
GARANTIZADOS POR HUGHES & KETTNER CUANDO:
• el montaje, la ampliación, el reajuste, los cambios o las reparaciones se realicen por Hughes
& Kettner o por personas autorizadas para ello;
• la instalación eléctrica del recinto en cuestión corresponda a los requisitos de la
determinación del IEC (ANSI);
• el aparato se use de acuerdo con las indicaciones de uso.
ADVERTENCIA:
• Si se destapan protecciones o se retiran piezas de la carcasa, exceptuando si se puede hacer
manualmente, se pueden dejar piezas al descubierto que sean conductoras de tensión.
• Si es necesario abrir el aparato, éste tiene que estar aislado de todas las fuentes de
alimentación. Esto se debe tener en cuenta antes del ajuste, de un entretenimiento, de una
reparación y de una sustitución de las piezas.
• Un ajuste, un entretenimiento o una reparación en el aparato abierto y bajo tensión sólo
puede ser llevado a cabo por un especialista autorizado por el productor (según VBG 4)
que conozca a fondo los peligros que ello conlleva.
• Las salidas de altavoces que estén provistas de la característica IEC 417/5036 (figura 1,
véase abajo) pueden conducir tensiones peligrosas al contacto. Por ello es indispensable
que antes de poner en marcha el aparato; la conexión se haya realizado únicamente con el
cable de empalmes recomendado por el productor.
• Las clavijas de contacto al final de los cables conectores tienen que estar atornilladas o
enclavadas a la carcasa, en tanto que sea posible.
• Sólo se pueden utilizar del tipo IEC 127 con la intensidad de corriente nominal indicada.
• El empalme del conductor de protección no se puede interrumpir en ningún caso.
• Las superficies provistas de la característica „HOT“ (figura 2, véase abajo), los paneles de
fondo trasero o las protecciones con ranuras de ventilación, los cuerpos de ventilación y
sus protecciones, así como las válvulas electrónicas y sus protecciones pueden alcanzar
temperaturas muy altas durante el funcionamiento y por ello no se deberían tocar.
• Niveles elevados de la intensidad de sonido pueden causar continuos daños auditivos;
por ello debe evitar acercarse demasiado a altavoces que funcionen a altos niveles. En tales
casos utilice protecciones auditivas.
ACOMETIDA A LA RED:
• El aparato está proyectado para un funcionamiento continuo.
• La tensión de funcionamiento ajustada tiene que coincidir con la tensión de la red del
lugar.
• Advertencia: el interruptor de la red del aparato tiene que estar en la posición OFF cuando
se conecte el cable de red.
• La conexión a la red eléctrica se efectuará con la fuente de alimentación o con el cable de
red que se entreguen con el aparato.
• Fuente de alimentación: una linea de conexión dañada no se puede sustituir. La fuente de
alimentación no puede volver a ponerse en funcionamiento.
• Evite una conexión de la red eléctrica a distribuidores con muchas tomas de corriente.
• El enchufe para el suministro de corriente tiene que estar cerca del aparato y ser de fácil
acceso.
SITUACION:
• El aparato debería estar situado en una superficie limpia y totalmente horizontal.
• El aparato no puede estar expuesto a ningún tipo de sacudidas durante su
funcionamiento.
• Se deben evitar la humedad y el polvo.
• El aparato no puede ponerse en funcionamiento cerca del agua, la bañera, el lavamanos,
la pila de la cocina, un recinto con tuberías de agua, la piscina o en habitaciones húmedas.
Tampoco se pueden poner objetos llenos de líquido - jarrones, vasos, botellas, etc. - encima
de él.
• Procure que el aparato tenga suficiente ventilación.
• Las aberturas de ventilación existentes no se deben bloquear ni tapar nunca. El aparato
debe estar situado como mínimo a 20 cm de la pared. El aparato sólo se puede montar en
un rack, si se ha procurado la suficiente ventilación y se han cumplido las indicaciones de
montaje del productor.
• Evite los rayos del sol directos así como la proximidad a radiadores, electro-radiadores o
aparatos similares.
• Si el aparato pasa repentinamente de un lugar frío a otro caliente, se puede condensar
humedad en su interior. Esto se debe tener en cuenta sobretodo en los aparatos con
válvulas electrónicas. Antes de poner en marcha el aparato se debe esperar hasta que éste
haya adquirido la temperatura ambiental.
• Accesorios: el aparato no se puede colocar encima de carros, estantes, trípodes, soportes o
mesas inestables. Si el aparato se cae puede causar daños personales y se puede estropear.
Coloque el aparato sólo en un carro, rack, estante, trípode o soporte recomendado por el
productor o que se le haya vendido junto con el aparato. En la instalación se deben seguir
las indicaciones del productor así como utilizar los accesorios recomendados por el mismo
para colocarlo encima. El conjunto del aparato con el pedestal se debe mover con mucho
cuidado. Un paro brusco, la aplicación de una fuerza desmesurada o un suelo irregular
puede ocasionar la caida de todo el conjunto.
• Piezas adicionales: no utilice nunca piezas adicionales que no estén recomendadas por el
productor, ya que se podrían provocar accidentes.
• Para protejer el aparato de una tormenta o si no se supervisa ni utiliza durante algún
tiempo, se debería desconectar la clavija de la red. Así se evitan daños en el aparato a
causa de un rayo y golpes de tensión en la red de corriente alterna.
Figura 1
Figura 2
21
francais
italano
CONSEILS DE SECURITE IMPORTANTS!
PRIERE DE LIRE AVANT L’EMPLOI ET A CONSERVER POUR UTILISATION
ULTERIEURE!
IMPORTANTI AVVERTIMENTI DI SICUREZZA!
LEGGERE ATTENTAMENTE PRIMA DELL’USO E CONSERVARE PER
UN UTILIZZO SUCCESSIVO
• L’appareil a été conçu par Hughes & Kettner selon la norme IEC 60065 et a quitté
l’entreprise dans un état irréprochable. Afin de conserver cet état et d’assurer un
fonctionnement sans danger de l’appareil nous conseillons à l’utilisateur la lecture des
indications de sécurité contenues dans le mode d’emploi. L’appareil est conforme à la
classification I (mise à terre de protection).
• L’apparecchio è stato costruito dalla Hughes & Kettner secondo la normativa europea
IEC 60065 ed ha lasciato il nostro stabilimento in stato ineccepibile. Per garantire il
mantenimento di tale stato e un utilizzo assolutamente privo di rischi l’utente è tenuto ad
osservare le indicazioni e gli avvertimenti di sicurezza contenuti nelle istruzioni per l’uso.
L’apparecchio rispecchia il livello di sicurezza I (collegato a terra).
• SURETE, FIABILITE ET EFFICACITE DE L’APPAREIL NE SONT GARANTIS PAR
HUGHES & KETTNER QUE SI:
• Montage, extension, nouveau réglage, modification ou réparation sont effectués par
Hughes & Kettner ou par toute personne autorisée par Hughes & Kettner.
• L’installation électrique de la pièce concernée correspond aux normes IEC (ANSI).
• L’utilisation de l’appareil suit le mode d’emploi.
• Sicurezza, affidabilità e prestazioni dell’apparecchio vengono garantiti dalla
Hughes & Kettner solo ed esclusivamente se:
• Montaggio, ampliamento, rimessa a punto, modifiche e riparazioni vengono
eseguite dalla Hughes & Kettner stessa o da personale da essa autorizzato.
• Gli impianti elettrici nei locali prescelti per l’uso dell’apparecchio rispondono alle
normative stabilite dall’ANSI.
• L’apparecchio viene utilizzato come indicato nel libretto delle istruzioni per l’uso.
AVERTISSEMENT
• A moins que cela ne soit manuellement possible, tout enlèvement ou ouverture du boîtier
peut entrainer la mise au jour de pieces sous tension.
• Si l’ouverture de l’appareil est nécessaire, celui-ci doit être coupé de chaque source de
courant. Ceci est à prendre en considération avant tout ajustement, entretien, réparation
ou changement de pieces.
• Ajustement, entretien ou réparation sur l’appareil ouvert et sous tension ne peuvent être
éffectués que par un spécialiste autorisé par le fabricant (selon VBG4). Le spécialiste étant
conscient des dangers liés à ce genre de réparation.
• Les sorties de baffles qui portent le signe IEC 417/5036 (fig. 1, voir en bas) peuvent être
sous tension dangereuse. Avant de brancher l’appareil utiliser uniquement le câble de
raccordement conseillé par le fabricant pour raccorder les baffles.
• Toutes les prises des câbles de raccordement doivent être, si possible, vissées ou
verrouillées sur le boîtier.
• L’utilisation de fusibles rafistolés ou court-circuites est inadmissible.
• Ne jamais interrompre la connexion du circuit protecteur.
• Il est conseillé de ne pas toucher aux surfaces pourvues du signe „HOT“ (fig. 2, voir en
bas), aux parois arrières ou caches munis de fentes d’aération, éléments d’aération et leurs
caches ansi qu’aux tubes et leurs caches. Ces éléments pouvant atteindre des températures
élévées pendant l’utilisation de l’appareil.
• Les Niveaux de puissance élévés peuvent entrainer des lésions auditives durables. Evitez
donc la proximité de haut-parleurs utilisés à haute puissance. Lors de haute puissance
continue utilisez une protection auditive.
BRANCHEMENT SUR LE SECTEUR
• L’appareil est conçu pour une utilisation continue.
• La tension de fonctionnement doit concorder avec la tension secteur locale.
• Attention: L’interrupteur de secteur de l’appareil doit être sur la position OFF, lorsque le
câble de réseau est raccordé.
• Le raccordement au réseau éléctrique s’effectue avec l’adaptateur ou le cordon
d´alimentation livré avec l’appareil.
• Adaptateur: Un câble de raccordement abimé ne peut être remplacé. L’adaptateur est
inutilisable.
• Evitez un raccordement au réseau par des boîtes de distribution surchargées.
• La prise de courant doit être placée à proximité de l’appareil et facile à atteindre.
LIEU D’INSTALLATION
• L’appareil doit être placé sur une surface de travail propre et horizontale.
• L’appareil en marche ne doit en aucun cas subir des vibrations.
• Evitez dans la mesure du possible poussière et humidité.
• L’appareil ne doit pas être placé à proximité d’eau, de baignoire, lavabo, évier, pièce d’eau,
piscine ou dans une pièce humide. Ne placez aucun vase, verre, bouteille ou tout objet
rempli de liquide sur l’appareil.
• L’appareil doit être suffisamment aéré.
• Ne jamais recouvrir les ouvertures d’aération. L’appareil doit être placé à 20 cm du mur
au minimum. L’appareil peut être monté dans un Rack si une ventilation suffisante est
possible et si les conseils de montage du fabricant sont suivis.
• Evitez les rayons de soleil et la proximité de radiateurs, chauffages etc.
• Une condensation d’eau peut se former dans l’appareil si celui-ci est transporté
brusquement d’un endroit froid à un endroit chaud. Ceci est particulièrement important
pour des appareils à tubes. Avant de brancher l’appareil attendre qu’il ait la température
ambiante.
• Accessoires: L’appareil ne doit être placé sur un chariot, support, trépied, bâti ou table
instable. Une chute de l’appareil peut entrainer aussi bien des dommages corporels que
techniques. Utilisez l’appareil uniquement avec un chariot, Rack, support, trépied ou bâti
conseillé par le fabricant ou vendu en combinaison avec l’appareil. Les indications du
fabricant pour l’installation de l’appareil sont à suivre, et les accessoires d’installation
conseillés par le fabricant sont à utiliser. Un ensemble support et appareil doit être déplacé
avec précaution. Des mouvements brusques et des revêtements de sol irreguliers peuvent
entrainer la chute de l´ensemble.
• Equipements supplémentaires: Ne jamais utiliser un équipement supplémentaire n’ayant
pas été conseillé par le fabricant, ceci pouvant entrainer des accidents.
• Afin de protéger l’appareil pendant un orage ou s’il ne doit pas être utilisé pendant un
certain temps, il est conseillé d’enlever la prise au secteur. Ceci évite des dommages dûs à
la foudre ou à des coups de tension dans le réseau à courant alternatif.
Version 1.0 10/2004
Fig. 1
Fig. 2
Avvertimenti:
• In caso di apertura di parti di rivestimento o rimozione di parti dell’involucro, a meno
che non si tratti di pezzi rimovibili semplicemente a mano, possono venire alla luce
parti dell’apparecchio conduttrici di tensione.
• Se l’apertura dell’apparecchio dovesse risultare necessaria è indispensabile staccare
precedentemente quest’ultimo da tutte le fonti di tensione. Rispettare tale misura di
prevenzione anche prima di un allineamento, di operazioni di manutenzione, della messa
in esercizio o della sostituzione di componenti all’interno dell’apparecchio.
• Allineamento, operazioni di manutenzione o eventuali riparazioni dell’apparecchio in
presenza di tensione vanno eseguite esclusivamente da personale specializzato ed
autorizzato, in grado di eseguire tali operazioni evitandone i rischi connessi.
• Le uscite degli altoparlanti contrassegnate dai caratteri IEC 417/5036 (vedi illustrazione
1 a fondo pag.) possono essere conduttrici di tensione pericolosa con cui evitare il contatto.
Per questo motivo, prima di accendere l’apparecchio, collegare quest’ultimo agli
altoparlanti servendosi esclusivamente del cavetto d’allacciamento indicato dal produttore.
• Tutte le spine e i cavi di collegamento devono essere avvitati o fissati all’involucro
dell’apparecchio per quanto possibile.
• Utilizzare esclusivamente fusibili del tipo IEC 127 con la indicata corrente nominale.
• L’utilizzo di fusibili di sicurezza non integri e la messa in corto circuito del sostegno di
metallo sono proibite.
• Non interrompere mai il collegamento con il circuito di protezione.
• Superfici contrassegnate dalla parola „HOT“ (vedi illustrazione 2 a fondo pag.), cosi
come griglie di aerazione, dispositivi di raffreddamento e i loro rivestimenti di protezione,
oppure valvole e i relativi rivestimenti protettivi possono surriscaldarsi notevolmente
durante l’uso e per questo motivo non vanno toccate.
• L’ascolto di suoni ad alto volume può provocare danni permanenti all’udito. Evitate perciò
la diretta vicinanza con altoparlanti ad alta emissione di suono e utilizzate cuffie protettive
in caso ciò non sia possibile.
Alimentazione:
• L’apparecchio è concepito per il funzionamento continuo.
• La tensione di esercizio deve corrispondere alla tensione di rete a cui ci si allaccia.
• Attenzione: l’interruttore di alimentazione dell’apparecchio deve essere in posizione
OFF quando viene allacciato il cavetto d’alimentazione.
• L’allacciamento alla rete elettrica avviene tramite alimentatore o cavetto d’alimentazione
consegnato insieme all’apparecchio.
• Alimentatore: un cavo di connessione danneggiato non può essere sostituito.
L’alimentatore non può più essere utilizzato.
• Evitate un allacciamento alla rete di corrente utilizzando cassette di distribuzione
sovraccariche.
• La spina di corrente deve essere situata nelle vicinanze dell’apparecchio e facilmente
raggiungibile in qualsiasi momento.
Locali di collocamento:
• Opportuno collocare l’apparecchio su una superficie pulita e orizzontale.
• Non sottoporre l’apparecchio in funzione a scosse e vibrazioni.
• Proteggere l’apparecchio per quanto possibile da umidità e polvere.
• Non collocare l’apparecchio vicino ad acqua, vasche da bagno, lavandini, lavelli da cucina,
locali umidi o piscine. Non appoggiare recipienti contenenti liquidi - vasi, bicchieri,
bottiglie, ecc. - sull’apparecchio.
• Provvedere ad una buone aerazione dell’apparecchio.
• Eventuali aperture previste per la ventilazione dell’apparecchio non vanno ne bloccate, ne
mai coperte. L’apparecchio va collocato ad almeno 20 cm di distanza dalle pareti circostanti
e può essere inserito tra altre componenti di un impianto solo in caso di sufficiente
ventilazione e qualora le direttive di montaggio del produttore vengano rispettate.
• Evitare di esporre l’apparecchio ai raggi del sole e di collocarlo direttamente nelle
vicinanze di fonti di calore come caloriferi, stufette, ecc.
• Se l’apparecchio viene trasportato rapidamente da un locale freddo ad uno riscaldato può
succedere che al suo interno si crei della condensa. Ciò va tenuto in considerazione
soprattutto in caso di apparecchi a valvole. Attendere che l’apparecchio abbia assunto la
temperatura ambiente prima di accenderlo.
• Accessori: non collocare l’apparecchio su carrelli, supporti, treppiedi, superfici o tavoli
instabili. Se l’apparecchio dovesse cadere a terra potrebbe causare danni a terzi o
danneggiarsi irreparabilmente. Utilizzate per il collocamento dell’apparecchio supporti,
treppiedi e superfici che siano consigliate dal produttore o direttamente comprese
nell’offerta di vendita. Per il collocamento dell’apparecchio attenetevi strettamente alle
istruzioni del produttore, utilizzando esclusivamente accessori da esso consigliati.
L’apparecchio in combinazione ad un supporto va spostato con molta attenzione.
Movimenti bruschi o il collocamento su pavimenti non piani possono provocare la caduta
dell’apparecchio e del suo supporto.
• Accessori supplementari: non utilizzate mai accessori supplementari che non siano
consigliati dal produttore, potendo essere ciò causa di incidenti.
• Per proteggere l’apparecchio in caso di temporali o nel caso questo non venisse utilizzato
per diverso tempo si consiglia di staccarne la spina di corrente. In questo modo si evitano
danni all’apparecchio dovuti a colpi di fulmine o ad improvvisi aumenti di tensione nel
circuito di corrente alternata.
Illustrazione 1
22
Illustrazione 2
HUGHES & KETTNER BassKick 100
HUGHES & KETTNER BassKick 100
23
MS D -1496 01/06
HUGHES & KETTNER • Postfach 1509 • 66595 St. Wendel • Tel. +49 (0) 68 51 - 905 0 • Fax. +49 (0) 68 51 - 905 103
INTERNATIONAL INQUIRIES: Fax +49 - 68 51 - 905 200 • E-Mail: [email protected]
www.hughes-and-kettner.com
copyright 2005 by Music & Sales GmbH