1
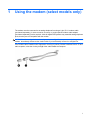
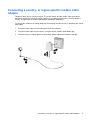
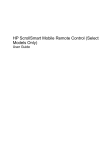
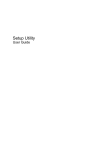
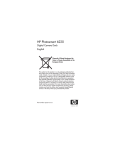
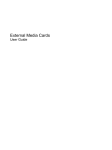
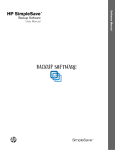
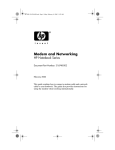
Modem and Local Area Network
User Guide
© Copyright 2008 Hewlett-Packard
Development Company, L.P.
The information contained herein is subject
to change without notice. The only
warranties for HP products and services are
set forth in the express warranty statements
accompanying such products and services.
Nothing herein should be construed as
constituting an additional warranty. HP shall
not be liable for technical or editorial errors
or omissions contained herein.
First Edition: June 2008
Document Part Number: 483455-001
Product notice
This user guide describes features that are common to most models. Some features may not be
available on your computer.
iii
iv
Product notice
Table of contents
1 Using the modem (select models only)
Connecting a modem cable .................................................................................................................. 2
Connecting a country- or region-specific modem cable adapter .......................................................... 3
Selecting a location setting ................................................................................................................... 4
Viewing the current location selection ................................................................................. 4
Adding new locations when traveling ................................................................................... 5
Solving travel connection problems ..................................................................................... 6
2 Connecting to a local area network
Index ..................................................................................................................................................................... 9
v
vi
1
Using the modem (select models only)
The modem must be connected to an analog telephone line using a 6-pin, RJ-11 modem cable
(purchased separately). In some countries, a country- or region-specific modem cable adapter
(purchased separately) is also required. Jacks for digital PBX systems may resemble analog telephone
jacks, but they are not compatible with the modem.
WARNING! Connecting the internal analog modem to a digital line can permanently damage the
modem. Immediately disconnect the modem cable if you accidentally connect it to a digital line.
If the modem cable contains noise suppression circuitry (1), which prevents interference from TV and
radio reception, orient the circuitry end (2) of the cable toward the computer.
1
Connecting a modem cable
WARNING! To reduce the risk of electric shock, fire, or damage to the equipment, do not plug a modem
cable (purchased separately) or telephone cable into an RJ-45 (network) jack.
To connect a modem cable into the RJ-11 telephone wall jack:
2
1.
Plug the modem cable into the modem jack (1) on the computer.
2.
Plug the modem cable into the RJ-11 telephone wall jack (2).
Chapter 1 Using the modem (select models only)
Connecting a country- or region-specific modem cable
adapter
Telephone jacks vary by country or region. To use the modem and the modem cable (purchased
separately) outside the country or region in which you purchased the computer, you must obtain a
country- or region-specific modem cable adapter (purchased separately).
To connect the modem to an analog telephone line that does not have an RJ-11 telephone jack, follow
these steps:
1.
Plug the modem cable into the modem jack (1) on the computer.
2.
Plug the modem cable into the country- or region-specific modem cable adapter (2).
3.
Plug the country- or region-specific modem cable adapter (3) into the telephone wall jack.
Connecting a country- or region-specific modem cable adapter
3
Selecting a location setting
Viewing the current location selection
To view the current location setting for the modem, follow these steps:
1.
Select Start > Control Panel.
2.
Click Clock, Language, and Region.
3.
Click Regional and Language Options.
Your location is displayed under Location.
4
Chapter 1 Using the modem (select models only)
Adding new locations when traveling
By default, the only location setting available to the modem is a location setting for the country or region
in which you purchased the computer. As you travel to different locations, set the internal modem to a
location setting that meets the operating standards of the country or region in which you are using the
modem.
As you add new location settings, they are saved by the computer so that you can switch among settings
at any time. You can add multiple location settings for any country or region.
CAUTION: To prevent losing your home location settings, do not delete your current modem settings.
To enable modem use in other locations while preserving your home location configuration, add a new
configuration for each location in which you will use the modem.
CAUTION: To prevent configuring the modem in a way that violates the telecommunications
regulations and laws of the country you are visiting, select the country or region in which the computer
is located. The modem may not function properly if the correct country or region selection is not made.
To add a location setting for the modem, follow these steps:
1.
Click Start, click Control Panel, click Hardware and Sound, and then click Phone and Modem
Options.
2.
Click the Dialing Rules tab.
3.
Click New. (The New Location window opens.)
4.
In the Location name box, type a name (such as “home” or “work”) for the new location setting.
5.
Select a country or region from the Country/region list. (If you select a country or region that is
not supported by the modem, the Country/region selection for USA or UK is displayed by default.)
6.
Enter the area code, a carrier code (if necessary), and the number to access an outside line (if
necessary).
7.
Next to Dial using, click Tone or Pulse.
8.
Click OK to save your new location setting. (The Phone and Modem Options window opens.)
9.
Do one of the following:
●
To set your new location setting as the current location, click OK.
●
To select another location setting as the current location setting, select your preference from
the settings in the Location list, and then click OK.
NOTE: You can use the preceding procedure to add location settings for places within your own
country or region as well as in other countries or regions. For example, you could add a setting
named “Work” that includes dialing rules for accessing an outside line.
Selecting a location setting
5
Solving travel connection problems
If you experience modem connection problems when using the computer outside of the country or region
in which you purchased it, try the following suggestions:
●
Check the telephone line type.
The modem requires an analog, not a digital, telephone line. A line described as a PBX line is
usually a digital line. A telephone line described as a data line, fax machine line, modem line, or
standard telephone line is usually an analog line.
●
Check for pulse or tone dialing.
An analog telephone line supports one of 2 dialing modes: pulse dialing or tone dialing. These
dialing mode options are selected in the Phone and Modem Options settings. The dialing mode
option selected must match the dialing mode supported by the telephone line in your location.
To determine the dialing mode supported by a telephone line, dial a few digits on the telephone,
and then listen for clicks (pulses) or tones. Clicks indicate that the telephone line supports pulse
dialing. Tones indicate that the telephone line supports tone dialing.
To change the dialing mode in your current modem location setting, follow these steps:
●
1.
Click Start, click Control Panel, click Hardware and Sound, and then click Phone and
Modem Options.
2.
Click the Dialing Rules tab.
3.
Select your modem location setting.
4.
Click Edit.
5.
Click either Tone or Pulse.
6.
Click OK twice.
Check the telephone number you are dialing and the response of the remote modem.
Dial a telephone number, make sure there is a response from the remote modem, and then hang
up.
●
Set the modem to ignore dial tones.
If the modem receives a dial tone it does not recognize, it does not dial and displays a “No Dial
Tone” error message.
To set the modem to ignore all dial tones before dialing, follow these steps:
6
1.
Click Start, click Control Panel, click Hardware and Sound, and then click Phone and
Modem Options.
2.
Click the Modems tab.
3.
Click the listing for the modem.
4.
Click Properties.
5.
Click Modem.
Chapter 1 Using the modem (select models only)
6.
Clear the check box for Wait for dial tone before dialing.
7.
Click OK twice.
Selecting a location setting
7
2
Connecting to a local area network
Connecting to a local area network (LAN) requires an 8-pin, RJ-45 network cable (purchased
separately). If the network cable contains noise suppression circuitry (1), which prevents interference
from TV and radio reception, orient the circuitry end of the cable (2) toward the computer.
To connect the network cable:
1.
Plug the network cable into the network jack (1) on the computer.
2.
Plug the other end of the cable into a network wall jack (2).
WARNING! To reduce the risk of electric shock, fire, or damage to the equipment, do not plug a
modem cable or telephone cable into an RJ-45 (network) jack.
8
Chapter 2 Connecting to a local area network
Index
C
cable
LAN 8
modem 2
country- or region-specific modem
cable adapter 3
L
local area network (LAN)
cable required 8
connecting cable 8
M
modem cable
connecting 2
noise suppression circuitry 1
modem cable adapter 3
modem software
setting/adding location 4
travel connection problems 6
N
network cable
connecting 8
noise suppression circuitry 8
noise suppression circuitry
modem cable 1
network cable 8
T
troubleshooting modem
6
W
wireless network (WLAN) 8
Index
9