1
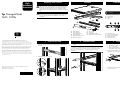
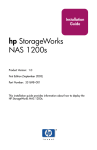
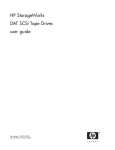
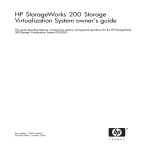
Warnings and Cautions
Rack
Installation
Instructions
!
Contents
WARNING: Before you begin, make sure that the rack is
sufficiently stable. If provided, lower the rack leveler feet and
make sure any required stabilizers are installed. If provided,
extend the rack anti-tip device. Failure to extend the anti-tip
device could result in personal injury or damage if the rack tips
over.
1
3
2
CAUTION: Make sure that the rack and all equipment
mounted in the rack have a reliable ground connection. Verify
that the total current of the rack components does not exceed
the current rating of the power distribution unit or outlet
receptacles.
hp StorageWorks
NAS 1200s
Front and Rear Views
4
5
5
3
6
7
1
2
3
Power button
Power on
Status
4
5
6
6
NIC 1 and NIC 2 status
Hard disk status (4)
Hard disk access (4)
4
2
1
2
3
10
9
4
5
1
8
1
2
3
4
5
© Copyright 2003 Hewlett-Packard Development Company, L.P.
Hewlett-Packard Company makes no warranty of any kind with regard to
this material, including, but not limited to, the implied warranties of merchantability
and fitness for a particular purpose. Hewlett-Packard shall not be liable for errors
contained herein or for incidental or consequential damages in connection with
the furnishing, performance, or use of this material.
1
1.
This document contains proprietary information, which is protected by copyright.
No part of this document may be photocopied, reproduced, or translated into
another language without the prior written consent of Hewlett-Packard. The
information contained in this document is subject to change without notice.
2
Prepare the Rack
Use the template to locate and mark the holes (using a pencil)
where the cage nuts need to be installed on the vertical rails of
the rack.
Hewlett-Packard Company shall not be liable for technical or editorial errors or
omissions contained herein. The information is provided “as is” without warranty of
any kind and is subject to change without notice. The warranties for HewlettPackard Company products are set forth in the express limited warranty statements
accompanying such products. Nothing herein should be construed as constituting
an additional warranty.
Rack Template
Inner slide rails
(removed for clarity)
Outer slide rails
Cable management arm
NAS 1200s server
1.
6
7
8
9
Velcro straps
Cage Nuts
Thumbscrew brackets
Assorted screws (not shown)
1
2
3
4
5
AC power plug
Mouse connector (green)
Video connector (blue)
Serial port (teal)
PCI expansion slot
Install the Rails
Install the slide rail assemblies as shown using the supplied
screws.
IMPORTANT: Leave the screws in the back a little loose until the server
is completely installed and has been moved in and out of the rack a few
times. This allows the rails to position properly and prevents binding.
Once step 4, “Install the Server” is complete, tighten the screws
completely.
3
1.
2.
8
6
7
8
9
-
7
6
LVD SCSI Controller connector
RJ-45 connector for NIC 1
RJ-45 connector for NIC 2
USB connectors (2) (black)
Keyboard connector (purple)
Prepare the Server
Remove the inner slides from the slide rail assemblies.
a. From the front of the rack, extend the inner slide rails until
they lock in place.
b. Press the inner slide lock (green tab) down to release and
then pull the inner slide rail straight out.
Attach the two thumbscrew brackets to the server using the
supplied screws, as shown.
2
2.
Install the cage nuts as shown.
1
2
1
HP StorageWorks NAS 1200s Rack Installation Instructions
First Edition (May 2003)
Part Number: 351699-001
3.
1
2
1
351699- 001
Attach the inner slide rails to the server using the supplied
screws, as shown.
4
1.
Install the Server
Insert the inner slide rails with the NAS server attached into the
outer slide rails as shown. Push the server all the way into the
rack, making sure that the inner slide rails lock into place.
5 Install the Cable Arm
1.
2.
2.
3.
Slide the server in and out of the rack several times, allowing
the rails to position properly.
Lock the server in place using the thumbscrews.
Thread the velcro straps through the cable management arm
as shown.
Attach the cable management arm to the slide rail at the back of
the rack.
a. Insert the cable arm’s hinged bracket into the slide rails
receiving hooks 1.
b. Rotate the bracket forward and lock into place with the
spring loaded tab 2.
6
1.
Cable the Server
Product Documentation
Connect the required cables to the back of the server.
1
2
10
2
1
4.
3
4
5
8
9
7
6
1
2
3
4
5
AC power plug
Mouse connector (green)
Video connector (blue)
Serial port (teal)
PCI expansion slot
2.
Route and secure the cables to the management arm using the
velcro straps as shown.
6
7
8
9
-
LVD SCSI Controller connector
RJ-45 connector for NIC 1
RJ-45 connector for NIC 2
USB connectors (2) (black)
Keyboard connector (purple)
Tighten the slide rails rear screws (4) completely.
3.
contains rack installation instructions
for experienced installers
HP StorageWorks
NAS 1200s
1U rack template
serves as a tool to quickly measure and
mark a rack for proper installation of a
NAS 1200s
HP StorageWorks
NAS 1200s
Installation Guide
provides product overview, requirements
and configuration options and
instructions for the NAS 1200s
HP StorageWorks
NAS 1200s
Documentation CD
contains electronic versions of all NAS
1200s product documents including:
Administration Guide
Quick Start Guide
Rack Installation Instructions
HP Warranty fulfillment
document
provides information on how to obtain
a printed warranty for your NAS 1200s
HP Important Safety
Information booklet
contains information about common
sense precautions necessary when
working with equipment powered at wall
receptacle service levels
Rack removed for clarity of illustration.
2
1
HP StorageWorks
NAS 1200s Rack
Installation Instructions
Insert the front of the cable managements arm into the receiving
clip of the slide rail assembly as shown.
Installation is now complete.
Refer to the HP StorageWorks NAS 1200s Installation Guide for
configuration.
4
1.
Install the Server
Insert the inner slide rails with the NAS server attached into the
outer slide rails as shown. Push the server all the way into the
rack, making sure that the inner slide rails lock into place.
5 Install the Cable Arm
1.
2.
2.
3.
Slide the server in and out of the rack several times, allowing
the rails to position properly.
Lock the server in place using the thumbscrews.
Thread the velcro straps through the cable management arm
as shown.
Attach the cable management arm to the slide rail at the back of
the rack.
a. Insert the cable arm’s hinged bracket into the slide rails
receiving hooks 1.
b. Rotate the bracket forward and lock into place with the
spring loaded tab 2.
6
1.
Cable the Server
Product Documentation
Connect the required cables to the back of the server.
1
2
10
2
1
4.
3
4
5
8
9
7
6
1
2
3
4
5
AC power plug
Mouse connector (green)
Video connector (blue)
Serial port (teal)
PCI expansion slot
2.
Route and secure the cables to the management arm using the
velcro straps as shown.
6
7
8
9
-
LVD SCSI Controller connector
RJ-45 connector for NIC 1
RJ-45 connector for NIC 2
USB connectors (2) (black)
Keyboard connector (purple)
Tighten the slide rails rear screws (4) completely.
3.
contains rack installation instructions
for experienced installers
HP StorageWorks
NAS 1200s
1U rack template
serves as a tool to quickly measure and
mark a rack for proper installation of a
NAS 1200s
HP StorageWorks
NAS 1200s
Installation Guide
provides product overview, requirements
and configuration options and
instructions for the NAS 1200s
HP StorageWorks
NAS 1200s
Documentation CD
contains electronic versions of all NAS
1200s product documents including:
Administration Guide
Quick Start Guide
Rack Installation Instructions
HP Warranty fulfillment
document
provides information on how to obtain
a printed warranty for your NAS 1200s
HP Important Safety
Information booklet
contains information about common
sense precautions necessary when
working with equipment powered at wall
receptacle service levels
Rack removed for clarity of illustration.
2
1
HP StorageWorks
NAS 1200s Rack
Installation Instructions
Insert the front of the cable managements arm into the receiving
clip of the slide rail assembly as shown.
Installation is now complete.
Refer to the HP StorageWorks NAS 1200s Installation Guide for
configuration.