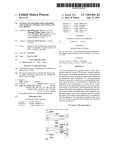
1
reference guide
hp iPAQ Pocket PC h5400 series
Document Part Number: 281984-002
April 2003
© 2003 Hewlett-Packard Development Company, L.P.
Microsoft, Windows, the Windows logo, Windows NT, ActiveSync, and
Outlook are trademarks of Microsoft Corporation in the U.S. and other
countries.
Intel, Pentium, Intel Inside, XScale, and Celeron are trademarks of
Intel Corporation in the U.S. and other countries.
Adobe, Acrobat, and Acrobat Reader are trademarks or registered
trademarks of Adobe Systems Incorporated.
SD is a trademark of Secure Digital.
BluetoothTM is a trademark owned by Bluetooth SIG, Inc.
All other product names mentioned herein may be trademarks of their
respective companies.
HP, Hewlett-Packard, and the Hewlett-Packard logo are trademarks of
Hewlett-Packard Company in the U.S. and other countries.
iPAQ is a trademark of Hewlett-Packard Development Company, L.P. in
the U.S. and other countries.
Hewlett-Packard Company shall not be liable for technical or editorial
errors or omissions contained herein or for incidental or consequential
damages in connection with the furnishing, performance, or use of this
material. The information in this document is provided “as is” without
warranty of any kind, including, but not limited to, the implied warranties
of merchantability and fitness for a particular purpose, and is subject to
change without notice. The warranties for HP products are set forth in the
express limited warranty statements accompanying such products. Nothing
herein should be construed as constituting an additional warranty.
This document contains proprietary information that is protected by
copyright. No part of this document may be photocopied, reproduced, or
translated to another language without the prior written consent of
Hewlett-Packard Company.
Å
WARNING: Text set off in this manner indicates that failure to
follow directions could result in bodily harm or loss of life.
Ä
CAUTION: Text set off in this manner indicates that failure to follow
directions could result in damage to equipment or loss of
information.
Reference Guide
hp iPAQ Pocket PC h5400 series
Second Edition (April 2003)
Document Part Number: 281984-002
Contents
1 Getting Started
What Is in the Box? . . . . . . . . . . . . . . . . . . . . . . . . . . . . . 1–2
Front Panel. . . . . . . . . . . . . . . . . . . . . . . . . . . . . . . . . 1–4
Top Panel. . . . . . . . . . . . . . . . . . . . . . . . . . . . . . . . . . 1–6
Bottom Panel . . . . . . . . . . . . . . . . . . . . . . . . . . . . . . . 1–7
Back Panel . . . . . . . . . . . . . . . . . . . . . . . . . . . . . . . . . 1–8
Universal Cradle . . . . . . . . . . . . . . . . . . . . . . . . . . . . 1–9
Register the hp iPAQ Pocket PC . . . . . . . . . . . . . . . . . . 1–10
Set Up Your hp iPAQ Pocket PC. . . . . . . . . . . . . . . . . . 1–10
Establish a Partnership With a PC . . . . . . . . . . . . . . . . . 1–12
For More Product Information . . . . . . . . . . . . . . . . . . . . 1–16
Troubleshooting and Support Information. . . . . . . . . . . 1–18
2 Getting Acquainted
Enter Information . . . . . . . . . . . . . . . . . . . . . . . . . . . . . . . 2–1
Change Word Suggestion Options . . . . . . . . . . . . . . 2–2
Type with the On-Screen Keyboard . . . . . . . . . . . . . 2–4
Write with the Stylus and the Letter Recognizer. . . . 2–6
Write with the Stylus and the Transcriber . . . . . . . . . 2–8
Write with the Stylus and Block Recognizer. . . . . . . 2–8
Draw and Write on the Screen. . . . . . . . . . . . . . . . . . 2–9
Convert Writing to Text . . . . . . . . . . . . . . . . . . . . . 2–10
Customize Settings. . . . . . . . . . . . . . . . . . . . . . . . . . . . . 2–12
Set the Time for Home . . . . . . . . . . . . . . . . . . . . . . 2–12
Set the Time for a Location You Are Visiting . . . . 2–14
Set the Date . . . . . . . . . . . . . . . . . . . . . . . . . . . . . . . 2–15
Reference Guide
v
Contents
Change the Backlight Settings. . . . . . . . . . . . . . . . .
Manage Your iPAQ Pocket PC . . . . . . . . . . . . . . . . . . .
Back Up Information . . . . . . . . . . . . . . . . . . . . . . . .
Use the iPAQ File Store . . . . . . . . . . . . . . . . . . . . .
Perform a Full Reset . . . . . . . . . . . . . . . . . . . . . . . .
Perform a Normal Reset . . . . . . . . . . . . . . . . . . . . .
Align the Screen . . . . . . . . . . . . . . . . . . . . . . . . . . .
Use the Self-Test . . . . . . . . . . . . . . . . . . . . . . . . . . .
Manage the Battery . . . . . . . . . . . . . . . . . . . . . . . . . . . .
Install the Battery. . . . . . . . . . . . . . . . . . . . . . . . . . .
Automatically Monitor the Battery . . . . . . . . . . . . .
Manually Monitor the Battery . . . . . . . . . . . . . . . . .
Charge the Battery . . . . . . . . . . . . . . . . . . . . . . . . . .
Adjust the Standby Setting . . . . . . . . . . . . . . . . . . .
Change the Battery Pack . . . . . . . . . . . . . . . . . . . . .
Reactivate the Battery . . . . . . . . . . . . . . . . . . . . . . .
Work with Programs . . . . . . . . . . . . . . . . . . . . . . . . . . .
Open Programs . . . . . . . . . . . . . . . . . . . . . . . . . . . .
Minimize Programs . . . . . . . . . . . . . . . . . . . . . . . . .
Close Programs . . . . . . . . . . . . . . . . . . . . . . . . . . . .
Install Programs. . . . . . . . . . . . . . . . . . . . . . . . . . . .
Customize the Programs Buttons . . . . . . . . . . . . . .
View Images . . . . . . . . . . . . . . . . . . . . . . . . . . . . . .
2–15
2–17
2–18
2–29
2–30
2–31
2–32
2–32
2–33
2–34
2–35
2–37
2–37
2–40
2–41
2–41
2–42
2–42
2–43
2–43
2–45
2–45
2–47
3 Using the Wireless LAN
Learn the Terms . . . . . . . . . . . . . . . . . . . . . . . . . . . . . . . . 3–1
Get Acquainted . . . . . . . . . . . . . . . . . . . . . . . . . . . . . 3–2
Power ON the WLAN . . . . . . . . . . . . . . . . . . . . . . . . 3–3
Activate the iPAQ WLAN Icon. . . . . . . . . . . . . . . . . 3–5
Work with Profiles . . . . . . . . . . . . . . . . . . . . . . . . . . . . . . 3–6
Create Profiles without Security . . . . . . . . . . . . . . . . 3–6
Create Profiles with Security. . . . . . . . . . . . . . . . . . . 3–9
Close the WLAN Program . . . . . . . . . . . . . . . . . . . 3–10
View Existing Profiles. . . . . . . . . . . . . . . . . . . . . . . 3–10
Select an Existing Profile . . . . . . . . . . . . . . . . . . . . 3–10
vi
Reference Guide
Edit an Existing Profile . . . . . . . . . . . . . . . . . . . . . .
Delete a Profile . . . . . . . . . . . . . . . . . . . . . . . . . . . .
Monitor Signal Strength and Status . . . . . . . . . . . . . . . .
View WLAN Signal Strength . . . . . . . . . . . . . . . . .
View WLAN Status. . . . . . . . . . . . . . . . . . . . . . . . .
Locate and Link to Access Points . . . . . . . . . . . . . . . . .
Search for Access Points . . . . . . . . . . . . . . . . . . . . .
Link to an Access Point . . . . . . . . . . . . . . . . . . . . . .
Use the Microsoft Connection Manager . . . . . . . . . . . .
Access the Connection Manager . . . . . . . . . . . . . . .
Use Bonus Software for Connectivity . . . . . . . . . . . . . .
Recommended Uses . . . . . . . . . . . . . . . . . . . . . . . . . . . .
Channel Setting . . . . . . . . . . . . . . . . . . . . . . . . . . . . . . .
3–11
3–11
3–12
3–12
3–12
3–12
3–13
3–13
3–13
3–14
3–14
3–14
3–14
4 Using Bluetooth
Get Acquainted with Bluetooth . . . . . . . . . . . . . . . . . . . . 4–2
Understand the Following Bluetooth Terms . . . . . . . 4–3
Review Supported Services . . . . . . . . . . . . . . . . . . . . 4–4
Work with Bluetooth Settings . . . . . . . . . . . . . . . . . . 4–5
Work with the Bluetooth Manager . . . . . . . . . . . . . . 4–7
Locate and Select a Device . . . . . . . . . . . . . . . . . . . . . . . 4–8
Understand Profiles . . . . . . . . . . . . . . . . . . . . . . . . . . . . . 4–8
Bluetooth Headset Profile . . . . . . . . . . . . . . . . . . . . . 4–8
Create a Profile . . . . . . . . . . . . . . . . . . . . . . . . . . . . . 4–8
Activate a Profile . . . . . . . . . . . . . . . . . . . . . . . . . . . 4–10
Rename a Profile . . . . . . . . . . . . . . . . . . . . . . . . . . . 4–10
Delete a Profile . . . . . . . . . . . . . . . . . . . . . . . . . . . . 4–10
Save Bluetooth Configuration Settings in a Profile. 4–11
Set Accessibility Properties . . . . . . . . . . . . . . . . . . . . . . 4–11
Enter a Device Name. . . . . . . . . . . . . . . . . . . . . . . . 4–11
Allow Others to Locate My Device. . . . . . . . . . . . . 4–12
Pair Devices. . . . . . . . . . . . . . . . . . . . . . . . . . . . . . . 4–12
Unpair Devices . . . . . . . . . . . . . . . . . . . . . . . . . . . . 4–14
Allow Connecting . . . . . . . . . . . . . . . . . . . . . . . . . . 4–14
Enable Bluetooth Services. . . . . . . . . . . . . . . . . . . . 4–15
Reference Guide
vii
Contents
Select Shared Folder . . . . . . . . . . . . . . . . . . . . . . . .
Select Business Card Information . . . . . . . . . . . . . .
Connect to Other Devices . . . . . . . . . . . . . . . . . . . . . . .
Identify the Communications Port. . . . . . . . . . . . . .
Establish an ActiveSync Connection. . . . . . . . . . . .
Establish a Serial Connection . . . . . . . . . . . . . . . . .
Use Dial-Up Networking. . . . . . . . . . . . . . . . . . . . .
Establish a Cell Phone Partnership . . . . . . . . . . . . .
Work with Files . . . . . . . . . . . . . . . . . . . . . . . . . . . . . . .
Create a File Transfer Connection. . . . . . . . . . . . . .
Send Files . . . . . . . . . . . . . . . . . . . . . . . . . . . . . . . .
Create a Folder on a Remote Device . . . . . . . . . . . .
Receive a File from a Remote Device . . . . . . . . . . .
Delete a File from a Remote Device . . . . . . . . . . . .
Send Information via Bluetooth . . . . . . . . . . . . . . .
Use Business Cards . . . . . . . . . . . . . . . . . . . . . . . . . . . .
Send Business Cards . . . . . . . . . . . . . . . . . . . . . . . .
Request Business Cards. . . . . . . . . . . . . . . . . . . . . .
Exchange Business Cards . . . . . . . . . . . . . . . . . . . .
Work with Connections . . . . . . . . . . . . . . . . . . . . . . . . .
Create a Shortcut . . . . . . . . . . . . . . . . . . . . . . . . . . .
Delete a Shortcut . . . . . . . . . . . . . . . . . . . . . . . . . . .
View Shortcuts . . . . . . . . . . . . . . . . . . . . . . . . . . . .
Open a Connection . . . . . . . . . . . . . . . . . . . . . . . . .
View Connection Status . . . . . . . . . . . . . . . . . . . . .
Close a Connection . . . . . . . . . . . . . . . . . . . . . . . . .
View Connection Information . . . . . . . . . . . . . . . . .
4–18
4–19
4–20
4–20
4–20
4–21
4–22
4–23
4–25
4–25
4–25
4–26
4–26
4–26
4–27
4–28
4–29
4–30
4–30
4–31
4–31
4–31
4–32
4–32
4–32
4–33
4–33
5 Using the Fingerprint Reader
Learn to Enroll a Fingerprint . . . . . . . . . . . . . . . . . . . . . . 5–1
Work with Fingerprints . . . . . . . . . . . . . . . . . . . . . . . . . . 5–5
Enroll a Fingerprint . . . . . . . . . . . . . . . . . . . . . . . . . . 5–6
Delete a Fingerprint . . . . . . . . . . . . . . . . . . . . . . . . . . 5–9
Set Logon Passwords . . . . . . . . . . . . . . . . . . . . . . . . . . . 5–10
Set “No password” for Logon . . . . . . . . . . . . . . . . . 5–11
viii
Reference Guide
Set “Simple 4 digit PIN” for Logon . . . . . . . . . . . .
Set “Strong alphanumeric password” for Logon. . .
Set “PIN OR fingerprint” for Logon . . . . . . . . . . . .
Set “PIN AND fingerprint” for Logon . . . . . . . . . .
Set “Password OR fingerprint” for Logon . . . . . . .
Set “Password AND Fingerprint” for Logon . . . . .
Set “Fingerprint-only” for Logon . . . . . . . . . . . . . .
Logon Using PIN, Passwords, and Fingerprints . . . . . .
Logon with No Password . . . . . . . . . . . . . . . . . . . .
Logon Using a 4-digit PIN . . . . . . . . . . . . . . . . . . .
Logon Using a Password . . . . . . . . . . . . . . . . . . . . .
Logon Using a PIN or Fingerprint. . . . . . . . . . . . . .
Logon Using a PIN and Fingerprint . . . . . . . . . . . .
Logon Using a Password or Fingerprint . . . . . . . . .
Logon Using a Password and Fingerprint . . . . . . . .
Logon Using a Fingerprint Only . . . . . . . . . . . . . . .
Set Security Options. . . . . . . . . . . . . . . . . . . . . . . . . . . .
Set the Security Level . . . . . . . . . . . . . . . . . . . . . . .
Set the Maximum Number of Attempts . . . . . . . . .
5–11
5–12
5–13
5–14
5–14
5–15
5–16
5–17
5–17
5–17
5–18
5–18
5–18
5–19
5–19
5–20
5–20
5–21
5–22
6 Connecting
Connect to a Computer. . . . . . . . . . . . . . . . . . . . . . . . . . . 6–1
Sync with Personal Computer . . . . . . . . . . . . . . . . . . 6–2
Use the Serial Infrared (IR) Connection . . . . . . . . . . 6–3
Change Synchronization Settings . . . . . . . . . . . . . . . 6–4
Move Files . . . . . . . . . . . . . . . . . . . . . . . . . . . . . . . . . 6–6
Connect to the Internet or Your Network . . . . . . . . . . . . 6–8
Use a Modem Card . . . . . . . . . . . . . . . . . . . . . . . . . . 6–8
Synchronize Links . . . . . . . . . . . . . . . . . . . . . . . . . . 6–10
Enter an Internet Address (URL). . . . . . . . . . . . . . . 6–11
Select from a Favorites List. . . . . . . . . . . . . . . . . . . 6–12
7 Communicating
Work with Contacts . . . . . . . . . . . . . . . . . . . . . . . . . . . . . 7–1
Reference Guide
ix
Contents
Create a Contact. . . . . . . . . . . . . . . . . . . . . . . . . . . . . 7–1
View a List of Contacts . . . . . . . . . . . . . . . . . . . . . . . 7–2
Edit Contact Information . . . . . . . . . . . . . . . . . . . . . . 7–3
Categorize Contacts. . . . . . . . . . . . . . . . . . . . . . . . . . 7–3
Delete Contacts . . . . . . . . . . . . . . . . . . . . . . . . . . . . . 7–6
Use the Inbox . . . . . . . . . . . . . . . . . . . . . . . . . . . . . . . . . . 7–7
Set Up E-mail . . . . . . . . . . . . . . . . . . . . . . . . . . . . . . 7–8
Compose/Send E-mail . . . . . . . . . . . . . . . . . . . . . . . . 7–9
Add an Attachment . . . . . . . . . . . . . . . . . . . . . . . . . 7–11
Receive E-mail . . . . . . . . . . . . . . . . . . . . . . . . . . . . 7–13
Open E-mail. . . . . . . . . . . . . . . . . . . . . . . . . . . . . . . 7–13
Delete E-mail. . . . . . . . . . . . . . . . . . . . . . . . . . . . . . 7–14
Manage Folders . . . . . . . . . . . . . . . . . . . . . . . . . . . . 7–16
Record Voice . . . . . . . . . . . . . . . . . . . . . . . . . . . . . . . . . 7–17
Make a Recording . . . . . . . . . . . . . . . . . . . . . . . . . . 7–18
Listen to a Recording. . . . . . . . . . . . . . . . . . . . . . . . 7–18
Take Notes . . . . . . . . . . . . . . . . . . . . . . . . . . . . . . . . . . . 7–19
Create a Note . . . . . . . . . . . . . . . . . . . . . . . . . . . . . . 7–19
8 Scheduling
Use the Today Screen. . . . . . . . . . . . . . . . . . . . . . . . . . . . 8–1
Create Information. . . . . . . . . . . . . . . . . . . . . . . . . . . 8–2
Change Information. . . . . . . . . . . . . . . . . . . . . . . . . . 8–3
Change Settings . . . . . . . . . . . . . . . . . . . . . . . . . . . . . 8–4
Use the Calendar . . . . . . . . . . . . . . . . . . . . . . . . . . . . . . . 8–6
Change the Calendar View . . . . . . . . . . . . . . . . . . . . 8–7
Customize the Calendar Appearance. . . . . . . . . . . . . 8–8
Schedule Appointments. . . . . . . . . . . . . . . . . . . . . . . 8–9
Create Reminders . . . . . . . . . . . . . . . . . . . . . . . . . . . 8–9
Delete Appointments . . . . . . . . . . . . . . . . . . . . . . . . 8–10
Categorize Appointments . . . . . . . . . . . . . . . . . . . . 8–10
Request Meetings . . . . . . . . . . . . . . . . . . . . . . . . . . 8–12
Use Tasks . . . . . . . . . . . . . . . . . . . . . . . . . . . . . . . . . . . . 8–13
Create a Task . . . . . . . . . . . . . . . . . . . . . . . . . . . . . . 8–13
Create a Task Quickly . . . . . . . . . . . . . . . . . . . . . . . 8–14
x
Reference Guide
Delete a Task . . . . . . . . . . . . . . . . . . . . . . . . . . . . . . 8–15
Sort Tasks . . . . . . . . . . . . . . . . . . . . . . . . . . . . . . . . 8–15
Change Appearance of Tasks . . . . . . . . . . . . . . . . . 8–16
9 Using Software
Use Pocket Word . . . . . . . . . . . . . . . . . . . . . . . . . . . . . . . 9–1
Create a New Document . . . . . . . . . . . . . . . . . . . . . . 9–2
Open a Word Document . . . . . . . . . . . . . . . . . . . . . . 9–4
Change the Pocket Word Options . . . . . . . . . . . . . . . 9–4
Use Pocket Excel . . . . . . . . . . . . . . . . . . . . . . . . . . . . . . . 9–6
Create a Workbook . . . . . . . . . . . . . . . . . . . . . . . . . . 9–7
Open an Excel File . . . . . . . . . . . . . . . . . . . . . . . . . . 9–8
Change Excel Options . . . . . . . . . . . . . . . . . . . . . . . . 9–9
Use Microsoft Reader . . . . . . . . . . . . . . . . . . . . . . . . . . 9–10
Activate the Reader . . . . . . . . . . . . . . . . . . . . . . . . . 9–11
Read an eBook. . . . . . . . . . . . . . . . . . . . . . . . . . . . . 9–11
Copy eBooks . . . . . . . . . . . . . . . . . . . . . . . . . . . . . . 9–12
Delete eBooks . . . . . . . . . . . . . . . . . . . . . . . . . . . . . 9–13
Listen to an eBook. . . . . . . . . . . . . . . . . . . . . . . . . . 9–14
Annotate your eBook. . . . . . . . . . . . . . . . . . . . . . . . 9–14
Change the Microsoft Reader Options . . . . . . . . . . 9–15
Use the Windows Media Player. . . . . . . . . . . . . . . . . . . 9–17
Copy Music to Your iPAQ Pocket PC . . . . . . . . . . 9–19
Play Music on Your iPAQ Pocket PC . . . . . . . . . . . 9–20
Create Playlists . . . . . . . . . . . . . . . . . . . . . . . . . . . . 9–21
Play a Playlist . . . . . . . . . . . . . . . . . . . . . . . . . . . . . 9–23
Play Video . . . . . . . . . . . . . . . . . . . . . . . . . . . . . . . . 9–23
Use Pocket Internet Explorer . . . . . . . . . . . . . . . . . . . . . 9–24
Use Pocket IE When Connected . . . . . . . . . . . . . . . 9–24
Use Pocket IE When Disconnected . . . . . . . . . . . . . 9–24
Synchronize Favorites . . . . . . . . . . . . . . . . . . . . . . . 9–25
10 Using the Universal Remote
Learn the Icons. . . . . . . . . . . . . . . . . . . . . . . . . . . . . . . . 10–2
Reference Guide
xi
Contents
Use the Configuration Icons . . . . . . . . . . . . . . . . . . 10–2
Add a Device . . . . . . . . . . . . . . . . . . . . . . . . . . . . . . . . . 10–3
Change a Device . . . . . . . . . . . . . . . . . . . . . . . . . . . 10–8
Delete a Device . . . . . . . . . . . . . . . . . . . . . . . . . . . . 10–8
Turn on a Device . . . . . . . . . . . . . . . . . . . . . . . . . . . 10–9
Add Activities . . . . . . . . . . . . . . . . . . . . . . . . . . . . 10–10
Change an Activity . . . . . . . . . . . . . . . . . . . . . . . . 10–15
Delete an Activity . . . . . . . . . . . . . . . . . . . . . . . . . 10–15
Set Up a Room . . . . . . . . . . . . . . . . . . . . . . . . . . . . . . . 10–16
Add a Device to a Room . . . . . . . . . . . . . . . . . . . . 10–16
Delete a Room . . . . . . . . . . . . . . . . . . . . . . . . . . . . 10–17
Add a Favorite Channel . . . . . . . . . . . . . . . . . . . . . . . . 10–17
Change a Favorite . . . . . . . . . . . . . . . . . . . . . . . . . 10–18
Set Up User Profile . . . . . . . . . . . . . . . . . . . . . . . . . . . 10–18
Change a User Profile . . . . . . . . . . . . . . . . . . . . . . 10–19
Download Device Codes and Key Functions. . . . . . . . 10–19
Download Device Codes . . . . . . . . . . . . . . . . . . . . 10–19
Download Key Functions . . . . . . . . . . . . . . . . . . . 10–20
Work with Function Keys . . . . . . . . . . . . . . . . . . . . . . 10–21
Add Function Keys . . . . . . . . . . . . . . . . . . . . . . . . 10–21
Edit Function Keys . . . . . . . . . . . . . . . . . . . . . . . . 10–21
Learn Function Keys . . . . . . . . . . . . . . . . . . . . . . . 10–21
Copy Function Keys . . . . . . . . . . . . . . . . . . . . . . . 10–22
Move Function Keys . . . . . . . . . . . . . . . . . . . . . . . 10–22
Delete Function Keys . . . . . . . . . . . . . . . . . . . . . . 10–22
A Regulatory Notices
Federal Communications Commission Notice. . . . . . . . . A–1
Modifications. . . . . . . . . . . . . . . . . . . . . . . . . . . . . . . A–2
Cables . . . . . . . . . . . . . . . . . . . . . . . . . . . . . . . . . . . . A–2
Declaration of Conformity for Products Marked with the
FCC Logo—United States Only . . . . . . . . . . . . . . . . A–2
Japanese Notice . . . . . . . . . . . . . . . . . . . . . . . . . . . . . A–3
Battery Warning . . . . . . . . . . . . . . . . . . . . . . . . . . . . A–4
Airline Travel Notice. . . . . . . . . . . . . . . . . . . . . . . . . A–4
xii
Reference Guide
Wireless Notices . . . . . . . . . . . . . . . . . . . . . . . . . . . . A–5
U.S. Regulatory Wireless Notice. . . . . . . . . . . . . . . . A–5
Canadian Regulatory Wireless Notice. . . . . . . . . . . . A–5
European Union Notice . . . . . . . . . . . . . . . . . . . . . . . A–6
Brazilian Regulatory Wireless Notice . . . . . . . . . . . . A–8
B Hardware Specifications
System Specifications . . . . . . . . . . . . . . . . . . . . . . . . . . . B–1
Physical Specifications. . . . . . . . . . . . . . . . . . . . . . . . . . . B–2
Operating Environment . . . . . . . . . . . . . . . . . . . . . . . . . . B–3
Index
Reference Guide
xiii
Contents
xiv
Reference Guide
1
Getting Started
Congratulations on purchasing an HP iPAQ Pocket PC h5400
Series. This Reference Guide will help you set up your Pocket PC
and familiarize you with how it works.
Reference Guide
1–1
Getting Started
What Is in the Box?
If items are missing, contact Customer Support at the numbers
provided in the Worldwide Telephone Numbers booklet.
Products Shipped in Box
1
HP iPAQ Pocket PC
2
Slim Removable Battery
3
Protective Cover Pack
4
Universal Cradle for either Universal Serial Bus (USB) or serial connection
(The appearance may vary depending on the model.)
5
Extra Stylus
6
AC Adapter
1–2
Reference Guide
Getting Started
Products Shipped in Box (Continued)
7
Charging Adapter (tethered to the AC adapter)
8
Getting Started guide
9
HP iPAQ Pocket PC Companion CD, which contains:
• Microsoft Outlook 2000
• Microsoft ActiveSync software
• Bonus software and programs
• HP documentation including the HP iPAQ Pocket PC Reference Guide
and eBook in select languages on CD
Reference Guide
1–3
Getting Started
Front Panel
Front Panel Components
1
Speaker: Alarms, voice, music
2
Power Indicator:
amber flash = charging
amber solid = charged
green flash = alarm, calendar, event
3
Stylus: Push to eject, push to lock
4
Power Button: Turn unit on and off
5
Color Display: High contrast color screen
6
*Inbox Button: Access your Inbox to send and receive e-mail
7
*iTask Button: Open, close, and switch between programs, run utilities,
and change settings
8
5-Way Navigation Button: Scroll through a list and push to select
(similar to using a joystick)
9
Fingerprint Reader: Biometric enhanced security
1–4
Reference Guide
Getting Started
Front Panel Components (Continued)
:
Microphone: Record your voice or other sounds
;
*Calendar Button: Schedule appointments, set reminders, or view your
calendar
<
*Contacts Button: Display a list of your contacts from the category you
select
=
Volume: Up/Down/Mute Voice and Record
>
Light Sensor: Automatically adjusts the backlight when selected
?
Active Bluetooth Indicator: Flashes “blue” when Bluetooth is on
@
Wireless LAN Indicator:
green flash = wireless link
amber flash = no wireless link
A
Antenna: Transmits and receives signals
*These buttons are programmable, but at startup they are assigned by default.
Reference Guide
1–5
Getting Started
Top Panel
Top Panel Components
1
Antenna: Transmits and receives signals
2
Stylus: Push to eject, push to lock
3
Infrared/Universal Remote: Beams information to and from other
infrared-enabled devices
4
Secure Digital I/O (SDIO) Expansion Slot: Supports Secure Digital
(SD) storage and expansion cards
1–6
Reference Guide
Getting Started
Bottom Panel
Bottom Panel Components
1
3.5 mm Stereo/Microphone Headphone Jack: Connect your
headphone or headset or earpiece
2
Charging/Communications Port: Connect to universal cradle,
synchronization cable, or charging adapter
3
Reset Button: Reset your iPAQ Pocket PC
4
Expansion Pack Connector: Connect to an optional Expansion Pack
5
Microphone: Record your voice or other sounds
Reference Guide
1–7
Getting Started
Back Panel
Back Panel Components
1
Battery Door: Covers the removable/rechargeable battery
2
Battery Latch: Slide up to remove the battery
3
Product Label: Needed for service and product-related questions
1–8
Reference Guide
Getting Started
Universal Cradle
Universal Cradle Components
1
Stabilizers: Stabilizes the iPAQ Pocket PC when cradled without an
Expansion Pack
2
Release Button: Releases the stabilizers from the locked position
Reference Guide
1–9
Getting Started
Register the hp iPAQ Pocket PC
You can receive the latest information on your iPAQ Pocket PC
as well as special offers on iPAQ Pocket PC accessories and
software by registering online at the following url:
http://www.register.hp.com
Set Up Your hp iPAQ Pocket PC
To begin using your HP iPAQ Pocket PC, locate the removable
battery and:
1. Insert the tabs 1 on the bottom of the battery into the slots on
the iPAQ Pocket PC.
2. Push the battery 2 upward and snap into place.
3. Remove the stylus (push down on it) from the slot on the top
of the iPAQ Pocket PC.
1–10
Reference Guide
Getting Started
4. Locate the reset hole on the bottom panel of your Pocket PC.
Insert the stylus into the hole and push inward on the stylus
to perform a normal reset. Your iPAQ Pocket PC will
automatically power on.
5. Follow the steps on the Welcome screen to:
■
Align the screen
■
Learn about the stylus
■
Learn about the pop-up menus
■
Select your time zone
6. Tap anywhere to open the Today screen.
will see the Today screen when you first turn on your iPAQ
✎ You
Pocket PC each day or after four hours of inactivity.
7. Personalize your iPAQ Pocket PC.
Tap to enter owner information
Reference Guide
1–11
Getting Started
Establish a Partnership With a PC
Using Microsoft ActiveSync, you can synchronize the
information on your personal computer with the information
on your iPAQ Pocket PC. Synchronization compares the data on
your Pocket PC with your personal computer and updates both
computers with the most recent information.
You can synchronize your Contacts, Calendar, Tasks, and Notes,
which require Microsoft Outlook. Also, you can synchronize
other items, such as files and Web pages, without Microsoft
Outlook. Your first synchronization process automatically begins
when you finish using the ActiveSync Setup Wizard.
To install ActiveSync:
1. Insert the HP iPAQ Pocket PC Companion CD into your
computer.
2. Click Start Here.
3. Install Microsoft Outlook, if necessary.
4. Click Install ActiveSync (version on this CD required as
minimum).
prompted to download the file, select “Run this program
✎ When
from its current location.”
1–12
Reference Guide
Getting Started
5. Follow the instructions on the HP iPAQ Pocket PC
Companion CD until you reach the screen shown and then
continue with Step 6 below.
6. Insert the AC Adapter plug into an electrical outlet. Connect
the AC connector to the universal cradle.
Reference Guide
1–13
Getting Started
7. If you have not already done so, connect either the (a) serial
or the (b) USB connector (not both) on the universal cradle to
the port on the back or front of your personal computer.
either the serial or the USB connector. Do not connect
✎ Connect
both connectors at the same time.
the USB connection for faster performance. Microsoft
✎ Use
Windows NT users must use the serial connection.
1–14
Reference Guide
Getting Started
8. Slide the bottom of your iPAQ Pocket PC into the universal
cradle until the connector is fully inserted.
✎ ActiveSync will automatically detect the Pocket PC connection.
9. Continue to follow the ActiveSync instructions to establish a
partnership.
10. Learn more about your iPAQ Pocket PC.
Reference Guide
1–15
Getting Started
For More Product Information
1–16
For information on...
See this source...
Programs on your HP iPAQ
Pocket PC
The HP iPAQ Pocket PC Reference
Guide on CD and eBook in select
languages. For Help, tap
and then
Help.
The HP iPAQ Pocket PC
Reference Guide
This information is presented in a
printable format and eBook in select
languages. It is located on the HP iPAQ
Pocket PC Companion CD and in
eBook format on the iPAQ Pocket PC.
Wireless LAN
Wireless LAN Special Features Guide
in the box and Chapter 3: HP iPAQ
Pocket PC Reference Guide on CD
Bluetooth
Bluetooth Special Features Guide in the
box and Chapter 4: HP iPAQ Pocket PC
Reference Guide on CD
Fingerprint Reader
Chapter 5: HP iPAQ Pocket PC
Reference Guide on CD
iPAQ Backup
Chapter 2: HP iPAQ Pocket PC
Reference Guide on CD
Universal Remote Control
Chapter 10: HP iPAQ Pocket PC
Reference Guide on CD
iPAQ File Store
Chapter 2: HP iPAQ Pocket PC
Reference Guide on CD
iTask Manager
Chapter 2: HP iPAQ Pocket PC
Reference Guide on CD
Additional programs that
can be installed on your
HP iPAQ Pocket PC
The HP iPAQ Pocket PC Companion CD
HP iPAQ Pocket PC options
The Accessories Information brochure
included with your HP iPAQ Pocket PC
or http://www.hp.com/products
/pocketpc/options
Reference Guide
Getting Started
For information on...
See this source...
Your HP iPAQ Pocket PC
http://www.hp.com/products
/pocketpc
Up-to-date information on
your Microsoft Pocket PC
2002 software
http://www.microsoft.com/mobile
/pocketpc
Programs that are already
on your HP iPAQ Pocket PC
The HP iPAQ Pocket PC Companion CD
and Help on your HP iPAQ Pocket PC.
Tap Start, and then Help.
Connecting your HP iPAQ
Pocket PC to a computer
This Getting Started guide, the
HP iPAQ Pocket PC Reference Guide,
or ActiveSync Help on the HP iPAQ
Pocket PC Companion CD.
Registering your HP iPAQ
Pocket PC to receive the
latest information as well as
special offers on iPAQ
Pocket PC accessories and
software
Register online at:
http://www.hp.com/go/ipaqreg
Warranty and service
information
Worldwide Limited Warranty Statement
in the box
Reference Guide
1–17
Getting Started
Troubleshooting and Support
Information
For information on...
See this source...
Connecting to and
synchronizing with
a computer
ActiveSync Help on your personal
computer. To view Help, start
ActiveSync, click Help, and then click
Microsoft ActiveSync Help.
Troubleshooting information
on ActiveSync connections
The ActiveSync troubleshooter on your
computer. After installing the desktop
software. Click Help, and then
Troubleshooter.
Exchanging files after
synchronizing your
HP iPAQ Pocket PC
Online ActiveSync on your computer.
View the online help by opening
Microsoft ActiveSync on your computer,
and then select Help, Microsoft
ActiveSync Help.
Last-minute updates and
detailed technical
information
The Read Me files, located in the
Microsoft ActiveSync folder on the
HP iPAQ Pocket PC Companion CD.
Support for your HP iPAQ
Pocket PC
http://www.hp.com/support
/pocketpc
Safety Information
Important Safety Information on the CD.
Up-to-date information on
Windows-powered devices
http://www.microsoft.com/pocketpc
is a Class B digital device, pursuant to Part 15 of the FCC
✎ This
Rules. Refer to the documentation CD for Class B information.
1–18
Reference Guide
2
Getting Acquainted
To use your HP iPAQ Pocket PC h5400 Series most effectively,
start by learning how to:
■
Enter information
■
Customize settings
■
Manage your iPAQ Pocket PC
■
Manage the battery
■
Work with programs
Enter Information
You can enter letters, symbols, and numbers on the iPAQ
Pocket PC screen by:
■
Tapping the keyboard
■
Writing with the stylus and using the Letter Recognizer,
Transcriber, or Block Recognizer to create text
■
Drawing and writing with the stylus
You can tap the keyboard or write with the Letter Recognizer,
Transcriber, or Block Recognizer in any program. You can use
the stylus to draw and write on the screen in the Notes program
and from any Notes tab in the Calendar, Contacts, and Tasks
programs.
Reference Guide
2–1
Getting Acquainted
you type or write, the iPAQ Pocket PC suggests words for
✎ As
you in a box above the Keyboard, Letter Recognizer, or Block
Recognizer but not in the Transcriber.
You can determine when the suggestions occur (for example, you
can decide how many letters to enter before the Letter Recognizer
makes suggestions) and how many words are suggested.
Change Word Suggestion Options
You can determine:
■
If words are suggested
■
The number of letters you must enter before a word is
suggested
■
The number of words that are suggested per entry
■
If you do not want any words suggested
To change word suggestions:
1. From the Start menu, tap Settings.
2. Tap Input.
3. Tap the Word Completion tab.
2–2
Reference Guide
Getting Acquainted
4. Tap the down arrow associated with letters, and select the
number of letters you want to type before a suggestion is
made.
4
5
5. Tap the down arrow associated with words, and select the
number of words you want suggested.
6. Tap OK.
Reference Guide
2–3
Getting Acquainted
Type with the On-Screen Keyboard
You can enter typed text directly on the screen by tapping letters,
numbers, and symbols on the keyboard.
To type with the keyboard:
1. From any program, tap the up arrow next to the Input Panel
icon.
2. Tap Keyboard to display a keyboard on the screen.
2–4
Reference Guide
Getting Acquainted
3. Tap a letter, symbol, or number to enter information.
✎ To see symbols, tap the
123
or Shift key.
4. Tap OK.
Reference Guide
2–5
Getting Acquainted
Write with the Stylus and the Letter
Recognizer
You can write letters, numbers, and symbols on the screen using
the stylus and the Letter Recognizer. You create words and
sentences by writing in uppercase (ABC), lowercase (abc), and
symbols (123) as instructed here.
To write with the stylus and letter recognizer:
1. From any program, tap the up arrow next to the Input Panel
button.
2. Tap Letter Recognizer.
2–6
Reference Guide
Getting Acquainted
3. Write a letter or symbol between the dashed line and
baseline.
a. To display in uppercase, write a letter between the hatch
marks labeled ABC.
b. To display in lowercase, write a letter between the hatch
marks labeled abc.
c. Write a number or symbol between the hatch marks
labeled 123.
should write characters between the dashed line and baseline
✎ You
for the character recognizer to work effectively. If you are writing
a letter like “p,” write the top portion within the dashed line and
baseline, and the tail portion below the baseline.
If you writing a letter like “b,” write the bottom portion within
the dashed line and baseline, and the top portion above the
dashed line.
What you write will be converted to text.
Reference Guide
2–7
Getting Acquainted
Write with the Stylus and the Transcriber
You can write words, letters, numbers, and symbols anywhere on
the screen using the stylus and Transcriber.
To write with the stylus and transcriber:
1. From any program, tap the up arrow next to the Input Panel
button.
2. Tap Transcriber.
3. Write on the screen.
What you write will be converted to text.
Write with the Stylus and Block Recognizer
You can write letters, numbers, and symbols using the stylus and
Block Recognizer. You create words and sentences by writing
letters and numbers in specific areas.
✎ You can input character strokes you learned using Graffiti.
To write with stylus and block recognizer:
1. From any program, tap the up arrow next to the Input Panel
button.
2. Tap Block Recognizer.
3. Write a word, letter, or symbol in the input box.
a. To type text, write a letter in the input box labeled “abc.”
b. To type numbers or symbols, write a number or symbol
in the input box labeled “123.”
What you write will be converted to text.
2–8
Reference Guide
Getting Acquainted
Draw and Write on the Screen
Use the stylus as a pen to draw and write on the screen in the
Notes program or from the Notes tab in Calendar, Contacts,
or Tasks.
To draw and write on the screen:
1. From the Start menu, tap Notes.
2. Tap New.
tap the Notes tab in Calendar, Contacts, or Tasks, and
✎ Otherwise,
then tap the Pen icon.
Reference Guide
2–9
Getting Acquainted
3. Draw and write on the screen.
4. Tap the Pen icon.
5. Tap OK.
Convert Writing to Text
You can convert your writing to text when you write with the
stylus in the Notes program or from the Notes tab in:
■
Calendar
■
Contacts
■
Tasks
To convert writing to text:
1. From the Start menu, tap Notes.
✎ Otherwise, tap the Notes tab in Calendar, Contacts, or Tasks.
2. Begin a new note or tap an existing note to open it.
3. Tap Tools, and then Recognize.
2–10
Reference Guide
Getting Acquainted
a particular word or phrase, highlight it before you
✎ Totapconvert
Recognize. If a word is not recognized, it will not be
converted.
.
4. Tap OK.
Reference Guide
2–11
Getting Acquainted
Customize Settings
You can navigate through the iPAQ Pocket PC interface in
three ways:
■
Tap
■
Tap and hold
■
Press program buttons
Tap the screen with the pointed tip of your stylus to open
programs and make selections. For example, tap the Start menu
to see a list of programs available.
Tap and hold an area on the screen to see a pop-up menu.
Press a program button on the front panel to quickly turn on the
screen and open your Calendar, Contacts, Inbox, or iTask (if you
have not changed the default settings for the buttons).
Set the Time for Home
The time on your iPAQ Pocket PC is synchronized with the time
on your personal computer when they connect using ActiveSync.
You will need to set the time again if:
■
The battery completely discharges.
■
You perform a full reset of your iPAQ Pocket PC. See
“Perform a Full Reset.”
✎ From the Today screen, tap the Clock icon to set the time.
2–12
Reference Guide
Getting Acquainted
To set the time for home:
1. From the Start menu, tap Settings.
2. Tap System, and then Clock.
default, the time on the host computer is synchronized with
✎ By
the iPAQ Pocket PC each time the two devices connect using
ActiveSync.
3. Verify Home is selected or tap Home.
3
4
5
4. Tap the time-zone down arrow, and then select your home
time zone.
5. Tap the hour, minutes, or seconds, and then use the up and
down arrows to adjust the time.
can adjust the time by moving the hands of the clock with
✎ You
the stylus.
6. Tap AM or PM.
7. Tap OK.
8. Tap Yes to save the clock settings.
Reference Guide
2–13
Getting Acquainted
Set the Time for a Location You Are Visiting
SHORTCUT: From the Today screen, tap the Clock icon to set
the time.
To set the time for visiting location:
1. From the Start menu, tap Settings.
2. Tap System, and then Clock.
3. Tap Visiting.
3
4
5
4. Tap the time-zone down arrow, and then select the time-zone
you are visiting.
5. Tap the hour, minutes, or seconds, and then use the up and
down arrows to adjust the time.
SHORTCUT: You can adjust the time by moving the hands of
the clock with the stylus.
6. Tap AM or PM.
7. Tap OK.
8. Tap Yes to save the clock settings.
2–14
Reference Guide
Getting Acquainted
Set the Date
You must set the date again if:
■
The battery discharges completely
■
You perform a full reset of your iPAQ Pocket PC
SHORTCUT: You can set the date from the Today screen. Tap
the Clock icon to set the date.
To set the date:
1. From the Start menu, tap Settings.
2. Tap System, and then Clock.
3. Tap the down arrow by the date.
4. Tap the left or right arrow to select a month and year.
5. Tap a day.
6. Tap OK.
7. Tap Yes to save the date settings.
Change the Backlight Settings
You can change the backlight settings to match your environment
or to conserve battery power.
Reference Guide
2–15
Getting Acquainted
backlight settings on your iPAQ Pocket PC are synchronized
✎ The
with the settings on your personal computer when they connect
using ActiveSync.
To change the backlight settings:
1. From the Start menu, tap Settings.
2. Tap System, and then Backlight.
3. Select the backlight settings.
2–16
Reference Guide
Getting Acquainted
Changing the Backlight Settings
On the...
Select when to use the...
Battery Power tab
Backlight on battery power.
External Power tab
Backlight on external power.
Brightness tab
• Appropriate level of brightness.
Slide the bar to the lowest level to conserve the
most power.
• Automatic light sensor.
Select the checkbox to disable the slider bar
and allow the brightness to automatically adjust
to the ambient light.
Manage Your iPAQ Pocket PC
You can effectively manage your iPAQ Pocket PC by learning
how to:
■
Back up and restore information
■
Use the iPAQ File Store
■
Perform full and normal resets
■
Align the screen
■
Perform a self-test
Reference Guide
2–17
Getting Acquainted
Back Up Information
You can back up information to the personal computer, the iPAQ
File Store, and storage cards using:
■
iPAQ Backup
■
Active Sync
Use iPAQ Backup
iPAQ Backup protects your data from hardware failures, loss of
battery power, and accidental deletions.
Using iPAQ Backup, you can:
Ä
2–18
■
Back up and restore selected files, folders, and databases on
your iPAQ Pocket PC
■
Copy the entire contents of the iPAQ Pocket PC (for
example, the registry, user and system databases, and data
files)
■
Schedule regular backup
■
Back up your PIM
CAUTION: Restoring your information replaces the current
information on your iPAQ Pocket PC with the information saved in
your backup.
Reference Guide
Getting Acquainted
Back up Files, Registry, and Databases
You can back up files, registry, and databases. A backup file can
be saved to any media (for example, storage card or hard drive)
that you would use for storing any other file.
To back up files, registry, and databases:
1. From the Start menu, tap Programs.
2. Tap iPAQ Backup.
3. Tap the checkboxes to select files, folders, or databases from
the tree view.
3
4
4. Tap the … button.
Reference Guide
2–19
Getting Acquainted
5. Enter a name and saving location for the back up data, and
then tap OK.
6. Tap Options... to set backup options.
2–20
Reference Guide
Getting Acquainted
7. Select whether to:
■ Compress and/or encrypt data
■ Exclude files from the backup
Selecting Back Up Options
If you select...
Then...
Compress Data
The backup file will be smaller, but the
process will take longer.
Encrypt Data
The backup file (*.pbf) will be encrypted.
The user must enter an alphanumeric
password (6-15 digits) to proceed with
the backup and then re-enter the
password to restore the data.
Stop Process Before Backup
All active programs will be closed prior
to the backup.
Exclude
iPAQ backup (*.pbf), program (*.exe
and *.dll), log (*.log), and storage card
files are excluded from the backup.
Reference Guide
2–21
Getting Acquainted
8. Tap OK.
9. Tap the Backup... button.
10. Tap the Start button.
Restore Back Up Files, Registry, and Databases
1. From the Start menu, tap Programs.
2. Tap iPAQ Backup.
3. Tap the Restore tab.
2–22
Reference Guide
Getting Acquainted
4. Tap the … button in the File field.
5. Select a file that you backed up.
Reference Guide
2–23
Getting Acquainted
6. Select the data you want to restore from the tree view.
7. Tap Options... to set restore options.
✎ Itfiles.is recommended that you close all programs prior to restoring
8. Tap OK.
9. Tap the Restore button.
10. Tap the Start button.
Schedule a Backup
You can schedule an automatic backup to run at a certain time
and date.
To schedule a backup:
1. From the Start menu, tap Programs.
2. Tap iPAQ Backup.
2–24
Reference Guide
Getting Acquainted
3. Tap the Options... button.
4. Tap the Schedule button.
Reference Guide
2–25
Getting Acquainted
5. Tap the checkbox Enable Scheduled Start Up.
6. Select one of the Frequency radio buttons.
Selecting a Frequency for Backup
If you select...
Then the backup will...
Once (default)
Begin at a designated future time
and date.
Daily
Occur at the same time each day.
Weekly
Occur on a scheduled day at a certain
time each week.
7. Tap OK.
2–26
Reference Guide
Getting Acquainted
Back Up/Restore Using Active Sync
You should back up information to your computer regularly to
help reduce the chance of losing information.
Close all programs on your iPAQ Pocket PC before restoring
your information.
Ä
CAUTION: Restoring your information replaces the current
information on your iPAQ Pocket PC with the information saved in
your backup.
To back up/restore using ActiveSync:
1. Make sure your iPAQ Pocket PC is connected to your
computer.
2. From your computer, open Microsoft ActiveSync. From
the Start menu, click Programs, and then click Microsoft
ActiveSync.
3. From the Tools menu, click Backup/Restore.
Reference Guide
2–27
Getting Acquainted
4. Click the Backup or Restore tab, and then select your
options.
5. Click Backup Now or Restore Now.
Save to a SDIO or CompactFlash Card
1. Insert SDIO or CompactFlash card.
2. Open file you want to save.
3. Tap Options.
4. Tap down arrow, and then tap SDIO card.
5. Tap Save.
2–28
Reference Guide
Getting Acquainted
Use the iPAQ File Store
You can install programs and save files to the iPAQ File Store
folder. The iPAQ File Store is accessed from the File Explorer on
your iPAQ Pocket PC.
Programs and files stored in the iPAQ File Store are held in ROM
and are saved if you perform a full reset of your iPAQ Pocket PC
or if the battery discharges completely.
Ä
CAUTION: Beware that registry changes will not be saved if you
perform a full reset or if the battery discharges completely.
The iPAQ File Store can store up to 20 MB of information,
depending on the model.
Save to the File Store
1. Copy the files you want to save to the iPAQ File Store.
2. From the Start menu, tap Programs.
3. Tap File Explorer.
4. Tap My Device.
5. Tap File Store.
6. Paste selected files.
Reference Guide
2–29
Getting Acquainted
Perform a Full Reset
A full reset is sometimes referred to as a “hard reset.” Perform a
full reset when you want to clear all settings, programs, and data
from RAM.
A full reset will de-activate the battery. The power button will not
function until the battery is reactivated.
and data stored in iPAQ File Store are not
✎ Programs
automatically deleted. You must manually delete the files.
To perform a full reset:
Ä
CAUTION: If you perform a full reset, you will return to your default
settings and lose all information not in ROM.
1. Press and hold the lower left and lower right buttons.
2. Press the Reset button on the bottom of the iPAQ Pocket PC
with the stylus.
2–30
Reference Guide
Getting Acquainted
3. Hold all buttons until the displayed image begins to fade
(approximately four seconds).
4. Release the program buttons and stylus.
can verify a full reset by pressing the power button. If the
✎ You
iPAQ Pocket PC has been fully reset, it will not turn on.
5. Reactivate the battery by:
❏
Removing and reinstalling the battery
❏
Connecting the iPAQ Pocket PC to AC power
❏
Pressing the Reset button with the stylus
6. Set up your iPAQ Pocket PC.
Perform a Normal Reset
A normal reset is sometimes referred to as a “soft reset.” You
perform a normal reset when you want to stop all running
programs. A normal reset will not erase any programs or data
stored in RAM or ROM.
Ä
CAUTION: A normal reset will erase all unsaved data.
To perform a normal reset:
1. Locate the Reset button on the bottom of the iPAQ Pocket
PC.
2. Lightly press the normal Reset button for two seconds.
iPAQ Pocket PC will restart in approximately five seconds
✎ The
and display the Today screen.
Reference Guide
2–31
Getting Acquainted
Align the Screen
When you turn on the screen of your iPAQ Pocket PC for the first
time, you are guided through the alignment process. Realign your
screen if:
■
The iPAQ Pocket PC does not respond accurately to your
taps
■
You performed a restore following a data backup
■
You performed a hard reset of your iPAQ Pocket PC
To align the screen:
1. From the Start menu, tap Settings.
2. Tap System, and then the Screen icon.
3. Tap the Align Screen button.
4. Tap the cross object at each location. Be precise when you
tap the cross object.
5. Tap OK.
Use the Self-Test
You can use the self-test to verify the proper operations of
various features and functions. Technical support may ask to
perform this test while they are troubleshooting problems.
To perform a self-test:
1. From the Start menu, tap Settings.
2. Tap the System tab, and then Self-test.
3. Select the tests you want to perform. The default is “all tests.”
4. Tap Next.
5. Select “Perform an Automatic Reset before the test.”
6. Tap Next to begin the test.
2–32
Reference Guide
Getting Acquainted
7. Follow the on-screen instructions.
8. Tap Finish to exit.
9. Tap Yes to save a test log file to the My Documents folder.
10. Tap OK to exit.
Manage the Battery
It is recommended that you fully charge the battery prior to using
the iPAQ Pocket PC.Your iPAQ Pocket PC h5400 will not power
on if the battery has a low charge (less than 3.2 Volts). It is
recommended that you fully charge the battery prior to using the
iPAQ Pocket PC.
To charge and reset the iPAQ Pocket PC h5400:
1. Connect the iPAQ Pocket PC h5400 to an A/C power supply.
2. Charge the battery to the minimum level of 3.2 Volts. This
will take 5 to 30 minutes depending on the current charge
level.
charge on the battery goes below the 3.2 Volts as a result of
✎ Ifnotthebeing
connected to the universal cradle or the AC adapter, no
damage will occur to the battery. However, the iPAQ Pocket PC
h5400 charge indicator light will not flash until the battery
reaches the minimum charge of 3.2 Volts and you perform a
normal reset.
3. Perform a normal reset (see “Perform a Normal Reset” in the
hp iPAQ Pocket PC Reference Guide on CD).
4. Power on the iPAQ Pocket PC h5400.
To use your battery power effectively, you need to know how to:
■
Install the battery
■
Monitor the battery
Reference Guide
2–33
Getting Acquainted
■
Charge the battery
■
Change the removable battery packs
■
Reactivate the battery
✎ Recycle and dispose of the lithium polymer battery properly.
Install the Battery
1. Locate the battery.
2. Insert the battery tabs into the slots on the iPAQ Pocket PC.
3. Push the battery into slots.
will need to fully charge your iPAQ Pocket PC within the
✎ You
next 12 hours. The amber charge light flashes when your iPAQ
Pocket PC is recharging the battery. The amber charge light is
solid (not flashing) when the battery is fully charged.
2–34
Reference Guide
Getting Acquainted
Automatically Monitor the Battery
You can automatically monitor the state of the battery and be
notified when the battery falls below a specified threshold. You
can then elect to:
■
Dismiss, which cancels the notification and battery
monitoring service
■
Snooze for a certain period of time then receive the battery
notification again
■
Run, which starts the iPAQ Backup program
To automatically monitor the battery:
1. From the Start menu, tap Programs.
2. Tap iPAQ Backup.
3. Tap the Options... button.
Reference Guide
2–35
Getting Acquainted
4. Tap the Schedule button.
5. Select Enable Battery Monitor.
6. Select a Threshold (%) value.
✎ The Threshold (%) value must be between 90% and 10%.
7. Tap OK.
2–36
Reference Guide
Getting Acquainted
Manually Monitor the Battery
You can manually monitor the battery power.
1. From the Start menu, tap Settings.
2. Tap System tab, and then Power icon.
3. Tap OK.
Charge the Battery
Because your iPAQ Pocket PC uses some power to maintain files
in RAM and the clock, you need to recharge the battery regularly.
Keep the iPAQ Pocket PC connected to the universal cradle or
the AC Adapter while you are at your desk.
The best policy is to keep the iPAQ Pocket PC connected to your
computer when working at your desk and carry your AC Adapter
and charging adapter plug with you when traveling.
Your iPAQ Pocket PC is shipped with a partial charge on the
battery. You may want to ensure that it is fully charged before
synchronizing.
Ä
CAUTION: Because most of the programs and data you install on
your iPAQ Pocket PC are held in memory (RAM), you will need to
reinstall them if the battery completely discharges.
recommend that you fully charge the battery prior to
✎ We
synchronizing with your personal computer.
Reference Guide
2–37
Getting Acquainted
Charge with the Universal Cradle
You can charge your iPAQ Pocket PC with it docked in the
universal cradle. Use the universal cradle to recharge the battery
of an optional expansion pack, if you purchased one.
To charge with the universal cradle:
1. Plug the AC Adapter of the universal cradle into an electrical
outlet.
2. Slide the bottom of your iPAQ Pocket PC into the universal
cradle until the connector is fully inserted.
amber charge light flashes when your iPAQ Pocket PC is
✎ The
recharging the battery. The amber charge light is solid (not
flashing) when the battery is fully charged.
Charge with the AC Adapter
You can charge your iPAQ Pocket PC using the AC Adapter and
the charger adapter. The AC Adapter works in any standard
electrical outlet.
2–38
Reference Guide
Getting Acquainted
If you purchased an optional expansion pack, you can also use the
AC Adapter to recharge the battery of an optional expansion
pack.
When traveling, you can purchase an adapter that works in your
car’s cigarette lighter or a 12-volt power outlet.
Ä
CAUTION: Use only HP recommended AC adapters.
To charge with the AC Adapter:
1. Plug the AC Adapter into an electrical outlet.
2. Insert the AC Adapter plug into the charging adapter.
inserting the charging adapter ensure that the triangle
✎ When
markings (located on the front of the charging adapter) are on the
same side as the iPAQ screen.
3. Insert the charging adapter into the bottom of your iPAQ
Pocket PC.
Reference Guide
2–39
Getting Acquainted
4. Remove the AC adapter when the power indicator on the top
of the iPAQ Pocket PC turns solid amber. The unit is fully
charged. The approximate time to fully charge a unit is four
hours.
Ä
CAUTION: Incorrectly inserting the charging adapter plug into the
connector on the bottom of the iPAQ Pocket PC can damage the
connector pins.
To avoid damage to the connector pins when removing the charging
adapter from the bottom of the iPAQ Pocket PC, push the release
buttons located on each side of the adapter and pull.
Adjust the Standby Setting
You can adjust the portion of the battery devoted to the “standby
period.” Standby is your battery reserve that is used to protect the
data and programs stored in RAM.
During standby, the unit turns off so very little power is being
consumed. This helps to preserve programs and data stored
in RAM.
You can select a lower standby period if you use the Pocket PC
for extended periods of time. A lower standby period increases
the usable battery operating time.
You can select a higher standby period if you leave your
Pocket PC off for extended periods of time without recharging it.
A higher standby period decreases the usable battery time and
allocates it for standby usage.
more information on using the Standby Setting, tap Help
✎ For
from the Start menu.
To adjust the standby setting:
1. From the Start menu, tap Settings.
2–40
Reference Guide
Getting Acquainted
2. Tap System, and then the Power icon.
3. Tap the Standby tab.
4. Drag the pointer to adjust the standby period.
Change the Battery Pack
If the main battery for your iPAQ Pocket PC is removed, your
device will not operate even if you try to use AC power.
You can change the battery without losing data. However, any
device activity and/or wireless communication will be
terminated.
It is recommended that you replace the removable battery within
30 minutes to avoid losing data.
Reactivate the Battery
A full reset will deactivate the battery. The power button will not
function until the battery is reactivated.
You reactivate the battery by:
■
Removing and reinstalling the battery
■
Connecting the iPAQ Pocket PC to AC power
Reference Guide
2–41
Getting Acquainted
■
Pressing the normal Reset button with the stylus
Work with Programs
You can open, minimize, and close programs.
Open Programs
Most programs on your iPAQ Pocket PC are only two taps
away from any screen. Open any program on your iPAQ
Pocket PC from the Start menu.
Ä
CAUTION: If a program has been added to the Start menu, it will
not display on the Programs menu.
✎ You can open a program by assigning it to a program button.
To open a program:
1. Tap Start or the Microsoft logo.
2. Tap Programs.
3. Tap the program title or icon.
2–42
Reference Guide
Getting Acquainted
Minimize Programs
From the program you would like to minimize, tap the X in the
top right corner.
Close Programs
Programs may close automatically as you open new programs.
This will depend on the amount of RAM being used.
If your iPAQ Pocket PC is running slowly, you can manually
close programs.
To close a program:
1. From the Start menu, tap Settings.
2. Tap System, and then Memory.
3. Tap the Running Programs tab.
Reference Guide
2–43
Getting Acquainted
4. Tap Stop All or select a particular program, and then tap
Stop.
✎ You can close active programs using iTask.
2–44
Reference Guide
Getting Acquainted
Install Programs
You can install programs on your iPAQ Pocket PC from your:
■
Personal computer by using Microsoft ActiveSync
■
iPAQ Pocket PC if the program file has a .cab extension
■
iPAQ Pocket PC or your personal computer by copying a
program file that has an .exe or .cef extension
When installing programs, look for the correct version for the
iPAQ Pocket PC.
Ä
CAUTION: If a program has been added to the Start menu, it will
not display on Programs menu.
To install programs:
1. Tap the program file to install and move it to the Programs
folder on your iPAQ Pocket PC.
2. Follow the instructions in the installation wizard to install the
program on your iPAQ Pocket PC.
3. If your program does not run, insert the stylus for
two seconds into the Reset button on the bottom of your
iPAQ Pocket PC.
Customize the Programs Buttons
You can quickly open your Calendar, Contacts, Inbox, or iTask
programs by pressing a program button on the front panel of your
iPAQ Pocket PC. If you want to open other programs with those
buttons, then you must change the default assignments.
To customize the program buttons:
1. From the Start menu, tap Settings.
2. Tap Buttons.
Reference Guide
2–45
Getting Acquainted
3. Tap the button you want to change.
4. Tap the button assignment down arrow.
5. Tap a program.
6. Tap OK.
2–46
Reference Guide
Getting Acquainted
View Images
You can use the iPAQ Image Viewer to:
■
Create a slide show of images
■
Sort and rotate images
■
Adjust the timing between images in a show
■
Set a variety of transition effects
■
View images with BMP, JPEG, and GIF file extensions
Locate an Image
1. From the Start menu, tap Programs.
2. Tap iPAQ Image Viewer.
3. Tap File, and then Look In.
4. Select a file from the tree structure, and then tap OK.
View Image Information
You can view the image size and type, date taken and modified,
color, and file size of an image.
Reference Guide
2–47
Getting Acquainted
To view image information:
1. Tap image to select it.
2. Tap View, and then Information Window.
Change the View
By default, the Image Viewer opens showing the images in the
Thumbnail View.
You can change the view to full screen by:
■
Double clicking a thumbnail
■
Tapping View, and then Full Screen
■
Tapping the View Full Screen icon
Create a Slide Show
You can put images together to create a slide show and control
display options like:
2–48
■
Orientation
■
Zoom
Reference Guide
Getting Acquainted
■
Image Quality
■
Transition Effect
■
Timing
To create a slide show:
1. From the Start menu, tap Programs.
2. Tap iPAQ Image Viewer.
3. Tap Show, and then Set up Show....
4. Select images for the show and modify any image settings.
change settings for all images in the show, click the Select All
✎ Tobutton.
5. Tap OK.
Save a Slide Show
You can save the show settings and use them again.
To save a slide show:
1. From the Start menu, tap Programs.
Reference Guide
2–49
Getting Acquainted
2. Tap iPAQ Image Viewer.
3. Create slide show (see section “Create a Slide Show”).
4. Tap File, and then Save Show Settings or Save Show
Settings As....
5. Enter a name and the location where you want to save the
settings.
6. Tap OK.
2–50
Reference Guide
Getting Acquainted
Open a Slide Show
You can view the settings for a saved slide show.
To open a slide show:
1. From the Start menu, tap Programs.
2. Tap Image Viewer.
3. Tap File, and then Open Show Settings....
4. Select the show setting.
Reference Guide
2–51
Getting Acquainted
Sort Image Files
You can sort images in the show.
To sort image files:
1. From the Start menu, tap Programs.
2. Tap iPAQ Image Viewer.
3. Tap Edit, and then Sort Images.
4. Select sort order. You can sort by ascending or descending
Name, Type, Size, or Date.
2–52
Reference Guide
Getting Acquainted
View Slide Show
1. From the Start menu, tap Programs.
2. Tap Image Viewer.
3. Create or open existing slide show.
4. Tap Show, and then View Show.
Reference Guide
2–53
Getting Acquainted
5. Select how to advance the images in the show: Manual
Advance, Automatic Advance, or Automatic Advance
(Loop).
2–54
Reference Guide
3
Using the Wireless LAN
Your HP iPAQ Pocket PC h5400 Series can connect to an
802.11b Wireless LAN (WLAN) or connect directly to other
WLAN-enabled devices.
Learn the Terms
It is recommended that you become familiar with the following
terms as you begin to use WLAN technology.
WLAN Terms
Term
Definition
Profile
A collection of defined WLAN settings.
Wireless Access Point
The access point provides a wireless connection
to a network (additional hardware).
Infrastructure
This connection mode uses wireless access points
to connect to networks.
Ad hoc
This mode does not use access points. It is used
in peer-to-peer network communications. All
peers must be configured on the same channel.
Reference Guide
3–1
Using the Wireless LAN
WLAN Terms (Continued)
Term
Definition
Hot spots
Public or private areas where there is a wireless
access point available.
SSID
The acronym for the service set identifier. This
identification number uses a maximum number
of 32 characters and is case sensitive.
Encryption (WEP)
A set of security services used to protect 802.11
networks from unauthorized access.
Get Acquainted
With WLAN, you can:
■
Access the Internet
■
Send and receive e-mail
■
Access corporate network information
■
Use virtual private networks (VPN) for secure remote access
■
Use hot spots for wireless connectivity
of dial-up and wireless Internet, e-mail, corporate networks,
✎ Use
and other wireless communications, such as Bluetooth-enabled
devices, may require separately purchased additional hardware
and other compatible equipment, in addition to a standard
Wireless LAN (WLAN) infrastructure and a separately purchased
service contract. Check with your service provider for availability
and coverage in your area. Not all web content may be available.
Some web content may require installation of additional software.
To use WLAN on your iPAQ Pocket PC, you need to turn ON the
WLAN and set up your device.
3–2
Reference Guide
Using the Wireless LAN
Power ON the WLAN
1. From the Start menu, tap the iPAQ Wireless folder.
2. Tap the Wireless Control icon to power ON the WLAN.
3. Tap the WLAN button to power on the WLAN.
The iPAQ Pocket PC has an LED indicator that illuminates to
reflect the WLAN connection status.
If the LED indicator is flashing... Then, the WLAN is...
Green
On and connected.
Amber
On but not connected.
During your initial log on to the Wireless LAN (WLAN), you are
prompted to enter iPAQ WLAN Wireless Adapter information.
You have two options:
1. Tap OK and wait to enter the Wireless Adapter information
until you are setting up your WLAN Profile. If you use the
default selection “Use server-assigned IP address,” you will
use a DHCP server address.
Reference Guide
3–3
Using the Wireless LAN
OR
2. Enter the IP Address and Name Server information.
■
Enter the IP address information on the IP address tab.
1
2
3–4
■
Tap the Name Servers tab at the bottom of the window.
■
Enter the Name server information.
Reference Guide
Using the Wireless LAN
contact your network administrator or service provider for
✎ Please
the address information.
❏
Tap OK.
Change iPAQ WLAN Wireless Adapter Information
To make changes to the iPAQ WLAN Wireless Adapter
information:
1. Tap Start, and then Settings.
2. Tap the Connections tab, and then the Network Adapters
icon.
3. Select “iPAQ WLAN Wireless Adapter” from the list.
4. Tap Properties.
5. Change the wireless adapter information.
6. Tap OK to save the wireless adapter changes.
7. Tap OK to close the program.
Activate the iPAQ WLAN Icon
After you create profiles (see “Work with Profiles”), tapping the
iPAQ WLAN icon enables the WLAN and places the icon in the
lower right corner of the Today screen.
1. From the Start menu, tap the iPAQ Wireless folder.
2. Tap the iPAQ WLAN icon to activate the WLAN icon in the
lower right corner of the Today screen.
the iPAQ WLAN is not powered on, you will be prompted to
✎ Ifpower
it on.
3. Click the X in the upper right corner of the screen to close the
window.
Reference Guide
3–5
Using the Wireless LAN
Work with Profiles
You must create profiles with or without security to use on your
WLAN. You can view existing profiles to:
■
Select for use
■
Edit connection information
■
Delete the profile
■
View connection status
Create Profiles without Security
1. Tap the iPAQ WLAN icon in the lower right corner of the
Today screen.
3–6
Reference Guide
Using the Wireless LAN
2. Tap Setup.
3. Tap the New button.
Reference Guide
3–7
Using the Wireless LAN
4. Enter the profile information.
Profile Information
Field Name
Information
Profile Name
Enter a name for your profile.
SSID
This is the service set identifier (SSID) that allows
you to connect to any available access point.
The default is “blank” when you connect to an
infrastructure network.
You and the wireless site you want to connect to
must use the same SSID. This identification
number uses a maximum of 32 characters and is
case sensitive.
Power Management
The default selection is “No.” Selecting “Yes”
will provide lower performance and use less
power.
Network
Choose: Infrastructure to connect to a wired
network via a wireless access point (the default).
Ad hoc for peer-to-peer communications.
Region
You are required to select your region from the
list or the option “Rest of the World” if your
region is not available.
Channel
The default is “Auto.”
You do not need to specify a channel if you are
using an infrastructure network. It will use the
same channel as the access point.
Otherwise, set the frequency that corresponds to
your country’s regulatory commission’s range
and the 802.11b standard.
Transmission Rate
The default is “Auto.”
This is the wireless data transmission speed. You
can select speeds of 1, 2, 5.5, or 11 Mbps.
5. Tap Next.
3–8
Reference Guide
Using the Wireless LAN
6. Tap “Use server-assigned IP address” and use the DHCP
server address or select “Use specific IP address.”
7. If you selected “Use specific IP address,” you must enter
information in all remaining fields.
your network administrator or your service provider for
✎ Contact
this information.
8. Tap Finish.
Create Profiles with Security
You can use encryption to increase security to prevent data theft.
This device supports open system (no encryption), 64-bit shared
key, and 128-bit shared key encryption.
The wireless access point that you are connecting to must use the
same encryption to receive and transmit data.
To create profiles with security:
1. Follow steps 1 through 6 in the section “Create Profiles
without Security.”
2. Tap Next.
3. Select “64” or “128” bit from the Wireless Encryption down
arrow list.
4. Select “hexadecimal” or “alphanumeric” from the WEP
Keys down arrow list.
5. Enter valid keys.
Reference Guide
3–9
Using the Wireless LAN
encryption key is case sensitive. Valid values for
✎ The
hexadecimal keys are “0–9 and A–F.” Valid values for
alphanumeric keys are “0–9, a–z, and A–Z.”
The length of the key depends on which wireless encryption
mode was selected: 64 bit (uses 5 alphanumeric or 10
hexadecimal values) or 128 bit (uses 13 alphanumeric or 26
hexadecimal values).
6. Select a Key number from the down arrow list.
7. Tap Finish.
Close the WLAN Program
1. Tap the iPAQ WLAN icon in the lower right corner of the
Today screen.
2. Tap Close on the pop-up menu.
View Existing Profiles
Tap the iPAQ WLAN icon in the lower right corner of the
Today screen.
profiles are listed in the top section of the pop-up menu.
✎ Existing
The active profile is indicated by a check mark.
Select an Existing Profile
1. Tap the iPAQ WLAN icon in the lower right corner of the
Today screen.
2. Tap a profile name from the list in the top section of the
pop-up menu. The profile is automatically loaded.
3–10
Reference Guide
Using the Wireless LAN
Edit an Existing Profile
1. Tap the iPAQ WLAN icon in the lower right corner of the
Today screen.
2. Tap Setup.
3. Select an existing profile from the Profile down arrow list
to edit.
4. Tap the Edit button.
5. Make desired changes to the profile.
6. Tap OK to save the changes.
Delete a Profile
1. Tap the iPAQ WLAN icon in the lower right corner of the
Today screen.
2. Tap Setup.
3. Select a profile from the Profile down arrow list.
4. Tap the Delete button.
5. Tap Yes to confirm.
Reference Guide
3–11
Using the Wireless LAN
Monitor Signal Strength and Status
You can monitor the signal strength and status of your connection
by viewing the:
■
WLAN icon on the Today screen
■
Signal strength indicator on the iPAQ WLAN screen
■
Signal strength indicator in the Status option
View WLAN Signal Strength
You can view the WLAN signal strength between your
iPAQ Pocket PC and access point.
1. Tap the iPAQ WLAN icon in the lower right corner of the
Today screen.
2. Tap Setup on the pop-up menu.
3. Notice the strength of the received signal and connection
quality as indicated by the color coding and percentage value.
4. Tap OK to exit.
View WLAN Status
1. Tap the iPAQ WLAN icon in the lower right corner of the
Today screen.
2. Tap Setup, and then tap the Status button.
✎ Tap the Refresh button to update the status.
Locate and Link to Access Points
You can search for access points within your coverage area and
establish a link.
3–12
Reference Guide
Using the Wireless LAN
Search for Access Points
1. Tap the iPAQ WLAN icon in the lower right corner of the
Today screen, and then tap Setup.
2. Tap the Status button.
3. Tap the Advanced button, and then tap the Rescan button to
begin the search.
4. Tap OK.
Link to an Access Point
1. Tap the iPAQ WLAN icon in the lower right corner of the
Today screen, and then tap Setup.
2. Tap the Status button.
3. Tap the Advanced button.
4. Select a site from the Access Points down arrow list.
are organized based on the server set identifier (SSID)
✎ Groups
information.
5. Tap OK.
Use the Microsoft Connection Manager
The Microsoft Connection Manager can manage the network
connectivity settings for your:
■
Home, office, modem, or network connections
■
Remote access service (RAS)
■
Virtual private network (VPN)
■
Proxy settings
Reference Guide
3–13
Using the Wireless LAN
may be necessary to enter network settings to establish WLAN
✎ Itconnectivity
using the Microsoft Connection Manager. If you
need assistance, it is recommended that you contact your WLAN
network administrator or your service provider.
Access the Connection Manager
1. From the Start menu, tap Settings.
2. Tap the Connections tab, and then tap the Connections icon
to input network settings.
assistance with the Microsoft Connection Manager, see the
✎ For
“Setup Connection Settings” help topic.
Use Bonus Software for Connectivity
Now that you have configured your WLAN, you are ready to use
your iPAQ Pocket PC. Note the valuable business and personal
bonus software on the Companion CD.
Recommended Uses
This product emits radio frequency energy, but the radiated
output power of this device is far below FCC radio frequency
exposure limits. Nevertheless, the device should be used in such a
manner that the potential for human contact with the antenna
during normal operation is minimized.
Channel Setting
When traveling, you can change your profile settings in the Setup
or Edit process (see the “Create Profiles” or “Edit an Existing
Profile”).
3–14
Reference Guide
Using the Wireless LAN
For international use, please note the channels supported by the
following countries:
Channels Supported
Country
Channels Supported
US
CH 1~11
Canada
CH 1~11
Argentina
1-13
Bolivia
1-13
Brazil
1-13
Chile
1-13
Columbia
1-13
Ecuador
1-13
Mexico
1-13
Panama
1-13
Peru
1-13
Uruguay
1-13
Venezuela
1-13
Australia
1-13
Hong Kong
1-13
India
1-13
Indonesia
1-13
Japan
1-14
Korea
1-13
Malaysia
1-13
New Zealand
1-13
PRC
1-13
Reference Guide
3–15
Using the Wireless LAN
Channels Supported (Continued)
Country
Channels Supported
Philippines
1-13
Singapore
1-13
Taiwan
1-13
Thailand
1-13
Vietnam
1-13
Austria
1-13
Belgium
1-13
Bulgaria
1-13
Cyprus
1-13
Czech Republic
1-13
Denmark
1-13
Estonia
1-13
Finland
1-13
France
10-13
Germany
1-13
Greece
1-13
Hungary
1-13
Iceland
1-13
Ireland
1-13
Israel
5-7
Italy
1-13
Liechtenstein
1-13
Luxembourg
1-13
Netherlands
1-13
3–16
Reference Guide
Using the Wireless LAN
Channels Supported (Continued)
Country
Channels Supported
Norway
1-13
Poland
1-13
Portugal
1-13
Russia
1-13
Slovak Republic
1-13
Slovenia
1-13
South Africa
1-13
Spain
1-13
Sweden
1-13
Switzerland
1-13
Turkey
1-13
United Kingdom
1-13
Reference Guide
3–17
Using the Wireless LAN
3–18
Reference Guide
4
Using Bluetooth
Your HP iPAQ Pocket PC is equipped with built-in Bluetooth
technology that allows short-range connections and provides fast,
reliable, and secure wireless communication.
With Bluetooth, you can perform the following tasks between
two Bluetooth devices, within range, without a physical
connection:
■
Exchange contacts, calendar items, and tasks
■
Send or exchange business cards
■
Transfer files
■
Access dial-up networks
■
Synchronize with a personal computer
■
Partner with a cell phone
■
Connect to serial ports
■
Connect to Bluetooth wireless local area networks (WLANs)
■
Use a Bluetooth headset
■
Print to a Bluetooth printer
■
Create a personal area network (PAN) to chat, play
games, etc.
Reference Guide
4–1
Using Bluetooth
Use of dial-up networks and WLANs may require separately
purchased additional hardware and compatible equipment, in
addition to a standard WLAN infrastructure and a separately
purchased service contract.
of dial-up and wireless Internet, e-mail, corporate networks,
✎ Use
and other wireless communications, such as Bluetooth-enabled
devices, may require separately purchased additional hardware
and other compatible equipment, in addition to a standard
Wireless LAN (WLAN) infrastructure and a separately purchased
service contract. Check with your service provider for availability
and coverage in your area. Not all web content may be available.
Some web content may require installation of additional software.
Get Acquainted with Bluetooth
Before you start using Bluetooth to establish wireless
connections, you should take a few minutes and familiarize
yourself with the:
4–2
■
Terms used in this chapter
■
Supported services
■
Bluetooth settings
■
Bluetooth Manager
Reference Guide
Using Bluetooth
Understand the Following Bluetooth Terms
The following Bluetooth terms are used throughout this chapter.
The Term...
Means...
Authentication
Verification of a numeric passkey before
a connection or activity can be
completed.
Authorization
Approval of a connection or activity
before it can be completed.
Bluetooth neighborhood or device
group
A collection of Bluetooth devices.
Bonding (Paired devices)
To create a trusted connection between
your device and another. After a bond is
created, the two devices become paired.
A paired device does not require
authentication or authorization.
Device address
The unique electronic address of a
Bluetooth device.
Device discovery
The location and recognition of another
Bluetooth device.
Device name
The name a Bluetooth device provides
when discovered by another device.
Encryption
A method of protecting data.
Link key
A key used to securely pair devices.
Passkey
A code you enter to authenticate
connections or activities requested by
other devices.
Personal Information Manager (PIM)
A collection of programs used to
manage daily business tasks (for
example, Contacts, Calendar, and
Tasks).
Profiles
A collection of Bluetooth settings.
Service discovery
Determination of which programs you
have in common with other devices.
Reference Guide
4–3
Using Bluetooth
Review Supported Services
The functions that Bluetooth supports are called services. You
can communicate only with Bluetooth devices that support the
following services:
4–4
■
Serial Port (COM port)
■
LAN Access
■
Dial-up Networking
■
Information Exchange
■
File Transfer
■
Headset
■
Print
■
Personal Area Network (PAN)
Reference Guide
Using Bluetooth
Work with Bluetooth Settings
You can open Bluetooth Settings by tapping on the Bluetooth
icon in lower right corner of the Today screen.
When the Bluetooth icon is blue, Bluetooth is active. When the
icon is dimmed with a red X, Bluetooth is inactive.
From the tabs in Bluetooth Settings, you can:
■
Turn the hardware on and off
■
Select a user profile
■
Change your iPAQ Pocket PC Bluetooth name
■
Specify security settings
■
Define settings for sharing and connecting
■
View software and port information
Use the arrows to the right to scroll through the tabs.
Reference Guide
4–5
Using Bluetooth
Open Bluetooth Settings
From the Today screen, tap the Bluetooth icon.
Turn ON Bluetooth
You can apply or remove power to the Bluetooth hardware from
Bluetooth Settings.
battery power, it is recommended that you enable
✎ To(turnpreserve
on) Bluetooth only when using it.
When Bluetooth is off, no incoming or outgoing connections are
possible.
To turn on Bluetooth:
1. From the Today screen, tap the Bluetooth icon.
2. Tap the Turn on button to enable.
✎ Tap the Turn off button to disable.
4–6
Reference Guide
Using Bluetooth
Work with the Bluetooth Manager
Using the Bluetooth Manager, you can:
■
Establish connections
■
Display shortcuts
■
Exchange business cards
■
Control the on-screen display
The first screen that displays is My Shortcuts.
Open the Bluetooth Manager
1. On the Today screen, tap Start.
2. Tap iPAQ Wireless, and then Bluetooth Manager.
Reference Guide
4–7
Using Bluetooth
Locate and Select a Device
Several tasks require you to locate a device and connect to it.
When you are required to locate a device, the Bluetooth browser
automatically assists by searching for other Bluetooth devices.
After you locate a device, tap it to select. You will be returned to
the previous window.
Understand Profiles
You can use profiles to quickly enable selected personal settings
in multiple environments.
Bluetooth Headset Profile
The Bluetooth Headset Profile is not currently available for the
iPAQ Pocket PC h5400 series.
Please visit the HP web site for future upgrades that may offer
this support in the future.
Create a Profile
To create a profile:
1. From the Today screen, tap the Bluetooth icon.
4–8
Reference Guide
Using Bluetooth
2. From the General tab, tap the Profile icon.
3. Tap the New button.
4. Enter a descriptive name.
5. Select an existing profile to use as a template.
4
5
6. Tap OK.
Reference Guide
4–9
Using Bluetooth
Activate a Profile
When a new profile is created, you will need to activate it.
To activate a profile after creating it:
1. From the Today screen, tap the Bluetooth icon.
2. From the General tab, select it from the Current Profile
down arrow list.
3. Tap OK.
Rename a Profile
1. From the Today screen, tap the Bluetooth icon.
2. From the General tab, tap the Profile icon.
3. Select a profile from the Add/Delete Profiles list.
4. Tap the Rename button.
5. Enter a new descriptive name.
6. Tap Enter.
7. Tap OK.
Delete a Profile
1. From the Today screen, tap the Bluetooth icon.
2. From the General tab, tap the Profile icon.
3. Select a profile from the Add/Delete Profiles list.
4. Tap the Delete button.
5. Tap Yes to confirm you want to delete the profile.
6. Tap OK.
4–10
Reference Guide
Using Bluetooth
Save Bluetooth Configuration Settings in a
Profile
To save the iPAQ Pocket PC’s Bluetooth configuration settings
to any profile:
✎ Bluetooth must be turned on for changes to be saved.
1. From the Today screen, tap the Bluetooth icon.
2. From the General tab, tap the Profile icon.
3. Select a profile from the Add/Delete Profiles list or create a
new one.
4. Tap OK.
5. Set up your iPAQ Pocket PC. You should specify the desired
connection, sharing, and security settings in all Bluetooth
Settings tabs.
6. Tap OK to close the Bluetooth Settings. The changes are
automatically saved.
Set Accessibility Properties
You can enter or change accessibility properties to define how
your iPAQ Pocket PC will interact with other Bluetooth devices.
Enter a Device Name
The device name is what other devices see when they locate your
device.
To enter a device name:
1. From the Today screen, tap the Bluetooth icon.
2. Tap the Accessibility tab.
Reference Guide
4–11
Using Bluetooth
3. Highlight the name in the Name field and enter a new one.
4. Tap OK to save your changes.
Allow Others to Locate My Device
You can allow other devices to search and locate your iPAQ
Pocket PC.
Ä
CAUTION: If another remote device has your device’s address, that
device may be able to locate and connect to you even though you
did not select for your device to be discovered.
To allow others to locate my device:
1. From the Today screen, tap the Bluetooth icon.
2. Tap the Accessibility tab.
3. Select Other devices can discover me.
4. Tap OK to save the changes.
Pair Devices
You can pair devices so that they must exchange a computer
generated before each connection. The security key is also called
a “Link Key.” It is generated from a unique Bluetooth device
address, a random number, and a user-defined password.
After two devices are paired, they have a trusted relationship with
each other that can be verified using a link key. No additional
input is needed from the user. Therefore, connections and
activities can be performed between the devices without constant
authorization from the user.
To pair devices:
1. From the Today screen, tap Start.
2. Tap iPAQ Wireless, and then Bluetooth Manager.
4–12
Reference Guide
Using Bluetooth
3. Tap Tools, and then Paired devices.
4. Tap Add.
5. Tap the Lookup
icon.
6. Tap a device.
7. Enter a password in the Passkey field.
8. Tap OK.
9. Enter the same passkey into the other device.
devices, such as mobile phones, need to be placed in a
✎ Some
mode to accept a bond from another device. Refer to that device’s
user instructions for more information.
Reference Guide
4–13
Using Bluetooth
Unpair Devices
You can remove the paired relationship between devices.
1. From the Today screen, tap Start.
2. Tap iPAQ Wireless, and then Bluetooth Manager.
3. Tap Tools, and then Paired devices.
4. Tap a device name.
5. Tap Remove.
6. Tap Yes to remove the pairing.
Allow Connecting
You can determine if all devices or only paired devices can
connect to your iPAQ Pocket PC.
Allow All Devices to Connect
1. From the Today screen, tap the Bluetooth icon.
2. Tap the Accessibility tab.
3. Select Allow other devices to connect, and then All devices.
4. Tap OK.
Ä
4–14
CAUTION: This allows any device, even those unknown to you, to
connect to your iPAQ Pocket PC. After they are connected, security
settings for specific services will apply as specified in the Bluetooth
Settings.
Reference Guide
Using Bluetooth
Allow Paired Devices to Connect
Paired devices share and exchange an internally generated Link
Key before each connection. The Link Key is derived from a
unique Bluetooth device address, a random number, and
user-defined password.
This feature allows only devices that you trust to connect to your
iPAQ Pocket PC.
To allow paired devices to connect:
1. From the Today screen, tap the Bluetooth icon.
2. Tap the Accessibility tab.
3. Select Allow other devices to connect, and then Paired
devices only.
4. Tap OK.
Enable Bluetooth Services
You can select to have certain services enabled:
■
Automatically when Bluetooth is activated
■
When you permit the connection
■
When a passkey or link key is correctly entered
You can use any of these security options when transferring files,
creating a serial port connection, exchanging business card
information, configuring dial-up networking, joining a personal
network, and connecting to a headset.
Reference Guide
4–15
Using Bluetooth
Automatically Enable Services
You can allow devices to connect without any authorization so
that anytime Bluetooth is on, it is ready for connections.
To automatically enable services:
1. From the Today screen, tap the Bluetooth icon.
2. Tap the tab for the service you want to enable: File Transfer,
Information Exchange, Serial Port, Dial-up Networking,
Audio Gateway, or Personal Network Server.
3. Select Enable service.
4. Tap OK.
Require Authorization to Access Services
If you elect to require authorization to access services, you must
authorize each connection. Then, your iPAQ Pocket PC will
always ask you if the connection should be permitted.
To require authorization to access services:
1. From the Today screen, tap the Bluetooth icon.
2. Tap the tab for the service you want to enable: File Transfer,
Information Exchange, Serial Port, Dial-up Networking,
Audio Gateway, or Personal Network Server.
3. Select Authorization required.
4. Tap OK.
4–16
Reference Guide
Using Bluetooth
Require a Passkey or Bond to Access Services
To establish a connection, the other device must have a passkey
or an established bond for added security. You can add data
encryption to this type of security.
A passkey is a code you enter to authenticate connections
requested by other devices. The passkey must be known and used
by both parties or the connection will not be allowed.
If...
Then...
Both devices successfully enter the
known passkey
A bond is created between the
devices.
You do not have to enter the
passkey again to exchange
information.
You want to require a passkey
exchange each time you transmit
information
You must remove the bond (“Unpair
Devices”) prior to establishing the
connection.
To require a passkey or bond:
1. From the Today screen, tap the Bluetooth icon.
2. Tap the tab for the service you want to enable: File Transfer,
Information Exchange, Serial Port, Dial-up Networking,
Audio Gateway, or Personal Network Server.
3. Select Authentication (Passkey) required.
4. Select Encryption Required if you want to require all data
exchanged between the devices to be encrypted.
5. Tap OK.
Reference Guide
4–17
Using Bluetooth
Select Shared Folder
You can determine the folder that other devices can access when
they connect to your iPAQ Pocket PC.
To select a shared folder:
1. From the Today screen, tap the Bluetooth icon.
2. Tap the File Transfer tab.
3. Tap the Folder icon and locate a desired file folder.
4. Tap OK.
4–18
Reference Guide
Using Bluetooth
Select Business Card Information
Two Bluetooth devices can exchange business card information
electronically. You can determine the information about you that
is sent to another device upon request. This information comes
from the Contacts list in Pocket Outlook.
The default selection is “None.”
To select business card information:
1. Create a contact in the Contacts program that includes your
name, title, and other relevant information.
2. From the Today screen, tap the Bluetooth icon.
3. Tap the Information Exchange tab.
4. Tap the Contacts icon.
5. Choose your contact from the list.
6. Tap OK.
Reference Guide
4–19
Using Bluetooth
Connect to Other Devices
You can use ActiveSync, serial and dial-up connections to
communicate with other Bluetooth devices. You can establish a
partnership with a cell phone and set up the Bluetooth services it
offers.
Identify the Communications Port
You can identify the virtual COM ports used to create a serial
port connection. You may need to identify these COM ports for
activities such as printing.
The inbound COM port is used when other devices initiate a
serial connection. The outbound COM port is used when you
initiate a serial connection to another device.
To identify the communications port:
1. From the Today screen, tap the Bluetooth icon.
2. Tap the Serial Port tab.
3. Note the names of your inbound and outbound COM ports.
4. Tap OK.
Establish an ActiveSync Connection
You can setup an ActiveSync partnership with a Bluetooth
enabled computer.
To establish an ActiveSync connection:
1. From the Today screen, tap Start.
2. Tap iPAQ Wireless, and then Bluetooth Manager.
3. Tap New, and then Connect.
4–20
Reference Guide
Using Bluetooth
4. Tap “ActiveSync via Bluetooth,” and then tap Next.
5. Follow the connection wizard instructions.
Establish a Serial Connection
You can use the wireless Bluetooth serial port connection just
like you would a physical serial cable connection. You must
configure the program that will use the connection to the correct
serial port.
Reference Guide
4–21
Using Bluetooth
To establish a serial connection:
1. From the Today screen, tap Start.
2. Tap iPAQ Wireless, and then Bluetooth Manager.
3. Tap New, and then Connect.
4. Tap “Explore a Bluetooth device,” and then tap Next.
5. Follow the connection wizard instructions.
Use Dial-Up Networking
When you use dial-up networking, the remote device providing
the dial-up networking service and the remote computer to which
you are connecting must both have telephone access.
Devices that can provide dial-up networking include Bluetooth:
■
Mobile phones
■
Desktop computers
■
Modems
Configure Dial-Up Connections
You can configure the dial-up networking settings.
1. From the Today screen, tap the Bluetooth icon.
2. Tap the Dial-Up Networking tab.
3. Select a communications port from the COM Port list.
4. Select a baud rate from the Baud Rate down arrow list
(typical rate is 57600).
5. Select the type of flow control to use from the Flow Control
down arrow list (typical setting is Hardware [RTS/CTS]).
6. Tap OK.
4–22
Reference Guide
Using Bluetooth
Use Dial-Up Networking
Connect to a device that provides telephone access.
1. From the Today screen, tap Start.
2. Tap iPAQ Wireless, and then Bluetooth Manager.
3. Tap New, and then Connect.
4. Tap “Connect to the Internet,” and then tap Next.
5. Follow the connection wizard instructions.
you create the dial-up networking shortcut with a device,
✎ After
tap and hold the shortcut icon in the My Shortcuts tab of the
Bluetooth Manager, and then tap Connect.
6. Tap New Connection.
7. Tap OK.
8. Enter a name in the Connection Name field.
9. Enter a phone number. You must enter the country code and
area code, depending on where you are calling.
10. Tap OK to begin dialing.
mobile phones require a bond between device (see the
✎ Some
section “Pair Devices”).
Establish a Cell Phone Partnership
You can establish a partnership with a cell phone, and then set up
the Bluetooth services it offers.
To establish a cell phone partnership:
1. From the Today screen, tap Start.
2. Tap iPAQ Wireless, and then Bluetooth Manager.
Reference Guide
4–23
Using Bluetooth
3. Tap New, and then Connect.
4. Tap “Partner with a cell phone,” and then tap Next.
5. Follow the connection wizard instructions.
4–24
Reference Guide
Using Bluetooth
Work with Files
You can exchange information with a connected device. You can
use the Bluetooth File Explorer to:
■
Navigate through the directories
■
View files and folders
■
Create new folders
■
Send and receive files from a remote device
■
Delete and rename files on a remote device
Create a File Transfer Connection
1. From the Today screen, tap Start.
2. Tap iPAQ Wireless, and then Bluetooth Manager.
3. Tap New, and then Connect.
4. Tap “Browse files on a remote device,” and then tap Next.
5. Follow the connection wizard instructions.
Send Files
1. Tap and hold a file transfer shortcut icon, and then tap
Connect.
2. Tap File, and then Send a File… .
3. Locate a file to send.
4. Tap the file to send it.
5. Tap OK.
Reference Guide
4–25
Using Bluetooth
Create a Folder on a Remote Device
1. Tap and hold a file transfer shortcut icon, and then tap
Connect.
2. Navigate to the location you want for the new folder.
3. Tap File, and then Create a folder.
4. Enter a folder name while New Folder is highlighted, and
then tap Enter.
5. Tap OK.
Receive a File from a Remote Device
1. Tap and hold a file transfer shortcut icon, and then tap
Connect.
2. Navigate to the file location on the remote device.
3. Tap the file.
4. Tap File, and then tap Get.
5. Tap OK.
Delete a File from a Remote Device
1. Tap and hold a file transfer shortcut icon, and then tap
Connect.
2. Navigate to the file location on the remote device.
3. Tap the file.
4. Tap File, and then tap Delete.
5. Tap Yes to verify you want to delete the selected file.
6. Tap OK.
4–26
Reference Guide
Using Bluetooth
Send Information via Bluetooth
In Pocket Outlook, you can send contacts, calendar information,
and tasks to a remote device using Bluetooth.
To send information using Bluetooth:
1. Open the Calendar, Contacts, or Tasks program from the
Start menu or tap Start, and then Programs.
2. Tap and hold the item to send, and then select “Send via
Bluetooth.”
3. Tap the name of destination device.
4. Tap OK.
Reference Guide
4–27
Using Bluetooth
Use Business Cards
Using the business card exchange, you can:
■
Send a business card to one or more devices
■
Request a business card from one or more devices
■
Exchange business cards with one or more devices
You must establish a default contact name to send or exchange
business card information.
You must first specify your default business card on the
Information Exchange tab in Bluetooth Settings. This name
becomes the default for business card transfers.
4–28
Reference Guide
Using Bluetooth
Send Business Cards
1. From the Today screen, tap Start.
2. Tap iPAQ Wireless, and then Bluetooth Manager.
3. Tap the Business card icon.
can open the business card exchange by tapping Tools,
✎ You
Business Card Exchange in the Bluetooth Manager.
4. Tap the Send icon.
5. Tap the device where you want to send your business card.
6. Tap OK.
Reference Guide
4–29
Using Bluetooth
Request Business Cards
1. From the Today screen, tap Start.
2. Tap iPAQ Wireless, and then Bluetooth Manager.
3. Tap the Business card icon.
4. Tap the Request icon.
5. Tap the device from which you want to request a business
card.
6. Tap OK.
Exchange Business Cards
You can exchange business card information with another device.
If available, the device’s information will be sent directly into
your Contacts list in Pocket Outlook.
To exchange business cards:
1. From the Today screen, tap Start.
2. Tap iPAQ Wireless, and then Bluetooth Manager.
3. Tap the Business card icon.
4. Tap the Exchange icon.
5. Tap the device where you want to exchange your
business card.
6. Tap OK.
4–30
Reference Guide
Using Bluetooth
Work with Connections
You can create shortcuts to open and view status information for
all connections.
Create a Shortcut
Creating a shortcut to one or more services does not establish
a connection. It only places a shortcut to that service on the
Shortcut tab of the Bluetooth Manager.
To create a shortcut:
1. From the Today screen, tap Start.
2. Tap iPAQ Wireless, and then Bluetooth Manager.
3. Tap New, and then Connect.
4. Select a type of service, and then tap Next.
5. Follow the connection wizard instructions.
✎ Paired devices are designated by a checkmark.
Delete a Shortcut
1. From the Today screen, tap Start.
2. Tap iPAQ Wireless, and then Bluetooth Manager.
3. Tap and hold the connection icon or list name to be deleted.
4. Tap Delete from the menu.
5. Tap Yes to verify the selected shortcut should be deleted.
6. Tap OK.
Reference Guide
4–31
Using Bluetooth
View Shortcuts
You can view shortcuts as icons or in a list format.
1. From the Today screen, tap Start.
2. Tap iPAQ Wireless, and then Bluetooth Manager.
3. Tap View.
4. Tap List or Icon.
5. Tap OK.
Open a Connection
1. From the Today screen, tap Start.
2. Tap iPAQ Wireless, and then Bluetooth Manager.
3. Tap and hold the icon or list name, and then tap Connect.
4. Tap OK.
View Connection Status
You can view:
4–32
■
Connection’s name
■
Device’s name
■
Connection status
■
Length of connection
■
Signal strength
Reference Guide
Using Bluetooth
To view the connection status:
1. From the Today screen, tap Start.
2. Tap iPAQ Wireless, and then Bluetooth Manager.
3. Tap and hold an active connection icon or list name, and then
tap Status.
4. Tap OK.
Close a Connection
1. From the Today screen, tap Start.
2. Tap iPAQ Wireless, and then Bluetooth Manager.
3. Tap and hold the connection icon or list name.
4. Tap Disconnect from the menu.
5. Tap OK.
View Connection Information
1. From the Today screen, tap Start.
2. Tap iPAQ Wireless, and then Bluetooth Manager.
3. Tap and hold the connection icon or list name.
4. Tap Properties from the menu.
5. Tap OK.
Reference Guide
4–33
Using Bluetooth
4–34
Reference Guide
5
Using the Fingerprint Reader
You can increase the security of the data stored in your iPAQ
Pocket PC by using the iPAQ Fingerprint Reader. This feature
allows you to require a PIN, password, and/or fingerprint be
entered before you can log on to your iPAQ Pocket PC.
Ä
CAUTION: In the event that an incorrect or unsuccessful PIN,
password, and/or fingerprint is repeatedly or incorrectly entered, all
data and programs stored in RAM are erased and the iPAQ Pocket
PC is returned to the as-shipped configuration. It is recommended that
you back up all data frequently when using the security features.
It is recommended that you complete the fingerprint reader
training on your iPAQ Pocket PC prior to changing your security
settings.
Learn to Enroll a Fingerprint
Fingerprint Reader enrollment training is available on the iPAQ
Pocket PC to assist you in proper enrollment of your unique
fingerprint. You can access the training in two ways:
■
First time you open a Fingerprint screen
■
Tap the Training button from one of the logon setup
fingerprint screens
Reference Guide
5–1
Using the Fingerprint Reader
To learn to enroll fingerprints:
1. From the Start menu, tap Settings, and then Password.
2. Select PIN or fingerprint from the down arrow list to access
training.
3. Tap four digits in the PIN field.
can tap OK at the top of the screen at anytime to exit the
✎ You
training.
5–2
Reference Guide
Using the Fingerprint Reader
4. Tap OK or ENTR.
5. Tap Yes to begin Fingerprint Reader training.
6. Read the swiping tips.
7. Tap the double arrows button.
Reference Guide
5–3
Using the Fingerprint Reader
8. Follow the on-screen demonstration to swipe a finger.
finger swipe is acceptable, the oval frame turns green and
✎ Ifthethemessage
“Good! Please continue” displays. If the finger swipe
is unacceptable, the oval frame turns red and the message “Poor
quality. Try again!” displays.
9. Repeat the finger swiping exercise as prompted until you
have completed six out of eight successful swipes. You must
perform six acceptable swipes to continue the training.
10. Tap the double arrows button to continue the Self-test.
11. Perform eight finger swipes in the Self-test. You must
perform seven acceptable swipes to complete the training.
5–4
Reference Guide
Using the Fingerprint Reader
12. Tap Finish to end the training.
13. Tap OK to exit or tap a finger to enroll.
Work with Fingerprints
iPAQ Fingerprint Reader suggests fingers for you to use during
the swiping activity. You can select a different finger at any time.
It is recommended that you enroll at least two fingers (index
fingers are suggested). To enroll a fingerprint, you must take
between two and eight quality finger swipes.
Reference Guide
5–5
Using the Fingerprint Reader
Enroll a Fingerprint
The Fingerprint screen uses color coding to display the status of
your fingerprint swipe.
Fingerprint Status
If the color around the
oval is...
Then...
Blue
No fingerprint has been taken for the finger.
Green
The fingerprint swipe was good quality.
Red
The fingerprint swipe was poor quality.
To enroll a fingerprint:
1. From the Start menu, tap Settings, and then Password.
2. Select the option from the down arrow list that you choose for
your security setting.
3. Enter either your PIN or password when prompted.
5–6
Reference Guide
Using the Fingerprint Reader
4. On the Fingerprint screen, tap the finger on the display you
want to enroll.
5. Swipe the selected finger. It is recommended that you gently
swipe your finger downward across the sensor. You should
begin the swipe at the first joint of your finger and continue
downward with a smooth slow motion.
you need additional assistance at any time, tap the Training
✎ Ifbutton.
6. Monitor the status to see if your fingerprint was correctly
swiped.
OK, the perimeter of the oval turns green and a message
✎ Ifdisplays
indicating the quality was good. If poor quality, the
perimeter of the oval turns red and a message displays.
Reference Guide
5–7
Using the Fingerprint Reader
7. Repeat steps 5 and 6 to acquire a sufficient number of quality
swipes (notice the progress bar) to enroll the print.
8. Tap OK.
9. Tap Yes.
5–8
Reference Guide
Using the Fingerprint Reader
Delete a Fingerprint
You can delete any saved fingerprints.
1. From the Start menu, tap Settings, and then Password.
2. Tap the finger you want to delete, and then tap Discard.
3. Tap Yes to confirm the deletion.
Reference Guide
5–9
Using the Fingerprint Reader
Set Logon Passwords
You have a variety of options for setting logon passwords. You
can select:
■
No password (default)
■
4-digit PIN
■
Alphanumeric password
■
PIN or fingerprint
■
PIN and fingerprint
■
Alphanumeric password or fingerprint
■
Alphanumeric password and fingerprint
■
Fingerprint only
you are using ActiveSync, you must enter a password on your
✎ Ifpersonal
computer to begin synchronization.
5–10
Reference Guide
Using the Fingerprint Reader
Set “No password” for Logon
In this mode, you are not required to enter a PIN, password, or
fingerprint to log on.
1. From the Start menu, tap Settings, and then Password.
2. Select “No password” from the down arrow list.
3. Tap OK.
4. Tap Yes to save the changes.
Ä
CAUTION: In the event that an incorrect or unsuccessful PIN,
password, and/or fingerprint is repeatedly or incorrectly entered,
all data and programs stored in RAM are erased and the
iPAQ Pocket PC is returned to the as-shipped configuration. It is
recommended that you back up all data frequently when using the
security features.
Set “Simple 4 digit PIN” for Logon
In this mode, you are required to enter a 4-digit PIN to logon.
1. From the Start menu, tap Settings, and then Password.
2. Select “Simple 4 digit PIN” from the down arrow list.
3. Select from the down arrow list the length of time the
iPAQ Pocket PC can remain unused before you must reenter
the PIN.
Reference Guide
5–11
Using the Fingerprint Reader
4. Tap four digits in the PIN field.
5. Tap OK or ENTR.
6. Tap Yes to save the changes.
Set “Strong alphanumeric password” for
Logon
In this mode, you are required to enter a strong password with
at least seven characters to logon. This password must contain a
combination of uppercase and lowercase letters, numerals, or
punctuation.
1. From the Start menu, tap Settings, and then Password.
2. Select “Strong alphanumeric password” from the down
arrow list.
3. Select from the down arrow list the length of time the
iPAQ Pocket PC can remain unused before you must reenter
the password.
5–12
Reference Guide
Using the Fingerprint Reader
4. Enter seven alphanumeric characters in the Password field.
password must have at least seven characters and contain
✎ Your
both uppercase and lowercase letters and numbers. You can use
punctuation marks.
5. Repeat step 4 in the Confirm field.
6. Tap OK.
7. Tap Yes to save.
Set “PIN OR fingerprint” for Logon
In this mode, you are required to enter a 4-digit PIN or fingerprint
to logon.
1. From the Start menu, tap Settings, and then Password.
2. Select “PIN OR fingerprint” from the down arrow list.
3. Tap four digits in the PIN field.
4. Select from the down arrow list the length of time the
iPAQ Pocket PC can remain unused before you must reenter
the PIN.
5. Tap OK or ENTR.
6. Tap the finger to enroll.
7. Swipe the selected finger, as instructed.
more information on finger swiping, see the section “Enroll a
✎ For
Fingerprint” or tap the Training button.
8. Tap OK.
9. Tap Yes to save changes.
Reference Guide
5–13
Using the Fingerprint Reader
Set “PIN AND fingerprint” for Logon
In this mode, you are required to enter both a PIN and a
fingerprint to logon.
1. From the Start menu, tap Settings, and then Password.
2. Select “PIN AND fingerprint” from down arrow list.
3. Select from the down arrow list the length of time the
iPAQ Pocket PC can remain unused before you must reenter
the PIN.
4. Tap four digits in the PIN field.
5. Tap OK or ENTR.
6. Tap the finger to enroll.
7. Swipe the selected finger, as instructed.
more information on finger swiping, see the section “Enroll a
✎ For
fingerprint” or tap the Training button.
8. Tap OK.
9. Tap Yes to save changes.
Set “Password OR fingerprint” for Logon
In this mode, you are required to enter an alphanumeric password
with at least seven characters or a fingerprint to logon.
alphanumeric password must contain a combination of
✎ The
uppercase and lowercase letters, numbers, and punctuation.
1. From the Start menu, tap Settings, and then Password.
2. Select “Password OR fingerprint” from the down arrow list.
5–14
Reference Guide
Using the Fingerprint Reader
3. Select from the down arrow list the length of time the
iPAQ Pocket PC can remain unused before you must reenter
the password.
4. Enter seven alphanumeric characters in the Password field.
5. Repeat step 4 in the Confirm field.
6. Tap OK.
7. Tap the finger to enroll.
8. Swipe the selected finger, as instructed.
more information on finger swiping, see the section “Enroll a
✎ For
Finger print” or tap the Training button.
9. Tap OK.
10. Tap Yes to save changes.
Set “Password AND Fingerprint” for Logon
In this mode, you are required to enter both a password with at
least seven characters and a fingerprint to logon.
alphanumeric password must contain a combination of
✎ The
uppercase and lowercase letters, numbers, and punctuation.
1. From the Start menu, tap Settings, and then Password.
2. Select “Password AND fingerprint” from down arrow list.
3. Select from the down arrow list the length of time the iPAQ
Pocket PC can remain unused before you must reenter the
password.
4. Enter seven alphanumeric characters in the Password field.
5. Repeat step 4 in the Confirm field.
Reference Guide
5–15
Using the Fingerprint Reader
6. Tap OK.
7. Tap the finger to enroll.
8. Swipe the selected finger, as instructed.
more information on finger swiping, see the section “Enroll a
✎ For
fingerprint” or tap the Training button.
9. Tap OK.
10. Tap Yes to save changes.
Set “Fingerprint-only” for Logon
In this mode, you are required to enter a successful fingerprint to
logon.
Ä
CAUTION: In the event that an incorrect or unsuccessful fingerprint
is repeatedly or incorrectly entered, all data and programs stored in
RAM are erased and the iPAQ Pocket PC is returned to the
as-shipped configuration. It is recommended that you back up all
data frequently when using the security features.
1. From the Start menu, tap Settings, and then Password.
2. Select “fingerprint-only” from the down arrow list.
you are using ActiveSync, you must enter a password on your
✎ Ifpersonal
computer to begin synchronization.
3. Tap the finger to enroll.
4. Swipe the selected finger as instructed.
more information on finger swiping, see the section “Enroll a
✎ For
Fingerprint” or tap the Training button.
5–16
Reference Guide
Using the Fingerprint Reader
5. Tap OK.
6. Tap Yes to save changes.
Logon Using PIN, Passwords, and
Fingerprints
If you have set up a PIN, password, and/or fingerprint for logon,
you must enter the correct PIN, password, and/or successfully
swipe the correct fingerprint to use your iPAQ Pocket PC.
When you power on your iPAQ Pocket PC, you will be required
to enter your logon information on the PIN, Password and/or
Fingerprint screen.
Ä
CAUTION: In the event that an incorrect or unsuccessful PIN,
password, and/or fingerprint is repeatedly or incorrectly entered, all
data and programs stored in RAM are erased and the iPAQ Pocket
PC is returned to the as-shipped configuration. It is recommended
that you back up all data frequently when using the security features.
The default number of attempts is six. You can select the maximum
number of attempts.
Logon with No Password
You do not need to enter a password or fingerprint to use the
iPAQ Pocket PC.
Logon Using a 4-digit PIN
You must enter the 4-digit PIN you entered during setup.
1. Turn on your iPAQ Pocket PC.
2. Tap your 4-digit PIN.
3. Tap OK or ENTR.
Reference Guide
5–17
Using the Fingerprint Reader
Logon Using a Password
You must enter the alphanumeric password you entered
during setup.
1. Turn on your iPAQ Pocket PC.
2. Enter your password.
3. Tap OK or ENTR.
Logon Using a PIN or Fingerprint
You must enter a PIN or swipe the fingerprint you entered during
setup. iPAQ Fingerprint Reader remembers your logon
preference.
The next time you logon, the PIN or Fingerprint window
corresponding to your last logon will be displayed.
1. Turn on your iPAQ Pocket PC.
2. Enter your 4-digit PIN or tap the Fingerprint tab to swipe
your enrolled finger.
was of poor quality, iPAQ Fingerprint Reader
✎ Ifwillyouraskfingerprint
you to swipe it again. If the quality was good, but there
was not a match, the message “No match” will be displayed.
Logon Using a PIN and Fingerprint
You must enter both a PIN and swipe the fingerprint you entered
during setup.
1. Turn on your iPAQ Pocket PC.
2. Enter your 4-digit PIN.
3. Swipe your enrolled finger.
5–18
Reference Guide
Using the Fingerprint Reader
Logon Using a Password or Fingerprint
You must enter a password or swipe the finerprint you entered
during setup.
1. Turn on your iPAQ Pocket PC.
2. Enter your password or swipe your enrolled finger.
letters, numbers, or punctuation, tap the Keyboard button
✎ atTothetypebottom
right corner of the screen. If you do not enter the
correct password, you will be prompted to try again.
3. Swipe your fingerprint if you did not enter your password.
Logon Using a Password and Fingerprint
You must enter both a password and swipe the fingerprint you
entered during setup. iPAQ Fingerprint Reader remembers your
logon preference.
The next time you logon, the Password or Fingerprint screen
corresponding to your last logon will be displayed.
1. Turn on your iPAQ Pocket PC.
2. Enter your password.
do not enter the correct password, you will be prompted to
✎ Iftryyouagain.
3. Tap OK.
4. Swipe your enrolled finger.
Reference Guide
5–19
Using the Fingerprint Reader
Logon Using a Fingerprint Only
You must successfully swipe the fingerprint you entered
during setup.
Ä
CAUTION: In the event that an incorrect or unsuccessful fingerprint
is repeatedly or incorrectly entered, all data and programs stored in
RAM are erased and the iPAQ Pocket PC is returned to the
as-shipped configuration. It is recommended that you back up all
data frequently when using the security features.The default number
of attempts is six. You can select the maximum number of attempts
for your security needs.
1. Turn on your iPAQ Pocket PC.
2. Swipe your enrolled finger.
Set Security Options
You can set the Fingerprint Reader security on your iPAQ
Pocket PC to one of three levels:
■
Regular (default)
■
High
■
Extra High
It is recommended that you use the Regular security setting.
You can set the maximum number of attempts allowed for
logging on to your iPAQ Pocket PC.
Ä
5–20
CAUTION: In the event that an incorrect or unsuccessful PIN,
password, and/or fingerprint is repeatedly or incorrectly entered,
all data and programs stored in RAM are erased and the iPAQ
Pocket PC is returned to the as-shipped configuration. It is
recommended that you back up all data frequently when using the
security features.
Reference Guide
Using the Fingerprint Reader
Set the Security Level
1. From the Start menu, tap Settings, and then Password.
2. In the Fingerprint screen, tap Options.
3. Select your preferred security level.
4. Tap OK.
Reference Guide
5–21
Using the Fingerprint Reader
Set the Maximum Number of Attempts
Ä
CAUTION: It is important to consider the maximum number of
attempts. If you unsuccessfully enter your PIN, password, or
fingerprint the maximum number of attempts, you will lose all data
and programs in the RAM and your iPAQ Pocket PC will be returned
to an as-shipped configuration.
1. From the Start menu, tap Settings, and then Password.
2. When using a PIN or password, tap Options, and then Max
Logon Attemps.
5–22
Reference Guide
Using the Fingerprint Reader
3. Select the maximum number of attempts.
4. Tap OK.
Reference Guide
5–23
Using the Fingerprint Reader
5–24
Reference Guide
6
Connecting
Your iPAQ Pocket PC h5400 Series lets you connect to:
■
A computer
■
The Internet or your network
can use the Microsoft Pocket PC Connection Wizard to help
✎ You
you set up connection preferences. The wizard is located on the
Companion CD or at http://www.pocketpc.com
The wizard installs on your personal computer desktop and
guides you through the setup process for several different types of
connections (for example, modem, Virtual Private Network, and
cell phone) and configurations (for example, e-mail and instant
messaging). The connection and configuration information are
sent from your personal computer to your iPAQ Pocket PC when
you synchronize.
Connect to a Computer
You can wirelessly connect to your personal computer using an
infrared connection, Bluetooth, or wireless LAN.
You can physically connect your iPAQ Pocket PC to your
personal computer using Microsoft ActiveSync and either a USB
or serial cable and a cradle.
Reference Guide
6–1
Connecting
With Microsoft ActiveSync, you can:
■
Synchronize information manually or automatically
■
Synchronize information with your server while connected to
your personal computer
■
Move files to and from your personal computer
■
Install programs on your iPAQ Pocket PC
■
Back up and restore information on your personal computer
Sync with Personal Computer
Ä
CAUTION: For synchronization to work properly, install Microsoft
ActiveSync before you connect your iPAQ Pocket PC to your
computer.
During installation, you can:
■
Create partnerships that allow you to synchronize
information with multiple computers
■
Select the information to synchronize with your iPAQ
Pocket PC (for example, Contacts, Calendar, Inbox, Tasks,
Favorites, Files, Notes, and AvantGo)
selected to synchronize files, drag and drop the selected
✎ Iffilesyoufrom
your computer to the synchronized folder for your
iPAQ Pocket PC on your desktop. If you named your Pocket PC
“PC1” when you created your partnership, the synchronized
folder is named “PC1.” When you synchronize, the files are
copied to your iPAQ Pocket PC.
6–2
Reference Guide
Connecting
To sync with a personal computer:
1. Insert the HP iPAQ Pocket PC companion CD into your
computer.
2. Follow the instructions in the installation wizard. For more
help, click the ActiveSync Help button during installation.
The information you select will automatically synchronize when
your installation is complete.
Use the Serial Infrared (IR) Connection
After setting up a connection with a USB or serial cable and a
cradle, synchronize your iPAQ Pocket PC and your computer
using an infrared connection (if you have an infrared port or an
infrared USB adapter installed on your computer). The infrared
connection option works only on computers that have
Windows 98, Me, XP, or 2000 operating system installed.
1. Follow the steps in “To Sync with a Personal Computer.”
2. Follow your computer manufacturer’s instructions to install
and set up an infrared port.
3. From your computer, open Microsoft ActiveSync.
4. From the File menu, select Connection Settings.
5. Click “Allow serial cable or infrared connection to this
COM port.”
6. Click the OK button.
7. Click the down arrow and choose Infrared Port (IR).
your iPAQ Pocket PC and the infrared port so they are
✎ Place
unobstructed and within 12 inches of each other.
Reference Guide
6–3
Connecting
8. From the Start menu on your iPAQ Pocket PC, tap
ActiveSync.
9. Tap Tools.
10. Tap Connect via IR.
11. Align the IR ports to establish a connection.
12. Move the devices away from each other to disconnect.
Change Synchronization Settings
You can modify your synchronization settings for Microsoft
ActiveSync to:
6–4
■
Change when your iPAQ Pocket PC synchronizes with your
computer
■
Change when your iPAQ Pocket PC synchronizes with your
server
■
Change the type of connection from your iPAQ Pocket PC
to your computer (for example, serial, USB, infrared
connections, Bluetooth, and wireless LAN)
Reference Guide
Connecting
■
Select the files and information to synchronize with your
computer
■
Select the files and information you do not want to
synchronize with your computer (for example, e-mail
attachments)
■
Determine how conflicts between information on your iPAQ
Pocket PC and information on your computer are handled
To change synchronization settings:
1. From your computer, open Microsoft ActiveSync.
2. From the Tools menu, click Options.
a. On the Sync Options tab, select the files and information
to synchronize with your computer.
b. On the Sync Mode tab, select when your iPAQ
Pocket PC synchronizes with your computer.
c. On the Rules tab, determine how conflicts between
information on your iPAQ Pocket PC and information on
your computer are handled.
Reference Guide
6–5
Connecting
Move Files
You can move files to and from your computer using Explore in
ActiveSync and Windows Explorer.
recommended that you store important information to
✎ IttheisiPAQ
File Store folder located in the File Explorer on your
iPAQ Pocket PC.
To move files:
1. From your computer, open Microsoft ActiveSync.
2. Click Explore.
3. Double-click the My Pocket PC icon.
4. Right-click the Start menu on your personal computer, and
then select Explore.
5. Locate the file you want to move.
6–6
Reference Guide
Connecting
6. Drag and drop your files between your Pocket PC and
Windows Explorer. ActiveSync converts the files so they can
be used by the Pocket Office programs, if necessary.
Ä
CAUTION: You should move your files directly into My Documents
or into a folder inside your My Documents folder, so the programs
on your iPAQ Pocket PC can find your files.
Reference Guide
6–7
Connecting
Connect to the Internet or Your
Network
To send and receive e-mail with Inbox and view Web sites with
Pocket Internet Explorer, you can set up a remote connection
using:
■
Wireless LAN (see Chapter 3)
■
Bluetooth (see Chapter 4)
■
Modem card
Use a Modem Card
To connect to the Internet with a modem card, you need a
phone line, a dial-up Internet Service Provider, and an optional
Single-Slot or Dual-Slot PC Card Expansion Pack, Expansion
Pack Plus, or CompactFlash (CF) Card Expansion Pack.
your modem card before trying to set up a modem
✎ Insert
connection.
To connect using a modem card:
1. Insert your modem card into an expansion pack.
your modem card is not recognized, follow your modem
✎ Ifmanufacturer’s
instructions to install the modem card driver on
your computer.
2. From the Start menu, tap Settings.
3. Tap the Connections tab, and then tap the Connections icon.
6–8
Reference Guide
Connecting
4. Make sure Internet Settings is selected.
5. Tap Modify, and then New.
6. Enter a name for the connection, select the modem type, and
then select the correct baud rate for that modem.
7. If you need to enter the TCP/IP settings, tap Advanced, and
then tap TCP/IP.
8. Select “Use specific IP address.”
9. Enter your IP address.
10. Tap OK, and then Next.
11. Enter the phone number for your Internet Service Provider,
and then tap Next.
Reference Guide
6–9
Connecting
12. Tap Finish to set up the modem connection.
13. Tap OK.
14. Tap OK to return to Settings.
Synchronize Links
You can synchronize links to Web sites from your Favorites list
on your personal computer to view them with Pocket Internet
Explorer.
To synchronize links to Web sites:
1. From the Start menu on your personal computer, click
Programs.
2. Open Internet Explorer on your personal computer.
3. Click Favorites to see the list of links to your favorite
Web sites.
4. To save a Web site link to Mobile Favorites, open the Web
site, and then click Create Mobile Favorite.
If you selected “Favorites” as an information type to be
synchronized, ActiveSync will copy your Mobile Favorites to
your iPAQ Pocket PC the next time you synchronize.
6–10
Reference Guide
Connecting
Enter an Internet Address (URL)
With Pocket Internet Explorer and a connection to the Internet,
you can view Web sites on your iPAQ Pocket PC by typing a
URL in the Address bar.
sites that use HTML 4.0, DHTML, animated GIF images,
✎ Web
and Java applets may not work correctly in Pocket Internet
Explorer. For more information, see the bonus software on
the CD.
To enter an Internet address:
1. From the Start menu, tap Internet Explorer.
2. Tap View, and then Address Bar.
3. Enter the address (URL) in the Address bar.
4. Tap the Go icon.
Reference Guide
6–11
Connecting
Select from a Favorites List
With Pocket Internet Explorer and a connection to the Internet,
you can view Web sites on your iPAQ Pocket PC by selecting a
Web site from your Favorites list.
To select from a Favorites list:
1. From the Start menu, tap Internet Explorer.
2. Tap the Favorites icon and the Web site you want to view.
6–12
Reference Guide
7
Communicating
Your HP iPAQ Pocket PC h5400 Series lets you communicate in
many ways:
■
Create and organize contacts
■
Use the e-mail Inbox
■
Record messages with the microphone
■
Take notes
■
Use MSN messenger
Work with Contacts
You can enter and view information about friends, family
members, or business associates in the Contacts program.
You can:
■
Create a contact
■
View and edit a contact
■
Categorize your contacts
■
Delete a contact
Create a Contact
You can create a contact from the Start menu or Today screen.
SHORTCUT: Press the Contact program button to navigate
quickly to Contacts.
Reference Guide
7–1
Communicating
To create a contact:
1. From the Start menu, tap Contacts.
2. Tap New to create a new contact.
3. Tap any item and enter information. Scroll down to see more
fields.
4. Tap the down arrow next to any item and enter additional
details about the item.
For example, tap the Name down arrow to enter the contact’s
title, first, middle, and last name, and suffix.
5. Tap OK to save the contact information and return to the list
of contacts.
View a List of Contacts
1. From the Start menu, tap Contacts to display a list of your
contacts from the last category selected.
2. Tap the down arrow next to the category name to see the list
of categories.
3. Tap a category name to see a list of contacts placed in that
category.
7–2
Reference Guide
Communicating
4. Tap a contact’s name.
Edit Contact Information
1. Tap a contact’s name.
2. Tap Edit to see the contact information.
3. Edit the contact information.
4. Tap OK to save the contact information and return to the list
of contacts.
Categorize Contacts
You can use categories to filter your list of contacts. This helps
you view and edit your contact information.
category will not display unless a contact has been
✎ Aassigned
to it.
To categorize contacts:
1. From the Start menu, tap Contacts.
2. Tap a contact’s name.
Reference Guide
7–3
Communicating
3. Tap Edit to see the contact information.
4. Tap the Categories field to see a list of available categories.
You may need to scroll down to see the Categories field.
7–4
Reference Guide
Communicating
5. Tap the Add/Delete tab to create a category.
6. Enter the name of the new category, and then tap Add.
7. Tap OK to place your contact in the category.
Reference Guide
7–5
Communicating
8. Tap the Categories field again to place your contact in
additional categories.
9. Tap additional category names to select them, and then tap
OK to list the categories you selected in the Categories field.
10. Tap OK to save the category information and return to the list
of contacts.
Delete Contacts
Ä
CAUTION: If you delete a contact on your iPAQ Pocket PC and
synchronize Contacts with your computer, you may delete the
contact in Outlook on your computer.
To delete contacts:
1. From the Start menu, tap Contacts to see a list of your
contacts from the last category selected.
2. Tap the down arrow next to the category name to see a list of
categories.
3. Tap a category name to see a list of contacts placed in that
category.
7–6
Reference Guide
Communicating
4. Tap and hold a contact’s name to see a pop-up menu.
5. Tap Delete Contact to remove the contact from the list.
6. Tap Yes to delete the contact permanently.
Use the Inbox
Send and receive e-mail by synchronizing your iPAQ Pocket PC
with your personal computer using Microsoft ActiveSync or by
connecting to the Internet or network through an e-mail service.
Use ActiveSync to send and receive e-mail. You can read and
compose e-mail offline using your iPAQ Pocket PC. The e-mail
remains in the Outbox until you synchronize with your personal
computer.
You see the name of the folder you are using at the bottom of the
screen. If you are using an e-mail service, use that folder to send
and receive e-mail.
Reference Guide
7–7
Communicating
The Inbox on your iPAQ Pocket PC is similar to the Inbox on
your computer. E-mail is saved in five default folders:
■
Inbox
■
Outbox
■
Deleted Items
■
Drafts
■
Sent Items
Set Up E-mail
If you are using a wireless Internet or network connection, you
must set up an e-mail service.
To set up e-mail service:
1. From the Start menu, tap Inbox.
2. Tap Services.
3. Tap New Service.
7–8
Reference Guide
Communicating
4. Enter configuration information for your wireless e-mail
service in the next five screens. Tap Next when finished with
each one.
✎ Tap the Question Mark icon for help on any screen.
Compose/Send E-mail
You can compose e-mail from the Inbox or Today screen.
If you want to compose and send e-mail, tap Services in the
Inbox, and then select the e-mail service you want to use (see
“Set Up E-mail”).
To compose and send e-mail:
1. From the Start menu, tap Inbox.
2. Tap New to compose a new e-mail.
Reference Guide
7–9
Communicating
3. Tap Send to place the e-mail in the Outbox.
The e-mail is sent when you synchronize or automatically if
you are connected to the Internet or your network through a
wireless e-mail service.
4. If you do not want to send your e-mail yet, tap OK to leave
your e-mail in the Drafts folder.
7–10
Reference Guide
Communicating
you are ready to send your e-mail, reestablish your
✎ When
wireless connection, tap Open, and then Send.
Add an Attachment
1. From the Start menu, tap Inbox.
2. Tap New to write a new e-mail.
3. Tap Edit.
4. Tap Add Attachment to see all folders in My Documents.
4
3
Reference Guide
7–11
Communicating
5. Tap the file you want to attach. You may have to scroll to
view your document name.
6. See the file name you selected below the body of the e-mail.
✎ You can record a message and attach it to an e-mail.
do not receive e-mail attachments by default. You can select
✎ You
this option in ActiveSync.
7–12
Reference Guide
Communicating
Receive E-mail
Receive e-mail by synchronizing your iPAQ Pocket PC Inbox
with your personal computer using ActiveSync or by connecting
to the Internet or your network through an e-mail service.
If you are using ActiveSync, you can synchronize your personal
folders from Outlook on your computer with Inbox on your
iPAQ Pocket PC.
do not receive e-mail attachments by default. You can select
✎ You
this option in ActiveSync.
To receive e-mail:
1. From the Start menu, tap Inbox.
2. Tap Services.
3. Tap the e-mail service you want to use.
4. If you have not set up an e-mail service, synchronize your
iPAQ Pocket PC with your computer.
Open E-mail
1. From the Start menu, tap Inbox.
Reference Guide
7–13
Communicating
2. Tap the down arrow next to Inbox to see a list of your
folders.
3. Tap the folder where you saved the e-mail.
4. Tap the e-mail to open it.
Delete E-mail
When you delete e-mail, it is placed in the Deleted Items folder,
but the e-mail is not permanently deleted until you tap Empty
Deleted Items from the Tools menu.
7–14
Reference Guide
Communicating
To delete e-mail:
1. From the Start menu, tap Inbox.
2. Tap the folder where you saved the e-mail.
3. Tap and hold the e-mail you want to delete.
4. Tap Delete to move the e-mail to the Deleted Items folder.
5. Tap Tools, and then Empty Deleted Items to permanently
delete the e-mail.
Ä
CAUTION: When you delete e-mail from your iPAQ Pocket PC, you
also delete it from your personal computer.
Reference Guide
7–15
Communicating
Manage Folders
If you are using an e-mail service, you can use folders to organize
your e-mail. You can also create additional folders that you can
rename or delete.
are using ActiveSync, you cannot create additional folders
✎ Ifin you
the Inbox. However, you can synchronize your personal
folders from Outlook on your computer with Inbox on your iPAQ
Pocket PC. You cannot rename or delete these folders in Inbox.
1. From the Start menu, tap Inbox.
2. Tap Services.
3. Tap the wireless e-mail service you want to use.
4. Tap Tools, and then Manage Folders.
5. Tap New to create a new folder.
7–16
Reference Guide
Communicating
6. Tap Rename to rename a folder.
7. Tap Remove Folder to delete a folder you created.
8. Tap Yes to permanently delete the folder.
Record Voice
You can record your voice or any other sound as a note within the
Calendar, Contacts, Notes, and Tasks programs. In the Notes
program, you can create stand-alone recordings, which are stored
as separate .wav files in File Explorer.
Reference Guide
7–17
Communicating
Make a Recording
1. From the Start menu, tap Notes.
2. Tap the Cassette Tape icon located at the bottom of the
screen to see the recording controls.
3. Tap the Record icon to start recording.
4. Position the microphone to record your voice or other sounds.
5. Tap the Stop icon to finish recording.
the quality of your recording, tap Settings, System,
✎ ToiPAQimprove
Audio, and then Microphone AGC.
Listen to a Recording
1. From the Start menu, tap Notes.
2. Tap a recording.
3. Tap the Speaker icon to listen to a recording.
7–18
Reference Guide
Communicating
Take Notes
You can take notes in the Calendar, Contacts, Notes, and Tasks
programs. You can type, write, draw, or record in your note. In
addition, you can compose an original note or a note based on a
template.
Create a Note
1. From the Start menu, tap Notes.
2. Tap New.
3. Tap anywhere and enter your note.
4. Tap OK to save your note and place it in the list of notes.
Reference Guide
7–19
Communicating
7–20
Reference Guide
8
Scheduling
Your iPAQ Pocket PC h5400 Series helps you keep track of your
schedule in many ways. You can:
■
See information at a glance on the Today screen
■
Set appointments and create reminders with the Calendar
■
Create a task list
Use the Today Screen
Use the Today screen to view your:
■
Owner information
■
Upcoming appointments
■
Unsent messages
■
Tasks that need to be completed
When you set up your device, you’ll first see the Today screen.
will also see the Today screen when you turn on your device
✎ You
for the first time each day or after four hours of inactivity.
Reference Guide
8–1
Scheduling
You can also display it by tapping
then Today. On the
Today screen, you can see at a glance the information you need
for the day.
Tap to switch
to a program.
Tap to view notification messages.
Tap to change volume or mute all sounds.
Tap to view battery status.
Tap to change date and time.
Tap to open an item.
Your day at a glance.
Tap to read e-mail.
Tap to create a new item.
Tap to view connection status.
Create Information
From the Today screen, you can create new information,
including:
8–2
■
Appointments
■
Contacts
■
E-mail
■
Excel Workbook information
■
Notes
■
Tasks
Reference Guide
Scheduling
■
Word documents
To create information:
1. From the Start menu, tap Today, New.
2. Tap an option to create a new item.
3. Tap OK after you finish creating a new item.
Change Information
From the Today screen, you can change:
■
Owner information
■
Upcoming appointments
■
Unsent messages
■
Tasks that need to be completed
For more information on changing these items, see the
appropriate instructions for each task in this guide. For example,
to create a new appointment, see “Schedule Appointments” later
in this chapter.
1. From the Start menu, tap Today.
2. Tap the information you want to change.
3. Enter or change the information.
4. Tap OK to save changes and return to the Today screen.
Reference Guide
8–3
Scheduling
Change Settings
From the Today Settings screen, you can:
■
Add a picture as the background
■
Select the information you see
■
Set the order of the information
■
Decide when to see the Today screen
To change the background:
1. From the Start menu, tap Settings.
2. Tap Today.
3. Select “Use this picture as the background” check box.
4. Tap Browse to select a picture from File Explorer.
To change the order of information:
1. From the Start menu, tap Settings.
2. Tap Today.
3. Tap the Items tab to select or reorder the information on the
Today screen.
8–4
Reference Guide
Scheduling
4. Tap an item to highlight it.
5. Tap Move Up or Move Down to change the order of items
on the Today screen.
cannot change the placement of the Date on the Today
✎ You
screen.
6. Tap the down arrow associated with “Display Today screen if
device is not used for...hours” checkbox to determine how
many hours must pass before the Today screen displays.
7. Tap OK.
Reference Guide
8–5
Scheduling
Use the Calendar
You can use the Calendar to schedule appointments and set
reminders. You can view your calendar by:
■
Agenda
■
Day
■
Week
■
Month
■
Year
the Calendar icon on the Today screen to navigate quickly
✎ Tap
to Calendar.
Look at the Calendar
By default, the Calendar first appears in the Agenda view. The
Agenda view provides the most detail about your appointments.
From the Start menu, tap Calendar to view your appointments.
8–6
Reference Guide
Scheduling
Change the Calendar View
By default, the Calendar first appears in the Agenda view, which
provides the most detail about your appointment. You can also
view your calendar by:
■
Day
■
Week
■
Month
■
Year
1. From the Start menu, tap Calendar.
2. Tap the Agenda, Day, Week, Month, or Year icon to see
your calendar in that view.
Reference Guide
8–7
Scheduling
Customize the Calendar Appearance
You can change the appearance of your calendar by setting the
first day of the week, how many days in a week you want to view,
the number of weeks and the half-hour time slots, font size, and
reminders. You can also display several icons that give visual
information about your appointments, including:
■
Reminder
■
Recurrence
■
Note
■
Location
■
Attendees
■
Private
You can determine whether to send meeting requests through
ActiveSync or an e-mail service.
To customize the calendar appearance:
1. From the Start menu, tap Calendar.
2. Tap Tools.
3. Tap Options.
4. Select the calendar options.
5. Tap OK.
8–8
Reference Guide
Scheduling
Schedule Appointments
1. From the Start menu, tap Calendar.
2. Tap New to schedule an appointment.
3. Enter a subject or select from the Subject drop-down list.
4. Tap any item to enter additional information.
5. Tap OK to schedule the appointment.
can schedule an appointment and set a reminder from the
✎ You
Today screen.
Create Reminders
You can create a reminder when you schedule an appointment or
you can do it later.
To create reminders:
1. From the Start menu, tap Calendar.
2. Tap an appointment.
Reference Guide
8–9
Scheduling
3. Tap Edit.
4. Tap the second Reminder field to select the time interval
between reminders. The default is 15 minutes.
Delete Appointments
1. From the Start menu, tap Calendar.
2. Tap an appointment.
3. Tap Tools.
4. Tap Delete Appointment.
5. Tap Yes to confirm deletion.
Categorize Appointments
You can use categories to filter the appointments in your
calendar.
To categorize appointments:
1. From the Start menu, tap Calendar.
2. Tap an appointment.
3. Tap Edit.
8–10
Reference Guide
Scheduling
4. Tap the Categories field to see a list of available categories.
5. Tap Add/Delete to create a category.
6. Enter the name of the new category.
7. Tap Add.
8. Tap OK to place your appointment in the category.
9. Tap the Categories field to place your appointment in more
categories.
10. Tap additional category names to select them.
11. Tap OK to list the categories you selected in the Categories
field.
12. Tap OK to save the category information and return to the
Calendar screen.
Reference Guide
8–11
Scheduling
Request Meetings
You can schedule a meeting and send a meeting request through
ActiveSync or an e-mail service.
you can send a meeting request, you must enter contacts
✎ Before
with e-mail addresses in the Contacts program and set up the
Inbox program to send and receive e-mail.
To request a meeting:
1. From the Start menu, tap Calendar, Tools, Options.
2. Tap the “Send meeting requests via” down arrow.
3. Tap the e-mail service you want to use to send a meeting
request, and then tap OK.
4. Tap New to create a new appointment.
5. Enter the appointment information.
6. Tap the Attendees field.
7. Tap the contacts you want to invite to the meeting.
8. Tap OK to add the attendees.
9. Tap OK to schedule the meeting.
10. Tap Yes to inform attendees about the meeting.
8–12
Reference Guide
Scheduling
Use Tasks
Use Tasks to:
■
Create new tasks
■
Set a reminder for a task
■
Delete a task
■
Sort your task list by category, status, priority, subject, start
date, and due date
Create a Task
You can create a task from the Today screen.
To create a task:
1. From the Start menu, tap Programs.
2. Tap Tasks.
3. Tap New to create a new task.
4. Enter a subject or select from the Subject dropdown list.
5. Tap any item to enter additional information.
6. Tap Due to add a due date for the task.
Reference Guide
8–13
Scheduling
7. Tap Reminder, and then select “Remind me.”
8. Tap the date you want to be reminded.
9. Tap OK to set the reminder and create the task.
Create a Task Quickly
You can create a task quickly by customizing Tasks, so you see
an Entry Bar at the top of the Tasks screen.
To quickly create a task:
1. From the Start menu, tap Programs.
2. Tap Tasks.
3. Tap Tools.
4. Tap Entry Bar.
5. Enter the subject.
6. Set a priority:
a. For high priority, tap the exclamation point.
b. For low priority, tap the down arrow icon.
c. For normal priority, do not tap an icon.
7. Tap outside the Entry Bar to add the task to your task list.
8–14
Reference Guide
Scheduling
Delete a Task
1. From the Start menu, tap Programs.
2. Tap Tasks.
3. Tap the task you want to delete.
4. Tap Tools.
5. Tap Delete Task.
6. Tap Yes to permanently delete the task.
Sort Tasks
1. From the Start menu, tap Programs.
2. Tap Tasks.
3. Tap the down arrow at the top left of the screen to sort the
task list by category.
4. Select a category.
Reference Guide
8–15
Scheduling
5. Tap the down arrow at the top right of the screen to sort the
task list by status, priority, subject, start date, or due date.
6. Select a sort option.
Change Appearance of Tasks
You can change the appearance of Tasks to use a large font, show
the start and end dates, and set reminders for new items.
1. From the Start menu, tap Programs.
2. Tap Tasks.
3. Tap Tools.
4. Tap Options.
5. Select the Tasks options.
6. Tap OK.
8–16
Reference Guide
9
Using Software
You can use the programs on your iPAQ Pocket PC h5400 Series
to:
■
Open or create Word documents
■
Open or create Excel workbooks
■
Read eBooks with Microsoft Reader*
■
Use the Media Player
■
Use Pocket Internet Explorer
*The Microsoft Reader may not be available in your country.
Use Pocket Word
You can create new Word documents from your iPAQ Pocket PC
or synchronize existing Word documents from your personal
computer to your iPAQ Pocket PC.
Microsoft ActiveSync converts Word documents into the
Pocket Word format and changes the .doc extension to a .psw
extension.
Ä
CAUTION: Because ActiveSync converts Word documents into the
Pocket Word format, you may lose some formatting from the original
Word document.
Reference Guide
9–1
Using Software
Pocket Word does not support items like:
■
Columns
■
Numbered lists
■
Headers and footers
■
Footnotes
■
Style sheets
more help with Pocket Word, tap Help from the Start menu,
✎ For
and tap Pocket Word.
Create a New Document
✎ Create a new document from the Today screen by tapping New.
To create a new document:
1. From the Start menu, tap Programs.
2. Tap Pocket Word.
3. Tap New to create a new document.
9–2
Reference Guide
Using Software
4. Tap View, and then tap Toolbar to format text.
5. Tap OK to close and save the document.
The document is automatically saved as a Pocket Word
Document with the first few words of your text as its name.
You may want to rename it.
can install programs and save files to the iPAQ File Store
✎ You
folder. The iPAQ File Store is accessed from the File Explorer on
your iPAQ Pocket PC. You can store up to 20 MB of information
(see section “Save to File Store”).
Programs and files stored in the iPAQ File Store are held in ROM
and are saved if you perform a full reset of your iPAQ Pocket PC
or if the battery discharges completely.
Reference Guide
9–3
Using Software
Open a Word Document
Ä
CAUTION: Pocket Word recognizes and displays only documents
saved in the My Documents folder or one folder below it. Files saved
elsewhere cannot be displayed.
To open a Word document:
1. From the Start menu, tap Programs.
2. Tap Pocket Word.
3. Tap a document to open it.
Change the Pocket Word Options
You can select:
9–4
■
A default template
■
Whether documents are stored in main memory or on a
storage card
■
Which types of documents are displayed in the list view
Reference Guide
Using Software
To change Pocket Word options:
1. From the Start menu, tap Programs.
2. Tap Pocket Word.
3. Tap Tools, and then Options.
4. Tap the Default template down arrow to select a default
template.
4
5
6
5. Tap the Save to down arrow to store documents in main
memory or on a storage card.
Reference Guide
9–5
Using Software
6. Tap the Display in list view down arrow to select which types
of documents to display in the list view.
7. Tap OK to save the options.
Use Pocket Excel
You can create Excel workbooks from your iPAQ Pocket PC or
synchronize existing Excel workbooks from your personal
computer to your iPAQ Pocket PC. ActiveSync converts Excel
workbooks into the Pocket Excel format and changes the .xls
extension to a .pxl extension.
Ä
9–6
CAUTION: Because ActiveSync converts Excel workbooks into the
Pocket Excel format, you may lose some formatting from the original
Excel workbook.
Reference Guide
Using Software
Pocket Excel does not support items like:
■
Data validation
■
Cell notes
■
Add-ins
■
Protection
■
Scenarios
■
Object charts
■
Vertical alignment
■
Text boxes
■
Embedded OLE objects
■
Hyperlinks
more help with Pocket Excel, tap Help from the Start menu,
✎ For
and tap Pocket Excel.
Create a Workbook
can create a new workbook from the Today screen by
✎ You
tapping New.
To create a workbook:
1. From the Start menu, tap Programs.
2. Tap Pocket Excel.
Reference Guide
9–7
Using Software
3. Tap New to create a new workbook.
4. Tap OK to close and save the workbook.
The workbook is automatically saved as a Pocket Excel
workbook named Book1. Depending on how many
workbooks you have created since opening Pocket Excel, you
may want to rename it.
can install programs and save files to the iPAQ File Store
✎ You
folder. The iPAQ File Store is accessed from the File Explorer on
your iPAQ Pocket PC. You can store up to 20 MB of information
(see section “Save to File Store”)
Programs and files stored in the iPAQ File Store are held in ROM
and are saved if you perform a full reset of your iPAQ Pocket PC
or if the battery discharges completely.
Open an Excel File
Ä
CAUTION: Pocket Excel only recognizes and displays documents
saved in the My Documents folder or 1 folder below it. Files saved
elsewhere cannot be displayed.
To open an Excel file:
1. From the Start menu, tap Programs.
2. Tap Pocket Excel.
3. Tap a workbook to open it.
9–8
Reference Guide
Using Software
Change Excel Options
You can change options to select:
■
A template for new workbooks
■
Whether workbooks are stored in main memory or on a
storage card
■
Which types of workbooks are displayed in the list view
To change Excel options:
1. From the Start menu, tap Programs.
2. Tap Pocket Excel.
3. Tap Tools, and then Options.
4. Tap the Template for new workbook down arrow to select a
template.
4
5
6
5. Tap the Save new workbooks to down arrow to store
workbooks in main memory, iPAQ file store, or on a
storage card.
Reference Guide
9–9
Using Software
6. Tap the Files to display in list view down arrow to select
which workbooks are displayed in the list view.
7. Tap OK to save the options.
Use Microsoft Reader
Use Microsoft Reader to read and listen to eBooks. You must
activate the Microsoft Reader the first time you use it. Before you
can copy protected eBooks from the Internet, the reader must be
activated. To activate your reader, you must have a Hotmail,
MSN, or Passport account.
The Microsoft Reader is available in select countries.
iPAQ Pocket PC Reference Guide is available as an eBook in
✎ The
some countries. You can copy it to your iPAQ Pocket PC from the
Companion CD.
9–10
Reference Guide
Using Software
Activate the Reader
You must activate the Microsoft Reader to copy protected
eBooks.
To activate the reader:
1. Connect your iPAQ Pocket PC to your computer.
2. Open Internet Explorer on your computer.
3. Go to http://das.microsoft.com/activate
Read an eBook
Read your eBook from start to finish or select specific topics. If
you close your eBook and later want to open it, your eBook will
open on the last page you read.
To read an eBook:
1. From the Start menu, tap Programs.
2. Tap Microsoft Reader.
3. Tap the title of your eBook.
Reference Guide
9–11
Using Software
4. Tap the page number or left and right arrows to move
backward and forward in the book.
jump to a topic, tap a link. Links can occur throughout the text
✎ Toor table
of contents. To return from a link, tap the title of the
eBook, and then tap Return.
Copy eBooks
You can copy eBooks from any eBook retailer to your iPAQ
Pocket PC.
To copy an eBook:
1. Connect your iPAQ Pocket PC to your personal computer.
2. Go to any eBook retailer’s Web site and follow the directions
for downloading or installing files to your iPAQ Pocket PC.
is recommended that you store important information on a
✎ Itstorage
card such as a CompactFlash or SDIO card.
9–12
Reference Guide
Using Software
Delete eBooks
You can delete an eBook from your iPAQ Pocket PC library. If
your eBook is stored on your personal computer, you can copy it
again to your iPAQ Pocket PC.
To delete an eBook:
1. From the Start menu, tap Programs.
2. Tap Microsoft Reader.
3. Tap and hold the title of your eBook.
4. Tap Delete.
5. Tap Yes.
Reference Guide
9–13
Using Software
Listen to an eBook
You can listen to an Audible eBook on your iPAQ Pocket PC. For
more information on buying and listening to Audible eBooks, go
to http://www.audible.com
To listen to an eBook:
1. From the Start menu, tap Programs.
2. Tap Microsoft Reader.
3. Tap the title.
4. Tap Play to listen to the book.
5. Tap Stop to quit listening to the book.
Annotate your eBook
You can annotate your eBook using items like:
■
Creating Bookmarks
■
Highlighting Words Or Phrases
■
Attaching Notes
■
Creating drawings
To annotate your eBook:
1. From the Start menu, tap Programs.
2. Tap Microsoft Reader.
9–14
Reference Guide
Using Software
3. Tap the title.
4. Highlight and hold the text where you want to create an
annotation, and then tap Add Bookmark, Add Highlight,
Add Text Note, or Add Drawing from the pop-up menu.
Change the Microsoft Reader Options
You can customize the Microsoft Reader to meet your individual
needs. Choose to see visual guides, allow annotations
(bookmarks, text notes, drawings, or highlights), or adjust the
size of the font.
To change the reader options:
1. From the Start menu, tap Programs.
2. Tap Microsoft Reader.
3. Tap Settings.
Reference Guide
9–15
Using Software
4. Tap the Visual Guides option.
5. Tap Page 1.
6. Select the Annotations options.
7. Tap Page 2.
8. Tap and drag the cursor along the ruler to adjust the font size.
9. Tap Library to return to the list of eBooks.
9–16
Reference Guide
Using Software
Use the Windows Media Player
You can use the Windows Media Player to listen to music or play
video from your iPAQ Pocket PC by downloading files:
■
Onto your personal computer and transferring them to your
iPAQ Pocket PC
■
Directly onto your iPAQ Pocket PC using your wireless LAN
more information about using Windows Media Player, tap the
✎ For
Windows icon, and then tap Help from within the Media Player.
Media Player supports the organization and playback of:
■
Windows Media content
■
MP3 audio files
■
Windows Media audio and video
Reference Guide
9–17
Using Software
■
FhG MP3
■
Streamed content in Windows Media format using
WM protocols (HTTP and MMS)
Indicates the progress
of the current track.
Tap to adjust volume.
Tap to
stop.
Tap to play
or pause.
Tap to skip to
the next song.
Tap to play
a previous song.
Internet music files are protected by licensing technology.
✎ Some
Windows Media Player uses Digital Rights Management (DRM)
for the electronic licensing procedure. Windows Media Player
and Windows Media Rights Manager must be installed on the
personal computer and are available on Microsoft’s Web site.
9–18
Reference Guide
Using Software
Copy Music to Your iPAQ Pocket PC
You can copy music that is in one of the accepted formats from
your personal computer to the iPAQ Pocket PC. You drag and
drop the music file into the My Documents folder located in
RAM or onto a storage card.
You must have the Windows Media Player installed on your
personal computer to copy music from an audio CD to your iPAQ
Pocket PC.
To copy music to your iPAQ Pocket PC:
actual steps for copying music using the Windows Media
✎ The
Player may vary depending on the version of the Media Player on
the personal computer.
1. Connect your iPAQ Pocket PC to your personal computer.
2. Open Windows Media Player on your personal computer.
3. Insert the audio CD into your CD drive.
4. From Media Player on your personal computer, select CD
Audio to display the tracks on the audio CD.
5. Select the tracks to copy and select Copy Music to transfer
the tracks to the hard drive.
6. From Media Player on your personal computer, select
Portable Device to display the tracks on the hard drive and
the files on the iPAQ Pocket PC.
7. Select the tracks to copy and the storage location on the iPAQ
Pocket PC and select Copy Music to transfer the tracks.
files can be relatively large. It is recommended that you
✎ Music
store your music files on a storage card.
Reference Guide
9–19
Using Software
Play Music on Your iPAQ Pocket PC
1. Tap Start, and then Windows Media.
2. Tap Select.
3. Tap the down arrow and Local Content to display media files
stored on the iPAQ Pocket PC.
4. Tap to select the desired file.
9–20
Reference Guide
Using Software
5. Tap the Play icon.
default, Media Player will play all files stored as local content
✎ By
on the iPAQ Pocket PC. You can repeat a file and shuffle the
contents by selecting Tools, and then Repeat or Shuffle.
Create Playlists
You can organize music and video files into playlists.
To create a playlist:
1. Tap Start, and then Windows Media.
2. Tap Select.
Reference Guide
9–21
Using Software
3. Tap the down arrow, and then Organize Playlists.
4. Tap New to name your playlist, and then tap OK.
5. Select the files to include in this playlist.
6. Tap OK to display your new playlist.
7. Tap OK.
9–22
Reference Guide
Using Software
Play a Playlist
1. Tap Start, and then Windows Media.
2. Tap Select.
3. Tap the down arrow and tap the playlist name to display its
contents.
4. Tap OK, and then the Play icon to start the playlist.
can delete and rename playlists by using the Organize
✎ You
Playlists menu option. You can also edit playlists by using the
Edit icon while viewing a playlist.
Play Video
You can play and manage video files just like music. You must
have an internet connection to play streaming video.
Reference Guide
9–23
Using Software
Use Pocket Internet Explorer
You can use Pocket Internet Explorer (Pocket IE) to view web or
WAP pages on your iPAQ Pocket PC by downloading pages while
connected to the Internet or through synchronization. While
browsing, you can download files and programs to your iPAQ
Pocket PC.
more information, tap Start, Help, and then Pocket Internet
✎ For
Explorer.
Use Pocket IE When Connected
With Pocket IE, you can use mobile browsing when connected to
the Internet.
1. Tap Start.
2. Tap Internet Explorer.
can use the pre-installed links that HP has provided to access
✎ You
content and services that are optimized for the iPAQ Pocket PC.
3. Enter the URL address in the address bar at the top of the
screen. If you do not see the address bar, tap View, and then
tap Address Bar.
4. Tap Go.
Use Pocket IE When Disconnected
With Pocket IE, you can browse previously viewed and
stored information when disconnected from the Internet. This
information can be viewed using the cached content or through
synchronization.
9–24
Reference Guide
Using Software
To cache content for viewing even when disconnected from the
Internet:
1. Tap Start.
2. Tap Internet Explorer.
3. Tap Tools, and then Options.
4. In the General tab, select the number of days to save the
history of pages visited.
5. Tap OK.
Synchronize Favorites
You can have the URLs of your favorite Web sites at your
fingertips. Synchronizing a mobile favorite allows you to view
Internet content on your iPAQ Pocket PC while you are
disconnected.
To synchronize favorites:
1. In ActiveSync on your personal computer, click Tools, and
then Options.
2. Select the check box next to Favorites.
3. In Internet Explorer on your personal computer, save or move
favorite links to the Mobile Favorites subfolder in the
Favorites list.
The Favorites will be synchronized to your iPAQ Pocket PC
at your next Sync connection.
add or delete a favorite link in the Mobile Favorites folder
✎ onIf you
your iPAQ Pocket PC, the next time you synchronize the same
change is made on your personal computer.
Reference Guide
9–25
Using Software
9–26
Reference Guide
10
Using the Universal Remote
You can use Nevo software to turn your iPAQ Pocket PC into
a universal remote control. With the universal remote control,
you can:
■
Operate infrared supported office, entertainment, and home
automation equipment
■
Set up favorite channels
■
Share the remote with others
■
Create unique personal settings and profiles
Reference Guide
10–1
Using the Universal Remote
Learn the Icons
The universal remote contains several icons that you tap to
perform actions or access screens. For information on each of
these icons, tap the Question Mark icon.
Use the Configuration Icons
You can use the configuration icons to customize, select user
menus, or select rooms. The configuration icons are located at the
bottom of the main Nevo screen.
To customize the home, screens, or favorites, tap the
Customize icon. This allows additional customizing
for controlling equipment in different rooms. You can
add, edit, and delete devices and activities.
To specify user defined favorites or device settings, tap
the User icon.You can add, edit, and delete user
settings.
To select a device in a specific room, tap the Room
icon. You can add, edit, and delete room assignments.
To change the functions when pressing the hard keys, tap the
KeyGuide icon.
For information on other icons, tap the Question Mark icon.
10–2
Reference Guide
Using the Universal Remote
Add a Device
You must add a device to the wheel before you can control it with
the universal remote. You can set up the universal remote to
control up to 12 devices in a room.
The universal remote comes pre-programmed with codes for
thousands of infrared supported devices. You can download other
codes from the Nevo Web site, http://www.mynevo.com
You can automatically transfer all the remote control settings to
your iPAQ Pocket PC.
first time you use the universal remote, you will see only the
✎ The
Add Devices and Add Activities icons on the device wheel.
A wizard guides you through the process of adding a device. To
exit the wizard at any time, tap the Cancel button. To return to
the previous page, tap the Back button.
To add a device:
1. From the Start menu, tap Nevo.
2. Select one of the following:
a. Tap the Add Device icon.
b. Tap the Wrench icon, and then Add Device.
Reference Guide
10–3
Using the Universal Remote
3. Tap Next.
4. Tap the Device down arrow, select your device from the list,
and then tap Next.
10–4
Reference Guide
Using the Universal Remote
5. Select the setup method.
To identify your
device by...
Then select...
Brand
By brand
Specific device number
By device ID
Searching through device
numbers
By stepping through device IDs
Searching through models
By updating brands from the Web site
downloaded from MyNevo.com
is recommended that you search for your device by
✎ Itmanufacturer’s
brand name.
6. Tap Next.
Reference Guide
10–5
Using the Universal Remote
7. Select specific device and device ID. The procedure varies
depending upon the setup method selected in step 5.
For this example, we are selecting our device by brand. Tap
the Brand down arrow and select your brand.
8. Tap the Power icon to test whether you can power on and off
your device. If not, choose another code from the Selection
list and repeat step 8.
9. Tap Next.
10–6
Reference Guide
Using the Universal Remote
10. Select an icon for your device, and then tap Next. The
universal remote automatically assigns an icon to your
device, but you can change it.
11. Enter a name for the device.
12. Tap Next to view your device on the wheel.
Reference Guide
10–7
Using the Universal Remote
Change a Device
You can change the setup information for a device.
1. From the Start menu, tap Nevo.
2. Tap the Room icon, and then select the room containing the
device.
3. Tap the icon for the device on the wheel.
4. Tap the Wrench icon, and then Edit Device....
5. Follow the on-screen instructions to make the changes.
Delete a Device
1. From the Start menu, tap Nevo.
2. Tap the device icon.
3. Tap the Wrench icon, and then Delete Device.
4. Tap Yes to confirm the deletion.
10–8
Reference Guide
Using the Universal Remote
Turn on a Device
1. From the Start menu, select Nevo.
You can choose Start, Programs, and then Nevo.
2. Click a device on the wheel to position it at the top of the
wheel.
3. Tap the Power button.
Reference Guide
10–9
Using the Universal Remote
Add Activities
You can customize the keys on devices to switch activities. You
can turn on more than one device at a time.
To add an activity:
1. Tap the Room icon to select where the devices are located.
2. Tap the Add Activity icon or tap the Wrench icon, and then
Add Activity.
10–10
Reference Guide
Using the Universal Remote
3. Tap Next.
Reference Guide
10–11
Using the Universal Remote
4. Tap Next.
5. Tap the icon for device you want to control.
6. Record the keystrokes for commanding multiple operations
into one activity.
command multiple devices, tap the Home icon, select another
✎ Todevice,
and follow the mini wizard to enter keystroke commands.
7. Tap the Wrench icon and select Stop.
8. Tap the Wrench icon, and then tap Test to test your
keystrokes.
10–12
Reference Guide
Using the Universal Remote
9. Tap Finish Wizard.
10. Assign an icon to the activity. Activities are designated in
gold on the wheel.
Reference Guide
10–13
Using the Universal Remote
11. Assign a name to the activity, and then tap Next.
12. Notice the activity on the wheel.
10–14
Reference Guide
Using the Universal Remote
Change an Activity
You can change an activity assigned to a room.
1. From the Start menu, tap Nevo.
2. Tap the Room icon, and then select the room for the activity.
3. Tap the icon for the activity.
4. Tap the Wrench icon, and then Edit Activity....
5. Follow the wizard to make changes and enter keystrokes.
sure you check “Record a new sequence of keystrokes” if
✎ Make
you want to change the input strokes.
6. Tap the Wrench icon, and then Stop.
7. Tap the Wrench icon, and then Test.
8. Tap the Wrench icon, and then Finish Wizard.
Assign a new name to your favorite channel.
Delete an Activity
1. From the Start menu, tap Nevo.
2. Tap the activity icon.
3. Tap the Wrench icon, and then Delete Activity.
4. Tap Yes to confirm the deletion.
Reference Guide
10–15
Using the Universal Remote
Set Up a Room
You can program the universal remote to control devices in
each room.
To set up a room:
1. From the Start menu, tap Nevo.
2. Tap the Room icon, and then Add Room.
3. Tap Next.
4. Assign an icon to the room, and then tap Next.
5. Enter a room label and select a region from Regions down
arrow list.
6. Tap Next.
Add a Device to a Room
After you set up a room, you can assign a device to it. For more
information on setting up a room, see section “To set up a room.”
1. From the Start menu, tap Nevo.
2. Tap the Room icon.
3. Select a room.
4. Tap the Add Devices icon to start the Device wizard.
5. Add the device to your room.
10–16
Reference Guide
Using the Universal Remote
Delete a Room
1. From the Start menu, tap Nevo.
2. Tap the Room icon, and then select the room to delete.
3. Tap the Room icon again, and then Delete Room.
4. Tap Yes to confirm the deletion.
Add a Favorite Channel
You can add a favorite channel to your device.
the Channel icon to modify a channel setup. If you have
✎ Tap
multiple pages of favorites, tap the Right and Left arrow icons to
scroll through the pages.
To add a favorite:
1. From the Start menu, tap Nevo.
2. Tap the Favorites icon, then tap the Wrench icon.
3. Tap Add Favorite.
4. Follow the on-screen wizard instructions.
5. Tap the Home Page icon.
6. Tap the device for the channel selection control.
7. Tap the correct key sequence for the channel.
requires you to press Enter, then include Enter in
✎ Ifthethekeydevice
sequence.
8. Tap the Wrench icon, and then Stop.
9. Tap the Wrench icon, and then Test.
10. Tap the Wrench icon, and then Finish.
Reference Guide
10–17
Using the Universal Remote
11. Assign a name to your favorite channel.
12. Tap the Wrench icon, and then select Add Page.
Change a Favorite
You can change a stored favorite channel.
1. From the Start menu, tap Nevo.
2. Tap the Favorites icon, and then select the favorite to
change.
3. Tap the Wrench icon, and then Edit Favorite....
4. Follow the wizard to make changes.
sure you check “Record a new sequence of keystrokes” if
✎ Make
you want to change the input strokes.
5. Tap the Wrench icon, and then Stop.
6. Tap the Wrench icon, and then Test.
7. Tap the Wrench icon, and then Finish.
8. Assign a new name to your favorite channel.
Set Up User Profile
You can set up multiple users for the universal remote. Each user
can have his or her own personal preferences and favorites.
To set up a user profile:
1. From the Start menu, tap Nevo.
2. Tap the User icon, the Add User.
3. Tap Next.
4. Type a name for the user, and then tap Next.
10–18
Reference Guide
Using the Universal Remote
Change a User Profile
You can change user information.
1. From the Start menu, tap Nevo.
2. Tap the User icon, the Edit User.
3. Tap Next.
4. Type a name for the user, and then tap Next.
Download Device Codes and Key
Functions
You can download setup codes and iPAQ Pocket PC serial key
functions from MyNevo.com. You must register at
http://www.MyNevo.com to download information. The
registration process requires your iPAQ Pocket PC serial number
and library code.
Download Device Codes
It is recommended that you follow the instructions on the
MyNevo.com device download center.
1. Establish a partnership between your iPAQ Pocket PC and
your personal computer (see Chapter 1 for more
information).
2. From your personal computer, go to
http://www.MyNevo.com
3. Follow the instructions on the web site to select the device to
download.
4. Synchronize your personal computer with the iPAQ
Pocket PC.
Reference Guide
10–19
Using the Universal Remote
5. Tap the Add Device icon.
6. Tap the device you downloaded from the By Brand down
arrow list.
7. Follow the wizard.
Download Key Functions
It is recommended that you follow the instructions on the
MyNevo.com device advanced key functions download center.
1. Establish a partnership between your iPAQ Pocket PC and
your personal computer (see Chapter 1 for more
information).
2. From your personal computer, go to
http://www.MyNevo.com
3. Follow the instructions on the web site to select the device
keys to download.
4. Synchronize your personal computer with the iPAQ
Pocket PC.
5. Open a key wizard.
6. Tap the keys you downloaded from the Function down
arrow list.
7. Follow the wizard.
10–20
Reference Guide
Using the Universal Remote
Work with Function Keys
You can add, edit, and learn functions for the universal remote.
Add Function Keys
1. From the Start menu, tap Nevo.
2. Tap the Control screen icon.
3. Tap the Wrench icon, and then Add Key.
4. Follow the on-screen instructions.
Edit Function Keys
1. From the Start menu, tap Nevo.
2. Tap the Control screen icon.
3. Tap the Wrench icon, and then Edit Key.
4. Follow the on-screen instructions.
Learn Function Keys
1. From the Start menu, tap Nevo.
2. Tap the Room icon, and then select the room with the device
to use the function keys.
3. Tap the activity on the wheel, and then the Control icon.
4. Tap the Wrench icon, and then Express Learning.
5. Follow the on-screen instructions.
Reference Guide
10–21
Using the Universal Remote
Copy Function Keys
1. From the Start menu, tap Nevo.
2. Tap the Wrench icon, and then Copy Key.
3. Follow the on-screen instructions.
Move Function Keys
1. From the Start menu, tap Nevo.
2. Tap the Wrench icon, and then Move Key.
3. Follow the on-screen instructions.
Delete Function Keys
1. From the Start menu, tap Nevo.
2. Tap the Wrench icon, and then Delete Key.
3. Follow the on-screen instructions.
10–22
Reference Guide
A
Regulatory Notices
Federal Communications Commission
Notice
This equipment has been tested and found to comply with the
limits for a Class B digital device, pursuant to Part 15 of the
FCC Rules. These limits are designed to provide reasonable
protection against harmful interference in a residential
installation. This equipment generates, uses, and can radiate radio
frequency energy and, if not installed and used in accordance
with the instructions, may cause harmful interference to radio
communications. However, there is no guarantee that interference
will not occur in a particular installation. If this equipment does
cause harmful interference to radio or television reception, which
can be determined by turning the equipment off and on, the user
is encouraged to try to correct the interference by 1 or more of the
following measures:
■
Reorient or relocate the receiving antenna
■
Increase the separation between the equipment and receiver
■
Connect the equipment into an outlet on a circuit different
from that to which the receiver is connected
■
Consult the dealer or an experienced radio or television
technician for help
Reference Guide
A–1
Regulatory Notices
Modifications
The FCC requires the user to be notified that any changes or
modifications made to this device that are not expressly approved
by Hewlett-Packard Company may void the Reference authority
to operate the equipment.
Cables
Connections to this device must be made with shielded cables
with metallic RFI/EMI connector hoods in order to maintain
compliance with FCC Rules and Regulations.
Declaration of Conformity for
Products Marked with the FCC
Logo—United States Only
This device complies with Part 15 of the FCC Rules. Operation is
subject to the following two conditions: (1) this device may not
cause harmful interference, and (2) this device must accept any
interference received, including interference that may cause
undesired operation.
For questions regarding your product, contact:
Hewlett-Packard Company
P. O. Box 692000, Mail Stop 530113
Houston, Texas 77269-2000
Or, call 1-800-652-6672
A–2
Reference Guide
Regulatory Notices
For questions regarding this FCC declaration, contact:
Hewlett-Packard Company
P. O. Box 692000, Mail Stop 510101
Houston, Texas 77269-2000
Or, call (281) 514-3333
To identify this product, refer to the Part, Series, or Model
number found on the product.
Japanese Notice
Reference Guide
A–3
Regulatory Notices
Battery Warning
Ä
CAUTION: Danger of explosion if battery is incorrectly replaced.
Replace with only the same or equivalent type recommended by the
manufacturer. Dispose of used batteries according to the
manufacturer’s instructions.
Å
WARNING: This computer contains an internal lithium polymer
battery pack. To reduce the risk of fire or burns, do not disassemble,
crush, puncture, short external contacts, or dispose of in fire or
water. Replacement should only be done by a HP authorized service
provider using the HP spare part for this computer.
Airline Travel Notice
Use of electronic equipment aboard commercial aircraft is at the
discretion of the airline.
A–4
Reference Guide
Regulatory Notices
Wireless Notices
In some environments, the use of wireless devices may be
restricted. Such restrictions may apply aboard airplanes, in
hospitals, near explosives, in hazardous locations, etc. If you are
uncertain of the policy that applies to the use of this device,
please ask for authorization to use it prior to turning it on.
U.S. Regulatory Wireless Notice
This product emits radio frequency energy, but the radiated
output power of this device is far below the FCC radio frequency
exposure limits. Nevertheless, the device should be used in such a
manner that the potential for human contact with the antenna
during normal operation is minimized.
Canadian Regulatory Wireless Notice
Operation is subject to the following two conditions: (1) this
device may not cause interference, and (2) this device must
accept any interference, including interference that may cause
undesired operation of the device.
To prevent radio interference to the licensed service, this device
is intended to be operated indoors and away from windows to
provide maximum shielding. Equipment (or its transmit antenna)
that is installed outdoors is subject to licensing.
The term “IC:” before the certification/registration number
only signifies that the Industry Canada technical specifications
were met.
Reference Guide
A–5
Regulatory Notices
European Union Notice
0682
Products bearing the CE marking comply with the R&TTE
Directive (1999/5/EC), EMC Directive (89/336/EEC), and the
Low Voltage Directive (73/23/EEC) issued by the Commission
of the European Community.
Compliance with these directives implies conformity to the
following European Norms (in parentheses are the equivalent
international standards and regulations):
■
EN 55022 (CISPR 22)—Electromagnetic Interference
■
EN 55024 (IEC61000-4-2, 3, 4, 5, 6,
8, 11)—Electromagnetic Immunity
■
EN61000-3-2 (IEC61000-3-2)—Power Line Harmonics
■
EN61000-3-3 (IEC61000-3-3)—Power Line Flicker
■
EN 60950 (IEC 60950)—Product Safety
■
EN 300 328—Technical requirements for radio equipment
■
ETS 300 826 or EN 301 489-17—General EMC
requirements for radio equipment
This product may be used in all EU and EFTA countries.
A–6
Reference Guide
Regulatory Notices
Japanese Notice
Reference Guide
A–7
Regulatory Notices
Brazilian Regulatory Wireless Notice
Este equipamento opera em caráter secundário, isto é, não tem
direito a proteção contra interferência prejudicial, mesmo de
estações do mesmo tipo, e não pode causar interferência a
sistemas operando em caráter primário.
Å
A–8
WARNING: To reduce the risk of personal injury, electric shock,
fire, or damage to the equipment, plug the AC Adapter into an
electrical outlet that is easily accessible at all times. Disconnect
power from the equipment by unplugging the AC Adapter from
the electrical outlet. Do not place anything on power cords or
cables. Arrange them so that no one may accidently step on or trip
over them.
Reference Guide
B
Hardware Specifications
System Specifications
Specifications
System Feature
hp iPAQ h5400 Series
Processor
400 MHz Intel XScale
Memory
64 MB SDRAM or greater
ROM
48 MB or greater
SDIO Storage
Memory card and SDIO ready
Display
Transflective color TFT, 240 x 320 pixels, 64K color
support, .24-dot pitch
LED Backlight
Multi-level brightness adjustment, light sensor for
automatic adjustment of brightness level
Audio
Speaker, 3.5 mm stereo headphone and
microphone jack
Infrared
IrDA, data transfer up to 115.2 Kb per second and
Universal Remote Control for control of home
entertainment units (CIR)
Bluetooth
All models
Fingerprint Reader
Thermal swipe technology
Reference Guide
B–1
Hardware Specifications
Specifications (Continued)
System Feature
hp iPAQ h5400 Series
Communications
Communication port, Expansion Pack connector
Indicators
3-mode alarm notification:
Flashing green LED, tone, pop-up message
Charge active: flashing/solid amber LED
Bluetooth active: flashing/solid blue LED
WLAN active: flashing green LED
WLAN enabled but not connected: flashing amber LED
Battery
Removable/rechargeable Lithium Polymer with internal
memory backup battery
Physical Specifications
hp iPAQ Pocket PC h5400 Series
US
Metric
Length of the unit
(without WLAN antenna)
5.23 in
133.0 mm
Length of the unit
(with LAN antenna)
5.43 in
138.0 mm
Width
3.30–3.03 in tapering
84.0–77.0 mm tapering
Depth
0.63 in
15.9 mm
Weight
7.26 oz
206 gm
B–2
Reference Guide
Hardware Specifications
Operating Environment
Environment
US
Temperature
Operating
Nonoperating
-22° to 140° F
-30° to 60° C
Relative Humidity
Operating
10 to 90%
10 to 90%
Nonoperating
10 to 90%
10 to 90%
Operating
0–15,000 ft
4,572 meters
Nonoperating
0–15,000 ft
4,572 meters
Maximum Altitude
Reference Guide
32° to 104° F
Metric
0° to 40° C
B–3
Hardware Specifications
B–4
Reference Guide
Index
Index
A
AC Adapter 2–38
ActiveSync
back up Pocket PC 2–27
connect to computer 6–1
restore Pocket PC memory
2–27
application buttons
customize 2–45
applications
close 2–43
install 2–45
open 2–42
appointments
categorize 8–10
delete 8–10
schedule 8–9
AvantGo 6–2
B
back up Pocket PC 2–27
backlight 2–15
Block Recognizer 2–8
C
Calendar 8–6
charging the Pocket PC 2–38
connect
to the Internet 6–8
Reference Guide
to your network 6–8
contacts 7–1
categorize 7–3
create 7–1
delete 7–6
edit 7–2
view 7–2
convert writing to text 2–10
customer support 1–2
customize
application buttons 2–45
Calendar appearance 8–8
D
date
set 2–15
delete
eBook 9–13
draw on screen 2–9
E
eBook
annotate 9–14
copy 9–12
delete 9–13
listen to 9–14
read 9–11
e-mail
delete 7–14
Index–1
Index
manage folders 7–16
open 7–13
receive 7–13
e-mail service, set up 7–8
enter information 2–1
F
files, move to, from computer 6–6
folders 7–16
I
Inbox 7–7
infrared connection
connect computer 6–1
install
applications 2–45
K
keyboard 2–4
L
Letter Recognizer 2–6
link to Web sites 6–10
M
Microsoft Reader 9–10
copy ebooks 9–12
delete eBook 9–13
N
network, connect 6–8
notes
write 7–19
O
onscreen keyboard 2–4
options, change
Microsoft Reader 9–15
Word 9–4
Index–2
word suggestions 2–2
P
Pocket Excel 9–6
Pocket Word 9–1
R
record
voice 7–17
registration 1–10
reminders, set 8–9, 8–13
restore memory 2–27
S
set
date 2–15
time, home 2–12
time, visiting location 2–14
support 1–2
synchronization, change settings
6–4
synchronize
Excel workbooks 9–6
links to Web sites 6–10
with your computer 6–2
Word documents 9–1
T
tasks 8–13
time
set for home 2–12
set for visiting location 2–14
Today screen 8–1
Transcriber 2–8
U
universal cradle 2–38
Reference Guide
Index
V
view
contacts 7–2
voice
recording 7–17
W
Web sites
synchronize links 6–10
Windows Explorer 6–6
Word 9–1
word suggestions, change options
2–2
write on screen 2–9
writing, convert to text 2–10
Reference Guide
Index–3