1
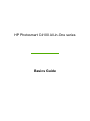
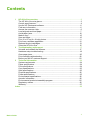
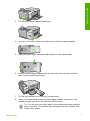
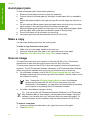
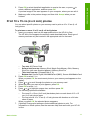
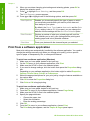
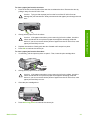
HP Photosmart C4100 All-in-One series
Basics Guide
HP Photosmart C4100 All-in-One series
Basics Guide
© 2006 Hewlett-Packard
Development Company, L.P.
Adobe® and the Acrobat logo® are
trademarks of Adobe Systems
Incorporated.
Windows®, Windows NT®, Windows
ME®, Windows XP®, and Windows
2000® are U.S. registered
trademarks of Microsoft Corporation.
Intel® and Pentium® are trademarks
or registered trademarks of Intel
Corporation or its subsidiaries in the
United States and other countries.
Energy Star® and Energy Star logo®
are US registered marks of the United
States Environmental Protection
Agency.
Publication number: Q8100-90256
Hewlett-Packard Company
notices
The information contained in this
document is subject to change
without notice.
All rights reserved. Reproduction,
adaptation, or translation of this
material is prohibited without prior
written permission of HewlettPackard, except as allowed under
copyright laws.
The only warranties for HP products
and services are set forth in the
express warranty statements
accompanying such products and
services. Nothing herein should be
construed as constituting an
additional warranty. HP shall not be
liable for technical or editorial errors
or omissions contained herein.
Contents
1
HP All-in-One overview........................................................................................2
The HP All-in-One at a glance................................................................................3
Control panel features............................................................................................4
Use the HP Photosmart software...........................................................................6
Find more information.............................................................................................6
Access the onscreen Help......................................................................................6
Load originals and load paper................................................................................7
Avoid paper jams..................................................................................................10
Make a copy.........................................................................................................10
Scan an image......................................................................................................10
Print 10 x 15 cm (4 x 6 inch) photos.....................................................................11
Print from a software application..........................................................................12
Replace the print cartridges..................................................................................13
Clean the HP All-in-One.......................................................................................15
2 Troubleshooting and support............................................................................17
Uninstall and reinstall the software.......................................................................17
Hardware setup troubleshooting...........................................................................18
Clear paper jams..................................................................................................20
Print cartridge troubleshooting..............................................................................22
Before you call HP customer support...................................................................22
3 Technical information........................................................................................24
System requirements............................................................................................24
Paper specifications.............................................................................................24
Print specifications................................................................................................24
Copy specifications...............................................................................................25
Scan specifications...............................................................................................25
Physical specifications..........................................................................................25
Power specifications.............................................................................................25
Environmental specifications................................................................................25
Acoustic information.............................................................................................25
Environmental product stewardship program.......................................................25
Regulatory notices................................................................................................25
Warranty...............................................................................................................27
Index...........................................................................................................................28
Basics Guide
1
HP All-in-One overview
1
HP All-in-One overview
Use the HP All-in-One to quickly and easily accomplish tasks such as making a copy,
scanning documents, or printing photos from a memory card. You can access many
HP All-in-One functions directly from the control panel, without turning on your
computer.
Note This guide introduces basic operations and troubleshooting, as well as
providing information for contacting HP support and ordering supplies.
The onscreen Help details the full range of features and functions, including
use of the HP Photosmart software that came with the HP All-in-One. For more
information, see Access the onscreen Help on page 6.
Copy
The HP All-in-One enables you to produce high-quality color and black-and-white
copies on a variety of paper types, including transparencies. You can enlarge or
reduce the size of an original to fit a specific paper size, adjust the darkness of the
copy, and use special features to make high-quality copies of photos, including
borderless copies.
Scan
Scanning is the process of converting text and pictures into an electronic format for
your computer. You can scan almost anything (photos, magazine articles and text
documents) on the HP All-in-One.
Print photots
The HP All-in-One is equipped with memory card slots which enable you to insert a
memory card and begin printing or editing photos without uploading your photos to a
computer first. Additionally, if the HP All-in-One is connected to a computer with a
USB cable, you can also transfer your photos to the computer to print, edit, or share.
Warning Do not insert more than one memory card at a time. If more than
one memory card is inserted, unrecoverable data loss might occur.
Print from your computer
The HP All-in-One can be used with any software application that allows printing. You
can print a range of projects, such as borderless images, newsletters, greeting cards,
iron-on transfers, and posters.
2
HP Photosmart C4100 All-in-One series
Label
Description
1
Color graphics display (also referred to as
the display)
2
Control panel
3
Photo paper cassette
4
Memory card slots
5
Input tray
6
Paper tray extender (also referred to as
the tray extender)
7
Paper-width guide
8
Print cartridge door
9
Glass
10
Lid backing
Label
Description
1
Rear door
Basics Guide
HP All-in-One overview
The HP All-in-One at a glance
3
Chapter 1
HP All-in-One overview
(continued)
*
Label
Description
2
Rear USB port
3
Power connection*
Use only with the power adapter supplied by HP.
Control panel features
The following diagram and related table provide a quick reference to the HP All-inOne control panel features.
Label
Name and Description
1
Color graphics display (also referred to as the display): View menus, photos,
and messages. The display can be pulled up and angled for better viewing.
4
HP Photosmart C4100 All-in-One series
(continued)
Name and Description
2
Directional pad: Navigates through menu options.
3
On button: Turns the HP All-in-One on or off. When the HP All-in-One is off, a
minimal amount of power is still supplied to the device. To completely remove
power, turn the HP All-in-One off, and then unplug the power cord.
4
Attention light: Indicates a problem occurred. See the display for more
information.
5
Back button: Returns to previous screen.
6
Setup: Accesses the menu system for reports and maintenance.
7
Preview: Displays a preview of a scan, copy, or photo job.
8
Photo Fix: Adjusts a photo for viewing or printing. Features include color effects,
photo brightness, frames, and red-eye removal. Press this button to switch this
feature on and off. Photo Fix is on by default.
9
Photosmart Express: Launches the Photosmart Express menu for printing,
editing, and sharing photos.
10
Scan Menu: Opens the Scan Menu.
11
Copy Menu: Selects copy options, such as number of copies, paper size, and
paper type.
12
Start Copy Black: Starts a black-and-white copy.
13
Start Copy Color: Starts a color copy.
14
Start Scan: Starts a scan job and sends it to the destination you selected using
the Scan Menu button.
15
Print Photos: Prints all selected images in color.
16
Reprints: Scans the original on the glass and launches the Photosmart Express
menu.
17
Cancel: Stops the current operation, exits a menu, or exits settings.
18
Help: Opens the Help menu on the display.
19
Rotate: Rotates the currently displayed photo on the display 90 degrees.
Subsequent presses continue to rotate the photo 90 degrees.
20
Zoom Out: Zooms out to show more of a photo on the display.
21
Zoom In: Zooms in to enlarge the image on the display. You can also use this
button to adjust the crop box when printing.
22
OK: Selects a menu, setting, or value displayed on the display.
Basics Guide
HP All-in-One overview
Label
5
HP All-in-One overview
Chapter 1
Use the HP Photosmart software
You can use the HP Photosmart software to access many features not available from
the control panel. The HP Photosmart software provides a fast and easy way to make
prints of your photos or to purchase prints online. It also provides access to other
basic HP Photosmart software features, such as saving, viewing, and sharing your
photos.
For more information on using the HP Photosmart software, see the HP Photosmart
Software Help.
Find more information
A variety of resources, both printed and onscreen, provide information about setting
up and using the HP All-in-One.
●
●
●
●
●
Setup Guide
The Setup Guide provides instructions for setting up your HP All-in-One and
installing software. Make sure you follow the steps in the Setup Guide in order.
If you have problems during setup, see Troubleshooting in the last section of the
Setup Guide, or see Troubleshooting and support on page 17 in this guide.
HP Photosmart Software Tour (Windows)
The HP Photosmart Software Tour is a fun, interactive way to get a brief overview
of the software included with your HP All-in-One. You'll learn how the software
you installed with your HP All-in-One can help you edit, organize, and print your
photos.
Onscreen Help
The onscreen Help provides detailed instructions on features of your HP All-inOne that are not described in this User Guide, including features that are only
available using the software you installed with your HP All-in-One.
For more information, see Access the onscreen Help on page 6.
Readme
The Readme file contains the most recent information which might be not be
found in other publications. Install the software to access the Readme file.
www.hp.com/support
If you have Internet access, you can get help and support from the HP website.
This website offers technical support, drivers, supplies, and ordering information.
Access the onscreen Help
This guide describes a sampling of the features available, so you can get started
using the HP All-in-One. Explore the onscreen Help that came with your device for
information on all the features that the HP All-in-One supports.
To access the HP Photosmart Software Help on a Windows computer
1. In the HP Solution Center, click the tab for the HP All-in-One.
2. In the Device Support area, click Onscreen Guide or Troubleshooting.
– If you click Onscreen Guide, a pop-up menu appears. You can choose to
open the welcome page for the entire Help system or to go specifically to the
Help for the HP All-in-One.
– If you click Troubleshooting, the Troubleshooting and support page
opens.
6
HP Photosmart C4100 All-in-One series
HP All-in-One overview
To access the HP Photosmart Mac Help
➔ On the Help menu in the HP Photosmart Studio, choose HP Photosmart Mac
Help.
The HP Photosmart Mac Help appears.
Load originals and load paper
You can copy or scan up to letter- or A4-size originals by loading them on the glass.
To load an original on the glass
1. Lift the lid on the HP All-in-One.
2. Load your original print side down in the right front corner of the glass.
Tip For more help on loading an original, refer to the engraved guides
along the edge of the glass.
3.
Close the lid.
To load full-size paper
1. Slide the paper-width guide to its outermost position.
Basics Guide
7
Chapter 1
HP All-in-One overview
Note If you are using letter or A4 paper or smaller, make sure the tray
extender is open all the way.
2.
3.
Tap a stack of paper on a flat surface to align the edges, and then check the
paper for the following:
– Make sure it is free of rips, dust, wrinkles, and curled or bent edges.
– Make sure all the paper in the stack is the same size and type.
Insert the stack of paper into the input tray with the short edge forward and the
print side down. Slide the stack of paper forward until it stops.
Caution Make sure that the HP All-in-One is idle and silent when you
load paper into the input tray. If the HP All-in-One is servicing the print
cartridges or otherwise engaged in a task, the paper stop inside the
device might not be in place. You could push the paper too far forward,
causing the HP All-in-One to eject blank pages.
Tip If you are using letterhead, insert the top of the page first with the
print side down.
4.
Slide the paper-width guide inward until it stops at the edge of the paper.
Do not overload the input tray; make sure the stack of paper fits within the input
tray and is no higher than the top of the paper-width guide.
Note When you use legal-size paper, leave the tray extender closed.
To load 10 x 15 cm ( 4 x 6 inch) photo paper using the photo paper cassette
1. Remove all paper from the input tray.
2. Pop out the photo paper cassette using the grooves.
8
HP Photosmart C4100 All-in-One series
Pull the photo paper cassette towards you.
4.
Load up to 20 sheets of paper print side down in the photo paper cassette.
5.
Adjust the paper-length and paper-width guides to fit the loaded paper.
6.
Line up the photo paper cassette with the right side of the input tray, and then
slide it into the printer until it stops.
7.
8.
Pull the tray extender out to hold your printed photos.
When you finish printing, remove the photo paper cassette and store it in the
cassette storage area on the left side of the HP All-in-One.
HP All-in-One overview
3.
Tip You can store your photo paper in the stowed photo paper cassette
when not printing. This protects the photo paper from rips, wrinkles, and
curled or bent edges.
Basics Guide
9
HP All-in-One overview
Chapter 1
Avoid paper jams
To help avoid paper jams, follow these guidelines.
●
●
●
●
●
●
●
Remove printed papers from the output tray frequently.
Prevent curled or wrinkled paper by storing all unused paper flat in a resealable
bag.
Ensure that paper loaded in the input tray lays flat and the edges are not bent or
torn.
Do not combine different paper types and paper sizes in the input tray; the entire
stack of paper in the input tray must be the same size and type.
Adjust the paper-width guide in the input tray to fit snugly against all paper. Make
sure the paper-width guide does not bend the paper in the input tray.
Do not force paper too far forward in the input tray.
Use paper types that are recommended for the HP All-in-One.
Make a copy
You can make quality copies from the control panel.
To make a copy from the control panel
1. Make sure you have paper loaded in the input tray.
2. Load your original print side down in the right front corner of the glass.
3. Press Start Copy Black or Start Copy Color to begin copying.
Scan an image
You can start a scan from your computer or from the HP All-in-One. This section
explains how to scan from the control panel of the HP All-in-One only.
To use the scan features, the HP All-in-One and computer must be connected and
turned on. The HP Photosmart Software (Windows) or HP Photosmart Mac Software
(Mac) must also be installed and running on your computer prior to scanning.
●
On a Windows computer, look for the HP Digital Imaging Monitor icon in the
Windows system tray (at the lower right side of the screen, near the time) to verify
the software is running.
Note Closing the HP Digital Imaging Monitor icon in the Windows
system tray can cause the HP All-in-One to lose some of its scan
functionality. If this happens, you can restore full functionality by restarting
your computer or by starting the HP Photosmart Software.
●
On a Mac, the software is always running.
Tip You can use the HP Photosmart Software (Windows) or HP Photosmart
Mac Software (Mac) to scan images, including panorama images. Using this
software, you can also edit, print, and even share your scanned images. For
more information, see the onscreen Help that came with the HP All-in-One.
To scan to a computer
1. Load your original print side down in the right front corner of the glass.
2. Press Start Scan.
10
HP Photosmart C4100 All-in-One series
4.
Press OK to select the default application to receive the scan, or press
to
select a different application, and then press OK.
A preview image of the scan appears on your computer, where you can edit it.
Make any edits to the preview image, and then click Accept when you are
finished.
HP All-in-One overview
3.
Print 10 x 15 cm (4 x 6 inch) photos
You can select specific photos on your memory card to print as 10 x 15 cm (4 x 6
inch) photos.
To print one or more 10 x 15 cm (4 x 6 inch) photos
1. Insert your memory card into the appropriate slot on the HP All-in-One.
The HP All-in-One supports the memory cards described below. Each type of
memory card can only be inserted in the appropriate slot for that card.
–
–
2.
3.
4.
5.
6.
7.
Basics Guide
Top slot: xD-Picture Card
Second slot from top: Memory Stick, Magic Gate Memory Stick, Memory
Stick Duo (with user-supplied adapter), Memory Stick Pro
– Third slot from top: CompactFlash (I, II)
– Bottom slot: Secure Digital, MultiMediaCard (MMC), Secure MultiMedia Card
Press OK to select Print.
When you press OK, the most recent photo on your memory card appears on the
display.
Press or to scroll through the photos on your memory card.
When the photo you want to print appears, press OK.
Press OK to select 4 x 6.
Press or to highlight a paper size, and then press OK.
The following options are available:
– Print one 10 x 15 cm (4 x 6 inch) borderless photo on each sheet of 10 x 15
cm (4 x 6 inch) photo paper
– Print up to three 10 x 15 cm (4 x 6 inch) photos with borders on a full-size
sheet of paper
When you press OK, the selected photo reappears.
(Optional) Change print settings or select additional photos to print. For
information on these options, see the onscreen Help that came with your HP Allin-One.
11
Chapter 1
When you are done changing print settings and selecting photos, press OK to
display the selection menu.
9. Press
to highlight Done Selecting, and then press OK.
The Print Summary screen appears.
10. Press
or
to highlight one of the following options, and then press OK.
HP All-in-One overview
8.
Print Options
Enables you to manually specify the type of paper on which
you are printing and whether you want to print a date and
time stamp on your photo.
By default, the Paper Type is set to Automatic and the Date
Stamp setting is set to Off. If you want, you can change the
defaults of these settings with the Set New Defaults option.
Print Preview
Displays a preview of what your printed page will look like.
This enables you to verify your settings before printing and
wasting paper and ink on potential mistakes.
Print Now
Prints your photos with the size and layout you selected.
Print from a software application
Most print settings are automatically handled by the software application. You need to
change the settings manually only when you change print quality, print on specific
types of paper or transparency film, or use special features.
To print from a software application (Windows)
1. Make sure you have paper loaded in the input tray.
2. On the File menu in your software application, click Print.
3. Make sure the HP All-in-One is the selected printer.
4. If you need to change settings, click the button that opens the Properties dialog
box.
Depending on your software application, this button might be called Properties,
Options, Printer Setup, Printer, or Preferences.
5. Select the appropriate options for your print job by using the features available on
the various tabs.
6. Click OK to close the Properties dialog box.
7. Click Print or OK to begin printing.
To print from a software application (Mac)
1. Make sure you have paper loaded in the input tray.
2. From the File menu in your software application, choose Page Setup.
3. Make sure the HP All-in-One is the selected printer.
4. Specify the page attributes:
– Choose the paper size.
– Select the orientation.
– Enter the scaling percentage.
5. Click OK.
6. From the File menu in your software application, choose Print.
The Print dialog box appears, and the Copies & Pages panel opens.
12
HP Photosmart C4100 All-in-One series
8.
Change the print settings for each option in the pop-up menu, as appropriate for
your project.
Click Print to begin printing.
HP All-in-One overview
7.
Replace the print cartridges
Follow these instructions when the ink level is low.
Note 1 When the ink level for the print cartridge is low, a message appears
on the display. You can also check the ink levels by using the HP Photosmart
Mac Software on your computer.
Note 2 When the ink level for the print cartridge is low, a message appears
on the display. You can also check the ink levels by using the Printer Toolbox
available through the HP Photosmart Software on your computer or through
the Print Properties dialog box on your computer.
When you receive a low-ink warning message on the display, make sure you have a
replacement print cartridge available. You should also replace the print cartridges
when you see faded text or if you experience print quality issues related to the print
cartridges.
To order print cartridges for the HP All-in-One, go to www.hp.com/learn/suresupply. If
prompted, choose your country/region, follow the prompts to select your product, and
then click one of the shopping links on the page.
Tip You can also use these instructions to replace the black print cartridge
with a photo print cartridge for printing high-quality color photos.
To replace the print cartridges
1. Make sure the HP All-in-One is on.
Caution If the HP All-in-One is off when you open the print cartridge door
to access the print cartridges, the HP All-in-One will not release the
cartridges for changing. You might damage the HP All-in-One if the print
cartridges are not docked safely when you try to remove them.
2.
3.
Basics Guide
Open the print cartridge door.
The print carriage moves to the far right side of the HP All-in-One.
1
Print cartridge door
2
Print carriage
Wait until the print carriage is idle and silent, and then lightly press down on a
print cartridge to release it.
If you are replacing the tri-color print cartridge, remove the print cartridge from the
slot on the left.
13
Chapter 1
HP All-in-One overview
If you are replacing the black or photo print cartridge, remove the print cartridge
from the slot on the right.
4.
5.
6.
1
Print cartridge slot for the tri-color print cartridge
2
Print cartridge slot for the black and photo print cartridges
Pull the print cartridge toward you out of its slot.
If you are removing the black print cartridge in order to install the photo print
cartridge, store the black print cartridge in the print cartridge protector or an
airtight plastic container.
If you are removing the print cartridge because it is low or out of ink, recycle the
print cartridge. The HP Inkjet Supplies Recycling Program is available in many
countries/regions, and lets you recycle used print cartridges free of charge. For
more information, go to the following website:
www.hp.com/hpinfo/globalcitizenship/environment/recycle/inkjet.html
Remove the new print cartridge from its packaging and, being careful to touch
only the black plastic, gently remove the plastic tape by using the pink pull tab.
1
Copper-colored contacts
2
Plastic tape with pink pull tab (must be removed before installing)
3
Ink nozzles under tape
Caution Do not touch the copper-colored contacts or ink nozzles.
Touching these parts can result in clogs, ink failure, and bad electrical
connections.
14
HP Photosmart C4100 All-in-One series
Slide the new print cartridge forward into the empty slot. Then gently push on the
upper part of the print cartridge forward until it clicks into the socket.
If you are installing the tri-color print cartridge, slide it into the left slot.
If you are installing a black or photo print cartridge, slide it into the right slot.
8.
Close the print cartridge door.
Clean the HP All-in-One
To ensure that your copies and scans remain clear, you might need to clean the glass
and lid backing. You might also want to dust the exterior of the HP All-in-One.
●
●
Clean the glass
Clean the lid backing
Clean the glass
Glass that is dirty from fingerprints, smudges, hair, and dust on the main glass surface
slows down performance and affects the accuracy of some features.
To clean the glass
1. Turn off the HP All-in-One, unplug the power cord, and raise the lid.
2. Clean the glass with a soft cloth or sponge slightly moistened with a nonabrasive
glass cleaner.
Basics Guide
15
HP All-in-One overview
7.
HP All-in-One overview
Chapter 1
Caution Do not use abrasives, acetone, benzene, or carbon
tetrachloride on the glass, since they can damage it. Do not place or spray
liquid directly on the glass. The liquid might seep under the glass and
damage the device.
3.
4.
Dry the glass with a dry, soft, lint-free cloth to prevent spotting.
Plug in the power cord, and then turn on the HP All-in-One.
Clean the lid backing
Minor debris can accumulate on the white document backing located underneath the
lid of the HP All-in-One.
To clean the lid backing
1. Turn off the HP All-in-One, unplug the power cord, and raise the lid.
2. Clean the white document backing with a soft cloth or sponge slightly moistened
with a mild soap and warm water.
Wash the backing gently to loosen debris. Do not scrub the backing.
3. Dry the backing with a dry, soft, lint-free cloth.
Caution Do not use paper-based wipes, as these might scratch the
backing.
4.
If further cleaning is needed, repeat the previous steps using isopropyl (rubbing)
alcohol, and wipe the backing thoroughly with a damp cloth to remove any
residual alcohol.
Caution Be careful not to spill alcohol on the glass or exterior of the
HP All-in-One, as this might damage the device.
5.
16
Plug in the power cord, and then turn on the HP All-in-One.
HP Photosmart C4100 All-in-One series
2
Troubleshooting and support
This chapter contains troubleshooting information for the HP All-in-One. Specific information is
provided for installation and configuration issues, and some operational topics. For more
troubleshooting information, see the onscreen Help that came with your software.
Many issues are caused when the HP All-in-One is connected to the computer using a USB
cable before the HP All-in-One software is installed on the computer. If you connected the HP Allin-One to your computer before the software installation screen prompts you to do so, you must
follow these steps:
Troubleshooting common setup issues
Disconnect the USB cable from the computer.
Uninstall the software (if you have already installed it).
Restart your computer.
Turn off the HP All-in-One, wait one minute, then restart it.
Reinstall the HP All-in-One software.
Caution Do not connect the USB cable to the computer until prompted by the software
installation screen.
For support contact information, see the inside back cover of this guide.
Uninstall and reinstall the software
If your installation is incomplete, or if you connected the USB cable to the computer before
prompted by the software installation screen, you might need to uninstall and then reinstall the
software. Do not simply delete the HP All-in-One application files from your computer. Make sure
to remove them properly using the uninstall utility provided when you installed the software that
came with the HP All-in-One.
To uninstall from a Windows computer and then reinstall
1.
2.
3.
4.
5.
On the Windows taskbar, click Start, Settings, Control Panel.
Double-click Add/Remove Programs.
Select the HP All-in-One, and then click Change/Remove.
Follow the onscreen instructions.
Disconnect the HP All-in-One from your computer.
Restart your computer.
Note It is important that you disconnect the HP All-in-One before restarting your
computer. Do not connect the HP All-in-One to your computer until after you have
reinstalled the software.
6.
7.
Insert the HP All-in-One CD-ROM into your computer’s CD-ROM drive and then start the
Setup program.
Follow the onscreen instructions and the instructions provided in the Setup Guide that came
with the HP All-in-One.
When the software installation is complete, the HP Digital Imaging Monitor icon appears in the
Windows system tray.
To verify that the software is properly installed, double-click the HP Solution Center icon on the
desktop. If the HP Solution Center shows the essential icons (Scan Picture and Scan
Document), the software has been properly installed.
Basics Guide
17
Troubleshooting and support
1.
2.
3.
4.
5.
Chapter 2
To uninstall from a Mac and then reinstall
1.
2.
3.
4.
5.
6.
7.
Disconnect the HP All-in-One from your Mac.
Open the Applications:Hewlett-Packard folder.
Double-click HP Uninstaller.
Follow the onscreen instructions.
After the software is uninstalled, restart your computer.
To reinstall the software, insert the HP All-in-One CD-ROM into your computer’s CD-ROM
drive.
On the desktop, open the CD-ROM and then double-click HP All-in-One Installer.
Follow the onscreen instructions and the instructions provided in the Setup Guide that came
with the HP All-in-One.
Hardware setup troubleshooting
Troubleshooting and support
Use this section to solve any problems you might encounter while setting up the HP All-in-One
hardware.
I connected the USB cable, but I am having problems using the HP All-in-One with my
computer
Cause The USB cable was connected before the software was installed. Connecting the
USB cable before prompted can cause errors.
Solution You must first install the software that came with the HP All-in-One before
connecting the USB cable. During installation, do not plug in the USB cable until prompted
by the onscreen instructions.
Once you have installed the software, connecting your computer to the HP All-in-One with a
USB cable is straightforward. Simply plug one end of the USB cable into the back of your
computer and the other into the back of the HP All-in-One. You can connect to any USB
port on the back of your computer.
For more information on installing the software and connecting the USB cable, see the
Setup Guide that came with the HP All-in-One.
The HP All-in-One will not turn on
Cause The HP All-in-One is not properly connected to a power supply.
18
HP Photosmart C4100 All-in-One series
Solution
●
●
●
1
Power connection
2
Power cord and adaptor
3
Grounded power outlet
If you are using a power strip, make sure the power strip is on. Or, try plugging the
HP All-in-One directly into a grounded power outlet.
Test the power outlet to make sure it is working. Plug in an appliance that you know
works, and see if the appliance has power. If not, then there might be a problem with
the power outlet.
If you plugged the HP All-in-One into a switched outlet, make sure the switch is on. If it
is switched to on but still does not work, then there might be a problem with the power
outlet.
Cause You pressed the On button too quickly.
Solution The HP All-in-One might not respond if you press the On button too quickly.
Press the On button once. It might take a few minutes for the HP All-in-One to turn on. If
you press the On button again during this time, you might turn the device off.
Warning If the HP All-in-One still does not turn on, it might have a mechanical
failure. Unplug the HP All-in-One from the power outlet and contact HP. Go to:
www.hp.com/support
If prompted, choose your country/region, and then click Contact HP for information
on calling for technical support.
The HP All-in-One does not print
Solution If the HP All-in-One and computer are USB-connected and are not
communicating with each other, try the following:
●
●
●
●
Basics Guide
Look at the display on the HP All-in-One. If the display is blank and the On button is
not lit, the HP All-in-One is turned off. Make sure the power cord is firmly connected to
the HP All-in-One and plugged into a power outlet. Press the On button to turn on the
HP All-in-One.
Make sure the print cartridges are installed.
Make sure you have paper loaded in the input tray.
Check that the HP All-in-One does not have a paper jam.
19
Troubleshooting and support
●
Make sure the power cord is firmly connected to both the HP All-in-One and the power
adaptor. Plug the power cord into a grounded power outlet, surge protector, or power
strip.
Chapter 2
●
●
●
Troubleshooting and support
●
●
●
●
●
●
●
Check that the print carriage is not jammed.
Open the print cartridge door to access the print carriage area. Remove any objects
that are blocking the print carriage, including any packing materials and the orange
shipping lock. Turn the HP All-in-One off and then turn it on again.
Check that the HP All-in-One print queue is not paused (Windows) or stopped (Mac). If
it is, choose the appropriate setting to resume printing. For more information about
accessing the print queue, see the documentation that came with the operating system
installed on your computer.
Check the USB cable. If you are using an older cable, it might not be working properly.
Try connecting it to another product to see if the USB cable works. If you experience
problems, the USB cable might need to be replaced. Also verify that the cable does
not exceed 3 meters (9.8 feet) in length.
Make sure your computer is USB ready. Some operating systems, such as Windows
95 and Windows NT, do not support USB connections. Check the documentation that
came with your operating system for more information.
Check the connection from the HP All-in-One to your computer. Verify that the USB
cable is securely plugged into the USB port on the back of the HP All-in-One. Make
sure the other end of the USB cable is plugged into a USB port on your computer.
After the cable is connected properly, turn the HP All-in-One off and then on again.
If you are connecting the HP All-in-One through a USB hub, make sure the hub is
turned on. If the hub is on, try connecting directly to your computer.
Check other printers or scanners. You might need to disconnect older products from
your computer.
Try connecting the USB cable to another USB port on your computer. After you check
the connections, try restarting your computer. Turn the HP All-in-One off and then on
again.
After you check the connections, try restarting your computer. Turn the HP All-in-One
off and then on again.
If necessary, remove and then install the software you installed with the HP All-in-One
again. For more information, see Uninstall and reinstall the software on page 17.
For more information on setting up the HP All-in-One and connecting it to your computer,
see the Setup Guide that came with the HP All-in-One.
Clear paper jams
If the HP All-in-One has a paper jam, first check the rear door.
If the jammed paper is not in the rear rollers, check the front door.
20
HP Photosmart C4100 All-in-One series
To clear a paper jam from the rear door
1.
Press in the tab on the left side of the rear door to release the door. Remove the door by
pulling it away from the HP All-in-One.
Caution Trying to clear a paper jam from the front of the HP All-in-One can
damage the print mechanism. Always access and clear paper jams through the rear
door.
Troubleshooting and support
2.
Gently pull the paper out of the rollers.
Caution If the paper tears when you are removing it from the rollers, check the
rollers and wheels for torn pieces of paper that might be remaining inside the
device. If you do not remove all the pieces of paper from the HP All-in-One, more
paper jams are likely to occur.
3.
4.
Replace the rear door. Gently push the door forward until it snaps into place.
Press OK to continue the current job.
To clear a paper jam from the front door
1.
If necessary, pull the input tray down to open it. Then, lower the print cartridge door.
2.
Gently pull the paper out of the rollers.
Caution If the paper tears when you are removing it from the rollers, check the
rollers and wheels for torn pieces of paper that might be remaining inside the
device. If you do not remove all the pieces of paper from the HP All-in-One, more
paper jams are likely to occur.
3.
Close the print cartridge door.
4.
Press Start Copy Black to continue the current job.
Basics Guide
21
Chapter 2
Print cartridge troubleshooting
If you are experiencing problems with printing, you might have a problem with one of the print
cartridges.
To troubleshoot print cartridges
1.
Troubleshooting and support
2.
Remove the black print cartridge from the slot on the right. Do not touch the ink nozzles or
the copper-colored contacts. Check for possible damage to the copper-colored contacts or
ink nozzles.
Make sure the plastic tape has been removed. If it is still covering the ink nozzles, gently
remove the plastic tape by using the pink pull tab.
Reinsert the print cartridge by sliding it forward into the slot. Then push the print cartridge
forward until it clicks into the socket.
3.
4.
5.
6.
7.
Repeat steps 1 and 2 for the tri-color print cartridge on the left side.
If the problem persists, print a self-test report to determine if there is a problem with the print
cartridges.
This report provides useful information about your print cartridges, including status
information.
If the self-test report shows a problem, clean the print cartridges.
If the problem persists, clean the copper-colored contacts of the print cartridges.
If you are still experiencing problems with printing, determine which print cartridge is
experiencing the problem and replace it.
For more information, see the onscreen Help.
Before you call HP customer support
Software programs from other companies might be included with the HP All-in-One. If you
experience problems with any of those programs, you will receive the best technical assistance
by calling the experts at that company.
If you need to contact HP Customer Support, do the following before you call:
1.
Make sure that:
2.
a. The HP All-in-One is plugged in and turned on.
b. The specified print cartridges are installed correctly.
c. The recommended paper is properly loaded in the input tray.
Reset the HP All-in-One:
3.
22
a. Turn off the HP All-in-One by pressing the On button.
b. Unplug the power cord from the back of the HP All-in-One.
c. Plug the power cord back into the HP All-in-One.
d. Turn on the HP All-in-One by pressing the On button.
To find support and warranty information, go to the HP website at www.hp.com/support. If
prompted, choose your country/region, and then click Contact HP for information on calling
for technical support.
HP Photosmart C4100 All-in-One series
4.
Check the HP website for updated information or troubleshooting tips for the HP All-in-One .
If you are still experiencing problems and need to speak with an HP Customer Support
Representative, do the following:
a.
5.
Have the specific name of the HP All-in-One, as it appears on the control panel,
available.
b. Print a self-test report. (See below.)
c. Make a color copy to have available as a sample printout.
d. Be prepared to describe your problem in detail.
e. Have your serial number and service ID ready, found on the self-test report.
Call HP Customer Support. Be near the HP All-in-One when you call.
To print a self-test report
3.
4.
5.
6.
Load letter, A4, or legal unused plain white paper into the input tray.
Press Setup.
The Setup menu appears.
Press the
or the
to highlight Print Report, and press OK.
The Print Report menu appears.
Press OK to print a self-test report, which might indicate the source of the printing problem.
A sample of the ink test area of the report is shown below.
Make sure the lines of color extend across the page.
If the black line is missing, faded, streaked, or shows lines, this might indicate a problem
with the black print cartridge in the right slot.
If any of the remaining three lines are missing, faded, streaked, or show lines, this might
indicate a problem with the tri-color print cartridge in the left slot.
If the color bars do not appear as black, cyan, magenta and yellow, you might need to clean
the print cartridges. If the problem is not resolved by cleaning the print cartridges, you might
need to replace the print cartridges.
Basics Guide
23
Troubleshooting and support
1.
2.
3
Technical information
The technical specifications and international regulatory information for the HP All-in-One are
provided in this section.
System requirements
Software system requirements are located in the Readme file.
Paper specifications
This section contains information about paper tray capacities and paper sizes.
Technical information
Paper tray capacities
Type
Paper weight
Paper tray*
Output tray†
Plain paper
20 to 24 lb. (75 to 90
gsm)
100 (20 lb. paper)
50 (20 lb. paper)
Legal paper
20 to 24 lb. (75 to 90
gsm)
100 (20 lb. paper
50 (20 lb. paper)
Cards
110 lb. index max (200
gsm)
20
10
Envelopes
20 to 24 lb. (75 to 90
gsm)
10
10
Transparency film
N/A
20
15 or fewer
Labels
N/A
20
10
4 x 6 inch (10 x 15 cm)
Photo paper
145 lb.
20
15
8.5 x 11 inch (216 x 279
mm) Photo paper
N/A
20
10
*
†
(236 gsm)
Maximum capacity.
Output tray capacity is affected by the type of paper and the amount of ink you are using.
HP recommends emptying the output tray frequently.
Paper sizes
For a complete list of supported media sizes, see the printer software.
Print specifications
●
●
●
●
●
●
●
24
Up to 1200 x 1200 rendered dpi black when printing from a computer
Up to 4800 x 1200 optimized dpi color when printing from a computer and 1200-input dpi
Print speeds vary according to the complexity of the document
Panorama-size printing
Method: drop-on-demand thermal inkjet
Language: PCL3 GUI
Duty cycle: Up to 3000 printed pages per month
HP Photosmart C4100 All-in-One series
Copy specifications
●
●
●
●
●
Copy resolution up to 4800x1200 optimized dpi output using a scan resolution of
1200x1200ppi
Digital image processing
Up to 50 copies from original (varies by model)
Zoom to 400%, fit to page
Copy speeds vary according to the complexity of the document
Scan specifications
●
●
●
●
●
●
Image editor included
Integrated OCR software automatically converts scanned text to editable text (if installed)
Twain-compliant interface
Resolution: up to 1200 x 2400 dpi optical (varies by model); 19200 dpi enhanced (software)
Color: 48-bit color, 8-bit grayscale (256 levels of gray)
Maximum scan size from glass: 21.6 x 29.7 cm (8.5 x 11.7 inches)
Physical specifications
●
●
●
●
Height: 40.2 cm (15.8 inches)
Width: 46.5 cm (18.3 inches)
Depth: 56.7 cm (22.3 inches)
Weight: 4.5 kg (10 pounds)
Power specifications
●
●
●
Power consumption: 40 watts maximum (average printing)
Input voltage: AC 100 to 240 V ~ 1 A 50–60 Hz, grounded
Output voltage: DC 32 V===940 mA, 16 V===625mA
●
●
●
●
●
●
Recommended operating temperature range: 15º to 32º C (59º to 90º F)
Allowable operating temperature range: 5º to 35º C (41º to 95º F)
Humidity: 15% to 80% RH non-condensing
Non-operating (Storage) temperature range: –20º to 50º C (–4º to 122º F)
In the presence of high electromagnetic fields, it is possible the output from the HP All-inOne may be slightly distorted
HP recommends using a USB cable less than or equal to 3 m (10 feet) in length to minimize
injected noise due to potential high electromagnetic fields
Acoustic information
If you have Internet access, you can get acoustic information from the HP website. Go to:
www.hp.com/support.
Environmental product stewardship program
Hewlett-Packard is committed to providing quality products in a environmentally sound manner.
For information on HP's Environmental product stewardship program, see the onscreen Help.
Regulatory notices
The HP All-in-One meets product requirements from regulatory agencies in your country/region.
For a complete listing of regulatory notices, see the onscreen Help.
Basics Guide
25
Technical information
Environmental specifications
Chapter 3
Regulatory model identification number
Technical information
For regulatory identification purposes, your product is assigned a Regulatory Model Number. The
Regulatory Model Number for your product is SDGOB-0602. This regulatory number should not
be confused with the marketing name (HP Photosmart C4100 All-in-One series, etc.) or product
numbers (Q8100A, etc.).
26
HP Photosmart C4100 All-in-One series
Warranty
HP product
Duration of limited warranty
Software
90 days
Print cartridges
Until the HP ink is depleted or the “end of warranty” date printed
on the cartridge has been reached, whichever occurs first. This
warranty does not cover HP ink products that have been refilled,
remanufactured, refurbished, misused, or tampered with.
Accessories
1 year
Printer peripheral hardware (see the following for details) 1 year
Basics Guide
27
Technical information
A. Extent of limited warranty
1. Hewlett-Packard (HP) warrants to the end-user customer that the HP products specified above will be free from
defects in materials and workmanship for the duration specified above, which duration begins on the date of purchase
by the customer.
2. For software products, HP's limited warranty applies only to a failure to execute programming instructions. HP does
not warrant that the operation of any product will be uninterrupted or error free.
3. HP's limited warranty covers only those defects that arise as a result of normal use of the product, and does not cover
any other problems, including those that arise as a result of:
a. Improper maintenance or modification;
b. Software, media, parts, or supplies not provided or supported by HP;
c. Operation outside the product's specifications;
d. Unauthorized modification or misuse.
4. For HP printer products, the use of a non-HP ink cartridge or a refilled ink cartridge does not affect either the warranty
to the customer or any HP support contract with the customer. However, if printer failure or damage is attributable to
the use of a non-HP or refilled ink cartridge, HP will charge its standard time and materials charges to service the
printer for the particular failure or damage.
5. If HP receives, during the applicable warranty period, notice of a defect in any product which is covered by HP's
warranty, HP shall either repair or replace the product, at HP's option.
6. If HP is unable to repair or replace, as applicable, a defective product which is covered by HP's warranty, HP shall,
within a reasonable time after being notified of the defect, refund the purchase price for the product.
7. HP shall have no obligation to repair, replace, or refund until the customer returns the defective product to HP.
8. Any replacement product may be either new or like-new, provided that it has functionality at least equal to that of the
product being replaced.
9. HP products may contain remanufactured parts, components, or materials equivalent to new in performance.
10. HP's Limited Warranty Statement is valid in any country where the covered HP product is distributed by HP. Contracts
for additional warranty services, such as on-site service, may be available from any authorized HP service facility in
countries where the product is distributed by HP or by an authorized importer.
B. Limitations of warranty
TO THE EXTENT ALLOWED BY LOCAL LAW, NEITHER HP NOR ITS THIRD PARTY SUPPLIERS MAKES ANY
OTHER WARRANTY OR CONDITION OF ANY KIND, WHETHER EXPRESS OR IMPLIED WARRANTIES OR
CONDITIONS OF MERCHANTABILITY, SATISFACTORY QUALITY, AND FITNESS FOR A PARTICULAR
PURPOSE.
C. Limitations of liability
1. To the extent allowed by local law, the remedies provided in this Warranty Statement are the customer's sole and
exclusive remedies.
2. TO THE EXTENT ALLOWED BY LOCAL LAW, EXCEPT FOR THE OBLIGATIONS SPECIFICALLY SET FORTH IN
THIS WARRANTY STATEMENT, IN NO EVENT SHALL HP OR ITS THIRD PARTY SUPPLIERS BE LIABLE FOR
DIRECT, INDIRECT, SPECIAL, INCIDENTAL, OR CONSEQUENTIAL DAMAGES, WHETHER BASED ON
CONTRACT, TORT, OR ANY OTHER LEGAL THEORY AND WHETHER ADVISED OF THE POSSIBILITY OF
SUCH DAMAGES.
D. Local law
1. This Warranty Statement gives the customer specific legal rights. The customer may also have other rights which vary
from state to state in the United States, from province to province in Canada, and from country to country elsewhere
in the world.
2. To the extent that this Warranty Statement is inconsistent with local law, this Warranty Statement shall be deemed
modified to be consistent with such local law. Under such local law, certain disclaimers and limitations of this Warranty
Statement may not apply to the customer. For example, some states in the United States, as well as some
governments outside the United States (including provinces in Canada), may:
a. Preclude the disclaimers and limitations in this Warranty Statement from limiting the statutory rights of a consumer
(e.g., the United Kingdom);
b. Otherwise restrict the ability of a manufacturer to enforce such disclaimers or limitations; or
c. Grant the customer additional warranty rights, specify the duration of implied warranties which the manufacturer
cannot disclaim, or allow limitations on the duration of implied warranties.
3. THE TERMS IN THIS WARRANTY STATEMENT, EXCEPT TO THE EXTENT LAWFULLY PERMITTED, DO NOT
EXCLUDE, RESTRICT, OR MODIFY, AND ARE IN ADDITION TO, THE MANDATORY STATUTORY RIGHTS
APPLICABLE TO THE SALE OF THE HP PRODUCTS TO SUCH CUSTOMERS.
HP Limited Warranty
Dear Customer,
You will find below the name and address of the HP entity responsible for the performance of the HP Limited Warranty in your
country.
You may have additional statutory rights against the seller based on your purchase agreement. Those rights are not
in any way affected by this HP Limited Warranty.
Ireland: Hewlett-Packard Ireland Ltd. 30 Herbert Street IRL-Dublin 2
United Kingdom: Hewlett-Packard Ltd, Cain Road, Bracknell, GB-Berks RG12 1HN
Index
J
jams, paper 10
B
buttons, control panel 4
L
labels
specifications
left arrow 5
legal paper
specifications
letter paper
specifications
lid backing, clean
C
cancel
button 5
clean
glass 15
lid backing 16
color graphics display 4
connection problems
HP All-in-One does not
turn on 18
control panel
buttons 4
features 4
copy
make a copy 10
specifications 25
customer support
contact 22
G
glass
clean
15
H
help
use onscreen Help 6
28
R
regulatory notices
regulatory model
identification number 26
reinstall software 17
replace print cartridges 13
right arrow 5
rotate button 5
24
24
24
16
M
maintenance
clean glass 15
clean lid backing 16
replace print cartridges 13
make a copy 10
memory cards
slots 2
O
OK button 5
on button 5
D
directional pad 5
E
envelopes
specifications 24
environment
Environmental product
stewardship program
environmental
specifications 25
print cartridges
replace 13
troubleshoot 22
proof sheet 5
Hewlett-Packard Company
notices 2
Symbols/Numerics
10 x 15 cm photo paper
specifications 24
25
P
paper
jams 10, 20
paper sizes 24
specifications 24
paper tray capacities 24
phone numbers, customer
support 22
photo paper
specifications 24
Photosmart Express 5
physical specifications 25
power specifications 25
print
from software application
12
specifications 24
S
scan
button 5
documents 10
photos 10
scan specifications 25
scan glass
clean 15
setup
button 5
software application, print
from 12
software installation
reinstall 17
uninstall 17
specifications. See technical
information
start copy black 5
start copy color 5
system requirements 24
T
technical information
copy specifications 25
environmental
specifications 25
paper sizes 24
paper specifications 24
paper tray capacities 24
physical specifications 25
power specifications 25
print specifications 24
scan specifications 25
HP Photosmart C4100 All-in-One series
Index
system requirements 24
weight 25
telephone numbers, customer
support 22
transparencies
specifications 24
troubleshoot
hardware installation 18
jams, paper 10
print cartridges 22
USB cable 18
U
uninstall software 17
USB cable installation 18
Z
zoom
button
5
Basics Guide
29
30
HP Photosmart C4100 All-in-One series
www.hp.com/support
61 56 45 43
Argentina (Buenos Aires)
Argentina
Australia
Australia
(out-of-warranty)
Österreich
17212049
België
Belgique
Brasil (Sao Paulo)
Brasil
Canada (Mississauga
Area)
Canada
Central America &
The Caribbean
Chile
Colombia (Bogota)
Colombia
Costa Rica
Česká republika
Danmark
Ecuador (Andinatel)
Ecuador (Pacifitel)
(02) 6910602
El Salvador
España
France
Deutschland
Guatemala
Magyarország
India
Indonesia
Ireland
1-700-503-048
Italia
Jamaica
54-11-4708-1600
0-800-555-5000
1300 721 147
1902 910 910
Luxembourg
Luxemburg
+ 43 1 86332 1000
0810-0010000
(Inland)
Malaysia
Mexico (Mexico City)
Mexico
22 404747
Nederland
070 300 005
070 300 004
55-11-4004-7751
0-800-709-7751
(905) 206-4663
1-800-474-6836
www.hp.com/support
800-360-999
86-10-68687980
800-810-3888
571-606-9191
01-8000-51-47468368
0-800-011-1046
810 222 222
+ 45 70 202 845
1-999-119
800-711-2884
1-800-225-528
800-711-2884
800-6160
902 010 059
+33 (0) 892 69 60 22
(0,34 € / min)
+49 (0) 180 5652 180
+ 30 210 6073603
801 11 75400
800 9 2654
1-800-711-2884
2802 4098
06 40 200 629
1600 425 7737
+62 (21) 350 3408
1 890 923 902
848 800 871
1-800-711-2884
0570-000511
New Zealand
Nigeria
Norge
Panama
Paraguay
Perú
Philippines
Polska
Portugal
Puerto Rico
República Dominicana
România
Рοссия (Москва)
Рοссия (СанктПетербург)
800 897 1415
Singapore
Slovensko
South Africa
(international)
South Africa (RSA)
Rest of West Africa
Suomi
Sverige
Switzerland
71 89 12 22
Trinidad & Tobago
Türkiye
Україна
600 54 47 47
United Kingdom
United States
Uruguay
Venezuela (Caracas)
Venezuela
Viêt Nam
03-3335-9800
1588-3003
900 40 006
900 40 007
(0,16 € / min)
1800 88 8588
55-5258-9922
01-800-472-68368
0900 2020 165
(0,20 € / min)
0800 441 147
1 3204 999
+46 (0) 77 120 4765
1-800-711-2884
009 800 54 1 0006
0-800-10111
(63) 2 867 3551
1800 1441 0094
0 801 800 235
808 201 492
1-877-232-0589
1-800-711-2884
0801 033 390
095 777 3284
812 332 4240
6 272 5300
0850 111 256
+ 27 11 2589301
086 0001030
+ 351 213 17 63 80
+358 (0) 203 66 767
+46 (0) 77 120 4765
0848 672 672
02-8722-8000
+66 (2) 353 9000
1-800-711-2884
90 212 444 71 71
(044) 230 51 06
+44 (0) 870 010
4320
1-(800)-474-6836
0004-054-177
58-212-278-8666
0-800-474-68368
+84 88234530