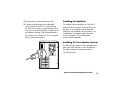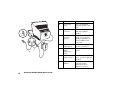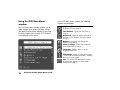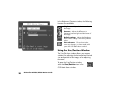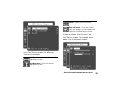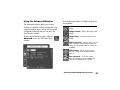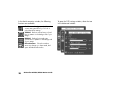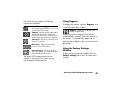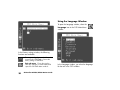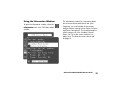
1
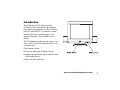
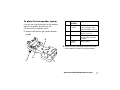
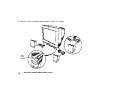
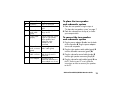
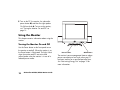
hp pavilion
mx703/m703
monitor guide
The information in this document is subject to change without
notice.
®
Hewlett-Packard Company makes no warranty of any kind with
regard to this material, including, but not limited to, the implied
warranties of merchantability and fitness for a particular purpose.
Hewlett-Packard Company
P.O. Box 4010
Cupertino, CA 95015-4010
USA
© 2003 Hewlett-Packard Company. All rights reserved.
HP shall not be liable for errors contained herein or for incidental
or consequential damages in connection with the furnishing,
performance, or use of this material.
Hewlett-Packard is a registered trademark of Hewlett-Packard
Company in the United States of America and other
countries/regions.
HP assumes no responsibility for the use or reliability of its software
on equipment that is not furnished by HP.
Other brand or product names are trademarks of their respective
holders.
This document contains proprietary information that is protected by
copyright. All rights are reserved. No part of this document may be
photocopied, reproduced, or translated to another language
without the prior written consent of HP.
Contents
Introduction..........................................1
Inventory .............................................2
For Your Safety ................................................. 2
Additional Safety Information ............................. 3
AC Power Safety Warning ................................. 3
Working in Comfort........................................... 3
Installation ...........................................4
Placing the Monitor ........................................... 4
Connecting the Power and Video Cables ............. 4
Installing the Speakers ....................................... 5
Installing the Two-Speaker System ....................... 5
Installing the Two-Speaker and
Subwoofer System........................................... 10
Using the Monitor ...............................12
Turning the Monitor On and Off ....................... 12
Degaussing the Display ................................... 13
Setting the Screen Resolution ............................ 14
Selecting Refresh Rate ..................................... 15
Minimizing Energy Use ................................... 15
Cleaning the Screen........................................ 16
Adjusting the Viewing Angle ............................ 16
Changing Display Settings .................. 17
Using the Front Panel ...................................... 17
Using the OSD Main Menu window.................. 18
Using the Brightness/Contrast Window ............. 19
Using the Size/Position Window ...................... 20
Using the Advanced Window .......................... 23
Choosing the Color Temperature....................... 25
Using Degauss ............................................... 29
Using the Factory Settings Window................... 29
Using the Language Window ........................... 30
Using the Information Window ......................... 31
Technical Information ......................... 32
Pre-Set Video Modes .......................... 33
HP Pavilion MX703/M703 Monitor Guide
iii
Pin Assignments................................. 33
DPMS Power-Management
Features............................................. 34
Regulatory Information ...................... 35
Federal Communications Commission
(FCC) Notice .................................................. 35
Modifications ................................................. 36
Cables........................................................... 36
Declaration of Conformity for Products
Marked with FCC Logo, United States Only ....... 36
Declaration of VCCI Class B Compliance .......... 36
Notice for Korea (Class B) ............................... 36
Canadian Notice............................................ 37
Avis Canadien................................................ 37
European Union Notice ................................... 37
X-Ray Radiation Notice.................................... 37
ENERGY STAR Compliance.............................. 38
Power Cords .................................................. 38
Environmental Information................................ 38
Index................................................. 39
iv
HP Pavilion MX703/M703 Monitor Guide
Introduction
The HP Pavilion mx703 Monitor and the
HP Pavilion m703 Monitor are high-resolution
color monitors designed for use with HP Pavilion
home PCs and other PCs. The monitors include
brackets for the two supplied speakers. The
optional subwoofer is not included with the
monitor.
The CRT (cathode-ray tube) monitor comes in two
styles, mx703 with a flat screen and m703 with
a curved screen.
Other features include:
■
Onscreen adjustment of display settings.
■
Support for high refresh rates to reduce screen
flicker and eyestrain.
■
Built-in tilt and swivel base.
HP Pavilion MX703/M703 Monitor Guide
1
Inventory
Warning: To completely disconnect
Check your monitor box for the following items:
power from the monitor, you must
remove the power cable from the
power socket.
■
Monitor
■
Monitor power cord
■
Two speakers
■
Power adapter for speakers
■
Power adapter power cord (one-piece or
alternate two-piece)
■
Documentation (including this guide)
For Your Safety
For your safety and the protection of your
monitor, follow these procedures:
■
2
Always connect the monitor to a grounded,
three-prong power outlet. Use only the factorysupplied power cord. If the power cord is lost
or damaged, you should purchase a power
cord that is approved for use in your
country/region.
HP Pavilion MX703/M703 Monitor Guide
■
To prevent electrical shock, do not remove
the back cover of the monitor. Only qualified
service personnel should remove the cover.
■
Do not place objects on top of the monitor that
could fall into the vents or block airflow.
■
To avoid the risk of damage to the monitor and
electrical shock to yourself, do not expose the
monitor to rain or moisture.
■
Adjust only those controls with operations
that are covered in this manual. Improperly
adjusting other controls can result in damage
and could require repair by a service
technician.
If any of the following conditions occur, unplug
the monitor and contact a qualified service
technician:
■
The power cord or plug is frayed or damaged.
■
You have spilled liquid into the monitor.
■
The monitor has been exposed to rain or
water.
■
The monitor does not operate correctly when
the operating instructions are followed.
■
The monitor has been dropped or the cabinet
has been damaged.
■
The performance of the monitor changes
abruptly.
Additional Safety Information
This product has been evaluated for connection
to an “IT” power system (an AC distribution
system with no direct connection to earth,
according to IEC 950).
AC Power Safety Warning
Warning: Locate the monitor near an
AC outlet. The AC power cord is your HP
monitor’s main AC disconnecting device
and must be easily accessible at all times.
For your safety, the power cord provided
with your system has a grounded plug.
Always use the power cord with a
properly grounded wall outlet to avoid
the risk of electrical shock.
Working in Comfort
To optimize your comfort and productivity,
it’s important that you set up your work area
correctly and use your HP equipment properly.
With that in mind, we have developed some
setup and use recommendations for you to follow
based on established ergonomic principles.
You can consult the onscreen version of “Working
in Comfort” in the Help and Support Center, or
visit HP’s Working in Comfort Web site at:
http://www.hp.com/ergo
HP Pavilion MX703/M703 Monitor Guide
3
Installation
Follow the instructions in this chapter to install
your monitor.
Warning: The monitor is a heavy object.
Exercise caution, or get help when lifting
it, to prevent back injury.
Note: Before installing the monitor, refer to your PC and
video adapter documentation. You may need to
make changes to accommodate the monitor.
Placing the Monitor
Place the monitor on a flat, sturdy surface.
Choose an area that is free from excessive heat,
moisture, and sunlight. Locate the monitor as far
as possible from sources of electromagnetic
interference, such as transformers, motors,
fluorescent lighting, and other PC monitors.
4
HP Pavilion MX703/M703 Monitor Guide
Connecting the
Power and Video Cables
Before connecting any cables, be sure to read
the safety instructions at the beginning of this
manual. The PC and monitor must be turned off.
To connect the power and video cables:
1 Connect the power cord to the back of the
monitor.
2 Plug the power cord into a power outlet.
Installing the Speakers
3 Connect the blue plug on the video cable
to the video port of your PC. If you have an
HP Pavilion, this port is usually marked in blue.
However, on some HP Pavilions, the port could
be marked in orange. (The illustration below is
for reference only. Check your PC user’s guide
for the video port location.)
The speakers are designed for use with the PC
and mount on the monitor. You may have two
speakers, or two speakers and an optional
subwoofer (not included with the monitor). See
“Installing the Two-Speaker and Subwoofer
System” on page 10 for installing and
connecting the subwoofer.
Installing the Two-Speaker System
The left and right speakers mount to brackets on
each side of the monitor or sit on the desktop.
The right speaker has connectors and the
On/Volume knob.
HP Pavilion MX703/M703 Monitor Guide
5
Item
Right speaker
Purpose
A
On/Volume
knob
Turns on and adjusts
right/left speaker sound
level
B
Headphones
connector
Accepts headphones plug
and mutes right/left
speakers
C
Control cable
connector
(purple)
Accepts subwoofer control
cable, mutes right/left
speakers and subwoofer
when headphones are
connected
D
Speaker audio
cable (green)
Carries audio signal, plugs
into PC or subwoofer
E
Left speaker
audio
(hardwired)
cable
Carries left speaker audio
signal
F
Power adapter
cable connector
Accepts adapter cable,
carries power for right/left
speakers
G
Speaker power
adapter
Provides power to
right/left speakers
(alternate two-piece
adapter not shown)
A
B
C
F
G
E
D
6
HP Pavilion MX703/M703 Monitor Guide
To place the two-speaker system
If you are not using the brackets for the speakers,
position the speakers and continue with
“To connect the two-speaker system.”
1 Locate the left and the right speaker brackets
(see H).
Item
Speaker
bracket
Purpose
H
Circled-R or
circled-L
Identifies bracket for left
side (circled-L) or right
side (circled-R) of monitor
J
Release tab
Releases bracket from
bottom of monitor
K
High ridge
Is flush with outside of
monitor when bracket is
installed
L
Speaker
mount
Holds speaker
H
2 Locate the slots underneath and on both sides
of the monitor. Do not lift or tip the monitor.
K
J
L
HP Pavilion MX703/M703 Monitor Guide
7
3 Note the correct orientation of the brackets shown in the figure.
Slots
under
monitor
8
HP Pavilion MX703/M703 Monitor Guide
4 Insert the bracket into the slots on the monitor
and slide the bracket toward the front of the
monitor.
If you need to remove the bracket, press the
tab J beneath the bracket and slide the
bracket back.
5 Align the bottom of the speaker with the
bracket L, and then slide the speaker onto the
bracket.
To connect the two-speaker
system
1 Plug the power adapter G cable into the back
of the right speaker F. Connect the power
adapter in a wall receptacle.
2 Plug the right speaker audio cable (green) D
into the PC. Refer to your PC user’s guide for
instructions on how to connect your speakers
to the PC.
3 Turn on the PC, the monitor, and then the right
speaker On/Volume knob A. To turn on the
monitor, see “Turning the Monitor On and Off”
on page 12.
HP Pavilion MX703/M703 Monitor Guide
9
Installing the Two-Speaker and Subwoofer System
This configuration uses an optional subwoofer (not provided) and the two speakers included
with the monitor.
O
E
A
B
C
F
M
Q
R
S
D
P
G
10
HP Pavilion MX703/M703 Monitor Guide
N
Item
Subwoofer
Purpose
M
On button
Turns on subwoofer
N
Volume knob
Adjusts subwoofer sound
level
O
Subwoofer
audio cable
(green)
Carries audio signal,
plugs into PC
P
Control cable
(purple)
Carries subwoofer control
signal to right speaker,
mutes speakers and
subwoofer when
headphones are
connected
Q
R
S
Subwoofer
audio connector
(green)
Accepts right speaker
audio cable (green)
Power adapter
cable connector
Accepts adapter cable
and carries power for
subwoofer
Power adapter
Provides power to
subwoofer (alternate twopiece adapter not shown)
To place the two-speaker
and subwoofer system
1 Place the two speakers using the steps in
“To place the two-speaker system” on page 7.
2 Place the subwoofer on the top of, or under
your computer desk.
To connect the two-speaker
and subwoofer system
1 Plug the power adapter S cable into the back
of the subwoofer R. Plug the power adapter
into a wall receptacle.
2 Plug the right speaker audio cable (green) D
into the subwoofer connector (green) Q.
3 Plug the subwoofer control cable (purple) P
into the right speaker connector (purple) C.
4 Plug the subwoofer audio cable (green) R into
the PC. Refer to your PC user’s guide for
instructions on how to connect your speakers
to the PC.
HP Pavilion MX703/M703 Monitor Guide
11
5 Turn on the PC, the monitor, the subwoofer
power button M, and then the right speaker
On/Volume knob A. To turn on the monitor,
see “Turning the Monitor On and Off” on
page 12.
Using the Monitor
This chapter contains information about using the
monitor.
Turning the Monitor On and Off
Use the Power button on the front panel to turn
the monitor on and off. When the monitor is on,
the Power button is illuminated. The light is blue
when the monitor and PC are active and
yellow/amber when the monitor is in one of its
reduced power modes.
12
HP Pavilion MX703/M703 Monitor Guide
Power button
OSD buttons
The monitor’s power-management features reduce
power consumption to low levels when your PC
has been inactive for a specified period of time.
See “Minimizing Energy Use” on page 15 for
more information.
Because of the monitor’s power-management
features, you don’t normally need to turn off the
monitor when it’s not in use. When turned off, the
monitor uses the same amount of power that it
uses in Sleep mode (less than 4 watts).
If your PC doesn’t support DPMS powermanagement, you can reduce power
consumption by turning off the monitor when it
won’t be used for an extended period. You can
turn the monitor off even if you leave the PC
running.
Warning: To completely disconnect
power from the monitor, you must
remove the power cord from the
AC power outlet or surge protector.
Degaussing the Display
Degaussing removes magnetism that causes
unwanted color variations. Degauss the display
any time you notice unusual color variations.
Note: Do not degauss more frequently than once every
30 minutes, or the degauss will be incomplete. It is
not necessary to degauss unless you have moved
the monitor.
There are two degaussing methods. Each time
you turn on the monitor, it is automatically
degaussed. You can also use the Degauss option
in the On Screen Display (OSD) Main Menu
window to degauss the display.
See “Using the OSD Main Menu window” on
page 18 for instructions.
HP Pavilion MX703/M703 Monitor Guide
13
Setting the Screen Resolution
To set the screen resolution
The screen resolution determines the amount
of information shown in the display. Screen
resolution refers to the number of dots, or pixels,
used to make up an image. A low screen
resolution means that the display uses a relatively
small number of relatively large dots. A higher
resolution means that more dots of a smaller
size make up the image. With higher screen
resolutions, icons, windows, and text are smaller
on the screen, but more information can be
displayed.
1 Right-click an empty part of the desktop.
The monitor supports many common screen
resolutions. The suggested resolution is
1024 x 768 (dots x lines) at a refresh rate
of 85 Hz.
Use the Display Properties in the Windows
Control Panel to set the screen resolution. To
select the screen refresh rate, see “To select the
screen refresh rate” on page 15.
14
HP Pavilion MX703/M703 Monitor Guide
2 Click Properties. The Display Properties
window opens.
3 Click the Settings tab.
4 Adjust the screen resolution.
5 Click Apply.
6 Click OK.
Selecting Refresh Rate
To select the screen refresh rate
To minimize eyestrain and maximize the
performance of your monitor, use the highest
possible image refresh rate or vertical frequency
for which you don’t perceive flicker (generally
at or above 75 Hz for most users). The image
refresh rate is the number of times per second
that the image is refreshed. The “Pre-Set Video
Modes” table shows the image refresh rates
supported by the monitors at different screen
resolutions. The suggested refresh rate is 85 Hz
with a resolution of 1024 x 768 (dots x lines).
1 Right-click an empty part of the desktop.
Use the Display Properties in the Windows
Control Panel to select the refresh rate. To set the
screen resolution, see “To set the screen
resolution” on page 14.
2 Click Properties. The Display Properties
window opens.
3 Click the Settings tab.
4 Click the Advanced button.
5 Click the Monitor tab.
6 Under Monitor settings, click the drop-down
arrow and select a refresh rate from the
available values.
7 Click Apply.
8 Click OK.
Minimizing Energy Use
HP Pavilion PCs support VESA Display
Power Management Signaling (DPMS). Powermanagement features reduce the monitor’s
power consumption after a period of keyboard
inactivity.
HP Pavilion MX703/M703 Monitor Guide
15
The monitor supports three different power-saving
modes — Standby, Suspend, and Sleep. See
“DPMS Power-Management Features” on
page 34 for a description of the characteristics
of each mode.
When the monitor is in one of its power-saving
modes, the screen is blanked out and the front
panel power indicator is yellow/amber. Consult
your PC user’s guide for information about setting
the power-saving modes.
Cleaning the Screen
To clean the screen:
1 Turn off and unplug the monitor.
2 Spray a soft cotton cloth with regular
household glass cleaner, and then gently wipe
the screen.
Warning: Don’t use cleaning solutions
containing fluoride, acids, or alkalis.
Never use hard or abrasive cleaning
products to clean the screen.
3 Dry the screen with a soft cotton cloth.
4 Plug in the monitor and turn it on.
Adjusting the Viewing Angle
The monitor’s pedestal mounting enables you to
adjust the viewing angle. You can tilt and swivel
the monitor to find the most comfortable viewing
position.
16
HP Pavilion MX703/M703 Monitor Guide
Changing Display Settings
menu
Use the On Screen Display (OSD) features of the
monitor to change settings. The buttons on the
front panel control onscreen icons and windows.
menu
select
Using the Front Panel
Use the four buttons on the front of the monitor to
control OSD functions:
select
Menu button opens the OSD Main Menu
window or closes the OSD window.
Minus button decreases a setting if an
adjustment window is open. In a window,
the button moves the pointer downward
through the icon menu. With no menu
window open, Minus opens the Brightness
adjustment.
Plus button increases a setting if an
adjustment window is open. In a window,
the button moves the pointer upward
through the icon menu. With no menu
window open, Plus opens the Contrast
adjustment.
Select button in the OSD Main Menu
window opens the adjustment bar for the
selected icon, or opens the corresponding
window.
HP Pavilion MX703/M703 Monitor Guide
17
Using the OSD Main Menu
window
The OSD Main Menu window enables you to
make changes to a variety of display settings.
You open the Main Menu window by pressing
the Menu button when no other OSD windows
are displayed on the screen.
In the OSD Main Menu window, the following
functions are available:
Brightness/Contrast Opens the
Brightness/Contrast window.
Size/Position Opens the Size/Position
window.
Advanced Opens the Advanced window
for setting Color, Rotation, and other image
settings.
Degauss Degausses the display and
restores image quality.
Factory settings Opens the window for
selecting the factory settings.
Language Opens a menu to set the
language of the OSD.
Information Opens a screen showing the
current mode and other information, including
the monitor serial number.
Exit Closes the OSD Main Menu window
and saves any changes you have made
(except User Color).
18
HP Pavilion MX703/M703 Monitor Guide
Some settings use an adjustment bar. You
lengthen or shorten the adjustment bar with the
Plus (+) or Minus (–) button. A number next to the
bar shows the percentage of the current setting
relative to its maximum value.
82
4 To close the OSD Main Menu window,
select the Exit icon, or press the Menu
button.
Note: Only a highlighted icon and the Exit icon display a
descriptive text.
To use the OSD Main Menu window:
Using the Brightness/Contrast
Window
1 Press the Menu button on the front of the
monitor to open the OSD Main Menu window.
The Brightness/Contrast window allows you to
adjust the brightness and contrast of an image.
2 Press the Plus (+) or Minus (–) button to move
among the icons in the window.
To open the Brightness/Contrast window,
select the Brightness/Contrast icon in
the OSD Main Menu window.
3 When the icon for the function you want is
highlighted, press the Select button.
■
If you select the Degauss or Exit option,
the option takes effect immediately.
■
If you select any other option, the window
for the option appears.
HP Pavilion MX703/M703 Monitor Guide
19
In the Brightness/Contrast window, the following
functions are available:
Brightness Adjusts the luminance level in
the image.
Contrast Adjusts the difference in
luminance between light and dark areas of
the image.
Default settings Adjusts the Brightness
and Contrast settings to the factory default
values.
Exit sub-menu Closes the window,
saves any changes you have made, and
opens the OSD Main Menu window.
Using the Size/Position Window
The Size/Position window allows you to open
windows for adjusting the horizontal and vertical
size and position of an image, or for adjusting
the zoom.
To open the Size/Position window,
select the Size/Position icon in the
OSD Main Menu window.
20
HP Pavilion MX703/M703 Monitor Guide
Zoom Opens the Zoom window.
Exit sub-menu Closes the window,
saves any changes you have made, and
opens the OSD Main Menu window.
To open a window, select the icon in the
Size/Position window. The example shown
below is the V Adjustment window.
In the Size/Position window, the following
functions are available:
H Adjustment Opens the Horizontal
Adjustment window.
V Adjustment Opens the Vertical
Adjustment window.
HP Pavilion MX703/M703 Monitor Guide
21
In the H Adjustment window, the following
functions are available:
In the V Adjustment window, the following
functions are available:
H Size Adjusts the horizontal size of the
image.
V Size Adjusts the vertical size of the
image.
H Position Adjusts the horizontal
position of the image.
V Position Adjusts the vertical position
of the image.
Default settings Adjusts the H Size
and H Position settings to the factory
default values.
Default settings Adjusts the V Size
and V Position settings to the factory
default values.
Exit sub-menu Closes the window,
saves any changes you have made, and
opens the Size/Position window.
Exit sub-menu Closes the window,
saves any changes you have made, and
opens the Size/Position window.
In the Zoom window, the following functions are
available:
Zoom Adjusts the zoom of the image.
Exit sub-menu Closes the window,
saves any changes you have made, and
opens the Size/Position window.
22
HP Pavilion MX703/M703 Monitor Guide
Using the Advanced Window
The Advanced window allows you to select
windows to correct the shape and position of an
image beyond the basic vertical and horizontal
sizing and positioning that you can do in the
Size/Position window.
To open the Advanced window, select the
Advanced icon in the OSD Main Menu
window.
In the Advanced window, the following functions
are available:
Color Adjusts the color temperature of the
image.
Image rotation Adjusts the angle of the
image.
Image shape Adjusts the shape of the
image.
Moiré correction Reduces wavy colored
lines or patterns in the background of your
image. Horizontal and vertical controls are
available.
OSD settings Adjusts the position of
the OSD on the screen and the maximum
timeout.
Exit sub-menu Closes the window,
saves any changes you have made, and
opens the OSD Main Menu window.
HP Pavilion MX703/M703 Monitor Guide
23
To open a window, select the icon in the
Advanced window. The example that follows is
the Image shape window.
24
HP Pavilion MX703/M703 Monitor Guide
To open the Color window, select the Color icon
in the Advanced window.
In the Color window, the following functions are
available:
9300 K
the image
6500 K
the image
5500 K
the image
Adjusts the color temperature of
to a pre-set value.
Adjusts the color temperature of
to a pre-set value.
Adjusts the color temperature of
to a pre-set value.
User Color (R, B, G) Adjusts the color
temperature of the image for the specific
value.
Cancel/Save and return Cancels or
saves the changes you made.
Exit sub-menu Closes the window,
saves any changes you have made, and
opens the Advanced window.
Choosing the Color Temperature
The default color settings are optimized for best
results, but you can change the color temperature
temporarily when necessary. (If you need to save
color settings for a particular software program,
use the User Color setting.)
You can choose between three settings: 9300 K,
6500 K, and 5500 K.
The 9300 K setting is often used for office
environments or fluorescent lighting. The 6500 K
setting is often used in environments with
incandescent lighting. The 5500 K setting is often
used for viewing photography or artwork proofs
prior to printing.
HP Pavilion MX703/M703 Monitor Guide
25
When you want to make very precise
adjustments to the screen color, you can
individually adjust the red, green, and blue
(RGB) values that make up the screen image.
For example, under unique ambient lighting
conditions, you may need to adjust the screen
color so that it more closely matches the ambient
lighting conditions. You make these adjustments
by individually setting red, green, and blue (RGB)
values.
Make sure to let the monitor warm up fully before
trying to match colors precisely. It takes the
monitor up to 30 minutes to warm up completely
after being turned on or recovering from a
power-saving state.
26
HP Pavilion MX703/M703 Monitor Guide
In the Image rotation window, the following
functions are available:
Rotation Adjusts the angle of the image.
Default settings Adjusts the Image
rotation setting to the factory default values.
Exit sub-menu Closes the window,
saves any changes you have made, and
opens the Advanced window.
In the Image shape window, the following
functions are available:
To open the Moiré correction window, select the
icon in the Advanced window.
Trapezoid Makes the vertical sides of the
image parallel to each other.
Parallelogram Squares the image.
Pincushion Adjusts any tapering or
bowing of both sides of the image.
Pincushion Balance Straightens the left
or right side of the image when only one
side of the image is bowed.
Default settings Adjusts the Image
shape settings to the factory default values.
Exit sub-menu Closes the window,
saves any changes you have made, and
opens the Advanced window.
HP Pavilion MX703/M703 Monitor Guide
27
In the Moiré correction window, the following
functions are available:
Moiré correction (yes, no) Shows the
current setting and allows you to lock or
unlock the Moiré settings.
V Moiré Reduces vertical wavy colored
lines or patterns in the background of your
image.
H Moiré Reduces horizontal wavy
colored lines or patterns in the background
of your image.
Exit sub-menu Closes the window,
saves any changes you have made, and
opens the Advanced window.
28
HP Pavilion MX703/M703 Monitor Guide
To open the OSD settings window, select the icon
in the Advanced window.
In the OSD settings window, the following
functions are available:
Lock OSD settings (yes, no) Shows
the current setting and allows you to lock
or unlock the OSD settings.
Timeout Sets the maximum idle time in
seconds that the monitor displays an
OSD menu. The monitor closes the OSD
window when the maximum is reached.
V Position Adjusts the vertical position
of the OSD window.
H Position Adjusts the horizontal
position of the OSD window.
Exit sub-menu Closes the window,
saves any changes you have made, and
opens the Advanced window.
The default OSD window position for the
windows is the center of the screen, but you
can change the window position.
Using Degauss
To degauss the monitor, select the Degauss icon
in the OSD Main Menu window.
Degauss Degausses the display and
restores image quality.
Degaussing removes magnetism that causes
unwanted color variations. Each time you turn on
the monitor, it is automatically degaussed. It is
not necessary to degauss unless you have moved
the monitor.
Using the Factory Settings
Window
To open the Factory settings window, select the
Factory settings icon in the OSD Main Menu
window.
HP Pavilion MX703/M703 Monitor Guide
29
Using the Language Window
To open the Language window, select the
Language icon in the OSD Main Menu
window.
In the Factory settings window, the following
functions are available:
Factory settings (yes, no) Shows the
current mode. Select yes to restore the
factory settings for all values.
Exit sub-menu Closes the window,
saves any changes you have made, and
opens the OSD Main Menu window.
30
HP Pavilion MX703/M703 Monitor Guide
In the Language window, you select the language
for the text in the OSD window.
Using the Information Window
To open the Information window, select the
Information icon in the OSD Main Menu
window.
The Information window lists information about
the current resolution and refresh rate (scan
frequency), the serial number of the monitor,
and the monitor working time as Power On hours
and Power Saving hours. The resolution and the
refresh rate are set in the Windows Control
Panel. See “To set the screen resolution” on
page 14 or “To select the screen refresh rate”
on page 15.
HP Pavilion MX703/M703 Monitor Guide
31
Technical Information
This chapter contains technical information about
the monitors.
The mx703 monitor and m703 monitor are
compatible with IBM PC, PC-compatible, and
PS/2 PCs. Each monitor is also compatible
with VESA power-management standards.
(See “DPMS Power-Management Features”
on page 34.)
Monitor Information
mx703
Picture tube
m703
Picture tube
Maximum
viewable area
32
17 in (43.1 cm) flat,
90° deflection,
black matrix,
phosphor P22 medium short,
0.25 mm dot pitch
17 in (43.1 cm) curved,
90° deflection,
black matrix,
phosphor P22 medium short,
0.27 mm dot pitch
310 mm (H) x 230 mm (V)
12.9 in (H) x 8.97 in (V)
16 in (406.4 mm) diagonal
HP Pavilion MX703/M703 Monitor Guide
Monitor Information
Raster (vertical)
frequency
50–140 Hz
Line (horizontal)
frequency
Power source
30–70 kHz
Power
consumption
Dot rate
100–240 V, 50/60 Hz
(auto switching)
75 W maximum
108 MHz
Pedestal
Tilt: 5° forward, 14° backward
Swivel: –60° left or right
Dimensions
(W x H x D)
415 x 442 x 438 mm
16.3 x 17.4 x 17.2 in
Net weight
17 kg (37.5 lb.)
Operating Conditions
Temperature
Humidity
Altitude
5° to 35° C (41° to 95° F)
15% to 80%, non-condensing
0 to 2286 m (0 to 7500 ft)
Storage Conditions
Temperature
–25° to 60° C (–13° to 140° F)
Humidity
0% to 90%, non-condensing
Altitude
0 to 4572 m (15,000 ft)
Pre-Set Video Modes
Pin Assignments
The monitor supports the following industrystandard combinations of screen resolution and
refresh rates. Other combinations are possible,
but may require adjustments to the image size
and position. (See “Using the OSD Main Menu
window” on page 18 for information about
making these adjustments.)
The following figure illustrates the 15-pin D-sub
male video connector used by the monitor. The
table shows the pin assignments.
The asterisk (*) denotes primary mode. This is the
suggested mode for display.
Resolution
(dots x lines)
60 Hz
640 x 350
N/A
640 x 480
720 x 400
800 x 600
70 Hz
75 Hz
85 Hz
N/A
N/A
N/A
N/A
N/A
N/A
N/A
1024 x 768
N/A
*
1280 x 1024
N/A
N/A
6
1
5
10
15
11
Note: Because of a policy of continuous product
improvement, pin assignments are subject to
change without notice.
N/A
HP Pavilion MX703/M703 Monitor Guide
33
Pin Number
Assignment
1
Red video input
2
Green video input
3
Blue video input
4
Ground
5
Ground (self test)
6
Red video return
7
Green video return
8
Blue video return
9
5V
10
Floating or Ground
(Sync ground)
11
Ground
12
DDC Data (SDA)
13
Horizontal synchronization
14
Vertical synchronization
15
DDC Data clock (SCC)
34
HP Pavilion MX703/M703 Monitor Guide
DPMS Power-Management
Features
To maximize screen life, take advantage of your
PC’s power-management system to control your
monitor.
■
The monitor can recognize power-management
signals from VESA Display Power
Management Signaling (DPMS) video
adapters, such as those in HP Pavilion and
many other PCs. When the monitor receives an
appropriate signal, it reduces its power but
remains ready for quick use. The power light
on the front panel turns yellow/amber when
the monitor is in a power-saving mode.
■
VESA DPMS video adapters reduce monitor
power consumption by setting the horizontal
and/or vertical synchronization signals to
inactive. The monitor recovers quickly when
the synchronization signals are reapplied.
■
Standby and Suspend modes offer low power
consumption with rapid recovery, while Sleep
mode offers the lowest power consumption
and a somewhat slower recovery.
The following table shows the characteristics
of the normal operating mode and the three
power-saving modes.
VESA Display Power Management
Signaling (DPMS)
Mode
Video
Hor.
Sync.
Vert.
Sync.
Power
Used
On
Active
Yes
Yes
≤75 W
Standby
Blank
No
Yes
≤15 W
Suspend
Blank
Yes
No
≤4 W
Sleep
Blank
No
No
≤4 W
Regulatory Information
Federal Communications
Commission (FCC) Notice
This equipment has been tested and found to comply with
the limits for a Class B digital device pursuant to Part 15
of the FCC Rules. These limits are designed to provide
reasonable protection against harmful interference in a
residential installation. This equipment generates, uses,
and can radiate radio frequency energy and if not installed
and used in accordance with the instructions, may cause
harmful interference to radio communications. However,
there is no guarantee that interference will not occur in a
particular installation. If this equipment does cause harmful
interference to radio or television reception, which can be
determined by turning the equipment off and on, the user is
encouraged to try to correct the interference by one or more
of the following measures:
■
■
■
■
Reorient or relocate the receiving antenna.
Increase the separation between the equipment and the
receiver.
Connect the equipment into an outlet on a circuit different
from that to which the receiver is connected.
Consult a dealer or an experienced radio or television
technician for help.
HP Pavilion MX703/M703 Monitor Guide
35
Modifications
The FCC requires the user to be notified that any changes or
modifications made to the device that are not expressly
approved by Hewlett-Packard Company may void the user’s
authority to operate the equipment.
Cables
Connections to this device must be made with shielded
cables with metallic RFI/EMI connector hoods to maintain
compliance with FCC Rules and Regulations.
For questions regarding this FCC declaration, contact:
Hewlett-Packard Company
P.O. Box 692000, Mail Stop 510101
Houston, Texas 77269-2000
or call (+1) (281) 514-3333
Declaration of
VCCI Class B Compliance
Declaration of Conformity for
Products Marked with FCC Logo,
United States Only
This device complies with Part 15 of the FCC Rules.
Operation is subject to the following two conditions: (1) this
device may not cause harmful interference, and (2) this
device must accept any interference received, including
interference that may cause undesired operation.
For questions regarding your product, contact:
Hewlett-Packard Company
P.O. Box 692000, Mail Stop 530113
Houston, Texas 77269-2000
or call (+1) (208) 472-4357
36
HP Pavilion MX703/M703 Monitor Guide
Notice for Korea (Class B)
Canadian Notice
X-Ray Radiation Notice
This Class B digital apparatus meets all requirements of the
Canadian Interference-Causing Equipment Regulations.
During operation, this product emits X-rays; however, it is
well shielded and meets the safety and health requirements
of various countries/regions, such as the Radiation Act of
Germany and the Radiation Control for Health and Safety
Act of the United States.
Avis Canadien
Cet appareil numérique de la classe B respecte toutes les
exigencies du Règlement sur le matériel brouilleur du
Canada.
European Union Notice
Products bearing the CE Marking comply with the EMC
Directive (89/336/EEC) and the Low Voltage Directive
(73/23/EEC) issued by the Commission of the European
Community and if this product has telecommunication
functionality, the RTTE Directive (1999/5/EC).
Radiation emitted by this product is less than 0.1 mR/hr
(1µSv/hr) at a distance of 10 centimeters from the surface of
the cathode-ray tube. The X-ray radiation primarily depends
on the characteristics of the cathode-ray tube and its
associated low-voltage and high-voltage circuitry. Internal
controls have been adjusted to ensure safe operation. Only
qualified personnel should perform any internal adjustments,
as specified in the service manual for this product.
Replace the cathode-ray tube with an identical CRT only.
Compliance with these directive implies conformity to the
following European norms (in parentheses are the equivalent
international standards and regulations):
EN 55022 (CISPR 22) — Electromagnetic Interference
EN 55024 (IEC6100-4-2, 3, 4, 5, 6, 8, 11) —
Electromagnetic Immunity
EN 61000-3-2 (IEC6100-3-2) — Power Line Harmonics
EN 61000-3-3 (IEC61000-3-3) — Power Line Flicker
EN 60950 (IEC 60950) — Product Safety
HP Pavilion MX703/M703 Monitor Guide
37
ENERGY STAR Compliance
Hewlett-Packard Pavilion PCs and
Monitors marked with the ENERGY
STAR® logo on the packaging box
qualify with the U.S. Environmental
Protection Agency’s ENERGY STAR
guidelines for energy efficiency.
Products with the ENERGY STAR label are designed to use
less energy, help you save money on utility bills, and help
protect the environment.
ENERGY STAR® is a registered trademark owned by the
U.S. government.
Power Cords
The power cord set (flexible cord or wall plug) received with
the product meets the requirements for use in the
country/region where you purchased the equipment.
If you need to obtain a power cord for a different
country/region, you should purchase a power cord that is
approved for use in that country/region.
The power cord must be rated for the product and for the
voltage and current marked on the product electrical ratings
label. The voltage and current rating of the cord should be
greater than the voltage and current rating marked on the
38
HP Pavilion MX703/M703 Monitor Guide
product. In addition, the diameter of the wire must be a
minimum of 0.75 mm or 18 AWG, and the length of the
cord must be between 6 feet (1.8 m) and 12 feet (3.6 m). If
you have questions about the type of power cord to use,
contact your HP authorized service provider.
A power cord should be routed so that it is not likely to be
walked on or pinched by items placed upon it or against it.
Particular attention should be paid to the plug, electrical
outlet, and the point where the cord exits from the product.
Environmental Information
HP has a strong commitment toward the environment. Your
HP monitor has been designed to respect the environment as
much as possible.
HP can also take back your old monitor for recycling when it
reaches the end of its useful life.
HP has a product take-back program in several
countries/regions. The collected equipment is sent to one of
HP’s recycling facilities in Europe or the USA. As many parts
as possible are reused. The remainder is recycled. Special
care is taken for batteries and other potentially toxic
substances, which are reduced to non-harmful components
through a special chemical process. If you require more
details about HP’s product take-back program, contact your
dealer or your nearest HP Sales Office.
Index
A
adjusting
brightness, 18
color, 13
position, 18
size, 18
adjustment windows, 17
Advanced
icon, 18, 23
window, 23
B
brackets
for speakers, 7
Brightness
button, 17
icon, 20
brightness, adjusting, 18
Brightness/Contrast, 19
buttons
Brightness, 17
Contrast, 17
Menu, 17
Minus, 17
Plus, 17
Power, 12
Select, 17
C
cables, connecting, 4
cleaning the screen, 16
Color
icon, 23
menu, 24
color settings, 25
color, adjusting, 13
Contrast
button, 17
icon, 20
D
default settings
Brightness/Contrast, 20
H Size and H Position, 22
Image rotation, 26
Image shape, 27
V Size and V Position, 22
Degaussing icon, 18, 29
degaussing the
display, 13, 18, 29
display
changing settings, 17
compatibility with PCs, 32
power-management
features, 15
resolution of, 14, 33
technical information, 35
DPMS (Display Power
Management Signaling),
15, 34
E
eyestrain, minimizing, 15
F
Factory settings
icon, 18, 30
window, 29
front panel, using, 17
HP Pavilion MX703/M703 Monitor Guide
39
H
M
horizontal (H)
H adjustment window, 22
H Moiré icon, 28
H Position icon, 22
H Position icon, OSD window, 29
H Size icon, 22
hours, power-on, 31
Menu button, 17
Minus button, 17
modes
power-saving, 16
Sleep, 16
Standby, 16
Suspend, 16
Moiré
correction menu, 27
icon, 23
settings, 28
monitor
avoiding damage to, 2, 4
cleaning, 16
degaussing, 13
features, 1
information, 32
installing, 4
inventory, 2
placing, 4
power-management
features, 13, 34
safety procedures, 2
I
image refresh rates, 15, 33
Image rotation icon, 23
Image shape
icon, 23
window, 24
Information
icon, 18, 31
window, 31
installing the monitor, 4
inventory, 2
L
Language
icon, 18, 30
window, 30
40
HP Pavilion MX703/M703 Monitor Guide
using, 16
viewing angle of, 16
O
OSD (On Screen Display)
features, 17
main menu window, 18
OSD settings, 29
OSD settings icon, 23
OSD settings window, 28
P
Parallelogram icon, 27
pin assignments, 33
Pincushion Balance icon, 27
Pincushion icon, 27
Plus button, 17
position, adjusting, 18
Power button, 12
power cables, connecting and
disconnecting, 2, 4
power-management features,
13, 15, 34
power-on time, 31
power-saving modes, 16
problems, 3
R
refresh rates, 15
resolution, screen, 14, 33
Rotation icon, 26
S
safety procedures, 2
screen
cleaning, 16
refresh rates, 15
resolution, 14, 33
Select button, 17
serial number, monitor, 31
settings, changing, 17
size, adjusting, 18
Size/Position
icon, 20
window, 20
Sleep mode, 13, 16, 35
speakers
installing, 5
installing brackets, 7
installing two speakers and
subwoofer, 10
placing two speakers, 7
right speaker connections, 5
specifications, 35
Standby mode, 16, 35
subwoofer (optional), 1
Suspend mode, 16, 35
T
technical information, 35
Timeout icon, 29
Trapezoid icon, 27
troubleshooting
color problems, 13
damage to monitor, 2, 4
degaussing, 13
flickering screen, 15
V
vertical (V)
V adjustment window, 21
V Moiré icon, 28
V Position icon, 22
V Position icon,
OSD window, 29
V Size icon, 22
vertical frequency, 15
VESA Display Power
Management Signaling
(DPMS), 15, 34
video cables, connecting, 4
video modes, 33
Z
Zoom icon, 22
HP Pavilion MX703/M703 Monitor Guide
41
42
HP Pavilion MX703/M703 Monitor Guide