1
Contents
Chapter 1
Welcome
...................................................................................................................... 1
What’s in the Box
Chapter 2
.................................................................................................. 2
The HP MediaSmart Server at a Glance (front)
.......................................................... 3
The HP MediaSmart Server at a Glance (back)
......................................................... 4
Getting Started
............................................................................................................. 5
What You’ll Need to Set up the HP MediaSmart Server
Connect the HP MediaSmart Server to Your Network
Turn on the HP MediaSmart Server
Check Lights
............................................. 6
................................................. 7
.......................................................................... 8
......................................................................................................... 9
Update Your Firewall’s Trusted Program List
............................................................ 10
Install the Software on the First Computer
............................................................... 11
Congratulations! You are Ready to Start Using Your Server
Chapter 3
Using the Assistant
..................................................................................................... 21
Setting up the HP MediaSmart Server using the Assistant
Chapter 4
...................................... 19
Installing on Additional Computers
............................................................................. 31
Install the Software on Additional Computers
Setting up Additional Home Computers
.......................................... 22
.......................................................... 32
.................................................................. 33
Getting Acquainted with the HP MediaSmart Server
................................................ 34
i
Chapter 5
Troubleshooting
.......................................................................................................... 35
Troubleshooting Tips for the Server
Health Indicator Codes
........................................................................ 36
........................................................................................ 44
Troubleshooting Tips for Networking Issues
............................................................. 46
Troubleshooting Tips for Common Network Connection Issues
Troubleshooting Tips for Webshare
....................................................................... 52
Troubleshooting Tips for Other Issues
..................................................................... 57
Troubleshooting Tips for Internet Router Configuration
Troubleshooting Tips for iTunes
.............................................. 59
............................................................................. 60
Troubleshooting Tips for Upload Photos
Troubleshooting Tips for Microsoft
.................................................................. 61
......................................................................... 62
Troubleshooting Tips for E-Mail.
............................................................................ 63
Troubleshooting Tips for iTunes
............................................................................. 65
Troubleshooting Tips for Media Streaming.
Troubleshooting Tips for DRM
............................................................. 66
............................................................................... 70
Troubleshooting Tips for TZO/DNS
ii
.................................. 47
....................................................................... 71
Chapter 1
Welcome
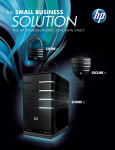
Welcome to the HP MediaSmart Server.
• Enjoy your digital experiences anywhere over the Internet.
• Share your life with friends and family with HP Photo Webshare.
• Automatically backup and protect your digital memories.
1
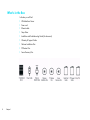
What’s in the Box
In the box you will find:
•
•
•
•
•
•
•
•
•
2
Chapter 1
HP MediaSmart Server
Power cord
Ethernet cable
Setup Poster
Installation and Troubleshooting Guide (this document)
Warranty & Support Guide
Software Installation Disc
PC Restore Disc
Server Recovery Disc
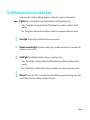
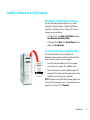
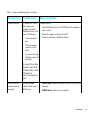
The HP MediaSmart Server at a Glance (front)
See the online User’s Guide for additional information on light colors or patterns not discussed here.
Light bar There is one light bar for each internal hard drive in the HP MediaSmart Server.
• Purple - The light bar is solid purple before the HP MediaSmart Server software is installed on the first
computer.
• Blue - The light bar is solid blue after the software is installed on one computer and the server restarts.
Power light The power light is solid blue when the server is turned on.
Network connection light The network connection light is solid blue when the server is connected to the
network via a router or switch.
Health light The health light indicates that the server is operating correctly.
• Purple - The health light is solid purple before the HP MediaSmart Server software is installed on the first
computer.
• Blue - The health light is solid blue after the software is installed on one computer and the server restarts.
USB port Plug up to four USB 2.0 or later disk drives into the USB ports to expand your storage space. There
is one USB port on the front and three on the back of the server.
Welcome
3
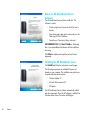
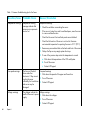
The HP MediaSmart Server at a Glance (back)
USB ports Plug up to four USB 2.0 or later disk drives into the USB ports to expand your storage space. There
is one USB port on the front and three on the back of the server.
eSATA port Plug an eSATA (external SATA) hard drive into the eSATA port to expand your storage space.
Ethernet port Connect the HP MediaSmart Server to your network using an Ethernet cable.
Power switch Press to turn the HP MediaSmart Server on.
Power port Plug the included AC power cord into the HP MediaSmart Server.
4
Chapter 1
Chapter 2
Getting Started
In this chapter you’ll connect the HP MediaSmart Server to your home network and install the
software on your first home computer.
To get started you need to
1
2
3
4
5
Connect the HP MediaSmart Server to your network and turn it on.
Update the trusted programs list for any firewall or anti-virus software on your computer.
Install the HP MediaSmart Server software on one computer.
Follow the Setup Assistant in the Windows Home Server Console (see Chapter 3).
Install the HP MediaSmart Server software on additional computers (see Chapter 4).
5
What You’ll Need to Set up the HP MediaSmart Server
• One or more computers with Windows Vista, Windows XP, or Windows Media Center Edition (32 bit systems
only). See the online User's Guide for a complete list of supported operating systems.
• A broadband internet connection, such as DSL or cable.
• An external Internet broadband router with 100 Mbps (or faster) Ethernet connection to the server. The router
should be setup for DHCP, which automatically provides IP addresses as devices are plugged in.
• Internet Explorer 6.0 or later, which you can download from www.microsoft.com/downloads.
• iTunes 7.1 or later, which you can download from www.apple.com/itunes/download (recommended for
combining household music libraries and streaming music with iTunes)
6
Chapter 2
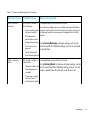
Connect the HP MediaSmart Server to Your Network
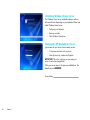
How to connect the HP MediaSmart Server to your network depends on your network configuration.
This example shows a broadband router connecting the following:
•
•
•
•
•
HP MediaSmart Server
Desktop computer
Laptop with a wireless adapter
TV connected to a network-enabled media streaming device, such as an Xbox 360
Remote users connecting to the HP MediaSmart Server and home network through an Internet browser
CAUTION: If you have wireless functionality on your network, be sure to enable your router's security settings
to protect your network. See the documentation that came with your router.
Getting Started
7
Turn on the HP MediaSmart Server
1
Plug in. Plug one end of the power cord into the server's power receptacle and the other end into an
electrical outlet.
2
Connect. Connect one end of the Ethernet cable to the server and the other end to an available Ethernet
port on your router or switch.
3
Power on. Press the Power button on the back of the server.
The server takes approximately 60 seconds to start. The indicator lights blink and change color throughout the
startup process. Wait for all of the server lights to be solid before proceeding with the software installation.
IMPORTANT: Do not attach USB devices to the HP MediaSmart Server during initial setup. For additional
information, see the Installation and Troubleshooting Guide.
8
Chapter 2
Check Lights
The lights on the front of the HP MediaSmart Server indicate the status of the server.
After the HP MediaSmart Server startup completes and prior to the first software installation, the indicator lights
show:
• Hard drives—solid purple
• Network—solid blue
• Health—solid purple
After you complete the software installation as described later in this chapter, all lights should be solid blue.
For any difficulties, see “Troubleshooting” in this guide.
Getting Started
9
Update Your Firewall’s Trusted Program List
The HP MediaSmart Server Software Installation Disc installs several programs that enable your computer to
communicate with the HP MediaSmart Server over your network. Software firewalls installed on your computer
can block this communication and prevent the computer from locating the HP MediaSmart Server on your
network. The following steps are recommended before installing the HP MediaSmart Server programs:
• Launch your firewall and anti-virus software and update the trusted programs list.
• Verify that your firewall and anti-virus software is set to "Learn" new programs. After the HP MediaSmart
Server software is installed, the firewall should prompt you to allow the installed programs to communicate
with the server.
• If you are using a firewall or anti-virus program that cannot automatically update its trusted software list,
please contact the firewall or anti-virus software vendor to find out how to manually add software to the trusted
software list. Then, visit http://www.hp.com/go/support for a list of software to add.
Sidebar: Hubs and Network Health Light
Some network hubs, as opposed to switches or routers, may reduce
performance between your computer and the HP MediaSmart Server, or the
hub may prevent your computer from communicating with the server. If this
is a problem, the network health indicator light on the front of the server will
be off. Replacing the hub with a switch may improve the network
performance or restore connectivity.
The network health light is solid blue when the server has network connectivity.
10
Chapter 2
Install the Software on the First Computer
Checking for Administrative Privileges
You must have administrative privileges on your home
computer to install the software. Complete the following
instructions for Windows Vista or Windows XP to view or
change user account settings.
•
In Windows Vista, click Start, Control Panel, and then
User Accounts and Family Safety.
•
In Windows XP, click Start, click Control Panel, and then
double-click User Accounts.
Inserting the Software Installation Disc
The Software Installation Disc first installs the HP
MediaSmart Server software and then the Microsoft Home
Server Connector software on your computer.
1
Insert the Software Installation Disc into a computer
connected to your network. The installation starts.
2
Follow the instructions on each installation page. The
remainder of this chapter describes important parts of the
installation, but not every step is described.
NOTE: Computers running Windows Vista may display User
Account Control messages, such as “A program needs your
permission to Continue.” Click Continue.
Getting Started
11
About the HP MediaSmart Server
Software
The HP MediaSmart Server software installs first. This
software is used to
• Provide a single point of access for all of the server’s
features,
• Share photos and videos quickly and securely over the
Web using HP Photo Webshare,
• Centralize your iTunes music library, and more!
RECOMMENDATION: Click User’s Guide on this dialog
box if you need additional assistance with the installation
and setup.
Click Next to display and accept the end user license
agreement.
Installing the HP MediaSmart Server
Click Install and follow the instructions on each page.
The following components are installed if they are not
already on your computer. This installation may restart your
computer and take several minutes.
• Windows Installer 3.1
• Microsoft .Net Framework 2.0
• HP Update
The HP MediaSmart Server software automatically installs
after the components. Once the HP software is installed, the
Windows Home Server Connector install begins.
12
Chapter 2
About the Windows Home Server
Connector
The Windows Home Server Connector:
• Connects your computer to the server.
• Automatically backs up your computer every night.
• Monitors the health of the network and computers
running Windows Vista.
• Enables configuration of the server from your computer.
Windows Home Server Setup runs only once—on the first
computer where you install the Windows Home Server
Connector software.
Finding the Server
The Windows Home Server Connector installations looks for
and connects to your HP MediaSmart Server. If the
installation cannot find your server, see the Troubleshooting
chapter at the end of this guide.
Once the server is found, click Next to continue the
installation.
Getting Started
13
Initializing Windows Home Server
The Windows Home Server initialization begins and can
take several hours depending on your hardware. Please wait
while Windows Home Server:
• Configures your hardware
• Recovers your data
• Starts Windows Home Server
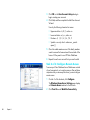
Naming the HP MediaSmart Server
Type a name for your server. Server names can be:
• 15 characters maximum with no spaces
• Letters (at least one), numbers and hyphens
IMPORTANT: This is the only time you can name your
server. It cannot be changed later.
Write your server name in the space provided below. The
default name is HPSERVER.
Server Name:
14
Chapter 2
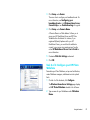
Setting the Server Password
On the Windows Home Server password page, you
are asked to create a strong password. A strong password
must be at least 7 characters long and must fulfill three of the
following four requirements:
•
•
•
•
Uppercase characters
Lowercase characters
Numbers
Symbols (such as !, @, and #)
NOTE: A password hint can be seen by anyone who clicks
the Password hint button.
IMPORTANT: The server password is not the same as a user
password. User accounts and passwords are covered in the
next chapter.
Write your password in the space provided below.
Password:
Help Protect Windows Home Server
Automatically
Windows Home Server Setup automatically downloads and
installs relevant important updates from Windows Update to
help make your home server more secure.
Choose if you want Windows Home Server to continue
automatically downloading updates after Setup and click the
next arrow.
NOTE: It is recommended that you turn on Automatic
Windows Updates.
Getting Started
15
Customer Experience Improvement
Program
Join the Customer Experience Improvement Program (CEIP)
and help make Windows Home Server even better. CEIP
collects information about your hardware and home server
usage without interrupting you. No information collected is
used to identify or contact you.
Choose if you want to participate in this program and click
the next arrow.
Windows Error Reporting
To help understand the problems you may encounter with
Windows Home Server, Windows Error Reporting can
automatically report them to Microsoft. Any personal
information inadvertently collected in the reports will not be
used.
Choose if you want to participate in this program and click
the next arrow.
Checking for Windows Home Server
Updates
The Windows Home Server installation checks for any
relevant important updates. This may take some time to
complete, but does not require additional information from
you.
IMPORTANT: Do not restart or turn off your home server
during the update process.
16
Chapter 2
Starting Windows Home Server
Click Start to log on and open Windows Home Server.
Logging on to Windows Home Server
Type the password you created during the installation. For
additional information, see “Setting the Server Password” on
page 15.
Checking for HP MediaSmart Server
Updates
The HP MediaSmart Server installation checks for any
updates. Installing updates ensures that you experience the
full functionality and optimal performance of the HP
MediaSmart Server.
IMPORTANT: Do not restart or turn off your home server
during the update process.
Getting Started
17
Introducing the HP MediaSmart Server
Assistant
The server installation is complete. When you click OK, the
Assistant remains at the bottom of the page to guide you
through setting up your HP MediaSmart Server.
A green check mark appears for each completed step. Once
all of the steps are complete, the Assistant link at the top of
the page turns green.
18
Chapter 2
Congratulations! You are Ready to Start Using Your Server
Some HP MediaSmart Server features, such as backups and shared folders, are pre-configured and ready to go
as soon as the first software installation is complete. Other features require some set up before you can use them.
Backups
After running the Software Installation Disc on your first
home computer it is automatically added to the list of
computers that are backed up by the HP MediaSmart
Server each night. Run the Software Installation Disc on
additional home computers to enable them to
communicate with the server and to add them to nightly
backups.
To customize the hard-drive volumes to back up, or to exclude
folders from the backup
1
At the computer, double-click the Windows Home
Server icon
in the task tray and log on.
2
Click the Backups & Computers tab.
Shared Folders and Media Sharing
Start copying digital assets from your computer to shared
folders on the HP MediaSmart Server.
1
At the computer, double-click the HP MediaSmart
Server desktop icon .
2
Copy Photos, Music, or Videos to the appropriate
shared folder or click
Server to create shared
folders for other digital content.
NOTE: From the Media Sharing page on the Windows
Home Server Settings tab, you can turn on digital media
streaming for the Photos, Music, or Videos shared folders.
Click On for each folder that you want to stream from.
Getting Started
19
Set up Additional Features
Features such as HP Software Update, User Accounts, Remote
Access, Photo Webshare, and Media Sharing require some
setup. The Assistant guides you through setting up your server.
Using the Assistant is optional but recommended to ensure
that the most frequently used server features are set up
correctly.
1
At the computer, double-click the Windows Home
Server icon
in the task tray and log on.
The MediaSmart Server tab should be active.
2
Follow the instructions in the Assistant at the bottom
of the page.
The next chapter discusses the Assistant in detail.
20
Chapter 2
Chapter 3
Using the Assistant
The Assistant guides you through setting up your server. Using the Assistant is optional but
recommended to ensure that the most frequently used server features are set up correctly.
After running the Software Installation Disc, the installer displays the Windows Home Server Console with
the MediaSmart Server tab selected. The Assistant displays at the bottom of the Windows Home Server
Console.
The Assistant helps you complete the following HP MediaSmart Server configuration steps.
•
•
•
•
•
•
Task 1 of 6: Setup HP Software Update
Task 2 of 6: Create User Accounts
Task 3 of 6: Configure Remote Access
Task 4 of 6: Configure your HP Photo Webshare
Task 5 of 6: Turn on Media Sharing
Task 6 of 6: Learn more about your HP MediaSmart Server
21
Setting up the HP MediaSmart Server using the Assistant
Opening the Assistant
Complete the following steps if the Assistant is not already
open.
1
At the computer, double-click the Windows Home
Server icon
in the system tray and log on.
2
3
Click the MediaSmart Server tab.
Click Assistant in the upper right corner.
The Assistant opens to the first incomplete task or closes
at the bottom of the Windows Home Server.
22
Chapter 3
Task 1 of 6: Setup HP Software Update
Use the HP MediaSmart software update to keep your
server and home computers current with the latest HP
software, online help, and new features.
HP MediaSmart software update does not update the
Microsoft Windows Home Server operating system. For
information about updating Windows Home Server, see
Configuring Windows Update in the Windows
Home Server Console Help.
1
On task1 of the Assistant, click Configure.
The Windows Home Server Settings page displays
with HP Software Updates selected in the left menu.
2
Select one of the following options
• Automatically download and install updates
(recommended)
• Download updates and let me choose when to install
• Turn off automatic updates
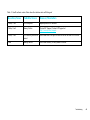
Task 2 of 6: Create User Accounts
The HP MediaSmart Server supports two types of user
accounts: guest and individual. Use the table below to
determine which type of user account best suits your
needs.
Using the Assistant
23
Type of
User Acct
Description
Shared Folders
Remote
Access
HP Photo
Webshare
Guest
Everyone uses the same
account. There is typically no
password, so no logon is
required.
Everyone has Full
access to all
shared folders.
Cannot use
with remote
access.
Cannot use with
Webshare.
Each family member has a
unique user name and
password. They logon to use
home computers.
Each person can
be set up with
different shared
folder access.
Available.
Requires a
strong
password.
Available.
Requires a strong
password to be a
Webshare
Manager.
Individual
Enabling the Guest Account
If you want everyone to use the same logon account to
access the HP MediaSmart Server, enable the guest
account. If the guest account is enabled with no
password, family members are not required to logon
when they use home computers.
IMPORTANT: If you enable the guest account, everyone
that connects to your home network has the same privileges.
That may mean that they all have full access to shared folders
and other resources on your server. To protect your home
network from unwanted connections, see Securing your
server from intruders in the Troubleshooting section
of the User’s Guide.
1
Click the User Accounts tab at the top of the page.
The User Accounts Setup dialog displays.
2
24
Chapter 3
Click Enable Guest.
Creating Individual User Accounts
If family members want to access information on your
home network from an Internet café, coffee shop, or other
location outside of your home, they need individual user
accounts with strong passwords. At least one individual
user account with a strong password is also required to
create a Webshare Manager and to set up HP Photo
Webshare.
IMPORTANT: When you create user accounts on the
server, use logon names and passwords that match the
logon names and passwords of existing user accounts on
your home computers. Creating matching user accounts
enables family members to automatically log on to the
server when they log on to their home computer.
If your computer does not have a password or if the
computer uses a factory default user name, you can
change these parameters
•
In Windows Vista, click Start, Control Panel, and then
User Accounts and Family Safety.
•
In Windows XP, click Start, Control Panel, and then
User Accounts.
To create user accounts on the server
1
Click the User Accounts tab at the top of the page.
The User Accounts Setup dialog displays.
2
Click Set Policy to force a password strength for all
user accounts and click OK. (optional)
Using the Assistant
25
3
Click OK on the User Accounts Setup dialog to
begin creating user accounts.
4
Click Add, and then complete the Add User Account
Wizard.
Use only the following characters for names:
•
•
•
•
Uppercase letters—A, B, C, and so on.
Lowercase letters—a, b, c, and so on.
Numbers—0, 1, 2, 3, 4, 5, 6, 7, 8, 9
Symbols—use only: dash - underscore _ period .
space [ ]
5
Check to enable remote access if the family member
wants to access the home network from outside of the
home of if they want to use HP Photo Webshare.
6
Repeat for each user account that you want to add.
Task 3 of 6: Configure Remote Access
To access your Photo Webshare from a Web browser outside
of your home network, or to easily access your files and home
computers while you are away from home, you must configure
remote access.
1
On task 3 of the Assistant, click Configure.
The Windows Home Server Settings page displays
with Remote Access selected in the left menu.
2
26
Chapter 3
Click Turn On under Web Site Connectivity.
3
Click Setup under Router.
The server tries to configure your broadband router. For
more information, see Configuring your
broadband router in the Windows Home Server
Console Help or see Troubleshooting in this guide.
4
Click Setup under Domain Name.
A Domain Name is a Web address. It allows you to
access your HP MediaSmart Server and HP Photo
Webshare from the Internet. For instance, if you
registered MyFamily.hpshare.net for your HP
MediaSmart Server, you would use this address to
connect to your server using remote access. See the
online HP MediaSmart Server User’s Guide for
more information.
5
6
Customize Web Site Settings as desired.
Click OK.
Task 4 of 6: Configure your HP Photo
Webshare
Personalize your Photo Webshare, set up email notifications,
create Webshare managers, and determine visitor upload
limits.
1
On task 4 of the Assistant, click Configure.
The Windows Home Server Settings page displays
with HP Photo Webshare selected in the left menu.
2
Type a name for your Webshare under Webshare
Name.
Using the Assistant
27
3
Click Configure under Webshare Notifications
and follow the instructions in the Email Settings
wizard.
4
Check users to be Webshare Managers.
You can only check users that have remote access
enabled and that have strong passwords. If you need to
change a user’s account settings, close the Windows
Home Server Settings dialog box, and click the
User Accounts tab.
5
Select Visitor storage limits.
Visitors are friends and family outside your home network
that you choose to share Webshare albums with.
Depending on how you set up visitors, they may be able
to add photos and videos to Webshare albums. The
storage limit restricts the space for unapproved photos
and videos added by visitors.
6
Click OK.
Task 5 of 6: Turn on Media Sharing
Turn on media sharing to stream music, videos, or pictures to
supported digital media players or digital media receivers.
28
Chapter 3
1
2
On task 5 of the Assistant, click Configure.
3
Click OK.
Click On for each folder that you want to enable
media streaming.
Task 6 of 6: Learn more about your HP
MediaSmart Server
This step does not require any set up. It takes you to the
HP MediaSmart Server User’s Guide where you can learn
about of the server’s features.
On task 6 of the Assistant, click the HP MediaSmart
Server User’s Guide link.
You can also open the User’s Guide by
•
Selecting the MediaSmart Server tab of the
Windows Home Server Console and clicking
Help in the upper right corner.
•
At the computer, click Start, All Programs, and then
select HP MediaSmart Server. Click the Help &
Support tab and User’s Guide.
Using the Assistant
29
30
Chapter 3
Chapter 4
Installing on Additional Computers
Now you are ready to run the Software Installation Disc on the other computers in your home.
After completing the steps in the Assistant on the first computer, use the Software Installation Disc to install the
HP MediaSmart Server and Windows Home Server Connector software on the other computers on your home
network. Install the software on one computer at time.
31
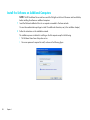
Install the Software on Additional Computers
NOTE: The HP MediaSmart Server must be on and all of the lights on the front of the server must be solid blue,
before installing the software on additional computers.
1
Insert the Software Installation Disc into a computer connected to the home network.
You must have administrative privileges to install. For additional information, see (in the installation chapter).
2
Follow the instructions on the installation wizards.
The installation process is identical to installing on the first computer except for the following:
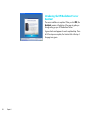
• The Windows Home Server Setup does not run.
• Your server password is required to install, as shown in the following figure:
32
Chapter 4
Setting up Additional Home Computers
After installing the software on the Software Installation Disc, there are a few setup options for you to consider.
• The home computer is automatically set up to be backed up each night. If you want to customize back up
settings for this computer, see “Backups” on page 19.
• If you created individual user accounts in Windows Home Server for one or more family members that use
this computer, you also need to set up computer user accounts for them if you want them to be able to access
features on the server without logging on. For additional information, see “Task 2 of 6: Create User Accounts”
on page 23.
• If there is an iTunes library on this computer that you want to include in an aggregated iTunes library on the
server, set up this computer to copy its iTunes library to the server. For additional information, see the online
HP MediaSmart Server User’s Guide on the Software Installation Disc or on the Help & Support tab of the
HP MediaSmart Server Control Center.
Installing on Additional Computers
33
Getting Acquainted with the HP MediaSmart Server
Families with several computers in their home are challenged by a proliferation of digital content. Precious and
often irreplaceable photos, music, videos, and documents are often scattered across multiple computers or are
on remote web pages somewhere on the Internet. The HP MediaSmart Server provides a simple way for family
members to access, share, and protect their valuable content.
Try the following steps to become acquainted with your new HP MediaSmart Server.
1
After you install the server software on one computer and complete the steps in the Assistant in the
Windows Home Server Console, install the software on a second computer on your home network.
2
From the first computer, click the HP MediaSmart Server desktop icon
Server Control Center.
3
4
Click the Photos icon and copy some pictures stored on your computer into the Photos folder.
5
While on your second computer, copy pictures into the Photos folder to share with other members of your
family on your home network.
to start the HP MediaSmart
From the second computer, you can now access the pictures on your HP MediaSmart Server by clicking
the HP MediaSmart Server desktop icon
and opening the Photos folder in the HP MediaSmart
Server Control Center.
We encourage you to explore other features such as the HP Photo Webshare, remote access over the Web, and
iTunes integration. For additional information on these topics and more, open the HP MediaSmart Server
Control Center, select the Help & Support tab, and click the User's Guide.
34
Chapter 4
Chapter 5
Troubleshooting
Find solutions for difficulties with your HP MediaSmart Server.
The tables below contain basic trouble shooting steps. if they do not resolve the issue or you need assistance in
some of the steps described open the HP MediaSmart Server. Open the Help & Support tab and click the
User’s guide.
If your problem is not listed, consult the HP support web site at http://www.hp.com/support.
Common Troubleshooting Tables
The tables below contain common trouble shooing steps.
Troubleshooting
35
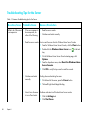
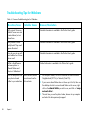
Troubleshooting Tips for the Server
Table 1: Common Troubleshooting tips for the Server
Question/Issue
Probable Cause
What to do if the server
is unresponsive
•
•
•
•
36
Chapter 5
If the server appears to
be unresponsive, do
either of the following.
Answer/Resolution
•
•
Reset the server console.
Shutdown and restart manually.
Reset the server console. How to reset the server from the Windows Home Server Console.
Shutdown and restart
manually.
How to force the server
to turn off and restart.
1
2
From the Windows Home Server Console, click the Close button.
3
On the Windows Home Server Console startup page, click
Options.
4
From the drop-down menu, select Reset the Windows Home
Server Console.
5
Click OK to verify that you want to reset the console.
Double-click the Windows Home Server icon
tray.
Shutting down and restarting the server.
1
2
On the back of the server, press the Power button.
The health light should begin blinking.
Shutdown and restart via Windows Home Server console.
1
2
Click the Settings tab.
Click Shut Down.
in the task
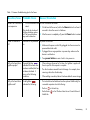
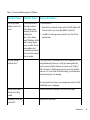
Table 1: Common Troubleshooting tips for the Server
Question/Issue
Probable Cause
What to do if the server
is unresponsive
•
Power on indicator is
off.
The server is not powered
on.
Why is the hard drive
light-bar purple?
Why is the hard drive
light-bar red?
Answer/Resolution
To force a shutdown and To force a shutdown and restart:
restart.
1 On the back of the server, hold in the Power button for at least 4
This should only be done if
seconds to force the server to shutdown.
all other shutdown options
2 After the server is completely off, press the Power button to restart.
fail. The forced shutdown
may result in data loss.
To power on the server:
1
Make sure the power cord is fully plugged into the server and a
powered electrical outlet.
2
If plugged into a surge protector or power strip, make sure the
device is switched on.
3
Press power button on rear of unit to turn power on.
A purple light bar
indicates that a hard drive
has been installed, but has
not been initialized. It
occurs in the following
conditions.
•
When setting up the server for first time—the light-bar is purple until
the set up on the first computer is complete.
•
The drive has been removed from total storage—for example, when
removing a drive from the drive bay.
•
When adding a new drive, before it has been added to server storage.
A red light-bar
indicates the following.
•
That a hard drive has failed and must be replaced. Additionally, the
connected computers show the following:
•
•
Red icon
Red indicator
Health tab.
on the task tray.
on the Windows Home Server Console Network
Troubleshooting
37
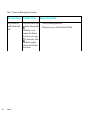
Table 1: Common Troubleshooting tips for the Server
38
Question/Issue
Probable Cause
Answer/Resolution
Why is the server’s
health indicator light
red?
A red Health indicator light
has the following states:
•
•
Chapter 5
Additionally, on your
computers the Windows
Home Server icon is grey
on the task tray, which
indicates the computer
cannot contact Windows
Home Server.
Solid red—operating system failure.
Blinking red—power on test has failed or BIOS failed.
Table 1: Common Troubleshooting tips for the Server
Question/Issue
Probable Cause
Answer/Resolution
Computer Recovery
PC Restore Disc. Use this
disc to restore your
computer from the HP
MediaSmart Server in the
event of the following:
Computer Recovery
•
To restore the system
drive.
•
When the operating
system will not start
(boot).
•
If you cannot use Single
file Restore to restore the
system files.
1
Insert the PC Restore Disc into a CD/DVD drive in the computer you
want to restore.
2
3
Restart the computer, and boot from the CD.
•
Critical issues—address immediately; otherwise, the server may be
damaged.
•
At Risk issues—address as soon as possible.
Follow the instructions in the Restore Wizard.
To ensure that you have
the latest version of the
PC Restore Disc, contact
HP support at
http://www.hp.com/su
pport.
What to do about
hardware warning
messages?
Warning messages
indicate Critical issues or
At Risk issues.
Troubleshooting
39
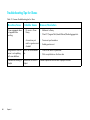
Table 1: Common Troubleshooting tips for the Server
Question/Issue
Probable Cause
Answer/Resolution
Temperature warnings.
Temperature warning
messages indicate that
some server components
are too hot
Temperature warnings.
1
Check the ventilation surrounding the server:
•
If the server is located in a small unventilated space, move the server
to a more ventilated location.
•
•
Check that the server’s front and back panels are not blocked.
2
3
4
Remove any accumulated dust on the back and front of the server.
Check that the location of the server is not too hot. Maximum
environmental temperature for operating the server is 35° C (95° F).
Fold up the flap on any empty system drive trays.
If none of the previous steps return the temperature to normal:
a Write down the temperatures of the CPU and System.
b Turn off the server.
c Contact HP Support
Fan speed warnings
Voltage warnings
The fans cool the disk
drives and other
electronics. If they are not
cooling the server
sufficiently, the hard drives
and server may be
damaged.
Fan speed warnings
1
2
3
Chapter 5
Turn off the server.
Contact HP Support
The voltages indicate the
Voltage warnings
health of the server’s power
1 Write down the voltages.
supply.
2 Turn off the server.
3
40
Write down the speeds of the upper and lower fans.
Contact HP Support
Table 1: Common Troubleshooting tips for the Server
Question/Issue
Probable Cause
Answer/Resolution
What is a Server
Recovery?
Why Should I consider a
Server Recovery:
For detailed steps see the online User’s Guide.
•
•
What is a Factory
Reset?
Server Recovery attempts to recover all data and restore the folders.
Server operating system However, because of the state of the system prior to the recovery, not
all data may be able to be recovered or integrated into the folder
has been corrupted.
structure.
Disk replacement—
partition data on other
storage drives are okay.
•
If you have lost your
password.
•
Server’s system hard
drive has been replaced.
Why Should I consider a
Factory Reset:
During Server Recovery, all system settings, such as User
Accounts and Photo Webshare settings, are lost. You will need
to recreate them.
For detailed Steps see the online User’s Guide.
During Factory Reset, not only are all system settings, such as
•
The partition data on the User Accounts and Photo Webshare settings, are lost. You will
other storage drives is
need to recreate them. Also the data on all drives is lost.
corrupted.
•
Giving away or selling
the server. See the
caution below this table.
Troubleshooting
41
Table 1: Common Troubleshooting tips for the Server
Question/Issue
Probable Cause
Answer/Resolution
File transfer failure
What to do about a failure
when transferring photos or
video clips to the HP
MediaSmart Server from
your computer.
File transfer failure
1
2
Compare the files and try transferring the missing files again.
3
If you cannot access the Windows Home Server please see the
following tip:
4
Check the Event Viewer to see if the System logs loss shows a
disconnect:
If the transfer fails again, check that you can access the Windows
Home Server.
• In Windows XP, click Start, Control Panel, Performance and
Maintenance, Administrative Tools, and then select Event
Viewer.
• In Windows Vista, click Start, Control Panel, System and
Maintenance, Administrative Tools, and then select Event
Viewer. network (subnet).
5
If the computer that you transferring files from is connected
wirelessly to the network, try connecting it with an ethernet cable.
• In Windows XP, click Start, Control Panel, Performance and
Maintenance, Administrative Tools, and then select Event
Viewer.
• In Windows Vista, click Start, Control Panel, System and
Maintenance, Administrative Tools, and then select Event
Viewer.
42
Chapter 5
Table 1: Common Troubleshooting tips for the Server
Question/Issue
Probable Cause
If you cannot access the Try the suggested
Windows Home Server resolutions
Answer/Resolution
•
•
Make sure that all the cable connections are correctly plugged in.
•
•
•
Make sure the router (or switch) has power.
•
Make sure your server and computers are on the same Network.
Make sure the HP MediaSmart Server has power and the Network
indicator light is blue.
Restart the router or switch.
Restart all the devices on the network, including the computers and the
server.
Troubleshooting
43
Health Indicator Codes
The Tables below are a breakdown of the Health indicator displays. To see this code, using a paper clip, press and release the
recessed Status/Recovery button on the front of the server..
Table 2: Health indicator codes Codes when the indicator starts as Solid red
44
Question/Issue
Probable Cause
Answer/Resolution
Solid red—no code
Operating system or
application error.
See Windows Home Server Console for error condition.
1 blue, 2 red
System drive failed to
boot.
If the light-bar for the system drive (the lowest light-bar) is also red, you
need to replace the system hard drive.
1 blue, 3 red
Operating system USB
boot failed.
Check that lowest USB port on back of server has boot source.
1 blue, 4 red
Recovery mode failed.
Contact HP Support at http://www.hp.com/support.
1 blue, 5 red
Multiple boot failure.
Contact HP Support at http://www.hp.com/support.
1 blue, 6 red
Service code.
Do not hold state button longer than 3 seconds. Shut down and
repeat.
Chapter 5
Table 3: Health indicator codes Codes when the indicator starts as Blinking red
Question/Issue
Probable Cause
Answer/Resolution
2 blue, 1 red
BIOS corrupted.
Repeat power-on to validate.
2 blue, 2 red
Memory failure.
Contact HP Support. Contact HP Support at
http://www.hp.com/support.
2 blue, 3 red
BIOS recovery source not
present.
Check that lower USB port on back of server has new BIOS source.
4 red
Memory Failure.
Check that Memory is firmly seated in socket.
Troubleshooting
45
Troubleshooting Tips for Networking Issues
Table 4: Common Troubleshooting tips for Networking
46
Question/Issue
Probable Cause
Answer/Resolution
No available port on
network router.
Take the following steps:
1
To add more Ethernet ports, connect an Ethernet switch to the
router. Refer to the switch documentation for instructions on how it
connects to the router.
2
Connect one end of the Ethernet cable that came with the server to
the switch and the other end to the HP MediaSmart Server.
Chapter 5
Troubleshooting Tips for Common Network Connection Issues
Table 5: Common Troubleshooting tips for Network Connection Issues
Question/Issue
Probable Cause
Answer/Resolution
The network connection
light alternates between
blue and off.
The server is
intermittently connected
to the network.
Check the cable connection between the server and the router (or switch).
Why is the Network
connection light off?
•
•
•
•
To determine why the 1
network connection
2
light is off.
Make sure that all the cable connections are correctly plugged in.
Make sure the router or switch has power.
3
4
Restart the router or switch (or unplug and plug it back in).
The firewall is
blocking the
connection.
•
If using a firewall program, configure it to allow any HP MediaSmart
or Windows Home Server applications.
•
For instructions to unblock, see the software vendor's documentation.
Check that the router
is correctly configured
for DHCP.
•
The HP MediaSmart Server comes automatically set to use a DHCP
server to dynamically assign IP addresses. Most routers come with a
built-in DHCP server.
•
Check that the router has the DHCP server correctly enabled. Refer to
the documentation that came with the router for instructions on proper
DHCP server configuration.
Check the network is
set up properly for
TCP/IP.
If you are using your own Ethernet cable, try using the Ethernet
cable that came with the HP MediaSmart Server.
Check that each computer on the network has TCP/IP listed and
selected for the network properties with these options selected:
•
•
Obtain IP address automatically.
Obtain DNS server address automatically.
Troubleshooting
47
Table 5: Common Troubleshooting tips for Network Connection Issues
Question/Issue
Probable Cause
Why is the Network
connection light off?
•
•
48
Chapter 5
Windows Vista.
Windows XP.
Answer/Resolution
To ensure that Network Discovery is turned on:
1
2
3
Click the Start menu, and then select Control Panel.
4
If Network discovery is off, click
, then select Turn on
network discovery and Apply.
In the Control Panel, click View network status and tasks.
In the Network and Sharing Center, make sure that Network
discovery is on.
To ensure your network is set up properly for TCP/IP:
1
2
3
4
Click Start, and then select Control Panel.
5
If the computer is using a wireless connection, right-click Wireless
Network Connection.
6
Click Properties. In the dialog box that opens, check to ensure
that TCP/IP is listed and selected.
7
If TCP/IP is not listed, click Install, Protocol, and then Add. In
the dialog box that appears, select Internet Protocol (TCP/IP).
8
If TCP/IP is listed and checked, highlight it and click Properties,
then select Obtain IP address automatically and Obtain
DNS server address automatically.
9
All computers should be set identically.
Double-click Network and Internet Connections.
Double-click Network Connections.
If the computer is connected via Ethernet cable to the network,
right-click Local Area Connection (LAN).
Table 5: Common Troubleshooting tips for Network Connection Issues
Question/Issue
Probable Cause
Why is the Network
connection light off?
•
•
Windows Vista.
Check the network
NetBIOS properties.
Answer/Resolution
To ensure your network is set up properly for TCP/IP:
1
2
Click Start, and then select Control Panel.
3
4
In the left pane, click Manage Network Connections.
5
If the computer is using a wireless connection, right-click Wireless
Network Connection.
6
Click Properties. In the dialog box that opens, check to ensure
that Internet Protocol Version 4 TCP/IP4 is listed and selected.
7
If TCP/IP is not listed, click Install, Protocol, and then Add. In
the dialog box that appears, select Internet Protocol
(TCP/IPv4).
8
If TCP/IP is listed and checked, highlight it and click Properties,
then select Obtain IP address automatically and Obtain
DNS server address automatically.
9
All computers should be set identically.
Click View network status and tasks under Network
and Internet.
If the computer is connected via Ethernet cable to the network,
right-click Local Area Connection (LAN).
Check that each computer on the network has TCP/IP advanced
network properties set to Enable NetBIOS over TCP/IP. All computers
should be set identically.
Troubleshooting
49
Table 5: Common Troubleshooting tips for Network Connection Issues
50
Question/Issue
Probable Cause
Why is the Network
connection light off?
•
Chapter 5
Windows XP.
Answer/Resolution
To ensure your network has the correct NetBIOS set up:
1
2
3
4
5
6
7
8
9
10
11
12
Click Start, and then select Control Panel.
Double-click Network and Internet connections.
Double-click Network Connections.
Double-click your default network connection.
Local Area Connection for wired networks.
Wireless for wireless connections.
Click Properties.
Highlight Internet Protocol (TCP/IP).
Click Properties.
Click Advanced.
Click the WINS tab.
NetBIOS settings are found at the bottom of the dialog box. Make
sure that the NetBIOS setting is not set to Disable NetBIOS
over TCP/IP.
Table 5: Common Troubleshooting tips for Network Connection Issues
Question/Issue
Probable Cause
Why is the Network
connection light off?
•
Windows Vista.
Answer/Resolution
To ensure your network has the correct NetBIOS set up:
1
2
Click Start, and then select Control Panel.
3
4
5
6
7
8
9
10
11
In the left pane, click Manage Network Connections.
Click View network status and tasks under Network
and Internet.
Right-click your default network connection.
Local Area Connection (LAN) for wired networks.
Wireless Network Connection for wireless connections.
Highlight Internet Protocol Version 4 (TCP/IP).
Click Properties.
Click Advanced.
Click the WINS tab.
NetBIOS settings are found at the bottom of the dialog box. Make
sure that the NetBIOS setting is not set to Disable NetBIOS
over TCP/IP.
Troubleshooting
51
Troubleshooting Tips for Webshare
Table 6: Common Troubleshooting tips for Webshare
Question/Issue
52
Probable Cause
Answer/Resolution
Why cannot I share my
album? Server users can
create albums, but not
share them.
Detailed information is available in the Online User’s guide.
Why cannot a visitor
add photos? They need
space allocated.
Detailed information is available in the Online User’s guide.
How do you set up an Email address for a Home
Server user?
Detailed information is available in the Online User’s guide.
What is the difference
between photos in
Shared Folders and
photos in Webshare?
Detailed information is available in the Online User’s guide.
How to add photos from Cannot access/browse
your photos shared
server shares from the
folder to your webshare. photo selector.
1
Use the photo loader, on the left hand side to browse Network
Neighborhood (XP PCs) or Network (Vista PCs).
2
If your server shared folder does not show up in this list, then use
the desktop shortcut to access shared folders on the server, right
click on the shared folder you wish to use, and click on "map
network drive".
3
The next time you use the photo loader, browser to my computer
and select the drive previously mapped.
Chapter 5
Table 6: Common Troubleshooting tips for Webshare
Question/Issue
Probable Cause
How do you make
webshare work in the
home?
Once remote access is
To work around this:
setup and you have a
1 Replace the {your domain name} section of the URL address with
custom domain name,
the local name of your server (the default is “hpserver”).
frequently urls that look
2 In addition to removing common network issues, this will also
something like
perform faster.
https://{your domain
name}/Webshare/ will be
used. For many internet
service providers, this can
cause problems and
occasionally even redirect
you to your home network
router or modem.
Why am I getting a
certificate error?
Answer/Resolution
If you access your HP MediaSmart server from a computer that is not
being backed up by the server, you will get a warning about the
server's security certificate whenever you access any of its https://
URLs. The reason is that the server issues its own security certificate,
and since it is not an official Certificate Authority, your web browser
issues the warning or error message.
You may ignore the warning or error message and continue to the HP
MediaSmart server's web pages.
Upload Photos requires
ActiveX control to be
loaded
Detailed information is available in the Online User’s guide.
Alternately, you can use
non-ActiveX.
Add photos to your album.
Troubleshooting
53
Table 6: Common Troubleshooting tips for Webshare
Question/Issue
Probable Cause
Answer/Resolution
Clicking on photo
Webshare on CC Does
Not Open
No Default Browser.
Select a default browser or reboot PC.
Webshare administrator Added visitor as User in
cannot delete Visitor
WHS Console.
account.
54
Add the visitor in webshare instead on in the Admin Console.
Visitor can create a
photo album and add
pictures but the album
doesn't display.
Visitor does not have auto- This is expected behavior for a Webshare Visitor who has permission
approve rights.
to add photos. The photos must be approved by a Webshare
administrator before they will display in the photo album.
Visitor can create a
photo album and add
pictures but the album
doesn't display the
pictures.
Visitor does not have auto- This is expected behavior for a Webshare Visitor who has permission
approve rights.
to add photos. The photos must be approved by a Webshare
administrator before they will display in the photo album.
Visitor cannot download Visitor does not have
pictures and sees a
download rights.
message telling them
that they cannot
download pictures.
Downloading permissions are set by the Webshare administrator.
Visitor cannot add
pictures and sees a
message telling them
that they can't add
pictures.
Permission to add pictures to photo albums are set by the Webshare
administrator.
Chapter 5
Visitor does not have add
rights.
Table 6: Common Troubleshooting tips for Webshare
Question/Issue
Probable Cause
Answer/Resolution
Visitor has created an
album (or albums) and
wants to delete the
album but cannot.
Visitors do not have delete Visitor should delete the photos from the file. The Webshare
album rights.
administrator has permissions to delete photo albums.
Visitor has changed their The Webshare admin has
password in Webshare edited the Visitor's
to nothing (using
password.
"Change Password"
link). Now they can't log
into Webshare. They are
getting a message about
their password being
incorrect.
There is an option on the Webshare login page to obtain a new
password.
Webshare Visitor or
Browser remembers
Administrator is selecting previous credentials.
URL from address field in
web browser and after
login the page that
opens cannot be closed
without closing the entire
application.
Type IP into browser address field, (e.g. www.192.168.1.103) and save
the login page as a Favorite.
Webshare user is unable No logout option, Browser There is no logout screen for Webshare. Closing the browser will log
to log out of Webshare. remembers credentials.
out the user if credentials not saved.
Trouble uploading large May keep timing out.
files to webshare.
Give directions for configuring FTP functionality of imbedded 2003
Server.
Troubleshooting
55
Table 6: Common Troubleshooting tips for Webshare
Question/Issue
Probable Cause
Clicking on Photo
Unknown.
Webshare on CC causes
command error.
Browser cannot display
the page when
accessing through URL.
56
Chapter 5
Answer/Resolution
Click OK on error and attempt to open Photo Webshare again.
•
•
•
UPnP disabled.
•
Websites are turned off. •
Multiple DHCP devices •
Enable UPnP.
•
Accessing the server
through the URL while
behind the same router
has known issues.
•
Access the server through the local name (Photo Webshare in CC) and
use the URL when outside the network.
•
Upnp not supported by
router.
•
Enable port forwarding for ports 80, 443, and 4125 to the server's IP
address.
are on the network.
Turn Websites on.
Verify that there is only one DHCP server on the network - VOIP
devices often are DHCP servers.
Troubleshooting Tips for Other Issues
Table 7: Common Troubleshooting tips for Other issues
Question/Issue
Probable Cause
Answer/Resolution
How to find the server
software and firmware
information.
The Hardware Status page
1
contains information about
your HP MediaSmart Server,
2
such as the software and
3
BIOS version.
At the computer, double-click the Windows Home Server icon
in the task tray.
Log on to the Windows Home Server.
On the Windows Home Server Console, click the Settings tab
, and then click Hardware Status in the left panel.
3.The first backup is
taking a long time.
Your initial PC backup could take several hours, depending on how
much data you have on your computer. Subsequent backups will go
much faster since only the data that has changed is copied to the
server.
What are optimum data
throughput speeds for
different network
interfaces?
Depending on the network interface your computer uses, you will
experience different rates of data transfer to your server. Network
Interfaces are described in terms of their ideal maximum speed, but
many factors can affect the actual data transfer speeds you will
experience. For example, your optimal wireless transfer speed will be
reduced depending on the type of security and encryption you have
enabled on your wireless network and by the amount of other work
your computer and server are performing at the same time.
What are optimum data
throughput speeds for
different network
interfaces?
•
•
•
•
•
•
Gigabit Ethernet—1000mbps/125MBs.
Fast Ethernet—100mbps/12.5MBs.
Wireless N—600mbps/75MBs.
Wireless G—54mbps/6.75MBs.
Wireless A—54mbps/6.75MBs.
Wireless B—11mbps/1.375MBs.
Troubleshooting
57
Troubleshooting Tips for Other Issues
Table 7: Common Troubleshooting tips for Other issues
Question/Issue
Ideal Minimum time to
transfer a 1GB file for
different network
interfaces?
58
Chapter 5
Probable Cause
Answer/Resolution
•
•
•
•
•
•
Gigabit Ethernet—8s.
Fast Ethernet—1min 20s.
Wireless N—13.3s.
Wireless G—2min 28s.
Wireless A—2min 28s.
Wireless B—12min 7s.
Troubleshooting Tips for Internet Router Configuration
Table 8: Common Troubleshooting tips for Internet Router Configuration
Question/Issue
Probable Cause
Answer/Resolution
How do I manually
forward port on my
router?
Detailed information is available in the Online User’s guide.
Why did URL not work? DNS has not updated.
Wait 10 minutes for DNS to update.
Troubleshooting
59
Troubleshooting Tips for iTunes
Table 9: Common Troubleshooting tips for iTunes
Question/Issue
Probable Cause
iTunes aggregator does
not appear to be
working.
•
•
60
Answer/Resolution
No music in iTunes
library.
•
•
Add music to library.
Accounts may not
match or guest account
disabled.
•
•
Fix account synchronization.
Wait for the Server to synchronize.
Check C:\Program Files\Hewlett-Packard\Media Aggregator.txt.
Enable guest account.
Song selection from the
server is not updating
with new additions.
Server has not refreshed
yet.
•
•
Podcasts not showing in
playlist.
Podcast will not show in
playlist.
Podcasts copied over will not show in playlist for server.
Chapter 5
Click on eject button on the Server bar.
Troubleshooting Tips for Upload Photos
Table 10: Common Troubleshooting tips for Upload Photos
Question/Issue
Probable Cause
Unable to upload
images.
•
Installs may be blocked
by browser security.
•
Click to enable download/install at top of browser.
•
Just inserted the drive
while Upload photo
was loading.
•
Reinsert the thumb drive.
•
Pop up blocker blocked
install.
•
Disable pop up blocker, or enable pop ups for the URL.
•
•
ActiveX is disabled.
•
•
Enable ActiveX.
Not using Internet
Explorer.
Answer/Resolution
Use Internet Explorer.
Troubleshooting
61
Troubleshooting Tips for Microsoft
Table 11: Common Troubleshooting tips for Microsoft
62
Question/Issue
Probable Cause
Answer/Resolution
Server low on space.
Clean out unused files.
Earmark backups for deletion and 'clean now', delete unused docs
from Shared Folders.
Cannot connect to
server shares.
•
A duplicate device exists
on the network.
•
Verify that there is no device on the network named "server".
•
User names and
passwords do not
match.
•
Create a user on the server whose name and password match the user
on the PC.
Chapter 5
Troubleshooting Tips for E-Mail.
Table 12: Common Troubleshooting tips for E-Mail
Question/Issue
Probable Cause
Answer/Resolution
Why do I need E-mail
address for visitors and
Home Server users?
Webshare has a notification mechanism that uses E-mail to share
photos with others. In order for Webshare to send E-mail and notify
other users or visitors, you must configure and enable webshare E-mail
notification in the administrative console. TZO E-mail is strongly
recommended whenever TZO domain names are being used, but
SMTP E-mail can also be used for E-mail notifications.
Why do I need to set-up
Webshare notifications?
Webshare has a feature to send E-mail notifications whenever items
are shared with others, and the E-mail addresses of these users is
required. It is recommended that visitor accounts always use the same
E-mail as the user name, as opposed to having a different user name
than the E-mail address of a visitor (which can add confusion for
visitors). E-mail for Home Server users must be set up separately within
Webshare, as there is no other location that uses the E-mail address of
Home Server users.
How do I find what my
SMTP server is?
Contact your internet service provider to find your SMTP E-mail
settings. Many service providers provide these settings as part of their
E-mail setup instructions for users. However, occasionally some ISPs do
not provide SMTP E-mail services. For these situations, some free Email accounts also provide SMTP access.
Do I need to do an SMTP
E-mail configuration?
If you are not using TZO domain services, then SMTP is required to
use any webshare E-mail feature. TZO E-mail and domain services are
a package, and for most situations it is recommended that you use
both together or neither.
Troubleshooting
63
Table 12: Common Troubleshooting tips for E-Mail
64
Question/Issue
Probable Cause
Answer/Resolution
If you have chosen to use
your own E-mail provider
to send Photo Webshare
announcements and these
E-mail announcements
have not been received by
the people on your lists.
•
Ensure that SMTP
server information is
correct.
•
SMTP: contact your ISP to insure the information you entered is correct.
•
Check that you
enabled E-mail
notification for the
group.
•
Check that the persons who have not received the E-mail are in the
correct group.
Emailed link not opening. Website Connectivity
Not On
Turn on Website Connectivity.
E-mail is not received.
Verify that the correct E-mail address was entered.
Chapter 5
Wrong E-mail address
entered.
Troubleshooting Tips for iTunes
Table 13: Common Troubleshooting tips for iTunes
Question/Issue
Probable Cause
iTunes aggregator does
not appear to be
working.
•
•
Answer/Resolution
No music in iTunes
library.
•
•
Add music to library.
Accounts may not
match or guest account
disabled.
•
•
Fix account synchronization.
Wait for the Server to synchronize.
Check C:\Program Files\Hewlett-Packard\Media Aggregator.txt.
Enable guest account.
Song selection from the
server is not updating
with new additions.
Server has not refreshed
yet.
•
•
Podcasts not showing in
playlist.
Podcast will not show in
playlist.
Podcasts copied over will not show in playlist for server.
Click on eject button on the Server bar.
Troubleshooting
65
Troubleshooting Tips for Media Streaming.
Table 14: Common Troubleshooting tips for Media Streaming
Question/Issue
Why my files do not
show up on DMA?
Probable Cause
Answer/Resolution
Digital Media Adapters (DMA, or Digital Media Receivers - DMR) use
the Universal Plug 'n Play (UPnP) protocol to automatically discover
Digital Media Servers (DMS). The HP MediaSmart Server uses
Windows Media Connect 2.0 (WMC) as its DMS. In order for a DMA
to discover the HP MediaSmart Server and access its content, WMC
must be enabled. WMC defaults to being disabled; it is automatically
enabled for all DMAs when the server administrator selects one or
more of the three media shared folders (Music, Photos and Videos) for
media sharing. On your DMA, you should then see the HP
MediaSmart Server listed as:
<YourServerName>: 1 : Windows Media Connect
Note that some DMAs aggregate the content from all DMSs into a single
view; in such a case you may not be able to identify each DMS
individually.
66
Chapter 5
Table 14: Common Troubleshooting tips for Media Streaming
Question/Issue
Probable Cause
Why my files do not
show up on DMA?
•
Answer/Resolution
Once WMC has been 1
enabled to share a
2
shared folder, it
continually monitors the 3
folder for new files.
Open the Control Center on one of your home PCs
Select the Tools tab at the bottom
On the Tools tab, click on the Home Server Console (HSC)
icon
4
On the HSC password screen, type in the Administrator's
password
5
When the HSC comes up, click on the Settings button near the
top right
6
7
In the left pane of the Settings panel, select Media Sharing
8
9
Click Apply
In the right pane of the Settings panel, you must now select at least
one of the shared folders for sharing by selecting the On radio
button.
This will automatically start WMC, which will then share all of the
files in the selected shared folders.
Troubleshooting
67
Table 14: Common Troubleshooting tips for Media Streaming
Question/Issue
Probable Cause
Answer/Resolution
Why my files do not
show up on DMA?
If your DMA does not
Verify
display WMC from the HP
1 Check that WMC is enabled (use the above steps to get to the
MediaSmart Server, or none
Media Sharing settings, and verify that at least one of the shared
of your files are found by the
folders is On)
DMA.
2 Check that the HP MediaSmart Server and DMA are both
connected to the same home network (a router or firewall between
them could interfere with the discovery and content sharing
protocols)
3
4
•
Restart the DMA
Restart the HP Media Smart server
If some of your files
Verify
(e.g., files newly copied
1 Check that the files were copied to the correct location. Only the
to the server) are not
Music, Photos and Videos shared folders may be enabled for
found by the DMA.
media sharing. Note that if one of these folders is enabled for
media sharing; then all folders below that are also enabled for
media sharing.
2
Re-enable the shared folder for media sharing
•
Go to the Media Sharing Settings panel (see the instructions above for
how to get here)
•
Turn sharing Off for the shared folder with the missing files and select
Apply
•
Turn sharing back On for the shared folder and select Apply
3
Restart the DMA
Restart the HP MediaSmart Server
68
Chapter 5
Table 14: Common Troubleshooting tips for Media Streaming
Question/Issue
Probable Cause
Answer/Resolution
File doesn't appear.
File type may not be
supported
May need to convert file to supported type.
Server not showing up.
End-user forgot to turn on
Media-Sharing.
Turn on Media Sharing.
Media Files
(audio/Video) of
supported format aren't
seen by device.
Possible naming
convention issues.
Double check names on server, make sure they start with a word, and
not a number or symbol.
Troubleshooting
69
Troubleshooting Tips for DRM
Table 15: Common Troubleshooting tips for DRM
Question/Issue
Answer/Resolution
Why can I play and
The HP MediaSmart Server includes a media server for streaming iTunes music to PCs running
stream DRM content my iTunes through the house. See the section in the User's Guide on iTunes.
home computer but I can
not stream it from my HP
For Windows Media DRM (WMDRM) content (protected .wma music and .wmv videos), the HP
MediaSmart Server?
MediaSmart server does not support streaming of this content to DMAs at this time. Playing (and
streaming) of WMDRM protected content requires that the device that is playing the content have a
license for the content. When you downloaded the content to your PC, you also received a license
to play the content on that PC. If you copy the files to the HP MediaSmart Server, you cannot copy
or transfer the license to the server. The server must obtain its own license, and we do not provide
for this feature in the current product.
What you can do however, is store your protected content on the HP MediaSmart Server. This allows all
of the PCs in the home that have a license for the content to play it from the HP MediaSmart Server by
accessing it through the network. For example, to add all of the music on your Server to the Windows
Media Player library on your PC:
1
2
3
Open Windows Media Player on your PC.
Select File -> Add to Media Library -> Add Folder ….
In the Add Folder dialog, type \\<YourServerName\Music and click OK.
This will add all of the music files in your Music shared folder on the HP MediaSmart Server to your
Windows Media Player library. You will then be able to play all of the protected content for which
this PC has a license.
70
Chapter 5
Troubleshooting Tips for TZO/DNS
Table 16: Common Troubleshooting tips for TZO/DNS
Question/Issue
Probable Cause
Why did URL not work?
DNS server might not have Wait about 10 minutes for DNS to update and try again.
updated.
What value does TZO
domain names provide
beyond the Microsoft
Live option:
Answer/Resolution
•
TZO provides automatic E-mail notifications to Webshare visitors that
new photos are available without having to set up an SMTP E-mail
server.
•
Some broadband ISPs block Port 80 which is required for easy remote
access. The TZO service allows you to obtain easy remote access even
if Port 80 is blocked.
•
With the Microsoft domain name, if you don't already have a
Microsoft Live account, you'll have to set that up.
•
With TZO custom domain name option, you can get your own domain
name (e.g., smithfamily.com).
•
TZO customer support and troubleshooting.
Troubleshooting
71
72
Chapter 5