1
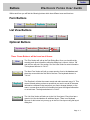
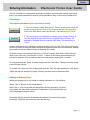
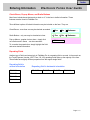
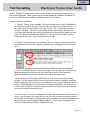
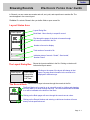
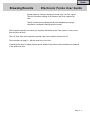
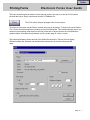
Index
Electronic
Forms
User Guide
Index
Electronic Forms User Guide
Welcome to Electronic Forms User Guide
Welcome to WSDOT Forms Application.
The form files included in this application are the same fillable (Fill and Print Online)
used by WSDOT personnel. The package includes a FileMaker Runtime engine that
will allow use of the files without any additional software. Some forms are “print
only” (Adobe Acrobat) files. If you do not have Acrobat Reader, you need to install it
to open those “PDF” files. Go to http://www.adobe.com/ to donwload the free reader
software.
As more electronic forms become available, they will be added to the system. Please
let us know about any desired addtions or any problems with using the system.
If you have a copy of FileMaker Pro version 5.0 from FileMaker Inc., installed on
your computer, you may want to review the instructions for use before using the
forms. If, however, you do not, you may still use these forms effectively by
following the instructions contained in this User Guide. Passwords were used to
assure that the standard forms are not altered. If you find errors or have suggestions
for improvement, please contact us so that any problems can be corrected.
This guide will not make you an ‘expert’ in FileMaker Pro, nor is it designed to
provide you with the expertise to create your own forms or databases. The purpose of
this tutorial is to assist you in filling out, adding new records, retrieving records,
printing, and transferring data.
Copyright
c 1998-2001 - Washington State Department of Transportation - All Rights Reserved
Page i
Index of Topics
Electronic Forms User Guide
Basic Instructions for Windows Users
1-1
Form Buttons
2-1
Entering Information
3-1
Text Formatting
4-1
Browsing Records
5-1
Finding Records
6-1
Sorting Records
7-1
Menus
8-1
Printing
9-1
Layouts
10-1
Importing and Exporting Records
11-1
Supported Systems and Printers
12-1
Notes and Warnings
Appendix A
Glossary of Terms
Appendix B
Powered By
Page ii
Index
WSDOT Forms
Electronic Forms User Guide
Windows Runtime Forms
These forms are the same electronic versions that are used at the Washington State
Department of Transportation. They are Filemaker Pro Version 5.0 databases and are
designed to be used by one person at a time. For your convenience we have supplied a
runtime application so you do not need your own copy of Filemaker Pro to use them.
However, if you do have your own copy of Filemaker Pro 5.0 or later , you can use it to run
these forms if you wish.
To run the forms
1. Open the DOTeForms or DOTeForms0 folder
2. Double click the DOTeForms.exe application or FormMenu.WF9 file.
Notes on Filemaker
All of the forms ship with one blank record. To enter data in a form click on the field you
want to enter data into and start typing. You don’t need to do anything special to save a
form after you have finished, they are automatically saved.
To fill out another form just click on the New Form button and enter data as described
above.
Page 1 - 1
Index
Buttons
Electronic Forms User Guide
Within each form you will find the following buttons which have different uses and functions.
Form Buttons
Print
New Form
Duplicate
List View
Find All
Sort
List View Buttons
Find
Print List
To Form
Optional Buttons
Supplement
Instructions
Instructions Main Menu
Exit
These ‘Forms Buttons’ will be found on all forms:
Print
Print
New
New Form
Duplicate
Duplicate
List
List View
View
The ‘Print’ button will call up the Print Dialog Box. Once you check that the
record(s) and other information within the dialog box is correct, click on ‘OK’
and the form will print. See section 10 of the User Guide for more information.
The keyboard shortcut is “Ctrl+P”.
The ‘New Form’ button will call up a new record or form in the database and
place the cursor within the first field of the form. The keyboard shortcut is
“Ctrl+N”.
The ‘Duplicate’ will take the current record and make an exact copy of it. This
comes in handy when you have a record that you want to use all of the same
information contained in that record but you want to change the date, or the
name, or some other small bit of information but leave the original information
or record intact. The keyboard shortcut is ‘Ctrl+D’.
The ‘List View’ button will take you to the List View layout. Every form has a
generic List View included as an additional layout. There is no keyboard
shortcut for this button but you may go to the List View layout using the layout
dialog box.
Page 2 - 1
Index
Buttons
Electronic Forms User Guide
These ‘Forms Buttons’ will be found on all List Views:
Print List
Find
Find All
Sort
Sort
To Form
The Print button will call up the Print Dialog Box. Click on ‘Records Being
Browsed’ to print the List View. See section 10 of the User Guide for more
information. The keyboard shortcut is “Ctrl+P”.
The ‘Find’ button will put you into the Find mode. In the Find mode you may
find records that meet criteria defined within a field or fields. See section 7 of
the User Guide for more information on Finding Records. The shortcut key is
‘Ctrl+F’.
The ‘Find All’ button will make all records within the database available for
browsing and printing. The keyboard shortcut is ‘Ctrl+J’.
The ‘Sort’ button calls up the Sort dialog box. The sort will be accomplished
according to the fields selected and order listed. For more information on
Sorting Records see Section 8 of this User Guide. The keyboard shortcut is
“Ctrl+S’.
The ‘To Form’ will take you to the main form layout. If there are other form
layouts in the file those buttons will be shown such as a supplement page.
There is no keyboard shortcut.
NOTE: Some buttons may not be included on some forms due to lack of space.
Buttons may also appear smaller than normally shown due to space limitations.
These ‘Form Buttons’ may also be found on form layouts:
English
English
Metric
?
Page 2 - 2
Index
Entering Information
Electronic Forms User Guide
Filling in information or entering data is perhaps the easiest and most used function of electronic
forms. This section describes the various options available in filling in forms using FileMaker Pro.
A New Form
Three options are available to fill in a new form (or record):
New Form
1. Click on the button called ‘New Record’. This will create a new record and
put the cursor on the first ‘Field’ or fill in blank on the form. The alternate is
found in the ‘Edit’ Menu’ under ‘New Record’. The shortcut key is ‘Ctrl+N’.
Duplicate
2. The second option is to duplicate an existing record. Simply ‘Browse’ or
‘Find’ the desired record and click on the ‘Duplicate Record’ button. The
alternate is ‘Duplicate Record’ under the ‘Edit’ Menu. The shortcut key is
‘Ctrl+D’.
Another option that may be required is to delete records or forms in a file. This option is fairly easy
but be very careful in using this feature because the deleted records cannot be recovered. Deleted
records are lost forever unless a backup or duplicate file is made.
To delete or erase a record simply ‘Browse’ or ‘Find’ the record(s) then use the ‘Delete Record’
option in the ‘Edit’ menu. The shortcut is ‘Ctrl+E’. A button for this option was intentionally not
included in electronic forms to preclude users from inadvertantly erasing files or records.
To navigate through the ‘Fields’ or blanks simply press the ‘Tab’ button. Tabbing moves the cursor
to the next field or blank.
To go back to the previous ‘Field’ or blank hold down the ‘Shift’ key while pressing the ‘Tab’ button.
‘Fields’ may also be accessed by simply ‘Clicking’ with the mouse on the desired field.
Altering an Existing Form
Altering an existing form is very similar to entering information in a “New Record’.
Simply ‘Find’ or ‘Browse’ to the record desired.
Either ‘Tab’ or ‘Click’ on the field and change the required information. If a field is
triple clicked, the entire field is selected for replacement. The field information can
also be highlighted using the mouse.
Remember that the record will be permanently changed. To preserve the original
information, ‘Duplicate’ the record first, then alter the copy.
Page 3 - 1
Index
Entering Information
Electronic Forms User Guide
Check Boxes, Pop-up Menus, and Radio Buttons
Most forms include boxes that require a check or ‘X’ in the box to define information. These
features are also found in FileMaker Pro.
Three different options of limited information may be included on the form. They are:
Check Boxes - more than one may be checked as needed:
Yes
No
Unknown
Radio Buttons - only one may be checked at a time:
Yes
No
Unknown
Pop-up Menus - popular choices show - simply click
on selection and it shows - can be overwritten:
Unknown
To overwrite the preselection, simply highlight the field
and enter desired information.
Repeating Fields
Another type of field used extensively in FileMaker Pro is a repeating field or a comb. In forms such as
the Travel Expense Voucher, (DOT Form 133-103) repeating fields make up the majority of the form.
These fields have slightly different properties from the regular single fields.
Repeating field in
vertical orientation
Field #1
Repeating field in horizontal orientation
Field #1
Field #2
Field #3
Field #4
Field #2
Field #3
Field #4
Page 3 - 2
Index
Text Formatting
Electronic Forms User Guide
Users of FileMaker Pro must keep in mind that this program is a database program and not a
text processing program. There is some text processing capabilities available in FileMaker Pro,
but you won’t find all of the capabilities available that are found in “Word”.
Features that are available:
1. Tabbing: Tabbing is now available. If you have already used a form in FileMaker Pro
you have found out that when you Tab your cursor moves from one field to the next. To
tab to the default tab stops within a field, use “Control” “Tab”. Default tabs are set to
1/2 inch increments. Tabs can be set by using the text ruler located in the menu bar.
To set up custom tabbing, simply click in the text ruler (in the menu bar) where you want
a tab. The tabs can be moved with the pointer. You can also set the tabs by double
clicking on the text ruler. You can then set all of your tabs.
1. Identing: Limited Identing is now available. When you are in a text field the ruler bar
will be shown in the menu bar. Identing is handled by the paragrapg markers in the text
ruler.
2. Fonts: All WSDOT electronic forms are designed using two fonts; Ariel (Helvetica for
Macintosh systems) for the forms text and Times New Roman (Times Roman for
Macintosh systems) for the fill-in text that users enter and for instructions.
You may change fonts and styles within fields just as you can in any text processing
program. You can change the font, the size, you can bold, italicize, underline, condense,
extend change the color of the text or any combination. You may also change the color of
the text. Simply highlight the text you want to change and chooseyour selection from the
‘Format’ menu. If the form is used on another computer that does not have that particular
font some unexpected results may occur.
3. Cut and Paste: You may cut and paste text within fields and between fields in electronic
forms. If you type data in the wrong field you can cut it from that field and paste it into the
correct field. You may also cut and paste from other compatible programs and FileMaker Pro.
Microsoft Word is one compatible software program. You can even cut and paste field
information (data) between different FileMaker Pro files.
Page 4 - 1
Index
Text Formatting
Electronic Forms User Guide
Let’s say you have data or text in a ‘Word’ document and you want to paste the data
into a form in FileMaker Pro. If your computer has sufficient memory simply; (a) open
both applications and (b) cut and paste from one to the other.
If you do not have sufficient memory you would have to (a) open one application (b)
highlight and copy the text you want to copy, (c) close the application, (d) open the
FileMaker Pro file, (e) click in the appropriate field, and (f) paste the text into that field.
3. Duplicate: You may duplicate text within fields. This is very useful in pasting
repeating or duplicated data into several fields of the forms.
With a little trial and error and testing you should be able to manipulate the text within your form to
look the way you want it to. Just be patient.
Page 4 - 2
Index
Browsing Records
Electronic Forms User Guide
In ‘Browse’ you can create new records and edit, sort, print, and export them to another file. The
records appear in the current layout.
FileMaker Pro selects ‘Browse’ after you define fields or open a new file.
Layout Status Area
Layout Dialog Box
Form Layout
Book Mark: Move directly to a specific record
Flip through the pages of the book to browse through
the records contained in the file
Number of record on display
3
Total number of records in file
Records:
3
Indicates status of records: ‘Sorted’,’ Semi-sorted’,
‘Number Found’
Unsorted
The Layout Dialog Box
Form Layout
Shows the layouts available in the file. Clicking on the box will
indicate the layout names.
Form Layout
Instructions
Supplement
List View
The Record Book
Clicking on the name of the layout will change to that
layout. Layouts allow information in the records to be
displayed in different ways.
Allows several ways to browse through the records in the file.
The Book Mark may be used to go to a specific record by clicking and dragging
the Book Mark up or down through the book. The record number the Book Mark
is on will be indicated at the bottom of the Book.
Clicking on the Book pages will move through the records one at a time.
3
Clicking on the Record Number and entering a valid record number will move
directly to that specified record.
Page 5 - 1
Index
Browsing Records
Electronic Forms User Guide
Another option in viewing or browsing records is the ‘List View’ layout.
The List View allows viewing of all records in the file in a generic list
view.
The list view does not include all fields in the database but enough
information is included to identify specific records.
After a specific record(s) is located you may then switch back to the ‘Form Layout’ to view or print
that record on the form.
The ‘List View’ may also be printed to provide a log of all or specific records in a file.
The instructions on page 1-1 will also work in the ‘List View’.
Customized list views or display layouts can be added to form files to view information not contained
in the generic list view.
Page 5 - 2
Index
Finding Records
Electronic Forms User Guide
Using Find Mode
In ‘Find Mode’ you make ‘Find’ requests to locate records based on selected criteria. The located
records become the ‘Found Set’ for browsing, sorting, previewing, and printing. FileMaker Pro
switches to Browse after completing a find request.
Use ‘Find Mode’ to work with find requests, blank records into which you type or paste search
criteria. FileMaker Pro maintains a field-by-field index of the values in a file. When you run a find
request, FileMaker Pro looks through the index to find entries that match the search criteria.
Records that match the criteria are called the ‘Found Set’. Once you have created a ‘Found Set’, those
are the only records available for browsing, sorting, previewing, and printing.
To switch to ‘Find’, use the ‘Find’ button located on the List View Layout, select
‘Find’ with the mode selector at the bottom of your screen or choose ‘Find’ from
the Select menu. The keyboard shortcut is ‘Ctrl+F’.
Find
Find
Find Status Area
Form Layout
In ‘Find’, use the status area to create find requests. ‘Find’ requests locate the
records that match your find criteria. Those records become the found set, and
are the only records available for browsing, sorting, previewing, and printing.
If more than one ‘Find Request’ is valid all of them can be
accessed by using the request book.
Indicates number of current ‘Find Requests‘.
1
Requests:
1
Omit
Click in box to not find according to the search criteria.
Click on ‘Symbols’ button to select range, wildcard, and other criteria.
Symbols
Find
Click on the ‘Find’ button (or press ‘Enter’) to execute Find.
Page 6 - 1
Index
Finding Records
Electronic Forms User Guide
Omit
Choose this option when you want to include all records except those meeting the selected
criteria.
Example: “Mary” as the selected criteria with ‘Omit’ checked will find all records except those
with “Mary” in that field.
Symbols Definitions
< less than
<= less than or equal
> greater than
=> greater than or equal
= exact match
... range
! duplicates
/ / today’s date
? invalid date or time
@ one character
* zero or more characters
“” literal text
Number range criteria
Range - Numbers, Dates, Alphabetical (example=
1/1/93...1/1/94 returns all records within those
dates inclusive)
Only duplicated records with the selected criteria
Wildcards (see below)
Exact match (text)
Wildcards
When making a ‘Find Request’, you can use wildcards to find words when you’re not sure of all the
characters. FileMaker Pro looks for the words in text fields and in calculation fields with a text
result.
Choose the ‘@’ wildcard when you know the number of unknown characters in a field but are not
sure what they are.
For example, to find Gray and Grey, type Gr@y.
Choose the ‘*’ wildcard to substitute for any number of unknown characters.
For example, to find McKineh and McKenneh, type McK*.
Page 6 - 2
Index
Finding Records
Electronic Forms User Guide
If you ‘Find’ a record and then duplicate the record the duplicated record also becomes part of the
‘Found Set’ even if the selection criteria is changed in the record. Likewise, if you create a ‘New
Record’ after a ‘Find’, that record also becomes a part of the ‘Found Set’. If you do not want these
records as part of the ‘Found Set’ you must do another ‘Find’.
Find All
Click on the ‘Find All’ button in List View Layout to make all records available for
browsing or printing after a Find. ‘Find All’ is located in the ‘Select’ menu. The
keyboard shortcut is ‘Ctrl+J’.
Page 6 - 3
Index
Sorting Records
Sort
Electronic Forms User Guide
Sort is selected by clicking on the ‘Sort’ button or choosing ‘Sort’ from the ‘Select’
menu. The keyboard shortcut is ‘Ctrl+S’.
Sorting rearranges records according to the entries in a field or a set of fields. FileMaker Pro stores
records in the order you add them. You can sort all records or a group of ‘Found Records’ and then
browse, update, or print those records in the new sequence.
The sort order instructs FileMaker Pro to arrange records in ascending, descending, or custom
order. FileMaker Pro sorts by the first field in the sort order, then by the second, and so on. You
can sort records in any mode except ‘Find’.
To sort records:
1. ‘Find’ the records you want to sort, or choose ‘Find All’ from the ‘Select’ menu to sort all
records. For more information on ‘Find’ see section 7.
2. In any mode except ‘Find’, choose ‘Sort’ from the ‘Select’ menu. You will see the ‘Sort
Records’ dialog box.
3. In the Field List, select the name of the field you want to sort by and click ‘Move’ to put the
field name in the ‘Sort Order’ list.
4. Add any additional sort fields in the same way.
5. Click ‘Sort’.
Page 7 - 1
Index
FileMaker and
Form Menus
Electronic Forms User Guide
FileMaker Pro has nine pull-down menus on the menu bar.
File
Edit
View
Insert
Format
Records
Scripts
Window
Help
The menu groups, definitions and commands available within each group are as follows. The
explanations are also available within FileMaker Pro Help.
File
Use File menu commands to manage, print,
copy, and recover files, set preferences,
work with files on a network, and exit
FileMaker Pro.
New Database...
Open...
Close
Define Fields...
Define Relationships...
Define Value Lists...
Access Privileges
Sharing...
Print Setup...
Print...
Import Records...
Export Records...
Save a Copy As...
Recover...
Exit
Edit
Use Edit menu commands to create new
records, layouts, and find requests, to undo
actions, and to cut, copy, paste, clear, and
select FileMaker Pro data and objects.
Undo
Cut
Copy
Paste
Paste Special...
Clear
Select All
Spelling
Objects...
Preferences...
View
Use View menu commands to switch
between Browse, Find, Layout, and Preview
modes, to search and sort records, to
determine the type information in your fields.
The View menu options are different in
Browse, Layout, and Preview Mode.
Browse Mode
Find Mode
Layout Mode
Preview Mode
View as Form
View as List
View as Table
Toolbars...
Status Bar
Status Area
Text Rulers
Page Margins
Graphic Rulers
Text Ruler
Ruler Lines
T-Square
Object Size
Show...
Zoom In
Zoom Out
Insert
Use Insert menu commands to insert picture, Object...
sound, movie, or data into the database
Picture...
fields.
QuickTime...
Sound...
Current Date
Current Time
Current User Name
From Index...
From Last Record
Page 8 - 1
Index
FileMaker and
Form Menus
Format
Electronic Forms User Guide
Use Format menu commands to change the
appearance of text and field entries.
Commands are available based on the
current mode and selection. In Browse,
formatting changes apply to the current
selection only and you can mix fonts, font
sizes, and styles in a single field entry.
Records Use Records menu commands to work
with records in the file. The Records
menu commands are only available in
Browse and Preview Modes
Font
Size
Style
Align Text
Line Spacing
Text Color
Text...
Text Ruler
Line Spacing
Text Color
Text...
Number...
Date...
Time...
Graphic...
Button...
Protal...
Field Format...
Field Borders...
New Record
Duplicate Record
Delete Record
Delete All Records
Modify Last Find
Show All Records
Show Omitted
Omit Record
Omit Multiple...
Sort...
Replace...
Relookup
Revert Record
Layouts
Use Layouts menu commands along
with the Layout status area tools to work
with layouts. The Layout menu is
available only in Layout mode.
New Layout/Report...
Duplicate Layout
Delete Layout
Layout Setup...
Part Setup...
Set Layout Order...
Set Tab Order...
Set Rulers...
Arrange
Use Arrange menu commands in Layout
to work with objects and fields. You can
group, lock, and position objects, remove
extra space at the end of printed fields,
and change the sequence of fields you
move to with the Tab key.
Group
Ungroup
Lock
Unlock
Bring to Front
Bring Forward
Send to Back
Send Backward
Rotate
Align
Set Alignment...
Object Grids
Scripts
ScriptMaker...
Use Scripts menu commands to define
scripts for running a series of FileMaker Pro
commands and creating buttons to run scripts
and activate individual commands.
Window
Use the Window menu commands to
arrange and activate file windows.
Tile Horizontally
Tile Vertically
Help
Use Help menu commands to access the
FileMaker Pro Help file and get information
on using FileMaker Pro.
Contents...
Keys...
Quick Info
How to Use Help...
About FileMaker Pro...
Cascade
Arrange Icons
Page 8 - 2
Index
Printing Forms
Electronic Forms User Guide
There are several ways that electronic forms may be printed. One way is to use the ‘Print’ buttons
provided that use a ‘Script’ to perform a function of FileMaker Pro.
Print
Print
The ‘Print’ button will print all pages of the current Layout.
Of course you may also use the ‘Menus’ located at the top of the screen. To do this you would click on
‘File’ ‘Print’ in the menu and that would bring up the Print Dialog Box. This method would be used if you
wanted to print anything other than just one copy of the form or layout such as the Field Definitions,
multiple copies, all records being browsed, or just a certain page of a form or layout.
The following illustration shows what the Print Dialog Box looks like. The box will look slightly
different between the Windows and the Macintosh versions but all of the functions are the
same.
Page 9 - 1
Index
Printing Forms
Electronic Forms User Guide
Selecting Print Options
In FileMaker Pro, you can print specific pages, control the print quality, print to a file, add page
numbers, choose to print specific records, print field and script definitions, print a specific number of
copies, and collate pages. To select print options, choose ‘Print’ from the ‘File’ menu and select an
option or click on the “Print’ button.
- To print all pages in a form, click ‘All’.
- To print a range of pages, click ‘Pages’ and type the first page in the ‘From’ box and the last page
in the To box.
- If your printer offers different print qualities, click ‘Print Quality’ and select a print quality option
such as a dpi value (dots per inch) or High, Medium, Low, or Draft.
- To store print jobs to print later or to print from a different computer, check ‘Print to File’.
- If a form uses the page number symbols ( # # ) in a layout, you can change the starting page
number that prints at the bottom of each page by typing a number in the ‘Number Pages From’ box.
- To print all records in the ‘Found Set’, click ‘Records Being Browsed’.
- To print the current record only, click ‘Current Record’.
- To print a blank record, click ‘Blank Record’ and select one of the following options from the
pop-up list;
As Formatted to print fields as formatted in the Field Borders dialog box.
With Boxes to print each field shown by a box.
With Underlines to print each field with an underline.
To print a list of field definitions, click Field Definitions.
- To print a script definition, click ‘Script Definition For’ and select ‘All Scripts’ or a specific script
from the pop-up list.
- To set the number of copies you want to print, type a number in the ‘Copies’ box.
- To print complete, collated copies instead of all copies of a page before going on to the next, click
‘Collate’ copies. Once you've selected your print options, click ‘OK’ to begin printing.
Page 9 - 2
Index
Printing Forms
Electronic Forms User Guide
Troubleshooting Printer Problems
The majority of problems and user frustrations using FileMaker Pro are usually traced to printer
problems.
FileMaker Pro uses the printer driver (for Windows) or printer definition (for Macintosh) to define
how the screen looks like and where the print margins are located. These margins are defined by
the maximum printable area for the printer selected and is not definable by the user. This causes
most of the problems such as multiple pages running onto the next or previous page(s).
Hewlett Packard LaserJet Series 4 in PCL Mode If you experience any difficulties or poor
printing results with LaserJet series 4 printers in PCL mode, go into the Printers control panel,
select Printer Setup (for the LaserJet 4), click Options, and change the Graphics Mode option
from HP-GL/2 to Raster.
Hewlett Packard LaserJet Series 5 and 5si If the printer hangs on multi-page or landscape
forms, check the installed memory in the Print Manager setup for the printer. It must match excatly
the memory installed in the printer. This is not an automatic function when installing the drivers for
the printer - it must be set manually.
Hewlett Packard LaserJet 4000 If printing causes FileMaker to lock up or generates a General
Protection Fault, check to see that the printer is using PCL5e. The default driver that comes with
the HP 4000 uses PCL6 which will not work in FileMaker or Microsoft Office 97 products.
Page 9 - 3
Index
Printing Forms
Electronic Forms User Guide
Special Printing Requirements
Some forms are required to be printed on other than standard white paper. If a form requires
special paper, a Warning box will notify you when the file is opened. This ‘Warning Box’ will
tell you what paper is required:
Warning
The Property Disposal Request
(Form SF 267-A EF)
MUST be printed on 4-Part Carbonless Paper.
It will NOT be accepted on plain paper.
OK
The most common paper required is 4-part carbonless paper. This paper is available from
Headquarters Reporduction and may be ordered using a Reporduction Request form. Other
papers that have been required are 3-part carbonless, 8-1/2 by 14 paper, and blue paper
(Retirement Information Form).
Failure to print the form on the paper specified will probably cause the form to be rejected when
submitted.
Other Warnings or Special Instructions for forms may also be displayed in a ‘Warning Box’.
Page 9 - 4
Index
Layouts
Electronic Forms User Guide
FileMaker Pro can display the database information in different formats or displays. These displays
are called ‘Layouts’.
These ‘Layouts’ may be accessed in several different ways:
Layout Buttons
Layout buttons are included in form layouts depending on layouts available.
To Form
Opens or goes to the Form Layout
List
List View
View
Opens or goes to the List View Layout
Instructions
Instructions
Opens or goes to the Instructions Layout
Supplement
Opens or goes to the Supplement Layout
Electronic forms will always have at least two layouts: the Form Layout and a List View Layout.
Other layouts may be included as required such as supplements, instructions or related forms.
Some form files may also include several different form layouts using a shared database (such as
the ‘Special Provisions for Permits and Franchises’ file).
When form files are opened they default to the ‘Form Layout’. This may be customized by users by
specifying which layout to open to in the ‘Document Preferences’ menu.
The Layout Dialog Box
Form Layout
3
Records:
3
Form Layout
Form Layout
Instructions
Supplement
List View
Shows the layouts available in the
file. Clicking on the box will
indicate the layout names.
Clicking on the name of the layout will change to that layout.
Layouts allow information in the records to be displayed in
different ways.
Will work in ‘Browse’, ‘Find’, ‘Layout’ or ‘Preview’ Mode
Unsorted
See section 3 (Form Buttons) for more information on Buttons or section 6 (Browsing Records) for
more information on Layouts.
Page 10 - 1
Index
Importing and
Exporting Records
Electronic Forms User Guide
Importing Records into FileMaker Pro
You can import records from other FileMaker Pro files or from files created in other applications.
To import records from a FileMaker Pro file or files from other applications:
1. Open the destination file. This is the file that will receive the imported records.
2. Choose ‘Import/Export’ in the ‘File’ menu and ‘Import Records’ from the submenu. You will see
the ‘Open File’ dialog box.
Some of the importable file types are:
*.DBF = dBase III and IV
*.WKS & *.WK1 = Lotus 1.2.3.
*.SLK = Microsoft Excel
*.TAB & *.TXT = Tab-Separated Text
*.CSV & *.TXT = Comma-Separated Text
*.FM, FP3, FP5, WF9 = FileMaker Files
3. Locate the source file in the files list and click OK.
You will next see the ‘Import Field Mapping’ dialog box.
Page 11 - 1
Index
Importing and
Exporting Records
Electronic Forms User Guide
Import Field Mapping
View By:
Matching Names
Data in “134_146.FP3” Fields in “134_146 Copy.FP3”
Contractor
Street Address
City
State
Zip Code
Date
Contractor
Street Address
City
State
Zip Code
Date
<<
Scan
Data
Field Names
>>
Define Fields...
Add new records
Replace data in current found set
Import
Cancel
4. The fields in the source file will map to the fields in the destination file as shown in the list. You
can drag the field names in the ‘Fields In’ list to change where FileMaker Pro maps data. Click the
‘Scan Data’ buttons to view data in the source file. By clicking the connection arrows between the
fields, you can turn on or off the importing of data for those fields.
5. If the Destination file is a revised or updated version of the source file, or if the fields in both files
are the same, click on the ‘Match Fields’ button to match the field entries.
6. Click ‘Add New Records’ to append the imported records to the end of the destination file or
‘Replace Data in Current Found Set’ to overwrite any existing records with the imported records.
7. Click on ‘OK’ and FileMaker Pro will do the rest.
Exporting Records from FileMaker Pro
Exporting records from FileMaker Pro to another application type is just as simple.
1. Open the source file - Locate the source file in the files list and click ‘OK’.
Some of the exportable file types are:
*.DBF = dBase III and IV
*.WKS & *.WK1 = Lotus 1.2.3.
*.SLK = Microsoft Excel
*.TAB & *.TXT = Tab-Separated Text
*.CSV & *.TXT = Comma-Separated Text
*.MER = Microsoft Word Merge Document
Page 11 - 2
Index
Importing and
Exporting Records
Electronic Forms User Guide
2. Choose ‘Import/Export’ in the ‘File’ menu and ‘Export Records’ from the submenu. You will see
the ‘Export Records To File’ dialog box.
3. Select the ‘File Type’ format desired.
4. Type an eight digit name for the file. You may type the three letter extension or, if omitted,
FileMaker Pro will automatically add the correct extension according to the file type selected.
5. Click ‘OK’.
Importing and Exporting Selected or Sorted Records
To Import or Export selected files:
1. Open the source file.
2. Create a ‘Found Set’ (see Section 7, Finding Records) of the records to be exported or
imported.
3. To import selected files open the destination file and follow the import procedures to import
records from the source file. To export the selected files follow the procedures to export records.
4. The ‘Found’ records may then be sorted if desired.
To Import or Export Sorted Records:
Normally FileMaker Pro records are in order of creation, i.e., first record first, last record created
last. The records can be sorted prior to importing or exporting, putting the records into a more
usable order such as date, alphabetical, or numerical.
Simply perform a ‘Sort’ (see Section 8, Sorting Records) prior to importing or exporting.
Page 11 - 3
Index
Supported Systems
and Printers
Electronic Forms User Guide
System Support
Since you are using the tutorial it is assumed that your computer has at least the minimum
requirements to run FileMaker Pro and WSDOT electronic forms.
The following are the minimum requirements to use electronic forms (FileMaker Pro 5.0):
Windows
Macintosh
Pentium class processor with 64 MB RAM
memory
64 MB RAM memory
Hard drive disk with at least 70 MB of disk
space free
Hard disk drive with at least 70 MB of disk
space free
System 7.6.1 or higher
Windows 95 or later with TruType fonts installed
Helvetica and Times normal fonts
VGA video adapter
Laser or Ink Jet printer
Laser or Ink Jet printer
NOTE: The above specifications are minimum requirements to utilize FileMaker Pro 5.0 and related
software only. Operating additional applications simultaneously may require additional memory.
MAC NOTE: Previously we recommended using Arial and Times New Roman TruType fonts on
the Macintosh platform. We have discovered that those fonts installed on a Macintosh will cause
extremely long print times (as much as 3 hours for some multi-page forms). Do not use these fonts.
If you have these fonts installed on your Macintosh system and are experiencing long print times,
removal of these fonts should significantly reduce print times. Contact your computer support staff
for assistance.
Supported Printers:
HP Series 2
HP Series 3, 3si
HP Series 4, 4m, 4m+, 4si
HP Series 5, 5p, 5si, 5L
HP Series 6
HP Series 4000
HP Series 6000
HP Deskjet 500, 550, 550c
HP Deskjet Series 600, 700, 800,1100
The forms should print on any laser printer with no problems. See the Notes and Warning Section
for known problems with specific printers.
Page clipping may occur with some inkjet printers, but should not be significant enough to cause
problems.
The forms have not been tested on dot-matrix printers.
Page 12 - 1
Index
Supported Systems
and Printers
Electronic Forms User Guide
Printer / System Troubleshooting
FileMaker reads the printer driver and the printer you are using and that defines the page setup of
the form on your system. Some printers will not print the forms correctly simply because their
printable area is different than the supported printers.
This margin limitation comes into play when you are using a printer that has a smaller printable
area than the listed printers. This will cause the bottom of pages to be clipped off. On most
printers, the clipping will be fairly minimal and not be a significant problem. Some older printers or
printers not tested, may have considerable clipping, enough to be unusable with the Runtime
electronic forms.
Printer names longer than 31 characters (including the server name) have been known to cause
long print times or can cause FileMaker to crash.
If you are new to FileMaker pro and you do not have one of the supported printers available to
print to, we suggest you contact your computer support staff to assist you.
Long Print Times
Several different reasons will cause long print times of electronic forms. Troubleshooting long print
times can be difficult. The following causes have been found to cause long print times for users.
There is no set remedy for these causes. Remedies will vary according to location, network type
and location, and/or system type:
1. Printer driver - Check the printer driver. For Macintosh, LaserWriter 8.3 works quite well for
printing to Apple LaserWriter Postscript, and Hewlett Packard printers.
2. Network attached printer - Wire routing and the number of users using the printer can
significantly affect print times.
3. Fonts - Using a printer without the correct fonts or the fonts disabled can cause long print
times. ‘Arial’ and ‘Times new Roman’ installed on a Macintosh printing to a printer without
those fonts resident will cause very long print times.
4. Network attached printer - Wire routing and the number of users using the printer can
significantly affect print times.
5. Fonts - Using a printer without the correct fonts or the fonts disabled can cause long print
times. ‘Arial’ and ‘Times new Roman’ installed on a Macintosh printing to a printer without
those fonts resident will cause very long print times.
Page 12 - 2
Index
Supported Systems
and Printers
Electronic Forms User Guide
6. Multi-User File - A FileMaker Pro file being utilized by several users can cause slow
processing and print times. Also, a user with a slow system in a Multi-User file can cause very
slow times (A Multi-User file operates at the speed of the host machine). The more users
connected to a Multi-User file - the slower the response times and print times. Multi-User files
also increases Network traffic significantly - even if only one user is using the file.
7. Low cache allocation - A low print cache or disk cache allocation may cause slow print
times for both Macintosh and Windows systems. If possible increase cache size.
8. Multiple applications - Multiple applications running simultaneously on a system without
sufficient memory can cause slow file response and print times.
For more information on printing problems see sections 10 (Printing) and Appendix A (Notes and
Warnings).
Multi-User Electronic Forms
Multi-User forms and other File Maker Pro files, even if only one user is using the file, causes
increased data traffic on a network which can cause a network slowdown and even a complete
shutdown. As a courtesy to other network users it is recommended that users keep Multi-User
FileMaker Pro files to a minimum.
If you encounter a problem or find a solution to a problem please call or E-mail Larry Dykstra at
Forms Management so this information can be shared with other users and computer support
personnel.
Page 12 - 3
Index
Notes and Warnings
Electronic Forms User Guide
FMPRO NOTE: If a FileMaker Pro file is terminated without properly closing, the next time the file is
open you may get a message that the file was not closed properly. FileMaker Pro will then make a
file check and repair any damage that might have been done.
On occasion the file will become damaged and FileMaker Pro will give you a warning that the file is
damaged and cannot be opened. These files usually are recoverable using the ‘Recover’ command
in the ‘File’ menu. For more information consult your FileMaker Pro documentation.
NOTE: FileMaker Files that have been E-Mailed sometimes cannot be opened just by
double-clicking on the file icon. If you receive a file such as this then you will have to open
FileMaker Pro first then open the file from within FileMaker Pro.
NOTE: On a few occasions FileMaker Pro files will get corrupted when they have been E-Mailed
and cannot be opened. Be aware that this does happen and there is no known fix. If you do receive
a corrupted file that you cannot open even from within FileMaker Pro then the only recourse is to
ask the person to send you another copy. Usually these files are not recoverable.
FMPRO NOTE: Most problems with WSDOT electronic forms are printer problems. If you have
printer problems and the suggestions included in this tutorial do not help you please contact your
computer support staff for assistance.
NOTE: One area that is overlooked by a lot of Users is the print area of the Dialog Box. For
example; if ‘Records being browsed’ is highlighted then all records in the file or all records in the
‘Found Set’ will be printed. If you have 200 records in the file, all 200 records will be printed.
Hewlett Packard LaserJet Series 4 in PCL Mode If you experience any difficulties or poor
printing results with LaserJet series 4 printers in PCL mode, go into the Printers control panel,
select Printer Setup (for the LaserJet 4), click Options, and change the Graphics Mode option from
HP-GL/2 to Raster.
Hewlett Packard LaserJet Series 5 and 5si If the printer hangs on multi-page or landscape
forms, check the installed memory in the Print Manager setup for the printer. It must match excatly
the memory installed in the printer. This is not an automatic function when installing the drivers for
the printer - it must be set manually.
Hewlett Packard LaserJet 4000 If printing causes FileMaker to lock up or generates a General
Protection Fault, check to see that the printer is using PCL5e. The default driver that comes with
the HP 4000 uses PCL6 which will not work in FileMaker or Microsoft Office 97 products.
Printer Names Longer than 31 Characters Printer names longer than 31 characters (including
the server name) have been known to cause FileMaker to crash.
If you have problems with a form itself or if you have a suggestion to improve a form please contact
Forms Management (Larry Dykstra or Antonette [Toni] Benham) by E-mail or by phone at 705-7424.
Appendix A - 1
Index
Glossary of Terms
Electronic Forms User Guide
Browse
In Browse you can create new records and edit, sort, print, and export them to
another file.
Button
An object, graphic or icon to which a script is attached so wneh the button is
‘pushed’ the attached script or mini-program will start.
Click
Clicking means to point the pointer or I-bar on an item in the layout and pressing
the mouse or pointer button once.
Cursor
In Browse mode, a pointer to show what field is current to enter new information,
alter existing information or delete information.
Database
A collection of information or data. Examples of information you can collect
and store in a database include a catalog of parts or products and a list of
sales contacts. To organize a database, you use a database management
application like FileMaker Pro.
A FileMaker Pro database consists of records, fields, files, and layouts.
Destination File
FileMaker file that will receive imported records.
Dialog Box
A window that appears temporarily to request or supply information. Many
dialog boxes have options that must be selected before a command is carried
out.
Directory
Part of a structure for organizing files on a disk. A directory can contain files
and other directories (called subdirectories).
Duplicate
Makes an exact copy of the current record. You can use Duplicate Record to
simplify data entry when there are only minor differences between records. If
you've set up fields to automatically enter data, FileMaker Pro enters the values in
those fields for you.
Export Records
Saves the records you select in a format that can be used by other applications.
You select a destination file for the records in the Export Records to File dialog
box.
Field
Within a record, you enter information into a field, which represents a category of
information. A field can contain names or other text, numbers, pictures or sounds,
dates, times, calculations, or summaries.
File
A file is a set of related records. A file also contains the layouts and scripts
designed for the records.
Appendix B - 1
Index
Glossary of Terms
Electronic Forms User Guide
Find
Activates Find mode. In Find you make find requests to locate records based on
selected criteria. The located records become the found set for browsing,
sorting, previewing, and printing.
Folder
Macintosh computer file directory in which computer files or programs are kept.
The PC equivelant is directory or subdirectory.
Font
A style of text type used by a computer to display text on the screen and for
printing. Electronic forms use Arial (Helvetica) and Times New Roman (Times)
for display and printing.
Found Set
Records selected using the Find Mode becomes the Found Set.
Group
Several items or symbols combined so that they can be treated as a single item.
Icon
A symbol usually associated with a script or macro to perform a specific
function. Also can be referred to as a button.
Import Records
Import records from other FileMaker Pro 5.0 for Windows or FileMaker Pro 5.0 for
Macintosh files or from files created in other applications.
Layout
You use a layout to organize information for display, data entry, and printing.
You can create several layouts for the same information because a layout is
completely separate from the information it contains. A layout determines how
you present information--not how you store it.
Locked
With a file locked means it it not accessible without the proper password. In
Layout mode it refers to text, or a graphic item that cannot be moved, editied, or
deleted. With records it means the records cannot be altered, or deleted.
Mode
FileMaker Pro has four different modes: Browse, Find, Layout, and Preview. You
select a mode based on the work you need to do.
- To enter data and view, add, change, omit, and delete records, use Browse .
- To work with a subset of records in your database that match the criteria you set,
use Find. For example, in a customer database, you might want to find the
customers who ordered a specific product or service.
- To design layouts that present your data for different tasks (such as invoice
reports or order processing), use Layout.
- To see how records will look when printed, use Preview. After previewing your
records, you can adjust the layout if needed.
Appendix B - 2
Index
Glossary of Terms
Electronic Forms User Guide
Preview
Preview usually refers to a screen mode to see how records will look like when
printed.
Read-Only
A Read-Only file cannot be saved, updated or written to. Electronic forms files
are located in a Read-Only directory. They must be copied to a directory where
the user has read and write priveleges.
Record
A record contains the information you keep about one product, person, or
transaction. A record corresponds to a paper form, such as a purchase order,
which contains detailed information in many different categories.
Script
A script instructs FileMaker Pro to carry out a sequence of specified tasks for a
specific file. Scripts can have subscripts to perform additional tasks.
To build a script you define a set of steps you want the script to perform. When
setting up a script, FileMaker Pro does not record your actions as you perform
them. You choose steps and build the script based on the current state of the
file.
To perform a script, you choose it from the Scripts menu or the Define Scripts
dialog box. You can also create buttons in a layout to perform scripts or run
specific commands.
Sort
Sorting rearranges records according to the entries in a field or a set of fields.
FileMaker Pro stores records in the order you add them. You can sort all records or
a group of found records and then browse, update, or print those records in the new
sequence. The sort order instructs FileMaker Pro to arrange records in ascending,
descending, or custom order. FileMaker Pro sorts by the first field in the sort order,
then by the second, and so on.
You can sort records in any mode except Find.
Source File
The file that contains the records or information that will be received or imported.
See also Destination File.
Subdirectory
See Directory
Wildcard
When making a find request, you can use wildcards to find words when you're not
sure of all the characters. FileMaker Pro looks for the words in text fields and in
calculation fields with a text result.
Window
A rectangular area on the screen desktop in which applications or documents
are viewed. Windows can be opened, closed, moved, and resized. Several
windows can be opened at the same time. Windows can be reduced to an icon
or enlarged to fill the entire desktop.
Appendix B - 3