1
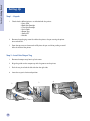
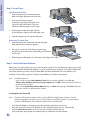
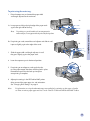
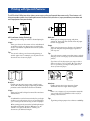
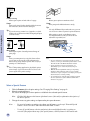
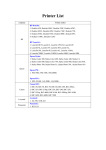
User's
Guide
HP DeskJet 1120C
Professional Series
This User's Guide with video help is also
available in electronic copy in the Starter CD.
Acknowledgements
Notice
HP ColorSmart II, HP PhotoREt II and HP ZoomSmart
Scaling Technology are trademarks of Hewlett-Packard
Company.
The information contained in this document is subject to
change without notice.
Microsoft is a U.S. registered trademark of Microsoft
Corporation.
Hewlett-Packard makes no warranty of any kind with regard
to this material, including, but not limited to, the implied
warranties of merchantability and fitness for a particular
purpose.
Windows is a trademark of Microsoft Corporation.
Hewlett-Packard shall not be liable for errors contained
herein or for incidental or consequential damages in
connection with the furnishing, performance, or use of this
material.
No part of this document may be photocopied, reproduced,
or translated to another language without the prior written
consent of Hewlett-Packard Company.
Contents
Section
1 Getting Started
• Understanding the Printer's Parts and Functions
• Setting Up
• Accessing Information
Section
2 Printing Basics
• Loading Paper
• Replacing and Maintaining Print Cartridges
• Getting to Know Your Printer Software
• Changing Print Settings
• Printing with Special Features
• Using Your Printer on a Network
• Printing from DOS Software Programs
Section
8
10
11
12
13
15
17
3 Support
• Troubleshooting
• Customer Support
• HP Supplies
Section
2
4
7
18
21
23
4 Specifications
• Printer Specifications
• Regulatory Notice
• Declaration of Conformity
• Hewlett-Packard Warranty Statement
25
26
27
28
1
Section 1 - Getting Started
Understanding the Printer's Parts and Functions
9
8
1
2
3
5
7
4
12
611
10
4
6
Printer Parts
Functions
1
Power Button and Indicator
Turns the printer on and off. See the following section on
"Printer Lights".
2
Resume Button and Indicator
Indicates that user intervention is required.
See the following section on "Printer Lights".
3
Cartridge Indicator
Indicates print cartridges need user attention.
4
Paper Length/Width Adjuster
Holds paper in place.
5
Alternative Top Media Feed
Holds up to 10 sheets of paper.
6
Main Bottom Media Tray
Holds the stack of commonly used paper.
Holds up to 150 sheets of paper.
7
Output Tray
Receives paper as it comes out of the printer.
Holds up to 50 sheets of printed paper.
8
Print Cartridge Latches
Secure the print cartridges.
9
Printer Cover
Keeps dust particles from the printer parts.
10
Rear Media Feed
For feeding thick paper requiring straight paper path.
11
Power Socket
For connecting to a power source.
12
Parallel Port
For sending and receiving data to and from the computer.
2
Section 1 - Getting Started
Printer Lights
The lights on the front panel of the printer indicate if the printer is on, in the process of receiving data,
or in an error state.
If the lights are...
Then...
Power
Resume
Cartridge
Off
Off
Off
The printer is off. Press the Power button to turn on the printer.
Power
Resume
Cartridge
On
Off
Off
The printer is ready to print. You can send a document to the printer.
Power
Resume
Cartridge
Blinking
Off
Off
The printer is receiving data from the computer or is printing.
Wait for the document to print.
Power
Resume
Cartridge
Blinking
Blinking
Off
There is either a paper jam or the movement of the print cartridge
cradle is obstructed.
Power
Resume
Cartridge
Blinking
Blinking
Blinking
The printer is in error state.
Turn the printer off and then on. If the three lights remain blinking,
call your nearest Customer Support center, see page 21.
Power
Resume
Cartridge
On
Off
Blinking
This indicates one or more of the following:
• the top cover is open;
• a print cartridge is missing or not functioning properly.
Power
Resume
Cartridge
On
Blinking
Off
This indicates one or more of the following:
• the printer is out of paper;
• the printer is waiting for the ink on special media (transparencies)
to dry, before printing the next page;
• user intervention required to load or feed paper by following the
instructions on the computer screen before pressing the Resume
button to continue printing;
• user intervention required to feed paper to the rear media feed.
3
Section 1 - Getting Started
Setting Up
Step 1 - Unpack
1
Check that the following items are included with the printer:
• Power Cord
• Black Print Cartridge
• Color Print Cartridge
• User’s Guide
• Output Tray
• Starter CD
• Print Kit
2
Remove the packaging material and the four pieces of tape securing the printer
(one at the back).
3
Open the top cover and remove the fifth piece of tape and white packing material
from the inside of the printer.
Step 2 - Install the Output Tray
1
Remove the output tray from its plastic cover.
2
Align the guides on the output tray with the grooves on the printer.
3
Push the tray in to lock the left side then the right side.
4
Lower the tray to its horizontal position.
2
4
3
4
Note: The cable that connects the printer to the computer is not supplied with the printer. You will need to
purchase a parallel cable. HP recommends a high-quality IEEE-1284 compliant parallel printer cable
(HP part number C2950A or C2951A).
1
Turn the computer off.
2
Connect one end of the printer cable to the parallel port
on the back of the printer and snap both clips onto the
notches of the connector.
3
Connect the other end of the printer cable to the parallel
port on the back of the computer and tighten the screws
on the connector.
Note:
Do not share the parallel port with a Zip drive or scanner.
4 Plug the power cord into the printer and then into a grounded outlet.
Step 4 - Install the Print Cartridges
1
Press the Power button to turn on the printer.
2
Open the printer cover.
The print cartridge cradles will move to the center of the printer.
3
Lift up the print cartridge latches.
4 Remove the color print cartridge from its package.
5
Gently remove the tape covering the ink nozzles.
Be careful not to touch the ink nozzles or the
gold-colored contacts.
6 Insert and push the print cartridge firmly down into the left cradle
and snap the cartridge latch onto the print cartridge.
7
51645A
Repeat steps 4 to 6 to install the black cartridge
into the right cradle.
Note:
8
C1823A
Both print cartridges must be correctly
installed for the printer to work.
Close the printer cover.
5
Section 1 - Getting Started
Step 3 - Connect the Cables
Section 1 - Getting Started
Step 5 - Insert Paper
Main Bottom Media Tray
1 Raise the output tray and extend the paper
width and length adjusters to the maximum.
2
Insert up to 150 sheets of paper
aligning the right edge of the paper stack
against the right side of the In-Tray, print
side down. Slide the paper in until it stops.
3
Slide the paper width and length adjusters
in until they press lightly against the paper stack.
4
Lower the output tray to its horizontal position.
Alternative Top Media Feed
1 Extend the alternative media feed and slide the paper
width adjuster to the outermost position.
2
Insert up to a maximum of 10 sheets of paper along
the right side of the alternative media feed, print side down,
until it stops.
3
Slide the paper width adjuster in until it stops at the edges of the paper.
Step 6 - Install the Printer Software
Before you can use the printer, you must install the printer software. To install the printer software, you need
at least 8 MB of RAM and Microsoft Windows 3.1x or 95 installed in your computer. To install the Windows NT
4.0 printer software, you need at least 24 MB of RAM and Microsoft Windows NT 4.0 installed in your
computer. Please refer to page 25, “Hardware Compatibility” for hardware requirements.
Note:
For Windows 95 users.
* If you see this message, New Hardware Found, before or during installation, select Do not
install a driver (Windows will not prompt you again) and click OK. Follow the instructions below to
install the printer software.
* If you see the Update Device Driver Wizard dialog, click Next. Subsequently, click Finish. Follow the
instructions below to install the printer software.
Installing from the Starter CD
Note:
1
2
3
6
The Starter CD includes a utility to easily copy the HP DeskJet 1120C printer software to 3.5-inch,
high-density diskettes. This allows you to use the diskettes to install the software on systems that do
not have a CD-ROM drive. See the Printer Software menu in the Starter CD.
Start Microsoft Windows and make sure no other Windows applications are running.
Insert the Starter CD into your CD-ROM drive. The installation program will run automatically.
Click the Printer Driver option on the CD menu to install your printer software.
If the installation program does not automatically run, follow the instructions below.
Section 1 - Getting Started
If the install does not run automatically
1
Start Microsoft Windows and make sure no other Windows applications are running.
2
Insert the CD into your computer's CD-ROM drive.
3
Select File, Run in Windows 3.1 or select Start, Run in Windows 95/NT 4.0.
4
At the Command Line box, type the letter of your computer's CD-ROM drive,
followed by :\INSTALL (for example, D:\INSTALL).
5
Follow the instructions that appear on the screen to complete installation.
Step 7 - Align Cartridges and Printer Test
You should align the print cartridges whenever a new cartridge is installed. This ensures that black and
color inks align when printed together on the same text, line, or graphic.
1
Run the HP DeskJet 1120C Toolbox software utility by double-clicking on the DJ1120C Toolbox icon
on the desktop or in the program group.
2
Click the Maintenance tab, and select Align Print Cartridges.
Follow the instructions on the computer screen.
3
Once you have aligned the cartridges, you may want to test the printer setup.
To do so, select Print a Self-Test from the Maintenance tab of the HP DeskJet 1120C Toolbox.
Accessing Information
User's Guide
includes information about using the printer software, selecting and using paper, printing
using special features, replacing print cartridges, solving printer problems, ordering
HP Supplies and accessing Customer Support.
Toolbox
provides "how-to" and troubleshooting instructions, as well as access to printer maintenance
functions and HP information.
Starter CD
includes a quick tour of your printer, a diskette download utility for the printer software,
videos on how to use your printer, print samples, an electronic copy of this user's guide, and
ordering information.
Print Kit
includes software that you can use for creating projects to print using the HP DeskJet 1120C
printer.
Web Site
http://www.hp.com/go/dj1120 or http://www.hp.com provides a link to the HP Web site for
latest printer software, product and support information.
Note:
If the help suggestions provided in the user's guide, toolbox, and Starter CD are not sufficient to help you
solve your printing problems, you may obtain assistance from the HP Customer Support Center. See
page 21 for a list of resources available to you for the support and maintenance of your printer.
7
Loading Paper
Your printer supports paper sizes from 4"x6" to 13”x19” .
Paper may be loaded using one of the ways described below.
Section 2 - Printing Basics
Main Bottom Media Tray
This is the default tray for loading commonly used paper.
Holds up to 150 sheets of paper or 15 envelopes.
Alternative Top Media Feed
Designed for occasional printing such as printing
on transparencies, labels or envelopes.
Holds up to 10 sheets of paper or 3 envelopes.
Rear Media Feed
Provides a straight paper path for printing on
thick paper (up to 0.3mm) such as cardboard.
Holds 1 sheet of paper at any time.
Tips for Selecting Paper
8
•
Always use paper that conforms with those listed under "Recommended Media Weight and Sizes",
in the Printer Specifications section on page 25.
•
Do not use media that is damaged, curled, or wrinkled. Do not use paper with cutouts or perforations
or paper that is heavily textured or embossed.
•
Do not use multiple-part forms.
•
Load only one type of paper at a time into any of the trays.
•
Always insert paper print side down, with the right edge of the paper aligned against the right edge
of the tray.
•
Do not load more that 150 sheets of paper or 15 envelopes into the main tray at one time.
For the alternative tray, do not load more than 10 sheets of paper or 3 envelopes.
The rear media feed only takes 1 sheet of paper at a time.
To print using the main tray:
1
Raise the output tray and extend the paper width
and length adjusters to the maximum.
2a
2a Insert paper and align the right edge of the paper stack
against the right side of the tray.
Note:
For printing on special media such as transparencies
and envelopes, insert paper with the print side facing down.
3
Section 2 - Printing Basics
2b For printing on cards, extend the card adjuster and slide in until
it presses lightly against the edge of the cards.
2b
Slide the paper width and length adjusters in until
they press lightly against the paper stack.
4 Lower the output tray to its horizontal position.
5
For printing on envelopes or cards, push the tabs
near the paper output slot down until they lock in place.
Remember to push the tabs back up into place
once printing is complete.
5
6 Adjust print settings in the HP DeskJet 1120C printer
driver to match the paper type, size, and orientation.
See "Changing Print Settings" on page 12.
Note:
For information on using the alternative tray, rear media feed, or printing on other types of media,
see "Print on various paper types and sizes" on the "How Do I?" tab in the HP DeskJet 1120C Toolbox.
9
Replacing and Maintaining Print Cartridges
Replacing the Print Cartridges
Note:
Do not remove a print cartridge until you are ready to replace it. If one print cartridge is empty,
the other will still print. However, the printer will not print unless both cartridges are in place.
Section 2 - Printing Basics
Use only recommended print cartridges (HP part no. 51645A for black and HP part no. C1823A for
color). Damage to the printer or the print cartridge resulting from modifying or refilling the print
cartridge is not the responsibility of Hewlett-Packard.
1
Turn on the printer, and then open the top cover.
The print cartridge cradles move to the center of the printer, and the Cartridge light flashes.
2
Lift up the print cartridge latch, grasp the top of the print cartridge, and pull it up and out of its cradle.
3
Remove the new print cartridge from its package and gently remove any tape covering the ink nozzles,
being careful not to touch the ink nozzles or the gold-colored contacts.
4 Push the new cartridge down firmly into its cradle slot and close the print cartridge latch.
5
Close the printer's top cover.
The cartridges return to their "home" position on the right side of the printer,
and the Resume light stops flashing.
Maintaining the Print Cartridges
Aligning the print cartridges
You should align the print cartridges whenever a new cartridge is installed. This insures that black and color
inks will align when printed together on the same text, line, or graphic.
1
2
3
4
5
Turn on the computer and printer.
Run the HP DeskJet 1120C Toolbox by double-clicking the DJ1120C Toolbox icon on the desktop
or in the program group.
Click the Maintenance tab.
Select Align Print Cartridges.
Follow the instructions on your computer screen to align the cartridges.
Cleaning the print cartridges
Clean the print cartridges when you notice lines or dots missing from printed text or graphics.
Note:
1
2
3
4
10
Do not clean print cartridges unnecessarily, as this consumes ink and shortens the life
of the print cartridges.
Run the HP DeskJet 1120C Toolbox by double-clicking the DJ1120C Toolbox icon on the desktop or in
the program group.
Click the Maintenance tab.
Select Clean Print Cartridges.
Follow the instructions on your computer screen to clean the cartridges.
Getting to Know Your Printer Software
Software
This section provides an overview of the components and functions of your printer software.
Printer Software Components
The HP DeskJet 1120C printer driver is equipped with special printing capabilities (see Printing with Special
Features), and enhanced print time functions (see details below). In addition, the following software utilities are
provided:
Toolbox program provides access to all the information you need when using the printer.
•
Status Monitor provides printer status information such as current print job and current print settings. It
also allows you to cancel your print job.
•
Uninstaller provides an easy and efficient means to remove the printer software,
and the entries no longer required from the Window's registry.
•
Access HP Web Site provides a link to HP web site for latest printer software,
product and support information.
•
Registration Utility allows you to register your printer through the Internet. Registration entitles
you to receive prompt information about software upgrades, and future HP products.
You can access these functions in the printer's program group.
Enhanced Print Time Functions
The HP DeskJet 1120C printer driver provides several functions that you can access in the user interface.
Note:
•
Print Preview. The HP DeskJet 1120C printer driver has the ability to display a
preview of your actual printout before printing. Application preview only shows you the
printout based on the application's options. The HP DeskJet 1120C printer driver however
will show you the actual output, that is, it shows you the combined effect of the
application and printer settings that the printer will finally print. If what you see in the
Print Preview is not what you want, then you cancel the print job. Remember to reselect
your print settings before printing again.
•
Print Settings Confirmation. The HP DeskJet 1120C printer driver provides you a quick
means to change some common printing options such as print quality, number of
copies, and paper type without having to change the settings in the printer driver. When
you print, a popup dialog with the common printing options appears. You may change
these options or click Print to continue.
By default, the enhanced print time functions are enabled. You can customize these
functions in the Preference tab of the printer driver. See "Changing Print Settings" on page 12.
11
Section 2 - Printing Basics
•
Changing Print Settings
Select Your Printer
To use your HP DeskJet 1120C printer, make sure that it is selected as the default printer.
To select your printer as the default printer - Windows 95 and Windows NT 4.0
Section 2 - Printing Basics
1
2
3
Click Start, select Settings followed by Printers.
Click the HP DeskJet 1120C printer icon to select it.
From the File menu, select Set As Default, then close the window.
To select your printer as the default printer - Windows 3.1
1
2
3
4
In the Program Manager, open the Main program group.
Double-click Control Panel to open it, then double-click Printers.
Select the HP DeskJet 1120C printer from the Installed Printers list, and then click
Set As Default Printer.
Click Close and exit the Control Panel.
Change Print Options
HP’s Print Settings dialog box allows you to select settings such as paper type and print quality that are not
provided by the software program.
You can change the print settings for the current document from your software program. This procedure will vary
depending on the software program you are using.
1
2
3a
3b
3c
3d
4
Select either Print, Print Setup or Printer Setup from the File menu.
Click Printer, Setup, Options or Properties according to your software program.
If you click Printer in step 2, you will need to click Options, then Setup.
If you click Setup, you will either see the HP Print Settings right away, or you will need to click Options.
If you click Options, you will need to click Setup.
If you click Properties, you will see the HP Print Settings right away.
Change the settings under the Setup, Color, Features, or Preference tabs in the HP print settings dialog
box.
Note:
12
Click the Help button at the bottom right-hand corner of each tab for explanations on the items
found in each tabs.
Printing with Special Features
The HP DeskJet 1120C printer driver allows you to create exciting and impactful documents easily. These features will
help you to produce professional-looking documents like direct mailer, brochures, large spreadsheets, newsletter and
extra large posters from your desktop.
Usage
Prints your letter-size document such as calendar and
spreadsheet easily onto larger paper size without the
need to reformat the original document in the software
application.
Tips
You can also reduce your document by printing on
smaller paper size. For example, you can print a C-size
document onto a letter-size paper.
Billboard
Allows you to enlarge your page and prints
sections of that page onto several sheets of paper
to form a large poster.
Usage
Prints your document up to five times its formatted
page size and paste the printed pages together to
form a poster.
Tips
If your document contains more than 1 page, only the
first page or the current page of the document will be
printed.
If you have a C-size document, you may use this to
print on 2 sheets of 11" x 17" paper. Or, if you have a
11" x 17" document, you may use this to print on 2
sheets of letter-size paper.
2
4 6
7
9
11
Booklet
Enables you to print 2 pages onto a single larger
sheet, and reorders the page sequencing so that the
printouts can be folded in half to form a booklet.
Handouts
Enables you to print 2, 4 or 8 pages of your
document onto one single sheet of paper.
Usage
Prints professional looking documents like newsletters
and brochures.
Usage
Prints 2, 4, or 8 pages of your presentation materials
onto a single sheet for distribution. Also useful for
printing electronic mail.
Tips
It is advisable to set the document size before you begin
working on your document. It is not recommended for
you to create your document using custom-sized paper.
Tips
Try printing on larger paper size to enhance readability.
When creating your document, the left and right margin
should be at least 0.5" (12.7mm). Otherwise, use the
"Shrink to Fit" option in Booklet to "shrink" your
document to fit within 0.5 margins.
13
Section 2 - Printing Basics
HP ZoomSmart Scaling Technology
Allows you to enlarge or reduce a selected print job.
HP DeskJet
HP DeskJet
HP DeskJet
HP DeskJet
HP DeskJet 1120C
HP DeskJet 1120C
HP DeskJet 1120C
HP DeskJet 1120C
HP Desk
HP Desk
HP Desk
HP Desk
HP Desk
HP Desk
2-Sided Printing
Allows you to print on both sides of a page.
Banner
Allows you to print on continuous feed.
Usage
Prints professional looking double-sided documents
like newsletters, brochures and catalogues.
Usage
Prints party and exhibition banners easily.
Section 2 - Printing Basics
Tips
If your document contains lots of graphics, use thick
media such as HP Premium InkJet Heavyweight Paper
for better results.
Tips
Use only HP Banner Paper and make sure you tear
one sheet more than is required to print the banner.
When printing, stretch out the Banner paper
(see diagram) and insert the first sheet into the
alternative top media feed.
Mirror Image
Allows you to print a laterally inverted image of
your page.
Usage
Prints your transparencies using this feature allows
you to write on the top side of the transparencies
which can be easily cleaned off later. Also useful for
printing on T-shirt transfers.
Tips
Most T-shirt printing applications, by default, print a
mirror image of your document. Do not choose this
feature again in the printer settings.
Note:
* For more information on printing using these special
features, see the topic "Print with Special Features" on the
"How Do I?" tab in the HP DeskJet 1120C Toolbox.
* If your application supports such features, it is
advisable for you to select the feature from your
application.
* When the Resume light blinks while you are printing
Booklet, 2-sided, or Banner, make sure you read the
instructions on your computer screen before pressing the
Resume button to continue printing.
* Use print Preview to verify the print-out before printing.
For more information, refer to "Enhanced Print Time
Functions" on page 11.
Select a Special Feature
1
2
Click the Features tab in the print settings. See "Changing Print Settings" on page 12.
Select the required feature.
The screen will display the various options available for the selected special feature.
Note:
3
Click the Help button at the bottom right-hand corner of this tab for explanations descriptions of
the various options.
Change the necessary print settings and proceed to print your document.
Note:
14
•
For more information on printing using these special features, see the topic "Print with Special
Features" on the "How Do I?" tab in the HP DeskJet 1120C Toolbox.
•
To turn off special features selection and print in the normal (default) mode, i.e. printing on
one-side of the paper without any of the special features, click No features in the Features tab.
Using Your Printer on a Network
The HP DeskJet 1120C printer can be shared in a network environment by connecting it directly to a network via
an optional HP JetDirect external print server. You may also share your printer using Windows printer sharing
methods. Refer to the topic "Use the printer on a network" on the "How Do I?" tab in the HP DeskJet 1120C
Toolbox.
If you are using JetDirect EX Plus, it is recommended that you upgrade your firmware to E.05.13. Check the
website: http://www.hp.com for upgrade information.
Section 2 - Printing Basics
HP JetDirect
external print
server
Before you install the printer software:
•
Make sure that your computer and print server are configured properly in a network environment. For
information about installation and setup of HP JetDirect print servers, refer to your HP JetDirect Hardware
and Software Installation Guides.
•
For Windows for Workgroup 3.11, Print Manager must be enabled. To enable this, double-click the Printers
icon in the Control Panel and choose Use print manager.
Installing Printer Software in Windows for Workgroup 3.11
At the server:
I.
If the server is running Novell Netware 3.12 & 4.11, set up the printer and make the cable connections to
your network.
II. If the server is running Windows NT 4.0 , ensure that your printer port is shared.
1
Set up the printer and make the cable connections to your network.
2
Install the printer software from the Starter CD (see page 6).
3
Select the HP DeskJet 1120C printer in the Printers folder, right-click the mouse and select
Properties.
4 Go to the Ports tab, select Add Port, and configure the type of Port Monitor you wish to use for this
shared printer, such as HP JetDirect Port.
Be sure to set up this printer so that it is “shared”.
15
At the client :
1
2
3
4
Section 2 - Printing Basics
5
6
Install the printer software from the Starter CD (see page 6).
When prompted for the printer name and port, choose “HP DeskJet 1120C Printer” and either “None”
or the Port (LPT1:) for the port that you wish to redirect the printer to. Click OK.
Continue installation until complete, then restart Windows.
Select Printers from the Windows Control Panel, click on the HP DeskJet 1120C printer icon, then click
Connect.
Choose the port to which the printer is connected (for example LPT3).
Click Network... then select the network path for the printer. To set up the printer as a permanent
network printer on your system, click the Permanent box, and then click Connect.
Installing Printer Software in Windows 95 / NT 4.0
At the server :
I.
If the server is running Novell Netware 3.12 & 4.11, set up the printer and make the cable connections to
your network.
II. If the server is running Windows NT 4.0 , ensure that your printer port is shared.
1
2
3
Set up the printer and make the cable connections to your network.
Install the printer software from the Starter CD (see page 6).
Select the HP DeskJet 1120C printer in the Printers folder, right click the mouse and select
Properties.
4 Go to the Ports tab, select Add Port, and configure the type of Port Monitor you wish to use for this
shared printer, such as HP JetDirect Port.
Be sure to set up this printer so that it is “shared”.
At the client :
Note:
If both the client and the server are running Windows NT 4.0, skip the following steps and use Network
Printer Server in NT 4.0 (Point-and-Print) to install the printer software.
1
2
Install the printer software from the Starter CD. (see page 6).
Follow the instruction to complete the installation. Select the HP DeskJet 1120C printer and any LPT
port when installing.
3
To access the Properties sheet of your printer, right-click on your printer icon in the Printers folder and
select Properties.
4a Windows 95:
Go to the Details tab, select Add Port, select Local Port and type the name of the server followed by
the name of the printer, such as \\ComputerName\\PrinterName.
4b Windows NT 4.0:
Go to the Ports tab, select Add Port, highlight Local Port, select New Port and type the name of the
server followed by the name of the printer, such as \\ComputerName\\PrinterName.
Note:
16
If the server is running Windows NT 4.0, install the JetAdmin software which comes with the
JetDirect products.
Printing from DOS Software Programs
When printing in DOS, there are two different ways you can adjust print settings: the HP DeskJet Control Panel for
DOS and DOS printer drivers.
HP DeskJet Control Panel for DOS
DOS users have access to many printer features through specific DOS printer drivers; however, many software
manufacturers do not develop printer drivers for their software programs. Use the DeskJet Control Panel to
specify the default printer setting for printing from your DOS program.
HP DeskJet Control Panel does not support printing of special features.
Section 2 - Printing Basics
Note:
Installing the HP DeskJet Control Panel for DOS
Before you install the Control Panel, make sure you have setup your printer and that the printer is
turned on.
1
Insert the Starter CD into the CD-ROM drive.
2
At the DOS prompt C:\>, type the CD-ROM drive letter and change the directory to \driver\win\disk3, e.g.
D:\driver\win\disk3.
3
Type INSTALL and press ENTER.
4
Follow the instructions on your computer screen to complete installation.
Note:
If you have created installation disks from the Starter CD (see "Installation from the Starter CD"
on page 6), then you can install the HP DeskJet Control Panel from floppy disk 3.
Using the HP DeskJet Control Panel for DOS
To open the DeskJet Control Panel, at the DOS prompt, change your directory to C:\DJ1120C, type DJCP and
press ENTER.
Use the Control Panel to select print settings that may not be available from some DOS programs. Duplicate
print settings that are selected from a DOS software program may override print settings selected in the Control
Panel. The Control Panel also allows you to clean and align the print cartridges for best print quality.
DOS Printer Drivers
Printer drivers are supplied by the manufacturers of DOS software programs. The recommended printer driver to
use is the HP DeskJet 850. If that is not available use the HP DeskJet 600 or 500 series.
17
Troubleshooting
A blank page is printed
•
Check the print cartridges for tape
Make sure you remove the protective plastic tape
that covers the ink nozzles.
•
Check for an empty print cartridge
If you are printing black text and a blank page is
printed, your black print cartridge may be empty.
Replace the black print cartridge.
•
Check the printer setup
Make sure your HP DeskJet 1120C printer is
selected as the current or default printer.
•
Check the parallel port on your computer
Make sure your printer is connected directly to the
parallel port. Do not share the port with other
devices such as a Zip drive.
Section 3 - Support
Nothing is printed
•
Be patient
Complex documents containing many fonts,
graphics, and/or color photos take longer to
begin printing. If the Power light is blinking, the
printer is processing information.
•
Check the power
Make sure the power cord is connected firmly to
the printer and to a working outlet, and that the
printer is turned on. The Power light on the front
panel of the printer should be lit.
•
Check the paper
Make sure paper is loaded correctly in the tray
and that the paper is not jammed in the printer.
See page 20 to clear a paper jam.
•
Check the print cartridges
Make sure that both the black and color print
cartridges are properly installed and that the top
cover of the printer is closed.
•
Try printing a "sample page"
Turn the printer off, then back on. Press
the Resume button and release it when the
Resume light starts to blink. If the sample page
prints, then the problem is not with the printer.
•
Check the interface cable (Windows 3.1x / 95 only)
Make sure that a high quality bi-directional
interface cable (IEEE-1284 compliant) is connected
properly to both the printer and the computer.
To test the cable, click the Maintenance tab in the
HP DeskJet 1120C Toolbox, and select
"Run bi-directional cable test".
•
Check the printer setup
Make sure your HP DeskJet printer is selected as
the current or default printer. See "Select Your
Printer", page 12.
•
Check the network setup
Make sure that your printer is properly setup in
network environment. See "Use the printer on a
network" on the "How Do I?" tab in the HP DeskJet
1120C Toolbox and the documentation provided
by your network vendors.
18
Placement of the text or graphics
is wrong
•
The paper size or orientation settings
may be incorrect
Make sure the paper size and page orientation
selected in the software program match the
settings in the HP print settings dialog box. See
"Changing Print Settings" on the "How Do I?"
tab in the HP DeskJet 1120C Toolbox.
•
The black and color print cartridges
may need to be aligned
Print cartridges need to be aligned whenever one
has been removed or replaced, or if the black ink
and color ink do not seem to line up properly with
each other on the page. See "Align print
cartridges" on the "Maintenance" tab in the HP
DeskJet 1120C Toolbox.
•
The paper may not be loaded correctly
If everything on the page is slanted or skewed,
make sure the paper width and length adjusters fit
snugly against the left and bottom edges of the
paper stack, and that there are no more than 150
sheets of paper loaded in the main tray or 10
sheets of paper in the alternative tray.
•
The margin settings may be wrong
If the text or graphics are cut off at the edges of
the page, make sure the margin settings for the
document do not exceed the printable area of
your printer. See "Printer Specifications",
page 25.
•
Print quality is poor
•
The print quality setting may need to be changed
While the EconoFast setting prints faster and uses
less ink, it may cause text to appear faded or
colors to appear dull. Select Normal or Best Print
Quality in the HP print settings dialog box.
ColorSmart II print settings may be wrong
If colors are printed in shades of gray, Print in
Grayscale is probably selected in the HP print
settings dialog box. The Automatic ColorSmart
selection will give the best color representation.
•
The wrong printer may be selected
Make sure your HP DeskJet printer is selected as
the current or default printer. See "Select Your
Printer", page 12.
See "Change print settings" on the "How Do I?" tab in
the HP DeskJet 1120C Toolbox.
•
•
•
A print cartridge may be low on ink or clogged
If print quality deteriorates, click the Maintenance
tab in the HP DeskJet 1120C Toolbox, and select
"Clean print cartridges". Follow the instructions on
the screen. If print quality does not improve, a
cartridge may be low on ink, and will need to be
replaced.
Printer takes a long time to print a job
Check your system configuration
The minimum system configuration for your
printer is 486-66MHz with 8MB RAM. However, the
printer performance is optimized for Pentium
machines.
•
There may be insufficient harddisk space
in your system
For printing on 11"x17" paper, it is recommended
that you should have at least 50MB free harddisk
space in your system. If you are printing graphics
intensive files, make sure you have enough
(>50MB) harddisk space.
•
There may be insufficient virtual memory
in your system
Increase the size of your system's virtual memory.
See "Other Known Problems" in the Readme file.
•
The margin settings may be wrong
If the text or graphics are cut off at the edges of
the page, make sure the margin settings for the
document do not exceed the printable area of
your printer.
The option to print line art and photo images
is enabled
If you are printing Best mode on HP Premium
Photo Paper and have enabled the option to print
line art and photo images, you need at least
200 MB free harddisk space in your system.
Also, the printer will take a longer time to spool.
•
Cable connection may be poor or cable may be
bad (Windows 3.1x / 95 only)
If meaningless characters are printed, make sure
you are using a bi-directional cable and that the
cable is firmly connected to both your printer and
computer. To test the cable, click the Maintenance
tab in the HP DeskJet 1120C Toolbox, and select
"Run bi-directional cable test".
The port setting configuration in your system
is not set to ECP (Windows 3.1x / 95 only)
Refer to the manual that comes with your
computer for information on how to change your
port setting or contact your computer
manufacturer.
•
The printer cable is not a bi-directional cable
(Windows 3.1x / 95 only)
Replace the printer cable with a IEEE-1284 printer
cable.
•
A print cartridge may be low on ink
Replace the low ink print cartridge.
The paper type setting may be incorrect
When printing on transparencies or other special
paper types, select the corresponding paper type
in the HP print settings dialog box. See "Print on
various paper types and sizes" on the "How Do I?"
tab in the HP DeskJet 1120C Toolbox.
The paper may not be suitable for use with your
HP DeskJet printer
Paper that is too thin or has a slick surface may
not feed properly. Paper that is heavily textured
does not accept ink well. Use HP Premium Papers
or test other paper types before purchasing in
large quantities. See "Recommended Printable
Weight" in the "Printer Specifications" section on
page 25.
Something on the page is missing
or incorrect
•
•
19
Section 3 - Support
•
3 Close the printer cover.
4 Turn off the printer, and then turn it on.
Insufficient harddisk space or virtual
memory to print
•
There is insufficient harddisk space in your
system
Cancel the print job and free up your harddisk
space before printing again. Alternatively, try
printing one page a time instead of printing the
entire document.
•
There is insufficient virtual memory in your
system
Increase the size of your system's virtual memory.
See "Other Known Problems" in the Readme file.
•
The option to print line art and photo images
is enabled
If you are printing Best mode on HP Premium
Photo Paper and have enabled the option to print
line art and photo images, you need at least
200 MB free harddisk space in your sytem.
Also, the printer will take a longer time to spool.
Paper is Jammed in the Printer
Section 3 - Support
To clear a paper jam
1 Leave the printer on, open the printer cover
and push the print cartridge cradle to the side.
Tips for Avoiding Paper Jams
• Make sure nothing is blocking the paper path.
• Do not overload the alternative paper tray.
The alternative paper tray holds up to 10
sheets of plain paper or other print material
measuring the same thickness. The bottom
main tray holds up to 150 sheets of plain
paper.
• Load paper in the proper manner.
• Do not use paper that is curled or crumpled.
• Always use paper that conforms with those
listed, in the Printer Specifications section on
page 25.
•
Printing a Sample Page
Your printer will print without being connected to a
computer. This allows you to see that your printer
is set up, and is working properly by printing a
sample page.
To print a sample page
1 Turn off the printer, and then turn it on again
by pressing the Power button.
2 Press the Resume button and release it when
the Resume light starts to blink.
Your printer will print a sample page.
Printing a Diagnostic Page
2
20
Free any wrinkled paper and press the
Resume button until the printer ejects the
entire sheet of paper. If this does not work,
turn the printer off, then on again until the
printer ejects the entire sheet of paper. If
necessary, free any wrinkled paper and
pull the sheet of paper towards you.
To print a diagnostic page
1 Power on your printer.
2 Press and hold down the Power button and
press the Resume button four times.
3 Release the Power button.
Your printer will print a diagnostic page.
The information on the diagnostic page is
useful to our customer support center in
helping you troubleshoot your printer
problem.
Customer Support
The information in the previous chapter suggests solutions to common problems. If your printer is not operating
properly and these suggestions do not solve your problem, try using one of the following support services to
obtain assistance.
Note: There are no user serviceable parts inside the printer.
HP DeskJet 1120C Toolbox
The " Troubleshooting" tab in this program provides an easy step-by-step solutions to common printing problems. You
should be able to resolve most printing problems by stepping through the provided solutions. You can run this
program by double-clicking the DJ1120C Toolbox icon on the desktop or in the program group.
Internet
Visit our World Wide Web for the latest printer software, product and support information.
http://www.hp.com/go/dj1120 or http://www.hp.com
HP FIRST
HP FIRST is an automated information fax retrieval service which provides toll-free, 24-hour technical information to
you by fax. Call HP FIRST at the following telephone numbers:
800 333 1917
0800 96 02 71
+31 20 681 5792
613 9272 2627
0660 8128
0800 11906
0800 17043
86 10 6505 5280
800 10453
800 13134
0800 905900
0130 810061
2506 2422
9111 682 6031
21-352 2044
1678 59020
822 769 0543
03 298 2478
64 09 356 6642
800 11319
(65) 275 7251
05 05 313342
275 7251
900 993123
020 795743
0800 551526
0800 551 527
662 661 3511
0800 022 2420
Section 3 - Support
United States and Canada
United Kingdom
For service in English outside UK
Australia
Austria
Belgium (Dutch)
Belgium (French)
China
Denmark
Finland
France
Germany
Hong Kong
India
Indonesia
Italy
Korea
Malaysia
New Zealand
Norway
Philippines
Portugal
Singapore
Spain
Sweden
Switzerland (French)
Switzerland (German)
Thailand
The Netherlands
21
HP Telephone Support
During the warranty period, you may obtain assistance from the HP Customer Support Center.
Before calling, please fill in the following information to be ready to help your Customer Support Center
representative:
What is the serial number of your printer (check the back of your printer)?
What model printer do you have?
HP DeskJet 1120C
What is the brand and model of your computer?
What is the version of printer software you are using (check the titlebar of the HP DeskJet 1120C Toolbox)
and what driver have you selected?
Run the DJ1120C Toolbox software utility by double clicking on the icon in the program group in Windows 3.1x
or on the desktop in Windows 95. Click the Maintenance tab, and select "Display system information".
Have this information ready when you call the support lines.
The HP Customer Support Center can be reached at any of the following numbers:
Section 3 - Support
For customers in US:
During Warranty: 208 323 2551
Post Warranty:
900 555 1500 ($2.50 per minute)
For customers outside US:
Africa/Middle East
Argentina
Australia
Austria
Belgium (Dutch)
Belgium (French)
Brazil
Canada
China
Czech Republic
Denmark
Finland
France
Germany
Greece
Hong Kong
Hungary
India
Indonesia
22
Monday through Friday
Monday through Friday
+41 22/780 71 11
541 781 4061/69
613 9272 8000
0660 6386
02 6268806
02 6268807
55 11 709 1444
208 323 2551
86 10 6505 3888
42 (2) 471 7327
3929 4099
0203 47 288
01 43 62 34 34
0180 52 58 143
01 68 96 4 11
800 96 7729
36 (1) 252 4505
9111 682 6035
21 350 3408
6 am to 6 pm (MST)
7 am to 6 pm (MST)
Ireland
Italy
Korea
Malaysia
Mexico D.F.
New Zealand
Norway
Philippines
Poland
Portugal
Russia
Singapore
Spain
Sweden
Switzerland
Taiwan
Thailand
The Netherlands
Turkey
United Kingdom
Vietnam
Venezuela
01 662 5525
02 264 10350
822 3270 0700
03 295 2566
01 800 2214700,
01 800 9052900
09 356 6640
22 11 6299
2 867 3551
022 37 5065, 48 22 37 5065
01 441 7 199
7095 923 50 01
272 5300
902 321 123
08 619 2170
0848 80 11 11
886-2-27170055
02 661 4011
020 606 8751
90 1 224 59 25
0171 512 5202
8 823 4530
582 239 5664
Section 3 - Support
HP Supplies
You can order HP Supplies from HP World Wide Web. Visit HP Outlet Center for more information.
http://www.outlet.hp.com/supp
HP Premium Transparency Film
US Letter, 50 sheets: 8.5 x 11 in.
US Letter, 20 sheets: 8.5 x 11 in.
A4, 50 sheets: 210 x 297 mm
A4, 20 sheets: 210 x 297 mm
C3834A
C3828A
C3835A
C3832A
HP Premium Inkjet Paper
US Letter, 200 sheets: 8.5 x 11 in.
US B-size, 100 sheets: 11 x 17 in.
A4, 200 sheets: 210 x 297 mm
A3, 100 sheets: 297 x 420 mm
51634Y
C1855A
51634Z
C1856A
HP Premium Inkjet Heavyweight Paper
US Letter, 100 sheets: 8.5 x 11 in.
A4, 100 sheets: 210 x 297 mm
C1852A
C1853A
23
HP Premium Photo Paper
US Letter, 15 sheets: 8.5 x 11 in.
US B-size, 20 sheets: 11 x 17 in.
A4 (European), 15 sheets: 210 x 297 mm
A4 (Asian), 15 sheets: 210 x 297 mm
A3, 20 sheets: 297 x 420 mm
C6039A
C6058A
C6040A
C6043A
C6059A
HP Bright White Paper
US Letter, 500 sheets: 8.5 x 11 in.
US Letter, 200 sheets: 8.5 x 11 in.
US B-size, 200 sheets: 11 x 17 in.
A4, 500 sheets: 210 x 297 mm
A4, 200 sheets: 210 x 297 mm
A3, 200 sheets: 297 x 420 mm
C1824A
C5976A
C1857A
C1825A
C5977A
C1858A
HP Banner Paper
US Letter, 100 sheets: 8.5 x 11 in.
A4, 100 sheets: 210 x 297 mm
C1820A
C1821A
HP Greeting Card Paper
US Letter, 20 sheets, 20 envelopes
A4, 20 sheets, 20 envelopes
C1812A
C6042A
HP Iron-on T-shirt Transfers
Section 3 - Support
US Letter, 10 sheets: 8.5 x 11 in.
A4, 10 sheets: 210 x 297 mm
C6049A
C6050A
HP Labels
A4, 14/sheet, 100 sheets: 99 x 38 mm
A4, 16/sheet, 100 sheets: 99 x 34 mm
A4, 21/sheet, 100 sheets: 64 x 38 mm
A4, 10/sheet, 100 sheets: 100 x 51 mm
A4, 1/sheet, 100 sheets: 200 x 289 mm
92296L
92296M
92296N
92296P
92296R
Print Cartridge
Black
Color
51645A
C1823A
Parallel Cable
HP IEEE-1284 Compliant Parallel Cable (2-metre)
HP IEEE-1284 Compliant Parallel Cable (3-metre)
C2950A
C2951A
HP JetDirect Print Server
HP JetDirect EX Plus
HP JetDirect 150X
24
J2592A
J2591A
Printer Specifications
Print Method
Plain paper drop-on-demand thermal inkjet printing
DOS Environment
DOS 3.3 and above
Print Speed
Up to 6.5 pages per minute for black printing
Up to 4.5 pages per minute for color printing
These are approximate figures. Exact speed will vary depending on the
system configuration and software used.
Software Compatibility
Microsoft Windows (version 3.1x, Windows 95 and Windows NT 4.0)
Resolution
Letter quality mode
600 x 600 dpi black
PhotoREt II color
PhotoREt II technology is a HP proprietary technology that delivers high
quality multi-level color image print quality by increasing the number of
colors that can be printed on an individual dot (pixel). HP PhotoREt II
makes use of a new ink cartridge (C1823A) which fires ink drops (10
picolitres) that are 70% smaller than previous HP DeskJet cartridges. HP
PhotoREt II places up to sixteen drops of ink on a dot, and is able to
produce 4 levels of shades per primary color by precisely controlling the
amount of ink applied to each dot.
Contact your HP Customer Support Center for more information on
PhotoREt II.
Draft quality mode
300 x 600 black
PhotoREt II color
Printable Paper Sizes
from 100 x 148 mm (3.94 x 5.83 in.) to 330 x 483 mm (13 x 19 in.)
Paper Handling
Main paper tray (up to 150 sheets of 60 g/m 2 or 16 lb paper)
Alternative paper feed (up to 10 sheets of 60 g/m2 or 16 lb paper)
Manual feed (for cards up to 0.3 mm thick which require a straight paper
path)
I/O Interface
Parallel, IEEE 1284 compliant with 1284-B receptacle (ECP)
Printer Memory
2MB of built-in ROM
2MB of built-in RAM
64KB receive buffer
Printer Command Language
HP PCL Level 3 Enhanced
Character Sets
PC-8, PC8 Danish/Norwegian, PC-8 Turkish, PC-850, PC-852, HP Roman8,
ECMA-94 Latin 1 (ISO 8859/1), ECMA-94 Latin 2 (ISO 8859/2), ECMA-128
Latin 5 (ISO 8859), United Kingdom (ISO 4), ASCII (ISO 6), Swedish (ISO
11), Italian (ISO 15), Spanish (ISO 17), German (ISO 11), Italian (ISO 15), Spanish
(ISO 17), German (ISO 21), Danish/Norwegian (ISO 60), French (ISO 69),
Legal, Windows Latin 1, Windows Latin 2, Windows Latin 5
Dimensions
With the paper tray closed
W x H x D:
22.8 x 8.8 x 15.0 in. (579.1 x 223.5 x 380.0 mm)
With the paper tray fully extended
W x H x D:
22.8 x 8.8 x 26.3 in. (579.1 x 223.5 x 668.0 mm)
Power Requirements
100 – 240 V ac (50 – 60 Hz)
Power Consumption
4.4 W when idle
35 W during printing
Operating Environment
Temperature
Max. operating temperature: 5°C to 40°C (41°F to 104°F)
Humidity: 10–80% RH non-condensing
Recommended operating conditions for best print quality:
15°C to 35°C (59°F to 95°F), 20 to 80% RH non-condensing
Storage temperature: -40°C to 60°C (-40°F to 140°F)
Noise Levels per ISO 9296
Sound Pressure, LpAm: 49 dB(A) (By-Stander position)
Weight
20.7 lb. (9.4 kg)
Reliability
3,000 pages per month black text, 500 pages per month color
20,000 hours MTBF
•
Product and Safety Certifications
Printer with Power Cord
NOM1, TUV-GS, UL, CSA, SABS (South Africa), CCIB (China) and PSB
(Singapore), JUN (Korea)
EMI Certifications
Printer with Power Cord:
CE (European Union), B mark (Poland), GOST (Russia), BCIQ (Taiwan),
FCC (USA), RRL (Korea), VCCI (Japan), C-Tick (Australia, New Zealand)
25
Section 4 - Specifications
Hardware Compatibility
Windows Environment
• 80486-66 MHz processor and above
• (optimized for Pentium-133 MHz)
• Windows 3.1x, Windows 95, Windows NT 4.0
• 8 MB RAM (optimized for 16 MB RAM) for Windows 3.1x,
Windows 95
• 24 MB RAM (optimized for 32 MB RAM)
• for Windows NT 4.0
• 50 MB of free hard disk space for 11" x 17" or A3 size printing
(Graphics intensive files may require more disk space)
Recommended Printable Weight
Paper:
60 to 135 g/m2 (16 to 36 lb bond)
Envelopes:
75 to 90 g/m2 (20 to 24 lb bond)
Cards:
110 to 200 g/m2 (up to 110 lb index)
(up to 0.012 in or 0.3 mm thickness for manual feed)
Regulatory Notices
Power Cord Statement
Safety Information
The power cord cannot be repaired. If it is defective it
should be discarded or returned to the supplier.
LEDs Classification
CLASS 1 LED PRODUCT
LED KLASSE 1
APPARECCHIO LED DI CLASSE 1
PRODUCT KLASY 1 Z DIODAMI ŒWHECYCYMI LED
Appareil à Diode Electrluminescente de Classe 1
ZA¤ÍZENÍ LED T¤ÍY 1
KLASS 1 LED APPARAT
LUOKAN 1 LED
Always follow basic safety precautions when using this
product to reduce risk of injury from fire or electric
shock.
1.
Read and understand all instructions in the user's
guide.
Warning
2. Observe all warnings and instructions marked on
the product.
3. Unplug this product from wall outlets before
cleaning.
Energy Consumption
4. Do not install or use this product near water, or
when you are wet.
5. Install the product securely on a stable
surface.
6. Install the product in a protected location where
no one can step on or trip over the line cord, and
the line cord will not be damaged.
7. If the product does not operate normally,
see the "Troubleshooting" section in the User's
Guide.
Energy Star is a US registered service mark of the United States
Environmental Protection Agency
8. There are no user-serviceable parts inside.
Refer servicing to qualified service personnel.
Section 4 - Specifications
9. All information followed by this word is meant to
alert you to a potential safety hazard.
26
DECLARATION OF CONFORMITY
according to ISO / IEC Guide 22 and EN 45104
Manufacturer's name:
Hewlett-Packard Singapore (Pte) Ltd.
Manufacturer's address:
Asia Hardcopy Manufacturing Operation
20 Gul Way Singapore 629196
declares, that the product
Product Name:
HP DeskJet 1120C Printer
Product Number:
HP C2679A, C2680A
Product Options:
All
conforms to the following Product Specifications:
Safety:
IEC 950 : 1991 + A1 + A2 / EN 60950 : 1992 + A1 + A2
IEC825-1 : 1993 / EN 60825-1 : 1994 class I for LEDS
EMC:
CISPR 22 : 1993 / EN 55022 : 1994 Class B
EN 50082-1 : 1992
IEC 801-2 : 1991 / prEN 55024-2 : 1992 - 4 kV CD, 8 kV AD
IEC 801-3 : 1984 / prEN 55024-3 : 1991 - 3 V/m
IEC 801-4 : 1988 / prEN 55024-4 : 1992 - 0.5 kV Signal Lines
1 kV Power Lines
IEC-1000-3-2 : 1995 / EN 61000-3-2 : 1995
IEC-1000-3-3 : 1994 / EN 61000-3-3 : 1995
Supplementary Information:
(1) The products herewith comply with the requirements of the Low Voltage Directive 73 / 23 / EEC and the EMC
Directive 89 / 336 / EEC.
(2) The HP DeskJet 1120C printer was tested in a typical configuration with Hewlett-Packard Personal Computer.
Singapore, December 1997
Chan Kum Yew, Quality Manager
Section 4 - Specifications
European Contact: Your local Hewlett-Packard Sales and Service Office or Hewlett-Packard GmbH,
Department TRE, Herrenberger Straße 130, D-71034 Boblingen (Fax: +49-7031-143143)
27
Hewlett-Packard Limited Warranty Statement
HP Product
Printer
Print cartridges
Software
A.
Extent of Limited Warranty
B.
Limitations of Warranty
1.
Hewlett-Packard (HP) warrants to the end-user customer
that the HP products specified above will be free from
detects in material and workmanship for the duration
specified above, which duration begins on the date of
purchase by the customer.
1.
TO THE EXTENT ALLOWED BY LOCAL LAW, NEITHER HP
NOR ITS THIRD PARTY SUPPLIERS MAKES ANY OTHER
WARRANTY OR CONDITION OF ANY KIND, WHETHER
EXPRESS OR IMPLIED WARRANTIES OR CONDITIONS OF
MERCHANTABILITY, SATISFACTORY QUALITY, AND
FITNESS FOR A PARTICULAR PURPOSE.
2.
For software products, HP's limited warranty applies only to
a failure to execute programming instructions. HP does not
warrant that the operation of any product will be
uninterrupted or error free.
C.
Limitations of Liability
1.
To the extent allowed by local law, the remedies provided in
this Warranty Statement are the customer's sole and
exclusive remedies.
2.
TO THE EXTENT ALLOWED BY LOCAL LAW, EXCEPT FOR
THE OBLIGATIONS SPECIFICALLY SET FORTH IN THIS
WARRANTY STATEMENT, IN NO EVENT SHALL HP OR ITS
THIRD PARTY SUPPLIERS BE LIABLE FOR DIRECT,
INDIRECT, SPECIAL, INCIDENTAL, OR CONSEQUENTIAL
DAMAGES, WHETHER BASED ON CONTRACT, TORT, OR
ANY OTHER LEGAL THEORY AND WHETHER ADVISED OF
THE POSSIBILITY OF SUCH DAMAGES.
D.
Local law
1.
This Warranty Statement gives the customer specific legal
rights. The customer may also have other rights which vary
from state to state in United States, from province to
province in Canada, and from country elsewhere in the
world.
2.
To the extent that this Warranty Statement is inconsistent
with local law, this Warranty Statement shall be deemed
modified to be consistent with such local law. Under such
local law, certain disclaimers and limitations of this
Warranty statement may not apply to the customer. For
example, some states in the United States, as well as some
governments outside the United States ( including provinces
in Canada), may:
3.
4.
5.
HP's limited warranty covers only those defects which arises
as a result of normal use of the product, and does not cover
any other problems, including those which arises as a result
of:
a. Improper maintenance or modification;
b. Software, media, parts or supplies not provided or
supported by HP; or
c. Operation outside the product's specifications.
For HP printer products, the use of a non-HP ink cartridge
or a refilled ink cartridge does not affect either the warranty
to the customer or any HP support contract with the
customer. However, if printer failure or damage is
attributable to the use of a non-HP or refilled ink cartridge,
HP will charge its standard time and materials charges to
service the printer for the particular failure or damage.
If HP receives, during the applicable warranty period, notice
of a defect in any product which is covered by HP’s
warranty, HP shall either repair or replace the product, at
HP's option.
6.
If HP is unable to repair or replace, as applicable, a
defective product which is covered by HP’s warranty, HP
shall, within a reasonable time after being notified of the
defect, refund the purchase price for the product.
7.
HP shall have no obligation to repair, replace, or refund
until the customer returns the defective product to HP.
a.
Any replacement product may be either new or like-new,
provided that is has functionality at least equal to that of
the product being replaced.
Preclude the disclaimers and limitations in this Warranty
Statement from limiting the statutory rights of a consumer
(e.g. the United Kingdom);
b.
Otherwise restrict the ability of a manufacturer to enforce
such disclaimers or limitations; or
HP products may contain remanufactured parts,
components, or materials equivalent to new in performance.
c.
Grant the customer additional warranty rights, specify the
duration of implied warranties which the manufacturer cannot
disclaim, or allow limitations on the duration of implied
warranties.
3.
FOR CONSUMER TRANSACTIONS IN AUSTRALIA AND NEW
ZEALAND, THE TERMS IN THIS WARRANTY STATEMENT,
EXCEPT TO THE EXTENT LAWFULLY PERMITTED, DO NOT
EXCLUDE, RESTRICT, OR MODIFY, AND ARE IN ADDITION TO,
THE MANDATORY STATUTORY RIGHTS APPLICABLE TO THE
SALE OF THE HP PRODUCTS TO SUCH CUSTOMERS.
8.
Section 4 - Specifications
Duration of Limited
Warranty
12 Months
90 Days
90 Days
9.
10. HP's limited warranty is valid in any country where the
covered HP product is distributed by HP. Contracts for
additional warranty services, such as on-site service, are
available from any authorized HP service facility in
countries where the product is distributed by HP or by an
authorized importer.
28
Printed on recycled paper
© Copyright 1997
Hewlett-Packard Company
Printed in USA
Manual Part No. C2679-90001
450 Alexandra Road
Singapore 119960
Singapore.
http://www.hp.com/go/dj1120
C2679-90001