1
HP D2D Backup Systems
Best practices for VTL, NAS and
Replication implementations
Table of contents
Abstract .............................................................................................................................................. 4
Related products .................................................................................................................................. 4
Validity ........................................................................................................................................... 4
Executive summary............................................................................................................................... 5
General D2D best practices at a glance ............................................................................................. 5
VTL best practices at a glance............................................................................................................ 5
NAS best practices at a glance ......................................................................................................... 6
HP StoreOnce Technology .................................................................................................................... 7
Replication overview ........................................................................................................................ 7
Housekeeping overview .................................................................................................................... 8
Upstream and Backup Application considerations ................................................................................ 9
Data compression and encryption backup application features ............................................................ 10
Network configuration........................................................................................................................ 11
Single Port mode ............................................................................................................................ 12
Dual Port mode .............................................................................................................................. 13
High availability port mode (Port failover) ......................................................................................... 14
High availability port mode (Link Aggregate) .................................................................................... 14
10Gbit Ethernet ports on the 4312/4324 appliances ........................................................................ 15
Network configuration for CIFS AD .................................................................................................. 15
Backup server networking ............................................................................................................... 18
1
Fibre Channel configuration.............................................................
19
Fibre Channel topologies ................................................................................................................ 19
Switched fabric .............................................................................................................................. 19
Direct Attach (Private Loop) ............................................................................................................. 20
Zoning .......................................................................................................................................... 20
Diagnostic Fibre Channel devices .................................................................................................... 21
Fibre Channel configuration via Web Management Interface .............................................................. 21
Best practices for network and Fibre Channel configuration ................................................................ 22
VTL best practices .............................................................................................................................. 25
Summary of best practices............................................................................................................... 25
Tape library emulation .................................................................................................................... 25
Backup application configuration ..................................................................................................... 27
Rotation schemes and retention policy .............................................................................................. 28
D2D NAS best practices ..................................................................................................................... 30
Introduction to D2D NAS backup targets .......................................................................................... 30
Overview of NAS best practices ...................................................................................................... 30
Choosing NAS or VTL for backup .................................................................................................... 30
Shares and deduplication stores ...................................................................................................... 31
Maximum concurrently open files ..................................................................................................... 31
Backup application configuration ..................................................................................................... 32
Housekeeping impact on maximum file size selection ......................................................................... 37
CIFS share authentication ................................................................................................................ 38
VTL and NAS – Data source performance bottleneck identification .......................................................... 44
Performance tools........................................................................................................................... 44
Performance metrics on the Web Management Interface..................................................................... 44
How to use the D2D storage and deduplication ratio reporting metrics ................................................. 46
D2D Replication ................................................................................................................................ 48
D2D replication overview................................................................................................................ 48
Best practices overview ................................................................................................................... 48
Replication usage models ................................................................................................................ 49
What to replicate ........................................................................................................................... 52
Appliance, library and share replication fan in/out ............................................................................ 53
Concurrent replication jobs ............................................................................................................. 54
Limiting replication concurrency ....................................................................................................... 54
WAN link sizing ............................................................................................................................ 54
2
Seeding and why it is required ........................................................................................................ 55
Seeding methods in more detail ....................................................................................................... 57
Replication and other D2D operations .............................................................................................. 65
Replication Monitoring.................................................................................................................... 67
Housekeeping monitoring and control .................................................................................................. 71
Terminology .................................................................................................................................. 71
Tape Offload .................................................................................................................................... 75
Terminology .................................................................................................................................. 75
When is Tape Offload Required? ..................................................................................................... 76
Key performance factors in Tape Offload performance ....................................................................... 78
Summary of Best Practices ............................................................................................................... 78
Appendix A Key reference information ................................................................................................ 80
D2D Generation 2 products, software 2.1.00 ................................................................................... 81
D2D Generation 1 products, software 1.1.00 ................................................................................... 82
Appendix B – Fully Worked Example ................................................................................................... 83
Hardware and site configuration ...................................................................................................... 83
Backup requirements specification.................................................................................................... 84
Using the HP StorageWorks Backup sizing tool ................................................................................. 85
Configure D2D source devices and replication target configuration ..................................................... 98
Map out the interaction of backup, housekeeping and replication for sources and target ...................... 100
Tune the solution using replication windows and housekeeping windows............................................ 102
Worked example – backup, replication and housekeeping overlaps .................................................. 103
Avoiding bad practices................................................................................................................. 107
Appendix C HP Data Protector Tape Offload – Worked Examples........................................................ 108
A note on terminology .................................................................................................................. 108
To perform a simple media copy .................................................................................................... 110
To perform an interactive object copy, VTL ...................................................................................... 111
To perform an interactive object copy, D2D NAS share .................................................................... 114
Appendix D Making use of improved D2D performance in 2.1.01 and 1.1.01 software ........................ 116
Overview .................................................................................................................................... 116
Replication for Virtual Device Migration .......................................................................................... 117
Self Replication for Virtual Device Migration .................................................................................... 119
Replication device self replication migration .................................................................................... 121
Configuring Self Migration from the D2D Web Management Interface ............................................... 123
Index.............................................................................................................................................. 129
For more information ........................................................................................................................ 131
3
Abstract
The HP StorageWorks D2D Backup System products with Dynamic Data Deduplication are Virtual Tape library
and NAS appliances designed to provide a cost-effective, consolidated backup solution for business data and
fast restore of data in the event of loss.
In order to get the best performance from a D2D Backup System there are some configuration best practices that
can be applied. These are described in this document.
Related products
Information in this document relates to the following products:
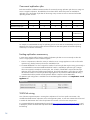
Product
Generation
Product Number
HP StorageWorks D2D4004i/4009i
G1
EH938A/EH939A
HP StorageWorks D2D4004fc/4009fc
G1
EH941A/EH942A
HP StorageWorks D2D2503i
G1
EH945A
HP StorageWorks D2D4112
G1
EH993A
HP StorageWorks D2D2504i
G1
EJ002A
HP StorageWorks D2D2502i
G1
EJ001A
HP StorageWorks D2D4324
G2
EH985A
HP StorageWorks D2D4312
G2
EH983A
HP StorageWorks D2D4106i
G2
EH996A
HP StorageWorks D2D4112
G2
EH993B
HP StorageWorks D2D4106fc
G2
EH998A
HP StorageWorks D2D2504i
G2
EJ002B
HP StorageWorks D2D2502i
G2
EJ001B
HP StorageWorks D2D3003i
G2
AY149A
Validity
This document replaces the document “HP StorageWorks D2D Backup System Best Practices for Performance
Optimization” (HP Document Part Number EH990-90921) to include more detailed content; the previous
document is now obsolete.
Best practices identified in this document are predicated on using up-to-date D2D system firmware (check
www.hp.com/support for available firmware upgrades). In order to achieve optimum performance after
upgrading from older firmware there may be some pre-requisite steps; see the release notes that are available
with the firmware download for more information.
4
Executive summary
This document contains detailed information on best practices to get good performance from an HP D2D Backup
System with HP StoreOnce Deduplication Technology.
HP StoreOnce Technology is designed to increase the amount of historical backup data that can be stored
without increasing the disk space needed. A backup product using deduplication combines efficient disk usage
with the fast single file recovery of random access disk.
As a quick reference these are the important configuration options to take into account when designing a backup
solution:
General D2D best practices at a glance
Always use the HP D2D Sizing tool to size your D2D solution.
Always ensure the hardware component firmware and D2D software in your HP D2D Backup System are fully
up-to-date. (Check at http://www.hp.com/support.)
Take into account the need for the deduplication “Housekeeping” process to run when designing backup
configurations. Configure some time every day for the D2D to perform housekeeping.
Run multiple backups in parallel to improve aggregate throughput to a D2D appliance.
Running too many concurrent jobs will impact the performance of each individual job. This will be true for all
types of job: backups, restores and replication. Ensure that the solution has been sized correctly to
accommodate the concurrent load requirements.
Restore performance is almost always slower than backup, so disabling “verify” in backup jobs will more than
halve the time taken for the job to complete.
Configure “High availability mode (link Aggregate)” or “Dual Port” network ports to achieve maximum
available network bandwidth.
Identify other performance bottlenecks in your backup environment using HP Library and Tape Tools.
VTL best practices at a glance
Make use of multiple network or fibre channel ports throughout your storage network to eliminate bottlenecks
and split virtual tape libraries across them.
Configure multiple VTLs and separate data types into their own VTLs.
Configure larger “block sizes” within the backup application to improve performance.
Disable any multiplexing configuration within the backup application.
Disable any compression or encryption of data before it is sent to the D2D appliance.
Delay physical tape offload/copy operations to allow for the housekeeping process to complete in order to
improve offload performance.
5
NAS best practices at a glance
Configure multiple shares and separate data types into their own shares.
Adhere to the suggested maximum number of concurrent operations per share/appliance.
Choose disk backup file sizes in backup software to meet the maximum backup size.
Disable software compression, deduplication and synthetic full backups.
Do not pre-allocate disk space for backup files.
Do not append to backup files
6
HP StoreOnce Technology
A basic understanding of the way that HP StoreOnce Technology works is necessary in order to understand
factors that may impact performance of the overall system and to ensure optimal performance of your backup
solution.
HP StoreOnce Technology is an “inline” data deduplication process. It uses hash-based chunking technology,
which analyzes incoming backup data in “chunks” that average up to 4K in size. The hashing algorithm
generates a unique hash value that identifies each chunk and points to its location in the deduplication store.
Hash values are stored in an index that is referenced when subsequent backups are performed. When data
generates a hash value that already exists in the index, the data is not stored a second time. Rather, an entry
with the hash value is simply added to the “recipe file” for that backup session.
Key factors for performance considerations with deduplication:
The inline nature of the deduplication process means that there will always be some performance trade-off for
the benefits of increased disk space utilisation.
With each Virtual Library or NAS Share created there is an associated dedicated deduplication store. If
“Global” deduplication across all backups is required, this will only happen if a single virtual library or NAS
share is configured and all backups are sent to it.
The best deduplication ratio will be achieved by configuring a minimum number of libraries/shares. Best
performance will be gained by configuring a larger number of libraries/shares and optimising for individual
deduplication store complexity.
If servers with lots of similar data are to be backed up, a higher deduplication ratio can be achieved by
backing them all up to the same library/share.
If servers contain dissimilar data types, the best deduplication ratio/performance compromise will be achieved
by grouping servers with similar data types together into their own dedicated libraries/shares. For example, a
requirement to back up a set of exchange servers, SQL database servers, file servers and application servers
would be best served by creating four virtual libraries or NAS shares; one for each server set.
When restoring data from a deduplicating device it must reconstruct the original un-deduplicated data stream
from all of the data chunks. This can result in lower performance than that of the backup.
Full backup jobs will result in higher deduplication ratios and better restore performance (because only one
piece of media is needed for a full restore). Incremental and differential backups will not deduplicate as well.
Replication overview
Deduplication technology is the key enabling technology for efficient replication because only the new data
created at the source site needs to replicate to the target site. This efficiency in understanding precisely which
data needs to replicate can result in bandwidth savings in excess of 95% compared to having to transmit the full
contents of a cartridge from the source site. The bandwidth saving will be dependent on the backup change rate
at the source site.
There is some overhead of control data that also needs to pass across the replication link. This is known as
manifest data, a final component of any hash codes that are not present on the remote site and may also need to
be transferred. Typically the “overhead components” are less than 2% of the total virtual cartridge size to
replicate.
Replication can be “throttled” by using bandwidth limits as a percentage of an existing link, so as not to affect
the performance of other applications running on the same link.
Key factors for Key factors for performance considerations with replication:
Seed replication using physical tape or co-location to improve first replicate performance.
7
Appended backups need to “clone” the cartridge on the target side, so performance of appended tape
replication will not be significantly faster than replicating the whole cartridge.
If a lot of similar data exists on remote office D2D libraries, replicating these into a single target library will
give a better deduplication ratio on the target D2D Backup System.
Replication starts when the cartridge is unloaded or a NAS share file is closed after writing is complete, or
when a replication window is enabled. If a backup spans multiple cartridges or NAS files, replication will start
on the first cartridge/NAS file as soon as the job spans to the second.
Size the WAN link appropriately to allow for replication and normal business traffic taking into account data
change rates.
Apply replication bandwidth limits or apply blackout windows to prevent bandwidth hogging.
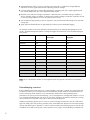
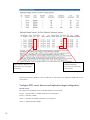
The maximum number of concurrent replication jobs supported by source and target D2D appliances can be
varied in the Web Management Interface to manage throughput. The table below shows the default settings for
each product.
Model
Fan in
Maximum number concurrent
source jobs
Maximum number concurrent
target jobs
D2D4324
50
16
48
D2D4312
50
16
48
D2D4112 G2
24
8
24
D2D4106i G2
16
8
24
D2D4106fc G2
16
8
24
D2D2504i G2
8
4
8
D2D2502i G2
4
4
8
D2D4112 G1
24
2
8
D2D4009i/fc G1
16
2
6
D2D4004i/fc G1
16
2
6
D2D2504i G1
8
2
3
D2D2503i G1
6
1
2
D2D2502i G2
4
2
3
Note: Fan in is the maximum number of source appliances that may replicate to the device as a replication
target.
Housekeeping overview
If data is deleted from the D2D system (e.g. a virtual cartridge is overwritten or erased), any unique chunks will
be marked for removal, any non-unique chunks are de-referenced and their reference count decremented. The
process of removing chunks of data is not an inline operation because this would significantly impact
performance. This process, termed “housekeeping”, runs on the appliance as a background operation, it runs on
a per cartridge and NAS file basis and will run as soon as the cartridge is unloaded and returned to its storage
slot or a NAS file has completed writing and has been closed by the appliance.
Whilst the housekeeping process can run as soon as a virtual cartridge is returned to its slot, this could cause a
high level of disk access and processing overhead, which would affect other operations such as further backups,
restores, tape offload jobs or replication. In order to avoid this problem the housekeeping process will check for
available resources before running and, if other operations are in progress, the housekeeping will dynamically
8
hold-off to prevent impacting the performance of other operations. It is, however, important to note that the holdoff is not binary, (i.e. on or off) so, even if backup jobs are in process, some low level of housekeeping will still
take place which may have a slight impact on backup performance.
Housekeeping is an important process in order to maximise the deduplication efficiency of the appliance and, as
such, it is important to ensure that it has enough time to complete. Running backup, restore, tape offload and
replication operations with no break (i.e. 24 hours a day) will result in housekeeping never being able to
complete. As a general rule a number of minutes per day should be allowed for every 100 GB of data
overwritten on a virtual cartridge or NAS share. See Appendix A for numbers for each product.
For example: if, on a daily basis, the backup application overwrites two cartridges in different virtual libraries
with 400 GB of data on each cartridge, an HP D2D4106 appliance would need approximately 30 minutes of
quiescent time over the course of the next 24 hours to run housekeeping in order to de-reference data and
reclaim any free space.
Configuring backup rotation schemes correctly is very important to ensure the maximum efficiency of the product;
doing so reduces the amount of housekeeping that is required and creates a predictable load.
Large housekeeping loads are created if large numbers of cartridges are manually erased or re-formatted. In
general all media overwrites should be controlled by the backup rotation scheme so that they are predictable.
Best practice
Create enough D2D virtual library cartridges for at least one backup rotation schedule and then overwrite the
tape cartridges when the virtual library cartridge data expires or when the data is no longer useful. If a large
expired media pool exists due to a non optimum rotation policy then this will use up space on the D2D
appliance. See Housekeeping monitoring and control on page 71 for more detailed information.
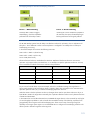
Upstream and Backup Application considerations
Multi-stream vs. Multiplex
Multi-streaming is often confused with Multiplexing; these are however two different (but related) terms. Multistreaming is when multiple data streams are sent to the D2D Backup System simultaneously but separately.
Multiplexing is a configuration whereby data from multiple sources (for example multiple client servers) is backed
up to a single tape drive device by interleaving blocks of data from each server simultaneously and combined
into a single stream. Multiplexing is used with physical tape devices in order to maintain good performance, if
the source servers are slow because it aggregates multiple source server backups into a single stream.
A multiplexed data stream configuration is NOT recommended for use with a D2D system or any other
deduplicating device. This is because the interleaving of data from multiple sources is not consistent from one
backup to the next and significantly reduces the ability of the deduplication process to work effectively; it also
reduces performance. Care must be taken to ensure that multiplexing is not happening by default in a backup
application configuration. For example when using HP DataProtector to back up multiple client servers in a single
backup job, it will default to writing four concurrent multiplexed servers in a single stream. This must be disabled
by reducing the “Concurrency” configuration value for the tape device from 4 to 1.
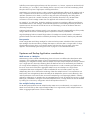
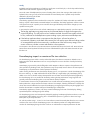
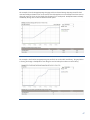
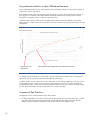
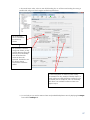
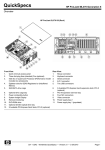
Use multiple backup streams
The HP D2D system performs best with multiple backup streams sent to it simultaneously. For example an HP
D2D4112 G2 will back up data at approximately 80 MB/s for a single stream, however multiple streams can
deliver an aggregate performance in excess of 360 MB/s.
9
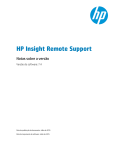
The following graph illustrates only the relationship between the number of active data streams and performance.
It is not based on real data.
Data compression and encryption backup application features
Both software compression and encryption will randomize the source data and will, therefore, not result in a high
deduplication ratio for these data sources. Consequently, performance will also suffer. The D2D appliance will
compress the data at the end of deduplication processing anyway.
For these reasons it is best to do the following, if efficient deduplication and optimum performance are required:
Ensure that there is no encryption of data before it is sent to the D2D appliance.
Ensure that software compression is turned off within the backup application.
Not all data sources will result in high deduplication ratios and performance can, therefore, vary across different
data sources. Digital images, video, audio and compressed file archives will typically all yield low deduplication
ratios. If this data predominantly comes from a small number of server sources, consider setting up a separate
library/share for these sources for best performance.
10
Network configuration
All D2D appliances have two 1GBit Ethernet ports, the D2D4312 and D2D4324 appliances also have two
10GBit Ethernet ports. The Ethernet ports are used for data transfer to iSCSI VTL devices and CIFS/NFS shares
and also for management access to the Web Management Interface.
In order to deliver best performance when backing up data over the Ethernet ports it will be necessary to
configure the D2D network ports, backup servers and network infrastructure to maximise available bandwidth to
the D2D device.
Each pair of network ports on the D2D, (i.e. the two 1Gbit ports and the two 10Gbit ports on D2D 4312/4324)
have four configuration modes available as follows:
Single port – In this case Port 1 (1Gbit) or Port 3 (10Gbit) must be used for all data and management traffic.
Dual port – Both ports in the pair are used, but must be in separate subnets, both ports can access the Web
Management Interface and virtual libraries and NAS shares are available on both ports.
High Availability mode (Port failover) – Both ports in the pair are used but are bonded to appear as a single
port with a single IP address. Data is only carried on one link, with the other link providing failover.
High Availability mode (Link Aggregate) – Both ports in the pair are used but are bonded to appear as a
single port with a single IP Address. Data is carried across both links to double the available bandwidth on a
single subnet.
11
Single Port mode
1Gbit ports: use this mode only if no other ports are available on the switch network or if the appliance is being
used to transfer data over fibre channel ports only.
On an HP D2D4312 or D2D4324 with 10Gbit ports it is possible that a single 10Gbit port will deliver good
performance in most environments.
Network configuration, single port mode
12
Dual Port mode
Use this mode if:
Servers to be backed up are split across two physical networks which need independent access to the D2D
appliance. In this case virtual libraries and shares will be available on both network ports; the host
configuration defines which port is used.
Separate data (“Network SAN”) and management LANs are being used, i.e. each server has a port for
business network traffic and another for data backup. In this case one port on the D2D can be used solely for
access to the Web Management Interface with the other used for data transfer.
Network configuration, dual port mode
In the case of a separate network SAN being used, configuration of CIFS backup shares with Active Directory
authentication requires careful consideration, see Network Configurations for CIFS AD on page 15 for more
information.
13
High availability port mode (Port failover)
In this mode, no special switch configuration is required other than to ensure that both Ethernet ports in the pair
from the D2D appliance are connected to the same switch. This mode sets up “bonded” network ports, where
both network ports are connected to the same physical switch and behave as one network port. This mode
provides some level of load balancing across the ports but generally only provides port failover.
High availability port mode (Link Aggregate)
This is the recommended mode to achieve highest performance for iSCSI and NAS operation. It requires the
switch to support IEEE802.3ad Link Aggregation and needs the switch to be set up accordingly. See the relevant
product user guide for more details. This mode sets up “bonded” network ports, where both network ports in the
pair are connected to the same physical switch and behave as one network port. This mode provides maximum
bandwidth across the ports and also port failover if one link goes offline.
Network configuration, high availability port mode
14
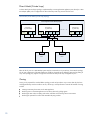
10Gbit Ethernet ports on the 4312/4324 appliances
10Gbit Ethernet is provided as a viable alternative to the Fibre Channel interface for providing maximum VTL
performance and also comparable NAS performance. When using 10Gbit Ethernet it is common to configure a
“Network SAN”, which is a dedicated network for backup that is separate to the normal business data network;
only backup data is transmitted over this network.
Network configuration, HP D2D4312/4324 with 10Gbit ports
When a separate network SAN is used, configuration of CIFS backup shares with Active Directory authentication
requires careful consideration, see the next section for more information.
Network configuration for CIFS AD
When using CIFS shares for backup on a D2D device in a Microsoft Active Directory environment the D2D CIFS
server may be made a member of the AD Domain so that Active Directory users can be authenticated against
CIFS shares on the D2D.
However, in order to make this possible the AD Domain controller must be accessible from the D2D device. This
may be conflict with a configuration with a Network SAN in order to separate Corporate LAN and Backup
traffic.
15
Broadly there are two possible configurations which allow both:
Access to the Active Directory server for AD authentication and
Separation of Corporate LAN and Network SAN traffic
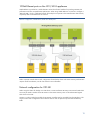
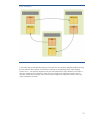
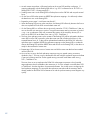
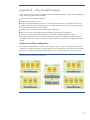
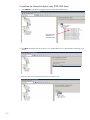
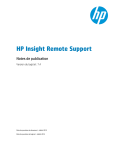
Option 1: HP D2D Backup System on Corporate SAN and Network SAN
In this option, the D2D device has a port in the Corporate SAN which has access to the Active Directory Domain
Controller. This link is then used to authenticate CIFS share access.
The port(s) on the Network SAN are used to transfer the actual data.
This configuration is relatively simple to configure:
On D2D devices with only 1Gbit ports: Dual Port mode should be configured and each port connected and
configured for either the Corporate LAN or Network SAN. In this case one data port is “lost” for authentication
traffic so this solution will not provide optimal performance.
On HP D2D4312/4324 devices with both 10Gbit and 1Gbit ports: the 10Gbit ports can be configured in a
bonded network mode and configured for access to the Network SAN. One or both of the 1Gbit ports can
then be connected to the Corporate LAN for authentication traffic. In this case optimal performance can be
maintained.
The backup application media server also needs network connections into both the Corporate LAN and Network
SAN. The diagram below shows this configuration with an HP D2D4300 Series Backup System.
HP D2D Backup System on Corporate SAN and Network SAN
16
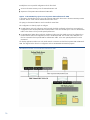
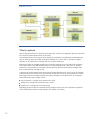
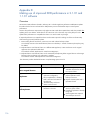
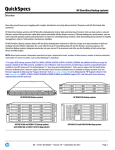
Option 2: HP D2D Backup System on Network SAN only with Gateway
In this option the D2D has connections only to the Network SAN, but there is a network router or Gateway server
providing access to the Active Directory domain controller on the Corporate LAN. In order to ensure two-way
communication between the Network SAN and Corporate LAN the subnet of the Network SAN should be a
subnet of the Corporate LAN subnet.
Once configured, authentication traffic for CIFS shares will be routed to the AD controller but data traffic from
media servers with a connection to both networks will travel only on the Network SAN. This configuration allows
both 1Gbit network connections to be used for data transfer but also allows authentication with the Active
Directory Domain controller. The illustration shows a simple Class C network for a medium-sized LAN
configuration.
HP D2D Backup System on Network SAN only with Gateway
17
Backup server networking
It is important to consider the whole network when considering backup performance, any server acting as a
backup server should be configured where possible with multiple network ports that are teamed / bonded in
order to provide a fast connection to the LAN. Client servers (those that back up via a backup server) may be
connected with only a single port, if backups are to be aggregated through the backup server.
Ensure that no sub-1Gbit network components are in the backup path because this will significantly restrict
backup performance.
18
Fibre Channel configuration
Fibre Channel topologies
The D2D appliances support both switched fabric and direct attach (private loop) topologies. Direct Attach (point
to point) topology is not supported.
Switched fabric using NPIV (N Port ID Virtualisation) offers a number of advantages and is the preferred topology
for D2D appliances.
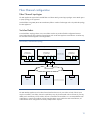
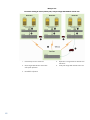
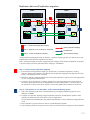
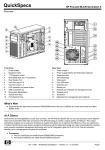
Switched fabric
A switched fabric topology utilizes one or more fabric switches to provide a flexible configuration between
several Fibre Channel hosts and Fibre Channel targets such as the D2D appliance virtual libraries. Switches may
be cascaded of meshed together to form large fabrics.
Fibre Channel, switched fabric topology
HP StorageWorks D2D Backup System
Virtual Library 1
(e.g. D2D Generic)
Medium
Changer
Tape
Drive 1
Tape
Drive 2
Virtual Library 2
(e.g. MSL 4048)
Medium
Changer
Tape
Drive 1
Tape
Drive 2
FC Port 1
Virtual Library n
(e.g. MSL 2024)
Tape
Drive 3
Tape
Drive 4
Medium
Changer
Tape
Drive 1
Tape
Drive 2
FC Port 2
Fibre Channel Fabric
FC HBA
FC HBA
FC HBA
Host 1
Host 2
Host n
The D2D Backup Appliances with a Fibre Channel interface have two FC ports. Either or both of the FC ports
may be connected to a FC fabric, but each virtual library may only be associated with one of these FC ports. By
default, each virtual library will be visible to all hosts connected to the same fabric. It is recommended that each
virtual library is zoned to be visible to only the hosts that require access. Unlike the iSCSI virtual libraries, FC
virtual libraries can be configured to be used by multiple hosts if required.
19
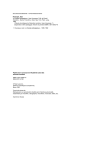
Direct Attach (Private Loop)
A direct attach (private loop) topology is implemented by connecting the D2D appliance ports directly to a Host
Bus Adapter (HBA). In this configuration the Fibre Channel private loop protocol must be used.
Fibre Channel, direct attach (private loop) topology
HP StorageWorks D2D Backup System
Virtual Library 1
(e.g. D2D Generic)
Medium
Changer
Tape
Drive 1
Tape
Drive 2
Virtual Library 2
(e.g. MSL 4048)
Medium
Changer
Tape
Drive 1
Tape
Drive 2
FC Port 1
Virtual Library n
(e.g. MSL 2024)
Tape
Drive 3
Tape
Drive 4
Medium
Changer
Tape
Drive 1
Tape
Drive 2
FC Port 2
FC HBA
FC HBA
Host 1
Host 2
Either of the FC ports on a D2D Backup System may be connected to a FC private loop, direct attach topology.
The FC port configuration of the D2D Appliance should be changed from the default N_Port topology setting to
Loop. This topology only supports a single host connected to each private loop configured FC port.
Zoning
Zoning is only required if a switched fabric topology is used and provides a way to ensure that only the hosts
and targets that they need are visible to servers, disk arrays, and tape libraries. Some of the benefits of zoning
include:
Limiting unnecessary discoveries on the D2D appliance
Reducing stress on the D2D appliance and its library devices by polling agents
Reducing the time it takes to debug and resolve anomalies in the backup/restore environment
Reducing the potential for conflict with untested third-party products
20
Zoning may not always be required for configurations that are already small or simple. Typically the larger the
SAN, the more zoning is needed. Use the following guidelines to determine how and when to use zoning.
Small fabric (16 ports or less)—may not need zoning.
Small to medium fabric (16 - 128 ports)—use host-centric zoning. Host-centric zoning is implemented by
creating a specific zone for each server or host, and adding only those storage elements to be utilized by
that host. Host-centric zoning prevents a server from detecting any other devices on the SAN or including
other servers, and it simplifies the device discovery process.
Disk and tape on the same pair of HBAs is supported along with the coexistence of array multipath software
(no multipath to tape or library devices on the HP D2D Backup System, but coexistence of the multipath
software and tape devices).
Large fabric (128 ports or more)—use host-centric zoning and split disk and tape targets. Splitting disk and
tape targets into separate zones will help to keep the HP D2D Backup System free from discovering disk
controllers that it does not need. For optimal performance, where practical, dedicate HBAs for disk and
tape.
Diagnostic Fibre Channel devices
For each D2D FC port there is a Diagnostic Fibre Channel Device presented to the Fabric. There will be one per
active FC physical port. This means there are two per HP D2D4000 series appliance that has two Fibre Channel
ports.
The Diagnostic Fibre Channel Device can be identified by the following example text.
Symbolic Port Name
"HP D2D S/N-CZJ1440JBS HP D2DBS Diagnostic Fibre
Channel S/N-MY5040204H Port-1"
Symbolic Node Name
S/N-MY5040204H"
"HP D2D S/N-CZJ1440JBS HP D2DBS Diagnostic Fibre Channel
A virtual driver or loader would be identified by the following example text:
Symbolic Port Name
S/N-CZJ1440JC5 Port-0"
Symbolic Node Name
CZJ1440JC5"
"HP D2D S/N-CZJ1440JBS HP Ultrium 4-SCSI Fibre Channel
"HP S/N-CZJ1440JBS HP Ultrium 4-SCSI Fibre Channel S/N-
In the above the S/N-CZJ1440JBS for all devices should be identical. If this is Node Port 1, the Node Name
string will be as above but, if Port 2, the Node Name string will end with “Port-2”. Often the diagnostic device
will be listed above the other virtual devices as it logs in first ahead of the virtual devices. The S/N-MY5040204H
string is an indication of the QLC HBA’s SN not any SN of an appliance/node.
At this time these devices are part of the StoreOnce D2D VTL implementation and are not an error or fault
condition. It is recommended that these devices be removed from the switch zone that is also used for virtual
drives and loaders.
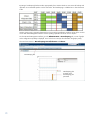
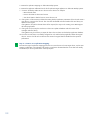
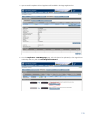
Fibre Channel configuration via Web Management Interface
Full details on how to use the Web Management Interface to create virtual libraries and assign them to one of the
two ports on the appliance (Port 0 and Port 1) are provided in the HP D2D Backup System user guide.
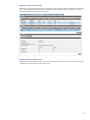
There is a page on the Web Management Interface that allows you to view and edit the Fibre Channel SAN
settings, if necessary. It shows FC settings for each port on the appliance. The editable fields are:
Speed: The default is Auto, which is the recommended option. For users who wish to fix the speed,
other available values are 8Gbs (D2D4312 and D2D4324 only), 4Gbs, 2Gbs and 1Gbs.
Configuring a slower speed can impact performance.
Topology: The default is Auto, which is the recommended option. Loop, where the D2D appliance
simulates a large number of FC devices, and N_Port, when a single target device creates many
virtual devices on a fabric attach port, are also supported. N_Port requires the switch port to
support NPIV (N_Port ID Virtualisation).
21
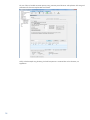
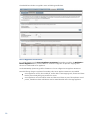
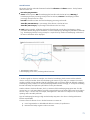
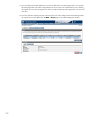
Another page on the Configuration – Fibre Channel page of the Web Management interface shows the status for
all the FC devices that are configured on the D2D appliance. It lists the connection state, port ID, Port type and
number of logins for each virtual library and drive connection. This page is mainly for information and is useful in
troubleshooting.
Best practices for network and Fibre Channel configuration
The following table shows which network and fibre channel ports are present on each model of D2D appliance.
Product/Model
Name
Part Number
Ethernet Connection
Fibre Channel Connection
D2D2502iG1
EJ001A
2 x 1GbE
None
D2D2503 G1
EH945A
2 x 1GbE
None
D2D2504i G1
EJ002A
2 x 1GbE
None
D2D400xi G1
EH938A/EH939A
2 x 1GbE
None
D2D400xFC G1
EH941A/EH942A
2 x 1GbE
2 x 4Gb FC
D2D4112 G1
EH993A
2 x 1GbE
2 x 4Gb FC
D2D2502i G2
EJ001B
2 x 1GbE
None
D2D2504i G2
EJ002B
2 x 1GbE
None
D2D4106i G2
EH996A
2 x 1GbE
None
D2D4106FC G2
EH998A
2 x 1GbE
2 x 4Gb FC
D2D4112 G2
EH993B
2 x 1GbE
2 x 4Gb FC
D2D4312 G2
EH983A
2 x 1GbE,
2 x 10GbE
2 x 8Gb FC
D2D4324 G2
EH985A
2 x 1GbE,
2 x 10GbE
2 x 8Gb FC
Correct configuration of these interfaces is important for optimal data transfer.
Key factors when considering performance.
It is important to consider the whole network when considering backup performance. Any server acting as a
backup server should be configured where possible with multiple network ports that are bonded in order to
provide a fast connection to the LAN. Client servers (those that backup via a backup server) may be connected
with only a single port if backups are to be aggregated through the backup server.
Ensure that no sub-1Gbit network components are in the backup path as this will significantly restrict backup
performance.
Configure “High availability mode (link Aggregate)” network ports to achieve maximum available network
bandwidth.
Virtual library devices are assigned to an individual interface. Therefore, for best performance, configure both
FC ports and balance the virtual devices across both interfaces to ensure that one link is not saturated whilst
the other is idle.
Switched fabric mode is preferred for optimal performance on medium to large SANs since zoning can be
used.
When using switched fabric mode, Fibre Channel devices should be zoned on the switch to be only accessible
from a single backup server device. This ensures that other SAN events, such as the addition and removal of
other FC devices, do not cause unnecessary traffic to be sent to devices. It also ensures that SAN polling
applications cannot reduce the performance of individual devices.
22
A mixture of iSCSI and FC port virtual libraries and NAS shares can be configured on the same D2D
appliance to balance performance needs.
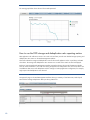
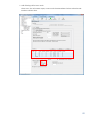
Sizing solutions
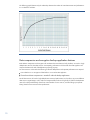
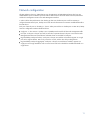
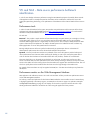
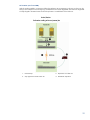
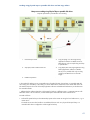
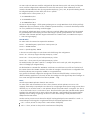
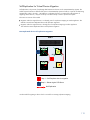
The following diagram provides a simple sizing guide for the HP D2D Generation 2 product family for backups
and backups and replication.
HP D2D Backup System Gen 2 sizing guide
Daily Backup – Typical amount of data that can be protected by
Daily backup: typical amount of data that can be protected by HP StoreOnce Backup systems
StoreOnce Backup systems.
D2D4324
38TB
D2D4312
24TB
32 TB
D2D4112
13TB
D2D4106
8TB
D2D2500
20 TB
10TB
7TB
3TB
Daily backup - typical amount of data that can
be backed up AND REPLICATED in 24hrs.
Daily backup - typical amount of data that can
be backed up in 24hrs.
Note: Assumes fully configured product, compression ratio of 1.5, data change rate of 1%, data retention period of 6 months and a 12hr backup window. Actual performance is dependent
upon data set type, compression levels, number of data streams, number of devices emulated and number of concurrent tasks, such as housekeeping or replication. Additional time is
required for periodic physical tape copy, which would reduce the amount of data that can be protected in 24hrs.
This is a guide only, please go www.hp.com/go/storageworks/sizer to more accurately characterize your specific environment.
Note: Assumes fully configured product, compression rate of 1.5, data change rate of 1%, data retention period
of 6 months and a 12-hour backup window. Actual performance is dependent upon data set type, compression
levels, number of data streams, number of devices emulated and number of concurrent tasks, such as
housekeeping or replication. Additional time is required for periodic physical tape copy, which would reduce the
amount of data that can be protected in 24 hours.
HP also provides a downloadable tool to assist in the sizing of D2D-based data protection solutions at
http://www.hp.com/go/storageworks/sizer.
23
The use of this tool enables accurate capacity sizing, retention period decisions and replication link sizing and
performance for the most complex D2D environments.
A fully worked example using the Sizing Tool and best practices is contained later in the document, see
Appendix B.
24
VTL best practices
Summary of best practices
Tape drive emulation types have no effect on performance or functionality.
Configuring multiple tape drives per library enables multi-streaming operation per library for good aggregate
performance.
Do not exceed the recommended maximum concurrent backup streams per library and appliance if maximum
performance is required. See Appendix A.
Target the backup jobs to run simultaneously across multiple drives within the library and across multiple
libraries.
Create multiple libraries on the larger D2D appliances to achieve best aggregate performance.
– Individual libraries for backing up larger servers
– Libraries for consolidated backups of smaller servers
– Separate libraries by data type if the best trade-off between deduplication ratio and performance is needed
Cartridge capacities should be set either to allow a full backup to fit on one cartridge or to match the physical
tape size for offload (whichever is the smaller)
Use a block size of 256KB or greater. For HP Data Protector and EMC Networker software a block size of
512 KB has been found to provide the best deduplication ratio and performance balance.
Disable the backup application verify pass for best performance.
Remember that virtual cartridges cost nothing and use up very little space overhead. This allows you to assign
backup jobs their own cartridges rather than appending very many small backups to a single piece of virtual
media. This will provide performance benefits during backup and with housekeeping.
Define slot counts to match required retention policy. The D2DBS, ESL and EML virtual library emulations can
have a large number of configurable slots.
Design backup policies to overwrite media so that space is not lost to a large expired media pool and media
does not have different retention periods.
All backups within a policy can remain on the D2D (there is no need to export or delete cartridges) as there is
very little penalty in keeping multiple full backups in a deduping library.
Recommend that full backup jobs are targeted to specific cartridges, sized appropriately.
Reduce the number of appends by specifying separate cartridges for each incremental backup.
Tape library emulation
Emulation types
The HP D2D Backup Systems can emulate several types of physical HP Tape Library device; the maximum
number of drives and cartridge slots is defined by the type of library configured.
Performance however is not related to library emulation other than in the respect of the ability to configure
multiple drives per library and thus enable multiple simultaneous backup streams (multi-streaming operation).
To achieve the best performance of the larger D2D appliances more than one virtual library will be required to
meet the multi-stream needs. For G1 products, a single virtual library is restricted to a maximum of four virtual
drives. As an example, an HP D2D4112 G1 appliance would require at least 10 streams running in parallel to
approach maximum aggregate throughput and so should be configured with a minimum of three virtual libraries,
each with four drives running in parallel, if achieving maximum performance is a critical factor.
For G2 products with 2.1.X or later software a more flexible emulation strategy is supported. The appliance is
provided with a drive pool and these can be allocated to libraries in a flexible manner and so more than 4
drives per library can be configured up to a maximum as defined by the library emulation type. The number of
25
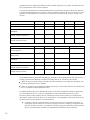
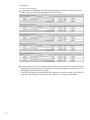
cartridges that can be configured per library has also increased compared to G1 products. The table below lists
the key parameters for both G1 and G2 products.
To achieve best performance the recommended maximum concurrent backup streams per library and appliance
in the table should be followed. As an example, while it is possible to configure 40 drives per library on a 4312
appliance, for best performance no more than 12 of these drives should be actively writing or reading at any
one time.
D2D2502 G1
D2D2503 G1
D2D2504 G1
D2D400X G1
D2D4112 G1
4
1
4
4
4
48
48
48
96
144
24, 48, 96
24, 48, 96
24, 48, 96
24, 48, 96
24, 48, 96
Recommended maximum concurrent
backup streams per appliance
16
8
24
12
24
Recommended maximum concurrent
backup streams per library
4
4
4
4
4
D2D2502 G2
D2D2504 G2
Maximum VTL drives per
library/appliance
16
32
64/96
200
Maximum slots per library (D2DBS,
EML-E, ESL-E)
96
96
1024
4096
24, 48, 96
24, 48, 96
24, 48, 96
24, 48, 96
Maximum active streams per store
32
48
64/96
128
Recommended maximum concurrent
backup streams per appliance
16
24
48
64
Recommended maximum concurrent
backup streams per library
4
4
6
12
Maximum VTL drives per library
Maximum slots per library (D2DBS)
Maximum slots (MSL2024, MSL4048,
MSL8096)
Maximum slots (MSL2024, MSL4048,
MSL8096)
D2D4106/4112 G2
D2D4312/4324 G2
The HP D2DBS emulation type and the ESL/EML type, supported on the G2 product family with code revision 2.1
onwards, provide the most flexibility in numbers of cartridges and drives. This has two main benefits:
It allows for more concurrent streams on backups which are throttled due to host application throughput, such
as multi-streamed backups from a database.
It allows for a single library (and therefore Deduplication Store) to contain similar data from more backups that
can run in parallel to increase deduplication ratio.
The D2DBS emulation type has an added benefit in that it is also clearly identified in most backup applications
as a virtual tape library and so is easier for supportability. It is the recommended option for this reason.
There are a number of other limitations from an infrastructure point of view that need to be considered when
allocating the number of drives per library. As a general point it is recommended that the number of tape drives
per library does not exceed 64 due to the restrictions below:
For iSCSI VTL devices a single Windows or Linux host can only access a maximum of 64 devices. A
single library with 63 drives is the most that a single host can access. Configuring a single library with
more than 63 drives will result in not all devices in the library being seen (which may include the library
device). The same limitation could be hit with multiple libraries and fewer drives per library.
26
A similar limitation exists for Fibre Channel. Although there is a theoretical limit of 255 devices per FC
port on a host or switch, the actual limit appears to be 128 for many switches and HBAs. You should
either balance drives across FC ports or configure less than 128 drives per library.
Some backup applications will deliver less than optimum performance if managing many concurrent
backup tape drives/streams. Balancing the load across multiple backup application media servers can
help here.
Cartridge sizing
The size of a virtual cartridge has no impact on its performance; it is recommended that cartridges are created to
match the amount of data being backed up. For example, if a full backup is 500 GB, the next larger
configurable cartridge size is 800 GB, so this should be selected.
If backups span multiple cartridges, there is a risk that this will impact performance because housekeeping
operations will start on the first backup cartridge as soon as the backup application spans to the next cartridge. If
backups do span a cartridge, the effect of the housekeeping process should be quite small because it will hold off
due to the remaining backup traffic to the appliance taking priority. The performance overhead might become
higher, if several backup jobs are running concurrently and they all behave in the same way so that several
cartridges are performing low level housekeeping activity.
It is best practice to configure housekeeping blackout windows, as described on page 71.
Note that if backups are to be offloaded to physical media elsewhere in the network, it is recommended that the
cartridge sizing matches that of the physical media to be used. For G1 products, direct attach tape offload
cannot span physical cartridges so if a cartridge is too large, the offload operation will fail. Some backup
application-controlled copies can accommodate spanning of a single cartridge onto multiple physical cartridges,
however.
Number of libraries per appliance
The D2D appliance supports the creation of multiple virtual library devices. If large amounts of data are being
backed up from multiple hosts or for multiple disk LUNs on a single host, it is good practice to separate these
across several libraries (and consequently into multiple backup jobs). Each library has a separate deduplication
“store” associated with it. Reducing the amount of data in, and complexity of, each store will improve its
performance.
Creating a number of smaller deduplication “stores” rather than one large store which receives data from
multiple backup hosts could have an impact on the overall effectiveness of deduplication. However, generally,
the cross-server deduplication effect is quite low unless a lot of common data is being stored. If a lot of common
data is present on two servers, it is recommended that these are backed up to the same virtual library.
For best backup performance, configure multiple virtual libraries and use them all concurrently.
For best deduplication performance, use a single virtual library and fully utilize all the drives in that one
library.
Backup application configuration
In general backup application configurations for physical tape devices can be readily ported over to target a
deduplicating virtual library with no changes; this is one of the key benefits of virtual libraries – seamless
integration. However considering deduplication in the design of a backup application configuration can improve
performance, deduplication ratio or ease of data recovery so some time spent optimizing backup application
configuration is valuable.
Blocksize and transfer size
As with physical tape, larger tape block sizes and host transfer sizes are of benefit. This is because they reduce
the amount of overhead of headers added by the backup application and also by the transport interface. The
recommended minimum is 256 KB block size, and up to 1 MB is suggested.
For HP Data Protector and EMC Networker Software a block size of 512 KB has been found to provide the best
deduplication ratio and performance balance and is the recommended block size for this application.
27
Some minor setting changes to upstream infrastructure might be required to allow backups with greater than 256
KB block size to be performed. For example, Microsoft’s iSCSI initiator implementation, by default, does not
allow block sizes that are greater than 256 KB. To use a block size greater than this you need to modify the
following registry setting:
HKEY_LOCAL_MACHINE\SYSTEM\CurrentControlSet\Control\Class\{4D36E97B-E325-11CE-BFC108002BE10318}\0000\Parameters
Change the REG_DWORD MaxTransferLength to “80000” hex (524,288 bytes), and restart the
media server – this will restart the iSCSI initiator with the new value.
Disable backup application verify pass
Most backup applications will default to performing a verify operation after a backup job. Whilst this offers a
very good way to ensure that data is backed up successfully it will also heavily impact the performance of the
whole backup job.
Performing a verify operation will more than double the overall backup time due to the fact that restore
performance (required for verify) is slower for inline deduplication-enabled devices.
Disabling verify for selected backup jobs can be done relatively safely as D2D Backup Systems perform CRC
(Cyclic Redundancy Check) checking for every backed-up chunk to ensure that no errors are introduced by the
D2D system. Verifying some backup jobs on a regular basis is recommended. For example, verifying the weekly
full backups where additional time is available might be an option.
Rotation schemes and retention policy
Retention policy
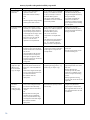
The most important consideration is the type of backup rotation scheme and associated retention policy to
employ. With data deduplication there is little penalty for using a large number of virtual cartridges in a rotation
scheme and therefore a long retention policy for cartridges because most data will be the same between backups
and will therefore be deduplicated.
A long retention policy has the following benefits:
It provides a more granular set of recovery points with a greater likelihood that a file that needs to be
recovered will be available for longer and in many more versions.
It reduces the overwrite frequency of full backup cartridge which reduces the amount of deduplication
housekeeping overhead required.
When using the D2D to copy cartridges to physical media a long retention policy ensures longer validity of the
offloaded cartridges because they inherit the same retention period as the virtual cartridge. Therefore, their
ability to restore data from a physical cartridge is improved.
Rotation scheme
There are two aspects to a rotation scheme which need to be considered:
Full versus Incremental/Differential backups
Overwrite versus Append of media
Full versus Incremental/Differential backups
The requirement for full or incremental backups is based on two factors, how often offsite copies of virtual
cartridges are required and speed of data recovery. If regular physical media copies are required, the best
approach is that these are full backups on a single cartridge. Speed of data recovery is less of a concern with a
virtual library appliance than it is with physical media. For example, if a server fails and needs to be fully
recovered from backup, this recovery will require the last full backup plus every incremental backup since (or the
last differential backup). With physical tape it can be a time consuming process to find and load multiple
physical cartridges, however, with virtual tape there is no need to find all of the pieces of media and, because
the data is stored on disk, the time to restore single files is lower due to the ability to randomly seek within a
backup more quickly and to load a second cartridge instantly.
28
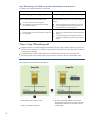
Overwrite versus append of media
Overwriting and appending to cartridges is also a concept where virtual tape has a benefit. With physical media
it is often sensible to append multiple backup jobs to a single cartridge in order to reduce media costs; the
downside of this is that cartridges cannot be overwritten until the retention policy for the last backup on that
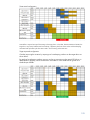
cartridge has expired. The diagram below shows cartridge containing multiple appended backup sessions some
of which are expired and other that are valid. Space will be used by the D2D to store the expired sessions as
well as the valid sessions. Moving to an overwrite strategy will avoid this.
With virtual tape a large number of cartridges can be configured for “free” and their sizes can be configured so
that they are appropriate to the amount of data stored in a specific backup. Appended backups are of no benefit
because media costs are not relevant. In addition, there will be a penalty when performing any tape offload
because the whole cartridge is offloaded with all backup sessions.
Our recommendations are:
Target full backup jobs to specific cartridges, sized appropriately
Reduce the number of appends by specifying separate cartridges for each incremental backup
Taking the above factors into consideration, an example of a good rotation scheme where the customer requires
weekly full backups sent offsite and a recovery point objective of every day in the last week, every week in the
last month, every month in the last year and every year in the last 5 years might be as follows:
– 4 daily backup cartridges, Monday to Thursday, incremental backup, overwritten every week.
– 4 weekly backup cartridges, Fridays, full backup, overwritten every fifth week
– 12 monthly backup cartridges, last Friday of month, overwritten every 13th month.
– 5 yearly backup cartridges, last day of year, overwritten every 5 years.
This means that in the steady state, daily backups will be small, and whilst they will always overwrite the last
week, the amount of data overwritten will be small. Weekly full backups will always overwrite, but housekeeping
has plenty of time to run over the following day or weekend or whenever scheduled to run, the same is true for
monthly and yearly backups.
Total virtual tapes required in above rotation = 25
Each backup job effectively has its own virtual tape.
The customer is also able to offload a full backup every week, month and year after the full backup runs to
physical tape for offsite storage.
29
D2D NAS best practices
Introduction to D2D NAS backup targets
The HP StorageWorks D2D Backup System now supports the ability to create a NAS (CIFS or NFS) share to be
used as a target for backup applications.
The NAS shares provide data deduplication in order to make efficient use of the physical disk capacity when
performing backup workloads.
The D2D device is designed to be used for backup not for primary storage or general purpose NAS (drag and
drop storage). Backup applications provide many configuration parameters that can improve the performance of
backup to NAS targets, so some time spent tuning the backup environment is required in order to ensure best
performance.
Note: HP D2D NAS Implementation guides are available for on the HP web site for the following backup
applications: HP Data Protector 6.11, Symantec Backup Exec 2010, CommVault Simpana 9 and Symantec
NetBackup.
Overview of NAS best practices
Configure bonded network ports for best performance.
Configure multiple shares and separate data types into their own shares.
Adhere to the suggested maximum number of concurrent operations per share/appliance.
Choose disk backup file sizes in backup software to meet the maximum size of the backup data.If this is not
possible, make the backup container size as large as possible.
Disable software compression, deduplication or synthetic full backups.
Do not pre-allocate disk space for backup files.
Do not append to backup files.
Choosing NAS or VTL for backup
D2D Backup Systems provide both NAS and VTL interfaces; the most appropriate interface for a particular
backup need varies depending on several requirements.
Benefits of NAS
Simpler configuration as no drivers need to be installed and the interface is familiar to most computer users.
Often backup to disk is provided as a no cost option in backup applications, so application licensing is
cheaper and simpler.
Backup applications are introducing new features that make good use of disk as a target such as Disk-to-Diskto-Tape migration.
Backup applications that do not support backup to tape devices can now be used.
Benefits of VTL
Seamless integration with existing physical tape environment.
Backup application media copy is available for physical tape copies.
Performance may be better than NAS in some configurations due to the efficiency differences between the
protocols, especially when using a Fibre Channel VTL interface.
30
Shares and deduplication stores
Each NAS share created on the D2D system has its own deduplication “store”; any data backed up to a share
will be deduplicated against all of the other data in that store, there is no option to create non-deduplicating
NAS shares and there is no deduplication between different shares on the same D2D.
Once a D2D CIFS share is created, subdirectories can be created via Explorer. This enables multiple host servers
to back up to a single NAS share but each server can back up to a specific sub-directory on that share.
Alternatively a separate share for each host can be created.
The backup usage model for D2D has driven several optimisations in the NAS implementation which require
accommodation when creating a backup regime:
Only files larger than 24 MB will be deduplicated, this works well with backup applications because they
generally create large backup files, but means that simply copying (by drag and drop for example) a
collection of files to the share will not result in the smaller files being deduplicated.
There is a limit of 25000 files per NAS share, applying this limit ensures good replication responsiveness to
data change. This is not an issue with backup applications because they create large files and it is very
unlikely that there will be a need to store more than 25000 on a single share.
A limit in the number of concurrently open files both above and below the deduplication file size threshold (24
MB) is applied. This prevents overloading of the deduplication system and thus loss of performance. See
Appendix A for values for each specific model.
When protecting a large amount of data from several servers with a D2D NAS solution it is sensible to split the
data across several shares in order to realise best performance from the entire system by improving the
responsiveness of each store. Smaller stores have less work to do in order to match new data to existing chunks
so they can perform faster.
The best way to do this whilst still maintaining a good deduplication ratio is to group similar data from several
servers in the same store. For example: keep file data from several servers in one share, and Oracle database
backups in another share.
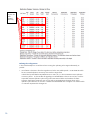
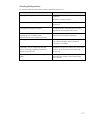
Maximum concurrently open files
The table below shows the maximum number of concurrently open files per share and per D2D appliance for files
above and below the 24 MB dedupe threshold size.
A backup job may consist of several small metadata/control files and at least one large data file. In some cases,
backup applications will hold open more than one large file. It is important not to exceed the maximum
concurrent backup operations, see Concurrent operationson page 34.
If these thresholds are breached the backup application will receive an error from the D2D indicating that a file
could not be opened and the backup will fail.
Concurrency values
D2D2502 G1
D2D2503 G1
D2D2504 G1
D2D400X G1
D2D4112 G1
Max open files per share > 24MB
8
8
8
8
8
Max open files per D2D > 24MB
32
16
48
24
48
Max open files per D2D Total
96
40
112
40
112
Concurrency values
D2D2502 G2
D2D2504 G2
D2D4106/4112 G2
D2D4312/4324 G2
Max open files per share > 24MB
32
48
64
128
Max open files per D2D > 24MB
32
48
64
128
Max open files per D2D Total
96
112
128
640
31
The number of concurrently open files in the table above do not guarantee that the D2D will perform optimally
with this number of concurrent backups, nor do they take into account the fact that host systems may report a file
as having been closed before the actual close takes place, this means that the limits provided in the table could
be exceeded without realizing it.
Should the open file limit be exceeded an entry is made in the D2D Event Log so the user knows this has
happened. Corrective action for this situation is to reduce the overall concurrent backups that are happening and
have caused too many files to be opened at once, maybe by re-scheduling some of the backup jobs to take place
at a different time.
More information on the practical implications of these limits is provided in the Backup Application
Implementation Guides; there is a separate guide for HP Data Protector 6.11, Symantec Backup Exec 2010,
CommVault Simpana 9.0 and Netbackup.
Backup application configuration
The HP D2D Backup System NAS functionality is designed to be used with backup applications that create large
“backup files” containing all of the server backup data rather than applications that simply copy the file system
contents to a share.
When using a backup application with D2D NAS shares the user will need to configure a new type of device in
their backup application. Each application varies as to what it calls a backup device that is located on a NAS
device, for example it may be called a File Library, Backup to Disk Folder, or even Virtual Tape Library. Details
about some of the more common backup applications and their use of NAS targets for backup can be found in
the Backup Application Implementation Guides.
Most backup applications allow the operator to set various parameters related to the NAS backup device that is
created, these parameters are important in ensuring good performance in different backup configurations.
Generic best practices can be applied to all applications as follows.
Backup file size
Backup applications using disk/NAS targets will create one or more large backup files per backup stream; these
contain all of the backed up data. Generally a limit will be set on the size that this file can get to before a new
one is created (usually defaulting to 4–5 GB). A backup file is analogous to a virtual cartridge for VTL devices,
but default file sizes will be much smaller than a virtual cartridge size (e.g. a virtual cartridge may be 800 GB).
In addition to the data files, there will also be a small number of metadata files such as catalogue and lock files,
these will generally be smaller than the 24 MB dedupe threshold size and will not be deduplicated. These files
are frequently updated throughout the backup process, so allowing them to be accessed randomly without
deduplication ensures that they can be accessed quickly. The first 24 MB of any backup file will not be
deduplicated, with metadata files this means that the whole file will not be deduplicated, with the backup file the
first 24 MB only will not be deduplicated. This architecture is completely invisible to the backup application
which is merely presented with its files in the same way as any ordinary NAS share would do so.
Backup size of data file
It is possible that the backup application will modify data within the deduplicated data region; this is referred to
as a write-in-place operation. This is expected to occur rarely with standard backup applications because these
generally perform stream backups and either create a new file or append to the end of an existing file rather
than accessing a file in the middle.
32
If a write-in-place operation does occur, the D2D will create a new backup item that is not deduplicated, a
pointer to this new item is then created so that when the file is read the new write-in-place item will be accessed
instead of the original data within the backup file.
Backup size of data file with write-in-place item
If a backup application were to perform a large amount of write-in-place operations, there would be an impact
on backup performance.
Some backup applications provide the ability to perform “Synthetic Full” backups, these may produce a lot of
write-in-place operations or open a large number of files all at once, it is therefore recommended that Synthetic
Full backup techniques are not used, see Synthetic full backups on page 37 for more information.
Generally configuring larger backup file sizes will improve backup performance and deduplication ratio
because:
1.
2.
3.
4.
5.
The overhead of the 24 MB dedupe region is reduced.
The backup application can stream data for longer without having to close and create new files.
There is a lower percentage overhead of control data within the file that the backup application uses to
manage its data files.
There is no penalty to using larger backup files as disk space is not usually pre-allocated by the backup
application.
Housekeeping may*not start until the large file is closed, lots of smaller files would result in housekeeping
running during the backup when the files are closed.
* See Housekeeping monitoring and control on page 71 for more details.
If possible the best practice is to configure a maximum file size that is larger than the complete backup will be
(allowing for some data growth over time), so that only one file is used for each backup. Some applications will
limit the maximum size to something smaller than that however, in which case, using the largest configurable size
is the best approach.
However in some specific cases using smaller backup files is of benefit. For example, in a replication
environment, using small files allows replication to start on each small file as soon as the backup application
closes it (assuming a replication blackout window is not in place). This allows either:
1. The replication of a single backup job to run along behind at the same time as the backup is running, or
2. If multiple replication jobs are running in parallel from a single source appliance or to a single target device,
the smaller file sizes prevent one backup job from locking out other backup jobs for the entire duration of the
replication. Instead, each backup replication job gets some replication time thus levelling out the time taken to
complete all replications rather than delaying one at the expense of another.
33
Backup job time, assuming no housekeeping or replication windows are set
Disk space pre-allocation
Some backup applications allow the user to choose whether to “pre-allocate” the disk space for each file at
creation time, i.e. as soon as a backup file is created an empty file is created of the maximum size that the
backup file can reach. This is done to ensure that there is enough disk space available to write the entire backup
file. This setting has no value for D2D devices because it will not result in any physical disk space actually being
allocated due to the deduplication system.
It is advised that this setting is NOT used because it can result in unrealistically high deduplication ratios being
presented when pre-allocated files are not completely filled with backup data or, in extreme cases, it will cause a
backup failure due to a timeout if the application tries to write a small amount of data at the end of a large empty
file. This results in the entire file having to be padded-out with zeros at creation time, which is a very time
consuming operation.
Block / transfer size
Some backup applications provide a setting for block or transfer size for backup data in the same way as for
tape type devices. Larger block sizes are beneficial in the same way for NAS devices as they are for virtual tape
devices because they allow for more efficient use of the network interface by reducing the amount of metadata
required for each data transfer. In general, set block or transfer size to the largest value allowed by the backup
application.
Concurrent operations
For best D2D performance it is important to either perform multiple concurrent backup jobs or use multiple
streams for each backup (whilst staying within the limit of concurrently open files per NAS share). Backup
applications provide an option to set the maximum number of concurrent backup streams per file device; this
parameter is generally referred to as the number of writers. Setting this to the maximum values shown in the table
34
below ensures that multiple backups or streams can run concurrently whilst remaining within the concurrent file
limits for each D2D share.
Multiple servers, single stream backup
Multiple servers, multi-stream backup
Multiple servers, multiple single-stream backups
The table below shows the recommended maximum number of backup streams or jobs per share to ensure that
backups will not fail due to exceeding the maximum number of concurrently open files. Note however that
optimal performance may be achieved at a lower number of concurrent backup streams.
These values are based on standard “file” backup using most major backup applications.
35
If backing up using application agents (e.g. Exchange, SQL, Oracle) it is recommended that only one backup per
share is run concurrently because these application agents frequently open more concurrent files than standard
file type backups.
D2D2502 G1
D2D2503 G1
D2D2504 G1
D2D400X G1
D2D4112 G1
Suggested maximum concurrent
operations per share
4
4
4
4
4
Suggested maximum concurrent
operations per appliance
16
8
24
12
24
D2D2502 G2
D2D2504 G2
Suggested maximum concurrent
operations per share
4
4
6
12
Suggested maximum concurrent
operations per appliance
16
32
48
64
D2D4106/4112 G2
D2D4312/4324 G2
Overall best performance is achieved by running a number of concurrent backup streams across several libraries;
the exact number of streams depends upon the D2D model being used and also the performance of the backup
servers.
Buffering
If the backup application provides a setting to enable buffering for Read and/or Write this will generally improve
performance by ensuring that the application does not wait for write or read operations to report completion
before sending the next write or read command. However, this setting could result in the backup application
inadvertently causing the D2D to have more concurrently open files than the specified limits (because files may
not have had time to close before a new open request is sent). If backup failures occur, disabling buffered writes
and reads may fix the problem, in which case, reducing the number of concurrent backup streams then reenabling buffering will provide best performance.
Overwrite versus append
This setting allows the backup application to either always start a new backup file for each backup job
(overwrite) or continue to fill any backup file that has not reached its size limit before starting new ones (append).
Appended backups should not be used because there is no benefit to using the append model, this does not save
on disk space used. There are also downsides to using append in that replication will need to “clone” the file on
the replication target device before it can append the new data, this operation takes time to complete so affects
replication performance.
Compression and encryption
Most backup applications provide the option to compress the backup data in software before sending, this
should not be implemented.
Software compression will have the following negative impacts:
1. Consumption of system resources on the backup server and associated performance impact.
2. Introduction of randomness into the data stream between backups which will reduce the effectiveness of D2D
deduplication
Some backup applications now also provide software encryption, this technology prevents either the restoration
of data to another system or interception of the data during transfer. Unfortunately it also has a very detrimental
effect on deduplication as data backed up will look different in every backup preventing the ability to match
similar data blocks.
The best practice is to disable software encryption and compression for all backups to the HP D2D Backup
System.
36
Verify
By default most backup applications will perform a verify pass on each back job, in which they read the backup
data from the D2D and check against the original data.
Due to the nature of deduplication the process of reading data is slower than writing as data needs to be rehydrated. Thus running a verify will more than double the overall backup time. If possible verify should be
disabled for all backup jobs to D2D.
Synthetic full backups
Some backup applications have introduced the concept of a “Synthetic Full” backup where after an initial full
backup, only file or block based incremental backups are undertaken. The backup application will then construct
a full system recovery of a specific point in time from the original full backup and all of the changes up to the
specified recovery point.
In most cases this model will not work well with a NAS target on a D2D backup system for one of two reasons.
The backup application may post-process each incremental backup to apply the changes to the
original full backup. This will perform a lot of random read and write and write-in-place which will
be very inefficient for the deduplication system resulting in poor performance and dedupe ratio.
If the backup application does not post-process the data, then it will need to perform a
reconstruction operation on the data when restored, this will need to open and read a large number
of incremental backup files that contain only a small amount of the final recovery image, so the
access will be very random in nature and therefore a slow operation.
An exception to this restriction is the HP Data Protector Synthetic full backup which works well. However the HP
Data Protector Virtual Synthetic full backup which uses a distributed file system and creates thousands of open
files does not.
Housekeeping impact on maximum file size selection
The housekeeping process which is used to reclaim disk space when data is overwritten or deleted runs as a
background task and for NAS devices will run on any backup file as soon as the file is closed by the backup
application.
Housekeeping is governed by a back-off algorithm which attempts to reduce its impact on the performance of
other operations by throttling it back when performance may be impacted; however there is still some impact of
housekeeping on the performance of other operations like backup.
When choosing the maximum size that a backup file may grow to, it is important to consider housekeeping. If the
file size is small (e.g. 4 – 5GB) and therefore lots of files make up a single backup job, housekeeping will by
default run as soon as the first and any subsequent files are overwritten and closed by the backup application,
thus housekeeping will run in parallel with the backup reducing backup performance. Using larger files will
generally mean that housekeeping does not run until after the backup completes.
In some situations however it may be preferable to have a small amount of housekeeping running throughout the
backup rather than a larger amount which starts at the end. For example, if backup performance is already slow
due to other network bottlenecks the impact of housekeeping running during the backup may be negligible and
therefore the total time to complete backup and housekeeping is actually faster.
Some backup applications, however, will always create housekeeping at the start of the backup by deleting
expired backup files at the beginning of the backup.
The housekeeping process can be temporarily delayed by applying housekeeping blackout windows to cover the
period of time when backups are running; this is considered best practice. In general it is best to use larger
backup files as previously described.
G1 and G2 products using 1.1.X and 2.1.X or later software contain functionality that allows the user to monitor
and have some control over the housekeeping process. This software provides user configurable blackout
windows for housekeeping during which time it will not run and therefore not impact performance of other
37
operations. Housekeeping remains an important part of the data deduplication solution and enough time must be
allowed for it to complete in order to make best use of available storage capacity.
See Housekeeping monitoring and control on page 71 for more information on best practices for applying
blackout windows and how to monitor the housekeeping load.
CIFS share authentication
The D2D device provides three possible authentication options for the CIFS server:
None – All shares created are accessible to any user from any client (least secure).
User – Local (D2D) User account authentication.
AD – Active Directory User account authentication.
None – This authentication mode requires no username or password authentication and is the simplest
configuration. Backup applications will always be able to use shares configured in this mode with no changes to
either server or backup application configuration. However this mode provides no data security as anyone can
access the shares and add or delete data.
User – In this mode it is possible to create “local D2D users” from the D2D management interface. This mode
requires the configuration of a respective local user on the backup application media server as well as
configuration changes to the backup application services. Individual users can then be assigned access to
individual shares on the D2D. This authentication mode is ONLY recommended when the backup application
media server is not a member of an AD Domain.
AD – In this mode the D2D CIFS server becomes a member of an Active Directory Domain. In order to join an
AD domain the user needs to provide credentials of a user who has permission to add computers and users to the
AD domain. After joining an AD Domain access to each share is controlled by Domain Management tools and
domain users or groups can be given access to individual shares on the D2D. This is the recommended
authentication mode if the backup application media server is a member of an AD domain. It is the preferred
option.
Tips for configuring User authentication
Select the User authentication mode on the D2D management interface, and click Update to create local user
accounts on the D2D. Provide a User Name and Password for the new user.
Up to 50 individual users may be created per D2D appliance, in reality however far fewer are generally
required in a backup environment.
User authentication should only be used where the backup application is hosted on a computer which is not a
member of an AD domain. User authentication requires the following:
38
A local user with the same username and password must be created on the media server that will be using
the D2D CIFS share.
The backup application services must be configured to run as the local user (how this is configured varies by
backup application).
The best practice when using User authentication is to create a “backup” user account on both the D2D and all
application media servers. This user should then be used to log in to the media server computer and to administer
the backup application.
All shares that need to be accessed by the media servers should use the same “backup” user account, including
any shares on other D2D devices or NAS systems.
Tips for configuring AD authentication
D2D products support configuration in a multi-domain tree forest but do not support multi-forest domain
topologies.
In order to join a domain:
1. Connect to the D2D Web Management Interface and navigate to the NAS - CIFS Server page.
2. Click Edit and choose AD from the drop-down menu.
3. Provide the name of the domain that you wish to join e.g. “mydomain.local”
4. Click Update. If the domain controller is found, a pop-up box will request credentials of a user with
permission to join the domain. (Note that joining or leaving the domain will result in failure of any backup or
restore operations that are currently running.)
5. Provide credentials (username and password) of a domain user that has permission to add computers to the
domain and select Register.
In most cases, as part of joining the AD Domain, the DNS server will be automatically updated to provide a
Host(A) record and Pointer(PTR) entry. If these are not configured to occur automatically, entries can be added
manually as follows:
39
1. Create a new Host(A) record in the forward lookup zone for the domain to which the D2D belongs with the
hostname and IP address of the D2D. Click Add Host.
2. Also create a Pointer(PTR) in the reverse lookup zone for the domain for the D2D appliance by providing
hostname and IP address.
Click OK.
40
Now that the D2D is a member of the domain its shares can be managed from any computer on the domain by
configuring a customized Microsoft Management Console (MMC) with the Shared Folders snap-in. Once you
have created shares you can manage them as follows.
1. Open a new MMC window by typing mmc at the command prompt or from the start search box. This will
launch a new empty MMC window.
2. To this empty MMC window add the Shared Folders snap-in.
Select File – Add/Remove Snap-in ... Then select Shared Folders from the left-hand pane.
41
3. Now click Add > In the dialog box choose the computer to be managed and select Shares from the View
options.
4. Finally select Finish and OK to complete the snap-in set up.
Note that the Folder Path field contains an internal path on the D2D Backup System.
5. Save this customized snap-in for future use.
42
6. Double click a share name in the right-hand pane and select the Permissions tab.
Add a user or group of users from the domain. Specify the level of permission that the users will receive and
click Apply.
Leaving an AD domain
The user may wish to leave an AD domain in order to:
Temporarily leave then rejoin the same domain
Join a different AD Domain
Put the D2D into either No Authentication or Local User Authentication modes.
Use the NAS - CIFS Server Web Management Interface page as follows:
Click Leave AD to leave the domain, but keep the option of rejoining it.
To join a different AD domain or change mode, click Edit and then select the new domain or mode.
In either case, the user will first be prompted to provide credentials of a user with authority to leave the domain. If
incorrect credentials are supplied, the D2D will reconfigure its own authentication mode, but will not correctly
inform the domain controller that the computer has left the domain. The administrator should then manually
remove the computer’s entry in the AD configuration.
43
VTL and NAS – Data source performance bottleneck
identification
In a lot of cases backup and restore performance using the HP D2D Backup System is limited by factors outside
of the appliance itself. For example the speed at which data can be transferred to and from the source disk
system (the system being backed up), or the performance of the Ethernet or fibre channel SAN link from source to
D2D.
Performance tools
In order to locate the bottleneck in the system, HP provides some performance tools that are part of the Library
and Tape Tools package (downloadable free from http://www.hp.com/support/tapetools) or can be used in
standalone mode (downloadable free from http://www.hp.com/support/pat).
The tools are:
Dev Perf – This provides a simple test that will write data directly from system memory to a cartridge in a library
on the D2D system. If this tool is run on a server being used as the backup media server it can provide the
maximum data throughput rate for a single backup or restore process. This will help to identify whether the D2D
system or data transport link (Ethernet or FC SAN) to the D2D system is the bottleneck because it isolates any
backup application or source disk system from the environment.
Running multiple instances of the Dev perf tool simultaneously to separate tape devices on the D2D will
demonstrate the performance that can be achieved with multiple backup streams.
Sys Perf – This tool provides two tests that are conducted on the source disk system to perform backup and
restore performance tests. These tests either read from (for backup) or write to (for restore) the system disks in
order to calculate how fast data can be transferred from disk and, therefore, whether this is a bottleneck.
These tests should be run on the media server that backs up to the D2D. In order to test how fast any client
servers can transfer data, the same performance tests can be used by mounting a directory from any of the client
servers to the media server then running the test from the media server against these mounted directories. This will
show how quickly data can be transferred from the client server disk right through to the media server.
For example if the source data can only be supplied at 20 MB/sec – the D2D cannot backup at any faster than
20 MB/sec!
Performance metrics on the Web Management Interface
D2D appliances with software at version 1.0.0 and 2.0.0 and later will also provide some performance metrics
on the Web Management Interface.
For backups, restores and replication for both VTL and NAS modes the current transfer rate and 5 minute history
is displayed graphically in the activity monitor, see examples on the next two pages. For replication examples
see Replication Monitoring on page 67. This display can be used in conjunction with the LTT tools to help
identify performance bottlenecks and aid the user when tuning the appliance for best practices.
44
The activity graph below shows the start of a Virtual Tape Write and the current throughput being achieved.
The activity graph below shows the end of a Virtual Tape Write and the start of a Virtual Tape Read and the
throughput achieved.
45
The activity graph below shows the end of a Virtual Tape Read.
How to use the D2D storage and deduplication ratio reporting metrics
D2D appliances with software at version 1.0.0 and 2.0.0 and later provide more detailed storage reporting and
deduplication ratio metrics on the Web Management Interface.
These will indicate the storage and deduplication ratio for the overall appliance and on a per library and NAS
share basis. The storage and deduplication ratio variation over a week and a month can also be displayed.
Below are some example Web Management Interface screenshots showing the type of information available.
One use of this information is as an aid when tuning the appliance for best practice. The user will be able to see
how different data sources will deduplicate and how changes in backup application configuration, for example,
might improve the deduplication ratio achieved.
Storage–Disk page on the Web Management Interface showing a summary of Total User Data, Total Physical
Data and the resulting Deduplication Ratio per Library/NAS share.
46
This example is from the Storage Reporting GUI page and shows the Disk Storage Capacity Growth for both
User Data and Physical Data for the current week for the whole appliance as more backups have been sent to it
during the week. This chart can also display this information for a month period. Deduplication Ratio and Daily
and Weekly Change rate can also be selected as Data options.
This example is also from the Storage Reporting GUI and looks at an individual virtual library. The graph below
is showing the change in deduplication ratio during the week as backups have been sent to this library.
47
D2D Replication
The HP StorageWorks D2D products provide deduplication-enabled, low bandwidth replication for both VTL and
NAS devices. Replication enables data on a “replication source” D2D to be replicated to a “replication target”
D2D system.
Replication provides a point-in-time “mirror” of the data on the source D2D at a target D2D system on another
site; this enables quick recovery from a disaster that has resulted in the loss of both the original and backup
versions of the data on the source site. Replication does not however provide any ability to roll-back to previously
backed-up versions of data that have been lost from the source D2D. For example, if a file is accidentally deleted
from a server and therefore not included in the next backup, and all previous versions of backup on the source
D2D have also been deleted, those files will also be deleted from a replication target device as the target is a
mirror of exactly what is on the source device.
D2D replication overview
The D2D utilizes a propriety protocol for replication traffic over the Ethernet ports; this protocol is optimized for
deduplication-enabled replication traffic. An item (VTL Cartridge or NAS file) will be marked ready for replication
as soon as it is closed (or the VTL cartridge returned to its slot). Replication works in a “round robin” process
through the libraries and shares on a D2D; when it gets to an item that is ready for replication it will start a
replication job for that item assuming there is not already the maximum number of replication jobs underway.
Replication will first exchange metadata information between source and target to identify the blocks of
deduplicated data that are different; it will then synchronize the changes between the two appliances by
transferring the changed blocks or marking blocks for removal at the target appliance.
Replication will not prevent backup or restore operations from taking place. If an item is re-opened for further
backups or restore, then replication of that item will be paused to be resumed later or cancelled if the item is
changed.
Replication can also be configured to occur at specific times in order to optimize bandwidth usage and not affect
other applications that might be sharing the same WAN link.
Best practices overview
Use the D2D Sizing tool to accurately specify D2D appliance and WAN link requirements.
Avoid replicating appended backups.
Use replication blackout windows to avoid overlap with backup operations.
Use bandwidth throttling to prevent oversubscription of the WAN link.
Replication jobs may be paused or cancelled if insufficient WAN bandwidth is available. Limit the number of
concurrent replication jobs if only a small WAN bandwidth is available.
When creating a VTL replication mapping, select only the subset of cartridges that you need to replicate, for
example a daily backup.
48
Replication usage models
There are four main usage models for replication using D2D devices.
Active/Passive – A D2D system at an alternate site is dedicated solely as a target for replication from a
D2D at a primary location.
Active/Active – Both D2D systems are backing up local data as well as receiving replicated data from each
other.
Many-to-One – A target D2D system at a data center is receiving replicated data from many other D2D
systems at other locations.
N-Way – A collection of D2D systems on several sites are acting as replication targets for other sites.
The usage model employed will have some bearing on the best practices that can be employed to provide best
performance.
Active to Passive configuration
Active to Active configuration
49
Many to One configuration
50
N-way configuration
In most cases D2D VTL and D2D NAS replication is the same, the only significant configuration difference being
that VTL replication allows multiple source libraries to replicate into a single target library, NAS mappings
however are 1:1, one replication target share may only receive data from a single replication source share. In
both cases replication sources libraries or shares may only replicate into a single target. However with VTL
replication a subset of the cartridges within a library may be configured for replication whereas a share may
only be replicated in its entirety.
51
Replication overview
What to replicate
D2D VTL replication allows for a subset of the cartridges within a library to be mapped for replication rather than
the entire library (NAS replication does not allow this).
Some retention policies may not require that all backups are replicated, for example daily incremental backups
may not need to go offsite but weekly and monthly full backups do, in which case it is possible to configure
replication to only replicate those cartridges that are used for the full backups.
Reducing the number of cartridges that make up the replication mapping may also be useful when replicating
several source libraries from different D2D devices into a single target library at a data center, for example.
Limited slots in the target library can be better utilized to take only replication of full backup cartridges rather
than incremental backup cartridges as well.
Configuring this reduced mapping does require that the backup administrator has control over which cartridges
in the source library are used for which type of backup. Generally this is done by creating media pools with the
backup application then manually assigning source library cartridges into the relevant pools. For example the
backup administrator may configure 3 pools:
Daily Incremental, 5 cartridge slots (overwritten each week)
Weekly Full, 4 cartridge slots (overwritten every 4 weeks)
Monthly Full, 12 cartridge slots (overwritten yearly)
Replicating only the slots that will contain full backup cartridges saves five slots on the replication target device
which could be better utilized to accept replication from another source library.
52
Appliance, library and share replication fan in/out
Each D2D model has a different level of support for the number of other D2D appliances that can be involved in
replication mappings with it, and also the number of libraries that may replicate into a single library on the
device as follows:
Max Appliance Fan out
The maximum number of target appliances that a source appliance can be
paired with
Max Appliance Fan in
The maximum number of source appliances that a target appliance can be
paired with
Max Library Fan in
The maximum number of source libraries that may replicate into a single target
library on this type of appliance.
Max Library Fan out
The maximum number of target libraries that may be replicated into from a
single source library on this type of appliance
Max Share Fan in
The maximum number of source NAS Shares that may replicate into a single
target NAS Share on this type of appliance
Max Share Fan out
The maximum number of target NAS Shares that may be replicated into from a
single source NAS Share on this type of appliance
D2D2502 G1
D2D2503 G1
D2D2504 G1
D2D400X G1
D2D4112 G1
Max Appliance Fan out
2
2
2
4
4
Max Appliance Fan in
4
6
8
16
24
Max Library Fan out
1
1
1
1
1
Max Library Fan in
1
1
1
4
4
Max Share Fan out
1
1
1
1
1
Max Share Fan In
1
1
1
1
1
D2D2502 G2
D2D2504 G2
D2D4106 G2
D2D4112 G2
D2D4312 and
D2D4324 G2
Max Appliance Fan out
2
2
4
4
8
Max Appliance Fan in
4
8
16
24
50
Max Library Fan out
1
1
1
1
1
Max Library Fan in
1
1
8
8
16
Max Share Fan out
1
1
1
1
1
Max Share Fan In
1
1
1
1
1
It is important to note that when utilizing a VTL replication Fan-in model (where multiple source libraries are
replicated to a single target library), the deduplication ratio may be better than is achieved by each individual
source library due to the deduplication across all of the data in the single target library. However, over a large
period of time the performance of this solution will be slower than configuring individual target libraries because
the deduplication stores will be larger and therefore require more processing for each new replication job.
53
Concurrent replication jobs
Each D2D model has a different maximum number of concurrently running replication jobs when it is acting as a
source or target for replication. The table below shows these values. When many items are available for
replication, this is the number of jobs that will be running at any one time. As soon as one item has finished
replicating another will start.
D2D2502 G1
D2D2503 G1
D2D2504 G1
D2D400X G1
D2D4112 G1
Maximum Source jobs
2
1
2
2
2
Maximum target jobs
3
2
3
6
8
D2D2502 G2
D2D2504 G2
D2D4106 G2
D2D4112 G2
D2D4312 and
D2D4324 G2
Maximum Source jobs
4
4
8
8
16
Maximum target jobs
8
8
24
24
48
For example, an HP D2D2502 G2 may be replicating up to 4 source items to an HP D2D4312 G2; the HP
D2D4312 may also be accepting another 44 source items from other D2D systems and itself be replicating
outward up to 16 streams concurrently.
Limiting replication concurrency
In some cases it may be useful to limit the number of replication jobs that can run concurrently on either the
source or target appliance. These conditions might be:
1. There is a requirement to reduce the activity on either the source or target appliance in order to allow other
operations (e.g. backup/restore) to have more available disk I/O.
2. The WAN Bandwidth is too low to support the number of concurrent jobs that may be running concurrently. It
is recommended that a minimum WAN bandwidth of 2 Mb/s is available per replication job. If a target
device can support for example 6 concurrent jobs, then 12 Mb/s of bandwidth is required for that target
appliance alone. If there are multiple target appliances, the overall requirement is even higher. So, limiting
the maximum number of concurrent jobs at the target appliance will prevent the WAN bandwidth being
oversubscribed with the possible result of replication failures or impact on other WAN traffic.
The Maximum jobs configuration is available from the Web Management Interface on the Replication – Local
Appliance tab.
WAN link sizing
One of the most important aspects in ensuring that a replication will work in a specific environment is the
available bandwidth between replication source and target D2D systems. In most cases a WAN link will be used
to transfer the data between sites unless the replication environment is all on the same campus LAN.
It is recommended that the HP StorageWorks Sizing Tool (http://www.hp.com/go/storageworks/sizer) is used
to identify the product and WAN link requirements because the required bandwidth is complex and depends on
the following:
54
Amount of data in each backup
Data change per backup (deduplication ratio)
Number of D2D systems replicating
Number of concurrent replication jobs from each source
Number of concurrent replication jobs to each target
As a general rule of thumb, however, a minimum bandwidth of 2 Mb/s per replication job should be allowed.
For example, if a replication target is capable of accepting 8 concurrent replication jobs (HP D2D4112) and
there are enough concurrently running source jobs to reach that maximum, the WAN link needs to be able to
provide 16 Mb/s to ensure that replication will run correctly at maximum efficiency – below this threshold
replication jobs will begin to pause and restart due to link contention. It is important to note that this minimum
value does not ensure that replication will meet the performance requirements of the replication solution, a lot
more bandwidth may be required to deliver optimal performance.
Seeding and why it is required
One of the benefits of deduplication is the ability to identify unique data, which then enables us to replicate
between a source and a target D2D, only transferring the unique data identified. This process only requires low
bandwidth WAN links, which is a great advantage to the customer because it delivers automated disaster
recovery in a very cost-effective manner.
However prior to being able to replicate only unique data between source and target D2D, we must first ensure
that each site has the same hash codes or “bulk data” loaded on it – this can be thought of as the reference data
against which future backups are compared to see if the hash codes exist already on either source or target. The
process of getting the same bulk data or reference data loaded on the D2D source and D2D target is known as
“seeding”.
Seeding is generally is a one-time operation which must take place before steady-state, low bandwidth
replication can commence. Seeding can take place in a number of ways:
Over the WAN link – although this can take some time for large volumes of data
Using co-location where two devices are physically in the same location and can use a GbE replication
link for seeding. After seeding is complete, one unit is physically shipped to its permanent destination.
Using a form of removable media (physical tape or portable USB disks) to “ship data” between sites.
Once seeding is complete there will typically be a 90+% hit rate, meaning most of the hash codes are already
loaded on the source and target and only the unique data will be transferred during replication.
It is good practice to plan for seeding time in your D2D deployment plan as it can sometimes be very time
consuming or manually intensive work.
During the seeding process it is recommended that no other operations are taking place on the source D2D, such
as further backups or tape copies. It is also important to ensure that the D2D has no failed disks and that RAID
parity initialization is complete because these will impact performance.
When seeding over fast networks (co-located D2D devices) it should be expected that performance to replicate a
cartridge or file is similar to the performance of the original backup. If, however, a lot of replication jobs are
running to a single target appliance from several source appliances, performance will be reduced due to the
amount of disk activity required on the target system.
Replication models and seeding
The diagrams in Replication usage models starting on page 49 indicate the different replication models
supported by HP D2D Backup Systems; the complexity of the replication models has a direct influence on which
seeding process is best. For example an Active – Passive replication model can easily use co-location to quickly
seed the target device, where as co-location may not be the best seeding method to use with a 50:1, many to 1
replication model.
55
Summary of possible seeding methods and likely usage models
Technique
Seed over the
WAN link
Best for
Active -- Passive and Many to 1
replication models with:
Initial Small Volumes of Backup
data
OR
Gradual migration of larger backup
volumes/jobs to D2D over time
Co-location (Seed
over LAN)
Active -- Passive, Active -- Active
and Many to 1 replication models
with significant volumes of data (>
1TB) to seed quickly and where it
would simply take too long to seed
using a WAN link ( > 5 days)
This process can only really be
used as a “one off” when
replication is first implemented.
Floating D2D
Many to 1 replication models with
high fan in ratios where the target
must be seeded with several remote
sites at once.
Concerns
Comments
As an example, the first 500GB full
backup over a 5Mbit link will take
5 days (120 hours) to seed on a
D2D2502 Backup System.
Seeding time over WAN is
calculated automatically when
using the StorageWorks Backup
Sizing tool for D2D.
This type of seeding should be
scheduled to occur over weekends
where at all possible.
It is perfectly acceptable for
customers to ask their link
providers for a higher link speed
just for the period where seeding
is to take place.
As an example, the first 500GB full
backup over 1 GbE link (LAN) link
will take 3.86 hours on a
D2D2502 Backup System.
Seeding time over LAN is
calculated automatically when
using the StorageWorks Backup
Sizing tool for D2D
This process involves the
transportation of complete D2D
units.
This method may not be practical
for large fan-in implementations
e.g. 50:1 because of the time
delays involved in transportation.
Careful control over the device
creation and co-location replication
at the target site is required. See
example below.
This is really co-location using a
spare D2D.
Relies on the backup application
supporting the copy process, e.g.
Media copy or “object” copy”
Reduced shipping costs of
physical tape media over actual
D2D units.
The last remote site D2D can be
used as the floating unit.
Using the floating D2D approach
means the device is ready to be
used again and again for future
expansion where more remote sites
might be added to the
configuration.
Backup
application Tape
offload/ copy
from source and
copy onto target
Suitable for all replication models,
especially where remote sites are
large (inter- continental) distances
apart.
Requires physical tape
connectivity at all sites, AND
media server capability at each
site even if only for the seeding
process.
Well suited to target sites that plan
to have a physical Tape archive as
part of the final solution.
Best suited for D2D VTL
deployments.
Use of portable
disk drives backup
application copy
or drag and drop
USB portable disks, such as HP RDX
series, can be configured as Disk
File Libraries within the backup
application software and used for
“copies”
OR
Backup data can be drag and
dropped onto the portable disk
drive, transported and then drag
and dropped onto the D2D Target.
Best used for D2D NAS
deployments.
56
Backup application licensing
costs for each remote site may be
applicable
Multiple drives can be used – single
drive maximum capacity is about
2TB currently.
USB disks are typically easier to
integrate into systems than
physical tape or SAS/FC disks.
RDX ruggedized disks are OK for
easy shipment between sites and
cost effective.
Seeding methods in more detail
Seeding over a WAN link
With this seeding method the final replication set-up (mappings) can be established immediately.
Active/Passive
WAN seeding over the first backup is, in fact, the first
wholesale replication.
Active/Active
WAN seeding after the first backup at each location
is, in fact, the first wholesale replication in each
direction.
57
Many to One
WAN seeding over the first backup is, in fact, the first wholesale replication from the many remote sites to the
Target site. Care must be taken not to run too many replications simultaneously or the Target site may become
overloaded. Stagger the seeding process from each remote site.
58
Co-location (seed over LAN)
With this seeding method it is important to define the replication set-up (mappings) in advance so that in say the
Many to One example the correct mapping is established at each site the target D2D visits before the target D2D
is finally shipped to the Data Center Site and the replication “re-established” for the final time.
Active/Passive
Co-location seeding at Source (remote) site
1.
Initial backup
2.
Replication over GbE link
3.
Ship appliance to Data Center site
4.
Reestablish replication
59
Many to One
Co-location seeding at Source (remote) sites; transport target D2D between remote sites.
60
1.
Initial backup at each remote site
2.
Replication to Target D2D over GbE at each
remote site.
3.
Move Target D2D between remote sites
and repeat replication.
4.
Finally take Target D2D to Data Center site.
5.
Re-establish replication.
Floating D2D method of seeding
Many to Once Seeding with Floating D2D target – for large fan-in scenarios
Co-location seeding at Source (remote) sites.
Transport floating target D2D between remote sites then perform replication at the Data Center site.
Repeat as necessary.
1.
Initial backup at each remote site.
2.
Replication to floating Target D2D over GbE at
each remote site.
3.
Move floating Target D2D between remote
sites and repeat replication.
4.
Take floating Target D2D to Data Center site.
5.
Establish replication from floating D2D Target (now a Source) with Target D2D at Data Center. Delete
devices on floating Target D2D.
Repeat the process for further remote sites until all data has been loaded onto the Data Center Target
D2D. You may be able to accommodate 4 or 5 site s of replicated data on a single floating D2D.
6.
Establish final replication with remote sites.
This “floating D2D” method is more complex because for large fan-in (many source sites replicating into single
target site) the initial replication set up on the floating D2D changes as it is then transported to the data center,
where the final replication mappings are configured.
The sequence of events is as follows:
1. Plan the final master replication mappings from sources to target that are required and document
them. Use an appropriate naming convention e.g. SVTL1, SNASshare1, TVTL1, TNASshare1.
61
2. At each remote site perform a full system backup to the source D2D and then configure a 1:1
mapping relationship with the floating D2D device” e.g. SVTL1 on Remote Site A - FTVTL1 on
floating D2D. FTVTL1 = floating target VTL1.
3. Seeding remote site A to the floating D2D will take place over the GbE link and may take several
hours.
4. On the Source D2D at the remote site DELETE the replication mappings – this effectively isolates
the data that is now on the floating D2D.
5. Repeat the process steps 1-4 at Remote sites B and C.
6. When the floating D2D arrives at the central site, the floating D2D effectively becomes the Source
device to replicate INTO the D2D unit at the data center site.
7. On the Floating D2D we will have devices (previously named as FTVTL1, FTNASshare 1) that we
can see from the Web Management Interface. Using the same master naming convention as we did
in step 1, set up replication which will necessitate the creation of the necessary devices (VTL or
NAS) on the D2D4100 at the Data Center site e.g. TVTL1, TNASshare 1.
8. This time when replication starts up the contents of the floating D2D will be replicated to the data
center D2D over the GbE connection at the data center site and will take several hours. In this
example Remote Site A, B, C data will be replicated and seeded into the D2D4100. When this
replication step is complete, DELETE the replication mappings on the floating D2D, to isolate the
data on the floating D2D and then DELETE the actual devices on the floating D2D, so the device is
ready for the next batch of remote sites.
9. Repeat steps 1-8 for the next series of remote sites until all the remote site data has been seeded
into the D2D4100.
10. Now we have to set up the final replication mappings using our agreed naming convention
decided in Step 1. This time we go to the Remote sites and configure replication again to the Data
Center site but being careful to use the agreed naming convention at the data center site e.g .
TVTL1, TNASshare1 etc.
This time when we set up replication the D2D4100 at the target site presents a list of possible
target replication devices available to the remote site A. So in this example we would select TVTL1
or TNASshare1 from the drop-down list presented to Remote Site A when we are configuring the
final replication mappings. This time when the replication starts almost all the necessary data is
already seeded on the D2D4100 for Remote site A and the synchronization process happens very
quickly.
62
Seeding using physical tape or portable disk drive and ISV copy utilities
Many-to-one seeding using Physical Tape or portable disk drives
Physical tape-based or portable disk drive seeding
1.
Initial backup to D2D.
2.
Copy to tape(s) or a disk using backup
application software on Media Server for
NAS devices; only use simple drag and drop
to portable disk.
3.
Ship tapes/disks to Data Center site..
4.
Copy tapes/disks into target appliance using
backup application software on Media
Server (or for portable disks only use drag
and drop onto NAS share on the D2D
target).
5.
Establish replication.
.
In this method of seeding we use a removable piece of media (like LTO physical tape or removable RDX disk
drive acting as a disk Library or file library*) to move data from the remote sites to the central data center site.
This method requires the use of the backup application software and additional hardware to put the data onto
the removable media.
* Different backup software describes “disk targets for backup” in different ways e.g. HP Data Protector calls
D2D NAS shares “ DP File Libraries”, Commvault Simpana calls D2D NAS shares “Disk libraries.”
Proceed as follows
1. Perform full system backup to the D2D Backup System at the remote site using the local media server, e.g. at
remote site C.
The media server must also be able to see additional devices such as a physical LTO tape library or a
removable disk device configured as a disk target for backup.
63
2. Use the backup application software to perform a full media copy of the contents of the D2D to a physical
tape or removable disk target for backup also attached to the media server.
In the case of removable USB disk drives the capacity is probably limited to 2 TB, in the case of physical
LTO5 media it is limited to about 3 TB per tape, but of course multiple tapes are supported if a tape library is
available. For USB disks, separate backup targets for disk devices would need to be created on each
removable RDX drive because we cannot span multiple RDX removable disk drives.
3. The media from the remote sites is then shipped (or even posted!) to the data center site.
4. Place the removable media into a library or connect the USB disk drive to the media server and let the media
server at the data center site discover the removable media devices.
The media server at the data center site typically has no information on what is on these pieces of removal
media and we have to make the data visible to the media server at the data center site. This generally takes
the form of what is known as an “import” operation where the removable media has to be registered into the
catalog/database of the media server at the data center site.
5. Create devices on the D2D at the data center site using an agreed convention e.g. TVTL1, TNASshare1.
Discover these devices through the backup application so that the media server at the data center site has
visibility of both the removable media devices AND the devices configured on the D2D unit.
6. Once the removable media has been imported into the media server at the data center site it can be copied
onto the D2D at the data center site (in the same way as before at step 2) and, in the process of copying the
data , we seed the D2D at the data centre site. It is important to copy physical tape media into the VTL device
that has been created on the D2D and copy the disk target for backup device (RDX) onto the D2D NAS share
device that has been created on the D2D at the data center site.
7. Now we have to set up the final replication mappings using our agreed naming convention. Go to the remote
sites and configure replication again to the data center site, being careful to use the agreed naming
convention at the data center site e.g. TVTL1, TNASshare1 etc. This time when we set up replication the
D2D4100 at the target site presents a list of possible target replication devices available to the remote site.
So in this example we would select TVTL1 or TNASshare1 from the drop-down list presented to remote site C
when we are configuring the final replication mappings. This time when the replication starts almost all the
necessary data is already seeded on the D2D4100 for Remote site A so the synchronization process happens
very quickly.
The media servers are likely to be permanently present at the remote sites and data center site so this is making
good use of existing equipment. For physical tape drives/library connection at the various sites SAS or FC
connection is required. For removable disk drives such as RDX a USB connection is the most likely connection
because it is available on all servers at no extra cost.
If the D2D deployment is going to use D2D NAS shares at source and target sites the seeding process can be
simplified even further by using the portable disk drives to drag and drop backup data from the source system
onto the portable disk. Then transport the portable disk to the target D2D site and connect it to a server with
access to the D2D NAS share at the target site. Perform a drag and drop from portable disk onto the D2D NAS
share and this then performs the seeding for you!
Note: Drag and drop is NOT to be used for day to day use of D2D NAS devices for backup; but for seeding
large volumes of sequential data this usage model is acceptable.
64
Replication and other D2D operations
In order to either optimize the performance of replication or minimize the impact of replication on other D2D
operations it is important to consider the complete workload being placed on the D2D.
By default replication will start quickly after a backup completes; this window of time immediately after a backup
may become very crowded if nothing is done to separate tasks. In this time the following are likely to be taking
place:
Other backups to the D2D system which have not yet finished
Housekeeping of the current and other completed overwrite backups
Copies to physical tape media of the completed backup
These operations will all impact each other’s performance, some best practices to avoid these overlaps are:
Try to schedule backups so that their finish times are co-incident, this may take some trial and error. If all
backups can run in parallel there is an overall aggregate performance increase and if they finish within a few
minutes of each other, the impact of housekeeping from the backup jobs will be minimized.
Delay physical tape copies to run at a later time when housekeeping has completed.
Set replication blackout windows to cover the backup window.
Set housekeeping blackout windows to cover the replication period, some tuning may be required in order to
set the housekeeping window correctly and allow enough time for housekeeping to run.
Replication blackout windows
The replication process can be delayed from running using blackout windows that may be configured using the
D2D Web Management Interface. Up to two separate windows per day, which are at different times for each
day of the week, may be configured.
The best practice is to set a blackout window throughout the backup window so that replication does not interfere
with backup operations.
If tape copy operations are also scheduled, a blackout window for replication should also cover this time.
Care must be taken, however, to ensure that enough time is left for replication to complete. If it is not, some items
will never be synchronized between source and target and the D2D will start to issue warnings about these items.
Replication bandwidth limiting
In addition to replication blackout windows, the user can also define replication bandwidth limiting; this ensures
that D2D replication does not swamp the WAN with traffic, if it runs during the normal working day.
This enables blackout windows to be set to cover the backup window over the night time period but also allow
replication to run during the day without impacting normal business operation.
Bandwidth limiting is configured by defining the speed of the WAN link between the replication source and
target, then specifying a maximum percentage of that link that may be used.
Again, however, care must be taken to ensure that enough bandwidth is made available to replication to ensure
that at least the minimum (2 Mb/s per job) speed is available and more, depending on the amount of data to be
transferred, in the required time.
Replication bandwidth limiting is applied to all outbound (source) replication jobs from an appliance; the
bandwidth limit set is the maximum bandwidth that the D2D can use for replication across all replication jobs.
The replication bandwidth limiting settings can be found on the D2D Web Management Interface on the
Replication - Local Appliance - Bandwidth Limiting page.
There are two ways in which replication bandwidth limits can be applied:
General Bandwidth limit – this applies when no other limit windows are in place.
Bandwidth limiting windows – these can apply different bandwidth limits for times of the day
65
A bandwidth limit calculator is supplied to assist with defining suitable limits.
Source Appliance Permissions
It is a good practice to use the Source Appliance Permissions functionality provided on the Replication Partner Appliances tab to prevent malicious or accidental configuration of replication mappings from
unknown or unauthorized source appliances.
See the D2D Backup System user guide for information on how to configure Source Appliance Permissions.
Note the following changes to replication functionality when Source Appliance Permissions are enabled:
Source appliances will only have visibility of, and be able to create mappings with, libraries and shares
that they have already been given permission to access.
Source appliances will not be able to create new libraries and shares as part of the replication wizard
process, instead these shares and libraries must be created ahead of time on the target appliance.
66
Replication Monitoring
It It The aim of replication is to ensure that data is “moved” offsite as quickly as possible after a backup job
completes. The “maximum time to offsite” varies depending on business requirements. The D2D Backup System
provides tools to help monitor replication performance and alert system administrators if requirements are not
being met.
Configurable Synchronisation Progress Logging and Out of Sync Notification
These configurable logging settings allow the system administrator to take snapshots of replication progress as
log events and at fixed hourly points in order to get a historical view of progress that can be compared to
previous days and weeks to check for changes in replication completion time.
Out of Sync notifications can be configured so that an alert is sent if the required maximum time to offsite is
exceeded.
If these logs and alerts indicate a problem, best practices may be applied in order to get replication times back
within required ranges.
Replication Activity Monitor
The Status - Activity page has a graph to show Replication Data throughput (inbound and outbound) over the
last five minutes. The throughput is the sum of all replication jobs and is averaged over several minutes. It
provides some basic information about replication performance but should be used mainly to indicate the general
performance of replication jobs at the current time.
67
Replication Throughput totals
Whilst replication jobs are running the Status - Source/Target Active Jobs pages show some detailed
performance information averaged over several minutes.
The following information is provided:
Source / Target jobs running: The number of replication jobs that this appliance is running concurrently.
Transmit / Receive Bandwidth: Amount of LAN/WAN Bandwidth in use
Outbound / Inbound Throughput: Apparent data throughput, which is the throughput standardized to
indicate what the effective transfer rate is. For example a 100GB cartridge transfer may only be
transferring 1% of unique data (1GB). The apparent rate is an indication of how fast the 100GB
cartridge is replicated in MB/sec as it proceeds through the cartridge replication.
This information can be used to assess how much bandwidth is being used and also how much efficiency
deduplication is providing to the replication process. It can also show whether replication is being able to utilize
multiple jobs to improve performance or whether only small numbers of jobs are running due to backups
completing at different times.
A best practice is to use blackout windows so that replication jobs all run concurrently at a time when backup
jobs are not running.
68
Replication share/library details
Replication share/library details show the synchronization status, throughput and disk usage for each replicated
device. This allows the system administrator to identify the performance of each share individually to see the
bandwidth utilization of each share and sync status.
Replication File/Cartridge details
Replication File/Cartridge details shows information about the last replication job to run on a specific cartridge
or NAS file. It also shows their Synchronization state.
69
This is very useful to identify:
Differences in bandwidth saving and therefore deduplication ratio for an individual cartridge or file.
These can be directly correlated to backup jobs and allow the backup administrator to see the
deduplication efficiency of specific data backups.
Individual files or cartridges that are not being replicated. This might be because the backup
application is leaving a cartridge loaded or a file open which prevents replication from starting.
Start and End time of specific file or cartridge replication jobs. This allows the backup administrator can
identify how quickly data is sent off site after a backup completes.
70
Housekeeping monitoring and control
Terminology
Housekeeping: If data is deleted from the D2D system (e.g. a virtual cartridge is overwritten or erased), any
unused chunks will be marked for removal, so space can be freed up (space reclamation). The process of
removing chunks of data is not an inline operation because this would significantly impact performance. This
process, termed “housekeeping”, runs on the appliance as a background operation. It runs on a per cartridge
and NAS file basis, and will run as soon as the cartridge is unloaded and returned to its storage slot or a NAS
file has completed writing and has been closed by the appliance, unless a housekeeping blackout window is set.
Housekeeping also applies when data is replicated from a source D2D to a target D2D – the replicated data on
the target D2D triggers housekeeping on the target D2D to take place.
Blackout Window: This is a period of time (up to 2 separate periods in any 24 hours) that can be configured
in the D2D during which the I/O intensive process of Housekeeping WILL NOT run. The main use of a blackout
window is to ensure that other activities such as backup and replication can run uninterrupted and therefore give
more predictable performance. Blackout windows must be set on BOTH the source D2D and Target D2D.
This guide includes a fully worked example of configuring a complex D2D environment including setting
housekeeping windows, see Appendix B. An example is shown below from a D2D source from the worked
example:-
In the above example we can see backups in green, housekeeping in yellow and replication from the source in
blue. In this example we have already set a replication blackout window which enables replication to run at
20:00. The reason Share 3 and Share 4 do not replicate immediately the replication window is open is because
this is a D2D2502 device which has a limit of 4 for the maximum concurrent replications. Share 3 & Share 4
have to wait until a free slot is available for replication.
Without a housekeeping blackout window set we can see how in this scenario where four separate servers are
being backed up to the D2D Backup System, the housekeeping can interfere with the backup jobs. For example
the housekeeping associated with DIR1 starts to affect the end of backup DIR2 since the backup of DIR2 and the
housekeeping of DIR1 are both competing for I/O.
71
By setting a housekeeping blackout window appropriately from 12:00 to 00:00 we can ensure the backups and
replication run at maximum speed as can be seen below. The housekeeping is scheduled to run when the device
is idle.
However some tuning is required to determine how long to set the housekeeping windows and to do this we must
use the D2D Web Management Interface and the reporting capabilities which we will now explain.
On the D2D Web Management Interface go to the Administration – Housekeeping tab; a series of graphs
and a configuration capability is displayed. Let us look at how to analyse the information the graphs portray.
There are three sections in Housekeeping: Overall, Libraries and Shares.
Housekeeping tab
Housekeeping jobs
received versus
housekeeping jobs
processed
72
Overall section
This section shows the combined information from both the Libraries and Shares sections. The key features
within this section are:
Housekeeping Statistics:
Status has three options: OK if housekeeping has been idle within the last 24 hours, Warning if
housekeeping has been processing nonstop for the last 24 hours, Caution if housekeeping has been
processing nonstop for the last 7 days.
Last Idle is the date and time when the housekeeping processing was last idle.
Time Idle (Last 24 Hours) is a percentage of the idle time in the last 24 hours.
Time Idle (Last 7 Days) is a percentage of the idle time in the last 7 days.
Load graph (top graph): will display what levels of load the D2D is under when housekeeping is being
processed. However this graph is intended for use when housekeeping is affecting the performance of the D2D
(e.g. housekeeping has been running nonstop for a couple of hours), therefore if housekeeping is idle most of
the time no information will be displayed.
1. Housekeeping under control
2. Housekeeping out of control, not being reduced over time
In the above graph we show two examples, one where the housekeeping load increases and then subsides,
which is normal, and another where the housekeeping job continues to grow and grow overtime. This second
condition would be a strong indication that the housekeeping jobs are not being dealt with efficiently, maybe the
housekeeping activity window is too short (housekeeping blackout window too large), or we may be overloading
the D2D with backup and replication jobs and the unit may be undersized.
Another indicator is the Time Idle status, which is a measure of the housekeeping empty queue time. If % idle
over 24 hours is = 0 this means that the box is fully occupied and that is not healthy, but this may be OK if the %
idle over 7 days is not 0 as well. For example, if the appliance is 30% idle over 7 days then we are probably
operating within reasonably safe limits.
Signs of housekeeping becoming too high are that backups may start to slow down or backup performance
becomes unpredictable.
Corrective actions if idle time is low or the load continues to increase are:
a)
Use a larger D2D box or add additional shelves to increase I/O performance.
b)
Restructure the backup regime to reduce overwrites.
73
c)
Restructure the backup regime to remove appends – as the bigger the tapes, files are allowed to grow
(through appends,) the more housekeeping they generate.
d)
Increase the time allowed for housekeeping to run if housekeeping blackout windows are set.
e)
Re-schedule backup jobs to try and ensure all backup jobs complete at the same time so housekeeping
starts at roughly the same time (if no housekeeping window set).
If you do set up housekeeping blackout windows (up to two periods per day, 7 days per week), be careful as
you cannot set a blackout time from say 18:00 to 00:00 but you must set 23:59. In addition there is a Pause
Replication button, but use this with caution because it pauses housekeeping indefinitely until you restart it!
Finally, remember that it is best practice to set housekeeping blackout windows on both the source and target
devices. In the worked example later in this best practice guide two blackout windows are set on the target
device, 10:00 to 14:00 and 20:00 to 02:00 (see below). Note how the replication process of data received at
the target (shown here in Blue) triggers housekeeping which must be managed. If housekeeping is not controlled
at the target it can start to impact replication performance from the source.
74
Tape Offload
Terminology
Direct Tape Offload
This is when a physical tape library device is connected directly to the rear of the D2D Generation 1 products
(D2D2503, 4004, 4009, 2502A, 2504A, 4112A - which are now obsolete) using a SAS host bus adapter.
The D2D device itself manages the transfer of data from the D2D to physical tape AND the transfer is not made
visible to the main backup software. Only transfer of data on VTL devices in the D2D is possible using this
method.
Copies of the data using Direct Tape offload are unable to be tracked by the backup application software.
This offload feature is no longer supported on current shipping D2D models.
Backup application Tape Offload/Copy from D2D
This is now the preferred way of moving data from a D2D to physical tape. The data transfer is managed
entirely by the backup software, multiple streams can be copied simultaneously and both D2D NAS and D2D VTL
emulations can be copied to physical tape. Both the D2D and the physical tape library must be visible to the
backup application media server doing the copy and some additional licensing costs may be incurred by the
presence of the physical tape library. Using this method entire pieces of media (complete virtual tapes or NAS
shares) may be copied OR the user can select to take only certain sessions from the D2D and copy and merge
them onto physical tape. These techniques are known as “media copy” or “object copy” respectively. All copies
of the data are tracked by the backup application software.
When reading data in this manner from the D2D device the data to be copied must be “reconstructed” and then
copied to physical tape and hence the speed is not optimal unless multiple copies can be done in parallel.
Backup application Mirrored Backup from Data Source
This again uses the backup application software to write the same backup to two devices simultaneously and
create two copies of the same data. For example, if the monthly backups must be archived to tape, a special
policy can be set up for these mirror copy backups. The advantage of this method is that the backup to physical
tape will be faster and you do not need to allocate specific time slots for copying from D2D to physical tape.
All copies of the data are tracked by the backup application software.
75
Tape Offload/Copy from D2D versus Mirrored Backup from Data Source
A summary of the supported methods is shown below.
For easiest integration
For optimum performance
Backup application copy to tape
Separate physical tape mirrored backup
The backup application controls the copy from the D2D
appliance to the network-attached tape drive so that:
It is easier to find the correct backup tape
The scheduling of copy to tape can be automated
within the backup process
Constraints:
Streaming performance will be slow because data must
be reconstructed
This is a parallel activity. The host backs up to the D2D
appliance and the host backs up to tape. It has the following
benefits:
The backup application still controls the copy location
It has the highest performance because there are no
read operations from the D2D appliance
Constraints:
There are two separate backups on the D2D appliance
and tape
It requires management if two backup processes and
will require the scheduling of specific mirrored backup
policies
When is Tape Offload Required?
Compliance reasons or company strategy dictate Weekly, Monthly, Yearly copies of data be put on tape and
archived or sent to a DR site. Or a customer wants the peace of mind that he can physically “hold” his data on
a removable piece of media.
In a D2D Replication model it makes perfect sense for the data at the D2D DR site or central site to be
periodically copied to physical tape and the physical tape be stored at the DR site (avoiding offsite costs)
Backup application tape offload at D2D target site
1. Backup data written to Source. D2D
2. D2D low bandwidth replication
76
3. All data stored safely at DR site. Data at D2D
target (written by D2D source via replication) must
be imported to Backup Server B before it can be
copied to tape.
Note: Target Offload can vary from one backup application to another in terms of import functionality. Please
check with your vendor.
Backup application tape offload at D2D source site
1.
2.
Copy D2D to physical tape; this uses the backup Copy job to copy data from D2D to physical tape and
is easy to automate and schedule, it has a slower copy performance.
Mirrored backup; specific backup policy used to back up to D2D and Physical Tape simultaneously
(mirrored write) at certain times (monthly). This is a faster copy to tape method.
As can be seen in the diagrams above – offload to tape at the source site is somewhat easier because the
backup server has written the data to the D2D at the source site. In the D2D Target site scenario, some of the
data on the D2D may have been written by Backup Server B (local DR site backups maybe) but the majority of
the data will be on the D2D Target via low bandwidth replication from D2D Source.In this case the Backup
Server B has to “learn” about the contents of the D2D target before it can copy them and the typical way this is
done is via “importing” the replicated data at the D2D target into the catalog at Backup Server B, so that it
knows what is on each replicated virtual tape or D2D NAS share. Copy to physical tape can then take place.
Gen 1 versus Gen 2 – Why Direct Tape Offload was removed.
The main reason was that it was limited to VTL tape offload only (there was no direct NAS offload to physical
tape) and it was limited to a single stream which meant performance was poor. Also, the backup application
software was unaware that other copies of the data existed.
77
Key performance factors in Tape Offload performance
Note in the diagram below how the read performance from a D2D4312 (red line) increases with the number of
read streams – just like with backup.
If the D2D4312 reads with a single stream (to physical tape) the copy rate is about 370 GB/hour. However, if
the copy jobs are configured to use multiple readers and multiple writers then for example with four streams
being read it is possible to achieve 1.3TB/hour copy performance.
What this means in practice is that you must schedule specific time periods for tape offloads when the D2D
Backup System is not busy and use as many parallel copy streams (tape devices) as practical to improve the copy
performance.
Read performance graph
Aggregate Throughput MB/sec
Read
Streams read/written concurrently
Single stream read
performance
Much higher read throughput (for tape offload) with 4 streams
For example: if each month there is 15 TB of data to archive or offload from a D2D4312 to a 2-drive physical
tape library, then the copy speed will be about 200 MB/sec (720 GB/Hr).
To offload 15 TB in one go will take 21 hours and, depending on other activities happening on the D2D, it may
not be possible to spare a single 21 hour copy time to physical tape. In this case one option is to stagger the
monthly offloads to tape over separate weeks doing approximately 4 TB each week, and this would then occupy
just over 4 hours bandwidth per week from the D2D which is easier to schedule.
Summary of Best Practices
See Appendix C for a worked example using HP Data Protector.
1. The first recommendation is to really assess the need for tape offload: with a D2D replication copy is another
copy of the data really necessary? How frequently does the offload to tape really need to be? Monthly
offloads to tape are probably acceptable for most scenarios that must have offload to tape.
78
2. For “Media Copies” it is always best to try and match the D2D VTL cartridge size with the physical media
cartridge size to avoid wastage. For example: if using physical LTO4 drives (800 GB tapes) then when
configuring D2D Virtual Tape Libraries the D2D cartridge size should also be configured to 800 GB.
3. Schedule time for Tape Offloads: The D2D is running many different functions – Backup & Deduplication,
Replication and Housekeeping – and Tape Offload is another task (that involves reading data from the D2D).
To ensure the offload to tape performs the best it can, no other processes should be running. In reality this
means actively planning downtime for tape offloads to occur. Later in this guide there is a complete multi-site
D2D scenario, an extract is shown in the planning schematic below. This example shows a very busy target
D2D which has local backups (green), replication arriving (blue), housekeeping activity (yellow); replication
and housekeeping windows have been assigned to enable predictable performance.
By applying housekeeping windows it is possible to free up spare time on the Target D2D which could then
be used either for future headroom for growth or to schedule tape offloads. These tape offloads would take
place in the grey shaded area, 06:00-12:00 in the above diagram.
4. Offload a little at a time or all at once? Depending on the usage model of the D2D and the amount of data to
be offloaded you may be able to support many hours dedicated to tape offload once per month. Or, if the
D2D is very busy most of the time, you may have to schedule smaller offloads to tape on a more frequent
weekly basis.
5. Importing data? When copying to tape at a D2D target site it is only possible to copy after the backup server
is aware of the replicated data from the source D2D. It is important to walk through this import process and
schedule the import process to occur in advance of the copy process, otherwise the copy process will be
unaware of the data that must be copied. In the case of HP Data Protector specific scripts have been
developed that can poll the target D2D to interrogate newly replicated cartridges and NAS files. HP Data
Protector can then automatically schedule import jobs in the background to import the cartridges/shares so
that when the copy job runs, all is well. For more information go to: HP Data Protector Import scripts.
6. Other backup applications’ methods may vary in this area. For example, for most backup applications the
target D2D can be read only to enable the copy to tape, but Symantec Backup Exec requires write/read
access which involves breaking the replication mappings for this to be possible. Please check with your
backup application provider before relying on the tape offload process or perform a DR offload to tape to
test the end to end solution.
79
Appendix A
Key reference information
80
D2D Generation 2 products, software 2.1.00
D2D Gen2 Products, Software 2.1.00
D2D2502i
D2D2504i
D2D4106i/fc
D2D4112fc
D2D4312fc
D2D4324fc
Usable Disk Capacity (TB)
1.5
3
9
18
36
72
Max Number Devices (VTL/NAS)
4
8
16
24
50
50
Max VTL Library Rep Fan Out
1
1
1
1
1
1
Max VTL Library Rep Fan In
1
1
8
8
16
16
Max Appliance Rep Fan Out
2
2
4
4
8
8
Max Appliance Rep Fan In
Max Appliance Concurrent Rep Jobs
Source
Max Appliance Concurrent Rep Jobs
Target
4
8
16
24
50
50
4
4
8
8
16
16
8
8
24
24
48
48
No
No
No
No
No
No
N/A
N/A
N/A
N/A
N/A
N/A
Max VTL Drives Per Library/Appliance
16
32
64
96
200
200
Max Cartridge Size (TB)
Max Slots Per Library (D2DBS, EML-E,
ESL-E Lib Type)
Max Slots Per Library (MSL2024,
MSL4048,MSL8096 Lib Type)
3.2
3.2
3.2
3.2
3.2
3.2
96
96
1024
1024
4096
4096
24,48,96
24,48,96
24,48,96
24,48,96
24,48,96
24,48,96
Max active streams per library
Recommended Max Concurrent Backup
Streams per appliance
Recommended Max Concurrent Backup
Streams per Library
32
48
64
96
128
128
16
24
48
48
64
64
4
4
6
6
12
12
25000
25000
25000
25000
25000
25000
32
48
64
64
128
128
32
48
64
64
128
128
96
112
128
128
640
640
16
24
48
48
64
64
4
4
6
6
12
12
90
125
222
361
680
1100
6
8
12
16
16
20
6
6
4
4
2
2
Devices
Replication
Physical Tape Copy Support
Supports direct attach of physical tape
device
Max Concurrent Tape Attach Jobs
Appliance
VTL
NAS
Max files per share
Max NAS Open Files Per Share >
DDThreshold*
Max NAS Open Files Per Appliance >
DDThreshold*
Max NAS Open Files Per Appliance
concurrent
Recommended Max Concurrent Backup
Streams per appliance
Recommended Max Concurrent Backup
Streams per Share
Performance
Max Aggregate Write Throughput
(MB/s)
Min streams required to achieve max
aggregate throughput**
Housekeeping time per 100GB
Overwritten*** (mins)
* DDThreshold is the size a file must reach before a file is deduplicated, set to 24MB.
** Assumes no backup client performance limitations.
*** For every 100GB of user data overwritten allow this much time for the housekeeping process to run at a later time.
81
D2D Generation 1 products, software 1.1.00
D2D Generation 1 Products, Software 1.1.00
D2D2502i
D2D2503i
D2D2504i
D2D4004i/fc
D2D4009i/fc
D2D4112fc
1.5
2.25
3
7.5
7.5
18
4
6
8
16
16
24
Max Library Rep Fan Out
1
1
1
1
1
1
Max Library Rep Fan In
1
1
1
4
4
4
Max Appliance Rep Fan Out
2
2
2
4
4
4
Max Appliance Rep Fan In
4
6
8
16
16
24
Max Appliance Concurrent Rep Jobs Source
2
1
2
2
2
2
Max Appliance Concurrent Rep Jobs Target
3
2
3
6
6
8
Supports direct attach of physical tape device
Yes
Yes
Yes
Yes
Yes
Yes
Max Concurrent Tape Attach Jobs Appliance
4
4
4
4
4
4
Max VTL Drives Per Library
4
1
4
4
4
4
Max Slots Per Library (D2DBS Library Type)
48
48
48
96
96
144
24,48,96
24,48,96
24,48,96
24,48,96
24,48,96
24,48,96
16
8
24
12
12
24
4
4
4
4
4
4
25000
25000
25000
25000
25000
25000
8
8
8
8
8
8
32
16
48
24
24
48
96
40
112
40
40
112
16
8
24
12
12
24
4
4
4
4
4
4
50
75
90
70
90
200
4
4
6
12
12
16
11
11
11
11
8
6
Devices
Usable Disk Capacity (TB)
Max Number Devices (VTL/NAS)
Replication
Physical Tape Copy Support
VTL
Max Slots MSL2024,MSL4048,MSL8096
Recommended Max Concurrent Backup
Streams per appliance
Recommended Max Concurrent Backup
Streams per Library
NAS
Max files per share
Max NAS Open Files Per Share >
DDThreshold*
Max NAS Open Files Per Appliance >
DDThreshold*
Max NAS Open Files Per Appliance
concurrent
Recommended Max Concurrent Backup
Streams per appliance
Recommended Max Concurrent Backup
Streams per Share
Performance
Max Aggregate Write Throughput (MB/s)
Min streams required to achieve max
aggregate throughput**
Housekeeping time per 100GB
Overwritten*** (mins)
* DDThreshold is the size a file must reach before a file is deduplicated, set to 24MB.
** Assumes no backup client performance limitations.
*** For every 100GB of user data overwritten allow this much time for the housekeeping process to run at a later time.
82
Appendix B – Fully Worked Example
In this section we will work through a complete multi-site, multi-region D2D design, configuration and deployment
tuning. The following steps will be undertaken:
Hardware and site configuration definition
Backup requirements specification
Using HP StorageWorks Backup sizing tool – size the hardware requirements, link speeds and likely costs
Work out each D2D Device configuration NAS, VTL, number of shares, and so on, using best practices that
have been articulated earlier in this document.
Configure D2D source devices and replication target configuration
Map out for sources and target the interaction of backup, housekeeping and replication.
Fine tune the solution using replication blackout windows and housekeeping blackout windows
The worked example below may seem rather complicated at times but it is specifically designed to tease out
many different facets of the design considerations required to produce a comprehensive and high performance
solution.
Hardware and site configuration
Please study the example below, it consists of four remote sites (A, B, C, D) with varying backup requirements
and these four remote sites replicate to a Data Center E over low bandwidth links. At the data Center E a larger
D2D Device is used as both the replication target (for sites A, B, C, D) and to back up local servers at site E.
Example hardware and software configuration
83
Backup requirements specification
Remote Sites A/D
NAS emulations required
Server 1 – Filesystem 1, 100 GB, spread across 3 mount points
Server 2 – SQL data, 100GB
Server 3 – Filesystem 2, 100GB, spread across 2 mount points
Server 4 –- Special App Data , 100GB
Rotation Scheme – Weekly Fulls, 10% Incrementals during week, Keep 4 weeks Fulls and 1 monthly backup
12 hour backup window
Remote sites B/C
iSCSI VTL emulations required
Server 1– Filesystem, 200 GB, spread across 2 mount points C,D
Server 2 – SQL data, 200GB
Server 3 – Special App data, 200GB
Rotation Scheme – Weekly Fulls, 10% Incrementals during week, Keep 4 weeks Fulls and 1 monthly backup
12 hour backup window
Data Center E
Fibre Channel VTL emulations required for local backups
Server 1 - 500GB Exchange => Lib 1 - 4 backup streams
Server 2 - 500GB Special App => Lib 2 – 1 backup stream
Rotation Scheme – 500GB Daily Full, retained for 1 month.
12 hour backup window
Replication target for sites A, B, C, D (this means we have to size for replication capacity AND local backups on
Site E)
Monthly archive required at Site E from D2D to Physical Tape
One of the key parameters in sizing a solution such as this is trying to estimate the daily block level change rate
for data in each backup job. In this example we will use the default value of 2% in the HP StorageWorks sizing
tool. http://h30144.www3.hp.com/SWDSizerWeb/default.htm
84
Using the HP StorageWorks Backup sizing tool
Configure replication environment
Click on Backup calculators and then Design D2D/VLS replication over WAN to get started.
1. Configure the replication environment for 4 source appliances to 1 target appliance, commonly known as
Many to One replication. The replication window allowed is 12 hours; the size of the target device is initially
based on capacity. Because A and D, and B and C are identical sites we can choose three sites, enter the
data once for Sites A and Site B, then create two identical sites for D and C within the sizer tool.
2. For each Source and Target – enter the backup sizes and rotation schemes. Source A and Target E are
shown as examples below.
Inputs for Source A are shown below; the inputs for Source D, which are identical, can also be added by
incrementing the number of similar sites in the drop-down list.
85
Number of parallel
backup streams will
determine overall
throughput. The backup
specification says
Filesystem1 has 3 mount
points which allows us to
run 3 parallel backup
streams.
Sites A and D are
identical so we can
specify 2 identical
sites
IT IS VERY IMPORTANT that when you are creating the backup specifications in the Sizer tool you pay
particular attention to the Field “Number of parallel Backup Streams”. This field determines the backup
throughput and the amount of concurrent replications that are possible BUT it may require a conscious
change by the customer in backup policies to make it happen.
A single backup stream (1) to a D2D device may run, for example, at 30 MB/sec but running three streams
simultaneously to a D2D will run at say 80 MB/sec. The Sizer has all these throughputs per stream modeled
with actual numbers from device testing. So, for best throughput, HP recommends four streams or more. What
this means in practice is re-specifying backup jobs to use separate mount points. For example, instead of
backing up “Filesystem1” spread across drives C, D, E on site A, create three jobs C:/Dir1, D:/Dir2,
E:/Dir3, so that we can run three parallel backup streams.
86
In the case of sites A and D, when we enter all the backup jobs, we will have seven backup jobs running in
parallel which will give us best throughput and backup performance.
Site A Filesystem 1
uses an Incrementals
& Fulls backup
scheme
This parameter is the block
change rate of data per day
and will determine along with
retention period the dedupe
ratio achieved and the
amount of data to be
replicated. The default is 2% for dynamic change
environments increase this
number.
For Site A Filesystem1 the retention scheme is Daily
incrementals for 6 days, Weekly full backups kept for 4
weeks and then a monthly full backup. Inputting 6-6, for
incremental, 4-4 for weekly fulls, and 1 for the monthly
fulls allows us to simulate this retention scheme. See
output in step 3.
3. For each Job you can view the rotation scheme and predicted deduplication ratios by displaying the Output
from within the Dedupe tab.
87
4. As you specify each job in turn click Add job and the job will be loaded to the summary table (see below).
88
5. Add all backup jobs for Sites A and D
Please note in line with customer request, at sites A and D the D2D emulation has been selected as NAS
Emulation with CIFS shares.
89
6. Repeat for Sites B and C.
90
7. Input backup job entries for Site E, which requires full backups every day for 29 days and is also required
to have FC attach, so click FC in the System interface area. The rotation scheme for Site E is Fulls & Fulls.
91
We will retain 29 days of Fulls.
92
8. Press the Solve/Submit button and the Sizer will do the rest.
93
Sizer output
The Sizer creates two outputs.
It creates an excel spreadsheet with all the parts required for the solution including Service and
Support, and any licenses required together with the List Pricing.
It creates a solution overview (see below) which indicates the types of devices to be used at source
and target, the amount of data to be replicated to and stored on target, the Link Speeds at source
and target for specified replication window.
In the following output it has sized HP D2D2502i appliances for the sources and an HP D2D2504
single unit for the target, this is because the Sizer initially sizes on capacity requirements.
94
Source &
Target Link
sizes
required
Amount of data in
GB transmitted
Source to target
worst case (fulls)
The Sizer has also established that each source needs a 4.6 or 4.47 Mbit/sec link for the sources,
whilst the target needs a link size of just over 9 Mbit/sec. The Sizer shows how much data is
replicated worst case from the sources to the target under Total TX GB
The output continues and shows a summary for each site of the backup concurrency up to the
maximum the source device can support (in this case the D2D2502i can support a maximum of 4
concurrent replication jobs).
The output also shows the replication concurrency – adding up all the replication jobs we have 24
but the D2D2504 can only handle up to 8 replication jobs at a time, and the sources can only
replicate 4 jobs at a time*, which means not all replication jobs can run at once.
*This is a configuration feature of every D2D device. As the models increase in size they can have
high replication source concurrency and a higher target replication concurrency – see Appendix A.
The Sizer also outputs a table that shows each backup in turn (and associated replication job(s))
together with the amount of data to be replicated TxGB (worst case fulls) and the required
replication throughput required in MB/sec to meet the stated replication window, in this case 12
hours.
95
These are
the jobs that
were
inputted
previously.
Refining the configuration
In this worked example it is crucial that we have as many jobs replicating to the target simultaneously as
possible.
1. Use a feature in the Sizer to force the target device to be the next model upwards – an HP D2D4106 which
has an increased replication concurrency when used as a target of 24.
It should also be noted that the HP D2D2502 units on sites A, B, C, D have a maximum source replication
concurrency of four. So, the net effect of upgrading to an HP D2D4106 is that we can now have 16 of the
24 possible maximum replication jobs running at the same time and allow more headroom for future
expansion should more remote sites come on line. With an HP D2D2504 as the target device only 8
replication jobs could have run at a time. In addition the HP D2D2504 does not support a FC interface which
is a customer requirement for the target site.
96
2. Click Solve/Submit again.
3. A new parts list is generated with HP D2D4106 as the target, along with an HP D2D4106 replication license
for the target.
97
Better replication efficiency at the
target means lower link speeds
can be used
Target can now handle
maximum replication
concurrency of sources with
room to spare.
Note how because the replication is now more efficient we only need just over 2 Mbit/sec WAN links on each
of the sources.
Configure D2D source devices and replication target configuration
Sites A and D
The customer has already told us he wants NAS emulation at sites A and D.
Server 1 – Filesystem data 1, 100GB, spread across 3 mount points
Server 2 – SQL data, 100GB
Server 3 – Filesystem 2, 100GB, spread across 2 mount points
Server 4 -- Special App Data,100GB
98
On sites A and D the D2D units would be configured with four NAS shares (one for each server), the filesystem
servers would be configured with subdirectories for each of the mount points. These subdirectories can be
created on the D2D NAS CIFS share by using Windows Explorer (e.g. Dir1, Dir2, Dir3) and the backup jobs can
be configured separately as shown below, but all run in parallel.
For example: Server 1 Mount points C, D, E
C: D2DNASShare/Dir1
D: D2DNASShare/Dir2
E: D2DNASShare/Dir3
This has two key advantages – all file system type data goes into a single NAS share which will then yield high
deduplication ratios and, because we have created the separate directories, we ensure the three backup streams
can run in parallel hence increasing overall throughput.
This creation of multiple NAS shares on Sites A and D (4 in total) with different data types allows best potential
for good deduplication whilst keeping the stores small enough to provide good performance. This would also
mean that a total of 8 NAS replication targets would need to be created at Site E, since NAS shares require a
1:1 source to target mapping.
Sites B and C
For sites B and C the customer has requested VTL emulations.
Server 1 – 200 GB Filesystem, spread across 2 mount points C,D
Server 2 – 200GB SQL data
Server 3 – Special App data, 200GB
In this case we would configure 3 x VTL Libraries with the following drive configurations:
Server 1 VTL – 2 drives (to support 2 backup streams) say 12 slots
Server 2 VTL – 1 drive (since only one backup stream) say 12 slots
Server 3 VTL – 1 drive (since only one backup stream) say 12 slots
The monthly backup cycle means a total of 11 cartridges will be used in each cycle, which has guided us to
select 12 cartridges per configured library.
The fixed emulations in HP D2D like “MSL2024” would mean we would have to use a full set of 24 slots but, if
the customer chooses the “D2DBS” emulation, the number of cartridges in the VTL libraries is configurable. Note:
the backup software must recognize the “D2DBS” as a supported device.
As a general rule of thumb, configure the cartridge size to be the size of the full backup + 25% and, if tape
offload via backup application is to be used, less than the cartridge size of the physical tape drive cartridges. So
let us create cartridges of 250 GB for these devices (200GB * 1.25))
Site E
We will require 8 NAS replication shares for Sites A and D.
For sites B and C with VTL emulations we have a choice, because with VTL replication we can use “slot
mappings” functionality to map multiple source devices into a single target devices (hence saving precious device
allocation). So, we can either create 6 * VTL replication libraries in the D2D at Site E or merge the slots from 3
* VTL on sites B and C into 3 x 24 slot VTLs on Site E. This allows the file system data, SQL data and the Special
App data to be replicated to VTLs on Site E with the same data type, -again benefiting from maximum dedupe
capability and not creating a single large VTL device on site E which would give lower performance as the
dedupe store becomes mature.
We also need to provision two VTL devices for daily full Exchange backups that are retained for 1 month – 4
stream backups for Exchange plus a single stream backup for the Special Application data.
VTL 1 = 4 drives, at least 31 slots (to hold 1 month retention of daily fulls)
VTL 2 = 1 drive, at least 31 slots (to hold 1 month retention of daily fulls)
99
The final total source and target configuration is shown below.
Example NAS and VTL configurations
Map out the interaction of backup, housekeeping and replication for
sources and target
With HP D2D Backup Systems it is important to understand that the device cannot do everything at once, it is
best to think of “windows” of activity. Ideally, at any one time, the device should be either receiving backups,
replicating or housekeeping. However this is only possible with some careful tuning and analysis.
Housekeeping (or space reclamation, as it is sometimes known) is the process whereby the D2D updates its
records of how often the various hash codes that have been computed are being used. When hash codes are no
longer being used they are deleted and the space they were using is reclaimed. As we get into a regular
“overwriting pattern” of backups, every time a backup finishes, housekeeping is triggered to happen and the
deduplication stores are scanned to see what space can be reclaimed. This is an I/O intensive operation. Some
care is needed to avoid housekeeping causing backups or replication to slow down as can be seen below.
100
Overlapping backups to minimize housekeeping interference
Source 1 – Bad scheduling
Source 2 – Good scheduling
As backup DIR 1 finishes it triggers
Housekeeping, which then impactsthe
performance of the backup on DIR 2
If backup jobs can be scheduled to cpmplete at
the same time, the impact of Housekeepong on
backup performance will be geatly reduced
The HP D2D Backup Systems have the ability to set blackout windows for replication, when no replication will
take place – this is deliberate in order to ensure replication is configured to run ideally when no backups or
housekeeping are running.
In the worked example let us assume the following time zones
Sites A and D = GMT + 6 (based in APJ)
Sites B and C = GMT - 6 (CST in US)
Site E = GMT (based in UK)
All time references below are standardized on GMT time. Replication blackout windows are set to ensure
replication only happens within prescribed hours. In our example we input the replication window as 12 hours,
but we would have to edit this to 8 hours to conform to the plan below.
Site
Backup
Replication
Housekeeping
A
12:00 – 20.00
20:00 – 04:00
04:00 - 12:00
B
24:00- 08:00
08:00-16:00
16:00-24:00
C
24:00- 08:00
08:00-16:00
16:00-24:00
D
12:00 – 20.00
20:00 – 04:00
04:00-12:00
E
18:00 – 02:00
08:00 – 04:00
02:00 – 10:00
As you can see from the above worst case example, with such a worldwide coverage, the target device E
cannot easily separate out its local backup (18:00 – 02:00) so that it does not happen at the same time as the
replication jobs from sites A, B, C, D and the housekeeping required on device E.
What this means is that the replication window on the target device must be open almost 24 hours a day or at
least 08:00 to 04:00. The target device essentially has a replication blackout window set only between the hours
of 04:00 and 08:00 GMT.
In this situation the user has little alternative but to OVERSIZE the target device E to the next model up with higher
I/O and throughput capabilities in order to handle this unavoidable overlap of local backup, replication from
geographically diverse regions and local housekeeping time. There are two ways of ensuring enough I/O
capability on the target. Upsize again to a two-shelf D2D4106. Or configure two housekeeping windows in the
24-hour period to alleviate congestion at the target site.
101
Tune the solution using replication windows and housekeeping windows
The objective of this section is to allow the solution architect to design for predictable behavior and performance.
Predictable configurations may not always give the fastest time to complete but in the long run they will prevent
unexpected performance degradation due to unexpected overlaps of activities.
In order to show the considerations that need to be taken into account the diagrams below show the stages of
“tuning” required at each source site and target sites over time.
102
1.
No changes to existing backup policies – all backups start at the same pre-defined time.
2.
Re-schedule backup policies to help reduce the housekeeping overhead.
3.
Set replication windows.
4.
Set the housekeeping window on the sources.
5.
Tune target device to handle replication from sources, housekeeping associated with replication and
local backups, again making using of replication windows and housekeeping windows.
Worked example – backup, replication and housekeeping overlaps
Because we have sized D2D2502 for the sources - there is a limit of 4 concurrent source replication jobs at any
one time.
This simulation is valid for Code Versions 2.1 and above which use container matching technology and
improved housekeeping performance.
Backup
Replication
Housekeeping
Start of Replication Window
Spare Time for future growth or Physical Tape Offload
Housekeeping Window
During a rotation scheme cartridges/shares are being overwritten daily, so housekeeping will happen daily.
Consider Sites A and D
In the example below housekeeping is happening when other backups are running and also when replication is
running.
Initial Configuration with NO replication blackout window set
There are many overlapping activities (housekeeping and replication running together) and performance is not
predictable.
There is no real control. Backups are
overlapping with replication and
housekeeping leading to unpredictable
results.
103
Initial configuration with replication blackout window set
There is improvement in some backup job performance e.g. Share 1 DIR2 & Share 2 SQL data, but replication
jobs can only run 4 at a time (2502 concurrent source replication limit).
Addition of replication window allows us to
force replication activities to only happen
outside of the backup window. Housekeeping
still happens when backup is complete and
cannot be stopped.
Using V2.1 code and higher
Housekeeping can now be scheduled to be run for 2 periods every 24 hours AND the housekeeping process
runs faster.
Housekeeping windows can be configured but should still be monitored to check that the housekeeping load is
not growing overall day by day.
Site E, data center
At Site E we have replication jobs from A and D, and from B and C as well as local backups.
Replication jobs also trigger housekeeping at the target site.
The replication window is set to 24 hours.
The concurrency level of the target is 24.
104
Target initial configuration
Some effort is required to map all the activity at the target, but it is clear that, between 20:00 and 02:00, the
target has a very heavy load because local backups, replication jobs from sites A and D and housekeeping
associated with replication jobs from sites B and C are all running at the same time.
Target improved configuration
Consider improving the situation by imposing two housekeeping windows on the target device as
shown below.
By applying housekeeping windows we now can free up spare time on the target D2D (shown in
dotted area on diagram), which could then be used either for future headroom for growth or to
schedule tape offloads.
105
Offload to Tape requirement
In this example the customer wants to know: “What is the best practice to make monthly copies to physical tape
from Site E?”
One fundamental issue associated with the deduplication process used on D2D is that the data is “chunked” into
nominal 4K pieces before it is stored on disk. When data is read from D2D for a restore or for a copy to tape,
the files must be re-assembled from millions of 4K chunks so, inherently, the restore or copy process from D2D
can be slower than expected for a single stream.
In this worked example the customer has two options for the copy to tape.
Use your backup application to perform a tape-to-tape copy. This can be used at the Central Site E to copy
both the local backups on VTL and the replication data from sites A, B, C and D onto physical tape. It is easy
to administer within the backup application but the streaming performance will be slow because of the reasons
explained above. Be sure to allocate this over a long period, such as a weekend, or allocate a specific time
during the day to do this. Because the data is being read back into the media server and then copied to
physical tape it will also add to network load.
Another way to copy the unique data at Site E to physical tape is for the Local VTLs is to send the data directly
from the sources to physical tape once a month, that is without reading the data from the D2D and so not
incurring any performance limitation.
See Tape Offload on page 75 for more information.
106
Avoiding bad practices
The worked example describes the best practices. Typical bad practices are:Bad Practice
Not using the Sizing tool
Results
Incorrect models chosen because of wrong throughput
calculations.
Replication Link sizing incorrect
Insufficient backup streams configured to run in parallel
Poor backup performance, poor replication
performance
Using single dedupe store (device) instead of separate
stores (devices) for different data types.
May get higher deduplication ratio but store will
become full quicker, and performance will start to
degrade with more complex/mature stores.
Run all backups without consideration for
housekeeping. Try to schedule specific
backup/replication and housekeeping windows.
Housekeeping will start to interfere with backup
performance and replication performance.
Use of Appends
Impacts replication performance because clones have
to be made on the target. Where possible use
“overwrites” on cartridges.
Using backup methods that use heavy write-in-place
functionality – such as, Drag & drop, Granular
Recovery Technology, VMWare changed block
tracking->create virtual full.
Recovery times will be increased because the
deduplication engine must perform many write-in-place
functions, which slows down restore times. NAS
devices only.
Daily direct tape offload from D2D with high volumes
of data
Unable to get all the data onto physical tape in a
reasonable time. Use direct write to physical tape
where possible.
107
Appendix C
HP Data Protector Tape Offload – Worked Examples
HP Data Protector has an extensive range of Copy processes. Here we will look at how to offload both D2D
Virtual Tape Libraries and D2D NAS shares to physical tape. Similar processes to this exist for all the major
backup applications.
A note on terminology
Media Copy – this is a byte by byte copy but can be wasteful of physical tape media as appending and
consolidation is not possible. For example: a D2D virtual tape library with 50GB of data on it when “media
copied” to an LTO5 piece of media only occupies 50GB of the LTO5’s 1.5TB capacity. No other data can be
added to the LTO5 media.
Object Copy – this is the copy of a particular host backup or particular data set on a host.
Sessions – A backup session is a collection of all the backup jobs that run under an overarching policy
HP Data Protector allows copies using a variety of identifiers. The copies can also be done:Interactively – on a one off basis
Immediately after a backup finishes
Scheduled to occur at a specific time. (This is the preferred option for D2D copies to physical tape.)
108
In this example the following storage devices are configured on HP Data Protector Cell Manager “zen”:
HP D2DMSL: is a Virtual Tape emulation on the D2D Backup System with 24 virtual slots (with virtual
barcodes) and 1 virtual LTO5 drive.
A physical MSL Tape Library configured with 2 x LTO5 drives and 24 slots with only two pieces of LTO5
media with physical barcodes loaded.
Virtual Tape Library on
D2D with virtual barcodes
Real physical library
with real barcodes
109
HP Data Protector has a context window for controlling Object operations as can be seen below.
Full media copy e.g. 50GB on D2D virtual media
copied to 800GB of LTO5 Physical media
Copy process can happen immediately after
backup or scheduled – for D2D scheduling copies
is the preferred option.
To perform a simple media copy
1. Right click on the media in the D2D Library in slot 1 and in the right-hand navigation pane select the target
for the copy to be the physical library slot 1.
COPY
Media
110
2. Select the default parameters for the copy.
It is important for base media copies that both the primary copy and the secondary copy media are of the
same format in terms of block size, etc, as many backup applications cannot reformat “on the fly”.
3. The media copy is shown as successful.
To perform an interactive object copy, VTL
1. Select Objects in the left-hand navigation pane. We have chosen to copy the last backups of the server Zen.
If we had multiple hosts and objects associated with these hosts, by selecting different “objects” we can copy
(merge) them all into a single copy job with each of the objects being copied in turn to the physical tape
media.
111
2. Click Next and, depending on what backup objects have been selected, HP Data Protector will check that
all the necessary source devices (that wrote the backups) are available. Click Next.
3. Select the target (copy to) device and the drive to be used and click Next. Here we have chosen LTO5 drive
2 on the physical MSL Tape Library.
4. You now have the option to change the protection limits on the copy and eject physical tape copy to a
mailslot (if the copy is to be stored offsite).
112
5. Select one or more media depending on the objects that are to be copied. Select Next to display the
Summary screen and click Finish to start the object copy.
6. These screens show the Object copy in progress from the D2D Backup System to the physical LTO-5 media.
Read Device
Write Device
Device
7. This Object copy can also be scheduled using the scheduled section under object copy
113
To perform an interactive object copy, D2D NAS share
1. Select Objects in the left-hand navigation pane and locate the D1D NAS share.
This object was
backed up to a
D2D NAS share
2. Click Next. Note below the Source device is now a D2D NAS share or in Data Protector terminology a File
Library.
3. Select an LTO5 drive in the HP MSL G3 Library to create the copy.
114
4. This shows the full path of the HP Data Protector File library and the file that represents the backup.
5. In this case the File Library was in 64K block format and needed to be re-packaged because the LTO5 block
size was set to 256K as can be seen in the section underlined in red below. The copy was successful.
Note: Consolidation on the left-hand navigation pane is a Data Protector term used for generating synthetic full
backups from a series of incremental backups and requires a specialist filesystem format. It is not associated with
the copy process.
115
Appendix D
Making use of improved D2D performance in 2.1.01 and
1.1.01 software
Overview
HP StoreOnce D2D software released in February 2011 includes significant performance stabilization updates
that reduce the disk access overhead of the deduplication process and therefore improve overall system
performance.
However this performance improvement only applies to D2D virtual devices (NAS Shares and VTLs) created after
updating to the new software. Older devices will continue to work in the same way as they did prior to the
update and if performance is acceptable then there is no need to make any changes.
If improved performance is required then there are three main options for making use of the new functionality
whilst retaining previously backed up data:
1. Retire existing libraries and shares, create new ones and re-direct backups to them.
Once backup sessions to the retired libraries/shares are obsolete (i.e. outside of retention policies) they may
be deleted.
2. Replicate data to new libraries/shares on a different D2D appliance, create new devices on the original
appliance then replicate the data back.
This method is termed “Replication for Virtual Device Migration”.
3. Replicate data to new libraries/shares on the same D2D (self replicate), delete original devices and re-target
backups to the new devices once replication is complete.
This method is termed “Self Replication for Virtual Device Migration”.
This document provides detailed information on implementing options 2 and 3.
Option
Option 1
Benefit
No migration time required
Retire original libraries
Option 2
Replication
Option 3
Self Replication
116
Makes use of a standard
replication configuration
Easy to implement if a “floating”
D2D is used and co-located on
the same site
The same library and share
names can be re-used
Requires no additional
hardware or licenses
Limitations
Needs enough disk space and
available virtual devices to store
two copies of data
Some migration time required to
perform replication when
backups cannot run
Requires 2 D2D systems and a
replication license
Needs enough disk space to
store two copies of data
Complex if replication is already
being used
Some migration time required
when backups cannot run
Replication for Virtual Device Migration
This method involves using two D2D Backup Systems and has the benefit that it does not require additional disk
space to be available on the existing D2D Backup System to work.
D2D A
D2D B
HP
ProLiant
DL320s
HP
ProLiant
DL320s
UID
UID
1
2
1
2
1
Original File Share
Original VTL
2
Replicated VTL
Replicated File Share
3
New File Share
New VTL
1
Step 1 – Replicate data for migration
Replication
2
Step 2 – Delete original VTL/Share and create new one
Recovery
3
1
Step 3 – Recover data to new VTL/Share
Step 1 – Replicate data for migration
1. Identify a D2D appliance to act as replication target for temporary storage of the data to be migrated. Ideally
for best performance the replication target appliance should be co-located on the same LAN as the original
D2D.
2. Upgrade the firmware on both D2D devices to 2.1.00/1.1.00.
3. Ensure that the D2D to be used as replication target is licensed for replication.
4. Configure a replication mapping using the Replication wizard on the original D2D to allow replication of all
data from the source device to the new target device.
See the D2D user guide for detailed steps to create a replication mapping for NAS or VTL.
5. Allow replication to complete so that both stores are synchronized, this will take some time as the new
share/library is a separate deduplication store so all data needs to be replicated.
2
Step 2 – Delete original VTL/D2D share and create new one
1. Stop any backup jobs from running to the source device so that both source and target now remain identical.
2. Remove the replication mapping from either the source or target D2D Web Management Interface
3. Delete the device on the original D2D appliance.
4. Create a new device on the original D2D appliance. If using NAS (CIFS or NFS) ensure that you give this
share the same share name as the original share as this will ease the migration of the backup application
devices.
117
3
Step 3 – Recover Data to new VTL /Share
1. Run the replication recovery wizard on the original D2D appliance, this will reverse replicate the data from
the replication target device back to the new source device.
2. Wait for replication to synchronize the devices.
3. Remove the replication mapping from either the source or target D2D Web Management Interface. The new
device on the original appliance now contains the same data as the old device did but will benefit from the
improved performance
Step 4 – Reconnect to backup host and tidy up
1. Delete the target you created D2D device on D2D-B“Connect” the backup media server to the new device on
D2D-A e.g:
– Mount the NFS share
– Discover the iSCSI VTL device and connect
– Zone the FC SAN so that the host can access the new VTL
2. If using VTL it may be necessary to delete the existing backup application presentation of the VTL and
discover the new device within the backup application. This is because the WWN and serial number of the
new library may be different to the original.
If using NAS and, if the share name is the same as previously used, the backup application should need no
re-configuration to use the new share.
3. If using VTL scan/inventory the new device so that it can update its database with the location of the
cartridges within the library. The virtual barcodes will be the same as the original cartridges so there is no
need to import the cartridge data.
118
Self Replication for Virtual Device Migration
Self replication is the process of replicating data between two devices on the same D2D Backup System. This
model requires that there is sufficient disk space on the D2D Backup System to hold two copies of the data being
migrated but, with 2.1.00 and 1.1.00 software, a replication license is not required for self replication. If
migrating several devices, it may be necessary to do them serially in order to preserve disk space.
There are two versions of this model
Migration when the original device is not already part of a replication mapping to another appliance. This
method is termed “Non Replicated device self replication migration”
Migration when the original device is already part of a replication mapping to another appliance.
This method is termed “Replicated device self replication migration”
Non Replicated device self replication migration
D2D A
HP
ProLiant
DL320s
UID
1
2
2
Original VTL
Original File Share
1
New File Share
New VTL
1
Step 1 – Self Replicate data for migration
2
Step 2 – Delete original VTL/Share
Self Replication
Use this model if migrating a device which is not itself in an existing replication mapping.
119
1
Step 1 – Self replicate data for migration
1. Create a new VTL or Share on the D2D Backup System; this will be the new location for the migrated data. It
is not possible to use the same Share or Library names as the original or use the same WWN/Serial numbers
for VTL devices.
2. Add a new replication target device by providing the own IP address or FQDN (Fully Qualified Domain
Name) of the D2D Backup System.
3. Configure a replication mapping using the Replication wizard on the D2D Backup System to allow replication
of all data from the source device to the new target device located on the same D2D Backup System. See the
HP StoreOnce Backup System user guide for detailed steps to create a replication mapping for NAS or VTL.
4. Allow replication to synchronize the two devices.
2
Step 2 – Delete the original VTL/Share
1. Stop any backup jobs from running to the source device so that both source and target now remain identical.
2. Remove the replication mapping.
3. Remove the appliance address from the list of replication target appliances.
4. “Connect” the backup media server to the new device. For example:
– Mount the NFS share
– Discover the iSCSI VTL device and connect
– Zone the FC SAN so that the host can access the new VTL
5. If using VTL it will be necessary to delete the existing backup application presentation of the VTL and create a
new device to connect to the new VTL. This is because the WWN and serial number of the new library is
different to the original.
If using NAS a new path to the NAS share will be required, this may involve creating a new NAS target in
the backup application.
Consult the documentation for your backup application for more information on reconfiguring devices and
changing the path to disk backup devices.
6. If using VTL scan/inventory the new device so that it can update its database with the location of the
cartridges within the library.
If using NAS it may be necessary to import the data in the new share into the backup application database.
7. Once the new VTL/share is successfully configured to work with the backup application delete the original
device. You are now left with a new device that contains the original data but benefits from the improved
performance.
120
Replication device self replication migration
D2D A
D2D B
HP
ProLiant
DL320s
HP
ProLiant
DL320s
UID
UID
1
2
1
2
1
3
Original VTL
Original File Share
2
Replicated VTL
Replicated File Share
2
2
New File Share
New VTL
2
New File Share
New VTL
1 Step 1 – Break Existing Replication Mapping
Existing Replication Mapping
2 Step 2 – Replicate to new VTL/Share on same D2D
3
Step 3 – Create new Replication Mapping
Self Replication
New Replication Mapping
Use this model if migrating devices that are already in a replication mapping of their own. Both the source and
target libraries/shares should be migrated to new devices.
Bear in mind that during this process the original replication mapping will be broken and therefore any backups
to the source device will not be replicated until the mapping is re-established.
1
Step 1 – Break existing replication mapping
1. Ensure that the existing replication mapping is synchronized. If a replication target library is hosting
replication mappings from multiple source devices then all replication mappings to the target will need to be
broken, so all mappings must be considered.
2. Remove the replication mappings between the source(s) and target device. Both the source and target devices
are now non-replicating shares/libraries.
3. Create new VTL or share devices on both the original source and original target D2D systems; these will
become the replacement devices for the migrated data with improved performance. It is not possible to use
the same Share or Library names as the original or use the same WWN/Serial numbers for VTL devices.
2
Step 2 – Self replicate to new VTL/Share on the same D2D Backup System
1. Add a new replication target device to both appliances by providing the D2D Backup Systems’ own IP
addresses or FQDNs.
2. Configure new replication mappings using the Replication Wizard on the D2D Backup Systems to allow
replication of all data from the source device to the new target device.
See the HP StoreOnce Backup System user guide for detailed steps to create a replication mapping for NAS
or VTL.
3. Allow replication to synchronize the two devices on both D2D Backup Systems.
4. Stop any backup jobs from running to the source device so that both source and target now remain identical.
121
5. Remove the replication mappings on both D2D Backup Systems.
6. Remove the appliance addresses from the list of replication target appliances on both D2D Backup Systems.
7. “Connect” the backup media server to the new source device. For example:
– Mount the NFS share
– Discover the iSCSI VTL device and connect
– Zone the FC SAN so that the host can access the new VTL
8. If using VTL it will be necessary to delete the existing backup application presentation of the VTL and create a
new device to connect to the new VTL. This is because the WWN and serial number of the new library are
different to the original.
If using NAS a new path to the NAS share will be required, this may involve creating a new NAS target in
the backup application.
9. If using VTL scan/inventory the new device so that it can update its database with the location of the
cartridges within the library.
If using NAS it may be necessary to import the data in the new share into the backup application database.
10. Once the new VTL/share is successfully configured to work with the backup application delete the original
devices. You are now left with new devices that contain the original data but benefit from the improved
performance.
3
122
Step 3 – Create a new replication mapping
Re-create the original replication mapping(s) from the new source device to the new target device, use the same
mapping configuration. The replication will need to re-synchronize the meta data but no user data will actually
be transferred, so the re-synchronization will be quite quick.
Configuring Self Migration from the D2D Web Management Interface
The HP StoreOnce Backup System user guide provides step by step instructions on how to configure replication
mappings on the Web Management Interface. However, there are some differences when configuring Self
Replication. This chapter provides a simple step by step guide to migrating a NAS share using self replication.
In this example:
There is a D2D Share called “BackupShare1” that was created on a previous firmware revision and is the
target for backups.
This share is going to be migrated to a new share that is going to be called “NEWBackupShare1”.
This new share is created after the upgrade to new firmware, so will benefit from the performance
enhancements.
The D2D Backup System does NOT need to have a replication license installed in order to perform self
replication.
Note: The following example shows NAS Share migration; a similar process can be followed for VTL store
migration; all parameters, drives/cartridge sizes, for the new VTL must be created identical to the old VTL.
1. The first step is to create the “NEWBackupShare1” device; this must be done prior to running the replication
wizard. (Unlike with replication to another appliance where a license is installed, the wizard cannot create
shares as part of the replication configuration process.)
123
2. The new share has now been created and after a few seconds is online. At this point there is no user data
stored in that share.
3. The next step is to begin configuring replication to migrate the data. Select Add Target Appliance from
the Replication–Partner Appliances–Target Appliances page on the Web Management Interface.
4. Enter the IP address or FQDN (Fully Qualified Domain Name) of the D2D in Target Appliance Address.
Note that this is the address of the local system. Addresses of other appliances may not be used because,
without a license, the D2D Backup System may only replicate to itself.
124
5. Upon successful completion the local appliance will be added to the Target Appliances list.
6. Go to the Replication – NAS Mappings page, select the share to be replicated (i.e. the original share
with backup data in it) and click Start Replication Wizard.
125
7. There are two main steps in the Wizard, the first is to select the target appliance from a list. This list will only
contain the information about the local D2D appliance and will be highlighted already. Click Next.
8. Select the Target Share (this is the new share that was created earlier in the process and is the target for
replication) and click Next.
126
9. After completing the wizard, replication will begin synchronizing the data between the two shares.
Synchronization will take some time to complete because all data must be replicated to the new device. Once
complete, the status will change to Synchronized which means that the same data is present in both shares.
(Note that the size on disk may be slightly different due to reporting inaccuracy and a slight difference in
deduplication ratio achieved).
10. After synchronization is complete remove the replication mapping between the two shares so that they are
separate entities.
127
11. Now reconfigure the backup application to use the new D2D share as a backup target device. For example
the backup application will need to retarget backups to the new share. This should be done prior to deleting
the original share to ensure the migration has been successful and that the backup application can access the
new share.
12. Once the replication mapping has been removed and the new share configured with the backup application,
the original share can be deleted from the NAS – Shares page on the Web Management Interface.
128
Index
10Gbit Ethernet, 15
A
Active Directory, 15
active-to-active replication, 50
active-to-passive replication, 50
activity graph, 44
AD authentication, 39
AD domain
joining, 39
leaving, 43
problems joining, 39
authentication, 38
B
backup application
and NAS, 32
backup application considerations, 27
backup job
recommendations, 29
bandwidth limiting, 66
best practices
general, 5
housekeeping, 9
NAS, 6, 30
network and FC, 22
replication, 49
store migration, 118
tape offload, 79
VTL, 5, 25
blackout window, 72
blackout window, 66
block size, 25, 27, 34
bottleneck identification, 44
C
cartridge sizing, 27
CIFS AD, 15
CIFS share
authentication, 38
managing, 41
sub-directories, 31
compression, 10, 36
concurrency, 54
concurrent backup streams
recommendations, 25
concurrent replication jobs, 8
D2DBS emulation type, 25, 26
D
deduplication
performance considerations, 7
Dev-Perf, 44
direct attach (private loop), 20
disk space pre-allocation, 34
DNS
AD domain, 39
dual port mode, 13
emulation types, 25
encryption, 10, 36
F
fan in/fan out, 53
Fibre Channel
best practices, 22
Fibre Channel topologies, 19
floating D2D, 62
H
high availability link aggregate mode, 14
high availability port failover mode, 14
housekeeping
best practice, 9
NAS, 37
overview, 8, 72
housekeeping load, 74
housekeeping statistics, 74
housekeeping tab, 73
L
libraries per appliance
performance, 27
M
many-to-one replication, 50
maximum file size
housekeeping, 37
MMC, 41
monitoring
replication, 68
multiplex, 9
multi-streaming, 9, 34
N
NAS
backup application considerations, 32
benefits of, 30
best practices, 30
open files, 31
performance considerations, 31, 34
NAS backup targets, 30
network
performance considerations, 22
network configuration, 11
best practices, 22
for CIFS AD, 15
n-way replication, 50
129
O
open files, 31
out of sync notifications, 68
P
performance
activity graph, 44
deduplication, 7
libraries per appliance, 27
maximum concurrent backup jobs, 26
maximum NAS operations, 36
metrics on GUI, 44
multi-streaming, 9
NAS, 31, 34
network, 22
replication, 7
reporting metrics on GUI, 46
performance tools, 44
Permissions
domain, 43
physical tape
seeding, 64
product numbers, 4
R
recommended network mode, 14
reference information
G1 products, 84
G2 products, 83
replication
bandwidth limiting, 66
best practices, 49
blackout windows, 66
concurrency, 54
fan in/out, 53
guidelines, 53
impact on other operations, 66
monitoring, 68
overview, 7, 49
performance considerations, 7
seeding, 56
source appliance permissions, 67
usage models, 50
WAN link sizing, 55
replication activity monitor, 68
replication concurrency
limiting, 55
replication throughput, 69
reporting metrics, 46
retention policy, 28
130
rotation scheme, 28
example, 29
S
seeding
active/active, 58
active/passive, 58
co-location (over LAN), 60
co-location at source, 60
floating D2D, 62
many to one, 59
methods, 57
over a WAN link, 58
overview, 56
using physical tape, 64
single port mode, 12
sizing guide, 23
sizing tool
example, 87
source, 67
storage and deduplication ratio, 46
store migration, 118
StoreOnce technology, 7
switched fabric, 19
synthetic backups, 37
Sys-Perf, 44
T
tape offload
best practices, 79
overview, 76
performance factors, 79
transfer size, 27, 34
U
user authentication, 38
V
verify operation, 28, 37
VTL
benefits of, 30
best practices, 25
W
WAN link sizing, 55
worked example, 85
Z
zoning, 20
For more information
To read more about the HP D2D Backup System, go to www.hp.com/go/D2D
Share with colleagues
© Copyright 2011-2012 Hewlett-Packard Development Company, L.P. The information
contained herein is subject to change without notice. The only warranties for HP products
and services are set forth in the express warranty statements accompanying such
products and services. Nothing herein should be construed as constituting an additional
warranty. HP shall not be liable for technical or editorial errors or omissions contained
herein.
EH985-90935, Revised June 2012