1
Hp Compaq 2230s Review and Step by Step Guide:
A UNIX perspective!
By: Kaya Şaman
Contents
1.
External
1
2.
Internal and Tech Specs
1
3.
Operating system, usage and capabilities
4
3.1Install
3.2Configuration
3.3Wireless setup
3.4Upgrading system components
3.5Usage and testing
4. Conclusion
4
5
5
11
13
19
In this document I will review the Hp Compaq 2230s notebook in terms of design and tech specs which will be totally operating system exclusive, then later on review the system coupled together with a UNIX based operating system using a hard disk install.
To start with let's approach this system from outside through inside dealing with the operating system and abilities later on.
1. External:
First of all the chassis is very attractive for a business grade laptop. No frills and spills with gimmicky coloration or graphics designs. Plain black enclosure with a very ergonomic and functional yet easy to use layout. Dimensionally the machine is very small, cute and compact with its 12.1” screen fitting very well within the tiltable housing with an inbuilt 0.3MP VGA webcam centered above with a stereo microphone surrounding it. No speakers to be seen as they are cleverly tucked away under the perforated bar just above the keyboard, the bar is of high quality material resembling carbon fiber and adds increased structural rigidity to the overall spaceframe (chassis).
Also included in the bar, is the power button, HP information button (only for MS Windows), presentation button, 802.11 wireless controller on/off switch, mute button and volume control scroll zone. Below the keyboard is the trackpad with scroll slider and mouse buttons.
All of the buttons above the keyboard light up with good luminous intensity making them easy to view and also change color depending on which mode they are in (on/off, or inuse). In fact since these buttons are only hotkeys they can be reconfigured and used for launching other processes or performing other functions, of course this all depends on how good the users' hacking skills are as one would need to hack through finding out which ASCII value is generated by each key and then reconfigure accordingly if using nonMS based OS's such as UNIX based systems.
The screen tilts to 120˚ which is a bit of a shame as a 180˚ tilt would be much better, however saying that it really isn't that much of big issue as the 180˚ tilt would be a bit difficult to achieve utilizing the same hinge mechanism that is currently in place. This hinge mechanism also gives the notebook an added level of attractiveness when opened so the 60˚ sacrifice isn't that much to pay and also one can adapt their personal viewing style to compensate.
Overall luminosity is good for the display, although I'm not sure if the model in front of me came with the 'standard' or 'high
brightness' screen which is also listed on the HP.com website. The resolution at 1280x800 is pretty good and actually probably enough for this type of machine being in the 'ultraportable' range as this is not a gaming laptop and for work related environments is more then sufficient. In fact 1280x800 seems about the norm with this size of screen as another one of my machines with a 12.1” WXGA 16:10 format display, also comes with the same resolution which is perfect viewing size. I think any higher resolution and seeing what's on the display would be very difficult indeed in a generic sense, especially with small text and icon sizes.
While the display is closed the machine feels rock solid and upon opening it, the motion is smooth and when positioned at the desired viewing angle sits perfectly with nothing but physical intervention or a gale force wind being able to move it.
The keyboard feels incredibly solid with absolutely no structural flex at all while typing and even gives the sensation that there are no components underneath, only a solid surface which is a pretty welcome illusion. Likewise the palm rests do a similar job of keeping the structural rigidity intact when pressure is applied and when palms are rested on them feel very comfortable to type on for an elongated period of time. Even when picked up with the screen opened in 'user operation mode' the spaceframe does a very good job of canceling torsional and tensile stress applied to the chassis which results again in a very solid feel. The only disappointing side is the structural strength under the CDROM drive. When picked up and fingers are positioned on this point there is quite a bit of chassis flex which gets worse if fingers are positioned directly below the drives bezel which actually bends.
2. Internal and Tech Specs:
The Hp Compaq 2230s has a very attractive specification list; This list includes the Intel Core2Duo T6570 processor running at a clock frequency of 2.1GHz with 2MB L2 cache and an 800MHz front side bus. The system is capable of taking up to 8GB of memory which for a 12.1” laptop is actually quite impressive, of course this is provided that one has installed a 64bit operating system which utilizes EM64T (extended memory technology) as a 32bit OS is limited to only ~4GB memory (theoretical max as realistic maximum is somewhat less due to system resource mappings and GPU memory which also needs to be mapped – can be approximated by calculation: (2^32) gives 4.29x10^9 which then dividing by 1024^3 results in 4GB).
For the remaining hardware list; a hybrid discrete/integrated Intel GMA 4500MHD GFX accelerator with up to 384MB of VRAM. This is actually quite interesting as 256MB of memory is dedicated to the GPU with 128MB being shareable with the host based OS, this is powered by the Intel GM45 chipset.
Again, as already mentioned the system can take up to 8GB of memory utilizing the dual channel memory capabilities of DDR2 Synchronous Dynamic Random Access based chipsets. This actually means that using any single SODIMM (small outline dual inline 1
memory module) chip the amount of memory per area onchip is doubled. Hence, instead of the system maxing out at 4GB RAM, it actually is able to give the system double which is the reason for the 8GB in total. The machine in front of me has 2GB of memory which will be thoroughly tested later on, but standard configurations are 2GB or 3GB of memory. This should be more then enough for the average user, the only times in question when one would need such high memory is when running multiple multimedia applications or a programmer looking to build a large scale program or run multiple VM's to test the intercompatibility of their source code on different platforms.
Hard drive space is ample at 160GB, although a choice of 160 or 320GB SATA I based drives is available in standard off theshelf configurations for this model. This is especially handy as if not using a network based file share, such as NFS or SMB for Windows users, one can store pretty much all their work related files on the drives with either space to spare in the long run over many years or alternatively can keep multiple concurrent backups of each file/folder. Another point is that if dealing with rather large files such as video files or VDI images, again there is plenty of room to store many of them and the host based operating system too. Alternatively one can multiboot the machine and have enough room for 23 host based operating systems with many further guest based operating systems using a virtual desktop technology such as Citrix Xen, VMWARE's virtual desktop edition, or Sun Microsystems Virtual Box. Or if using Sun's Solaris operating system then you can run multiple OS entries in different zones negating the use for a hypervisor or desktop virtualization software.
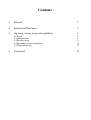
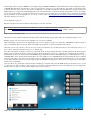
Now that the features making up the core components has been mentioned, the nonessential hardware list is pretty impressive also including a very clean sounding sound output which already I have tested on headphones and two LCD TV systems. In fact the sound was very clear and vibrant coming out of a Sony Xseries 40” TV display from the standard PC input section, meaning 25pin VGA connector and 3.5” stereo minijack for audio input. Having an audio engineering background I can definitely say that this setup is pretty good for consumer based standards of course being used to very expensive Pro line equipment myself I am quite picky with my A/V based systems. Where normally my Sun Microsystems Ray 1 setup is connected to the data center downstairs over wireless bridge, unplugging and using the Sony display as a secondary to the primary notebook internal display did wonders for fullscale cinematic viewing and effects when coupled with compressed CSI Miami HD video files, full HD quality BattleStar Galactica video files, and non HD based Babylon 5 video files. An example of this can be seen below with the 2230s connected to the 40” Sony display running the compressed version of CSI Miami HD: Img1. Image taken on Nokia N95 cell phone and transferred over Bluetooth to Hp 2230s. Sysconfig=Kubuntu 9.04 running NFS v4 to file server over WLAN. 2
As can be seen the picture quality is cineperfect having a resolution of 1366x768 which falls under the category of: Widescreen eXtended Graphics Array, however there is no pixelation in the image at all and is totally photorealistic.
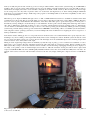
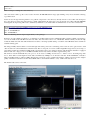
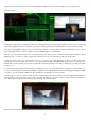
In a small office based environment, coupled to a much smaller 4:3 format Samsung LCD display and Soundcraft Spirit Folio Notepad desktop mixer again results were more then impressive with the notebook being able to handle everything I threw at it while heavily multi tasking. This actually was for my current home office setup comprising of the Hp 2230s and HiGrade Notino C2200 notebook which I use as my 'all round' development platform. This type of environment not only allows me to do specific administration tasks in terms of documentation and IT based administration meaning serial stty lines and remote telnet and SSH connections, but also a full blown set of operating system and software development and testing too. An example of this setup can be seen below:
Img2. Image taken on Nokia N95 cell phone and transferred over Bluetooth to Hp 2230s. Sysconfig=Kubuntu 9.04 running NFS v4 to file server over WLAN. The 2230s also comes with a Dual Layer DVD +/ RW drive with Light Scribe capability. This is very good but considering that the much older Centrino CPU based HiGrade also has a DVD RW +/ drive I am wondering why a Blue Ray drive was not coupled to this system or why it isn't available as an option. It would definitely save me burning hundreds of DVD's to back up gigabytes of information, especially for server based small mail stores or user accounts.
The amount of provided external ports is also really good for a machine of this size. To start with 3 USB ports for connecting to external devices in comparison to my older notebook's 2. Also VGA and DVI ports. Not having used DVI before myself I will need to buy a cable for testing this with my Sony 40” display mentioned earlier as DVI has the ability to transmit both sound and video through the same connector. One ExpressCard and Secure Digital (SD) slot means that connecting the machine to modern devices is easy as PCMCIA technology seems to be getting phased out over this smaller and faster alternative. Of course the SD card is great for digital images captured on camera or as a very expensive backup solution when a USB memory stick is not handy.
The system also comes with a biometric finger print reader which if I recall correctly IBM started off with their acclaimed Think Pad series line of notebooks before running into financial difficulty and being rebranded as Lenovo. On the front of the system are the line in and line out connectors of which the quality of the line out connector has already been discussed.
That leaves us only with the networking capabilities of the system which again are nothing short of impressive; A Bluetooth 2.0 EDR 3
radio for connection to PAN (personal area network) devices such as cell phones, PDA's, wireless headsets etc.
The Intel 802.11 interface has dual radios which operate at the 2.4GHz and 5GHz frequency ranges. This means a,b,g, and ndraft compatibility so this notebook can connect to any wireless access point (WAP), even in the United States of America as the 5GHz range is the preferred operating frequency out there while 2.4GHz is preferred in the rest of the world. Also security abilities of the Intel IPW5100AGN are completely business class offering backwards compatibility with WEP based networks but also being WPA and WPA2 (enterprise) compatible.
The 802.3 interface is a standard 10/100/1000 fullduplex NIC (network interface card) so nothing special to write about here other then I would be worried if it didn't operate at 1000Mbps as this is now the standard for all NICs of today.
Last but not least and something which I think is hardly ever used today is the V.92 56K modem, but it is still there for compatibility when 802.3, 802.11 and 802.16 networks are not available.
3. Operating system, usage and capabilities:
Now that we've discussed the system's internals and externals, let's have a look at actually installing and running an operating system on here. It is going to be interesting to see the level of specific hardware support.
Based on my previous experience with my older laptop the HiGrade which is now about 5/6 years old, running Debian 3.1 (Sarge) Linux on there meant that I had to hack the system out quite a bit in order to gain compatibility for the IPW2200 wireless controller and the Intel 855GME based chipset too. This meant installing the kernel driver and firmware for the Intel Pro Wireless 2200 NIC, and 855 or 955 resolution for the i810 based Intel 855GME chipset in order to gain proper screen resolution of 1280x800 which without, defaulted to SVGA resolution of 1024x768 superimposed upon the 1280x800 based screen area causing visuals to be stretched and squashed.
As a UNIX engineer I could run any operating system on here from any of the following: Linux, Solaris, BSD, AIX, HPUX, and IRIX. Unfortunately AIX, HPUX, and IRIX are all proprietary and I do not have access to them. Instead however BSD, Solaris and Linux seem much more viable options. I must admit the decision is a bit hard as they're all really interesting platforms but since Linux is probably the best OS out there for a desktop platform, having an amazingly high number of applications which are not just free but very powerful too it seems like the best option to go for at the moment.
The key element now is to select a distro which is going to be pretty tough as there are so many out there with varying levels of hardware support. Due to the newness of the Intel chipset and GPU I am going to go for one of the larger distributions as there is more chance for support. Now not liking GUI's very much as they are really tedious and long winded I am going to elect to stick with the CLI based interface as needing 23 hours for configuring the wireless NIC in the preinstalled version of MS Windows Vista Business was not fun, as I did not enjoy fighting with the system trying to automate everything and leave me with no control whatsoever. Out of the choices I have are: OpenSuse, CentOS, Fedora, Debian, and Ubuntu. Now the Red Hat based distro's which are CentOS 5.3 and Fedora 11 as of 08/09/2009 (August 9), are definitely something to consider as their hardware support has always been very good. However, after dealing with Fedora 11 on a PowerPC based Apple G4 Quicksilver edition, the Anacron chronological scheduler package seems to be broken and also CUPS (Common UNIX Printing System) on CentOS 5.3 doesn't seem to be working correctly either. This means that I am either going to put Debian or Ubuntu onto this system as I am not a fan of OpenSuse after trying Suse 10 many years ago I did not like the interface as it was too heavily GUI based and stole valuable CPU cycles and memory in order to achieve this.
Narrowing down even further now, Debian stable edition packages are really old and so is the kernel version and the unstable or testing branch has packages missing but is not something I would consider as is mainly for testing and development, not everyday use. This leaves me with Ubuntu which is a Debian derived operating system and shares a lot in common with Debian but having the advantage of more up to date packages and kernel which are totally stable.
For the last few months I have been running Kubuntu 9.04 which is based on Ubuntu 9.04 Jaunty, on all my desktop based systems and since it has a 64bit edition this seems like an obvious starting choice. I actually think this is a good choice for a wide range of users as Kubuntu will appeal to basic and more experienced users alike.
3.1 Install:
The install of this system went very smoothly and was very fast too. The Intel based GFX controller, although not recognized 100% by the system didn't have any problems in reverting back to Intel i915 compatibility. This of course resulted in the system only being able to achieve SVGA quality at 1024x768 resolution but since this was only for the GUI based installer it wasn't really that important an issue.
I always like to use a custom partitioning scheme when I do any install unless it's MS based where in which I usually just have everything on the C: partition. For UNIX systems I maybe dealing with multiple partitions and/or slices depending on the filesystem 4
format, but however in this case I am going to restrict myself to simply ext3. The system comes with a 160GB HD, which is more then enough for what I am going to use it for with a single OS based install seeing as I always work from network server. Out of this 160GB I will allocate 30GB to my root / partition, 3GB to my swap partition, and the rest to my user /home partition, this will be done by having the root on a primary partition and the rest on an extended or logical based partition. The current partitioning scheme can be seen below:
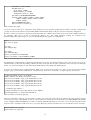
kaya@Compaq2230s:~$ df h Filesystem Size Used Avail Use% Mounted on /dev/sda1 28G 4.9G 22G 19% / tmpfs 958M 0 958M 0% /lib/init/rw varrun 958M 132K 958M 1% /var/run varlock 958M 4.0K 958M 1% /var/lock udev 958M 168K 958M 1% /dev tmpfs 958M 212K 958M 1% /dev/shm lrm 958M 2.5M 956M 1% /lib/modules/2.6.2814generic/volatile /dev/sda5 117G 6.8G 104G 7% /home
root@Compaq2230s:~# fdisk l Disk /dev/sda: 160.0 GB, 160041885696 bytes 255 heads, 63 sectors/track, 19457 cylinders Units = cylinders of 16065 * 512 = 8225280 bytes Disk identifier: 0x80d2f3ee Device Boot Start End Blocks Id System /dev/sda1 * 1 3647 29294496 83 Linux /dev/sda2 3648 19457 126993825 5 Extended /dev/sda5 3648 19087 124021768+ 83 Linux /dev/sda6 19088 19457 2971993+ 82 Linux swap / Solaris
Table1. Filesystem and disk usage information.
3.2 Configuration:
After initial bootup of the HD install, the system was again very fast to get from initial mode 0 (init 0) to initial mode or run level 5 (init 5) and rapidly went from the off state to the KDM login manager. From here the overall viewing perspective changed as I could still see that the system was running at 1024x768 resolution superimposed upon the 1280x800 widescreen. Logging into the KDE4 desktop environment, the panels and windows were larger then they should be when compared to my other laptop also running at the same resolution of 1280x800. This meant diving into the system to check what the overall status of everything was as it seemed to be a bit of deja vous and the HiGrade all over again. First lets start by seeing if the KDE4 environment actually was in 1280x800 resolution or if it was running in 1024x768. Opening the Kicker or Kmenu and going to System Settings and Display actually revealed that the system thought that it was at the correct WXGA resolution. This meant that either we had a driver issue on our hands or something wrong with KDE interfacing with the kernel and the X server. My immediate response was to perform an upgrade of all packages and kernel so that I had the latest hardware support. For this to happen I needed to either use the wired or wireless network controller:
Before dealing with that though Ubuntu has a major security issue of having sudo enabled, meaning that if a sudoer's account gets hacked then the hacker has potential access to the root user account and filesystem. Let's sort this out quickly as one can do everything they need to by using the su command. Booting up a terminal window, Konsole in KDE4, then running: sudo passwd root and entering the 'new' root password will set a specific password for the root or 'superuser' account. Once this is done we have the ability to su to root without any problems or fear of weak security.
3.3 Wireless setup:
Now, as I was performing the install downstairs I needed to connect to my WAP in order to have inter/intranet access. This meant connecting to one of 4 WAPs, since 3 of them were being used in a point to multipoint WDS bridge, that left me with connecting to the Cisco 857W 2 floors above me. Did the system even have support for the wireless interface??
5
Running ifconfig a revealed all the 'supported' interfaces on this system. And further running iwconfig revealed which interface the kernel detected with wireless extensions. The outputs below both show the system as being configured, however as this doesn't matter as without being configured they still come up in a similar fashion obviously without any wireless ESSID or IP address attached.
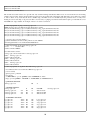
root@Compaq2230s:~# ifconfig a eth0 Link encap:Ethernet HWaddr 00:25:b3:5a:58:f5 UP BROADCAST MULTICAST MTU:1500 Metric:1 RX packets:0 errors:0 dropped:0 overruns:0 frame:0 TX packets:0 errors:0 dropped:0 overruns:0 carrier:0 collisions:0 txqueuelen:1000 RX bytes:0 (0.0 B) TX bytes:0 (0.0 B) Interrupt:17 lo Link encap:Local Loopback inet addr:127.0.0.1 Mask:255.0.0.0 inet6 addr: ::1/128 Scope:Host UP LOOPBACK RUNNING MTU:16436 Metric:1 RX packets:1692 errors:0 dropped:0 overruns:0 frame:0 TX packets:1692 errors:0 dropped:0 overruns:0 carrier:0 collisions:0 txqueuelen:0 RX bytes:176491 (176.4 KB) TX bytes:176491 (176.4 KB) pan0 Link encap:Ethernet HWaddr 26:a4:35:3e:65:c0 BROADCAST MULTICAST MTU:1500 Metric:1 RX packets:0 errors:0 dropped:0 overruns:0 frame:0 TX packets:0 errors:0 dropped:0 overruns:0 carrier:0 collisions:0 txqueuelen:0 RX bytes:0 (0.0 B) TX bytes:0 (0.0 B) vboxnet0 Link encap:Ethernet HWaddr 0a:00:27:00:00:00 BROADCAST MULTICAST MTU:1500 Metric:1 RX packets:0 errors:0 dropped:0 overruns:0 frame:0 TX packets:0 errors:0 dropped:0 overruns:0 carrier:0 collisions:0 txqueuelen:1000 RX bytes:0 (0.0 B) TX bytes:0 (0.0 B) wlan0 Link encap:Ethernet HWaddr 00:22:fa:f0:62:f6 inet addr:192.168.0.80 Bcast:192.168.0.255 Mask:255.255.255.0 inet6 addr: fe80::222:faff:fef0:62f6/64 Scope:Link UP BROADCAST RUNNING MULTICAST MTU:1500 Metric:1 RX packets:6653007 errors:0 dropped:0 overruns:0 frame:0 TX packets:4039732 errors:0 dropped:0 overruns:0 carrier:0 collisions:0 txqueuelen:1000 RX bytes:9354507709 (9.3 GB) TX bytes:1151296061 (1.1 GB) wmaster0 Link encap:UNSPEC HWaddr 0022FAF062F600000000000000000000 UP BROADCAST RUNNING MULTICAST MTU:1500 Metric:1 RX packets:0 errors:0 dropped:0 overruns:0 frame:0 TX packets:0 errors:0 dropped:0 overruns:0 carrier:0 collisions:0 txqueuelen:1000 RX bytes:0 (0.0 B) TX bytes:0 (0.0 B)
root@Compaq2230s:~# iwconfig lo no wireless extensions. eth0 no wireless extensions. wmaster0 no wireless extensions. wlan0 IEEE 802.11abgn ESSID:"My_ESSID" Mode:Managed Frequency:2.452 GHz Access Point: 00:1A:A1:05:D6:C0 6
Bit Rate=48 Mb/s TxPower=15 dBm Retry min limit:7 RTS thr:off Fragment thr=2352 B Encryption key:********** Security mode:open Power Management:off Link Quality=77/100 Signal level:56 dBm Noise level=87 dBm Rx invalid nwid:0 Rx invalid crypt:0 Rx invalid frag:0 Tx excessive retries:0 Invalid misc:0 Missed beacon:0 vboxnet0 no wireless extensions. pan0 no wireless extensions.
Table2. Network interface list and hardware assignment.
Now that we have a bunch of interfaces listed but are unsure of whether we need firmware on not for them, as in if they have default kernel and OS support or not, let's run a quick test. Running iwlist wlan0 scan in the terminal as root will show us if the wireless NIC is working or not if various different SSID's are detected.
root@Compaq2230s:~# iwlist wlan0 scan wlan0 Scan completed : Cell 01 Address: 00:22:3F:CF:35:B0 ESSID:"The Bush" Mode:Master Channel:6 Frequency:2.437 GHz (Channel 6) Quality=43/100 Signal level:83 dBm Noise level=127 dBm Encryption key:on IE: Unknown: 00085468652042757368 IE: Unknown: 010882848B962430486C IE: Unknown: 030106 IE: Unknown: 2A0104 IE: Unknown: 2F0104 IE: Unknown: 32040C121860 IE: Unknown: DD090010180201F0000000 IE: WPA Version 1 Group Cipher : TKIP Pairwise Ciphers (1) : TKIP Authentication Suites (1) : PSK IE: Unknown: DD180050F2020101800003A4000027A4000042435E0062322F00 Bit Rates:1 Mb/s; 2 Mb/s; 5.5 Mb/s; 11 Mb/s; 18 Mb/s 24 Mb/s; 36 Mb/s; 54 Mb/s; 6 Mb/s; 9 Mb/s 12 Mb/s; 48 Mb/s Extra:tsf=00000a251fd97ad8 Extra: Last beacon: 2292ms ago Cell 02 Address: 00:1A:A1:05:D6:C0 ESSID:"" Mode:Master Channel:9 Frequency:2.452 GHz (Channel 9) Quality=73/100 Signal level:61 dBm Noise level=127 dBm Encryption key:on IE: Unknown: 000100 IE: Unknown: 010882848B0C12961824 IE: Unknown: 030109 IE: Unknown: 2A0100 IE: Unknown: 32043048606C IE: Unknown: 851E00008D000F00FF031900436973636F38353757000000000000000100002B IE: Unknown: DD050040960304 IE: Unknown: DD180050F2020101010003A4000027A4000042435E0062322F00 Bit Rates:1 Mb/s; 2 Mb/s; 5.5 Mb/s; 6 Mb/s; 9 Mb/s 11 Mb/s; 12 Mb/s; 18 Mb/s; 24 Mb/s; 36 Mb/s 7
48 Mb/s; 54 Mb/s Extra:tsf=00000bdb71ab6181 Extra: Last beacon: 188ms ago Cell 03 Address: 00:1A:A1:05:D6:C0 ESSID:"" Mode:Master Channel:9 Frequency:2.452 GHz (Channel 9) Quality=67/100 Signal level:61 dBm Noise level=88 dBm Encryption key:on IE: Unknown: 0005436973636F IE: Unknown: 010882848B0C12961824 IE: Unknown: 030109 IE: Unknown: 2A0100 IE: Unknown: 32043048606C IE: Unknown: 851E00008D000F00FF031900436973636F38353757000000000000000100002B IE: Unknown: DD050040960304 IE: Unknown: DD180050F2020101010003A4000027A4000042435E0062322F00 Bit Rates:1 Mb/s; 2 Mb/s; 5.5 Mb/s; 6 Mb/s; 9 Mb/s 11 Mb/s; 12 Mb/s; 18 Mb/s; 24 Mb/s; 36 Mb/s 48 Mb/s; 54 Mb/s Extra:tsf=00000bdb71ad3e25 Extra: Last beacon: 68ms ago Cell 04 Address: 00:90:D0:2A:94:0A ESSID:"jojonhattie" Mode:Master Channel:6 Frequency:2.437 GHz (Channel 6) Quality=40/100 Signal level:85 dBm Noise level=127 dBm Encryption key:on IE: Unknown: 000B6A6F6A6F6E686174746965 IE: Unknown: 010882848B962430486C IE: Unknown: 030106 IE: Unknown: 050401030000 IE: Unknown: 2A0100 IE: Unknown: 2F0100 IE: Unknown: 32040C121860 IE: Unknown: DD060010180200F0 IE: WPA Version 1 Group Cipher : TKIP Pairwise Ciphers (1) : TKIP Authentication Suites (1) : PSK IE: Unknown: DD180050F2020101880003A4000027A4000042435E0062322F00 Bit Rates:1 Mb/s; 2 Mb/s; 5.5 Mb/s; 11 Mb/s; 18 Mb/s 24 Mb/s; 36 Mb/s; 54 Mb/s; 6 Mb/s; 9 Mb/s 12 Mb/s; 48 Mb/s Extra:tsf=0000000fc3186186 Extra: Last beacon: 2252ms ago Cell 05 Address: 00:12:A9:58:BA:75 ESSID:"" Mode:Master Channel:2 Frequency:2.417 GHz (Channel 2) Quality=74/100 Signal level:60 dBm Noise level=127 dBm Encryption key:on IE: Unknown: 0000 IE: Unknown: 010882848B960C183048 IE: Unknown: 030102 IE: Unknown: 050400010000 IE: Unknown: 0706545220010D14 IE: Unknown: 2A0104 8
IE: Unknown: 32041224606C IE: WPA Version 1 Group Cipher : CCMP Pairwise Ciphers (1) : CCMP Authentication Suites (1) : PSK IE: Unknown: DD07000A5E01010006 Bit Rates:1 Mb/s; 2 Mb/s; 5.5 Mb/s; 11 Mb/s; 6 Mb/s 12 Mb/s; 24 Mb/s; 36 Mb/s; 9 Mb/s; 18 Mb/s 48 Mb/s; 54 Mb/s Extra:tsf=00000a61dbf1d037 Extra: Last beacon: 2432ms ago
Table3. Iwlist scan output.
As can be seen from the above output that various WAP's have been detected meaning that the 802.11 controller is functioning properly. As can be noticed there are a few hidden SSID's within that list which are all part of my home networks configuration.
In order to connect to any wired or wireless networks without the use of GUI tools we need to have a look at the configuration files for the interfaces. This can be found in /etc/network/ directory in a file called interfaces. Issuing the command: nano /etc/network/interfaces after su'ing to root we can start building the file up with our configuration:
auto lo iface lo inet loopback auto eth0
iface eth0 inet dhcp
auto wlan0 iface wlan0 inet dhcp wireless_essid [Wireless LAN ESSID]
wireless_enc [40bit or 128bit WEP key in HEX]
Table4. Network interface file configuration.
By default, the loopback interface is always listed in this file however the other physical interfaces may not be, for this reason we can add them in like so. Obviously depending on whether the needs of the end user are static or dynamic in terms of the layer 3 addressing means, one can put in inet dhcp or static followed by the IP address, subnet mask, and default gateway.
To test if our system has been associated with the WAP or not, we can perform a ping test to verify, as any user from the terminal typing in: ping c 5 followed by the IP address of the gateway the notebook is connected to. A sample output is shown below:
root@Compaq2230s:~# ping c 5 192.168.0.1 PING 192.168.0.1 (192.168.0.1) 56(84) bytes of data. 64 bytes from 192.168.0.1: icmp_seq=1 ttl=255 time=1.73 ms 64 bytes from 192.168.0.1: icmp_seq=2 ttl=255 time=1.54 ms 64 bytes from 192.168.0.1: icmp_seq=3 ttl=255 time=1.33 ms 64 bytes from 192.168.0.1: icmp_seq=4 ttl=255 time=1.55 ms 64 bytes from 192.168.0.1: icmp_seq=5 ttl=255 time=1.53 ms 192.168.0.1 ping statistics 5 packets transmitted, 5 received, 0% packet loss, time 4007ms rtt min/avg/max/mdev = 1.334/1.539/1.732/0.126 ms
Table5. Gateway connectivity ping test.
The test reveals that connection was successful as 5 replies were sent and received from the gateway. Now that we have network connectivity we need to setup DNS if we wish to connect at all to the internet and resolve hostnames. If running DHCP without DNS servers configured within the DHCP server setup or if running static IP addressing, we can look in our resolv.conf config file located in /etc in order to add name resolution servers to our system. By using our trusty text editor nano, we can add name servers as follows:
domain domain.com {optional}
search domain.com {optional}
9
nameserver 192.168.1.100 nameserver 192.168.1.101
Table6. Resolv.conf file entries.
The domain and search criteria are optional and only useful if running authoritative DNS servers in a network. Since I am running primary and secondary, master and slave DNS servers I have both domain and search listed with dual name server addresses pointing to both of them on my local network. If in a SOHO setup, the DNS servers for the ISP maybe the preferred choice of entry here. Testing we can use nslookup or dig tools, but this is not necessary as pinging a domain should result in replies provided that the server has ICMP echo reply enabled. An example of these tools can be seen below:
root@Compaq2230s:~# ping c 5 www.google.com PING www.l.google.com (209.85.129.147) 56(84) bytes of data. 64 bytes from fkinf147.google.com (209.85.129.147): icmp_seq=1 ttl=245 time=26.4 ms 64 bytes from fkinf147.google.com (209.85.129.147): icmp_seq=2 ttl=245 time=26.2 ms 64 bytes from fkinf147.google.com (209.85.129.147): icmp_seq=3 ttl=245 time=26.8 ms 64 bytes from fkinf147.google.com (209.85.129.147): icmp_seq=4 ttl=245 time=26.7 ms 64 bytes from fkinf147.google.com (209.85.129.147): icmp_seq=5 ttl=245 time=24.3 ms www.l.google.com ping statistics 5 packets transmitted, 5 received, 0% packet loss, time 4004ms rtt min/avg/max/mdev = 24.331/26.115/26.820/0.916 ms
root@Compaq2230s:~# nslookup www.google.com Server:
192.168.1.100 Address:192.168.1.100#53 Nonauthoritative answer: www.google.comcanonical name = www.l.google.com. Name: www.l.google.com Address: 209.85.129.104 Name: www.l.google.com Address: 209.85.129.147 Name: www.l.google.com Address: 209.85.129.99
root@Compaq2230s:~# dig @192.168.1.100 www.google.com ; <<>> DiG 9.5.1P2 <<>> @192.168.1.100 www.google.com ; (1 server found) ;; global options: printcmd ;; Got answer: ;; >>HEADER<< opcode: QUERY, status: NOERROR, id: 31674 ;; flags: qr rd ra; QUERY: 1, ANSWER: 4, AUTHORITY: 6, ADDITIONAL: 0 ;; QUESTION SECTION: ;www.google.com.
IN
A ;; ANSWER SECTION: www.google.com.
www.l.google.com.
233
www.l.google.com.
233
www.l.google.com.
233
0
IN
IN
IN
IN
A
A
A
CNAME
www.l.google.com. 209.85.129.99 209.85.129.104 209.85.129.147 ;; AUTHORITY SECTION: l.google.com.
41142
l.google.com.
41142
l.google.com.
41142
l.google.com.
41142
l.google.com.
41142
l.google.com.
41142
IN
IN
IN
IN
IN
IN
NS
NS
NS
NS
NS
NS
b.l.google.com. f.l.google.com. d.l.google.com. e.l.google.com. g.l.google.com. a.l.google.com. 10
;; Query time: 33 msec ;; SERVER: 192.168.1.100#53(192.168.1.100) ;; WHEN: Mon Aug 10 18:32:20 2009 ;; MSG SIZE rcvd: 196
Table7. DNS query examples.
Having replies in the answer sections means that DNS information is functioning properly. If not however then these tools can be used to perform diagnostics on the system.
3.4 Upgrading system components:
Now that the network connectivity is up and fully functional we need to start upgrading the system components like packages and kernel in order for enhanced security and hardware support. For this we really only need to run two basic commands using the Aptitude package manager, which will resolve any dependency or package conflict issues automatically.
Aptget update will update the apt cache with the latest packages and kernels, and aptget upgrade will upgrade those packages. Before upgrading the kernel to the latest version let's upgrade the packages first. Once all done we can reboot the system using: init 6 from the terminal.
Once booted back into the system we can now run: aptget update again to see if there are any other packages that have just been released which depend on previous packages being updated. To update the kernel to the latest one we run: aptget distupgrade which will give us the latest kernel, however the system won't utilize this kernel version straight away as it needs to be rebooted. Before issuing the init 6 command we need to edit the GRUB boot loader menu in order to show us the different kernel versions just in case we run into problems. Running: nano /boot/grub/menu.lst we can edit the file to exclude this statement:
[...]
## hiddenmenu # Hides the menu by default (press ESC to see the menu) #hiddenmenu {placing a # here comments out this statement in order to view the different boot options}
[...]
Table8. GRUB menu configuration for new kernels.
Many other GRUB customizations can be done via this file such as adding a Splash screen or multibooting the system. An example of a few customizations can be seen below:
Img3. GRUB boot loader example.
11
Unfortunately, when booted into KDE4 now nothing has changed. KDM and KDE4 are still in 1024x768 resolution with Xorg being in 1280x800. The K desktop environment for some reason has always seemed to not use Xorg like the other desktop environments such as Gnome. For this reason I am not sure if this is a KDE bug or if the DE can't interface with the GFX driver properly because the GM45 chipset is not supported and defaulting back to the old i915 derivative as shown by running dmesg. There are two more things we can try; the first being to upgrade the Intel chipset, xserverxorgvideointel, driver to the latest version. If running an Ubuntu based system like we are doing right now, we can go to this location: https://launchpad.net/~ubuntuxswat/+archive/xupdates and follow the instructions on the site.
Just for duplication purposes:
Run nano /etc/apt/sources.list and add the following lines to the end of the file:
deb http://ppa.launchpad.net/ubuntu-x-swat/x-updates/ubuntu jaunty main
deb-src http://ppa.launchpad.net/ubuntu-x-swat/x-updates/ubuntu jaunty main
Table9. Apt souces.list file entry.
After that we need to add the additional shared key which without running: aptget update will come up with missing key errors. Running: aptkey adv keyserver keyserver.ubuntu.com recvkeys 123456789
where 123456789 is the key from the SigningKey part of the xupdates page. For the current key, AF1CDFA9 should be added in place of 123456789. Then run: aptget update and finally: aptget upgrade to get the newest Intel video drivers.
Once this is done, reboot and boot into the recovery mode for the kernel in use (should be the latest!). Now follow the menu to root user of who's description should say: Drop to root shell prompt
From there run: dpkgreconfigure xserverxorg, and follow all the prompts leaving all values at default apart from the keyboard type which you need to put in the 2 letter country description. Then let's bring the system up to runlevel 5 by issuing the init 5 command.
Unfortunately we have the same problem with KDM being in 1024x768 resolution and KDE4 being in a weird 1024x768 on top of 1280x800. This can be checked when running Konsole as the default size for 1280x800 should be 81x36 which allows two terminal windows to run side by side, however if the window sizes are 1024x768 then one Konsole window will take up more or less the whole screen. When running a widesceen movie though say like the CSI Miami example given earlier, the movie sits perfectly on the display and the size is as should be. Of course this is very odd behavior and means that something is not right! I will contact the KDE developers about this issue soon and see what they say and according to their thoughts on the matter contact the Intel Linux driver development team and explain the situation and see if there is a fix for it. The output of this can be seen below:
SCR1. Resolution on KDE desktop environment. 12
This brings us to the second step to try, which is installing the Gnome desktop environment. This can be achieved by running: aptget install ubuntudesktop. This installs a group of packages negating the need to install every Gnome component individually. Once installed and the graphical user interface customized to my liking the system now looks like so:
SCR2. Gnome2 desktop environment.
As can be seen, resolution and screen size is correct, which now leads us on to using the system and the testing phase.
3.5 Usage and testing:
Now that I have the basic system setup I want to test two major usage areas of this system which are going to be multimedia and running VM's. There is no need to test this system with 3D games as it hasn't been designed for gaming use, however one of my all time favorites of FreeDoom and Prboom based around the old DOS based Doom back from the early 90's is going to be worth a look at.
To start with let's grab the multimedia packages so that we have the ability to play video files of all formats and music files too. We will install Rhythmbox, Xine, Mplayer, the GStreamer codecs, Mozilla Mplayer plugin, and mplayer codecs too. For that we look in our apt repos again: aptget install mplayer, xineui, rhythmbox, mozillampalyer
by default the GStreamer codecs are installed automatically with Rhythmbox along with the Fluendo mp3 codec which seems to be needed these days by some Linux distros as well as Solaris too to playback mp3 files.
The next step is to download and install all the mplayer codecs for full playback of multimedia files from Xine and Mplayer alike. To do this I will go the Mplayer official site codec download page, located here: http://www.mplayerhq.hu/MPlayer/releases/codecs/
Instead of only installing the x86 based line of codecs I prefer to grab all of them just in case there is some incompatibility for some strange reason later on. For this I will go to the /usr/lib directory as I'm logged into root already from my terminal and create a new folder called codecs:
kaya@Compaq2230s:~$ ls /usr/lib | grep codecs codecs
Table10. Multimedia codecs directory.
In order to create this folder we need to issue these commands:
#cd /usr/lib
13
#mkdir codecs
#cd codecs
Table11. Steps to creating the codecs directory.
Once done there I will copy the source location from the all20071007.tar.bz2 range, right clicking on my mouse and then selecting: copy link location
Now I can use the wget internet grabber tool to pull the compressed codecs directory directly into the codecs folder and uncompress the codecs directory at the same time. There is a slight quirk with this though as the codecs are already in a folder called all20071007 meaning that decompressing will create a subdirectory within the codes folder which we will then have to move the contents back.
#wget http://www.mplayerhq.hu/MPlayer/releases/codecs/all20071007.tar.bz2
#bunzip2 all20071007.tar.bz2
#tar xf all20071007.tar
#mv all20071007/* .
Table12. Obtaining and uncompressing the binary codec packages.
From here we can actually test already to see if things are working with regards to multimedia. This would be actually a great time to see how the 2230s deals with HD encoded video files, and since I have season one of BattleStar Galactica handy encoded in 720p format into Matroska .mkv files which I haven't been able to run using my PIV desktop or Centrino based HiGrade this looks like an excellent starting point.
Two things initially that I would be concerned though with at this point is the overheating of the notebook as I've gotten used to with other models from other manufacturers which I've had. The second point of concern would be high CPU usage and very slow and poor performance which the nonHD based PIV desktop and Centrino laptop give. However having said all that this machine is equipped with a mobile low voltage processor and HD based GPU, therefor my worries should be negated at this point. The wireless network bandwidth may also prove to be an issue as 54Mbps doesn't leave too much room for streaming large files across. Since 802.11 is halfduplex it means that I am limited by 22Mbps in one direction and after all the CSMA/CA overhead is taken off I will be lucky to achieve 11Mbps. Even being connected to a Cisco 857W radio interface, which is expected to have a higher quality of link then a standard consumer based WAP solution, the medium still has to carry 1.9GB of file data across it.
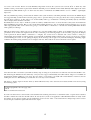
The initial results can be seen below:
SCR3. Initial running of HD quality media over wireless communications medium,
14
As can be seen from the lmsensors based Gkrellm2 temperature readouts the system doesn't even hit 50˚C of which my older machines at this point would be up at between 8090 ˚C with full processor utilization. The 2230s definitely makes light work of this with hardly any CPU utilization per core and in tests was able to communicate at 1.5MB/s which is 1.5 x 8 = 12Mb/s – again highly impressive. The only small hiccup at this point was that the ALSA sound system would not work. This primarily was because the GM45 chipset isn't supported fully yet and another issue I am going to have to press the Intel open source guys about. Not a major problem though as the OSS driver seemed to be fine and for now would actually make a good substitute considering that hardly anybody will watch videos and play music all at the same time. Essentially there are two ways to make the system use OSS by default. The first is to select the OSS sound system from within the Xine and Mplayer setup menus. This of course works fine but limits the driver to just one application. The next thing to try is to issue OSS usage globally. This can be achieved by going to: Gnome Menu → Preferences → Sound and selecting HDA Intel AD198x Analog (OSS) for all usage.
What about dual screen content now? As my intention is to use this machine with it's VGA out in dualhead mode as well as for presentation mode in mirrored singlehead mode. After connecting to the Samsung display as shown earlier, going into the Display control panel from Gnome Menu → Preferences → Display, the second screen is detected and correct format too being 4:3. Unfortunately the maximum resolution that this screen will take is 1024x768 (SVGA) which is fine as long as I can use it to display content. Turning the screen on now, putting the display in the desired position, right of my main internal display and hitting Apply resulted in the desktop being stretched over two displays with ease. The result can be observed from the screen capture:
SCR4. Dual head capability of the 2230s.
Since all seems fine now and the system almost entirely setup for using for my needs there are still a few areas that I would like to test. The first being the inbuilt webcam, which may or may not have support. Unfortunately, the VoIP software: Skype is not available for 64bit Linux installs resulting in some users who may want to revert back to an install with 32bit hardware extensions, therefor making this a bit of a difficult thing to test but there are some ways even around this.
The first is to list the output of the /dev directory which will tell us if any video device has been detected. This can be done by using the following syntax:
kaya@Compaq2230s:~$ ls /dev | grep video video0
Table13. Camera driver detection.
It seems now that we have a device listed as video0 which I am assuming since I have no external TV tuner or capture device attached, that this is indeed the notebook's internal camera. To test my theory I can use an application called XawTV which I can easily obtain through the apt repositories. Issuing: aptget install xawtv, I can now run: xawtv c /dev/video0 from a shell prompt as the local user and see if I get a result. The capture below shows the output:
15
SCR5. Using the internal camera as a capture interface.
As we can see, that is working, so now we can move over to the next and final stage which will be testing the system with Sun Microsystems Virtual Box and the OpenSolaris derivative BeleniX as the guest based OS. The reason for choosing BeleniX is largely political as I am part of the project in helping identify and fix bugs and issues but also a collaborator in the GUI design process too. Installation of Vbox is trivial and standard so it won't be discussed here but can be obtained from Sun's website www.sun.com.
The interesting thing about this setup will be again to see if the 2230s will overheat and how much CPU consumption there will be while running effectively two operating systems at the same time. The dual screen capture can be seen below:
SCR6. Desktop virtualization with Sun Micosystems Virtual Box.
Astonishingly, while running sidebyside there was hardly any CPU usage at all and the temperatures where totally within check not even going beyond 45˚C. The system at this point felt smooth and operable when compared with my desktop PIV running the same setup. Because of the Intel Core2Duo processor inside, we are effectively ending up with two processor cores running off a single system bus with increased clock speed in order to get the operating system streams vectored into each core efficiently. On top of that as the name Core2Duo implies we also have Hyper Threading too which means that we can have multiple threads vectored into each CPU core again making for multiple binary calculations which results in a vaster ability to process incoming information. The 64bit operating system at this point too is another reason for such immense capabilities as there are an extra 32 bits width in each of the machine's buses meaning more information can get through at one moment in time, but also the processor can handle a higher resolution of data too as a 32 bit architecture would be able to only handle approximately half of the information intake meaning more CPU cycles per stream. The next test I want to perform will surely kill the system I'm certain. Basically I will attempt to run a video in the host based operating system and also a second video in the guest based operating system. Although this type of test should really be attempted on a machine with two discrete sockets as opposed to cores as it will have dual system and data buses meaning that it has virtually the power of two separate machines contained in one system board. Basically this is not something that should even be considered to be attempted on a portable computer.
The videos to be played will be an mpeg2 rip of a VCD and an xvid of a Babylon 5 movie. Again these will take a bit of processing to 16
get them to run smoothly each and since the system is limited to 2GB memory it will be interesting to see if it locks up or not.
The result is below:
SCR7. Dual concurrent videos with virtualized operating system.
Amazing the system didn't even buckle and rendered everything perfectly without any hitches or glitches in any form or way. Opening windows and applications at this point did become quite slow and sluggish but then with 2GB of memory that would be expected. From the top and Gkrellm2 outputs we can see that there are still plenty of cycles left in the CPU with utilization of both cores not even reaching 60%. Memory capacity is full however with 409MB swapped to the hard disk.
My major concern of internal temperatures was totally swept aside as 50˚C was the maximum reached during running time. Again highly impressive, not just for a desktop usage based system but for a notebook and an ultraportable notebook at that.
As discussed earlier for my personal amusement I want to see how the system runs with FreeDoom. Being an old early 90's game, although 3D, it is still very light on the system as one could originally run this on 66MHz 486DX2 based processors which were pre
Pentium. The issue here though is not how the system will run with the game but how it will cope running the operating system with the game on top.
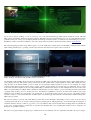
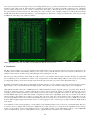
As can be seen from the image below the graphics rendering in pretty good considering that this is a remake of a game which is over 15 years old now. The game was immensely playable considering on my older HiGrade that it felt really sluggish and graphics quality was really poor as the old Intel 855GME controller most likely was at maximum processing capacity.
From the image it can be seen that the system was also running in dualscreen mode at the same time and multi tasking with internet based applications. In fact from the previous tests performed, I probably have enough confidence in this machine to actually run a video file and play this game at the same time in the knowledge that it could handle it.
Img4. FreeDoom running Prboom WAD on 2230s.
17
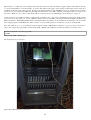
My final test to conclude the review and guide will be the data center test where the battery longevity will be tested while hooked up to servers and mainframes. As I am currently on vacation this will be a bit tough to put in practice 'inthefield', however I can run a simulation in the data center I have at home. Because I am using Sun Microsystems SPARC based servers running Solaris operating system, they do not natively have GFX cards meaning that I will need to use a USB → RS242c serial adapter cable to connect to a 9
pin dsub → RJ45 console or rollover cable which will be connected to the servers LOM (lights out monitoring) or serial port.
At this point I need to install some kind of software that would allow me to setup serial communications between the 2230s and the server array. To do this I have two options, GTKterm which is based around Microsoft's Hyper Terminal but highly simplified, and Minicom which is a 1980's DEC VT102 emulator meaning that I have the ability to do X and Z data modem transfers over stty (serial) line. Using apt again to install Minicom I will now need to set it up, meaning I need to run minicom s from my terminal shell.
From here I will choose to go to Serial Port Setup and activate settings: 9600 bauds/s, 8 data bits, 1 stop bit, no flow control, and no parity. Also using ls /dev | grep USB to determine my USB → RS242c serial adapter I now find out that the port I need to use is:
kaya@Compaq2230s:~$ ls /dev/ | grep USB ttyUSB0
Table14. Stty USB → RS242c port.
The actual setup can be seen here:
Img5. Hp 2230s Data Center performance.
18
Of course the system was not running on AC power meaning that this was a good test for the battery life of the four cells that made up the battery pack of this notebook. Obviously this is a simulation and in reality one would be potentially connecting to tens or hundreds of these systems whether it be servers, routers or switches in the data center or data farm. From the screenshot below it is evident that the system had the potential to last for two and a half hours solely on batter power. Actually probably more without the inserted CD and Mozilla Seamonkey internet suite running, so I would imagine up to three hours of usage provided that the system was used with just Minicom connecting to stty serial console lines.
SCR8. Hp 2230s connected to Sun Microsystems E420r, Sun Ray interconnect server.
4. Conclusion:
The Hp Compaq 2230s is one very nice machine indeed. Built with a strong spaceframe (chassis), the system is equipped for the workplace and road alike and definitely will last. Some issues however, with the build in some areas discussed earlier need to be addressed, however these are minor issues when taking the whole package into account.
The tech specs and performance of the 2230s are really second to none with the 'ultraportable' form guise. Features are plentyfull and overall I/O ports are in abundance in relation to the casing dimensions. The multitasking abilities of this system are astounding proving the Hp 2230s a powerhouse in disguise under the sleek and conservative yet professional looking black exterior. Portability and mobility of this device is again highly exemplary with up to 3 hours of battery usage time and longevity. The system is light enough to carry around all day without feeling any pain or discomfort in ones shoulders if using a laptop case or backpack.
Although untested with other forms of UNIX apart from a VM of BeleniX, for Linux usage this system is very much ready. From the moment of install the system is complete with all the necessary drivers and kernel headers to handle the hardware. No serious compiling of drivers and kernel headers is needed and the system is ready to take configuration from first boot. The only slight issue is the Intel GM45 chipset driver which with default configuration assumes i915 compatibility mode, but even in this mode with the Gnome2 desktop environment the resolution is perfect. The only areas where the system and thus usage would suffer is in the processing capabilities which can be rectified by installing the latest xorgintel driver as shown in section 3.4. KDE users and fans however will be slightly disappointed and may need to do some digging in order to obtain proper resolution within the KDE4 desktop environment.
I can definitely see this system appealing to a wide audience range including business users, home users, and students alike. The price for what is given is a bargain and in real terms ~£600 mark is not that expensive for a notebook at all. I think that I will even buy another one for multiboot usage using multiple versions of the UNIX operating system. Most likely I will go for the 320GB HD option and 3GB memory option too, although I may need to upgrade that later on but that's only a small detail.
19