1
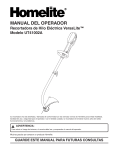
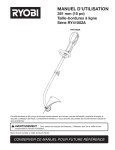
OPERATOR'S MANUAL
VersaLite™ Electric String Trimmer
UT41002A
Your trimmer has been engineered and manufactured to Homelite's high standard for dependability, ease of
operation, and operator safety. When properly cared for, the trimmer will give you years of rugged, trouble-free
performance.
WARNING:
To reduce the risk of injury, the user must read and understand the operator’s manual before using this product.
Thank you for buying a Homelite product.
SAVE THIS MANUAL FOR FUTURE REFERENCE
TABLE OF CONTENTS
Introduction .............................................................................................................................................................. 2
Safety ................................................................................................................................................................... 3-4
Symbols ................................................................................................................................................................... 5
Specifications .......................................................................................................................................................... 6
Unpacking ................................................................................................................................................................ 6
Features .................................................................................................................................................................. 7
Assembly .............................................................................................................................................................. 8-9
Operation .......................................................................................................................................................... 10-12
Maintenance ..................................................................................................................................................... 13-14
Troubleshooting ..................................................................................................................................................... 15
Accessories ........................................................................................................................................................... 16
Warranty ................................................................................................................................................................ 17
Customer Service Information ............................................................................................................................... 18
INTRODUCTION
Your trimmer has many features that make using this product more pleasant and enjoyable. We have given safety,
performance, and dependability top priority in the design of this product, making it easy to maintain and operate.
WARNING:
Do not attempt to use this product until you read thoroughly and understand completely the operator’s manual. Pay
close attention to the safety rules, including Dangers, Warnings, and Cautions. If you use your product properly
and only as intended, you will enjoy years of safe, reliable service.
Page 2
SAFETY
WARNING:
When using electric gardening appliances, basic
safety precautions should always be followed to
reduce the risk of fire, electric shock, and personal
injury, including the following:
READ ALL INSTRUCTIONS
GENERAL SAFETY RULES
Clear the work area before each use. Remove all
objects, such as rocks, broken glass, nails, wire, or
string that can be thrown or become entangled in the
cutting line.
Wear heavy, long pants, boots, and gloves. Do not
wear loose fitting clothing, short pants, or go barefoot.
Do not wear jewelry of any kind.
Secure hair above shoulder level to prevent entanglement in moving parts.
Do not allow children or untrained individuals to use
this product.
Keep all bystanders, children, and pets at least 50 ft.
(15 m) away.
Do not operate this product when you are tired, ill, or
under the influence of alcohol, drugs, or medication.
Do not operate in poor lighting.
Keep firm footing and balance. Do not overreach.
Overreaching can result in loss of balance or exposure to hot surfaces.
Keep all parts of your body away from moving parts.
Inspect the product before use. Replace any damaged parts before use.
Do not operate the product in damp or wet locations.
Do not use the product in the rain.
Wear safety glasses or goggles that are marked to
comply with ANSI Z87.1 standard when operating this
product.
Use the right product. Use the product for the intended purpose only.
Do not handle the product with wet hands.
Do not use the product if the switch does not turn the
product on or off. A product that cannot be controlled
with the switch is dangerous and must be repaired.
Avoid accidental starting; never carry the product with
your finger on the trigger.
Stay alert and pay attention to what you are doing.
Use common sense when using this product.
Do not force the product. It will do a better job with
less likelihood of a risk of injury when you operate it
at the rate for which it was designed.
Use the product for cutting grass and light weeds
only. Do not use for any other purpose.
Before starting the product, position it so that the line
does not come in contact with anything you do not
intend to cut.
Keep the grass deflector in place at all times while
operating the product. The product may overheat
without the grass deflector in place.
Stop the product immediately, unplug it, and check for
damage if you strike or become entangled with
foreign objects. Do not operate the product before
having any damage repaired.
Keep hands away from the cutting line. Do not
attempt to remove cut material or to hold material to
be cut when the line is moving. Be sure the unplug
the product and the release the trigger when clearing
jammed material from the line. Do not grasp the line
when picking up or holding the product.
Be cautious after turning off the product. The line
coasts after turning off the product.
Disconnect the product from the power supply when it
is not in use, before servicing, and when changing
accessories.
SPECIFIC TRIMMER SAFETY RULES
Replace the trimmer head if cracked, chipped, or
damaged in any way. Be sure the trimmer head is
properly installed and securely fastened.
Make sure all guards, straps, deflectors, and handles
are properly and securely attached.
Use only the manufacturer’s replacement line in the
trimmer head.
Never operate the product without the grass deflector
in place and in good condition.
Maintain a firm grip on both handles while trimming.
Keep the trimmer head below waist level. Never cut
with the trimmer head over 30 in. (76 cm) or more
above the ground.
ELECTRICAL SAFETY RULES
Make sure the cord is located so that it will not be
stepped on, tripped over, or otherwise subjected to
damage or stress.
Do not abuse the power cord. Never carry the product
by the cord. Never yank the plug out of the receptacle. Keep the cord away from heat, oil, and sharp
edges.
Page 3
SAFETY
To reduce the risk of electrical shock, use only roundjacketed extension cords approved for outdoor use,
such as cords of type SW-A, SOW-A, STW-A,
STOW-A, SJOW-A, SJTW-W, or SJTOW-A. Since
this tool is double insulated, you may use a 2-wire
extension cord (an extension cord without a ground).
However, you may also use a 3-wire extension cord
(an extension cord with a ground) that has a NEMAtype connector (parallel blade, U ground). Extension
cords are available from your local retailer.
Be sure to use a cord that is heavy enough to carry
the current that your product will draw. The correct
cord size depends on cord length and amperage
rating (see figures below). An undersized cord set will
cause a drop in line voltage resulting in loss of power
and overheating. Use of an improper extension cord
could result in a risk of fire and electric shock. If an
extension cord must be used, make sure:
a. That pins on plug of extension cord are the same
number, size and shape as those on the plug on the
charger.
b. That the extension cord is properly wired and in
good electrical condition; and
c. That the wire size is large enough for the AC
ampere rating of the product as specified below:
Cord Length (Feet) 25'
50'
100'
Cord Size (AWG)
16
14
12
Note: AWG = American Wire Gage
To reduce the risk of electrical shock, this product has
a polarized plug (one blade is wider than the other)
and requires the use of a polarized extension cord.
This product’s plug fits into a polarized extension cord
in only one way. If the plug does not fit fully into the
extension cord, reverse the plug. If the plug still does
not fit, obtain a correct polarized extension cord. Use
of a polarized extension cord requires use of a
polarized wall outlet. This product’s plug fits into a
polarized wall outlet in only one way. If the plug does
not fit fully into the wall outlet, reverse the plug. If the
plug still does not fit, contact a qualified electrician to
install the proper wall outlet. Do not change the
product plug, the extension cord receptacle, or the
extension cord plug in any way.
Ground Fault Circuit Interrupter (GFCI) protection
should be provided on the circuits(s) or outlet(s) used
for this product. Receptacles with built-in GFCI
protection are available and may be used.
Inspect extension cords for deterioration, cuts, or
cracks in the insulation. Repair or replace the cords if
any defects appear.
A nameplate on the product indicates the unit’s
voltage. Never connect the product to an AC voltage
that differs from this voltage.
MAINTENANCE RULES
Maintain the product with care. Follow instructions for
changing accessories. Keep the product dry, clean,
and free from oil and grease.
Release the trigger, allow the motor to stop, and
unplug the product before making adjustments or
repairs.
Do not use the product if parts have been damaged.
Check the product to make sure that it will operate
properly and perform the intended function. Check for
alignment of moving parts, binding of moving parts,
breakage of parts, and any other condition that may
affect the unit’s operation. Inspect the unit’s power
connection. Any part that is damaged should be
properly repaired or replaced by a Homelite authorized service center.
Keep the product clean of grass clippings and other
materials that may become lodged in the cutting lines.
Never douse or squirt the product with water or any
other liquid. Keep handles dry, clean and free from
debris. After each use, clean with a soft, dry cloth.
SERVICE RULES
Service on this product must be performed by qualified repair personnel only. Service or maintenance
performed by unqualified personnel could result in
injury to the user or damage to the product. Such
service may also void your warranty.
Use only identical replacement parts when servicing
the product. Follow the instructions in the Maintenance section of this manual. Use of unauthorized
parts or failure to follow maintenance instructions may
create a risk of shock, serious injury to the user, or
damage to the product. Such use may also void your
warranty.
STORAGE AND TRANSPORTATION RULES
Stop the motor when you are waiting to cut or when
you are walking from one cutting location to another.
Store the product inside in a dry place. Store the
product up high or lock it up to prevent unauthorized
use or damage. Keep the product out of the reach of
children.
Secure the product when transporting it.
Save these instructions. Refer to them frequently
and use them to instruct others who may use this
product. If you loan someone this product, loan these
instructions also.
Page 4
SYMBOLS
Some of the following symbols may be used on your tool. Please study them and learn their meaning. Proper
interpretation of these symbols will allow you to operate the tool more safely and effectively.
SYMBOL
NAME
EXPLANATION
Safety Alert
Indicates danger, warning or caution. Attention is
required to avoid serious personal injury. May be
used in conjunction with other symbols or
pictographs.
Ricochet
Thrown objects can cause severe injury. Wear
protective clothing and boots.
Eye Protection
Thrown objects can cause severe eye injury. Wear
eye protection marked to comply with ANSI Z87.1
when operating this product.
Bystanders Alert
Keep all bystanders, especially children and pets,
at least 50 feet (15 m) from the operating area.
No Blade
Do not install any type of blade on this product.
Class II Construction
Double-insulated construction
Read Operator’s Manual
Read the operator’s manual before starting or
operating this product. Failure to follow operating
instructions and safety precautions in the
operator’s manual can result in serious injury.
The purpose of safety symbols is to attract your attention to possible dangers. The safety symbols, and the
explanations with them, deserve your careful attention and understanding. The safety warnings do not by
themselves eliminate any danger. The instructions or warnings they give are not substitutes for proper accident
prevention measures.
SYMBOL
MEANING
DANGER: Indicates an imminently hazardous situation, which, if not avoided, will result in death or
serious injury.
WARNING: Indicates a potentially hazardous situation, which, if not avoided, could result in serious injury.
CAUTION: Indicates a potentially hazardous situation, which, if not avoided, may result in minor or
moderate injury. It may also be used to alert against unsafe practices that may cause property damage.
NOTE:
Advises you of additional information concerning the operation or maintenance of the equipment.
SAVE THESE INSTRUCTIONS
Page 5
SPECIFICATIONS
MOTOR
Motor Type ......................................................................................................................................................... 120 V AC
Operating RPM ......................................................................................................................................................... 7500
Amperage .............................................................................................................................................................. 6 amps
DRIVE SHAFT AND CUTTING HEAD
Drive Shaft ............................................................................................................................................. 1/4 in. Flex Shaft
Cutting Head ...................................................................................................................................... Bump Line Release
Cutting Path Diameter .............................................................................................................................. 15 in. (381 mm)
Drive Shaft Housing ................................................................................................................................. Aluminum Tube
Cutting Line Diameter ............................................................................................................................... .080 in. (2 mm)
UNPACKING
INFORMATION
PACKING LIST
Upper shaft (Power head) (1)
Attachment shaft (Cutting head) (1)
Front Handle (1)
Carriage bolt - 6 mm x 50.0 mm (1)
Flat washer - 6 mm (1)
Wing nut - 6 mm (1)
Grass deflector (1)
Wing nut - 1/4 in. (1)
Flat washer - 1/4 in. (1)
Lock washer - 1/4 in. (1)
Hex bolt - 1/4 in. x 2 in. (1)
Operator’s manual
Carefully remove the parts from the box.
Inspect the parts carefully to make sure no breakage
or damage occurred during shipping.
Do not discard the packing material until you have
carefully inspected and satisfactorily operated the
product.
If any parts are damaged or missing, please call
1-800-242-4672 for assistance.
WARNING
If any parts are missing, replace them before operating the product. Failure to do so could result in
serious personal injury.
Page 6
FEATURES
TOP-MOUNTED MOTOR
GRASS DEFLECTOR
The top-mounted motor improves balance and is
located away from the dust and debris of the cutting
area.
The trimmer includes a grass deflector that helps
protect you from flying debris.
CORD RETAINER
The cord retainer helps prevent accidental unplugging
of the extension cord.
ERGONOMIC DESIGN
The design of the trimmer provides for easy handling. It
is designed for comfort and ease of grasp when
operating in different positions and at different angles.
DUAL LINE
WARNING:
The dual line permits more efficient and aggressive
cutting.
Do not attempt to modify this product or create
accessories not recommended for use with this
product. Any such alteration or modification is misuse
and could result in a hazardous condition leading to
serious personal injury.
EZ LINE™ TAP ADVANCE SYSTEM
The EZ Line™ Tap Advance System allows easy line
advance during trimmer operation.
MOTOR
HOUSING
TRIGGER
HANDLE
FRONT
HANDLE
TRIGGER
CORD
RETAINER
CORD
BEND
RELIEF
DUAL
LINE
GRASS
DEFLECTOR
Page 7
Fig. 1
ASSEMBLY
CONNECTING THE ATTACHMENT TO THE
UPPER SHAFT
See Figure 2.
The coupler connects the attachment to the upper shaft.
Follow these steps to connect the attachment to the
upper shaft.
Loosen the knob by turning it counterclockwise.
Remove the end cap from the attachment shaft.
Align the button with the guide recess on the upper
shaft.
Slide the attachment shaft into the upper shaft until
the attachment shaft clicks into place.
NOTE: If the button does not release completely in
the positioning hole, the shafts are not locked.
Slightly rotate the attachment shaft until the button is
locked into place.
Tighten the locking knob securely by turning it
clockwise.
NOTE: During operation, periodically check the knob
and tighten as necessary.
COUPLER
GUIDE
RECESS
UPPER
SHAFT
BUTTON
POSITIONING
HOLE
ATTACHMENT
SHAFT
Fig. 2
REMOVING THE ATTACHMENT FROM THE
UPPER SHAFT
See Figure 2.
Disconnect the upper shaft and attachment shaft for
storage or when a job calls for a different attachment.
Follow these steps to remove the attachment from the
upper shaft.
Release the trigger and allow the trimmer to coast to
a stop.
Unplug the trimmer.
Loosen the locking knob by turning it counterclockwise.
Push the button, while pulling out the attachment.
ATTACHING THE FRONT HANDLE
See Figure 3
Follow these steps to attach the front handle.
Press the front handle onto the upper shaft so that
the handle is angled toward the trigger handle.
Place the front handle along the upper shaft to a
position that allows for comfortable operation.
Slide the bolt through the holes in the front handle.
Slide the washer onto the bolt.
Place the wing nut onto the bolt and tighten the wing
nut securely.
Page 8
KNOB
FRONT
HANDLE
BOLT
WASHER
WING NUT
Fig. 3
ASSEMBLY
ATTACHING THE GRASS DEFLECTOR
WING
NUT
GRASS
DEFLECTOR
See Figure 4.
WASHER
WARNING:
The line cutting blade on the grass deflector is sharp.
Avoid contact with the blade. Failure to avoid contact
can result in serious personal injury.
Follow these steps to attach the grass deflector.
Slide the grass deflector onto the attachment shaft
and fit it over the bracket.
Install the bolt through the holes in the tabs on the
grass deflector and the slots in the bracket on the
attachment shaft.
Install the flat washer, the lock washer, and the wing
nut.
Tighten the wing nut securely.
Remove the protective packaging from the line
cutting blade.
LOCK
WASHER
BOLT
CUT OFF
BLADE
Fig. 4
EXTENSION CORD RETAINER
An extension cord retainer is located on the bottom
of the trimmer. This provides strain relief for the
cord, preventing unwanted disconnects.
Note: To reduce the disconnection of the power
cord from the extension cord during operation, use
the extension cord retainer described below.
METHOD OF SECURING EXTENSION CORD
Use the extension cord retainer when you connect
the extension cord to the power cord to prevent
disconnection. Use only an outdoor approved
extension cord as indicated by the letters “W-A” on
the cord’s jacket.
Loop the extension cord through the extension
cord retainer slot located on the bottom end of
the trimmer. See Figure 5.
Pull loop of extension cord around tongue and
pull tight. See Figure 6.
Attach extension cord to plug on trimmer. See
Figure 6.
Fig. 5
WARNING:
The product may throw objects during operation,
causing injury to the operator or to bystanders.
Always wear suitable eye protection, boots, gloves,
and long, heavy pants while operating the product.
CORD
RETAINER
Fig. 6
Page 9
OPERATION
WARNING:
The product may throw objects during operation,
causing injury to the operator or to bystanders.
Always wear suitable eye protection, boots, gloves,
and long, heavy pants while operating the product.
STARTING AND STOPPING THE TRIMMER
See Figure 7.
To start the trimmer: Press the trigger.
To stop the trimmer: Release the trigger.
OPERATING THE TRIMMER
See Figure 8.
Follow these steps to operate the trimmer.
Plug the trimmer cord into an extension cord approved for outdoor use. Refer to “Electrical Safety
Rules ” earlier in this manual.
Hold the trimmer with your right hand on the trigger
handle and your left hand on the front handle.
NOTE: Keep a firm grip with both hands during
operation.
Place the trimmer on the right side of your body with
the engine behind and away from your body.
Press the trigger to start the trimmer.
Trim grass and weeds in a right-to-left motion with
the line parallel to the ground.
TRIGGER
Fig.7
CUTTING TIPS
Inspect and clear the area to be trimmed for any
rocks, broken glass, or wire that could be thrown or
become entangled in the cutting line.
Trim only when grass or weeds are dry.
Keep the cutting line parallel to the ground.
Cut grass or weeds over eight inches tall from the
top to the bottom in small amounts. This will prevent
grass becoming wrapped around the trimmer head
assembly, which may result in damage due to
overheating. If grass becomes wrapped around the
trimmer head assembly, stop the trimmer, unplug it,
and remove the grass.
Move the trimmer slowly in and out of the area you
are cutting, keeping the trimmer at the desired
cutting height.
Use the tip of the line to do the cutting. Do not force
the trimmer head assembly into uncut grass.
Feed out some line after each use to prevent the line
from retracting into the cutting head.
Page 10
Fig. 8
OPERATION
The tip of the cutting line will wear during use; this
reduces the cutting swath. If the line is not advanced
occasionally, it will wear down to the eyelet. When
the trimmer stops, the line tends to relax and may
retract into the trimmer head assembly. Should this
occur, unplug the trimmer, remove the spool, refeed
the line through the eyelets, and reassemble the
spool.
Avoid hitting objects with the line, such as chain-link
fences or concrete, as this causes rapid wear.
Never drag the trimmer head assembly on the
ground while trimming.
RETAINING
CAP
ADVANCING THE CUTTING LINE AUTOMATICALLY
See Figure 9.
The trimmer includes the EZ Line™ Tap Advance
System.
Follow these steps to advance the cutting line
automatically.
Press the trigger.
Tap the retaining cap lightly on the ground while the
motor is running. Do not hold the retaining cap on
the ground.
NOTE: The line cutting blade on the grass deflector
will cut the line to the proper length.
NOTE: To help prevent line tangle, tap only once to
lengthen the line. If additional line is required, wait a
few seconds before retapping the retaining cap.
Keep the line length at or near full cutting diameter.
ADVANCING THE CUTTING LINE
MANUALLY
Fig. 9
LINE
RETAINING
CAP
Fig. 10
See Figure 10.
If the cutting line wears to less than the recommended
length, you may not be able to lengthen it by tapping the
retaining cap.
Follow these steps to advance the cutting line manually.
Release the trigger and allow the trimmer to coast to
a stop.
Unplug the trimmer.
Pull sharply on the line while pushing down on the
retaining cap.
Page 11
OPERATION
CUT OFF BLADE
This trimmer is equipped with a cut-off blade on the
grass deflector. For best cutting, advance string until it is
trimmed to length by the cut-off blade. Advance string
whenever you hear the engine running faster than
normal. This will maintain best performance and keep
string long enough to advance properly.
CUTTING TIPS
See Figure 11.
Keep the trimmer tilted toward the area being cut;
this is the best cutting area.
Do not cut in dangerous cutting area.
Use the tip of string to do the cutting; do not force
string head into uncut grass.
Wire and picket fences cause extra string wear,
even breakage. Stone and brick walls, curbs, and
wood may wear string rapidly.
Avoid trees and shrubs. Tree bark, wood moldings,
siding, and fence posts can easily be damaged by
the string.
DANGEROUS CUTTING
AREA
GRASS DEFLECTOR LINE TRIMMING CUTOFF BLADE
BEST CUTTING
AREA
Fig. 11
See Figure 12.
This trimmer is equipped with a line trimming cut-off
blade on the grass deflector. For best cutting, advance
string until it is trimmed to length by the cut-off blade.
Advance string whenever you hear the engine running
faster than normal. This will maintain best performance
and keep string long enough to advance properly.
CUT-OFF
BLADE
Fig. 12
Page 12
MAINTENANCE
WARNING:
Use only identical Homelite replacement parts when
servicing this product. Use of any other parts may
create a hazard or cause product damage.
CLEANING THE TRIMMER
Release the trigger, allow the trimmer to coast to a stop,
and unplug the trimmer before cleaning.
Clean the exterior of the trimmer with a soft, dry
cloth.
Avoid using solvents when cleaning plastic parts.
Most plastics are susceptible to damage from
various types of commercial solvents and may be
damaged by their use.
Wipe or scrape the trimmer head and spool area
when they accumulate dirt or clippings.
Scrape or brush debris away from air intake vents on
the motor housing.
Fig. 13
SERVICING THE TRIMMER
Check all fasteners and tighten as necessary. If any
part is damaged or lost, repair it or replace it.
Any other service should be performed at a Homelite
Authorized Service Dealer.
UPPER AREA
REPLACING THE CUTTING LINE
See Figures 13, 13a and 13b.
WARNING:
Use of line other than the original .080 in. monofilament cutting line could cause serious personal injury
or damage to the trimmer.
Follow these steps to replace the cutting line.
Release the trigger and allow the trimmer to coast to
a stop.
Unplug the trimmer.
WARNING:
LOWER AREA
Fig. 13a
TRIMMER
HEAD
Make sure the trimmer head stops rotating when you
release the trigger. Contact with a rotating trimmer
head could cause personal injury.
SPOOL
Remove the retaining cap by turning it counterclockwise.
Remove the empty spool.
Clean the trimmer head thoroughly. Inspect the
trimmer head for any damaged or worn parts.
Cut two pieces of line approximately 9 ft. (2.7 m)
long.
Page 13
RETAINING
CAP
Fig. 13b
MAINTENANCE
Insert the end of the new line into the hole in the
upper threaded area of the spool.
Wind the line counterclockwise around the spool
following arrows on spool. Do not overfill.
NOTE: After winding the line, there should be about
6 in. (152 mm) between the wound line and the
outside edge of the spool.
Secure the line temporarily by pushing it into one of
the slotted tabs on the spool.
Repeat the process for the lower threaded area of
the spool, winding the line clockwise and securing it
in the slotted tab opposite the first secured line.
Insert the lines into the eyelets in the trimmer head.
Place the spool on the drive shaft.
NOTE: To install the spool, you may need to rotate it
slightly.
NOTE: If the line should tangle or break at the
eyelets, remove the spool, refeed the line through
the eyelets, and reassemble the spool on the
trimmer.
Release the lines from the tabs by sharply pulling
each line while pushing down on the spool.
Push down on the spool to reveal the threads on the
drive shaft.
Place the retaining cap on the threads inside the
drive shaft.
Secure the retaining cap by turning it clockwise.
DRIVE
SHAFT
TRIMMER
HEAD
SPOOL
Fig. 14
WARNING:
An improperly installed retaining cap or spool could
fly off the trimmer. Contact with a thrown retaining
cap or spool could cause personal injury.
REPLACING THE SPOOL
See Figure 14.
The spool may wear during normal use of the line
advance feature and may require occasional
replacement. Replacement spools are available through
your local retailer.
Release the trigger.
Unplug the trimmer.
WARNING:
Make sure the trimmer head stops rotating. Contact
with a rotating trimmer head could cause personal
injury.
Remove the retaining cap by turning it counterclockwise.
Remove the empty spool.
Page 14
Clean the trimmer head thoroughly. Inspect the
trimmer head for any damaged or worn parts.
Hold the spool so that its tabbed side is positioned
upward.
NOTE: On the new spool, the ends of the lines are
secured in slots on tabs. Release the line from the
tabs, unwind approximately six inches of line, and
re-secure the lines in the tabs.
Insert the lines on the new spool into the eyelets in
the trimmer head.
Place the spool on the drive shaft.
NOTE: To install the spool, you may need to rotate it
slightly.
NOTE: If the line should tangle or break at the
eyelets, remove the spool, refeed the line through
the eyelets, and reassemble the spool on the
trimmer.
Release the lines from the tabs by sharply pulling
each line while pushing down on the spool.
Push down on the spool to reveal the drive shaft.
Place the retaining cap on the drive shaft.
Secure the retaining cap by turning it clockwise.
TROUBLESHOOTING
PROBLEM
POSSIBLE CAUSE
SOLUTION
Line will not advance when tap 1. Line is welded to itself.
retaining cap
2. Not enough line on spool.
3. Line is worn too short.
4. Line is tangled on spool.
1. Lubricate with Homelite silicone spray.
2. Install more line (Refer to “Replacing the
Cutting Line” earlier in this manual).
3. Pull lines while alternately pressing down
on and releasing spool retainer.
4. Remove line from spool and rewind (Refer
to “Replacing the Cutting Line” earlier in
this manual).
Retaining cap is hard to turn
Screw threads are dirty or damaged.
Clean threads and lubricate with grease. If no
improvement, replace spool retainer.
Grass wraps around the
attachment shaft and the
trimmer head assembly
Cutting tall grass at ground level.
Cut tall grass from the top down.
Page 15
ACCESSORIES
REPLACEMENT PARTS
String Head (RH Thread) .080 in. (2 mm) ...................................................................................................... DA03001A
Spool & Line .080 in. (2 mm) ............................................................................................................................ UP00145
String Refill .080 in. (2 mm); 390 ft. (118 mm) ....................................................................................................D06511
String Refill .080 in. (2 mm); 50 ft. (15 mm) ..................................................................................................... D06509A
Retaining Cap (RH thread) ............................................................................................................................. DA98866A
Retaining Cap (Power Care™) ......................................................................................................................... AP04106
OPTIONAL ATTACHMENTS
Expand-It Tiller Attachment ............................................................................................................................ UT15550A
Expand-It Edger Attachment ......................................................................................................................... UT15518D
UT15518D
UT15550A
WARNING:
The use of attachments or accessories not listed above could result in serious personal injury.
Page 16
WARRANTY
LIMITED WARRANTY STATEMENT
Homelite Consumer Product, Inc. warrants to the original
retail purchaser that this HOMELITE product is free from defect
in material and workmanship and agrees to repair or replace,
at Homelite Consumer Products, Inc.'s discretion, any defective
product free of charge within these time periods from the date
of purchase.
Two years if the product is used for personal, family or
household use;
90 days, if any of the above products are used for product
used for any other purpose, such as commercial or rental.
This warranty extends to the original retail purchaser only and
commences on the date of the original retial purchase.
Any part of the HOMELITE product manufactured or supplied
by HOMELITE and found in the reasonable judgment of
HOMELITE to be defective in material or workmanship will be
repaired or replaced by an authorized HOMELITE service
dealer without charge for parts and labor.
The HOMELITE product including any defective part must be
returned to an authorized service dealer within the warranty
period. The expense of delivering the HOMELITE product to
the dealer for warranty work and the expense of returning it
back to the owner after repair or replacement will be paid for by
the owner. HOMELITE'S responsibility in respect to claims is
limited to making the required repairs or replacements and no
claim of breach of warranty shall be cause for cancellation or
rescission of the contract of sale of any HOMELITE product.
Proof of purchase will be required by the dealer to substantiate
any warranty claim. All warranty work must be performed by an
authorized HOMELITE service dealer.
This warranty is limited to ninety (90) days from the date of
original retail purchase for any HOMELITE product that is used
for rental or commercial purposes, or any other incomeproducing purpose.
This warranty does not cover any HOMELITE product that has
been subject to misuse, neglect, negligence, or accident, or
that has been operated in any way contrary to the operating
instructions as specified in the HOMELITE operator's manual.
This warranty does not apply to any damage to the HOMELITE
product that is the result of improper maintenance or to any
HOMELITE product that has been altered or modified so as to
adversely affect the products operation, performance or
durability or that has been altered or modified so as to change
its intended use. The warranty does not extend to repairs made
necessary by normal wear or by the use of parts or accessories which are either incompatible with the HOMELITE product
or adversely affect its operation, performance or durability.
In addition, this warranty does not cover:
A. Tune-ups – Spark Plugs, Carburetor Adjustments, Filters
B. Wear items – Bump Knobs, Outer Spools, Cutting Lines,
Inner Reels, Starter Pulley, Starter Ropes, Drive Belts
HOMELITE reserves the right to change or improve the design of
any HOMELITE product without assuming any obligation to
modify any product previously manufactured.
ALL IMPLIED WARRANTIES ARE LIMITED IN DURATION
TO THE STATED WARRANTY PERIOD. ACCORDINGLY,
ANY SUCH IMPLIED WARRANTIES INCLUDING MERCHANTABILITY, FITNESS FOR A PARTICULAR PURPOSE,
OR OTHERWISE, ARE DISCLAIMED IN THEIR ENTIRETY
AFTER THE EXPIRATION OF THE APPROPRIATE TWOYEAR, ONE-YEAR, OR NINETY DAY WARRANTY PERIOD.
HOMELITE'S OBLIGATION UNDER THIS WARRANTY IS
STRICTLY AND EXCLUSIVELY LIMITED TO THE REPAIR
OR REPLACEMENT OF DEFECTIVE PARTS AND
HOMELITE DOES NOT ASSUME OR AUTHORIZE ANYONE
TO ASSUME FOR THEM ANY OTHER OBLIGATION. SOME
STATES DO NOT ALLOW LIMITATIONS ON HOW LONG
AN IMPLIED WARRANTY LASTS, SO THE ABOVE LIMITATION MAY NOT APPLY TO YOU.
HOMELITE ASSUMES NO RESPONSIBILITY FOR INCIDENTAL, CONSEQUENTIAL OR OTHER DAMAGES INCLUDING, BUT NO LIMITED TO EXPENSE OF RETURNING THE
HOMELITE PRODUCT TO AN AUTHORIZED SERVICE
DEALER AND EXPENSE OF DELIVERING IT BACK TO THE
OWNER, MECHANIC'S TRAVEL TIME, TELEPHONE OR
TELEGRAM CHARGES, RENTAL OF A LIKE PRODUCT
DURING THE TIME WARRANTY SERVICE IS BEING
PERFORMED, TRAVEL, LOSS OR DAMAGE TO PERSONAL PROPERLY, LOSS OF REVENUE, LOSS OF USE
OF THE PRODUCT, LOSS OF TIME, OR INCONVENIENCE,
SOME STATES DO NOT ALLOW THE EXCLUSION OR
LIMITATION OF INCIDENTAL OR CONSEQUENTIAL
DAMAGES, SO THE ABOVE LIMITATION OR EXCLUSION
MAY NOT APPLY TO YOU.
This warranty gives you specific legal rights, and you may also
have other rights which vary from state to state.
This warranty applies to all HOMELITE products manufactured
by HOMELITE and sold in the United States and Canada.
To locate your nearest service dealer, dial 1-800-242-4672 or
log on to our website at www.homelite.com.
Page 17
OPERATOR'S MANUAL
VersaLite™ Electric String Trimmer
UT41002A
CUSTOMER SERVICE INFORMATION
For parts or service, contact your nearest Homelite authorized service dealer. Be sure to provide all
relevant information when you call or visit. For the location of the authorized service dealer nearest you,
please call 1-800-chainsaw (1-800-242-4672) or visit us online at www.homelite.com.
The model number of this tool is found on a plate attached to the motor housing. Please record the
serial number in the space provided below. When ordering repair parts, always give the following
information:
Model No.
UT41002A
Serial No.
HOMELITE CONSUMER PRODUCTS, INC.
1428 Pearman Dairy Road Anderson, SC 29625
Post Office Box 1207, Anderson, SC 29622
Phone 1-800-chainsaw (1-800-242-4672)
www.homelite.com
983000-252
10-03