1
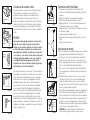
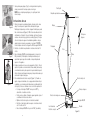
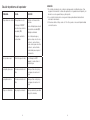
Garantía limitada por dos años
HoMedics vende sus productos con la intención de que no tengan defectos de fabricación ni de mano
de obra por un plazo de dos años a partir de la fecha de compra original, con las siguientes excepciones.
HoMedics garantiza que sus productos no tendrán defectos de material ni de mano de obra bajo
condiciones de uso y servicio normales. Esta garantía se extiende únicamente a consumidores y no a
distribuidores.
Para obtener servicio para su producto HoMedics, envíe por correo el producto y su recibo de compra
fechado (como comprobante de compra), con franqueo pago, a la siguiente dirección:
Hometouch
Service Center Dept. 168
3000 Pontiac Trail
Dirección postal:
Commerce Township, MI 48390
No se aceptarán pagos contra entrega.
HoMedics no autoriza a nadie, incluyendo, pero sin limitarse a, distribuidores, posteriores consumidores
Hometouch
compradores del producto a un distribuidor, o compradores remotos, a obligar a HoMedics de forma
alguna más allá de las condiciones aquí establecidas. La garantía de este producto no cubre daños
Service Center, Dept. 168
causados por uso inadecuado o abuso, accidente, conexión de accesorios no autorizados, alteración
3000 Pontiac Trail
del producto, instalación inadecuada, reparaciones o modificaciones no autorizadas, uso inadecuado
Commerce Township, MI
de la fuente de energía/electricidad, cortes de energía, caída del producto, funcionamiento incorrecto o
daño de una pieza de funcionamiento debido al no cumplimiento del mantenimiento recomendado por
48390
el fabricante, daños durante el transporte, robo, descuido, vandalismo, condiciones climáticas, pérdida
de uso en el período durante el cual el producto está en una instalación de reparación o a la espera de
correo electrónico:
piezas o reparación, o cualquier otra condición, sin importar cual sea, que se encuentre fuera del control
[email protected] de HoMedics.
Esta garantía es válida únicamente si el producto es comprado y operado en el país en el cual se compró
el producto. Un producto que requiera modificaciones o adaptación para habilitar su funcionamiento
en cualquier país que no sea aquél para el que fue diseñado, fabricado, aprobado y/o autorizado, o la
reparación de productos dañados por estas modificaciones no están cubiertos bajo esta garantía.
Teléfono:
LA GARANTÍA AQUÍ ESTABLECIDA SERÁ LA ÚNICA Y EXCLUSIVA GARANTÍA. NO HABRÁ NINGUNA
Lunes - Viernes
OTRA GARANTÍA EXPRESA NI IMPLÍCITA, INCLUYENDO NINGUNA GARANTÍA DE COMERCIALIZACIÓN
8:30am - 5:00pm (EST)
O APTITUD NI NINGUNA OTRA OBLIGACIÓN POR PARTE DE LA COMPAÑÍA CON RESPECTO A
PRODUCTOS CUBIERTOS POR ESTA GARANTÍA. HOMEDICS NO TENDRÁ RESPONSABILIDAD
ALGUNA POR NINGÚN DAÑO INCIDENTAL, CONSECUENTE NI ESPECIAL. BAJO NINGÚN CONCEPTO
1.800.466.3342
ESTA GARANTÍA REQUERIRÁ MÁS QUE LA REPARACIÓN O CAMBIO DE ALGUNA PIEZA O PIEZAS
QUE SE HALLEN DEFECTUOSAS DENTRO DEL PERÍODO DE VIGENCIA DE ESTA GARANTÍA. NO SE
EFECTUARÁN REEMBOLSOS. SI NO HAY PIEZAS DE REPUESTO DISPONIBLES PARA LOS MATERIALES
DEFECTUOSOS, HOMEDICS SE RESERVA EL DERECHO DE REALIZAR SUSTITUCIONES EN VEZ DE
REPARAR O CAMBIAR.
Esta garantía no se extiende a la compra de productos abiertos, usados, reparados, embalados otra vez
y/o abiertos y vueltos a cerrar, incluyendo entre otras cosas la venta de dichos productos en sitios de
remate por Internet y/o la venta de dichos productos por revendedores o mayoristas. Todas y cada una
de las garantías cesarán y terminarán inmediatamente con respecto a cualquier producto o pieza del
mismo que estén reparados, cambiados, alterados o modificados sin el consentimiento previo explícito
y por escrito de HoMedics.
Esta garantía le proporciona derechos legales específicos. Es posible que usted tenga derechos
adicionales que pueden variar de un país a otro. Debido a las regulaciones de ciertos países, es posible
que algunas de las limitaciones y exclusiones no se apliquen en su caso.
Por más información con respecto a nuestra línea de productos en los EE.UU., visítenos en:
www.homedics.com
PerfectSteam®
commercial garment steamer
© 2009 HoMedics, Inc. y sus compañías afiliadas, reservados todos los derechos. HoMedics® es una marca registrada
de HoMedics, Inc. y sus compañías afiliadas. Home Touch®, PerfectSteam® y Safe Touch® son marcas registradas de
HoMedics, Inc. y sus compañías afiliadas. Reservados todos los derechos.
IB-PS250A
El manual en español
empieza a la 2página 13
Instruction Manual and
Warranty Information
PS-250
IMPORTANT SAFEGUARDS
WHEN USING ELECTRICAL PRODUCTS, ESPECIALLY WHEN
CHILDREN ARE PRESENT, BASIC SAFETY PRECAUTIONS
SHOULD ALWAYS BE FOLLOWED, INCLUDING THE
FOLLOWING:
WARNING - TO REDUCE THE RISK OF BURNS,
ELECTROCUTION, FIRE OR INJURY TO PERSONS:
• Read all instructions before using.
• To reduce the risk of contact with hot water emitting from steam vents, check appliance
before each use by holding it away from your body and operating unit.
• Use appliance only for its intended use.
• To reduce the risk of electric shock, do not immerse the appliance in water or other liquids.
• Never pull cord to disconnect from outlet; instead, grasp plug and pull to disconnect.
• Do not allow cord to touch hot surfaces. Let appliance cool completely before putting away.
Loop cord loosely around appliance when storing.
• Always disconnect appliance from electrical outlet when filling with water or emptying, and
when not in use.
• Do not operate appliance with a damaged cord, or if the appliance has been dropped or
damaged. To reduce the risk of electric shock, do not disassemble or attempt to repair the
appliance.
• Return to HoMedics Service Center for examination and repair. Incorrect reassembly or repair
could cause a risk of fire, electric shock, or injury to persons when the appliance is used.
• Close supervision is necessary for any appliance being used by or near children. Do not
leave appliance unattended while plugged in.
• Never steam a garment while it is being worn.
• Burns could occur from touching hot metal parts, hot water, or steam. Use care when you
turn a steam appliance upside down – there may be hot water in the reservoir.
• Let the unit cool for at least 30 minutes before pouring water out of the reservoir.
• Never drop or insert any object into any opening or hose.
2
• Do not use outdoors or operate where aerosol (spray) products are being used or where
oxygen is being administered.
• Surfaces of this appliance may be hot when in use. Do not let eyes or bare skin touch heated
surfaces.
• Do not place the steam nozzle directly on any surface or on the appliance power cord while it
is hot or plugged in. Use the stand provided.
• Always keep the hose and nozzle elevated above the water container.
• To reduce likelihood of circuit overload, do not operate another high wattage appliance on
the same circuit.
• Do not use an extension cord to operate the appliance. If an extension cord is absolutely
necessary, a 15 ampere rated cord should be used. Cords rated for less amperage may
overheat. Care should be taken to arrange the cord so that the cord cannot be pulled or
tripped over.
• Never pour water directly into reservoir. Pour water in water tank only.
• When changing attachments, please be sure the unit is off and no steam is being released to
avoid contact with hot water.
• Use caution when changing attachments as they may contain hot water from condensation.
Ensure the attachments are dry or cooled off to avoid contact with hot water.
SAVE THESE INSTRUCTIONS
3
Grounding Instructions
Grounding Pin
Figure A
This product must be grounded. If it should malfunction or
breakdown, grounding provides a path of least resistance for the
electric current to reduce the risk of electric shock. This product is
equipped with a cord having an equipment grounding conductor and
a grounding plug. The plug must be plugged into an appropriate
outlet that is properly installed and grounded in accordance with all
local codes and ordinances.
DANGER
Adapter
Tab for
Grounding
Screw
Figure B
Grounded
Outlet
Figure C
Metal Screw
Figure D
Improper connection of the equipment-grounding conductor
can result in a risk of electric shock. Check with a qualified
electrician or serviceman if you are in doubt as to whether
the product is properly grounded. Do not modify the plug
provided with the product - if it will not fit the outlet, you may
temporarily use an adapter (such as the one shown in Figure
B) until you have a proper outlet (such as the one shown in
Figure C) installed by a qualified electrician.
Perfect Steam Features
Pole
Turn
Figure 1
Hanger
Attachment
Safe for use on all types of fabrics
Quick heat-up feature emits steam in 45 seconds
Convenient integrated garment hanger
Telescoping design for compact storage
5 foot flexible hose with Safe Touch® hose cover for safe and
comfortable handling
• Easy-fill water tank provides 45 minutes of continuous steam
• Rolling casters for excellent mobility
• Low water auto shut-off for safe use
Assembly Instructions
Clips
Figure 2
This product is for use on a nominal 120-volt circuit, and has a
grounding plug that looks like the plug illustrated in Figure A.
A temporary adapter that looks like the adapter illustrated in Figure B
may be used to connect this plug to a 2-pole receptacle as shown in
Figure D if a properly grounded outlet is not available. The temporary
adapter should be used only until a properly grounded outlet Figure
C can be installed by a qualified electrician. The tab for grounding
screw Figure B extending from the adapter must be connected to a
permanent ground such as a properly grounded outlet box cover.
Whenever the adapter is used, it must be held in place by a metal
screw. See Figures D and E.
Fabric
Brush
Figure 3
Turn
Figure 4
Crease
Clamp
Figure E
•
•
•
•
•
Nozzle
Tab
1 Carefully remove all contents from packaging and inspect the
product to make sure all components have been received
(Fig. 10).
2. Insert pole into top of unit. Match the grooves on the pole with the
notches in the pole connector and push down. Securely tighten
the nut on the pole over the connector by turning it clockwise
(Fig 1).
3. To attach the hanger attachment, align tabs in hanger attachment
with grooves on pole and push down (Fig. 2).
4. Fully extend the telescopic pole. To do so, open the 3 clips on the
pole and pull the pole upwards (Fig. 2). When fully extended close
the clips. Make sure that the pole is securely locked into place
and cannot be pushed downward.
5. Attach the fabric brush to the nozzle by setting into place (Fig. 3).
6. Attach handle & hose assembly to unit. Line up the nut on the
hose with the screw on the hose connector. Turn nut clockwise
until it is securely tightened on the hose connector, (Fig 4). It
should be tightly screwed into place. Then you may hang the
steamer handle onto the hanger attachment (Fig. 3).
NOTE: Do not hang the hose on the hanger attachment until after
it has been connected to the base to prevent the hose from falling
on you.
7. Attach the crease clamp (Fig. 5) onto the nozzle tab and gently
push into place.
NOTE: Do not use the crease clamp and the fabric brush at the
same time
Figure 5
4
5
Instructions for Use
Figure 6
Figure 7
Figure 8
1. Remove the water tank from the unit by grasping the handle and
turning upside down. Unscrew the cap from the bottom of the water
tank. Hold the tank under cold running water and fill to the desired
level (Fig. 6). DO NOT fill past the 45 min. fill line. When you have
finished filling the tank screw the cap back on and turn over (Fig. 7).
Place water tank back into unit and make sure it is sitting properly &
securely in the cavity.
NOTE: Only fill the water tank with cold water, DO NOT use HOT
water.
2. Plug the steamer cord into a 120V AC electrical outlet.
3. Turn the On/Off switch to the On position. The switch will light
to indicate that the garment steamer is on. Steam will emit in 45
seconds from the nozzle.
4. Hang the garment onto the hanger attachment (Fig 8). Steam the
garment in an up/down motion starting from the top of the garment
to the bottom. Always keep the hose and nozzle elevated above the
water container.
5. This unit has a reset button (Fig. 10). When the unit runs out of
water it will automatically shut-off to ensure safe use and the red
indicator light will come on above the reset button. If you wish to
continue your steaming session:
• Turn On/Off switch to “Off” position and unplug the power cord
• Remove and refill water tank by following Step 1 under
Instructions for Use
• Plug the steamer cord into a 120V AC electrical outlet.
• Push the reset button on side of unit
• Turn On/Off switch to “On” position
6. When you are finished with your steaming session place the On/Off
switch in the Off position and remove the plug from the outlet.
NOTE: Be cautious when handling until steamer has fully cooled.
Fabric Brush
Steamer Nozzle
Hanger Attachment
Handle
Crease
Clamp
Hose
Pole
Clips
Pole Connector
Hose Connector
Water Tank
Indicator Light
Reset Button
On/Off Switch
Casters
Figure 10
6
7
Using Attachments
NOTE: When installing or changing attachments, be sure the unit is off, unplugged, and no
steam is being released to avoid contact with hot water.
1. Fabric Brush
Helps open the fabric for greater steam penetration.
- Attach the fabric brush onto the steam nozzle (Fig. 3).
- Move the fabric brush in a downward motion from top to bottom gently brushing the fabric.
2. Crease Clamp
Helps create a straight crease
- Attach the crease clamp to the steam nozzle (Fig. 5).
- Push the trigger to open the crease clamp.
- Place the garment between the crease clamp and steam nozzle.
- Release the trigger.
- Move the crease clamp in a downward motion from top to bottom to set a crease.
Cleaning and Maintenance
1. Be sure the steamer is turned off and unplugged.
2. Allow the steamer to cool for at least 30 minutes.
3. Empty any excess water from the water tank and allow it to air dry before replacing the cap
and setting it back in the unit.
4. Empty excess water from the reservoir by tipping unit over a sink.
Storing
1. Open the 3 clips (Fig. 2) on the telescopic pole and glide it slowly to
collapse being careful not to pinch your fingers. When it is all the way down
close the 3 clips back into place.
2. Coil the hose and place on the hanger attachment (Fig. 9)
3. Store in a cool, dry place.
Removing Mineral Buildup
One common problem with steamers is mineral buildup caused by the high mineral content
in many municipal water supplies. Mineral residue inside of the internal pipes and heater can
cause intermittent steaming or in severe cases no steaming at all.
The best way to avoid this is to use de-mineralized or distilled water in the unit. The procedure
below can be used to clear mineral buildup. If you are unable to use de-mineralized or distilled
water we recommend you use this procedure every 30 hours of operation to help avoid mineral
buildup.
1. Turn the unit off and unplug the power cord.
2. Unscrew and remove the hose from the hose connector on the top of the unit.
3. Remove the pole from the unit.
4. Remove the water tank from the main unit and drain any water in the unit over a sink.
5. Make a mixture of 4 oz. white vinegar and 4 oz. water. In most cases 1 cup of this mixture will
be sufficient.
6. Slowly pour the water-vinegar mixture into the hose connector (Fig. 11).
a. If the internal piping is only partially blocked by mineral buildup, the water-vinegar mixture
will soon start flowing out of the water intake hole. If this happens proceed to step 8.
b. If the internal piping is completely blocked, continue to pour the mixture into the hose
connector until full.
7. Pour the water-vinegar mixture into the water intake hole until full.
8. Let stand for 40 minutes.
9. Drain the water-vinegar mixture from hose connector or the reservoir by tipping the unit over a
10. sink.
Pour clean water through the hose connector and water intake hole until the vinegar smell
11. dissipates.
12.
Drain the residual water from hose connector or the reservoir by tipping the unit over a sink.
Reassemble the unit and operate normally.
If the procedure above does not return the unit to normal operation, the unit may need servicing.
Figure 9
Water Intake
Hole
Hose
Connector
Figure 11
8
9
Trouble Shooting the Steamer
PROBLEM
CAUSE
SOLUTION
Steamer fails to heat
Steamer not plugged in
Plug in to electrical outlet
ON/OFF switch not in
“ON” position
Push switch to “ON”
position. Switch will
illuminate.
Auto shut off engaged
Check water container to
ensure it is not empty. If
full, press the reset button
on side of unit. If empty,
refill and push reset to
begin.
No steam
Water level is low
Turn ON/OFF switch OFF
and refill water container
Water drips from nozzle
Condensation in hose
Hold the hose vertically
and allow water to drain
back into tank
Nozzle gurgles
Condensation in hose
Hold the hose vertically
and allow water to drain
back into tank
Steam is intermittent
Mineral build-up
Follow the procedure for
removing mineral build-up
10
NOTE:
1. Water mineral content and conditions will vary in different areas. To insure continued
operation of the steamer, never store without cleaning and removing excess water from the
reservoir and water container.
2. If the reset light comes on with water in the tank you probably need to remove mineral buildup.
3. In areas where the voltage exceeds 120V, it may be necessary to clean your unit more
frequently.
11
Mail To:
Hometouch
Service Center, Dept. 168
3000 Pontiac Trail
Commerce Township, MI
48390
E-mail:
[email protected]
Phone:
Monday - Friday
8:30am - 5:00pm (EST)
1.800.466.3342
Limited Two Year Warranty
HoMedics sells its products with the intent that they are free of defects in manufacture and workmanship
for a period of two years from the date of original purchase, except as noted below. HoMedics warrants
that its products will be free of defects in material and workmanship under normal use and service. This
warranty extends only to consumers and does not extend to Retailers.
To obtain warranty service on your HoMedics product, mail the product and your dated sales receipt (as
proof of purchase), postpaid, to the following address:
Hometouch
Service Center Dept. 168
3000 Pontiac Trail
Commerce Township, MI 48390
No COD’s will be accepted.
HoMedics does not authorize anyone, including, but not limited to, Retailers, the subsequent consumer
purchaser of the product from a Retailer or remote purchasers, to obligate HoMedics in any way
beyond the terms set forth herein. This warranty does not cover damage caused by misuse or abuse;
accident; the attachment of any unauthorized accessory; alteration to the product; improper installation;
unauthorized repairs or modifications; improper use of electrical/power supply; loss of power;
dropped product; malfunction or damage of an operating part from failure to provide manufacturer’s
recommended maintenance; transportation damage; theft; neglect; vandalism; or environmental
conditions; loss of use during the period the product is at a repair facility or otherwise awaiting parts or
repair; or any other conditions whatsoever that are beyond the control of HoMedics.
This warranty is effective only if the product is purchased and operated in the country in which the
product is purchased. A product that requires modifications or adoption to enable it to operate in any
other country than the country for which it was designed, manufactured, approved and/or authorized, or
repair of products damaged by these modifications is not covered under this warranty.
THE WARRANTY PROVIDED HEREIN SHALL BE THE SOLE AND EXCLUSIVE WARRANTY. THERE
SHALL BE NO OTHER WARRANTIES EXPRESS OR IMPLIED INCLUDING ANY IMPLIED WARRANTY OF
MERCHANTABILITY OR FITNESS OR ANY OTHER OBLIGATION ON THE PART OF THE COMPANY WITH
RESPECT TO PRODUCTS COVERED BY THIS WARRANTY. HOMEDICS SHALL HAVE NO LIABILITY FOR
ANY INCIDENTAL, CONSEQUENTIAL OR SPECIAL DAMAGES. IN NO EVENT SHALL THIS WARRANTY
REQUIRE MORE THAN THE REPAIR OR REPLACEMENT OF ANY PART OR PARTS WHICH ARE FOUND
TO BE DEFECTIVE WITHIN THE EFFECTIVE PERIOD OF THE WARRANTY. NO REFUNDS WILL BE GIVEN.
IF REPLACEMENT PARTS FOR DEFECTIVE MATERIALS ARE NOT AVAILABLE, HOMEDICS RESERVES
THE RIGHT TO MAKE PRODUCT SUBSTITUTIONS IN LIEU OF REPAIR OR REPLACEMENT.
This warranty does not extend to the purchase of opened, used, repaired, repackaged and/or resealed
products, including but not limited to sale of such products on Internet auction sites and/or sales of
such products by surplus or bulk resellers. Any and all warranties or guarantees shall immediately cease
and terminate as to any products or parts thereof which are repaired, replaced, altered, or modified,
without the prior express and written consent of HoMedics.
This warranty provides you with specific legal rights. You may have additional rights which may vary
from country to country. Because of individual country regulations, some of the above limitations and
exclusions may not apply to you.
For more information regarding our product line in the USA, please visit: www.homedics.com
© 2009 HoMedics, Inc. and its affiliated companies, all rights reserved. HoMedics® is a registered trademark
of HoMedics, Inc. and its affiliated companies. Home Touch®, PerfectSteam®, and Safe Touch® are registered
trademarks of HoMedics, Inc. and its affiliated companies. All rights reserved.
IB-PS250A
12
PerfectSteam®
plancha a vapor comercial para ropa
Manual de instrucciones e
Información de garantía
13
PS-250
IMPORTANTES PRECAUCIONES DE SEGURIDAD –
CUANDO UTILICE PRODUCTOS ELÉCTRICOS,
ESPECIALMENTE CUANDO ESTÁN NIÑOS PRESENTES, SE
DEBEN CUMPLIR CIERTAS PRECAUCIONES BÁSICAS DE
SEGURIDAD, INCLUYENDO LO SIGUIENTE:
ADVERTENCIA - PARA REDUCIR EL RIESGO DE
QUEMADURAS, ELECTROCUCIÓN, INCENDIO O LESIONES A
LAS PERSONAS:
• Leer todas las instrucciones antes del uso.
• Para reducir el riesgo de contacto con agua caliente que sale de las aberturas para el vapor,
verifique el artefacto antes de cada uso sosteniéndolo alejado de su cuerpo y de la unidad
de operación.
• Use este artefacto sólo para el uso para el cual ha sido diseñado.
• Para reducir el riesgo de choque eléctrico, NO sumerja este artefacto en agua u otros
líquidos.
• NUNCA jale del cordón para desconectar del tomacorriente; en cambio, agarre el enchufe y
jálelo para desconectar.
• NO deje que el cordón venga en contacto con superficies calientes. Deje que el artefacto
se enfríe por completo antes de guardarlo. Cuando lo guarda, envuelva el cable sin apretar
alrededor del artefacto.
• SIEMPRE desconecte el artefacto del tomacorriente cuando lo va a llenar de agua o a vaciar,
y cuando no lo esté usando.
• NO opere el artefacto si tiene el cordón eléctrico dañado, o si se lo ha dejado caer o está
dañado. Para reducir el riesgo de choque eléctrico, no desarme ni trate de arreglar este
artefacto.
• Envíelo al Centro de servicio de HoMedics para que lo examinen y lo reparen. El armado o
la reparación incorrecta pueden crear un riesgo de incendio, choque eléctrico, o daños a las
personas cuando se use el artefacto.
• Se requiere una supervisión estrecha cuando cualquier artefacto es usado por o cerca de
niños. NO deje el artefacto sin supervisión mientras se encuentra enchufado.
14
• Nunca planche con vapor una prenda que tenga puesta.
• El tocar partes metálicas calientes, agua caliente o vapor puede ocasionar quemaduras.
Ponga cuidado cuando voltea boca abajo un artefacto que produce vapor – puede haber
agua caliente en el recipiente.
• Deje que la unidad se enfríe durante al menos 30 minutos antes de retirar el agua sobrante
del recipiente de agua.
• NUNCA lo deje caer ni inserte ningún objeto en ninguna abertura o manguera.
• NO lo haga funcionar al aire libre o donde se utilizan productos de rociado por aerosol o
donde se está administrando oxígeno.
• Las superficies de este artefacto pueden estar calientes cuando está en uso. No deje que
los ojos o la piel desnuda vengan en contacto con las superficies calientes.
• NO coloque la boquilla de vapor directamente sobre cualquier superficie, o sobre el cordón
eléctrico del artefacto mientras éste se encuentre caliente o esté conectado. Use el soporte
que se proporciona.
• SIEMPRE mantenga la manguera y la boquilla más arriba del recipiente del agua.
• Para reducir la posibilidad de sobrecargar el circuito eléctrico, NO opere en el mismo circuito
ningún otro artefacto de elevado consumo eléctrico.
• NO use un cordón eléctrico de extensión para operar este artefacto. Si es indispensable el
uso de un cordón de extensión, se debe usar un cordón homologado para 15 amperios.
Los cordones homologados para un amperaje inferior pueden recalentarse. Es necesario
disponer el cordón en forma tal que no pueda ser jalado accidentalmente o que nadie
pueda tropezar en él.
• NUNCA vierta agua directamente en el recipiente. Vierta el agua sólo en el tanque.
• Cuando cambia los accesorios, para evitar el contacto con el agua caliente asegúrese de
que el artefacto está apagado y que no está emitiendo vapor.
• Ponga cuidado cuando cambia los accesorios porque pueden contener agua caliente de
condensación. Para evitar el contacto con el agua caliente, asegúrese de que los accesorios
estén secos y que se hayan enfriado.
GUARDE ESTAS INSTRUCCIONES
15
Instrucciones de conexión a tierra
Espigo de conexión
a tierra
Figura A
Adaptador
Lengüeta
para el
tornillo de
tierra
Figura B
Toma con
conexión a
tierra
Figura C
Tornillo metálico
Figura D
Figura E
Este producto debe ser conectado a tierra. Si llegara a funcionar
incorrectamente o a descomponerse, la conexión a tierra
proporciona una ruta de mínima resistencia para la corriente
eléctrica reduciendo así el riesgo de choque eléctrico. Este
producto está equipado con un conductor de conexión a tierra y un
enchufe de conexión a tierra. El enchufe debe estar enchufado en
un tomacorriente apropiado que esté adecuadamente instalado y
conectado a tierra de acuerdo con todos los códigos y ordenanzas
locales.
Características del Perfect Steam
Poste
Turn
Figura 1
Accesorios para
gancho
PELIGRO
Una conexión inadecuada del conductor de conexión a tierra
puede dar como resultado un riesgo de choque eléctrico.
Verifique con un electricista calificado o un técnico de servicio
si está en duda sobre si el producto está conectado a tierra
adecuadamente. No modifique el enchufe que se proporciona
con el producto – si no entra en el tomacorriente, usted puede
usar temporalmente un adaptador (como el que se muestra
en la Figura B) hasta que disponga de un tomacorriente
apropiado (como el que se muestra en la Figura C) que haya
sido instalado por un electricista calificado.
Este producto debe usarse en un circuito de 120 voltios nominales, y
está equipado con un enchufe con conexión a tierra, que se parece
al que está ilustrado en la Figura A. En caso que no se disponga
de un enchufe con la conexión a tierra apropiada, puede usarse
un adaptador temporal, similar al que se ilustra en la Figura B,
para conectar este enchufe a un tomacorriente de 2 polaridades,
como se indica en la Figura D. El adaptador temporal debería
usarse sólo hasta que un electricista calificado pueda instalar una
toma con la conexión a tierra apropiada (Figura C). La lengüeta
para el tornillo de conexión a tierra (Figura B) que sobresale del
adaptador debe conectarse a una tierra permanente como una caja
eléctrica propiamente conectada a tierra. Cada vez que se utilice el
adaptador, el mismo debe ser mantenido en su lugar con un tornillo
metálico. Ver Figuras D y E.
Sujetadores
Instrucciones de montaje
Figura 2
Tela
Cepillo
Figura 3
Girar
Figura 4
Pinza para
pliegues
Lengüeta
de la
boquilla
Figura 5
16
• Puede usarse con seguridad con cualquier tipo de tejido
• La función de calentamiento rápido permite producir vapor en 45
segundos.
• Gancho para colgar ropa convenientemente incorporado
• Diseño telescópico para almacenamiento compacto
• Manguera flexible de 5’ (1,5 m) con cubierta de manguera Safe
Touch® para un manejo cómodo y sin peligro
• El tanque de agua, fácil de llenar, permite la producción de vapor
por 40 minutos seguidos
• Las ruedas permiten movilidad excelente
• El apagado automático por bajo nivel de agua hace el uso más
seguro
• Drenaje conveniente en la base
1. Retire con cuidado todo el contenido del embalaje y revise el producto
para asegurarse de que ha recibido todas las piezas (Fig. 10).
2. Inserte el poste en el tope de la unidad. Haga corresponder las
ranuras en el poste con los relieves en el conector del poste, y
presione hacia abajo. Ajuste de forma segura la tuerca en el poste
sobre el conector girándola hacia la derecha (Figura 1).
3. Para colocar el accesorio para gancho, alinee las lengüetas del
accesorio para gancho con las ranuras del poste y empuje hacia
abajo (Fig. 2).
4. Extienda por completo el poste telescópico. Para eso, abra los
3 sujetadores en el poste y jale el poste hacia arriba (Figura 2).
Después de extender el poste, vuelva a cerrar los sujetadores.
Asegúrese de que el poste esté firmemente colocado en su lugar y
que no se le pueda empujar hacia abajo.
5. Una el cepillo para tela en la boquilla colocándolo en su lugar (Figura 3).
6. Una el montaje de mango y la manguera a la unidad. Alinee la
tuerca de la manguera con el tornillo del conector de la manguera.
Gire la tuerca hacia la derecha hasta que esté ajustada de forma
segura en el conector de la manguera (Fig. 4). Debe estar bien
atornillada en el lugar. Luego puede colgar el mango de la plancha
a vapor en el accesorio para ganchos (Fig. 3).
ATENCIÓN: No cuelgue la manguera del gancho antes de
conectarla a la base para evitar que se le caiga encima.
17
7. Una la pinza para pliegues (Fig. 5) a la lengüeta de la boquilla y
empuje suavemente hasta que quede en su lugar.
NOTA: no use la pinza para pliegues y el cepillo para tela al
mismo tiempo.
Tela Cepillo
Boquilla vaporizadora
Gancho
Instrucciones de uso
1. Retire el tanque de la unidad sujetando el mango y gírelo boca
abajo. Desenrosque la tapa del fondo del tanque de agua.
Mantenga el tanque bajo un chorro de agua fría hasta que quede
lleno al nivel deseado (Figura 5). NO lo llene más arriba del nivel
de llenado de 40 minutos. Una vez terminado de llenar el tanque,
vuelva a enroscar la tapa y gírelo boca arriba (Figura 6). Coloque
otra vez el tanque de agua en la unidad asegurándose de que
quede bien posicionado y asegurado en su lugar. ATENCIÓN:
Llene el tanque solamente con agua fría, NO use agua CALIENTE.
2. Enchufe el cordón del vaporizador en un tomacorriente de 120
voltios.
3. Gire el interruptor On/Off (encendido/apagado) en la posición
Figura 7
On (encendido). El interruptor se ilumina para indicar que el
vaporizador para ropa está encendido. La boquilla producirá
vapor en 45 segundos.
4. Cuelgue la prenda en el accesorio para ganchos (Fig. 8). Pase el
vapor en la prenda con un movimiento hacia arriba y hacia abajo
comenzando desde la parte superior de la prenda hasta la parte
inferior. Siempre mantenga la manguera y la boquilla elevadas por
encima del recipiente de agua.
5. Este unidad tiene un botón de reajuste (Figura 10). Cuando se
agota el agua en la unidad, este se apaga automáticamente por
seguridad y se enciende una luz indicadora roja (arriba del botón
Figura 8
de reajuste). Si desea continuar con sus sesión de vaporización:
• Coloque el interruptor “On/Off” en la posición “Off” y
desenchufe el cable de corriente.
• Retire y vuelva a llenar el tanque de agua siguiendo el paso 1
a continuación Instrucciones de uso
• Oprima el botón de reajuste en el lado de la unidad
• Enchufe el cable de la plancha a vapor en un tomacorriente
de 120 voltios de CA.
• Gire el interruptor On/Off en la posición “On” (encendido).
Figura 6
18
Mango
Pinza para
pliegues
Manguera
Poste
Pinzas
Conector del poste
Tanque de agua
Conector de manguera
Interruptor On/Off
Luz indicadora Botón de reajuste
Ruedas
Figure 10
19
6. Cuando ha terminado su sesión de vaporización, gire el interruptor On/Off en la posición
Off (apagado) y desconecte el enchufe del tomacorriente.
ATENCIÓN: Maneje el vaporizador con cautela hasta que se haya enfriado por completo.
Uso de los accesorios
NOTA: cuando instale o cambie los accesorios, asegúrese de que la unidad esté apagada,
desenchufada y que no esté largando vapor para evitar el contacto con el agua caliente.
1. Cepillo para tela
Ayuda a abrir la tela para una mayor penetración del vapor.
- Coloque el cepillo para tela en la boquilla de la plancha a vapor (Fig. 3).
- Deslice el cepillo para tela con un movimiento de arriba hacia abajo cepillando suavemente la tela.
2. Pinza para pliegues
Ayuda a crear un pliegue recto
- Coloque la pinza para pliegues en la boquilla de la plancha a vapor (Fig. 5).
- Presione el gatillo para abrir la pinza para pliegues.
- Coloque la prenda entre la pinza para pliegues y la boquilla de la plancha a vapor.
- Suelte el gatillo.
- Deslice la pinza para pliegues con un movimiento de arriba hacia abajo para crear un pliegue.
Limpieza y mantenimiento
1. Asegúrese de que la plancha a vapor esté apagada y desenchufada.
2. Deje que el vaporizador se enfríe por no menos de 30 minutos.
3. Desocupe todo el exceso de agua del tanque y déjelo secar antes de
volver a colocar la tapa y posicionarlo en la unidad.
4. Desocupe el exceso de agua del recipiente retirando el tapón de drenaje
(Figura 9) e inclinando la unidad.
Para guardar
1. Abra los 3 sujetadores (Fig. 2) del poste telescópico y deslícelo
suavemente para colapsarlo, con el cuidado de no pellizcar sus dedos.
Después de colapsar las secciones, vuelva a cerrar los sujetadores.
2. Envuelva la manguera y colóquela en el gancho (Figura 8).
3. Guarde la unidad en un lugar fresco y seco.
Figura 9
Remoción de los depósitos minerales
La acumulación de depósitos minerales es un problema frecuente de los vaporizadores; este es
causado por el alto contenido de minerales en muchas redes municipales de agua. El depósito
mineral al interior de tubos y calentadores puede causar un flujo irregular de vapor o, en los
casos más serios, impedir por completo la emisión de vapor.
La mejor manera de evitar este problema es la de usar agua desmineralizada o destilada.
Puede usarse el siguiente procedimiento para limpiar la acumulación de minerales. Si usted
no puede usar agua desmineralizada o destilada, le recomendamos llevar a cabo el siguiente
procedimiento cada 30 horas de operación para ayudar a impedir la acumulación de minerales.
1. Apague la unidad y desenchufe el cable eléctrico.
2. Desenrosque y retire la manguera del conector en la parte superior de la unidad.
3. Retire el poste de la unidad.
4. Retire el tanque de agua de la unidad principal y drene el agua de la unidad sobre una pileta.
5. Prepare una mezcla de 4 oz. de vinagre blanco y 4 oz. de agua. En muchos casos una taza
de esta mezcla será suficiente.
6. Lentamente vierta la mezcla de agua y vinagre en el conector de la manguera (Fig. 11).
a. Si la tubería interna está sólo parcialmente bloqueada por los depósitos minerales, la
mezcla de agua y vinagre empezará a salir pronto del orificio de entrada de agua. Si eso
ocurre, pase al paso 8.
b. Si la tubería interna está completamente bloqueada, siga vertiendo la mezcla en el
conector de la manguera hasta que quede lleno.
7. Vierta la mezcla de agua y vinagre en el orificio de entrada de agua hasta que quede lleno.
8. Deje reposar por 40 minutos.
9. Drene la mezcla de agua y vinagre del conector de la manguera o el recipiente de agua
inclinando la unidad sobre la pileta.
10.Vierta agua limpia en la base de la manguera y en el orificio de entrada de agua hasta
eliminar el olor a vinagre. Vuelva a montar la unidad y úsela normalmente.
11.Drene el agua residual del conector de la manguera o el depósito inclinando la unidad sobre
la pileta.
12.Si el procedimiento de arriba
no logra que la unidad vuelva
a funcionar normalmente,
Orificio de
es posible que necesite
entrada de
mantenimiento.
agua
Conector de
manguera
Figure 11
20
21
Solución de problemas del vaporizador
PROBLEMA
CAUSA
SOLUCIÓN
El vaporizador no calienta
El vaporizador no está
Enchúfelo en el tomacorriente
conectado
El interruptor “ON/OFF”
no está en la posición de
encendido (ON)
Presione el interruptor para colocarlo
en la posición de encendido (ON)
El interruptor se iluminará.
El apagado automático
está activado
Revise el tanque de agua y
asegúrese de que no esté vacío.
Si está vacío, vuelva a llenar y
presione reinicio para comenzar.
Si está vacío, vuelva a llenarlo
y a reinicializar para empezar el
funcionamiento.
No se produce vapor
El nivel de agua está bajo
Gire el interruptor en OFF
(apagado) y vuelva a llenar el
tanque de agua
La boquilla gotea agua
Condensación dentro del
tubo
Mantenga el tubo vertical y deje
que el agua se devuelva en el
tanque
La boquilla borbotea
Condensación dentro del
tubo
Mantenga el tubo vertical y deje
que el agua se devuelva en el
tanque
El vapor es intermitente
Hay depósitos minerales
Siga el procedimiento para retirar
los depósitos minerales
22
ATENCIÓN:
1. El contenido de minerales y las condiciones del agua varían en la diferentes áreas. Para
asegurar el funcionamiento continuo del vaporizador, no lo guarde nunca sin limpiarlo y sin
drenar el exceso de agua del tanque y del recipiente.
2. Si se enciende la luz de reinicio con agua en el tanque probablemente deba retirar la
acumulación de minerales.
3. En las áreas donde el voltaje excede los 120 voltios, puede ser necesario limpiar la unidad
con más frecuencia.
23