1
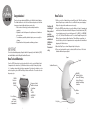
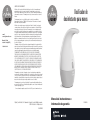
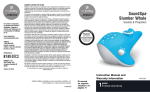
GARANTÍA LIMITADA POR UN AÑO correo electrónico: [email protected] Lunes - Viernes 8:30am - 5:00pm (EST) 1.800.466.3342 HoMedics vende sus productos con la intención de que no tengan defectos de fabricación ni de mano de obra por un plazo de un año a partir de la fecha de compra original, con las siguientes excepciones. HoMedics garantiza que sus productos no tendrán defectos de material ni de mano de obra bajo condiciones de uso y servicio normales. Esta garantía se extiende únicamente a consumidores y no a distribuidores. Para obtener servicio de garantía en su producto HoMedics, póngase en contacto con un Representante de Relaciones con el Consumidor por el teléfono 1-800-466-3342 para obtener asistencia. Asegúrese de tener a mano el número de modelo del producto. HoMedics no autoriza a nadie, incluyendo, pero sin limitarse a, distribuidores, posteriores consumidores compradores del producto a un distribuidor, o compradores remotos, a obligar a HoMedics de forma alguna más allá de las condiciones aquí establecidas. La garantía de este producto no cubre daños causados por uso inadecuado o abuso, accidente, conexión de accesorios no autorizados, alteración del producto, instalación inadecuada, reparaciones o modificaciones no autorizadas, uso inadecuado de la fuente de energía/electricidad, cortes de energía, caída del producto, funcionamiento incorrecto o daño de una pieza de funcionamiento debido al no cumplimiento del mantenimiento recomendado por el fabricante, daños durante el transporte, robo, descuido, vandalismo, condiciones climáticas, pérdida de uso en el período durante el cual el producto está en una instalación de reparación o a la espera de piezas o reparación, o cualquier otra condición, sin importar cual sea, que se encuentre fuera del control de HoMedics. Esta garantía es válida únicamente si el producto es comprado y operado en el país en el cual se compró el producto. Un producto que requiera modificaciones o adaptación para habilitar su funcionamiento en cualquier país que no sea aquél para el que fue diseñado, fabricado, aprobado y/o autorizado, o la reparación de productos dañados por estas modificaciones no están cubiertos bajo esta garantía. LA GARANTÍA AQUÍ ESTABLECIDA SERÁ LA ÚNICA Y EXCLUSIVA GARANTÍA. NO HABRÁ NINGUNA OTRA GARANTÍA EXPRESA NI IMPLÍCITA, INCLUYENDO NINGUNA GARANTÍA DE COMERCIALIZACIÓN O APTITUD NI NINGUNA OTRA OBLIGACIÓN POR PARTE DE LA COMPAÑÍA CON RESPECTO A PRODUCTOS CUBIERTOS POR ESTA GARANTÍA. HOMEDICS NO TENDRÁ RESPONSABILIDAD ALGUNA POR NINGÚN DAÑO INCIDENTAL, CONSECUENTE NI ESPECIAL. BAJO NINGÚN CONCEPTO ESTA GARANTÍA REQUERIRÁ MÁS QUE LA REPARACIÓN O CAMBIO DE ALGUNA PIEZA O PIEZAS QUE SE HALLEN DEFECTUOSAS DENTRO DEL PERÍODO DE VIGENCIA DE ESTA GARANTÍA. NO SE EFECTUARÁN REEMBOLSOS. SI NO HAY PIEZAS DE REPUESTO DISPONIBLES PARA LOS MATERIALES DEFECTUOSOS, HOMEDICS SE RESERVA EL DERECHO DE REALIZAR SUSTITUCIONES EN VEZ DE REPARAR O CAMBIAR. Esta garantía no se extiende a la compra de productos abiertos, usados, reparados, embalados otra vez y/o abiertos y vueltos a cerrar, incluyendo entre otras cosas la venta de dichos productos en sitios de remate por Internet y/o la venta de dichos productos por revendedores o mayoristas. Todas y cada una de las garantías cesarán y terminarán inmediatamente con respecto a cualquier producto o pieza del mismo que estén reparados, cambiados, alterados o modificados sin el consentimiento previo explícito y por escrito de HoMedics. Esta garantía le proporciona derechos legales específicos. Es posible que usted tenga derechos adicionales que pueden variar de un estado a otro. Debido a las regulaciones de ciertos estados, es posible que algunas de las limitaciones y exclusiones no se apliquen en su caso. Por más información con respecto a nuestra línea de productos en los EE.UU., visítenos en: www.homedics.com Mybaby™ y HoMedics® marcas registradas de HoMedics, Inc. y sus compañías afiliadas. ©2012 HoMedics, Inc. Reservados todos los derechos. IB-MYBW20 Hand Sanitizer Instruction Manual and Warranty Information El manual en español empieza a la página 7 MYB-W20 Congratulations! How To Use Thank you for purchasing the MyBaby, by HoMedics Hand Sanitizer. The Hands Sanitizer is one of the most advanced products of its kind. Luxury meets practicality and hygiene meets style: - Motion sensor technology provides sanitary hands-free operation. - Adjustable controller dispenses the right amount of sanitizer or gel every time. - Convenient magnetically attached drip tray removes easily for cleaning. - Elegant functional design makes sanitizing a pleasure. 1.Lift the cover to the Sanitizer Reservoir and fill up to the “Max” line with any brand of liquid soap or sanitizer. Do not overfill as this may cause dripping. Replace the plug in the sanitizer reservoir securely. IMPORTANT: To avoid accidental dispensing of liquid, slide the Dispensing Control Switch to [OFF] and install batteries before filling the Sanitizer Reservoir. Caution: All servicing of this product must be performed by authorized HoMedics Service Personnel only. 2.Press the [OPEN] release button to open the Battery & Control Compartment on the bottom of the unit and slide the Dispenser Control Switch from [OFF] to your desired amount of soap to be dispensed [1 = LOW], [2 = MEDIUM] or [3 = HI]. The Red LED will turn on for 12 seconds. During this period, the Motion Sensor and motor will not function. This will allow enough time to close the Battery & Control Compartment door and position the unit without triggering the Motion Sensor. 3.Attach the Drip Tray as shown. Magnets help hold in place. 4.Place your hand under the spout to activate the Motion Sensor. The Hand Sanitizer will then dispense liquid. Figure 2 How To Install Batteries: Press the [OPEN] release button on the underside of the unit to open the Battery/Control Compartment door. Insert three (3) AA alkaline batteries carefully following the polarity (+ / –) markings shown inside the battery compartment. Note: when the batteries are low and need replacing, the red LED Low Battery Indicator will flash for 10 seconds after each dispensing cycle. Spout Sanitizer Reservoir Red LED: Indicates Motion Sensor OFF During Set-up; Flashes to Indicate Low Battery Condition Figure 1 CLEAN Function ON/OFF Switch Dispenser Control Switch for Amount of Sanitizer: OFF/ 1–LOW 2–MEDIUM 3–HIGH Door Release for Battery and Control Compartment Motion Sensor Drip Tray 2 3 How to use the CLEAN Function: If you wish to change the type of liquid in Hand Sanitizer, you may use the CLEAN function to empty and clean the unit. Press the [CLEAN] button and the unit will enter the auto cleaning mode: 1.) first the Red LED will illuminate for 12 seconds to allow you to replace the battery door and position the unit for cleaning, 2.) then the motor will turn on and pump for 30 seconds. During this period, you can press the [CLEAN] button again to abort the cleaning function (motor will turn off). The CLEAN function will work with the Dispenser Control Switch set to [1], [2] or [3]; it will not work with the Dispenser Switch in the OFF position. Repeat until there is no more liquid in the reservoir. To thoroughly flush out the unit, you should add water to the reservoir and repeat the cleaning process. IMPORTANT: 1. 2. 3. 4. 5. The Motion Detector that activates dispensing uses a sensitive infrared sensor. To avoid accidental dispensing of liquid, please do not place Hand Sanitizer Dispenser in direct sunlight. After a period of inactivity, the sanitizer inside Hand Sanitizer Dispenser may become dry and clog the line. Should this occur, simply use a toothpick or water to remove the obstruction. The only part of the Hand Sanitizer designed to be wet is the liquid reservoir and spout. Do not immerse the Hand Sanitizer in water as the product will be damaged. Run the Clean function to flush the sanitizer reservoir with water, then remove the batteries from the battery compartment whenever the Hand Sanitizer is to be left unused for a long period of time. To clean the unit, use a soft damp cloth. Do not clean with a abrasive materials or corrosive substances. Battery Precautions: 1. Use AA alkaline batteries only. Do not use rechargeable batteries. 2. Replace all batteries at the same time. 3. Clean the battery contacts and the contacts of the device prior to battery installation with a dry cloth. 4. Ensure the batteries are installed correctly with regard to polarity (+ /–). 5. Remove batteries from the unit when it is not to be used for an extended period of time. 6. Remove depleted batteries from the unit promptly. Dispose of used batteries safely. Keep all batteries away from children. Batteries are small objects and could be ingested. If swallowed, contact a physician at once. Do not open batteries or dispose of in fire. Do not mix the new and used batteries. WARNING Keep out of reach of children. When using liquid sanitizer, avoid contact with eyes. In case of eye contact, flush with water. If swallowed get medical help or contact Poison Control Center right away. Trouble Shooting: No Sanitizer Dispensed; Motor Does Not Run 1. 2. 3. 4. Ensure that Dispensing Control Switch is turned ON in the 1 = LOW; 2 = MEDIUM or 3 = HI position; not OFF. Hands are placed directly between the Motion Sensor and Spout. Ensure unit is not placed in bright sunlight which will interfere with Motion Sensor operation. Batteries are installed with correct polarity (+/ –) and not dead. No Sanitizer Dispensed; Motor Runs 1. 2. 3. During start-up you may need to activate the Motion Sensor several times to “prime” the pump to begin dispensing sanitizer. The sanitizer reservoir should be at least ¼ FULL. Make sure that no dried sanitizer is clogging the spout or pump tubing. Use a toothpick to clean the spout. If necessary, empty the sanitizer tank, fill with water and run the CLEAN Function. 4 5 LIMITED ONE YEAR WARRANTY e-mail: [email protected] Monday - Friday 8:30am - 5:00pm (EST) 1.800.466.3342 HoMedics sells its products with the intent that they are free of defects in manufacture and workmanship for a period of one year from the date of original purchase, except as noted below. HoMedics warrants that its products will be free of defects in material and workmanship under normal use and service. This warranty extends only to consumers and does not extend to Retailers. To obtain warranty service on your HoMedics product, contact a Consumer Relations Representative by telephone at 1-800-466-3342 for assistance. Please make sure to have the model number of the product available. HoMedics does not authorize anyone, including, but not limited to, Retailers, the subsequent consumer purchaser of the product from a Retailer or remote purchasers, to obligate HoMedics in any way beyond the terms set forth herein. This warranty does not cover damage caused by misuse or abuse; accident; the attachment of any unauthorized accessory; alteration to the product; improper installation; unauthorized repairs or modifications; improper use of electrical/power supply; loss of power; dropped product; malfunction or damage of an operating part from failure to provide manufacturer’s recommended maintenance; transportation damage; theft; neglect; vandalism; or environmental conditions; loss of use during the period the product is at a repair facility or otherwise awaiting parts or repair; or any other conditions whatsoever that are beyond the control of HoMedics. This warranty is effective only if the product is purchased and operated in the country in which the product is purchased. A product that requires modifications or adoption to enable it to operate in any other country than the country for which it was designed, manufactured, approved and/or authorized, or repair of products damaged by these modifications is not covered under this warranty. THE WARRANTY PROVIDED HEREIN SHALL BE THE SOLE AND EXCLUSIVE WARRANTY. THERE SHALL BE NO OTHER WARRANTIES EXPRESS OR IMPLIED INCLUDING ANY IMPLIED WARRANTY OF MERCHANTABILITY OR FITNESS OR ANY OTHER OBLIGATION ON THE PART OF THE COMPANY WITH RESPECT TO PRODUCTS COVERED BY THIS WARRANTY. HOMEDICS SHALL HAVE NO LIABILITY FOR ANY INCIDENTAL, CONSEQUENTIAL OR SPECIAL DAMAGES. IN NO EVENT SHALL THIS WARRANTY REQUIRE MORE THAN THE REPAIR OR REPLACEMENT OF ANY PART OR PARTS WHICH ARE FOUND TO BE DEFECTIVE WITHIN THE EFFECTIVE PERIOD OF THE WARRANTY. NO REFUNDS WILL BE GIVEN. IF REPLACEMENT PARTS FOR DEFECTIVE MATERIALS ARE NOT AVAILABLE, HOMEDICS RESERVES THE RIGHT TO MAKE PRODUCT SUBSTITUTIONS IN LIEU OF REPAIR OR REPLACEMENT. This warranty does not extend to the purchase of opened, used, repaired, repackaged and/or resealed products, including but not limited to sale of such products on Internet auction sites and/ or sales of such products by surplus or bulk resellers. Any and all warranties or guarantees shall immediately cease and terminate as to any products or parts thereof which are repaired, replaced, altered, or modified, without the prior express and written consent of HoMedics. This warranty provides you with specific legal rights. You may have additional rights which may vary from state to state. Because of individual state regulations, some of the above limitations and exclusions may not apply to you. For more information regarding our product line in the USA, please visit: www.homedics.com MyBaby™ and HoMedics® are Trademarks of Homedics, Inc. and its affiliated companies. ©2012 HoMedics, Inc. All rights reserved. IB-MYBW20 Dosificador de desinfectante para manos Manual de instrucciones e Información de garantía MYB-W20 ¡Felicitaciones! Gracias por comprar el Dosificador de desinfectante para manos de MyBaby por HoMedics. El recipiente para jabón líquido es uno de los productos más avanzado de su categoría. El lujo se une a la practicidad y la higiene se une con el estilo: - La tecnología del sensor de movimiento proporciona un funcionamiento higiénico sin utilizar las manos. - El controlador ajustable dispensa la cantidad correcta de desinfectante o gel cada vez. - La bandeja para goteo pegada con imanes de forma práctica se quita fácilmente para la limpieza. - El diseño elegante y funcional hace que desinfección sea un placer. IMPORTANTE: para evitar que el líquido se dispense accidentalmente, deslice el interruptor control de dispensado a [OFF] e instale las pilas antes de llenar el depósito de desinfectante. compartimiento de la batería. Nota: cuando las baterías tengan baja carga y deban ser reemplazadas, la luz LED roja indicadora de batería baja parpadeará durante 10 segundos después de cada ciclo de dispensación. Modo de uso Precaución: 1.Levante la tapa para el depósito de desinfectante y se llenan a la “MAX” Todo el ser(máxima) de acuerdo con cualquier marca de jabón líquido o desinfectante vicio de este No llene de más ya que esto puede hacer que gotee. Vuelva a colocar el producto enchufe del tanque de desinfectante de forma segura. debe ser 2.Presione el botón de liberación [OPEN] para abrir el Compartimiento de las realizado únipilas y el control que se encuentra en la parte inferior de la unidad y deslice camente por el interruptor de control del dispensador de [OFF] (apagado) hasta la cantidad personal deseada de jabón que se dispensará [1 = LOW] (bajo), [2 = MEDIUM] de servicio (medio) o [3 = HI] (alto). La luz LED roja se encenderá durante 12 segundos. autorizado Durante este período, el Sensor de movimiento y el motor no funcionarán. de HoMedics. Esto permitirá el tiempo suficiente para cerrar la puerta del compartimiento de pilas y control y colocar la unidad sin activar el sensor de movimiento. 3.Coloque la bandeja para el goteo como se muestra. Imanes ayudar a mantenerlo en su lugar. 4.Coloque su mano bajo el pico para activar el Sensor de movimiento. El Dosificador de desinfectante para manos dispensará el líquido. Cómo instalar las pilas: Presione el botón de liberación [OPEN] (abrir) en la parte inferior de la unidad para abrir la tapa del compartimiento de las pilas/el control. Introduzca 3 (tres) pilas alcalinas AA respetando con atención las marcas de polaridad (+ / –) que se muestran dentro del Figura 2 Pico Depósito de desinfectante Figura 1 Función CLEAN (limpieza) Interruptor ON/OFF (encendido/ apagado) LED roja: indica que el sensor de movimiento está apagado durante la configuración; parpadea para indicar la condición de bajo nivel de batería Control del dispensador Cambie para indicar la cantidad de desinfectante: OFF/ (apagado) 1–LOW (bajo) 2–MEDIUM (medio) 3–HIGH (alto) Liberación de la puerta del compartimiento de las pilas y el control Sensor de movimiento Bandeja para el goteo 8 9 Cómo usar la función CLEAN (limpieza): Si desea cambiar el tipo de líquido del Dosificador de desinfectante para manos, puede usar la función CLEAN (limpieza) para vaciar y limpiar la unidad. Presione el botón [CLEAN] (limpieza) y la unidad iniciará el modo de limpieza automática: 1.) primero la LED roja se iluminará durante 12 segundos para permitirle volver a colocar la tapa de las pilas y colocar la unidad para la limpieza, 2) luego el motor se encenderá y bombeará durante 30 segundos. Durante este período, puede presionar nuevamente el botón [CLEAN] (limpieza) para salir de la función de limpieza (el motor se apagará). La función CLEAN (limpieza) funcionará con el interruptor de control del dispensador en [1], [2] o [3]; no funcionará con el interruptor del dispensador en la posición OFF (apagado). Repita hasta que no haya más líquido en el depósito. Para enjuagar bien la unidad, debe agregar agua al depósito y repetir el proceso de limpieza. IMPORTANTE: 1. 2. 3. 4. 5. El Detector de movimiento que activa el dispensado usa un sensor infrarrojo. Para evitar que el líquido se dispense accidentalmente, no coloque el Dosificador de desinfectante para manos bajo la luz directa del sol. Luego de un período sin actividad, el desinfectante en el interior del dispensador desinfectante de puede volverse seca y obstruir la línea. Si sucediera esto, simplemente use un palillo o agua para quitar la obstrucción. Las únicas partes del Dosificador de desinfectante para manos diseñadas para estar húmedas son el depósito de líquido y el pico. No sumerja el Dosificador de desinfectante para manos en agua ya que esto dañará el producto. Ejecute la función de CLEAN (limpieza) para limpiar el depósito de desinfectante con agua, a continuación, retire las pilas del compartimiento de la batería cada vez que el desinfectante de manos debe ser utilizado durante un largo período de tiempo. Para limpiar la unidad use un paño suave y húmedo. No limpie con materiales abrasivos ni con sustancias corrosivas. 2. 3. El depósito de desinfectante debe estar lleno a ¼ de su capacidad. Asegúrese de que no haya desinfectante obstruyendo el pico o la tubería de bombeo. Use un palillo para limpiar el pico. Si fuera necesario, vacíe el tanque de desinfectante, llene con agua y active la función CLEAN (limpieza). Precauciones sobre las pilas: 1. Use solamente pilas alcalinas AA. No use baterías recargables. 2. Cambie todas las pilas al mismo tiempo. 3. Limpie los contactos de las pilas y los del dispositivo con un paño seco antes de instalar las pilas. 4. Asegúrese de que las pilas están instaladas correctamente con respecto a la polaridad (+ / –). 5. Quite las pilas de la unidad cuando no vaya a ser usada por un largo período de tiempo. 6. Quite las baterías agotadas de la unidad rápidamente. Deseche las pilas usadas de forma segura. Mantenga todas las pilas fuera del alcance de los niños. Las pilas son objetos pequeños y podrían tragarlos. Si las tragan, póngase en contacto con un médico inmediatamente. No abra las pilas ni las arroje al fuego. No mezcle pilas nuevas y nuevas. ADVERTENCIA Mantener fuera del alcance de los niños. Cuando se utiliza desinfectante líquido, evitar el contacto con los ojos. En caso de contacto con los ojos, enjuague con agua. Si se ingiere consiga ayuda médica o contacte al Centro de Control de Envenenamiento de inmediato. Diagnóstico y resolución de problemas: No se dispensa desinfectante; el motor no funciona 1. 2. 3. 4. Asegúrese de que el interruptor de control de dispensado esté en ON (encendido) en la posición 1 = LOW (bajo); 2 = MEDIUM (medio) o 3 = HI (alto); no en la posición OFF (apagado). Las manos deben colocarse directamente entre el sensor de movimiento y el pico. Asegúrese de que la unidad no debe colocarse bajo la luz directa del sol, la cual interfiere con el funcionamiento del sensor de movimiento. Asegúrese de que las pilas estén instaladas con la polaridad correcta (+ / –) y que no estén agotadas. No se dispensa desinfectante; el motor funciona 1. Durante el encendido es posible que deba activar el sensor de movimiento varias veces para “cebar” la bomba para que comience a dispensar el desinfectante. 10 11