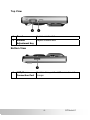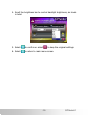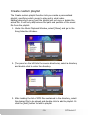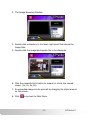
1
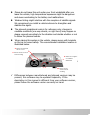
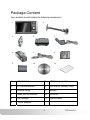
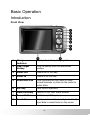
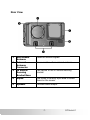
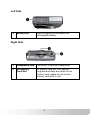
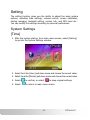
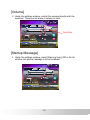
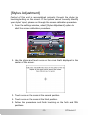
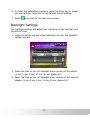
Portable Automobile
Navigation System
Product User Manual
Version: V.01
July 2005
Registered info
HOLUX and GPSmile are trademarks of HOLUX Technology, Inc.
All other trademarks belong to each registered companies.
Note
Contents of this manual will be modified without further notice.
Safety Precautions
About charging
Please use the power adapter included with the package, using power
adapters other than the provided one will result in malfunction and
danger.
The device should only be supplied with specific batteries internally.
About the power adapter
Please do not use the power adapter in a wet environment. When
hands and feet are wet, please do not touch the power adapter.
While using the power adaptor ensure that the area is well ventilated.
Do not let paper or other material cover the power adaptor, therefore
interfering with the cooling effect. Do not use the power adaptor
whilst it is in a bag.
Please do not attempt to repair the device. If device is damaged or is
in a wet environment, replace the device immediately.
About the battery
Use only the original factory approved charger.
A Lithium battery is built in to the device. To prevent fire or skin burns,
please do not disassemble, pierce, impact, or expose the battery to
fire. The battery will crack, explode, or release dangerous chemicals if
placed in a fire.
Important instructions
Note: Replacing with an incorrect battery might result in
explosion. When disposing of the battery, please follow the
instructions. The replacement battery must be original factory
approved.
Recycling or disposing of batteries must follow regulations.
The battery should only be used in specific devices.
-ii-
Warrantee Statement
This warrantee applies to parts and services of GPSmile51
manufactured and sold through Holux Technology Inc. The local area
covered is Taiwan; the warrantee length is one year from date of
purchase (counting from the date on the sales receipt). Under normal
user operation, Holux Technology provides free repair services.
The replaceable battery warrantee is six months.
The replaced parts after a repair are properties of Holux
Technology.
Holux Technology is not responsible for providing repairs or
replacements of any software; Holux Technology does not provide any
warrantee service for third party software/hardware.
Important instructions
Note: This warrantee does not cover damage or malfunction
from the below causes: unauthorized disassembly/modification
of unit, abuse or incorrect usage, accidental and other
unpreventable causes, operation under variables mentioned
other than in this product user manual, using parts not made
or sold by Holux Technology, or repairs done by anyone other
than Holux Technology and authorized retail/service provider.
Expendable parts are not covered in the warrantee.
Any program, data, or portable storage media damages or lost
are not responsible. Please contact your local Holux Technology
authorized service provider to learn more about geographical
limitations, proof of purchase requests, response time
agreements, and other specific maintenance service requests.
-iii-
GPSmile51
Technical Support
If there are any questions on using the product, please logon to the
website www.holux.com and see the FAQ.
If answers could not be found on the website, please send an e-mail
to [email protected] Stating your location and question.
Maintenance Service
HOLUX Technology, Inc.
+886-3-6687000
Web Site: www.holux.com.tw
E-mail: [email protected]
HOLUX Technology, Inc.
www.holux.com
-iv-
Contents
Preface ........................................................................ 1
Symbols ............................................................................... 1
Important Notice .................................................................. 1
Functions and Features ......................................................... 3
Others Functions................................................................... 3
First Time Use ...................................................................... 4
Copyright ..................................................................... 4
Important Notice........................................................... 4
Package Content................................................................... 5
Basic Operation ............................................................ 6
Introduction ......................................................................... 6
Front View.................................................................... 6
Rear View..................................................................... 7
Left Side....................................................................... 8
Right Side..................................................................... 8
Top View...................................................................... 9
Bottom View ................................................................. 9
Getting Started........................................................... 10
Preparing for Use ....................................................... 11
Installing Battery .................................................................11
Connecting to AC Adapter and Charging.................................12
Using the In Vehicle Bracket .................................................13
Using the Car Charger ..........................................................15
Operating Method ................................................................16
Startup........................................................................16
Shutdown....................................................................16
Using the Function Button.............................................17
Using the Stylus ...........................................................18
Using the SD Memory Card ...................................................19
Function Menu.....................................................................20
-v-
GPSmile51
Setting ...................................................................... 21
Time ...................................................................................21
Volume ...............................................................................22
Startup Message ..................................................................22
Align Screen ........................................................................23
Backlight Settings ................................................................24
Help....................................................................................26
Music Playback Function.............................................. 27
Storing MP3 files onto SD memory cards................................27
Starting Music Playback ........................................................27
Create Custom Playlist..........................................................29
Image Browsing Function............................................ 30
Using the CD.............................................................. 32
Appendix ................................................................... 32
Troubleshooting...................................................................32
System Reset...............................................................32
Quick Troubleshooting..................................................33
Normal Care and Maintenance.......................................34
Storage ...............................................................................35
Specifications ......................................................................36
-vi-
Preface
We appreciate your purchase of the GPSmile 51.
Please thoroughly read all instructions regarding the product for a full
understanding of its features.
Symbols
For fast reference to the data you wish to find, this manual uses the
following symbols.
This icon means to take note to messages and to read for while
during use.
This icon means a warning and should take care not to damage the
unit.
This icon means useful tips for extra information while using.
Important Notice
This system only provides a navigational reference. Please do not use
this system for any directional, distance, and geographic etc precise
measurements.
The first GPS positioning should be performed at a single set point,
wide-open area without building shelters. Positioning time length will
depend on the satellite signal strength, cloud levels; possibly taking up
to 10 minutes.
GPS (Global Positioning System) is the satellite system by the United
States of America Department of Defense. All maintenance and
operations are also managed by the United States of America
Department of Defense. Should the system be modified and adjusted,
the precision and operation of GPS related systems might be affected.
Any wireless communication products (mobile phone, radio, speed
detection unit etc) might affect the GPS signal, resulting in a poor
signal.
For safety, please do not operate this system while driving a vehicle.
-1-
GPSmile51
Please do not leave this unit under your front windshield after you
leave the vehicle, high temperature exposures might be dangerous
and cause overheating to the battery and malfunctions.
Window tinting might interfere with the reception of satellite signals.
We recommend you install a vehicle antenna to strengthen and
stabilize the signal.
The planned navigational route is for reference only; changes in
roadside conditions (one way streets, no right turns) may happen so
please respond accordingly to the situation and decide whether or not
to follow the planned course.
When placing this system in the vehicle, please secure with brackets
on the car to ensure safety. The recommended installation location is
illustrated below.
X Please do not block
driver’s view
X Please do not secure in
front of airbag
X Please do not place
on unstable
dashboard
X Please do not
secure in front
of airbag
Differences between manufactured and shipped versions may be
present; this software may be updated frequently. If the
description in this manual is different from your software version,
please follow the software version currently on hand.
-2-
Functions and Features
Realistic full scene 3D view, go where you see.
Smart road travel display, zoom-in on cross roads.
GPS speed limit warning setting (city and highway speed limit
settings).
Voice cue for information such as turning, u-turn, distance etc.
Highway info display and voice cueing function, including for next
interchange, rest stop, tollbooth.
GPS map rotation with road.
GPS street traveled, administrative divisions, map directions
information displays.
Custom “speeding camera location”. Under GPS, voice cueing from a
distance of 300m before encounter.
Other Functions
Music playback: plays MP3 music files.
Image display: displays photographs or image files.
-3-
GPSmile51
First time use
Copyright
Without the written consent of HOLUX Technology, Inc, this manual
including the product and the software may not be duplicated,
transmitted, recorded or saved on storage devices; nor shall it be
translated under any circumstances into any other languages.
Copyright ©2005 HOLUX Technology, Inc. All rights reserved.
Important Notice
Please read thoroughly this manual of operating instructions and
explanations. Use only original factory approved batteries and
accessories to prevent unexpected damage. If the correct procedures
were not followed for operation or incompatible accessories were
connected, this violates the warrantee agreement and will automatically
void the warrantee; even causing personal safety issues.
-4-
Package Content
Your product should include the following accessories:
1
2
3
4
5
6
7
8
9
10
11
1
NAV-51 Unit
7
USB Charging Cable
2
In Vehicle Bracket
8
128 MB SD Memory Card
3
Bracket fixing
9
Battery
4
Base Unit for Bracket
10
CD-ROM
5
Car Adapter
11
6
Travel Adapter
-5-
Quick Guide
GPSmile51
Basic Operation
Introduction
Front View
1
Charge
Indicator
Find-Target
Hotkey
Displays the battery charging status
3
Zoom-Out
Zooms out of the map
4
Zoom-In
Zooms in on the map
5
Directional Pad
6
ESC Key
Press up/down/left/right keys to move
around onscreen or press-on the center to
select items
Exits current operation
7
Menu Directory
Returns to the main menu window
8
Power Button
Switches on/off the power
9
Touch Screen
Displays system status/use stylus to directly
input data or select items on the screen
2
Press to quickly enter the destination
window
-6-
Rear View
1
Receives satellite signals
4
Retractable
Antenna
External
Antenna
Connector
In Vehicle
Securing
Bracket Base
Stylus
5
Speaker
Increase audio output
2
3
For connection of an external antenna
Fast secure to the in vehicle securing
bracket
Use stylus to directly input data or select
items on the screen
-7-
GPSmile51
Left Side
1
Battery Lid
Open the battery lid to replace the
rechargeable battery
Right Side
1
Headphone Jack
Connection to external headphones
2
SD Memory
Card Slot
SD memory card slot, the required
programs and maps are saved on this
memory card, please do not remove
memory card while in use.
-8-
Top View
1
Reset
System reset switch
2
Volume
Adjustment Key
Adjusts volume level
Bottom View
1
USB/Power
Connection Port
Dual function port for USB connector and
charger
-9-
GPSmile51
Getting Started
If you are a first-time system user, the following explanations will help
you quickly understand the system operations, and experience the
system’s powerful and convenient functions.
1. Battery installation
This system uses a proprietary Lithium battery, please charge after
installation. For details please refer to page 12 in this manual.
2. SD memory card installation
The system included memory card contains the digital map files
and important data for GPS navigation. Please install first and refer
to page 20in this manual.
3. Using the stylus
The stylus is the main tool for operating this unit and is concealed
in the pen slot on the back, pullout to use. For details please refer
to page 19 in this manual.
4. Initial GPS positioning
Please perform GPS positioning at an outdoor open location. Press
the power switch and select [GPS] to enter the navigational screen.
Select [Menu] for the control menus and then select [GPS status]
to enter the GPS positioning screen. The system will automatically
search for a satellite signal and begin the positioning procedure.
After GPS positioning is complete, a GPS satellite status icon will
appear onscreen and related data will also be shown. For details
please refer to page 5 “Navigation software manual”.
5. Voice settings
Sets the language type. Startup > select [GPS] > press [Menu] key
> enter the control menu > select [Navigation setting] > at
[Language selection] select the arrows on both sides to switch
between Chinese and English. For details please refer to page 58
“Navigation software manual”.
-10-
6. Experience the GPS navigation
Startup > select [GPS] > press [Find] key > enter the destination
screen > select [Area] > select city > zoom in/out or scroll map to
find destination > select [Find nearest location] > select [Sort] >
select a type > select an entry > select [Set destination] > select
[Simulate navigation] > system will begin to plan a route and then
start simulation of navigation. For details please refer to page 13
“Navigation software manual”.
Preparing for Use
Installing battery
Please follow the procedures to install the
proprietary rechargeable battery:
1. Follow the indicated direction to open
the battery compartment.
2. Insert the rechargeable battery
according to the polarity.
3. Follow the indicated direction to close the
battery compartment.
-11-
GPSmile51
Connecting to AC Adapter and Charging
Before first use, we strongly suggest beginning use with a fully charged
battery.
1. Insert the USB connector into the adapter.
2. Insert the other end into the power port under the unit.
3. Plug the adapter into a power outlet.
4. When charging starts, the charging indicator light will be red,
please wait for the charging to complete (this might take several
hours). After charging is completed the indicator light will be green.
This device uses a Lithium battery, please note the following:
Please do not charge in a hot environment, such as on a balcony or
expose to sunlight.
-12-
Lithium batteries do not need to be discharged, do not wait until the
battery is depleted to recharge.
When not in use for a long period, please charge the battery every
two weeks to prevent excessive discharge affecting battery
performance.
When charging a completely depleted battery, please wait at least
one minute before system startup. Preventing excessive battery
discharge.
Using the in Vehicle Bracket
The included in vehicle bracket set can be securely suctioned on the
front windshield, or using the adhesive plate, securing on top of the
glove compartment. This device will effectively secure the GPS unit in
the vehicle. Please follow the procedures below to secure the bracket:
1. Follow the arrows and slide the component A into component B
fitting holes to secure.
Please note the directions of A and B, when fitted the assembly
should be tight. If the directions are incorrect, it will result in a
loose fit, please reassemble.
-13-
GPSmile51
2. Follow the indicated directions and insert B into slots on base C,
slide along the arrow direction to secure.
3. Finally insert the GPS unit on to the base..
When using the in-vehicle secure bracket, do not install in a
location that will block the view of the driver
Recommended installation requirements:
1. The bracket base should be secured close to the area above the
dashboard to prevent excessive shock.
-14-
Using the Car Charger
While using in a vehicle, use the included car charger for long periods
of usage.
1. Plug in the car adapter small plug into the power jack on the back
of the base.
2. Insert the other end into the cigarette lighter.
-15-
GPSmile51
Operating Methods
Startup
1. Press the power button for about two
seconds to turn on the power.
Shutdown
2. While power is on, press the power button to turn off power.
During the first startup, the screen will show the main screen consisting
of four functions, including navigation, music, images, and settings.
Directly select the icon onscreen to use the function.
Navigation
Music
Loads the navigation program and to the navigation
screen
Plays MP3 music
Images
Plays images
Settings
Function adjustments and operation instructions
-16-
Using the Function Buttons
Control the main functions with the buttons on the right hand side.
1
Find-Target
Hotkey
Fast forward to the target window, this
window provides 7 location searches
enabling quick setting of destinations.
2
Zoom-Out
Zooms out of the map
3
Zoom-In
Zooms in on the map
4
Directional Pad
5
ESC Key
Press up/down/left/right keys to move
around onscreen or press-on the center to
select items
Exits current operation
6
Menu Directory
Returns to the main menu
7
Power Button
Switches on/off the power
-17-
GPSmile51
Using the Stylus
The stylus is the main tool for operating this unit, use the stylus to
select icons/items on the screen, drag around the map to view directly,
or even input hand written data.
The stylus is concealed in the pen slot on the back, pull out and extend
for easy usage. Replace the stylus after use and to prevent it being
misplaced.
Functions of the stylus:
Selection:
Use the stylus point to select items onscreen to enter the selected
function. On the map display, select the street or indicators on the map
for detailed building name or road name.
Drag:
Touch the stylus point on the screen and drag in one direction to scroll
the map for direct search or landmarks.
Select and hold:
Select the item/icon and hold for a second to show the floating context
menu, and then select the item to be executed.
-18-
Using the SD Memory Card
This unit is equipped with a SD memory card slot; you can purchase SD
(Secure Digital) Cards to expand the memory capacity.
Insert the memory card as below: turn to the right side of the unit and
with the metal contacts of the memory card facing back, insert the card
into the slot.
Removing the Memory Card
1. Gently press the top of the memory card, and the card will eject
automatically.
2. Then remove the memory card.
-19-
GPSmile51
The included memory card contains the digital map files that are
required for the GPS navigational data. Please do not delete.
When removing the memory card, please make sure the card is not
reading data, or it will cause a system crash.
Please do not set the SD memory card as write protect, or the
system cannot be successfully executed.
When operating, accidental removal of the memory card will result
in showing an error message, please reinsert the memory card and
the system may need to be reset before successful execution.
Function Menu
The function menu is the main function window other than the
navigation screen and includes system settings, navigation settings,
schedule plans, GPS status, MP3, image browsing.
Entering the Operation Menu
Under the navigation screen, press the Menu key to enter the
operational menu.
For other detailed operational explanations, please refer to the
navigational software manual.
-20-
Setting
The setting function gives you the ability to adjust the basic system
options, including time settings, volume control, screen calibration,
startup message, backlight setting, version info, and GPS reset etc…
You can modify the settings according to personal preferences.
System Settings
[Time]
1. After the system startup, from main menu screen, select [Setting]
to go into the System Settings window.
2. Select from the [Hour] pull down menu and choose the correct value.
3. Select from the [Minute] pull down menu and choose the correct value.
4. Select
5. Select
to confirm, or select
to keep original settings.
to return to main menu screen.
-21-
GPSmile51
[Volume]
1. Under the settings window, control the volume directly with the
scroll bar. There are six levels of volume in total.
Scroll bar
[Startup Message]
1. Under the settings window, select [Warning Voice] Off or On for
whether the startup message is to be broadcast.
-22-
[Stylus Adjustment]
Control of this unit is accomplished primarily through the stylus by
touching/writing on the screen. If the system cannot correctly identify
your stylus’ input, please run through the screen calibration procedure.
1. From the settings window, select [Stylus Adjustment] option to
start the screen calibration procedure.
2. Use the stylus and touch once on the cross that’s displayed in the
center of the screen.
3. Touch once on the cross at the second position.
4. Touch once on the cross at the third position.
5. Follow the procedures and finish touching on the forth and fifth
positions.
-23-
GPSmile51
6. To finish the calibration procedure, press the Enter key to accept
the new settings. Press the Esc key to keep the old settings.
7. Select
to go back to the main menu screen.
Backlight Settings
The backlight settings will adjust the brightness of the backlight and
the auto-off time.
1. Under the setting window, select [Backlight] to enter the backlight
settings window.
2. Select the time to turn off backlight when running off the battery.
(1 min, 3 min, 5 min, 10 min, 30 min, Always On)
3. Select the time to turn off backlight when running off the external
adapter. (1 min, 3 min, 5 min, 10 min, 30 min, Always On)
-24-
4. Scroll the brightness bar to control backlight brightness, six levels
in total.
5. Select
to confirm or select
6. Select
to return to main menu screen.
-25-
to keep the original settings.
GPSmile51
Help
1. Under the setting window, select [Help] to enter the help window.
2. The screen display will show instructions for operation of music
playback and image browsing functions.
-26-
Music Playback Function
This unit has aMP3 Music Playback function that is capable of playing
back MP3 files stored on SD memory cards.
Storing MP3 files onto SD memory cards
On your computer, you must first convert the music from an audio CD
into MP3 files, then save them onto the SD memory card.
Starting music playback
1. Insert the SD memory card with stored MP3 files into the SD
memory card slot on the unit.
2. Power on, and select [Music] icon on main menu.
-27-
GPSmile51
3. The Music Playback Window.
4. Use the buttons in the Music Playback Window to control each
playback function.
5. For functions of different buttons in the Music Playback Window,
please refer to the illustration below:
Previous
Exit
Play/Pause
Increase Volume
Volume Display
To Song
Selection Window
Progress Bar Display
Back to First Song
Stop
Timer
Skip to Last Song
Song Title
Decrease Volume
Repeat Single Song
Next
Battery Indicator
Repeat All Songs
-28-
Create custom playlist
The Create custom playlist function lets you create a personalized
playlist, specifying which songs to play and in what order.
Adding/removing a song from the playlist will not copy or delete the
actual file. It will only add/remove the path and position of the music
file from the playlist.
1. Under the Music Playback Window, select [Menu] and go to the
Song Selection Window.
2. The panel on the left lists the source directories, select a directory
and double click to enter the directory.
3. After loading the list of MP3 files contained in the directory, select
the desired file to be played and double click to add to playlist. Or
click the [Add] button to add to playlist.
-29-
GPSmile51
4. The file will be added to the panel/playlist on the right.
5. Clicking the [Add All] button will add all songs currently in the left
panel into the playlist.
6. To remove a song from the playlist, please select the song from
the right panel and then click the [Delete] button.
7. Clicking the [Delete All] button at the right panel removes all songs
at once.
8. Click the
button to exit the Song Selection Window and go
back to the Music Playback Window.
Image Browsing Function
The system has an Image Browsing function that is capable of
displaying images/photographs stored on SD memory cards.
1. Insert the SD memory card with stored image files into the SD
memory card slot on the unit.
2. Power on, and select [Photo] icon on Main Menu.
-30-
3. The Image Browsing Window.
4. Double click a directory in the lower right panel that stores the
image files.
5. Double click the image/photograph file to be displayed.
6. Click the expand/shrink button to expand or shrink the viewed
image. (1x, 2x, 4x, 8x)
7. An expanded image can be panned by dragging the stylus around
on the screen.
8. Click
to go back to Main Menu.
-31-
GPSmile51
Using the CD
Appendix
Troubleshooting
System reset
Only under extremely few circumstances will it be required to reboot
the system. Reset your system if the following situations occur:
1. Heavy lag experienced with screen refresh or operations, resulting
in an inoperable system.
2. Cannot turn off the system with power button.
3. No response with selection on the screen.
Use the tip of the stylus and insert into the reset switch on top of the
unit.
-32-
The system will be immediately reset.
On the main menu screen, directly select the icon and start using.
Quick Troubleshooting
Power
Cannot startup
Screen
No screen
displayed
Display speed
is too slow
Navigation
Screen has no
response
GPS cannot
display my
current
location
Insufficient batter charge, please
connect to the adapter and restart
system.
After powering up, if the system has no
response, please try the following:
1. Connect to adapter, restart system.
2. Reset system.
1. Please check if the battery is low on
power.
2. Reset system.
Please reset system.
Make sure your current location is not
obstructed by buildings or other
inferences.
-33-
GPSmile51
Normal Care and Maintenance
To ensure the unit’s normal operation and extended life span, please
note the following while using and storing:
Keep dry
This product is not water proof. If it comes into contact with water
spray or is submerged it will seriously damage the components,
resulting in irreversible damage.
Please do not drop
If violently impacted or shocked, it might cause serious damage to the
unit.
Avoid sudden temperature changes
Condensation might happen when entering a warm room on a cold day.
To prevent condensation from damaging the unit, please place into an
airtight plastic bag before sudden temperature changes.
Keep away from strong fields
When using or storing, please keep away from strong
electromagnetic/radioactive or magnetic field equipment.
Operating temperature
The products operating temperature is between -10° and 55°C; please
do not operate under extreme temperatures.
Avoid sunlight exposures
Please avoid long periods of sunlight or high temperature exposure.
Using the stylus
The LCD screen is easily scratched; please use only the stylus for
operation. Do not use any other sharp objects on the screen to avoid
damaging the LCD screen.
-34-
Cleaning the screen
Using a soft clean cloth to wipe the screen is recommended; do not use
ordinary tissue to wipe the screen.
Please do not disassemble
Please do not disassemble the product, this might void the warrantee
and damage the unit.
Storage
When the product is not being used for a long period, please take the
battery out and store in a cool and dry place. For long-term storage,
keeping in a dry box is recommended.
Please do not keep the product in the following environments:
1. Unventilated and humid location.
2. Under a high temperature exposure through a car window.
3. Environments of humidity over 60%.
-35-
GPSmile51
Specifications
Integrated GPS Receiver
Acquisition Time
20 parallel channels
‧Reacquisition : 0.1 sec.
‧Hot start : 8 sec.
‧Warm start : 35 sec.
‧Cold start : 42 sec.
Accuracy
Operation Temperature
Position: 10 m. for 90%
Velocity: 0.1 m/s
Built-in flip-open active antenna
Companion CD: Adobe Acrobat Reader® for
Pocket PC - PDF file viewer
NAV-51 Handheld Manual
Centrality Atlas Processor at 200 MHz. O.S.
Microsoft Windows CE.Net 4.2
32 MB flash memory and 64MB SDRAM memory
for operating system and embedded applications
< 180 g
125.5(L) x75.8 (W) x21 (H) mm (H: 26.5 antenna
included)
Input voltage: 11V. ~ 28V.
Output voltage: 5.5V. ± 0.3V.
Rechargeable 1050 mAh. Li-ion
8 hours battery life when backlight is inactive
3 hours to fully charge
SD
3.5" high-brightness & contrast ratio transflective
TFT LCD (262k colors) with 240 x 320 (QVGA)
resolution
Red/Green LED for battery charging status
Built-in microphone and speaker 18 mm. stereo
earphone jack
-10°~55°C
Storage Temperature
-20°~70°C
Proprietary 24-pin Connector
USB client; DC power in
GPS antenna
Handheld Software (Preloaded)
Processor
Operating System
Memory
Weight
Size
Car Holder / Charger
Battery
Extension Slot
Display
LED
Audio
-36-