1
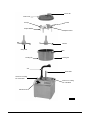
I
N
S
T
R
U
C
T
FOOD PROCESSORS
I
O
N
S
MODEL FP41, FP61, & FP62
FOOD PROCESSORS
MODELS
FP41
FP61
FP62
ML-104345
ML-104346
ML-104347
EXECUTIVE OFFICES
701 RIDGE AVENUE
TROY, OHIO 45374-0001
FORM 18655 (8-93)
Feed Tube
Bowl Cover
Scraper
Handle
Scraper Blades
Splash Guard
Cut Knife
Whip Knife
Bowl
Locating Pin
Locating Pin
Arm
Drive Shaft
Groove for Locating
Pin of the Bowl
Groove for Locating
Pin of the Bowl
Indicator Knob
PL-40043-1
© HOBART CORPORATION, 1993
–2–
Installation, Operation and Care of
MODELS FP41, FP61 & FP62 FOOD PROCESSORS
SAVE THESE INSTRUCTIONS
GENERAL
The Model FP41, FP61 and FP62 Food Processors may be used for:
•
•
•
•
•
Chopping and grinding meat, fish, fruits and vegetables
Mixing sauces, aromatic butter, mayonnaise and soups
Grinding nuts, almonds and bread crumbs
Kneading and mixing dough
Pureeing
Model FP41 is equipped with a 4-quart bowl. Models FP61 and FP62 are equipped with a 6-quart bowl. Models
FP41 and FP61 are single speed; Model FP62 has a high and low speed. All models have a separate pulse
function.
Standard equipment includes one cut/mix knife, a spatula, and a bowl scraper with turnable splash guard.
Optional equipment includes a whip knife, and additional bowls and knives. Also available as an option is a 4quart bowl adapter kit for Models FP61 and FP62. The adapter kit includes a 4-quart bowl, adapter ring, cut knife,
bowl cover and bowl scraper.
INSTALLATION
UNPACKING
Immediately after unpacking the food processor, check for possible shipping damage. If the food processor is
found to be damaged, save the packaging material and contact the carrier within 15 days of delivery.
Prior to installation, verify that the electrical service agrees with the specifications on the data plate located on
the back of the machine.
Do not lift the food processor by the arm; lift only with the carrying handles located on either side.
LOCATION
Your food processor should be operated on a suitable counter height surface.
ELECTRICAL CONNECTIONS
WARNING: THE POWER SUPPLY CORD ON THIS MACHINE IS PROVIDED WITH A THREE-PRONG
GROUNDING PLUG (4-PRONG GROUNDING PLUG ON MODEL FP62). THE OUTLET TO WHICH THIS
PLUG IS CONNECTED MUST BE PROPERLY GROUNDED. IF THE RECEPTACLE IS NOT THE PROPER
GROUNDING TYPE, CONTACT AN ELECTRICIAN.
Rated voltage of Models FP41 and FP61 is 115/60/1; rated voltage of Model FP62 is 240/60/3.
–3–
SETTING UP
1. Lift the arm up and then rotate it as far back as it will go.
2. Place the bowl on the machine so that the locating pins of the bowl are inserted into the grooves in the bowl
recess on top of the machine, push bowl all the way down to the base and rotate counterclockwise slightly
to lock in position.
3. Place the cut knife (or optional whip knife) on the drive shaft at the center of the bowl and make sure that
the knife drops all the way down to the bottom of the bowl.
4. Place the scraper in the bowl with its splash guard positioned at 6 o'clock.
5. Place the bowl cover on the bowl with the arrow on the bowl cover pointing toward the handle of the scraper,
and press the bowl cover down gently until the scraper and bowl cover snap together.
6. Lift the arm, and at the same time, swing it over the bowl cover. Lower the arm over the center of the bowl
cover to secure it in position.
The machine will not operate unless the bowl and bowl cover are correctly positioned and the arm is in position
above the center of the bowl cover.
CHECK MACHINE
Once the machine is set up, check to ensure that:
1. Cutting blades stop turning within 4 seconds when the arm is swung back away from the center of the bowl
cover.
2. The machine cannot be started with the bowl and bowl cover removed but with the arm swung into position
above the center of the drive shaft.
If either of these conditions occur, contact your local Hobart Service Office.
INSTALLING 4-QUART ADAPTER KIT ON MODELS FP61 OR FP62
1. Remove the 6-quart bowl from the machine (see REMOVING BOWL in this manual).
2. Fit 4-quart adapter ring into the bowl recess on top of the machine and rotate adapter ring counterclockwise
to lock in place.
3. Place 4-quart bowl on the machine inside the adapter ring. Place bowl so that the locating pins of the bowl
are inserted into the grooves in the bowl recess inside the adapter ring. Push bowl all the way down to the
base and rotate counterclockwise slightly to lock in position.
4. Place the 4-quart cut knife on the drive shaft at the center of the bowl and make sure that the knife drops
all the way down to the bottom of the bowl.
5. Place the 4-quart scraper in the bowl with its splash guard positioned at 6 o'clock.
6. Place the 4-quart bowl cover on the bowl with the arrow on the bowl cover pointing toward the handle of the
scraper. Press the bowl cover down gently until the scraper and bowl cover snap together.
7. Lift the arm, and at the same time, swing it over the bowl cover. Lower the arm over the center of the bowl
cover to secure it in position.
–4–
OPERATION
WARNING: ROTATING KNIVES INSIDE MACHINE. KEEP HANDS OUT.
BEFORE FIRST USE
Before using for the first time, wash all removable parts of the food processor in warm soapy water. The cutting
blade is very sharp; be very careful when cleaning the cutting blade. Rinse thoroughly and wipe dry with a soft
clean cloth.
INDICATOR KNOB — MODELS FP41 AND FP61 (Fig. 1)
The indicator knob for Models FP41 and FP61 has three positions:
OFF — machine is switched off.
ON — machine runs continuously.
PULSE — machine runs until the indicator knob is released. Use the PULSE setting for short processing
tasks in which a precise result is required.
SE
UL
OF F
P
•
•
•
ON
PL-51246-1
Fig. 1
INDICATOR KNOB — MODEL FP62 (Fig. 2)
The indicator knob for Model FP62 has four positions:
P
OFF — machine is switched off.
LOW SPEED — machine runs continuously at low speed.
HIGH SPEED — machine runs continuously at high speed.
PULSE — machine runs at low speed until the indicator knob is released. Use the PULSE setting for short
processing tasks in which a precise result is required.
SE
UL
OF F
•
•
•
•
L
O
W H IG
H
PL-51246-2
Fig. 2
–5–
USE OF CUT OR WHIP KNIFE
The cut knife and whip knife are manufactured using high quality knife steel to give a keen cutting edge and
effective cutting action. Never leave this type of knife in a wet condition when not in use and never place it on
a stainless steel worktop.
Use the cut knife when meat, fish, fruit, vegetables, etc., are to be cut, pulverized and blended. Use the cut knife
also for grinding nuts and bread crumbs, and kneading/mixing dough.
Use the whip knife when the product(s) are to be blended only, for example: sauces, aromatic butter,
mayonnaise and soups. If the action of the whip knife is sluggish because of the consistency of the product, try
using the cut knife instead.
SCRAPER
The scraper will remove product (e.g., minced meat) which has stuck to the sides of the bowl and return it to the
cutting zone during processing. It can also be used to stir/mix products which do not stick to the sides. The
scraper has four blades so it is only necessary to move it through a quarter turn to scrape the entire internal
surface of the bowl. To move the scraper, grasp the handle and rotate it either clockwise or counterclockwise
until it reaches the stop. The scraper should be fitted at all times since the blades of the scraper guide the product
toward the cut knife even when the scraper is not activated.
FEED TUBE
A splashguard is fitted to the scraper. Rotate the scraper in order to open or close the feed tube. The machine
will operate with the feed tube open.
PREPARING THE PRODUCT
For the best and most consistent results, cut firm products such as meat and cheese into pieces of equal size
no larger than 1" cube.
When processing dry product (e.g. bread crumbs), place product into the bowl first, turn the machine on, then
add liquid ingredients.
When pureeing, be sure to rotate scraper to get all liquid off the sides of the bowl and back into the cutting zone.
OPERATING THE FOOD PROCESSOR
1.
2.
3.
4.
Assemble components as described in Steps 1-4 in the SETTING UP section of this manual.
Add product. Refer to CAPACITY CHART in this manual.
Follow Steps 5 and 6 in the SETTING UP section of this manual.
For best results, use the pulse setting a few times at the beginning of the processing operation to cut product
into smaller pieces. Then set the indicator knob to the desired setting.
REMOVING BOWL
Always leave the cut/whip knife in the bowl when moving it so that the contents do not leak out through the tube
in the center of the bowl. To remove bowl, lift the arm slightly and rotate it to the rear to clear the bowl. Rotate
bowl slightly clockwise to unlock bowl locating pins from base, and lift bowl from machine.
–6–
CAPACITY CHART
The maximum quantity that can be processed at one time and the length of time required for the processing are
dependent on the consistency of the product and the kind of result desired. Shorter processing times give a
coarser end result, and longer processing times a finer one.
The chart below shows the maximum quantity that can be processed at one time and the approximate processing
time for various types of product.
MODEL FP41
(OR MODELS FP61/62
WITH 4-QT. ADAPTER)
MODELS FP61/62
PRODUCT
QTY.
TIME
QTY.
TIME
Mince, Slice, Chop
Onions/Carrots
Mozzarella Cheese
2 Lb.
2 Lb.
20 Sec.
20 Sec.
3 Lb.
3 Lb.
20 Sec.
20 Sec.
Meats
Fresh
Cooked
Salmon Mousse
Steak Tatar
2 Lb.
3 Lb.
2 1/2 Lb.
2 Lb.
30
30
30
30
Sec.
Sec.
Sec.
Sec.
3 Lb.
41/2 Lb.
3 1/2 Lb.
3 Lb.
30
30
30
30
Miscellaneous
Dough
Bread Crumbs
Parmesan Cheese (fine)
Aromatic Butter
Mayonnaise
Tomato Sauce
Liquid
3 Lb.
1 Lb.
1 Lb.
3 Lb.
1 3/4 Qt.
1 1/2 Qt.
1 Qt.
1 Min.
10 Sec.
1 Min.
30 Sec.
35 Sec.
20 Sec.
0
4 Lb.
1 1/2 Lb.
1 1/2 Lb.
4 Lb.
2 1/2 Qt.
1 3/4 Qt.
1 1/4 Qt.
1 Min.
10 Sec.
1 Min.
30 Sec.
35 Sec.
20 Sec.
0
Sec.
Sec.
Sec.
Sec.
CLEANING
WARNING: TURN MACHINE OFF AND UNPLUG THE POWER SUPPLY CORD BEFORE CLEANING.
Always clean the machine immediately after use. If leftovers are allowed to dry on the machine, cleaning
becomes difficult.
Never use steel wool or sharp objects during cleaning of the machine; the surfaces can be scratched, making
subsequent cleaning difficult.
Never use high pressure hosing equipment for cleaning, since it can result in electrical or mechanical damage.
Dismantle all removable parts from the machine and wash them in warm water and detergent. Rinse thoroughly
and wipe dry with a soft clean cloth.
Wipe the exterior of the machine with a damp cloth.
–7–
MAINTENANCE
WARNING: TURN MACHINE OFF AND UNPLUG THE POWER SUPPLY CORD BEFORE DOING ANY
MAINTENANCE.
Inspect the machine weekly to ensure that it is in proper working order. Fit the cut knife or whip knife and then
check the following:
1. The machine stops within 4 seconds after the arm has been swung away from the center of the bowl cover.
2. The machine cannot be started with the bowl removed and the arm swung into position above the center of
the bowl cover.
3. Unplug the power supply cord and check to make sure that it is in good condition with no cracks or cuts.
4. The blades of the cut knife are in good condition and have a sharp cutting edge.
If a problem occurs, contact your local Hobart Service Office before operating the machine.
TROUBLESHOOTING
PROBLEM
Machine won't start.
Machine stops while
operating and won't
restart.
FORM 18655 (8-93)
CAUSE
REMEDY
Fuse or circuit breaker
interrupting power.
Have electrician check circuit.
Bowl not in place.
Make sure bowl locating pins are in proper
position in the grooves on the bowl recess,
and the bowl is seated on the base and
locked in position.
Arm not in position over
center of bowl cover.
Lift arm and rotate to center of bowl cover.
Lower arm over center of bowl cover to
secure it in position.
Machine not plugged in.
Plug machine into electrical outlet.
Motor overloaded.
Allow motor to cool; motor will restart when
it has cooled.
Fuse or circuit breaker
interrupting power.
Have electrician check circuit.
–8–
PRINTED IN U.S.A.