1
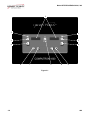
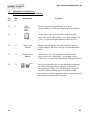
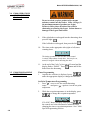
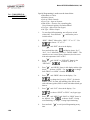
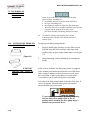
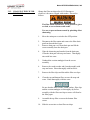
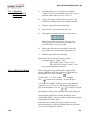
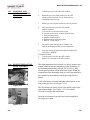
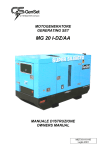
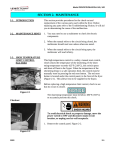
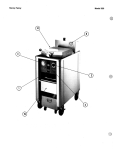
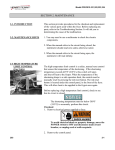
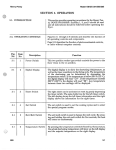
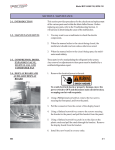
Model OFE/OFG/OEA/OGA-341, 342 SECTION 3. OPERATION 3-1. OPERATING COMPONENTS C1000 CONTROLS Description Reference Figure 3-1. Fig. No. 3-1 Item No. 1 3-1 2 This LED lights when the shortening temperature is within 5° of the setpoint temperature, signaling the operator that the shortening temperature is now at the proper temperature for dropping product into the frypot 3-1 3 The timer buttons are used to start and stop Cook Cycles 3-1 4 The idle buttons are used to start an Idle Mode which reduces the temperature of the shortening during non-use periods; press and hold to exit the Idle Mode 3-1 5 The program button is used to access the Program Modes; also, once in the Program Mode, it is used to advance to the next parameter 3-1 6&7 Used to adjust the value of the currently displayed setting in the Program Mode and to change set-point temperature for the left frypot, or basket 3-1 8&9 Used to adjust the value of the currently displayed setting in the Program Mode and to change set-point temperature for the right frypot, or basket Digital Display Function Shows the shortening temperature, the timer countdown in the Cook Cycle, and the selections in the Program Mode; the temperature of the shortening can be shown by pressing once, or twice to view set-point temperature; if shortening temperature exceeds 425°F (218°C), the display reads “E-5, FRYER TOO HOT” Proceed onto Section 3-3, Filling or Adding Shortening 408 3-1 Model OFE/OFG/OEA/OGA-341, 342 1 2 2 3 3 4 4 6 7 5 8 9 Figure 3-1 3-2 408 Model OFE/OFG/OEA/OGA-341, 342 3-2. OPERATING CONTROLS 12 BUTTON CONTROLS This section provides operating procedures for the Henny Penny 340 series open fryer with 12 button timer controls. Read sections 1, 2, and 3, and all instructions before operating the fryer. Figure 3-2 shows the function of the 12 button timer control. Fig. No. Item No. 3-2 1 3-2 2 3-2 3 Once the fryer is out of the Melt Mode, this LED lights, signaling the operator that the shortening temperature is not at the proper temperature for cooking product 3-2 4 This LED lights when the shortening temperature is within 5° of the setpoint temperature, signaling the operator that the shortening temperature is at the proper temperature for cooking product 3-2 5 Used to display the current shortening temperature, the setpoint temperature, as well as cooking performance, and other information such as, filter use, time of day, etc; in the Program Mode, it steps back to the previous parameter 3-2 6&7 903 Description Function This LED lights when the control calls for heat, and the burners come on and heat the shortening Digital Display Shows the shortening temperature, the timer countdown in the Cook Cycle, and the selections in the Program Mode; press the INFO button to display the temperature of the shortening; if the temperature exceeds 425°F (218°C), the display reads "E-5", “FRYER TOO HOT” Used to adjust the value of the currently displayed setting in the Program Mode 3-3 Model OFE/OFG/OEA/OGA-341, 342 3-2. OPERATING CONTROLS12 BUTTON CONTROLS (Continued) Fig. No. Item No. Description 3-2 8 Used to access the Program Modes; once in the Program Mode, it is used to advance to the next parameter 3-2 9 Used to stop Cook Cycles and also to stop the quality timer at the end of a Hold Mode; to use them to start Cook Cycles, see Special Program Mode Section item SP-10 0 3-2 10 Menu Card Window 3-2 11 Product Select Buttons 3-2 12 3-4 Function Displays the food product associated with each product selection button; the menu card strip is located behind the decal Used to stop Cook Cycles and also to stop the quality timer at the end of a Mold Mode; to use them to start Cook Cycles, see Special Program Mode Section item SP-10 Are used to manually raise or lower the basket (or baskets), out of the shortening if unit is equipped with auto-lift; if pressed during a Cook Cycle, the cooking time is paused until the basket (or baskets) are lowered back into the shortening; on units not equipped with auto-lift, these buttons manually pause and resume a cook timer 903 Model OFE/OFG/OEA/OGA-341, 342 12 9 1 2 3 4 5 10 6 7 12 8 9 11 Figure 3-2 903 3-5 Model OFE/OFG/OEA/OGA-341, 342 3-3. FILLING OR ADDING SHORTENING The shortening level must always be above the heating elements when the fryer is heating and at the frypot level indicators on the rear of the frypot. Failure to follow these instructions could result in a fire and/or damage to the fryer. When using solid shortening, it is recommended to melt the shortening on an outside heating source before placing it in the frypots. The heating elements or burner tubes must be completely submerged in shortening. Fire or damage to the frypot could result. 1. It is recommended that a high quality frying shortening be used in the open fryer. Some low grade shortenings have a high moisture content and will cause foaming and boiling over. Wear gloves to avoid severe burns when pouring hot shortening into frypot. Shortening and all metal parts that are in contact with the shortening are extremely hot, and take care to avoid splashing. Figure 3-3 2. The gas open fryers require 90 lbs. (41 kg) of shortening per frypot, and the electric 80 lbs. (36 kg) per frypot. All frypots have 2 level indicator lines inscribed on the rear wall of the frypot. The top indicator shows the proper level of heated shortening; the bottom indicator shows the proper level of cold shortening. (See Figure 3-3) So the faucet doesn’t interfere with operating, filtering and cleaning procedures, swivel the faucet to either frypot and push it into the area above the elements, as shown in Figure 3-4 at left. Figure 3-4 3-6 408 Model OFE/OFG/OEA/OGA-341, 342 3-4. C1000 OPERATIONS AND PROCEDURES The Computron 1000 controls are available on both split electronic controls frypot and full frypot fryers. The following is a brief description of the operating procedures for fryers with these controls. 1. Be sure the drain valve is in the closed position. 2. Place basket support inside of frypot. 3. Make sure frypot is filled with shortening to the proper level. 4. Display shows “OFF” until power switch is turned to the ON position. Display now shows the cook time and the unit automatically goes into the Melt Cycle until the shortening temperature reaches 230°F (110°C). The control then automatically exits the Melt Cycle. The OFG-320 series open fryer has several safety devices which shuts-down the gas supply when they are activated. The above procedures should be followed to restart the open fryer and if the shut down is repeated, a qualified technician should be notified. The Melt Cycle may be bypassed, if desired, by pressing and holding for 3 seconds. Do not bypass the Melt Cycle unless enough shortening on gas fryers and elements on electric fryers. If Melt Cycle is bypassed before all burner tubes or elements are covered, excessive smoking of the shortening, or a fire will result. 5. Once out of the Melt Cycle, the shortening is heated until lights and the cook time is displayed. Thoroughly stir shortening to stabilize the temperature throughout the frypots. 408 6. Before loading product into the baskets, lower baskets into the hot shortening to keep the product from sticking to the baskets. 7. Once the shortening temperature has stabilized at the setpoint temperature, lower the basket with product into the frypot. 3-7 Model OFE/OFG/OEA/OGA-341, 342 3-4. C1000 OPERATIONS AND PROCEDURES (Continued) Do not overload, or place product with extreme moisture content into the basket. 18 lbs. (8.2 kgs.) is the maximum amount of product per frypot. Failure to follow these directions can result in shortening overflowing the frypot. Serious burns or damage to the frypot could result. 9. If the right basket was dropped into the shortening, then press the right . If the left basket was dropped, then press the left . 10. The timer on the appropriate side (right or left) starts counting down. The timing operation of the two sides of the control is entirely independent of each other. One may be set, started, or stopped without affecting the other. 11. At the end of the Cook Cycle a tone will sound and the display flashes “DONE”. Press button and lift the basket from the shortening. 3-5. C1000 PROGRAMMNG INSTRUCTIONS Timer Programming 1. Anytime the cook time is displayed, press under the appropriate display to change the cook time. Set-Point Temperature Programming 1. Press once to view the actual shortening temperature and press again to view the set-point temperatue. 2. While the set-point temperature is in the display, press to change the set-point temperature. If “LOCK” shows in display when pressing , the controls are locked and must be unlocked before changing the time or set-point temperature. See C1000 Special Programming Section. 3-8 408 Model OFE/OFG/OEA/OGA-341, 342 3-6. C1000 SPECIAL PROGRAMMING Special Programming is used to set the items below: Fahrenheit or Celsius Initialize System Lock or Unlock Controls Fryer Type – Open or Pressure Heat Source – Electric; Gas w/standing pilot; Gas w/electronic ignition; Gas-Induced Draft Vat Type - Split or Full Vat (frypot) Oil Type - Solid or Liquid 1. To enter Special Programming, turn off power switch (either side). Press and hold and turn the power switch back on. 2. “SPEC” “PROG” followed by, “DEG” “°F” or “°C”. Use to choose “°F” or “°C”. 3. Press and “INIT” shows in the display. Press and hold the right and display shows “In-3”, “In-2”, “In-1” followed by “Init Sys” “DONE DONE”. The controls now are reset to factory parameters, the time set to 0:00 and temperature 190°F or 88°C. 4. Press and “LOCK” or “UNLOCK” shows in the displays. Use to choose “LOCK” or “UNLOCK”. 5. Press and “FRYR” shows in left display and the right display should show “OPEN”. Use to change from “PRES” to “OPEN” if needed. 6. Press and “FRYR” shows in the display. Use to change the fryer type: “ELEC” for electric models; “GAS” for units with standing pilot; SSI for units with solid state ignition; IDG for units with induced draft gas burners. 7. Press and “VAT” shows in the display. Use to choose “SPLIT” or FULL” vat (frypot) type. 1209 8. Press and “MELT” and “Solid” or “LIQD” shows in the displays. Use to choose “Solid”, if using solid shortening, or “LIQD”, if using liquid shortening. 9. Press and hold time. to exit Special Programming at any 3-9 Model OFE/OFG/OEA/OGA-341, 342 3-7. BASIC OPERATIONS AND PROCEDURES(12 Button Controls/Autolift) The Henny Penny open fryers are available with 12 product button controls. Also, models OEA/OGA are available with 12 button controls with auto-lift features. The auto-lift controls automatically lowers the basket(s) into the shortening, at the beginning of the Cook Cycle, and raises the basket(s) at the end of the cycle. 1. Be sure the drain valve is in the closed position. 2. Place basket support inside frypot. 3. Fill the frypot with shortening. 4. Move power switch to the ON position. Unit automatically goes into the Melt Cycle. When the temperature reaches 230°F (110°C) the control enters the Heat Cycle, and heats the shortening until the temperature setting is reached. The gas open fryer has several safety devices which shuts down the gas supply when they are activated. Follow above procedures to restart the fryer, and if the shut down is repeated, notify a qualified technician. Only on gas units can the Melt Cycle be bypassed, if desired, by pressing a product button and holding it for five seconds. The display shows “EXIT MELT? 1=YES 2=NO”. Press to exit melt. Do not bypass the Melt Cycle unless enough shortening has melted to completely cover all of the heat tubes. If the Melt Cycle is bypassed before all heat tubes are covered, excessive smoking of shortening, or a fire will result. 5. 3-10 Once out of the Melt Cycle, flashes until the setpoint temperature is reached. Then I illuminates. 408 Model OFE/OFG/OEA/OGA-341, 342 3-7. BASIC OPERATIONS AND PROCEDURES(12 Button Controls/Autolift) Continued) The two separate timer controls (left and right), can be programmed entirely independent from each other for 2 half baskets, or as one timer for a single, full sized basket. The default setting from the factory is for two half sized baskets. To change to a single full size basket setting, push and hold the #1 product button while turning on the power switch. To change back to the two basket mode, push and hold the #2 product button while turning on the power switch. When using a single full size basket, be sure the control is set for 1 basket. Upon turning on the fryer, the display shows “1 BASKET”, or “2 BASKET”. If “2 BASKET” is set, while using a single basket, damage to the basket or lift mechanisms could result. 6. Thoroughly stir shortening to stabilize the temperature throughout the frypots. 7. Once the shortening temperature has stabilized at the setpoint temperature, place the baskets into the shortening, (or for auto-lift fryers, lift basket onto the hangers). Place product into the basket. Do not overload, or place product with extreme moisture content into the basket. 18 lbs. (8.2 kgs.) is the maximum amount of product per frypot. Failure to follow these directions can result in shortening overflowing the frypot. Serious burns or damage to the frypot could result. 903 8. If the right basket is to be lowered into the shortening, then one of the right product buttons should be pressed. If the left basket is to be lowered, then one of the left product buttons should be pressed. On auto-lift fryers, the basket(s) automatically lowers into the shortening. 9. The timer on the appropriate side will start counting down. 3-11 Model OFE/OFG/OEA/OGA-341, 342 3-7. BASIC OPERATIONS AND PROCEDURES(12 Button Controls/Autolift) (Continued) To load product directly into the shortening on Auto-lift fryers, lower empty basket(s) into the shortening by pressing , load with product, then press the product button to start the Cook Cycle. Raise the basket(s) on Auto-lift fryers anytime during a Cook Cycle by pressing . The Timed Cycle then pauses. 10. At the end of the Cook Cycle, a tone sounds and the display shows “DONE”. Lift the basket from the shortening. (On auto-lift fryers, the basket(s) automatically rises out of the shortening.) To stop the “DONE” beeper, press either , or the product button. A different product can be selected during the first minute of cooking, in case the wrong product button was pressed. 11. The display shows either dashes, or the product name, depending on the Special Program setting, SP-10. If a Quality Time was programmed, the controller alternately shows the product selected and the Quality Time remaining in minutes. If a different product is selected during the Hold Cycle, the display only shows the product selected. 12. At the end of the Hold Cycle, a tone sounds, the display flashes “QUALITY”, and the product it was timing. Press and release . In the Cook Mode, when "FILTER SUGGESTED, shows in the display, the operator has the option to filter at this time, or to continue cooking. But, if the operator continues cooking, a filter lockout will occur within the next Cook Cycle, or two. When "FILTER LOCKOUT" , then "YOU *MUST* FILTER NOW........” shows in the display, is the only button that functions, until the unit is filtered. 3-12 903 Model OFE/OFG/OEA/OGA-341, 342 3-8. CARE OF SHORTENING FOLLOW THE INSTRUCTIONS BELOW TO AVOID SHORTENING OVERFLOWING THE FRYPOT, WHICH COULD RESULT IN SERIOUS BURNS, PERSONAL INJURY, FIRE, AND/OR PROPERTY DAMAGE. 1. Maintain the shortening at the proper cooking level. Add fresh shortening as needed. 2. To protect and get the maximum life out of the shortening, lower the temperature to 275° F (135° C) or lower when the fryer is not in immediate use. Deteriorated shortening smokes badly, even at lower temperatures. 3. Taste the cold shortening daily for signs of bad flavor. Discard any shortening which has a bad flavor or shows signs of excessive foaming or boiling. Keep the frypot clean. WITH PROLONGED USE, THE FLASHPOINT OF SHORTENING IS REDUCED. DISCARD SHORTENING IF IT SHOWS SIGNS OF EXCESSIVE SMOKING OR FOAMING. SERIOUS BURNS, PERSONAL INJURY, FIRE, AND/OR PROPERTY DAMAGE COULD RESULT. 907 3-13 Model OFE/OFG/OEA/OGA-341, 342 3-9. FILTERING OF SHORTENING 1. Best results are obtained when shortening is filtered at the normal frying temperature. DRAIN VALVE HANDLE 2. PUMP SWITCH Turn the main switch to the off position. Remove and clean the fry basket in soap and water. Rinse thoroughly. Use a metal spatula to remove any build up from the sides of frypot. Do not scrape burner tubes on gas models, or heating elements on electric models. Scraping the electric fryer elements, or the burner tubes of the gas frypot, produces scratches in these surfaces causing breading to stick and burn. FILTER UNION Figure 3-5 The filter drain pan must be as far back under fryer as it will go, and the cover in place. Be sure the hole in the cover lines up with the drain before opening the drain. Failure to follow these instructions causes splashing of shortening and could result in personal injury. Surfaces of fryer and baskets will be hot. Use care when filtering to avoid getting burned. 3. Open door(s) under unit, and slowly turn drain valve handle a half turn. Leave for a few minutes, then slowly, fully open drain valve. This prevents much splashing of the hot shortening as it drains. Figure 3-5. 4. As the shortening drains from the frypot, use brushes to clean the sides of the frypot and the burner tubes or heating elements. If the drain fills with breading, use straight white brush to push excess breading into the drain pan. 5. When all shortening has drained, scrape or brush the sides and the bottom of the frypot. Use the lift tool (Figure 3-6) and lift the elements (electric fryers), to clean the bottom of the frypot. Figure 3-7. Figure 3-6 Figure 3-7 3-14 406 Model OFE/OFG/OEA/OGA-341, 342 3-9. FILTERING OF SHORTENING (Continued) 6. Rinse the frypot as follows: a. Close the drain valve. b. Position return line over empty frypot. Figure 3-8. c. Move the pump switch to the pump position. d. Fill the frypot 1/3 full, then turn off pump. e. Wash down and scrub the sides of the frypot with the brushes. f. After the sides and bottom are cleaned, open the drain valve. 7. Close drain valve and pump all of the shortening out of the filter drain pan and back into the frypot. Figure 3-8 IF SHORTENING FLOW IS SLOW FROM THE FAUCET, IT’S POSSIBLE THAT THE FILTER CONNECTION AT THE UNION ON THE FILTER TUBE IS NOT TIGHTENED PROPERLY. IF SO, TURN OFF THE PUMP AND WEAR ROTECTIVE GLOVES OR CLOTH WHEN TIGHTENING THE UNION. THIS UNION WILL BE HOT. SEVERE BURNS COULD RESULT. 406 8. When the pump is pumping air only, move the pump switch from on to off. 9. Check the level of the shortening in the frypot. Add fresh shortening if necessary, until it reaches the top level indicator line on the rear wall of the frypot. 3-15 Model OFE/OFG/OEA/OGA-341, 342 3-9. FILTERING OF SHORTENING (Continued) About 10 to 12 filterings can be made with one filter paper envelope, depending on: • the quantity and type of product fried and filtered • the type of breading used • the amount of crumbs left inside the filter drain pan; When the filter screen assembly and filter paper become clogged, and the pumping flow slows, clean the screen assembly and change the filter envelope. 10. 3-10. FILTER PUMP PROBLEM PREVENTION To continue cooking, turn the main power switch to the on position. (Remove the element lift tool on electric fryers.) To help prevent filter pump problems: 1. Properly install paper envelope over the filter screens. Fold the open end of the envelope, and clamp with retaining clips so that crumbs cannot enter. (See Figure 3-9) 2. Pump shortening, until no shortening is coming from nozzle. Figure 3-9 3-11. FILTER PUMP MOTOR PROTECTOR – MANUAL RESET In the event it overheats, the filter pump motor is equipped with a manual reset button located on the rear of the motor. After waiting 5 minutes to allow the motor to cool, press the reset button. It takes some effort to reset the motor. A screwdriver can be used to help press reset button. Servicing of the filter pump is done at the side of the unit. If service is required, disconnect the open fryer from the electrical and/or gas power source. To prevent burns caused by splashing shortening, turn the unit's filter pump switch to the off position before resetting the filter pump motor’s manual reset protection device. 3-16 903 Model OFE/OFG/OEA/OGA-341, 342 3-12. CHANGING THE FILTER ENVELOPE Change the filter envelope after 10-12 filterings or whenever it becomes clogged with crumbs. Proceed as follows: The filter union could be hot. Wear protective glove or cloth, or severe burns could result. Use care to prevent burns caused by splashing of hot shortening. 1. Move the main power switch to the OFF position. 2. Disconnect the filter union and remove the filter drain pan from beneath the frypot. Remove drain pan cover from drain pan and lift the screen assembly from the drain pan. 3. 4. Wipe the shortening and crumbs from the drain pan. Clean the drain pan with soap and water. Thoroughly rinse with hot water. 5. Unthread the suction standpipe from the screen assembly. 6. Remove the crumb catcher and clean thoroughly with soap and water. Rinse thoroughly with hot water. 7. Remove the filter clips and discard the filter envelope. 8. Clean the top and bottom filter screen with soap and water. Rinse thoroughly with hot water. Be sure that the filter screens, crumb catcher, filter clips and the suction standpipe are thoroughly dry before assembly with the filter envelope or water will dissolve the filter paper. 903 9. Assemble the top filter screen to the bottom filter screen. 10. Slide the screen into a clean filter envelope. 3-17 Model OFE/OFG/OEA/OGA-341, 342 3-12. CHANGING THE FILTER ENVELOPE (Continued) 3-13. CLEANING THE FRYPOT(S) 11. Fold the corners in and then double fold the open end. 12. Clamp the envelope in place with the two filter retaining clips. 13. Replace the crumb catcher screen on top of the filter paper. Screw on the suction standpipe assembly. 14. Place complete filter screen assembly back into filter drain pan, replace cover, and slide pan back into place beneath the fryer. 15. Connect the filter union by hand. Do not use a wrench. 16. The fryer is now ready to operate. After the initial installation of the fryer, as well as before every change of shortening, the frypot should be thoroughly cleaned as follows: 1. Turn the main power switch off. The filter drain pan must be as far back under fryer as it will go, and the cover in place. Be sure the hole in the cover lines up with the drain before opening the drain. Failure to follow these instructions causes splashing of shortening and could result in personal injury. Moving the fryer or filter drain pan while containing hot shortening is not recommended. Hot shortening can splash out and severe burns could result. Always wear chemical splash goggles or face shield and protective rubber gloves when cleaning the frypot as the cleaning solution is high in alkaline. Avoid splashing or other contact of the solution with your eyes or skins. Severe burns may result. Carefully read the instructions on the cleaner. If the solution comes in contact with your eyes rinse thoroughly with cool water and see a physician immediately. 2. 3-18 If hot shortening is present in the frypot, drain it by slowly opening the drain valve handle, one half turn. Leave for a few minutes, then slowly open the valve to full open position. 903 Model OFE/OFG/OEA/OGA-341, 342 3-13. CLEANING THE FRYPOT(S) (Continued) 3. Close the drain valve. Discard the shortening in the filter pan using the shortening shuttle. Then install the filter drain under the fryer, leaving out the filter screen assembly. The filter union could be hot. Wear protective glove or cloth, or severe burns could result. 4. Fill the frypot to the level indicator line with hot water. Add 4 ounces (.12 l) of fryer cleaner to the water and mix thoroughly. The fry basket can be placed inside the frypot for cleaning. 5. Use the Clean-Out Mode (see section 3-14), or turn the main power switch to the ON position and set temperature to 195° F (90.5° C). 6. When the solution reaches 195° F (90.5° C), turn the main power switch to the OFF position. If the cleaning solution in the frypot starts to foam and boil over, immediately turn the power switch to OFF or damage to components could result. Do not use steel wool, other abrasive cleaners or cleaners/ sanitizers containing chlorine, bromine, iodine or ammonia chemicals, as these will deteriorate the stainless steel material and shorten the life of the unit. Do not use a water jet (pressure sprayer) to clean the unit, or component damage could result. 7. Let the cleaning solutions stand for 15 to 20 minutes with the power off. 8. Using the fryer brush (never use steel wool), scrub the inside of the frypot. Lift the elements (electric fryers), to clean the bottom of the frypot (See Figures 3-10 and 3-11). 9. After cleaning, open the drain valve and drain cleaning solution from the frypot into drain pan and discard. 10. Replace the empty drain pan, close the drain valve, and refill frypot with plain hot water to the proper level. Figure 3-10 Figure 3-11 207 3-19 Model OFE/OFG/OEA/OGA-341, 342 3-13. CLEANING THE FRYPOT(S) (Continued) 11. Add approximately 8 ozs. (0.24 liters) of distilled vinegar. Use the Clean-Out Mode (see section 3-14), or bring the solution back up to 195° F (90.5° C). 12. Using a clean brush, scrub the interior of frypot. This neutralizes the alkaline left by the cleaning compound. 13. Drain the vinegar rinse water and discard. 14. Rinse down the frypot using clean, hot water. 15. Thoroughly dry the drain pan and the frypot interior. Make sure the inside of the frypot, the drain valve opening, and all the parts that come in contact with new shortening are as dry as possible. 16. Replace the clean filter screen assembly in the drain pan, replace cover, and install drain pan under fryer. 17. Refill the frypot with fresh shortening. Henny Penny has the following cleaners available: Foaming Degreaser - Part no. 12226 PHT Liquid Cleaner - Part no. 12135 PHT Dry Powder Cleaner - Part no. 12101 See your local distributor for details. 3-14. CLEAN-OUT MODE When heating the cleaning solution and vinegar solutions, turn the POWER switch to the ON position. When the fryer starts the Melt Cycle, press and hold then “CLEAN-OUT ?”, “1=YES 2=NO” shows in display. Press to start Clean-Out Mode. The fryer displays “*CLEAN-OUT MODE*” and heats up to a preprogrammed temperature, up to 195˚F (91˚C), then automatically begins a preset timed countdown. Use the if necessary, to adjust the temperature and keep the cleaning solution from boiling over. Once the timed countdown is complete and display shows “CLEANING DONE”, turn power switch to off position and drain cleaning solution from the frypot. Refer back to the Cleaning the Frypot procedures for more detailed instructions. See Special Program Modes SP-20 and SP21 to preset the temperature and time. 3-20 207 Model OFE/OFG/OEA/OGA-341, 342 3-15. LIGHTING AND SHUTDOWN OF THE BURNERS 1. Turn the power switch to the OFF position. 2. Rotate the gas valve knob clockwise to the OFF position and wait at least five(5) minutes before continuing to the next step. 3. Rotate gas valve counter clockwise to the on position. 4. Place the power switch to the ON position. Ignition sequence: a. Checks to see vacuum switch is open. b. Fan runs and waits for vacuum switch to close. c. 30 Second purge delay. d. Ignition modules turn on. e. Ignition modules sparking igniters. f. Pilot lit – ready to heat. 5. The burner lights and operates in a Melt Cycle until the shortening reaches a preset temperature. 6. Press the desired product button after the display and LED shows “READY”. To Shutdown burner: 1. Turn the power switch to the OFF position. 2. Rotate gas valve knob to the OFF position. 3-16. HIGH TEMPERATURE LIMIT CONTROL This high temperature limit control is a safety, manual reset control, which senses the temperature of the shortening. If the shortening temperature exceeds 425°F (218°C), this switch opens and shuts off the heat to the frypot. When the temperature of the shortening drops to a safe operation limit, the control must be manually reset by pressing the reset button. A red reset button is located under the control panel, in the front of the gas fryer. (See Figure 3-12) Figure 3-12 The reset button on electric fryers is located in a hole in the right element hinge. (See Figure 3-13) Use a small screwdriver to press the reset button. Once the reset button is pressed, heat is then supplied to the frypot once again. Figure 3-13 903 3-21 Model OFE/OFG/OEA/OGA-341, 342 3-17. REGULAR MAINTENANCE As in all food service equipment, the Henny Penny open fryer requires care and proper maintenance. The table below provides a summary of scheduled maintenance procedures to be performed by the operator. Procedure Filtering of shortening Frequency Daily (3-4 loads) Changing of shortening When shortening smokes, foams up violently, or tastes bad Changing the filter envelope After 10-12 filterings, or when envelope is clogged with crumbs Cleaning the frypot Every change of shortening If moving fryer to perform preventive maintenance: • Gas supply should be turned off to avoid fire or explosion. • Electrical supply should be unplugged or wall circuit breaker turned off to avoid electrical shock. 3-22 903