1
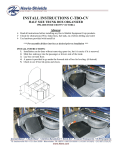
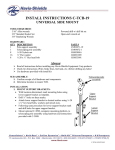
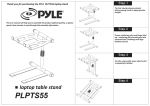
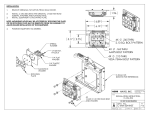
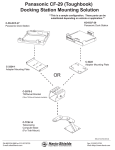
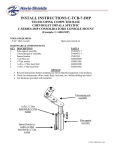
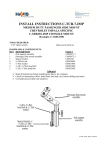
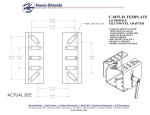
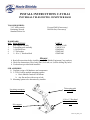
INSTALL INSTRUCTIONS C-TCB-14
UNIVERSAL TELESCOPING COMPUTER BASE
TOOLS REQUIRED:
3/16” Allen wrench
Ratcheting Wrench
Standard Socket Set
Powered Drill (if necessary)
Drill Bit Set (if necessary)
HARDWARE:
QTY DESCRIPTION
1
Pole support assembly
1
Telescoping pole assembly
4
¼-20 Nylock nut
4
¼” Flat washer
4
¼ - 20 x ½” Hex head bolt
PART #
CM93071-14W
CM93072-14
GSM30016
GSM31005
GSM33000
Always!
Read all instructions before installing any Havis-Shields Equipment Corp products.
Check for obstructions (Wire, brake lines, fuel tank, etc.) before drilling any holes!
Use hardware provided with install kit
SUB ASSEMBLY:
1. Confirm receipt of all hardware and components.
2. C-TCB-14 offers multiple mounting options.
a. Havis Shields extruded Trak Mount
b. Any flat surface with access to bolt.
3. Mounting option to be determined by installer.
Location to mount to
Trak or flat surface
Pole support
assembly
Telescoping pole
assembly
¼-20 x ½” Hex head
bolts, washers & hex
nuts
C-TCB-14_INST_8-07
INSTALLATION:
1. Mount C-TCB-14 to Havis-Shields Trak Mount:
• Mount console, transmission hump bracket(s), and Trak mount being sure to leave
room for C-TCB-14
• Slide (4) ¼-20 x ½” Hex head bolts, (2) in each rail.
• Place Pole support assembly so slots line up with hex head bolts on Trak mount.
• Secure with ¼” Flat washers and nylock nuts.
• Attach optional C-3090 Computer mounting platform to Telescoping pole assembly.
Note: It is recommended to leave all components loose on Trak until exact positioning is determined.
2. Mount C-TCB-14 to flat surface:
• Exact location to be determined by installer.
• Position C-TCB-14 on floor or other flat surface in vehicle.
• Mark and drill ¼” holes.
• Bolt using ¼-20 x ½” Hex head bolts, washers and nylock nuts.
• Attach optional C-3090 Computer mounting platform to Telescoping pole assembly.
C-TCB-14_INST_8-07