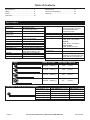
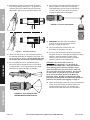
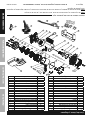
1
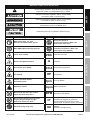
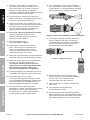
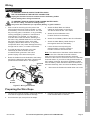
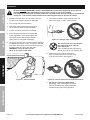
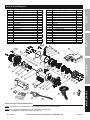
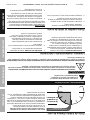
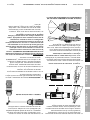
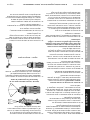
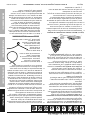
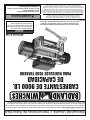
Owner’s Manual & Safety Instructions
Save This Manual Keep this manual for the safety warnings and precautions, assembly,
operating, inspection, maintenance and cleaning procedures. Write the product’s serial number in the
back of the manual near the assembly diagram (or month and year of purchase if product has no number).
Keep this manual and the receipt in a safe and dry place for future reference.
REV 15c
Visit our website at: http://www.harborfreight.com
Email our technical support at: [email protected]
When unpacking, make sure that the product is intact
and undamaged. If any parts are missing or broken,
please call 1-888-866-5797 as soon as possible.
Copyright© 2013 by Harbor Freight Tools®. All rights reserved.
No portion of this manual or any artwork contained herein may be reproduced in
any shape or form without the express written consent of Harbor Freight Tools.
Diagrams within this manual may not be drawn proportionally. Due to continuing
improvements, actual product may differ slightly from the product described herein.
Tools required for assembly and service may not be included.
Read this material before using this product.
Failure to do so can result in serious injury.
SAVE THIS MANUAL.
Table of Contents
Specifications.............................................. 2
Safety��������������������������������������������������������� 3
Setup........................................................... 8
Operationa��������������������������������������������������� 10
Maintenancei���������������������������������������������� 13
Parts List and Diagram............................... 15
Warranty..................................................... 16
Specifications
Rated Single Line Pull 9,000 lb. (4082 kg.)
Application
Vehicle Recovery /
For Trucks and SUV’s
Motor
12VDC 4.6 HP Series Wound
Power IN &
Yes
Power OUT
Duty Cycle Rating
5% (45 sec at Max Rated Load;
14 min, 15 sec Rest)
Pendant Controller
Wired, 12 ft (3.7m) long
Geartrain
3-Stage Planetary
Gear Ratio
210:1
Freespool
Sliding Ring Gear
Brake
Auto. Load Holding
Drum (Dia. X L)
2.5″ X 8.8″ (64mm X 224mm)
Clevis Hook
3/8″, Replaceable with
Spring‑loaded Safety Latch
Fairlead
Roller with nylon bushings
Overload Protection
In line Circuit Breaker
Sound Rating
85 dB
Layer
Wire Rope Size / Type Ø3/8″ X 65′ (Ø9.5mm X 19.8m)
Nominal strength=14,000 lb
7X19 Galvanized Steel
Aircraft Wire Rope
Battery
12VDC Minimum 650 CCA
Battery Cables
3.5 gauge, 6′ (1.8m) long
Mounting Bolt Pattern 10″ x 4.5″ (254mm x 114.3mm)
Mounting Hardware
Winch:
4x G8, M10-1.50 X 30mm
Fairlead:
2x G8, M12-1.75 X 25mm
Solenoid Box:
2x G8, ST-M5 X 14mm
Overall Dimensions
21-5/8″ X 6-3/8″ X 10-1/8″
(L X D X H)
Weight
81.2 lb. (37 kg.)
IP Rating
IP 66 - Winch and Controls
(resistant to powerful water jets,
except remote control switch)
Winch Certification
CE
Rated Line Pull
Wire Rope Capacity
1
9000 lb. (4082 kg.)
15.9′
(4.8m)
2
7138 lb. (3238 kg.)
35.9′
(10.9m)
3
5914 lb. (2683 kg.)
60.1′
(18.3m)
4
5049 lb. (2290 kg.)
65′
(19.8m)
First Layer of Wire Rope Performance
Line Pull lb. (kg.) Line Speed fpm (mpm) Amp Draw (@ 12V)
1
Page 2
0(0)
2000 (907)
4000(1814)
6000(2722)
8000(3629)
9000(4802)
19.2
11.5
9
7.6
6.3
5.7
(5.9)
(3.5)
(2.7)
(2.3)
(1.9)
(1.7)
For technical questions, please call 1-888-866-5797.
97
146
190
245
305
322
Item 61325
WARNING SYMBOLS AND DEFINITIONS
This is the safety alert symbol. It is used to alert you to potential
personal injury hazards. Obey all safety messages that
follow this symbol to avoid possible injury or death.
Safety
Indicates a hazardous situation which, if not avoided,
will result in death or serious injury.
Indicates a hazardous situation which, if not avoided,
could result in death or serious injury.
Indicates a hazardous situation which, if not avoided,
could result in minor or moderate injury.
Addresses practices not related to personal injury.
Property or Statement
Wear heavy-duty, cut- and
abrasion‑resistant leather gloves.
Do not use winch in
overwind orientation. (Wire rope
enters/exits at the top.)
Wear ANSI-approved safety glasses.
Use winch only in
underwind orientation. (Wire rope
enters/exits at the bottom.)
Cut or sever hazard.
Roller entanglement hazard.
Hot surface burn hazard.
VDC
A
CCA
HP
Fire hazard.
Caustic chemical hazard
from battery acid.
fpm
Volts Direct Current
Amperes
Cold Cranking Amperes
Horsepower
Feet Per Minute
Explosion hazard.
mpm
Meters Per Minute
Do not loop the wire rope around
object and hook onto itself.
RPM
Revolutions Per Minute
Do not place finger(s) through hook.
Fingers may be caught and get
pulled into fairlead or drum.
Pull hook using strap only.
Item 61325
IP
G8
Setup
Symbol
Operation
Property or Statement
International Protection rating
Classifies the degrees of protection
provided against the intrusion of solid
objects, dust, accidental contact, and water.
Grade 8
A fastener strength rating.
For technical questions, please call 1-888-866-5797.
Page 3
Maintenance
Symbol
IMPORTANT SAFETY INFORMATION
Safety
WARNING! Read all instructions. Failure to follow all instructions listed on pages 4 to 7 may
result in fire, serious injury and/or DEATH.
The warnings and precautions discussed in this manual cannot cover all possible conditions and
situations that may occur. It must be understood by the operator that common sense and caution
are factors which cannot be built into this product, but must be supplied by the operator.
Installation Precautions
Setup
1. Do not wear loose clothing or jewelry,
as they can be caught in moving parts.
Non‑skid footwear is recommended.
Wear restrictive hair covering to contain long hair.
7. Ventilate area well before and while working
on battery. Explosive invisible hydrogen gas
can accumulate and then explode when ignited
by a spark from the battery connection.
2. Wear ANSI‑approved safety goggles and
heavy‑duty leather work gloves during installation.
8. Only connect to a clean, corrosion free battery.
3. Before installation confirm that area is clear
of fuel lines, brake lines, electrical wires,
gas tanks or any other component which
could be damaged during drilling.
9. Do not lean over or come in contact with
battery while making connections.
10. Remove all metal jewelry before
working near battery.
4. Mounting location and hardware
must support winch and load.
11. Connect red wire to positive battery terminal
and black wire to negative battery terminal.
5. Use supplied power cords and wire rope listed
in manual only. Do not use thinner/longer
cables or link multiple cables together.
12. Insulate all exposed wiring and
terminals after installation.
Operation
6. Do not route electrical cables near sharp edges
or parts that will move or become hot.
13. Install winch and fairlead in underwind
orientation, so that the wire rope enters and
exits the winch at the bottom of the drum.
Maintenance
Page 4
For technical questions, please call 1-888-866-5797.
Item 61325
2. Do not maintain power to the winch if the motor
stalls. Verify load is within rated capacity for
the wire rope layer, see Winch Specifications on
page 2.
Make sure the battery is fully charged.
Use double line rigging whenever possible,
see Double Line Rigging on page 11.
13. Use as intended only. Do not lift items
vertically or use for aircraft purposes.
14. Prevent entanglement. Do not wear loose clothing
or jewelry, as they can be caught in moving
parts. Non-skid footwear is recommended. Wear
restrictive hair covering to contain long hair.
15. Disconnect Pendant Controller before
working near the Wire Rope, drum, fairlead
or load, to prevent accidental starting.
5. Keep clear of fairlead when operating.
Do not try to guide wire rope.
16. Inspect before every use; do not use if damaged or
parts loose. Examine the winch for structural cracks,
bends, damage, frayed or kinked wire rope, and any
other conditions that may affect the safe operation
of the winch. Do not use the winch even if minor
damage appears. A kink permanently weakens the
wire rope, even after it is straightened out; kinked
wire rope can fail suddenly and must not be used.
6. Do not place finger(s) through hook. Fingers may
be caught and get pulled into fairlead or drum.
Use included strap to hold hook instead.
17. Keep wire rope straight to avoid kinking
the wire rope. The illustrations to the
right show how a kink forms.
4. Do not disengage clutch under load.
Engage clutch before starting.
7. Place heavy rag or carpet over wire
rope span 6 feet from hook to help absorb the force
released if the wire rope breaks. (See Figure A.)
a. This illustration shows a kink about
to form. At this point the winch
should be stopped and the wire
rope should be straightened out
to prevent kinking.
Operation
3. Wear ANSI‑approved safety goggles and
heavy‑duty leather work gloves during operation.
Setup
1. Do not exceed load capacity. Be aware of
dynamic loading! Sudden load movement may
briefly create excess load causing product failure.
Safety
Operation Precautions
b. This wire rope is
kinked. It is too
late to reverse the
damage at this point, the
wire rope must be discarded.
It is permanently damaged
and must not be used.
8. Stay out of the direct line that the wire
rope is pulling. In case it slips or breaks,
it will “whiplash” along this line.
9. Do not use for lifting or moving people.
10. Use a spotter to assist you in assuring that it is safe
to operate the winch. Make sure the spotter is out of
the way of the vehicle and the wire
rope before activating the winch.
11. Do not use the hand crank, if equipped,
to “assist” the winch.
12. Do not use vehicle to pull on the
Wire Rope and “assist” the winch.
Item 61325
c. This is a kinked wire rope that has been
straightened out. Even though it has been
pulled straight, some wires in the wire rope
are stretched, and others are severely bent,
if not broken. The unstretched wires will
take more load and can fail suddenly before
the rope reaches its capacity. This wire
rope must be discarded and not be used.
A kink permanently weakens the wire rope,
even after it is straightened out; kinked wire
rope can fail suddenly and must not be used.
18. Keep children and bystanders away while operating.
Distractions can cause you to lose control.
For technical questions, please call 1-888-866-5797.
Page 5
Maintenance
Figure A: Whiplash Dampening Blanket or Rug
19. Stay alert, watch what you are doing and
use common sense when operating. Do not
use a winch while you are tired or under the
influence of drugs, alcohol or medication.
A moment of inattention while operating winches
may result in serious personal injury.
30. Do not operate the winch at extreme angles.
Do not exceed the angles shown in Figure B for
a roller fairlead. For a hawse fairlead, the angle
should be as close to straight as possible.
Safety
15°
20. Do not overreach. Keep proper footing and
balance at all times. This enables better control
of the winch in unexpected situations.
15°
21. Hook onto the object using a pulling point, tow
strap or chain. Do not wrap the wire rope around
the object and hook onto the wire rope itself.
This can cause damage to the object being
pulled, and kink or fray the wire rope.
45°
22. Do not use a Recovery Strap while winching.
They are designed to stretch and can
suddenly whip back towards the operator
during a winching operation.
45°
Setup
23. Secure load after moving.
NO LOCKING MECHANISM.
24. Keep at least 5 full turns of wire rope on
drum. The wire rope’s connection to the
drum is not intended to sustain a load,
without the added support from the friction
of at least 5 full turns of wire rope.
25. Wrap wire rope under 500 lb. tension before use.
Otherwise, wire rope may bind during operation.
Figure B: Roller Fairlead Maximum Winching Angles
31. If the object to be pulled must be pulled at an
angle in relation to the winch, use a pulley
(sold separately) and an anchor point directly
in front of the winch, as shown in Figure C,
to keep the Wire Rope pull straight.
Figure C: Pulley Anchoring
Operation
26. Keep clear of wire rope, hook, and load while
winching. Do not step over wire rope.
Do not push sideways against wire rope
under tension; wire rope might break under
this load and recoil back, striking the
person pushing against it or a bystander.
27. If wire rope begins to get entangled, stop winch
immediately and release wire rope using switch.
28. Do not submerge winch in water.
If winch gets submerged accidentally, it needs
to be immediately disassembled, cleaned, dried
and re-lubricated by a qualified technician to
prevent permanent damage from corrosion.
Maintenance
29. Only winch with the winching vehicle′s
transmission in neutral. Winching with a vehicle′s
transmission in gear or park may damage
the transmission. A vehicle′s transmission is
not designed to handle that type of load.
Page 6
32. Broken strands of wire rope will be sharp.
Wear heavy‑duty work gloves when handling
the wire rope. Do not slide wire rope
through hands, even with gloves on.
33. Winch motor will be hot during and after use.
Keep clear.
34. Do not power the hook all the way
into the fairlead or winch.
35. People with pacemakers should consult their
physician(s) before use. Electromagnetic fields in
close proximity to heart pacemaker could cause
pacemaker interference or pacemaker failure.
For technical questions, please call 1-888-866-5797.
Item 61325
1. Wear ANSI‑approved safety goggles and
heavy‑duty leather work gloves during service.
2. Disconnect power to winch and allow it
to cool completely before service.
3. Use supplied power cords/wire rope or cables
listed in manual only. Do not use thinner/
longer cables or link multiple cables together.
4. Have the winch serviced by a qualified repair person
using only identical replacement parts. This will
ensure that the safety of the winch is maintained.
5. Maintain labels and nameplates on the winch.
These carry important safety information.
If unreadable or missing, contact
Harbor Freight Tools for a replacement.
Safety
Service Precautions
6. WARNING: The cord of this product contains
lead and/or di (2-ethylhexyl) phthalate (DEHP),
chemicals known to the State of California
to cause cancer, and birth defects or other
reproductive harm. Wash hands after handling.
(California Health & Safety Code § 25249.5, et seq.)
Maintenance
Operation
Setup
SAVE THESE INSTRUCTIONS.
Item 61325
For technical questions, please call 1-888-866-5797.
Page 7
Installation and Setup
Read the ENTIRE IMPORTANT SAFETY INFORMATION section at the beginning of this
manual including all text under subheadings therein before set up or use of this product.
1. The mounting plate must be rated to
at least the winch’s capacity.
8.58 in. / 218mm
Safety
Mounting the Winch
2. Align the winch perpendicular to center line of
the vehicle at the desired location, and mark the
locations of the winch base holes. Compare the
dimensions of the marked holes to Figure D.
3. Before drilling, verify that the installation
surface has no hidden components or
structural pieces that will be damaged.
4. Drill holes appropriate for the hardware
at the marked locations.
8.8 in. / 223.6mm
5.28 in. / 134mm
4*Ø0.43 in. / 11mm
6.3 in. / 160mm
10 in. / 254.6mm
4.49 in.
/ 114mm
Setup
NOTE: This winch can generate extreme forces.
Select a location that can withstand the rated
capacity without damage or weakening. Steel
reinforcement plates may be needed or a
certified welder may need to weld on additional
bracing depending on the mounting location.
6.85 in. / 174mm
20.94 in. / 532mm
Figure D: Winch Dimensions
5. Install the winch using the hardware
specified on the specification chart.
Mounting the Solenoid Assembly
Operation
1. Place the Solenoid Box in a suitable
place near enough to the winch to allow
the cables to be routed properly.
3. Verify that the installation surface has no
hidden components or structural pieces
that will be damaged before drilling.
2. Mark the where the screw holes will be.
4. Drill pilot holes for the mounting screws.
5. Secure in place with mounting screws.
Maintenance
Page 8
For technical questions, please call 1-888-866-5797.
Item 61325
Wiring
Safety
TO PREVENT SERIOUS INJURY FROM EXPLOSION
DUE TO SPARKING AT THE BATTERY CONNECTION:
Unplug the Pendant Connector and disconnect the Battery Cables
before making other wiring connections.
TO PREVENT SERIOUS INJURY FROM LEAKING BATTERY ACID:
Do not use a dirty, corroded or leaking battery.
Only use a 12V automotive (or equivalent) battery, in good condition.
2. If you drill through the bumper or any part
of the body to route the wires, be sure
to install a rubber grommet in the hole to
prevent fraying of the wires at that point.
3. Route the Cables from the Solenoid to the battery
and from the Solenoid to the Winch, following the
precautions discussed above. See Figure E.
Red
Solenoid
Box
Black
4. Attach the Red, Black and Yellow
Cables to the terminals on the Winch.
The Winch terminals are color-coded.
5. Attach the Circuit Breaker to the
Positive Terminal on the battery.
6. Attach the red Battery Cable to the Circuit Breaker.
Setup
7. Attach the black Battery Cable directly to
the negative terminal of the battery.
8. Lift the Socket Cover exposing the
electrical switch connector. Insert the
Pendant connector into the Socket.
Note: The attachment of the Motor Cables determines
the direction of the Pendant Controller’s button.
After the unit is mounted and powered, check the
direction of the Power In and Power Out on the Pendant
Controller button. If you wish to change the direction on
the Pendant Controller, disconnect the Battery Cables
from the battery, switch the Motor Cable connections on
the Motor Assembly, then reconnect the Battery Cables.
9.
Disconnect the Pendant Controller when not in use.
Black
Yellow
Red
Circuit
Breaker
Black
Figure E: Wiring Connections
Operation
1. Plan a route for the wiring from the point of the
vehicle where the winch will be mounted, or used,
to the battery. This route must be secure, out of the
way of moving parts, road debris, or any possibility
of being damaged by operation or maintenance
of the vehicle. For example, you may wish to
route the wires under the vehicle, attaching it to
the frame using suitable fasteners. Do not attach
the wires to the exhaust system, drive shaft,
emergency brake cable, fuel line, or any other
components which may create damage the wiring
through heat or motion, or create a fire hazard.
Winch
1. The wire rope must be properly coiled under tension
to be able to support a load without damage.
Maintenance
Preparing the Wire Rope
3. Recoil the wire rope back into the winch
under at least 500 lb. of tension.
2. Uncoil the wire rope, except for 5 full wraps.
Item 61325
For technical questions, please call 1-888-866-5797.
Page 9
Operation
Safety
Read the ENTIRE IMPORTANT SAFETY INFORMATION section at the beginning of this manual
including all text under subheadings therein before set up or use of this product.
The instructions that follow are basic guidelines only and cannot cover all situations encountered
during use. The operator and assistants must carefully plan usage to prevent accidents.
1. Examine the wire rope. Do not use the winch if
the wire rope is frayed, kinked or damaged.
7. Hook onto the object using a pulling point, tow
strap, tree strap, or chain. See Figure G.
2. Fully charge the vehicle’s battery.
3. Check the Winch’s electrical connections.
All connections must be tight and clean.
4. Put the vehicle’s transmission in Neutral.
5. If the vehicle where the winch is mounted
is not supposed to be moved, engage the
emergency brake and block the wheels
using wheel chocks (sold separately).
Setup
6. To pull out the wire rope, move the Clutch Handle to
the Released position, shown in Figure F, slide the
loop of the Hook Strap over the hook, then pull on
the Hook Strap to pull out the wire rope.
WARNING! Leave at least five full
turns of wire rope on the drum.
Figure G: Using a strap anchor point
Do not wrap the wire rope around
the object and hook onto the
wire rope itself.
This can damage the object being
pulled, and kink or fray the wire rope.
8. Attachment point must be centered in
loop of hook and the hook’s safety clasp
must be fully closed. See Figure H.
Operation
Figure F: Clutch released
Figure H: Correct and incorrect hook attachment
9. Do not use a Recovery Strap while
winching. They are designed to stretch
and can suddenly whip back towards the
operator during a winching operation.
Maintenance
Page 10
For technical questions, please call 1-888-866-5797.
Item 61325
a. A double line system should be used whenever
possible. It reduces the load on the winch,
allowing it to work longer with less heat buildup.
It reduces load on the winch in two ways:
• It utilizes the lower layers of wire rope
that have higher capacity, and
• It halves the load on the winch
through pulley action.
FIGURE A: WHIPLASH DAMPENING
BLANKET OR RUG
11. Re-engage the clutch by moving the Clutch Handle
to the Engaged position, shown in Figure I.
Safety
Double Line Rigging
b. Connect the wire rope for a double line
system as shown in Figure J below.
Use a pulley block (sold separately) properly
rated for the load to be pulled and designed
to be operated with this winch’s wire rope.
Stationary
Winching Vehicle
(Chock tires,
set parking brake,
and leave in neutral)
Carpet
Load
Setup
10. Place a heavy rag or carpet (sold separately) over
the wire rope span, 6 feet from the hook to help
absorb the force released if the wire rope breaks.
Figure J: Double Line setup
WARNING! Do not allow anyone to stand near
the wire rope, or in line with the wire rope behind
the winch while it is under power. If the wire rope
should slip or break, it can suddenly whip back
towards the winch, causing a hazard for anyone in
the area. Stand well to the side while winching.
Note: If anchoring the winching vehicle, only attach
the anchor line to the front of the vehicle.
If the anchor line is attached to the rear of the vehicle,
the vehicle's frame may be damaged by
the forces exerted by winching.
12. Attach the Pendant Controller to the Socket
on the Solenoid Assembly, see Figure K.
Maintenance
Figure I: Clutch Engaged
Figure K: Pendant connection
Item 61325
For technical questions, please call 1-888-866-5797.
Operation
c. Loop the wire rope around the pulley and connect
to another part of the vehicle’s chassis or to
a separate anchor point. Do not anchor the
Wire Rope back to the winch or winch mount.
Page 11
13. Operate the Pendant controls briefly to ensure
they work properly, see Figure L. If operation is
reversed, the power cables may be connected
backwards. Correct any such issue before use.
16. If the object to be pulled must be pulled at an
angle in relation to the winch, use a pulley
(sold separately) and an anchor point directly
in front of the winch, as shown in Figure C,
to keep the Wire Rope pull straight.
Safety
FIGURE C: PULLEY ANCHORING
Setup
17. WARNING! Stop the winch and release
tension on the wire rope before moving
the rag or carpet placed on it.
18. Do not continue use of the winch until
the battery is completely run down.
Figure L: Pendant Controls
14. When it is safe to do so, use the power switch on
the Pendant Controller to retract the wire rope, and
winch the item as desired. Do not power the hook
all the way into the fairlead to prevent damage.
Operation
15. Do not operate the winch at extreme angles.
Do not exceed the angles shown in Figure B for
a roller fairlead. For a hawse fairlead, the angle
should be as close to straight as possible.
15°
15°
45°
19. You may wish to keep the engine running while
using this winch, to continually recharge the battery.
However, exercise extreme caution when
working around a running vehicle and ONLY
operate a vehicle in an outdoor area.
CAUTION: Do not use the winch in a
constant duty application, it is designed for
INTERMITTENT USE ONLY. Keep the duration
of the pulling job as short as possible. If the
motor becomes very hot to the touch, stop and
let it cool down for several minutes. Do not pull
for more than one minute at or near the rated
load. Do not maintain power to the Winch if
the motor stalls. Double Line Rigging will help
prevent overloading and should be used whenever
practical, see Double Line Rigging on page 11.
20. When finished pulling the load, reverse the direction
of the winch just enough to release tension on
the Wire Rope so that you can unfasten the
Hook from the load and reel in the Wire Rope.
45°
Maintenance
FIGURE B: ROLLER FAIRLEAD
MAXIMUM WINCHING ANGLES
Page 12
For technical questions, please call 1-888-866-5797.
Item 61325
45 seconds winching
at least
14 minutes,
15 seconds
of rest
Avoid damage to the Winch by not winching
for more than the prescribed duty cycle time.
The Duty Cycle defines the amount of time, within
a 15 minute period, during which a Winch can
operate at its maximum capacity without overheating.
For example, this Winch with a 5% duty cycle at its
maximum load must be allowed to rest for at least
14 minutes, 15 seconds after every 45 seconds of
continuous operation. Failure to carefully observe
duty cycle limitations can easily over‑stress a
Winch contributing to premature Winch failure.
Safety
Duty Cycle (Duration of Use)
Maintenance and Servicing
Setup
Procedures not specifically explained
in this manual must be performed
only by a qualified technician.
TO PREVENT SERIOUS INJURY FROM ACCIDENTAL OPERATION:
Unplug the Pendant connector and disconnect the Battery Cables before performing any
inspection, maintenance, or cleaning procedures.
Cleaning, Maintenance, and Lubrication
1. BEFORE EACH USE, inspect the general
condition of the winch. Check for loose hardware,
misalignment or binding of moving parts, cracked
or broken parts, damaged electrical wiring,
corroded or loose terminals, and any other
condition that may affect its safe operation.
Examine the wire rope. Do not use the winch if
the wire rope is frayed, kinked or damaged.
2. AFTER USE, wipe external surfaces
of the winch with clean cloth.
3. Lubricate the wire rope occasionally with a light oil.
Operation
TO PREVENT SERIOUS INJURY FROM WINCH FAILURE:
Do not use damaged equipment. If abnormal noise or vibration
occurs, have the problem corrected before further use.
4. The winch’s internal mechanism is permanently
lubricated. Do not open the housing.
However, if the winch is submerged, it should be
opened, dried, and re-lubricated by a qualified
technician as soon as possible to prevent corrosion.
1. Move Clutch Handle to the Released position.
2. Extend the Wire Rope to its full length,
noting how the existing Wire Rope is
connected to the inside of the drum.
3. Remove old Wire Rope and attach new assembly.
CAUTION: Do not replace with inferior Wire Rope.
Only use a wire rope rated to the same rating
cited on the specification chart or better.
4. Retract Wire Rope onto Wire Rope
drum being careful not to allow kinking.
Refer to instructions for tensioning the wire rope
under ″Preparing the Wire Rope on page 9.
5. Test Electric Winch for proper operation.
Item 61325
For technical questions, please call 1-888-866-5797.
Page 13
Maintenance
Wire Rope Replacement
Troubleshooting
Problem
Possible Causes
Safety
Motor overheats. 1. Incorrect power cords.
2. Winch running time too long.
Motor does
1. Switch Assembly not
not turn on.
connected properly.
2. Loose battery cable connections.
3. Vehicle battery needs charging.
4. Solenoid malfunctioning.
5. Defective Switch Assembly.
6. Defective motor.
7. Water has entered motor.
Setup
8. Internal damage or wear.
Motor runs but
Clutch not engaged.
Wire Rope drum
does not turn.
Motor runs
1. Insufficient current or voltage.
slowly or without
normal power.
2. Loose or corroded battery
cable connections.
3. Incorrect power cords.
Motor runs in one 1. Defective or stuck solenoid.
direction only.
2. Defective Switch Assembly.
Likely Solutions
1. Use only supplied power cords.
2. Allow winch to cool down periodically.
1. Insert Switch Assembly all the way into connector.
2. Tighten nuts on all cable connections.
3. Fully charge battery.
4. Tap solenoid to loosen contacts. Apply 12 volts to coil
terminals directly. A clicking indicates proper activation.
5. Replace Switch Assembly.
6. Check for voltage at armature port with Switch
pressed. If voltage is present, replace motor.
7. Allow to drain and dry. Run in short bursts
without load until completely dry.
8. Have technician service winch.
Move the Clutch Handle to the Engaged position.
If problem persists, a qualified technician
needs to check and repair.
1. Battery weak, recharge.
Run winch with vehicle motor running.
2. Clean, tighten, or replace.
3. Use only supplied power cords.
1. Tap solenoid to loosen contacts.
Repair or replace solenoid.
2. Replace Switch Assembly.
Operation
Follow all safety precautions whenever diagnosing or servicing
the tool. Disconnect power supply before service.
PLEASE READ THE FOLLOWING CAREFULLY
Maintenance
THE MANUFACTURER AND/OR DISTRIBUTOR HAS PROVIDED THE PARTS LIST AND ASSEMBLY DIAGRAM
IN THIS MANUAL AS A REFERENCE TOOL ONLY. NEITHER THE MANUFACTURER OR DISTRIBUTOR
MAKES ANY REPRESENTATION OR WARRANTY OF ANY KIND TO THE BUYER THAT HE OR SHE IS
QUALIFIED TO MAKE ANY REPAIRS TO THE PRODUCT, OR THAT HE OR SHE IS QUALIFIED TO REPLACE
ANY PARTS OF THE PRODUCT. IN FACT, THE MANUFACTURER AND/OR DISTRIBUTOR EXPRESSLY
STATES THAT ALL REPAIRS AND PARTS REPLACEMENTS SHOULD BE UNDERTAKEN BY CERTIFIED AND
LICENSED TECHNICIANS, AND NOT BY THE BUYER. THE BUYER ASSUMES ALL RISK AND LIABILITY
ARISING OUT OF HIS OR HER REPAIRS TO THE ORIGINAL PRODUCT OR REPLACEMENT PARTS
THERETO, OR ARISING OUT OF HIS OR HER INSTALLATION OF REPLACEMENT PARTS THERETO.
Page 14
For technical questions, please call 1-888-866-5797.
Item 61325
Parts List and Diagram
Bolt M8×25
Lock Washer M8
Motor
Seal
Retainer
Tie Bar
Brake Asm.
Drum Asm.
Steel Cable
End Bearing
Bolt M4×12
Lock Washer M4
Gear Housing Cover
Washer
Bush
Input sun gear
Gear Carrier Asm. - Input
Gear Carrier Asm. - Intermediate
Gear Carrier Asm. - Output
Qty
2
1
Part
4
4
1
2
1
1
1
1
1
1
8
16
1
1
1
1
1
1
1
20
21
22
23
24
25
26
27
28
29
30
31
32
33
34
35
36
37
38
1
26
2
Description
Qty
Bolt M6×12
Cable Anchor
Gear Ring
Bolt M8×10
Gearbox Housing Asm.
Bolt M4×14
Clutch Handle
O-ring
O-ring Cover
O-ring Washer
Lock Washer M5
Retaining Screw
Roller Fairlead
Solenoid Asm.
Bolt Asm.
Hook
Strap
Switch Asm.
Circuit Breaker
27
28
33
29
25
1
1
1
1
1
8
1
1
1
1
1
1
1
1
1
1
1
1
1
Safety
Description
1
2
3
4
5
6
7
8
9
10
11
12
13
14
15
16
17
18
19
Setup
Part
30
31
12
14
24
22 21
3
Operation
23
20
19
18
4
17
6
16
7
15
14
8
13
12
11
9
5
32
4
10
34
37
35
Maintenance
5
38
36
Record Product’s Serial Number Here:
Note: If product has no serial number, record month and year of purchase instead.
Note: Some parts are listed and shown for illustration purposes only,
and are not available individually as replacement parts.
Item 61325
For technical questions, please call 1-888-866-5797.
Page 15
Limited 90 Day Warranty
Harbor Freight Tools Co. makes every effort to assure that its products meet high quality and durability standards,
and warrants to the original purchaser that this product is free from defects in materials and workmanship for the
period of 90 days from the date of purchase. This warranty does not apply to damage due directly or indirectly,
to misuse, abuse, negligence or accidents, repairs or alterations outside our facilities, criminal activity, improper
installation, normal wear and tear, or to lack of maintenance. We shall in no event be liable for death, injuries
to persons or property, or for incidental, contingent, special or consequential damages arising from the use of
our product. Some states do not allow the exclusion or limitation of incidental or consequential damages, so the
above limitation of exclusion may not apply to you. THIS WARRANTY IS EXPRESSLY IN LIEU OF ALL OTHER
WARRANTIES, EXPRESS OR IMPLIED, INCLUDING THE WARRANTIES OF MERCHANTABILITY AND FITNESS.
To take advantage of this warranty, the product or part must be returned to us with transportation charges
prepaid. Proof of purchase date and an explanation of the complaint must accompany the merchandise.
If our inspection verifies the defect, we will either repair or replace the product at our election or we may
elect to refund the purchase price if we cannot readily and quickly provide you with a replacement. We will
return repaired products at our expense, but if we determine there is no defect, or that the defect resulted
from causes not within the scope of our warranty, then you must bear the cost of returning the product.
This warranty gives you specific legal rights and you may also have other rights which vary from state to state.
3491 Mission Oaks Blvd. • PO Box 6009 • Camarillo, CA 93011 • 1-888-866-5797
Garantía limitada de 90 días
Harbor Freight Tools Co. hace todo lo que está a su alcance para garantizar que sus productos cumplan con altos
estándares de calidad y durabilidad, y garantiza al comprador original que este producto está libre de defectos de
materiales y mano de obra por el periodo de 90 días subsiguiente a la fecha de la compra. Esta garantía no corresponde
a los daños resultantes, directa o indirectamente, del mal uso, abuso, negligencia o accidentes, reparaciones o
alteraciones fuera de nuestras instalaciones, actividad ilegal, instalación incorrecta, desgaste normal o falta de
mantenimiento. En ningún caso seremos responsables por muerte, lesiones a personas o bienes, o en el caso de daños
incidentales, contingentes, especiales o consecuentes derivados del uso de nuestro producto. Algunos estados no
permiten la exclusión o limitación de daños incidentales o consecuentes, por lo cual es posible que la anterior limitación
de exclusión no sea aplicable a usted. ESTA GARANTÍA SUSTITUYE EXPRESAMENTE TODAS LAS DEMÁS
GARANTÍAS, EXPRESAS O IMPLÍCITAS, INCLUIDAS LAS GARANTÍAS DE COMERCIABILIDAD Y ADECUACIÓN.
Para obtener los beneficios de esta garantía, deberá remitirnos el producto o pieza con los gastos de transporte
prepagados. Junto con el artículo, deberá remitir, además, el comprobante de la fecha de compra y una explicación
de su reclamo. Si nuestra inspección verifica el defecto, repararemos o sustituiremos el producto, a nuestra elección,
o podemos optar por reintegrar el precio de compra si no podemos fácil y rápidamente proporcionarle un reemplazo.
Los gastos de envío de los productos reparados correrán por nuestra cuenta, pero si determinamos que no existe
ningún defecto, o que el defecto fue resultado de circunstancias que no se encuentran dentro del alcance de nuestra
garantía, usted deberá hacerse cargo de los costos de envío del producto.
Esta garantía le otorga derechos legales específicos y también puede tener otros derechos que varían entre estados.
3491 Mission Oaks Blvd. • PO Box 6009 • Camarillo, CA 93011 • 1-888-866-5797
Lista de piezas y diagrama
Pieza
1
2
3
4
5
6
7
8
9
10
11
12
13
14
15
16
17
18
19
Descripción
Perno M8×25
Arandela de seguridad M8
Motor
Sello
Retén
Columna
Mecanismo de freno
Mecanismo de tambor
Cable de acero
Soporte final
Perno M4×12
Arandela de seguridad M4
Tapa de la caja de engranajes
Arandela
Cojinete
Engranaje central de entrada
Carcasa portaengranajes - Entrada
Carcasa portaengranajes - Intermedia
Carcasa portaengranajes - Salida
Cant.
4
4
1
2
1
1
1
1
1
1
8
16
1
1
1
1
1
1
1
2
1
1
Pieza
20
21
22
23
24
25
26
27
28
29
30
31
32
33
34
35
36
37
38
26
2
Descripción
Perno M6×12
Anclaje del cable
Anillo de engranaje
Perno M8×10
Mecanismo de la caja de engranajes
Perno M4×14
Palanca del embrague
Junta tórica
Tapa de la junta torica
Arandela de la junta tórica
Arandela de seguridad M5
Tornillo de retención
Pasacabos de rodillo
Mecanismo del solenoide
Mecanismo del perno
Gancho
Correa
Módulo del interruptor
Disyuntor
27
28
29
25
Cant.
1
1
1
1
1
8
1
1
1
1
1
1
1
1
1
1
1
1
1
33
30
31
Seguridad
Configuración
12
14
24
Funcionamiento
23
22 21
3
20
19
18
4
5
17
6
16
7
15
14
8
13
12
11
9
5
32
4
10
34
38
37
35
Mantenimiento
36
Anote el número de serie del producto aquí: Nota: Si el producto no posee número de serie, tome nota del mes y el año de la compra.
Nota: Algunas piezas se detallan y muestran a modo de ilustración únicamente y no están disponibles por separado
como piezas de repuesto.
Si desea realizar preguntas técnicas, llame al 1-888-866-5797.
Página 15
Artículo 61325
Resolución de problemas
Problema
Seguridad
El motor se
recalienta
El motor no
enciende
Causas posibles
Soluciones probables
Configuración
1. Cables de suministro eléctrico
1. Utilice únicamente los cables de suministro eléctrico
incorrectos.
que se suministran.
2. El cabrestante está funcionando 2. Permita que el cabrestante se enfríe periódicamente.
por demasiado tiempo.
1. El mecanismo del interruptor no 1. Inserte el mecanismo del interruptor a fondo en el conector.
está bien conectado.
2. Las conexiones de los cables de 2. Ajuste las tuercas de todas las conexiones de cables.
la batería están flojas.
3. Se debe cargar la batería del
3. Cargue la batería por completo.
vehículo.
4. Mal funcionamiento del solenoide. 4. Dé golpecitos ligeros al solenoide para aflojar los
contactos. Aplique 12 voltios a los terminales de la
bobina directamente. El sonido de un "clic" indica una
activación correcta.
5. El mecanismo del interruptor
5. Reemplace el mecanismo del interruptor.
presenta defectos.
6.
Con el interruptor presionado, verifique si existe voltaje en
6. Motor defectuoso.
el puerto del armazón. Si hay voltaje, reemplace el motor.
7. Entró agua al motor.
7. Permita que se drene el agua y el motor se seque.
Hágalo funcionar por breves momentos sin carga
hasta que esté completamente seco.
8. Solicite a un técnico que repare el cabrestante.
Mueva la palanca del embrague a la posición "Engaged"
(Activado). Si el problema persiste, un técnico calificado
debe examinar y reparar el equipo.
Funcionamiento
8. Daño o desgaste interno.
El motor
No está colocado el embrague.
funciona, pero el
tambor del cable
de acero no gira
El motor funciona 1. Corriente o voltaje insuficiente.
con lentitud o
sin la potencia
normal
2.
Las conexiones de los cables
de la batería están flojas o con
corrosión.
3. Cables de suministro eléctrico
incorrectos.
El motor funciona 1. El solenoide presenta defectos o
en una dirección
está atascado.
únicamente
2.
El mecanismo del interruptor
presenta defectos.
1. La batería tiene poca carga; recárguela.
Haga funcionar el cabrestante con el motor del
vehículo en funcionamiento.
2. Limpie, ajuste o reemplace.
3. Utilice únicamente los cables de suministro eléctrico
que se suministran.
1. Dé golpecitos ligeros al solenoide para aflojar los
contactos. Repare o reemplace el solenoide.
2. Reemplace el mecanismo del interruptor.
Siga todas las precauciones de seguridad cada vez que realice tareas de diagnóstico o reparación a la
herramienta. Desconecte el suministro de energía eléctrica antes de realizar el servicio de mantenimiento.
Mantenimiento
POR FAVOR, LEA ESTO CON DETENIMIENTO
EL FABRICANTE Y/O DISTRIBUIDOR HA PROPORCIONADO LA LISTA DE PIEZAS Y EL DIAGRAMA DE
MONTAJE QUE SE MUESTRAN EN ESTE MANUAL ÚNICAMENTE COMO HERRAMIENTA DE REFERENCIA.
NI EL FABRICANTE NI EL DISTRIBUIDOR ASEVERAN O GARANTIZAN DE NINGÚN MODO QUE EL/LA
COMPRADOR(A) ESTÉ CALIFICADO(A) PARA REALIZAR REPARACIONES AL PRODUCTO, NI QUE ÉL/ELLA
ESTÉ CALIFICADO(A) PARA REEMPLAZAR NINGUNA PIEZA DEL PRODUCTO. EN REALIDAD, EL FABRICANTE
Y/O EL DISTRIBUIDOR DEJAN EXPRESA CONSTANCIA DE QUE TODAS LAS REPARACIONES Y REEMPLAZOS
DE PIEZAS DEBEN SER EFECTUADOS POR TÉCNICOS DIPLOMADOS Y CERTIFICADOS, Y NO POR EL/
LA COMPRADOR(A). EL/LA COMPRADOR(A) ASUME TODOS LOS RIESGOS Y RESPONSABILIDADES
QUE PUEDAN DERIVARSE DE LAS REPARACIONES DEL PRODUCTO ORIGINAL O DE LAS PIEZAS QUE
REEMPLACE, O QUE PUEDAN DERIVARSE DE LA INSTALACIÓN DE PIEZAS DE REEMPLAZO QUE REALICE.
Artículo 61325
Si desea realizar preguntas técnicas, llame al 1-888-866-5797.
Página 14
Ciclo de trabajo (tiempo de uso)
45 segundos de funcionamiento
del cabrestante
al menos
14 minutos y
15 segundos
de descanso
Evite que el cabrestante se dañe no excediendo
la duración máxima del ciclo de trabajo indicada.
El ciclo de trabajo define la cantidad de tiempo,
en un periodo de 15 minutos, durante la cual un
cabrestante puede funcionar a su capacidad máxima sin
recalentarse. Por ejemplo: este cabrestante con un ciclo
de trabajo de 5% a su capacidad máxima de carga debe
descansar durante al menos 14 minutos y 15 segundos
por cada 45 segundos de funcionamiento continuo.
De no respetarse rigurosamente los límites del ciclo
de trabajo, el cabrestante puede sobrecargarse, lo cual
propicia su fallo prematuro.
Mantenimiento y servicio técnico
Un técnico calificado debe realizar los
procedimientos que no se expliquen
específicamente en este manual.
PARA EVITAR LESIONES GRAVES CONSECUENCIA DE UN FUNCIONAMIENTO ACCIDENTAL:
Desenchufe el conector del terminal de mando y desconecte los cables de la batería antes de
realizar cualquier procedimiento de inspección, mantenimiento o limpieza.
PARA EVITAR LESIONES GRAVES OCASIONADAS POR UN FUNCIONAMIENTO DEFECTUOSO DEL CABRESTANTE:
No utilice el equipo si está dañado. Si detecta ruidos extraños o vibración, haga corregir el problema antes
de continuar con el uso.
Limpieza, mantenimiento y lubricación
1. ANTES DE CADA USO, inspeccione el estado
general del cabrestante. Verifique que no haya
componentes sueltos, piezas móviles desalineadas
o empastadas, piezas agrietadas o rotas, cables
eléctricos dañados, terminales sueltos o con
corrosión o cualquier otra condición que pueda
afectar su funcionamiento seguro. Examine el cable
de acero. No utilice el cabrestante si el cable de
acero está desgastado, deformado o dañado.
2. DESPUÉS DE UTILIZAR, limpie las superficies
externas del cabrestante con un paño limpio.
3. Lubrique el cable de acero ocasionalmente con un
aceite liviano.
4. El mecanismo interno del cabrestante posee
lubricación permanente. No abra la carcasa.
Sin embargo, si se sumerge accidentalmente
el cabrestante, un técnico calificado lo debe abrir,
secar y volver a lubricar tan pronto como sea
posible, para evitar la corrosión.
Cómo cambiar el cable de acero
1. Mueva la palanca del embrague a la posición
"Released" (Desactivado).
2. Extienda el cable de acero en toda su longitud,
tomando nota de cómo está conectado el cable de
acero existente al interior del tambor.
3. Extraiga el cable de acero viejo y conecte uno nuevo.
PRECAUCIÓN: No reemplace por un cable de acero de
capacidad inferior. Utilice únicamente un cable de acero
que, según las indicaciones del cuadro de Especificaciones,
tenga una capacidad nominal igual o mayor al cable viejo.
4. Repliegue el cable de acero hacia el tambor, teniendo
cuidado de no permitir que se deforme. Consulte las
instrucciones para tensar el cable de acero en la sección
Preparación del cable de acero en la página 24.
Seguridad
Configuración
Funcionamiento
Mantenimiento
5. Pruebe el cabrestante eléctrico para determinar
si funciona correctamente.
Página 13
Si desea realizar preguntas técnicas, llame al 1-888-866-5797.
Artículo 61325
Seguridad
13. Opere los controles del terminal de mando brevemente,
para asegurarse de que funcionen correctamente;
consulte la Figura G. Si el funcionamiento está
invertido, puede que los cables de suministro eléctrico
estén conectados al revés. Corrija cualquier problema
de esa naturaleza antes de utilizar el equipo.
16. Si se debe tirar del objeto en ángulo en relación
con el cabrestante, utilice una polea (se vende por
separado) y un punto de anclaje directamente delante
del cabrestante, como se muestra en la Figura L,
de modo de mantener derecho el cable de acero.
FIGURA L: ANCLAJE CON POLEA
Configuración
17. ¡ADVERTENCIA! Detenga el cabrestante y afloje la
tensión del cable de acero antes de mover el trapo o
la alfombra colocados sobre él.
18. No continúe utilizando el cabrestante hasta que la
batería se descargue por completo.
Figura G: Controles del terminal de mando
Funcionamiento
14. Cuando sea seguro hacerlo, utilice el interruptor de
alimentación del terminal de mando para replegar el
cable de acero, y levante el elemento con el cabrestante
según desee. Para evitar daños, no trabe totalmente
el gancho en el pasacabos o cabrestante.
15. No opere el cabrestante en ángulos extremos.
No exceda los ángulos que se muestran en la
Figura K para un pasacabos de rodillo. En el caso
de un pasacabos sin rodillo, el ángulo debe ser
lo más cercano posible a un ángulo recto.
15°
15°
45°
19. Es deseable mantener el motor en funcionamiento
mientras utiliza este cabrestante, para recargar
la batería continuamente. Sin embargo, tenga
extrema precaución cuando trabaje en el entorno
de un vehículo en funcionamiento, y ÚNICAMENTE
opere el vehículo en exteriores.
PRECAUCIÓN: No utilice el cabrestante para fines que
demanden un funcionamiento constante; fue diseñado
para UN USO INTERMITENTE ÚNICAMENTE. La tarea
de tracción debe ser tan breve como sea posible.
Si el motor se calienta mucho al tacto, detenga el
equipo y permita que se enfríe durante varios minutos.
No realice tareas de tracción con el cabrestante por
más de un minuto a, o cerca de, su capacidad nominal
de carga. No continúe suministrando corriente al
cabrestante si el motor se detiene. Un polipasto
de dos líneas ayudará a evitar la sobrecarga, y debe
ser utilizado siempre que resulte práctico; consulte
Polipasto de dos líneas en la página 22.
Mantenimiento
20. Cuando termine de tirar de la carga, revierta la
dirección del cabrestante solo lo suficiente para
aflojar la tensión del cable de acero, para poder
separar el gancho de la carga y enrollar el cable
de acero.
45°
FIGURA K: ÁNGULOS MÁXIMOS PARA USO DE
CABRESTANTE CON PASACABOS DE RODILLO
Artículo 61325
Si desea realizar preguntas técnicas, llame al 1-888-866-5797.
Página 12
10. Coloque un trapo pesado o una alfombra (se venden
por separado) sobre el recorrido del cable de acero
a 6 pies del gancho, para ayudar a absorber la fuerza
liberada en caso de que el cable de acero se rompa.
Polipasto de dos líneas
a. Siempre que sea posible, debe utilizarse un sistema de
dos líneas. Reduce la carga del cabrestante, permitiendo
que funcione por más tiempo con menos incremento del
calor. Reduce la carga del cabrestante de dos formas:
• Utiliza los niveles más bajos del cable de acero
que tienen mayor capacidad; y
• Divide la carga del cabrestante por medio de la
acción de las poleas.
Figura J: Manta o alfombra amortiguadora de latigazos
11. Vuelva a colocar el embrague moviendo la palanca
del embrague a la posición "Engaged" (Activado),
como se muestra en la Figura D.
b. Conecte el cable de acero para un sistema de
dos líneas como se muestra en la Figura E a
continuación. Utilice un cuadernal (se vende por
separado) que tenga capacidad nominal adecuada
para la carga de la que se va a tirar, y que esté
diseñado para ser operado con el cable de acero de
este cabrestante.
Vehículo inmóvil que
va a tirar de la carga
(coloque cuñas en las
ruedas, active el freno de
estacionamiento y deje
en punto muerto).
Alfombra
Carga
Figura E: Configuración de dos líneas
c. Enlace el cable de acero alrededor de la polea y
conéctelo a otra pieza del chasis del vehículo o a
un punto de anclaje separado. No ancle el cable
de acero de vuelta en el cabrestante o en el
soporte del cabrestante.
Figura D: Embrague activado
¡ADVERTENCIA! No permita que nadie se pare cerca
del cable de acero, o en la misma línea del cable de
acero detrás del cabrestante mientras éste reciba
suministro eléctrico. En caso de que el cable de acero
se deslice o rompa, puede rebotar repentinamente hacia
atrás, hacia el cabrestante, generando un peligro para
cualquiera que se encuentre en el área. Mientras opera
el cabrestante, párese al costado.
Nota: Si ancla el vehículo que va a tirar de la carga,
sujete la línea de anclaje únicamente a la parte
delantera del vehículo.
Si se sujeta la línea de anclaje a la parte trasera
del vehículo, el bastidor del vehículo puede resultar
dañado por las fuerzas ejercidas al tirar de la carga.
12. Conecte el terminal de mando al enchufe del
mecanismo de solenoide; consulte la Figura F.
Figura F: Conexión del terminal de mando
Página 11
Si desea realizar preguntas técnicas, llame al 1-888-866-5797.
Seguridad
Configuración
Funcionamiento
Mantenimiento
Artículo 61325
Funcionamiento
Seguridad
Antes de instalar o usar este producto, lea LA TOTALIDAD de la sección "INFORMACIÓN
IMPORTANTE SOBRE SEGURIDAD" que se encuentra al comienzo de este manual, incluyendo
todos los textos debajo de los subtítulos.
Las instrucciones que se dan a continuación son solo pautas básicas, y no pueden cubrir todas
las situaciones posibles que pueden ocurrir durante el uso. El operador y los asistentes deben
planificar cuidadosamente la utilización para evitar accidentes.
1. Examine el cable de acero. No utilice el cabrestante
si el cable de acero está desgastado, deformado o
dañado.
7. Enganche el objeto utilizando un punto de tracción,
una correa de remolque, una eslinga para árbol o
una cadena. Consulte la Figura B.
2. Cargue por completo la batería del vehículo.
3. Verifique las conexiones eléctricas del cabrestante.
Todas las conexiones deben estar ajustadas y limpias.
Configuración
4. Coloque la transmisión del vehículo en punto muerto.
5. Si el vehículo donde se encuentra montado el
cabrestante no debe moverse, coloque el freno de
emergencia y bloquee las ruedas utilizando cuñas
para ruedas (se venden por separado).
6. Para extraer el cable de acero, mueva la palanca
del embrague a la posición Released (Desactivado),
como se muestra en la Figura A, deslice sobre el
gancho el rulo de la cincha del gancho, y tire de la
cincha para extraer el cable de acero.
¡ADVERTENCIA! Deje al menos 5 vueltas
completas de cable de acero en el tambor.
Figura B: Uso de un punto de anclaje con correa
No enrolle el cable de acero
alrededor del objeto para luego
enganchar el cable mismo.
Eso podría dañar el objeto del que se
está tirando, y deformar o desgastar el
cable de acero.
Funcionamiento
8. El punto de sujeción debe estar en el centro del rulo
del gancho, y el cierre de seguridad del gancho debe
estar totalmente cerrado. Consulte la Figura C.
Figura A: Embrague desactivado
Figura C: Conexión correcta e incorrecta del gancho
Mantenimiento
9. No utilice una eslinga de rescate mientras
utiliza el cabrestante. Las eslingas de rescate
están diseñadas para estirarse, y pueden rebotar
repentinamente hacia atrás y golpear al operador
mientras utiliza el cabrestante.
Artículo 61325
Si desea realizar preguntas técnicas, llame al 1-888-866-5797.
Página 10
Cableado
ADVERTENCIA
PARA EVITAR LESIONES GRAVES PRODUCTO DE UNA EXPLOSIÓN DEBIDA A LA PRESENCIA
DE CHISPAS EN LA CONEXIÓN DE LA BATERÍA:
Desenchufe el conector del terminal de mando y desconecte los cables de la batería antes
de realizar otras conexiones de cableado.
PARA EVITAR LESIONES GRAVES CONSECUENCIA DE FILTRACIONES DE ÁCIDO DE LA BATERÍA:
No utilice una batería sucia, con corrosión o filtraciones.
Utilice únicamente una batería automotriz (o equivalente) de 12 voltios, en buenas condiciones.
1. Planifique una ruta de cableado desde el punto del
vehículo donde se montará o utilizará el cabrestante
hasta la batería. Esa ruta debe ser segura, a salvo
de piezas móviles, desechos carreteros o cualquier
otro peligro potencial de sufrir daños causados
por la operación o el mantenimiento del vehículo.
Por ejemplo, una buena opción es realizar el cableado
debajo del vehículo, sujetando los cables al bastidor
con grapas apropiadas. No conecte los cables al
sistema de escape, al árbol motor, al cable del
freno de emergencia, a las tuberías de combustible
ni a cualquier otro componente que pueda causar
daños al cableado por calor o por movimiento, o que
pueda generar peligro de incendio.
2. Si para el recorrido de los cables hace perforaciones
en el parachoques o cualquier pieza de la carrocería,
asegúrese de instalar un anillo de caucho en el orificio,
para prevenir el desgaste de los cables en ese lugar.
3. Dirija los cables desde el solenoide a la batería y desde
el solenoide al cabrestante, siguiendo las precauciones
que se mencionan arriba. Consulte la Figura I.
Rojo
Negro
Caja del
solenoide
4. Conecte los cables rojo, negro y amarillo a los
terminales del cabrestante. Los terminales del
cabrestante tienen códigos de colores.
5. Conecte el disyuntor al terminal positivo de la batería.
6. Conecte el cable rojo de la batería al disyuntor.
7. Conecte el cable negro de la batería directamente
al terminal negativo de la batería.
8. Levante el cubre-enchufe y deje a la vista el
conector del interruptor eléctrico. Inserte el conector
del terminal de mando en el enchufe.
Nota: La conexión de los cables del motor determina la
dirección del botón del terminal de mando. Una vez
realizado el montaje y el cableado de la unidad,
verifique la dirección de "Power In" (Con electricidad)
y "Power Out" (Sin electricidad) en el botón del terminal
de mando. Si desea cambiar la dirección del terminal de
mando, desconecte los cables de la batería, cambie las
conexiones del cable del motor en el módulo del motor
y vuelva a conectar los cables de la batería.
9. Desconecte el terminal de mando cuando no lo esté
utilizando.
Negro
Rojo
Seguridad
Amarillo
Configuración
Funcionamiento
Disyuntor
Negro
Cabrestante
Figura I: Conexiones de cableado
Preparación del cable de acero
1. El cable de acero debe estar adecuadamente
enrollado bajo tensión, para poder soportar una
carga sin sufrir daños.
3. Vuelva a enrollar el cable de acero en el cabrestante
bajo al menos 500 libras de tensión.
2. Desenrolle el cable de acero, excepto por 5 vueltas
completas.
Página 9
Si desea realizar preguntas técnicas, llame al 1-888-866-5797.
Mantenimiento
Artículo 61325
Instalación y preparación
Seguridad
Antes de instalar o usar este producto, lea LA TOTALIDAD de la sección "INFORMACIÓN
IMPORTANTE SOBRE SEGURIDAD" que se encuentra al comienzo de este manual, incluyendo
todos los textos debajo de los subtítulos.
Montaje del cabrestante
1. La placa de montaje debe tener por lo menos
la misma capacidad nominal que el cabrestante.
2. Alinee el cabrestante de forma perpendicular a la
línea central del vehículo en el lugar deseado, y
marque los lugares donde se encuentran los orificios
de la base del cabrestante. Compare las dimensiones
de los orificios marcados con la Figura H.
Configuración
3. Antes de perforar, verifique que la superficie donde se
va a realizar la instalación no tenga componentes o
piezas estructurales ocultas que resultarían dañadas.
6,85 pulg. (174 mm)
8,8 pulg. (223,6 mm)
10 pulg. (254,6 mm)
5,28 pulg.
(134 mm)
4*Ø0,43 pulg. (11 mm)
4,49 pulg.
(114 mm)
NOTA: Este cabrestante puede generar fuerzas extremas.
Seleccione un lugar que pueda soportar la capacidad
nominal sin daños ni debilitamiento. Es posible que se
necesiten placas de acero de refuerzo, o que un soldador
certificado deba soldar tirantes adicionales, dependiendo
del lugar del montaje.
8,58 pulg. (218 mm)
6,3 pulg. (160 mm)
20,94 pulg. (532 mm)
4. Perfore orificios adecuados para la estructura en los
lugares marcados.
Figura H: Dimensiones del cabrestante
5. Instale el cabrestante utilizando los componentes que
se especifican en el cuadro de Especificaciones.
Funcionamiento
Montaje del mecanismo de solenoide
4. Perfore orificios piloto para los tornillos de montaje.
2. Marque dónde estarán los orificios de los tornillos.
3. Antes de perforar, verifique que la superficie donde
se va a realizar la instalación no tenga componentes
o piezas estructurales ocultas que resultarían
dañadas.
1. Coloque la caja del solenoide en un lugar adecuado
suficientemente cercano al cabrestante como para
permitir trazar el recorrido de los cables de forma
apropiada.
5. Fije el mecanismo en su lugar con tornillos de montaje.
Mantenimiento
Artículo 61325
Si desea realizar preguntas técnicas, llame al 1-888-866-5797.
Página 8
Precauciones para el servicio técnico
1. Al realizar tareas de reparación, utilice gafas de
seguridad y guantes de trabajo de cuero de alta
resistencia aprobados por el ANSI.
2. Desconecte la alimentación eléctrica del cabrestante
y permita que se enfríe por completo antes de
realizar tareas de reparación.
3. Utilice únicamente los cables de alimentación
eléctrica suministrados y el cable de acero o los
cables que se indican en el manual. No utilice cables
más delgados/largos ni ensamble múltiples cables.
5. Conserve las etiquetas y placas del cabrestante.
Contienen información de seguridad importante.
Si faltan o son ilegibles, póngase en contacto con
Harbor Freight Tools para solicitar un reemplazo.
6. ADVERTENCIA: Manipular el cable de este
producto lo expondrá al plomo, químico que,
según posee conocimiento el Estado de California,
causa cáncer, defectos congénitos u otros daños
relacionados con la reproducción. Lávese las manos
después de manipular el equipo. (Código de Salud y
Seguridad de California § 25249.5, et seq.)
4. El servicio técnico del cabrestante debe estar
a cargo de una persona calificada que utilice
únicamente piezas de repuesto idénticas a las
del equipo. Esto garantizará que se mantenga
la seguridad del cabrestante.
CONSERVE ESTAS INSTRUCCIONES.
Seguridad
Configuración
Funcionamiento
Mantenimiento
Página 7
Si desea realizar preguntas técnicas, llame al 1-888-866-5797.
Artículo 61325
Seguridad
19. Manténgase alerta; cuide lo que hace y use el
sentido común cuando utilice este equipo. Cuando
esté cansado o bajo la influencia de drogas, alcohol o
medicamentos, no utilice cabrestantes. Un momento
de distracción mientras opera un cabrestante puede
generar lesiones personales graves.
20. No se extienda demasiado. Mantenga una
postura firme y buen equilibrio en todo momento.
Esto permite controlar mejor el cabrestante en
situaciones inesperadas.
21. Enganche el objeto utilizando un punto de tracción,
una correa de remolque o una cadena. No enrolle el
cable de acero alrededor del objeto y lo enganche
al cable de acero mismo. Eso podría dañar el objeto
del que se está tirando, y deformar o desgastar el
cable de acero.
Configuración
22. No utilice una eslinga de rescate mientras
utiliza el cabrestante. Las eslingas de rescate
están diseñadas para estirarse, y pueden rebotar
repentinamente hacia atrás y golpear al operador
mientras utiliza el cabrestante.
23. Asegure la carga después de moverla.
NO HAY MECANISMO DE BLOQUEO.
30. No opere el cabrestante en ángulos extremos.
No exceda los ángulos que se muestran en la
Figura K para un pasacabos de rodillo. En el caso
de un pasacabos sin rodillo, el ángulo debe ser lo
más cercano posible a un ángulo recto.
15°
15°
45°
45°
Figura K: Ángulos máximos para uso de
cabrestante con pasacabos de rodillo
31. Si se debe tirar del objeto en ángulo en relación con el
cabrestante, utilice una polea (se vende por separado)
y un punto de anclaje directamente delante del
cabrestante, como se muestra en la Figura L, de modo
de mantener derecho el cable de acero.
24. Mantenga al menos 5 vueltas completas de cable
de acero en el tambor. La conexión del cable de
acero al tambor no puede sostener una carga sin
el apoyo extra de la fricción de al menos 5 vueltas
completas de cable de acero.
Funcionamiento
25. Antes de utilizar el cable de acero, enróllelo bajo
una tensión de 500 libras. De lo contrario, el cable
de acero podría trabarse durante la operación.
26. Mientras utiliza el cabrestante, aléjese del cable
de acero, del gancho y de la carga. No pase por
encima del cable de acero.
No ejerza presión lateralmente contra el cable
de acero bajo tensión; el cable podría romperse
bajo esta carga, replegarse hacia atrás y golpear
a la persona que presiona contra él o a algún
circunstante.
27. Si el cable de acero comienza a enredarse, detenga
de inmediato el cabrestante y suelte cable de acero
utilizando el interruptor.
Mantenimiento
28. No sumerja el cabrestante en el agua.
Si se sumerge el cabrestante por accidente, un
técnico calificado debe desmontarlo de inmediato,
limpiarlo, secarlo y volver a lubricarlo, para evitar
que la corrosión lo dañe de forma permanente.
29. Utilice el cabrestante únicamente con la transmisión
del vehículo remolcado en punto muerto. Utilizar un
cabrestante con la transmisión del vehículo con un
cambio puesto o en la posición "estacionamiento" puede
dañar la transmisión. La transmisión de un vehículo no
está diseñada para manejar ese tipo de carga.
Artículo 61325
Figura L: Anclaje con polea
32. Los haces rotos del cable de acero son filosos.
Utilice guantes de trabajo de alta resistencia cuando
manipule el cable de acero. No deslice el cable
de acero por las manos, incluso aunque tenga
los guantes puestos.
33. El motor del cabrestante se calienta durante y
después del uso. Aléjese de él.
34. No retraiga totalmente el gancho en el pasacabos
o cabrestante usando el motor.
35. Las personas que utilizan marcapasos deben
consultar a su(s) médico(s) antes de utilizar el
equipo. Los campos electromagnéticos próximos a un
marcapasos podrían interferir con el funcionamiento
del marcapasos o hacer que éste funcione mal.
Si desea realizar preguntas técnicas, llame al 1-888-866-5797.
Página 6
Precauciones para la utilización
1. No exceda la capacidad de carga. ¡Tenga en cuenta
las cargas dinámicas! Un movimiento repentino de
la carga puede crear por un momento un exceso de
carga que ocasionaría un fallo del producto.
2. No continúe suministrando corriente al cabrestante
si el motor se detiene. Verifique que la carga
se encuentre en el rango de cargas nominales
indicado para el nivel de trabajo del cable de acero;
consulte "Especificaciones del cabrestante" en la
página 31.
Asegúrese de que la batería esté completamente
cargada. Siempre que sea posible, utilice polipastos
de dos líneas; vea Polipasto de dos líneas en la
página 22.
3. Al operar el equipo, utilice gafas de seguridad y
guantes de trabajo de cuero de alta resistencia
aprobados por el ANSI.
4. No desactive el embrague cuando el equipo esté
cargado. Coloque el embrague antes de arrancar.
5. Aléjese del pasacabos cuando esté operando
el equipo. No intente guiar el cable de acero.
6. No pase el/los dedo(s) por el gancho. Los dedos
pueden quedar atrapados y ser arrastrados hacia
el pasacabos o el tambor. Para sostener el gancho
utilice, en cambio, la cincha que se incluye.
7. Coloque un trapo o una alfombra sobre el recorrido
del cable de acero a 6 pies del gancho, para ayudar
a absorber la fuerza liberada en caso de que el
cable de acero se rompa. (Consulte la Figura J.)
13. Use tal como se ha previsto únicamente. No levante
objetos en forma vertical ni utilice para fines aeronáuticos.
14. Evite quedar atrapado por el equipo. No utilice
prendas sueltas ni alhajas, pues pueden quedar
atrapadas en piezas móviles. Se recomienda utilizar
calzado antideslizante. Utilice algún cobertor que
restrinja el movimiento del cabello largo.
15. Desconecte el terminal de mando antes de trabajar
cerca del cable de acero, del tambor, del pasacabos
o de la carga, para evitar un arranque accidental.
16. Inspeccione el equipo antes de cada uso; no lo utilice si
hay piezas sueltas o dañadas. Examine el cabrestante
para detectar potenciales grietas, combas o daños
estructurales, desgaste o deformación del cable de
acero y cualquier otra condición que pueda afectar la
operación segura del cabrestante. Ante el menor daño,
no utilice el cabrestante. Las deformaciones debilitan
permanentemente el cable de acero, incluso después
de haberlo enderezado; un cable de acero deformado
puede fallar de repente, por lo cual no debe ser utilizado.
17. Mantenga derecho el cable de acero para evitar
que se deforme. Las ilustraciones de la derecha
muestran cómo se produce una deformación.
a. Esta ilustración muestra una
deformación a punto de
producirse. A estas alturas,
debe detenerse el proceso de
deformación y debe
enderezarse el cable de acero.
b. Este cable de acero
está deformado
A estas alturas,
ya es demasiado tarde
para revertir el daño; se
debe descartar el cable de
acero. El daño es
permanente, y el cable no debe utilizarse.
Figura J: Manta o alfombra amortiguadora de latigazos
8. Manténgase fuera de la línea directa en la que el cable
de acero está tirando. En caso de que el cable se deslice
o rompa, dará un "latigazo" a lo largo de esa línea.
9. No utilice el equipo para levantar o mover personas.
10. Recurra a la ayuda de un asistente que observe el
área y confirme que sea seguro operar el cabrestante.
Antes de activar el cabrestante, asegúrese de que
el asistente que observa el área esté fuera de la
trayectoria del vehículo y del cable de acero.
11. No utilice la manivela (si está incluida en el equipo)
para "ayudar" al cabrestante.
12. No utilice el vehículo para tirar del cable de acero
y "ayudar" al cabrestante.
Página 5
Seguridad
c. Éste es un cable de acero deformado que ha
sido enderezado. Aunque ha sido enderezado,
algunos haces del cable están estirados, y otros
están severamente doblados, si no rotos.
Los haces no estirados soportarán más carga,
y pueden fallar de repente antes de que el
cable llegue a su capacidad. Se debe dejar
de utilizar y descartar el cable de acero.
Las deformaciones debilitan permanentemente
el cable de acero, incluso después de haberlo
enderezado; un cable de acero deformado puede
fallar de repente, por lo cual no debe ser utilizado.
18. Mantenga alejados a los niños y a los curiosos
mientras opere el equipo. Las distracciones
pueden hacer que pierda el control.
Si desea realizar preguntas técnicas, llame al 1-888-866-5797.
Configuración
Funcionamiento
Mantenimiento
Artículo 61325
INFORMACIÓN IMPORTANTE SOBRE SEGURIDAD
Seguridad
¡ADVERTENCIA! Lea todas las instrucciones. No seguir todas las instrucciones que se dan en las
páginas 29 a 26 puede ocasionar incendio, lesiones graves y/o LA MUERTE.
Las advertencias y precauciones que se describen en este manual no pueden cubrir todas las condiciones y
situaciones posibles que pueden ocurrir. El operador del equipo debe entender que el sentido común y la cautela
son factores que no pueden fabricarse e incorporarse al producto, sino que corren por cuenta del operador.
Precauciones de instalación
Configuración
8. Haga la conexión únicamente a una batería limpia
y libre de corrosión.
2. Durante la instalación, utilice gafas de seguridad
y guantes de trabajo de cuero de alta resistencia
aprobados por el ANSI.
7. Ventile bien el área antes de trabajar con la batería
y mientras lo hace. Puede acumularse hidrógeno,
gas invisible que puede explotar si una chispa lo
enciende al conectar la batería.
1. No utilice prendas sueltas ni alhajas, pues pueden
quedar atrapadas en piezas móviles. Se recomienda
utilizar calzado antideslizante. Utilice algún cobertor
que restrinja el movimiento del cabello largo.
3. Antes de la instalación, confirme que el área esté
libre de tuberías de combustible, conductos de
frenos, cables eléctricos, tanques de gasolina o
cualquier otro componente que pueda sufrir daños
durante la perforación.
Funcionamiento
4. El lugar y la estructura donde se realizará el montaje
deben estar en condiciones de soportar el cabrestante
y la carga.
5. Utilice únicamente los cables de suministro eléctrico
suministrados y el cable de acero que se indica en
el manual. No utilice cables más delgados/largos ni
ensamble múltiples cables.
9. No se incline sobre la batería ni entre en contacto
con ella mientras realiza las conexiones.
10. Quítese todas las alhajas de metal antes de trabajar
cerca de la batería.
11. Conecte el cable rojo al terminal positivo de la batería,
y el cable negro al terminal negativo de la batería.
12. Después de la instalación, aísle todos los cables
y terminales expuestos.
13. Instale el cabrestante y el pasacabos en la dirección
del enrollado que se hace desde abajo, para que el
cable de acero ingrese y salga del cabrestante por
la parte inferior del tambor.
6. El recorrido de los cables eléctricos no debe pasar
cerca de bordes puntiagudos ni de piezas que se
moverán o calentarán.
Mantenimiento
Artículo 61325
Si desea realizar preguntas técnicas, llame al 1-888-866-5797.
Página 4
SÍMBOLOS DE ADVERTENCIA Y DEFINICIONES
Este es el símbolo de alerta de seguridad. Se utiliza para alertarlo sobre potenciales
riesgos de sufrir lesiones personales. Para evitar posibles lesiones o la muerte,
acate todos los mensajes de seguridad que acompañan a esta señal.
Indica una situación peligrosa que, de no evitarse,
podría provocar lesiones menores o de moderada gravedad.
PRECAUCIÓN
Indica una situación peligrosa que, de no evitarse,
podría provocar la muerte o lesiones graves.
ADVERTENCIA
Indica una situación peligrosa que, de no evitarse,
provocará la muerte o lesiones graves.
PELIGRO
AVISO
PRECAUCIÓN
Símbolo
Hace referencia a prácticas no relacionadas con lesiones personales.
Propiedad o enunciado
Símbolo
Utilice guantes de cuero de alta
resistencia, resistentes a cortes
y abrasiones.
Utilice gafas de seguridad aprobadas
por el ANSI.
Peligro de cortes o amputación.
Peligro de ser atrapado por rodillos.
Superficie caliente,
peligro de quemaduras.
VCC
A
CCA
¡Peligro de incendio!
HP
Peligro por exposición a químicos
cáusticos provenientes del ácido de
la batería.
Peligro de explosión.
No enlace un objeto con el cable de
acero para luego enganchar el mismo
cable.
No pase el/los dedo(s) por el gancho.
Los dedos pueden quedar atrapados
y ser arrastrados hacia el pasacabos
o el tambor.
Para tirar del gancho, utilice
únicamente la cincha.
fpm
Propiedad o enunciado
No utilice el cabrestante en la dirección
del enrollado que se hace desde arriba.
(El cable de acero ingresa/sale en la
parte superior).
Utilice el cabrestante únicamente en
la dirección del enrollado que se hace
desde abajo. (El cable de acero ingresa/
sale en la parte inferior).
Voltios Corriente Continua
Amperios
Amperios de arranque en frío
Caballos de fuerza
Pies por minuto
Revoluciones por minuto
RPM
Metros por minuto
mpm
IP
G8
Código de Protección Internacional
Clasifica los grados de protección ofrecida
contra la intrusión de objetos sólidos,
polvo, contacto accidental y agua.
Grado 8
Clasificación de resistencia de
sujetadores.
Si desea realizar preguntas técnicas, llame al 1-888-866-5797.
Página 3
Seguridad
Configuración
Funcionamiento
Mantenimiento
Artículo 61325
Especificaciones.......................................... 2
Seguridad.................................................... 3
Instalación1�������������������������������������������������� 8
Funcionamientoa����������������������������������������� 10
Contenido
Mantenimiento ������������������������������������������� 13
Lista de piezas y diagrama......................... 15
Garantía..................................................... 16
Especificaciones
Tracción nominal en
9000 lb. (4082 kg.)
una sola línea
Aplicación
Recuperación de vehículos /
Para camionetas y vehículos
utilitarios deportivos
Motor
"Power IN" (Con
electricidad) y "Power Sí
OUT" (Sin electricidad)
Ciclo de trabajo
5% (45 s a carga máxima nominal;
nominal
14 min. 15 s en descanso)
Terminal de mando
Con cable, 12 pies (3,7 m)
de largo
Tren de engranajes
Epicicloidal de 3 fases
Relación de transmisión 210:1
Carrete libre
Anillo deslizante de engranajes
Freno
Automático Con retención de
la carga
Tambor (diám. x largo) 2,5″ x 8,8″ (64 mm x 224 mm)
Gancho Clevis
De 3/8″, reemplazable por cierre
de seguridad con resorte
Bujes de rodillos con nylon
Disyuntor en línea
Pasacabos
Protección contra
sobrecarga
Nivel
Potencia de sonido
nominal
Tamaño/tipo de cable
de acero
Batería
Cables de la batería
Patrón de perno de
montaje
Estructura de montaje
Dimensiones totales
(largo x diámetro x altura)
Peso
Código IP
Certificación de
cabrestante
Tracción nominal
5049 lb. (2290 kg.)
4
5914 lb. (2683 kg.)
3
7138 lb. (3238 kg.)
2
9000 lb. (4082 kg.)
1
Primer nivel de trabajo del cable de acero
Tracción lb. (kg.)
0(0)
2000 (907)
4000(1814)
6000(2722)
8000(3629)
9000(4802)
1
Artículo 61325
85 decibeles
Ø3/8″ x 65′ (Ø9,5 mm x 19,8 m)
Resistencia nominal=14000 lb
Cable de acero galvanizado de
aviación de 7x19
12 VCC de 650 CCA mínimo
Calibre 3,5, 6′ (1,8 m) de longitud
10″ x 4,5″ (254 mm x 114,3 mm)
Cabrestante:
4x G8, M10-1,50 x 30 mm
Pasacabos:
2x G8, M12-1,75 x 25 mm
Caja del solenoide:
2x G8, ST-M5 x 14 mm
81,2 lb. (37 kg.)
IP 66 - Cabrestante y controles
(resistente a chorros de agua
potentes, excepto el interruptor
del control remoto)
CE
Capacidad del
cable de acero
15,9′
35,9′
60,1′
65′
(4,8 m)
(10,9 m)
(18,3 m)
(19,8 m)
Velocidad de línea
pies/minuto (metros/minuto)
19,2
(5,9)
11,5
(3,5)
9
(2,7)
7,6 (2,3)
6,3 (1,9)
5,7 (1,7)
Consumo de
amperios (a 12 V)
Si desea realizar preguntas técnicas, llame al 1-888-866-5797.
97
146
190
245
305
322
Página 2
Manual del Usuario y Instrucciones de Seguridad
Conserve Este Manual Guarde este manual para consultas futuras sobre las advertencias y precauciones de
seguridad y los procedimientos de montaje, funcionamiento, inspección, mantenimiento y limpieza. Escriba el número de
serie del producto en el dorso del manual junto al esquema de montaje (o el mes y año de la compra si el producto no
tiene número). Conserve este manual y el comprobante de compra en un lugar seco y seguro para futuras consultas.
CABRESTANTE DE 9000 LB.
DE CAPACIDAD
PARA VEHÍCULOS TODO TERRENO
ARTÍCULO 61325
AVISO
REV S13h
Visite nuestro sitio web: http://www.harborfreight.com
Si lo necesita, envíe un correo electrónico a nuestro
Servicio Técnico: [email protected]
Al desembalar el producto, asegúrese de que esté intacto
y no haya sufrido daños. Si alguna pieza falta o está rota,
llame al 1-888-866-5797 tan pronto como sea posible.
Copyright© 2013 por Harbor Freight Tools®. Todos los derechos reservados. Queda
prohibido cualquier tipo de reproducción de los contenidos de este manual, incluyendo
sus ilustraciones gráficas, sin el expreso consentimiento escrito de Harbor Freight Tools.
Es posible que los diagramas incluidos en este manual no hayan sido dibujados
guardando las proporciones. Debido a las mejoras continuas, el producto real puede
diferir ligeramente del descrito en este documento. Es posible que las herramientas
necesarias para el montaje y el mantenimiento técnico no estén incluidas.
¡IMPORTANTE! Esta edición en
español del manual es una traducción
del manual original Inglés. El manual
original Inglés reemplaza a esta
información si hay una inconsistencia.
ADVERTENCIA
Lea el siguiente material antes
de usar este producto.
De no hacerlo, podría sufrir lesiones graves.
CONSERVE ESTE MANUAL.