1
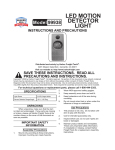
SPECIFICATIONS
TUBING
BENDER
Model 3755
INSTRUCTIONS AND
PRECAUTIONS
Visit our website at: http://www.harborfreight.com
SAVE THESE
INSTRUCTIONS.
READ ALL
PRECAUTIONS AND
INSTRUCTIONS.
Copyright© 2010 by Harbor Freight Tools®. All rights
reserved. No portion of this document or any artwork
contained herein may be reproduced in any shape or form
without the express written consent of Harbor Freight
Tools. Diagrams within this document may not be drawn
proportionally. Due to continuing improvements, actual
product may differ slightly from the product described herein.
Tools required for assembly and service may not be included.
For technical questions or replacement parts,
please call 1‑800‑444‑3353.
Die Range
1/4”, 5/16”, 3/8”
Max. Bending Angle
180°
UNPACKING
When unpacking, make sure that the item
is intact and undamaged. If any parts are missing
or broken, please call Harbor Freight Tools at
1‑800‑444‑3353 as soon as possible.
IMPORTANT SAFETY INFORMATION
To prevent serious injury and/or property damage:
1.
Wear ANSI-approved safety goggles and heavyduty work gloves during assembly.
2.
Use for 1/4” to 3/8” tubing only. Do not attempt to
bend tubing greater than 3/8”.
3.
Use for aluminum, copper and steel tubing only.
4.
Inspect lines carefully after forming; discard
damaged or malformed lines.
5.
This product is not a toy. Do not allow children to
play with or near this item.
6.
Use as intended only.
7.
Inspect before every use; do not use if parts are
loose or damaged.
8.
Maintain product labels and nameplates. These
carry important safety information. If unreadable
or missing, contact Harbor Freight Tools for a
replacement.
Record Serial Number Here:
Note:If product has no serial number, record month
and year of purchase instead.
Note:Some parts are listed and shown for illustration
purposes only, and are not available individually
as replacement parts.
Please Note:
No replacements parts are available for this item.
OPERATION
Read the ENTIRE IMPORTANT SAFETY
INFORMATION section at the beginning
of this document including all text under
subheadings therein before set up or use
of this product.
1.
Before inserting tubing into Bender, estimate the
location of the bend area and mark the location
with a pencil. This mark will indicate the location
of the bend.
2.
Once the tube is marked, swing the Bending
Handle up above the Bender Die. See Figure 1
on reverse side of this Instruction Sheet.
3.
Place the tube in the appropriate sized die
groove (1/4”, 5/16” or 3/8”), making sure the end
rests under the Tube Holder. The Tube Holder
will help restrict movement of the tube during the
initial bending. See Figure 1 on reverse side.
4.
NOTE: Make sure the reference mark is facing
towards the Main Gauge on the Bender Die.
5.
Carefully lower the Bending Handle until the Roll
Die rests gently on the tube. Make sure tube is
kept straight and aligned with the Main Handle.
6.
WARNING! Premature bending can occur if the
tubing is not kept straight and aligned with Main
Handle.
7.
Align the “0” mark on the Roll Die with the “0”
mark on the Main Gauge.
8.
SLOWLY push down the Bending Handle until
the “0” on the Roll Die aligns with the desired
degree marking on the Main Gauge.
9.
WARNING! Do not bend all the way to the
reference mark when bending softer tubing
material such as copper or aluminum.
10.
Once the designated bend is complete, swing the
Bending Handle up and away from the tube.
11.
Slide the bent tube out of the die groove.
12.
NOTE: All tubing will display “springback” after
a bend is complete. The degree of springback
depends on the designated angle and the tubing
material. For most bends, 1° to 3° of springback
is to be expected.
Bending Handle
Figure 1
Bender
Die
Roll Die
Main Handle
Main Gauge
Tube Holder
Page 2
For technical questions, please call 1-800-444-3353.
SKU 3755