1
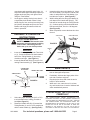
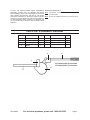
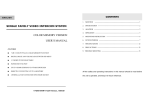
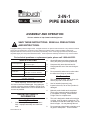
2-IN-1
PIPE BENDER
94623
ASSEMBLY AND OPERATION
Visit our website at: http://www.harborfreight.com
Save these instructions.
and instructions.
Read all precautions
Copyright© 2008 by Harbor Freight Tools®. All rights reserved. No portion of this document or any artwork contained
herein may be reproduced in any shape or form without the express written consent of Harbor Freight Tools.
Diagrams within this document may not be drawn proportionally. Due to continuing improvements, actual product
may differ slightly from the product described herein. Tools required for assembly and service may not be included.
For technical questions or replacement parts, please call 1-800-444-3353.
Specifications
Product Applications
Designed for bending copper
and aluminum pipe.
Pipe Size Capacity
1/2” to 7/8” Diameter tubing.
Maximum Bend
Up to 180°
Construction
Cast iron and steel tube.
Steel rollers. Aluminum hardware.
Accessories
Bending dies (Qty. 2)
Unpacking
When unpacking, check to make sure that
the item is intact and undamaged. If any parts are
missing or broken, please call Harbor Freight Tools
at the number shown on the cover of this document
as soon as possible.
Important SAFETY
Information
Assembly Precautions
1.
Assemble only according to these instructions. Improper assembly can create hazards.
Revised Manual 10k
2.
Wear ANSI-approved safety goggles and
heavy-duty work gloves during assembly.
3.
Keep assembly area clean and well lit.
4.
Keep bystanders out of the area during assembly.
5.
Do not assemble when tired or when under
the influence of drugs or medication.
Use Precautions
1.
This product is not a toy. Do not allow children to play with or near this item.
2.
Use for intended purpose(s) only.
3.
Inspect before use; do not use if product is
damaged.
4.
Maintain product labels and nameplates.
These carry important safety information.
If unreadable or missing, contact Harbor
Freight Tools for a replacement.
5.
This tool is designed to bend soft metal pipe
or tubing, such as copper or aluminum. Do
not attempt to bend hard metal pipe, such as
black iron pipe. You may damage the tool.
6.
Do not attempt to bend brittle materials, such
as glass or hard plastic. Those materials
7.
may shatter and potentially cause injury. Always wear ANSI-approved safety impact eye
goggles and heavy duty work gloves when
using the Tube Bender.
3.
Insert the tubing along the Handle (4). Move
the Tube Holder (1) to allow the tube to slide
under it, and position the Tube Holder (1) to
hold the tube in place. (See Figure B.)
As the pipe or tubing is being bent, there is
a significant pinch hazard created. Keep
hands, fingers, feet, and any item which may
be injured or damaged away from the Tube
Bender and hinge point areas of this tool
when in operatoin.
4.
While holding the tube along the Handle (4),
pull down on the Handle with Grip (5). The
tube will be formed along the Tubing Bender
(2). Continue pulling until the desired bend
has been achieved, from 0 to 180 degrees.
(See Figure B.)
5.
When completed, remove the bent tube from
the tool.
Assembly & OPERATION
Instructions
TUBE HOLDER
(1)
Read the entire Important
Safety Information section at the
beginning of this document including
all text under subheadings therein
before set up or use of this product.
2.
HANDLE
(4)
Insert the Handle (4) through the Tube Holder (1). Screw the Handle into the threaded
hole of the Tubing Bender (2) by turning
clockwise until tight. (See Figure A.)
TUBING BENDER
(2)
TUBING
(NOT INCLUDED)
Insert the Handle with Grip (5) into the Connecting Plate Assembly (3). (See Figure A.)
HANDLE WITH GRIP
(5)
TUBE HOLDER
(1)
FIGURE A
TUBING BENDER
(2)
Operation
1.
Select the proper bending die (5/8” or 7/8”)
to suit the diameter of tubing you wish to
bend.(See Figure B.)
2.
Rotate the Handle with Grip (5) around the
Tubing Bender (2) until it is in a straight line
with the other Handle (4). (See Figure B.)
SKU 94623
CONNECTING
PLATE ASSY.
(3)
5/8” OR 7/8”
BENDING DIE
(6, 7)
maintenance
CONNECTING
PLATE ASSY.
(3)
HANDLE
(4)
(PULL DOWN TO
BEND TUBE)
FIGURE B
Assembly
1.
HANDLE WITH GRIP
(5)
1.
Before each use, inspect the Pipe Bender for
bent or damaged components.
2.
Periodically, lubricate the hinge points of the
tool with a medium weight oil.
3.
Regularly wipe down and clean the tool to
keep it in best condition.
4.
When not in use, store the tool in a clean,
dry, safe location out of reach of children and
other unauthorized persons.
PLEASE READ THE FOLLOWING
CAREFULLY
The manufacturer and/or distributor has
provided the parts list and assembly diagram in
this document as a reference tool only. Neither
the manufacturer or distributor makes any
representation or warranty of any kind to the
buyer that he or she is qualified to make any
repairs to the product, or that he or she is
qualified to replace any parts of the product.
For technical questions, please call 1-800-444-3353
Page 2
In fact, the manufacturer and/or distributor Record Serial Number Here:
expressly states that all repairs and parts
Note: If product has no serial number, record month and year of
replacements should be undertaken by certified
purchase instead.
and licensed technicians, and not by the buyer.
Note:
No parts are available individually as replacement parts.
The buyer assumes all risk and liability arising
out of his or her repairs to the original product
or replacement parts thereto, or arising out
of his or her installation of replacement parts
thereto.
PARTS LIST & ASSEMBLY DIAGRAM.
Part #
Qty.
Part #
1
Tube Holder
Description
1
5
Handle with Grip
Description
1
2
Tubing Bender
1
6
5/8” Bending Die
1
3
Connecting Plate
1
7
7/8” Bending Die
1
4
Handle
1
3
Qty.
5
1
5/8” Bending Die (6) not shown.
7/8” Bending Die (7) not shown.
4
SKU 94623
2
For technical questions, please call 1-800-444-3353
Page 3