1
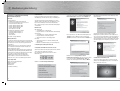
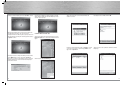
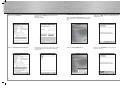
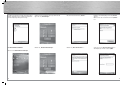
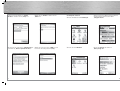
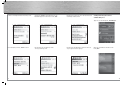
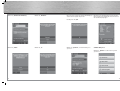
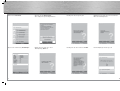
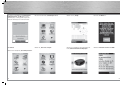
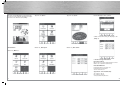
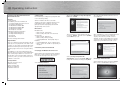
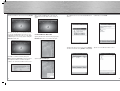
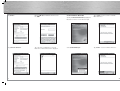
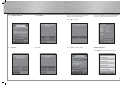
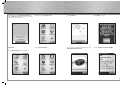
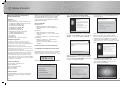
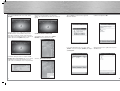
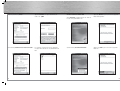
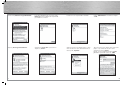
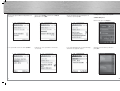
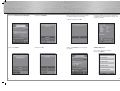
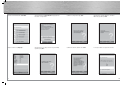
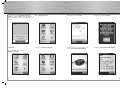
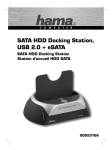
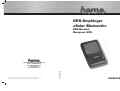
C
O
M
P
U
T
E
R
GPS-Empfänger
»Solar Bluetooth«
GPS Receiver
Recepteur GPS
All listed brands are trademarks of the corresponding companies. Errors and omissions excepted,
and subject to technical changes. Our general terms of delivery and payment are applied.
00062722/03.07
PO Box 80 · 86651 Monheim/Germany
Phone: +49 9091 502-0
Fax: +49 9091 502-458
[email protected]
http://www.hama.com
00062722
d Bedienungsanleitung
Installations- und Konfigurationsanleitung
Bluetooth GPS-Empfänger
Übersicht:
1. Inbetriebnahme
2. Verbindungsherstellung über Bluetooth
2.1 PC/Notebook Windows XP Service Pack2
2.2 PC/Notebook IVT Bluesoleil
2.3 PDA / Windows Mobile 2002
2.4 PDA / Windows Mobile 2003
2.5 PDA / Windows Mobile5
2.6 Smartphones Series60
3. Konfiguration Navigationssoftware
3.1 Navigon Mobile Navigator 5
3.2 Navigon Mobile Navigator 6
3.3 TomTom6
3.4 Destinator6
4. Kontakt- & Supporthinweise
Wichtige Hinweise:
!! Achten Sie während der Fahrt genau auf den Verkehr
und treffen Sie eventuelle Einstellungen am GPS-Receiver
bzw. Notebook nur wenn das Fahrzeug still steht und
abgestellt ist.
!! Bitte beachten Sie, dass das integrierte Solarpanel
nur zur Akkuunterstützung dient und keinesfalls den
Akku komplett laden kann!!
!! Der Verbindungsaufbau (Pairing) zwischen Bluetooth
GPS-Emfpänger und dem Endgerät (PDA, Mobile Phone
und PC) kann von Endgerät zu Endgerät unterschiedlich
sein. Sollte sich die nachfolgend aufgezeigte
Verbindungsmethode mit der Ihres Endgerätes
unterscheiden, lesen Sie bitte im Handbuch Ihres
Endgerätes nach, um eine Verbindung herzustellen.!!
1. Inbetriebname
Legen Sie den Akku entsprechend der Polarität in den
GPS-Empfänger ein und laden Sie diesen vollständig auf.
2
Die Verbindung mit dem Bluetooth GPS Empfänger wird
nun hergestellt.
Schalten Sie den Bluetooth GPS-Empfänger ein. Nach
dem Einschalten ist der Bluetooth GPS-Empfänger sofort
bereit eine Verbindung herzustellen (Pairing-Modus).
Dieses wird angezeigt, wenn die blaue LED am Empfänger
schnell blinkt.
LED-Übersicht:
Blau (Bluetooth):
• schnell blinkend – Pairing Modus
• langsam blinkend – bestehende Bluetoothverbindung
Grün (Power):
• schnell blinkend – niedriger Batterieladestand
• langsam blinkend – Akku wird geladen
• dauerhaft leuchtend – vollständig geladen
Das Programm muss den Bluetooth GPS Empfänger als
„BT GPS“ erkennen. Markieren Sie das Symbol für
„BT GPS“ und fahren Sie mit einem Klick auf Weiter fort.
Rot (GPS):
• dauerhaft leuchtend – Positionsbestimmung wird
durchgeführt
• blinkend – Satellitenempfang / bereit zur Navigation
Nachdem die Verbindung mit dem Bluetooth GPS
Empfänger hergestellt ist, wird Ihnen der COM-Port für
ein- und ausgehende Verbindungen zum GPS Empfänger
angezeigt. Der COM-Port für ausgehende Verbindungen
muss im Navigationsprogramm eingestellt werden, damit
der GPS-Empfänger von Navigationsprogramm erkannt
wird.
2. Verbindungsherstellung über Bluetooth
2.1 PC/Notebook mit Windows XP Service Pack2
Öffnen Sie die Bluetooth-Umgebung mit einem Rechtsklick
auf das Bluetooth Symbol im Systemtray.
Das Systemtray finden Sie in der unteren rechten
Bildschirmecke.
Markieren Sie nun „Hauptschlüssel aus der
Dokumentation verwenden“ und tragen Sie in das dafür
vorgesehenen Feld den Hauptschlüssel „0000“ ein.
Beenden Sie Ihre Eingabe mit einem Klick auf Weiter.
Verpackungsinhalt
Bluetooth-Solar-GPS Empfänger
Lithium-Ionen Akku
KFZ-Ladekabel
230V Netzteil
Installationsanleitung
Setzen Sie einen Haken bei „Gerät ist eingerichtet und
kann erkannt werden“ und fahren Sie mit Weiter fort.
Wählen Sie nun Bluetoothgerät hinzufügen.
2.2 PC/Notebook mit IVT Bluesoleil
Öffnen Sie die Bluesoleil Software und klicken Sie mit
der Maus auf die orangene Kugel, um nach verfügbaren
Bluetooth Geräten zu suchen.
3
Der Bluetooth GPS-Empfänger wird als „BT GPS“ erkannt.
Mit einem Doppelklick auf das Symbol für den Bluetooth
GPS-Empfänger werden in der oberen Leiste die
verfügbaren Bluetooth Dienste gelb angezeigt. Starten Sie
die Verbindungsherstellung mit einem Doppelklick auf das
3. Symbol von links.
Bestätigen Sie den nachfolgenden Dialog mit einem Klick
auf Ja. Merken Sie sich den angezeigten Serial Port.
Diesen müssen Sie in der Navigationssoftware einstellen,
damit die Navigationssoftware mit dem GPS Empfänger
kommunizieren kann.
4
Nachdem die Verbindung ordnungsgemäß hergestellt
wurde, wird das Symbol für den GPS Empfänger in der
Software grün angezeigt.
Tippen Sie auf Ja, um nach vorhandenen Bluetooth
Geräten zu suchen.
Bestätigen Sie diesen Bildschirm mit OK.
Der Bluetooth GPS Empfänger wird als „BT GPS“ erkannt.
Setzen Sie einen Haken vor den Eintrag „BT GPS“ und
tippen Sie auf Speichern.
Tippen Sie nun auf das Symbol für den Bluetooth GPS
Empfänger.
2.3 PDA mit Windows Mobile 2002
Öffnen Sie die Bluetooth Umgebung indem Sie auf das
Bluetooth-Symbol am rechten unteren Bildschirmrand
tippen.
Öffnen Sie den „Bluetooth-Manager“.
5
Tippen Sie nun auf „Aktionen“.
Wählen Sie „Bindung herstellen zu SPP Slave“.
6
Geben Sie nun den PIN-Code für den Bluetooth GPS
Empfänger ein.
Dieser lautet: „0000“
2.4 PDA mit Windows Mobile 2003
Die Verbindung ist hergestellt, sobald über dem Symbol
für den GPS Emfpänger das blaue Bluetooth Symbol
angezeigt wird.
Wählen Sie „Bluetooth Manager“ aus.
Tippen Sie auf „Neu“ um nach verfügbaren Bluetooth
Geräten zu suchen.
Öffnen Sie die Bluetooth Umgebung indem Sie auf das
Bluetoothsymbol am rechten unteren Bildschirmrand
tippen.
Klicken Sie auf „Verbinden“ um nach Bluetooth
Geräten zu suchen.
7
Wählen Sie „Bluetooth Gerät durchsuchen“ aus.
Der Bluetooth GPS Empfänger wird als BT-GPS
erkannt. Tippen Sie auf das Symbol für den
GPS-Empfänger um eine Verbindung herzustellen.
Die Verknüpfung mit dem GPS Empfänger wurde
hergestellt.
Setzen Sie einen Haken vor „Authentifizierung“ und
beenden Sie Ihre Auswahl mit OK.
Tippen Sie auf „Kein Gerät ausgewählt“.
Wählen Sie „SPP-Slave“ aus und fahren Sie mit
„Weiter“ fort.
Tippen Sie nun das Symbol solange an, bis sich ein
Auswahlmenü öffnet. Wählen Sie in diesem Menü
den Punkt „Eigenschaften“.
Tippen Sie danach wieder solange auf das Symbol
des GPS-Empfängers bis sich das Auswahlmenü
öffnet. Wählen Sie nun „Verbinden“. Danach werden
Sie aufgefordert das Kennwort für den
GPS-Empfänger einzugeben. Dieses lautet: „0000“
8
9
Sobald Sie das Kennwort richtig eingegeben haben,
wird die Verbindung hergestellt und das Symbol für
den GPS-Empfänger wird grün hinterlegt.
Stellen Sie sicher das Bluetooth eingeschaltet ist und
tippen Sie auf „Einstellungen“.
Wechseln Sie auf den Reiter „Geräte“.
Der Bluetooth GPS Empfänger wird als „BT-GPS“
erkannt.
Markieren Sie diesen und fahren Sie mit „Weiter“
fort.
2.5 PDA mit Windows Mobile5
Wählen Sie „Bluetooth-Einstellungen“
Wählen Sie „Neue Partnerschaft ....“
Geben Sie nun den Zugangsschlüssel für den
GPS-Empfänger ein. Dieser lautet „0000“.
Öffnen Sie den Kommunikations Manager.
10
11
Setzen Sie nun einen Haken vor „Serieller
Anschluss“ und fahren Sie mit „Fertig“ fort.
Wählen Sie nun „BT-GPS” un dfahren Sie mit
„Weiter” fort.
2.6 Smartphones Series 60
Öffnen Sie im Menü den Punkt Verbindungen.
Wechseln Sie nun auf den Reiter „COM-Anschlüsse“
und wählen Sie „Neuer ausgehender Anschluss“.
12
Wählen Sie nun den Anschluss „COM8“ aus und
beenden Sie die Konfiguration mit „Fertig“.
Öffnen Sie den Punkt Bluetooth.
Stellen Sie sicher, dass Bluetooth eingeschaltet ist
und wechseln Sie auf den nächsten Reiter
„Gekoppelte Geräte.“
Drücken Sie Optionen und wählen Sie
„Neues gekopp. Ger.“.
13
Es wird nach verfügbaren Bluetooth Geräten gesucht.
Nachdem Sie „BT GPS“ angewählt haben, muss ein
Passwort eingegeben werden. Dieses lautet: „0000“
Beantworten Sie die Frage, nach dem automatischen
Verbindungsaufbau, mit Ja.
3. Konfiguration Navigationssoftware
3.1 Moblie Navigator 5
Tippen Sie auf den Menüpunkt „Einstellungen“.
Der GPS-Emfpänger wird als „BT GPS“ erkannt.
14
Die Verbindung zum GPS-Empfänger wurde
ordnungsgemäß hergestellt.
Der Bluetooth GPS Empfänger wird nun in der Liste
der gekoppelten Geräte angzeigt.
Wechseln Sie mithilfe der Pfeiltasten zum
Punkt „GPS“.
15
Wählen Sie „Automatische Erkennung“
Wählen Sie „Bluetooth“.
Nach einer kurzen Suchzeit, wird der GPS-Emfpänger
erkannt und vom System eingerichtet.
Die Funktion des GPS-Emfpängers können Sie überprüfen, indem Sie im Hauptmenü auf das Zeichen für
den Satelitenempfang tippen.
Bestätigen Sie mit „OK“.
Wählen Sie „Extern“.
Wählen Sie „Ja“
Wählen Sie „Speichern“, um die Einstellungen zu
speichern.
3.2 Mobile Navigator 6
Wählen Sie „Optionen“ nachdem das Programm
gestartet ist.
16
17
Wählen Sie nun GPS-Status.
Öffnen Sie nun den GPS-Assistent,
durch antippen des gleichnamigen Buttons.
Bestätigen Sie diese Frage mit „Ja“
Wählen Sie bei der Frage nach einer bestehenden
Bluetooth-Verbindung Ja aus.
Tippen Sie anschließend auf „Einstellungen“.
Wählen Sie bei der Frage nach einem
TMC-Empfänger „Nein“ aus.
Bestätigen Sie das nächste Fenster mit Nein.
Der GPS-Empfänger wird nun gesucht.
18
19
Bestätigen Sie die Meldung „Es wurde ein GPS
Emfpänger erkannt.“ mit OK. Danach ist der
GPS-Emfpänger ordnungsgemäß eingerichtet
und kann zum Navigieren verwendet werden.
Wechseln Sie zum Reiter „Einstellungen 3 von 5“
Wählen Sie nun „Konfig.“
Fahren Sie mit Weiter fort.
3.3 TomTom6
Wählen Sie „GPS-Status anzeigen“.
Navigieren Sie mit Hilfe der Pfeile im Display zum
Punkt „Anderer Bluetooth-GPS-Emfpänger“.
Wählen Sie Bluetooth Serial Port an COM8.
Wählen Sie im Hauptmenü „Einstellungen ändern“.
20
21
Nachdem der GPS-Empfänger richtig eingerichtet
ist, können Sie den aktuellen GPS-Status verfolgen.
Beenden Sie die Einrichtung mit „Fertig“.
Tippen Sie auf „Einst.“.
Tippen Sie auf „Festl.“
Der GPS Empfänger wurde gefunden.
Schließen Sie die Einrichtung des Empfängers mit
„Fertig“ ab.
3.4 Destinator 6
Wählen Sie „GPS-Signal“.
Wählen Sie „GPS suchen“.
Wählen Sie „Mehr“aus.
4. Kontakt- und Supportinformationen
Bei defekten Produkten:
Bitte wenden Sie sich bei Produktreklamationen an Ihren
Händler oder an die Hama Produktberatung.
Internet/World Wide Web
Produktunterstützung, neue Treiber oder
Produktinformationen bekommen
Sie unter www.hama.com
Support Hotline – Hama Produktberatung:
Tel. +49 (0) 9091 / 502-115
Fax +49 (0) 9091 / 502-272
e-mail: [email protected]
22
23
g Operating Instruction
Installation and Configuration Instructions for
Bluetooth GPS Receiver
Overview:
1. Getting Started
2. Establishing Connection via Bluetooth
2.1 PC/Laptop Windows XP Service Pack 2
2.2 PC/Laptop IVT BlueSoleil
2.3 PDA / Windows Mobile 2002
2.4 PDA / Windows Mobile 2003
2.5 PDA / Windows Mobile 5
2.6 Smartphones Series 60
3. Navigation Software Configuration
3.1 Navigon Mobile Navigator 5
3.2 Navigon Mobile Navigator 6
3.3 TomTom6
3.4 Destinator6
4. Contact and Support Information
Important Notes:
!! Pay close attention to traffic when driving, and only
make any necessary adjustments to the GPS receiver
or laptop once the vehicle is parked and switched off.
!! Ensure that the integrated solar panel only serves
as battery support and can never charge the battery
fully.
!! Establishing a connection (pairing) between the
Bluetooth GPS receiver and your device (PDA, mobile
phone and PC) may be different for each device. If
the following connection method differs from that of
your device, refer to your device‘s manual in order to
establish a connection.!!
1. Getting started
Insert the battery according to the polarity in the GPS
receiver and charge it fully.
24
The connection with the Bluetooth GPS receiver is
now established.
The program must recognize the Bluetooth GPS
receiver as „BT GPS“. Select the icon for „BT GPS“
and click Next to proceed.
After establishing the connection with the Bluetooth
GPS receiver, the COM port for incoming and
outgoing connections for your GPS receiver is
displayed. You must set the COM port for outgoing
connections in the navigation program so that the
navigation program will detect the GPS receiver.
Switch on the Bluetooth GPS receiver. After
switching on the device, the Bluetooth GPS receiver
is immediately ready to establish a connection
(pairing mode). This is displayed by the blue LED
quickly flashing on the receiver.
LED overview:
Blue (Bluetooth):
• Flashes quickly – Pairing mode
• Flashes slowly – Bluetooth connection made
Green (power):
• Flashes quickly – Battery low
• Flashes slowly – Battery charging
• Constantly illuminated – Battery fully charged
Red (GPS):
• Constantly illuminated – Device is fixing position
• Flashes – Device has satellite reception/ready for
navigation
2. Establishing Connection via Bluetooth
2.1 PC/Laptop with Windows XP Service Pack 2
Open the Bluetooth environment by right-clicking the
Bluetooth icon in the system tray. The system tray is
located in the lower right corner of the screen.
Select „Use the passkey found in the
documentation“ and enter the passkey „0000“ in the
field provided. Confirm your entry by clicking Next.
Package Contents
Bluetooth solar GPS receiver
Lithium-ion battery
Vehicle charging cable
230 V power supply unit
Installation instructions
Add a tick by „My device is set up and ready to be
found“ and click Next.
Select Add Bluetooth Device.
2.2 PC/Laptop with IVT BlueSoleil
Open the BlueSoleil software and click the orange
ball to search for available Bluetooth devices.
25
The Bluetooth GPS receiver is detected as „BT GPS“.
By double-clicking the icon for the Bluetooth GPS
receiver, the available Bluetooth services icon is
highlighted in yellow in the service icon bar. Begin
establishing the connection by double-clicking the
third icon from the left.
Click Yes to confirm the following dialog box.
Note the displayed serial port. You must set this in
the navigation software so that the navigation
software can communicate with the GPS receiver.
26
After correctly establishing the connection, the
highlighted icon for the GPS receiver changes to
green.
Tap on Yes in order to search for available Bluetooth
devices.
Confirm this screen with OK.
The Bluetooth GPS receiver is detected as „BT GPS“.
Tick the box next to the entry „BT GPS“ and tap Save.
Tap the icon for the Bluetooth GPS receiver.
2.3 PDA with Windows Mobile 2002
Opening the Bluetooth environment by tapping the
Bluetooth icon on the screen in the lower right.
Open the „Bluetooth Manager“.
27
Tap „Actions“.
Enter the PIN code for the Bluetooth GPS receiver.
It is „0000“.
2.4 PDA with Windows Mobile 2003
Tap on „New“ in order to search for available
Bluetooth devices.
Opening the Bluetooth environment by tapping the
Bluetooth icon on the screen in the lower right.
Tap „Connect to SPP slave“.
28
The connection is established as soon as the
Bluetooth icon for the GPS receiver is displayed.
Select „Bluetooth Manager“.
Tap „Connect“ to search for Bluetooth devices.
29
Select „Explore Bluetooth device“.
The Bluetooth GPS receiver is detected as „BT GPS“.
Tap the icon for the GPS receiver to establish a
connection.
The connection with the GPS receiver is established.
Tick the box next to „Authentication“ and select OK
to finish.
Tap „No device selected“.
Select „SPP slave“ and tap „Next“ to proceed.
Tap the icon until a selection menu opens.
In the menu that appears, select „Properties“.
Tap the GPS receiver icon again until the selection
menu opens. Select „Connect“.
You will then be asked to enter the passkey for the
GPS receiver. It is „0000“.
30
31
As long as you have correctly entered the passkey,
the connection is established and the icon for the
GPS receiver turns green.
Ensure that the Bluetooth is switched on and tap
„Settings“.
Navigate to the „Devices“ tab.
The Bluetooth GPS receiver is detected as „BT GPS“.
Select this and tap „Next“ to proceed.
2.5 PDA with Windows Mobile5
Select „Bluetooth Settings“.
Tap „New Partnership…“.
Enter the passkey for the GPS receiver.
It is: „0000“.
Open the Communications Manager.
32
33
Tick the box next to „Serial Connection“ and tap
„Finish“ to proceed.
Select „BT GPS“ and tap „Next“ to proceed.
2.6 Smartphones Series 60
Ensure that the Bluetooth is switched on and
navigate to the next tab „Connected Devices“.
Open Connections in the menu.
Navigate to the „COM Connections“ tab and select
„New outgoing connection“.
34
Specify the „COM8“ port and confirm the
configuration by tapping „Finish“.
Open Bluetooth in the menu.
Choose Options and select
„Newly connected device“.
35
Available Bluetooth devices are searched for.
After you have selected „BT GPS“, enter the Password.
It is „0000“.
Answer Yes to the question after the connection is
automatically established.
3. Navigation Software Configuration
3.1 Moblie Navigator 5
Tap the menu item „Settings“.
The GPS receiver is detected as „BT GPS“.
36
The connection to the GPS receiver is correctly
established.
The Bluetooth GPS receiver is now displayed on the
connected devices list.
Use the arrow keys to navigate to „GPS“.
37
Select „Automatic Detection“.
Select „Bluetooth“.
After a short search time, the GPS receiver is
detected and set up by the system.
You can check the GPS receiver function by tapping
the icon for satellite reception in the main menu.
Select „OK“ to confirm.
Select „External“.
Select „Yes“.
Select „Save“ to save the settings.
3.2 Mobile Navigator 6
Select „Options“ after the program has started.
38
39
Select GPS Status.
Tap the „GPS Wizard“ button.
Confirm this question with „Yes“.
Select „Yes“ when asked if there is an existing
Bluetooth connection.
Then tap „Settings“.
Select „No“ when asked about having a
TMC receiver.
Choose „No“ for the question in the next window.
The GPS receiver is now searched for.
40
41
Confirm the message „GPS receiver detected.“ by
selecting OK. After the GPS receiver is correctly set
up, you can use it to navigate.
Navigate to the tab „Settings 3 of 5“.
Select „Configure“.
Select Next to proceed.
3.3 TomTom6
Select „Show GPS Status“.
Use the arrow to navigate in the display to the item
„Other Bluetooth GPS receiver“.
Specify „Bluetooth Serial Port to COM8“.
Select „Change Settings“ in the main menu.
42
43
After the GPS receiver is correctly set up, you can
track the current GPS status. Click „Finish“ to close
set up.
Tap „Settings“.
Tap „Specify“.
The GPS receiver is found.
Click „Finish“ to close receiver set up.
3.4 Destinator 6
Select „GPS Signal“.
Select „GPS search“.
Select „More“.
4. Contact and Support Information
If products are defective:
Please contact your dealer or Hama Product Consulting if you have any product claims.
Internet / World Wide Web:
Product support, new drivers or product information
can be found at www.hama.com
Support Hotline – Hama Product Consulting:
Tel. +49 (0) 9091 / 502-115
Fax +49 (0) 9091 / 502-272
E-mail: [email protected]
44
45
f Mode d‘emploi
Notice d´installation et de configuration du
Récepteur GPS Bluetooth
Sommaire :
1. Mise en marche
2. Etablissement de la connexion via Bluetooth
2.1 PC/Notebook Windows XP Service Pack2
2.2 PC/Notebook IVT Bluesoleil
2.3 PDA / Windows Mobile 2002
2.4 PDA / Windows Mobile 2003
2.5 PDA / Windows Mobile5
2.6 Téléphones Smart série 60
3. Configuration du logiciel de navigation
3.1 Navigon Mobile Navigator 5
3.2 Navigon Mobile Navigator 6
3.3 TomTom6
3.4 Destinator6
4. Informations de contact & de support
Informations importantes:
!! Pendant la conduite, concentrez-vous sur la
circulation et procédez à d´éventuels réglages du
récepteur GPS ou de l´ordinateur portable,uniquement
quand le véhicule est à l´arrêt ou garé.
!! Veuillez observer que le panneau solaire intégré sert
uniquement de support pour l´accu et ne peut en aucun
cas recharger l´accu entièrement!!
!! L´établissement de la communication (couplage) entre
le récepteur GPS Bluetooth GPS et le poste terminal
(PDA, téléphone mobile et PC) est différente selon le
poste terminal. Si la méthode de connexion illustrée
ci-après diffère de celle de votre poste terminal, veuillez
consulter le manuel d´utilisation de votre poste terminal
pour établir une connexion.!!
Contenu de l´emballage
Récepteur GPS solaire Bluetooth
Batterie Lithium-Ion
Câble de charge automobile
Bloc secteur 230V
Notice de montage
Allumez le récepteur GPS Bluetooth. Une fois allumé,
le récepteur GPS Bluetooth est prêt pour établir
immédiatement une connexion (mode couplage).
Celle-ci est indiquée quand la DEL bleue clignotte
rapidement au récepteur.
Cochez „Un appareil est installé et peut être
détecté“ puis poursuivez en cliquant sur Suivant.
La connexion avec le récepteur GPS Bluetooth est
maintenant réalisée.
Le programme doit reconnaître le récepteur GPS
Bluetooth comme „BT GPS“. Cliquez sur le symbole
„BT GPS“ et continuez en cliquant sur Suivant.
Une fois la connexion avec le récepteur GPS
Bluetooth effectuée, le port COM va s´afficher
pour les connexions entrantes et sortantes vers le
récepteur GPS. Le port COM pour les connexions
sortantes doit être installé dans le programme de
navigation pour que celui-ci reconnaisse le récepteur
GPS.
Vue d´ensemble DEL :
Bleu (Bluetooth) :
• Clignotte rapidement – Mode couplage
• Clignotte lentement – Connexion Bluetooth
existante
Vert (Power)
• Clignotte rapidement – batterie faible
• Clignotte lentement – l´accu est en train d´être
rechargé
• Allumé en permanence – entièrement rechargé
Rouge (GPS) :
• Allumé en permanence – L´affectation de
positionnement est exécutée
• Clignotte – Réception satellite / prêt pour la
navigation
2. Etablissement de la connexion via Bluetooth
2.1 PC/Notebook avec Windows XP Service Pack2
Ouvrez Bluetooth avec un clic à droite sur le symbole
Bluetooth dans le système tray. Vous trouverez le
système tray dans le coin de l´écran à droite, en bas.
Cliquez à présent sur „Utiliser la clé passe-partout
de la documentation“ et inscrivez dans le champ
prévu pour Clé passe-partout „0000“. Achevez votre
inscription en cliquant sur Suivant.
Cliquez à présent sur Ajouter un appareil Bluetooth.
2.2 PC/Notebook avec IVT Bluesoleil
Ouvrez le logiciel Bluesoleil puis cliquez avec la
souris sur la boule orange, pour rechercher les
appareils Bluetooth disponibles.
1. Mise en marche
Veuillez installer l´accu dans le récepteur GPS en
respectant les symboles de polarité et chargez-l
entièrement.
46
47
Le récepteur GPS Bluetooth est reconnu comme
„BT GPS“.
En double-cliquant sur le symbole du récepteur
GPS Bluetooth, les services Bluetooth qui sont à
disposition sont affichés en jaune dans la barre du
haut. Commencez l´établissement de la connexion en
double-cliquant sur le Symbole 3. de gauche.
Confirmez le dialogue suivant en cliquant sur Oui.
Rappelez-vous le Port sériel affiché car vous devrez
l´installer dans le logiciel de navigation pour que
celui-ci puisse communiquer avec le récepteur GPS.
48
Une fois la connexion établie correctement, le
symbole du récepteur GPS est affiché en vert dans le
logiciel.
Tapez sur Oui pour rechercher les appareils
Bluetooth existants.
Confirmez en cliquant sur OK.
Le récepteur GPS Bluetooth est reconnu comme
„BT GPS“. Cochez l´inscription „BT GPS“ puis cliquez
sur Enregistrer.
Cliquez maintenant sur le symbole du récepteur
GPS Bluetooth
2.3 PDA avec Windows Mobile 2002
Ouvrez Bluetooth en cliquant sur le symbole
Bluetooth en bas et à droite de l´écran.
Ouvrez le „Gestionnaire Bluetooth“.
49
Cliquez à présent sur „Actions“.
Tapez le code PIN du récepteur GPS Bluetooth.
Celui-ci est : „0000“
2.4 PDA avec Windows Mobile 2003
Tapez sur „Nouveau“ pour rechercher les appareils
Bluetooth disponibles.
Ouvrez Bluetooth en cliquant en bas et à droite de
l´écran sur le symbole Bluetooth.
Sélectionnez „Etablir une liaison avec Esclave SPP“.
50
La connexion est réalisée dès que le symbole du
récepteur GPS s´affiche avec le symbole Bluetooth
bleu.
Sélectionnez le „Gestionnaire Bluetooth“.
Cliquez sur „Relier“ pour rechercher les appareils
Bluetooth.
51
Sélectionnez „Rechercher un appareil Bluetooth“.
Le récepteur GPS Bluetooth est reconnu comme
BT-GPS. Cliquez sur le symbole du récepteur GPS
pour établir une connexion.
La liaison avec le récepteur GPS a été établie.
Cochez „Authentification“ et terminez en cliquant
sur OK.
Tapez sur „Aucun appareil sélectionné“.
Sélectionnez „Esclave SPP“ et poursuivez en
cliquant sur „Suivant“.
Cliquez à présent sur le symbole jusqu´à ce qu´un
menu de sélection s´ouvre. Sélectionnez dans ce
menu le point „Propriétés“.
Tapez de nouveau sur le symbole du récepteur GPS
jusqu´à ce que le menu de sélection s´ouvre.
Sélectionnez à présent „Relier“.
Ensuite, on va vous demander de taper le mot de
passe du récepteur GPS. Celui-ci est : „0000“
52
53
Dès que vous aurez tapé le mot de passe correct, la
liaison sera établie et le symbole du récepteur GPS
s´affichera en vert.
Vérifiez que Bluetooth est allumé comme il faut puis
cliquez sur „Réglages“.
Allez sur „Appareils“.
Le récepteur GPS Bluetooth est reconnu comme
„BT-GPS“. Cliquez dessus puis poursuivez en
cliquant sur „Suivant“.
2.5 PDA avec Windows Mobile5
Sélectionnez „Réglages Bluetooth“
Sélectionnez „Nouvelle association ....“
Inscrivez maintenant la clé d´accès du récepteur
GPS. Celle-ci est „0000“.
Ouvrez le gestionnaire de communication
54
55
Cochez „Port sériel“ et continuez en cliquant sur
„Achevé“.
Sélectionnez maintenant „BT-GPS“ et poursuivez en
cliquant sur „Suivant“.
2.6 Téléphones Smart série 60
Assurez-vous que Bluetooth soit allumé et allez sur
„Appareils couplés.“
Dans le menu, ouvrez le point Connexions.
Allez à présent sur „Connexions COM“ et
sélectionnez „Nouvelle connexion sortante“.
56
Sélectionnez maintenant la connexion
„COM8“ et achevez la configuration avec „Achevé“.
Ouvrez le point Bluetooth.
Appuyez sur Options et sélectionnez
„Nouvel appareil couplé“.
57
De nouveaux appareils Bluetooth disponibles sont
recherchés.
Une fois choisi „BT GPS“, il faut inscrire un Mot de
passe. Celui-ci est : „0000“
A la question Etablissement automatique de la
connexion, répondez par Oui.
3. Configuration du logiciel de navigation
3.1 Moblie Navigator 5
Dans le menu, tapez sur „Réglages“.
Le récepteur GPS est détecté comme „BT GPS“.
58
La liaison avec le récepteur GPS a été effectuée
correctement.
Le récepteur GPS Bluetooth est à présent Indiqué
dans la liste des appareils couplés.
A l´aide des touches fléchées, allez sur le
point „GPS“.
59
Sélectionnez „Reconnaissance automatique“
Sélectionnez „Bluetooth“.
Après un bref temps de recherche, le système
reconnaît et installe le récepteur GPS.
Vous pouvez vérifier la fonction du récepteur GPS
en cliquant dans le menu principal sur le signe de la
réception du satellite.
Confirmez en cliquant sur „OK“.
Sélectionnez „Externe“.
Sélectionnez „Oui“
Cliquez sur „Enregistrer“ pour sauvegarder
les réglages.
3.2 Mobile Navigator 6
Une fois que le programme a débuté,
sélectionnez „Options“.
60
61
Sélectionnez maintenant le statut GPS.
Ouvrez maintenant l‘ Assistant GPS en appuyant sur
le bouton correspondant.
Confirmez cette question par „Oui“
A la question s´il exsite déjà une connexion
Bluetooth, répondez par Oui.
Cliquez ensuite sur „Réglages“.
A la question si vous disposez d´un récepteur TMC,
répondez par „Non“.
Confirmez la fenêtre suivante avec Non.
Le récepteur GPS est à présent recherché.
62
63
Confirmez le message „Un récepteur GPS a été
détecté“ en cliquant sur OK. Le récepteur GPS est
ensuite installé correctement et peut être utilisé pour
naviguer.
Allez sur „Réglages de 3 à 5“
Sélectionnez à présent „Config.“
Poursuivez en cliquant sur Suivant.
3.3 TomTom6
Sélectionnez „Afficher le statut GPS“.
A l´aide de la flèche à l´écran, naviguez vers
le point „Autre récepteur GPS Bluetooth”.
Sélectionnez Port sériel Bluetooth au COM8.
Dans le menu principal, sélectionnez
„Modifier les réglages“.
64
65
Une fois le récepteur GPS installé correctement,
vous pouvez suivre le statut GPS actuel. Terminez le
réglage avec „Achevé“.
Tapez sur „Réglages“.
Tapez sur „Localiser.“
Le récepteur GPS a été trouvé.
Achevez l´installation du récepteur en cliquant sur
„Achevé“.
3.4 Destinator 6
Sélectionnez „Signal GPS“.
Sélectionnez „Chercher le GPS“.
Sélectionnez „Plus“.
4. Informations de contact & de support
En cas d’appareil défectueux :
En cas de réclamation concernant le produit, veuillez vous
adresser à votre revendeur ou au département conseil
produits de Hama.
Internet / World Wide Web
Notre support technique, les nouveaux pilotes et les
informations produits sont disponibles sous :
www.hama.com
Ligne téléphonique directe d’assistance – Conseil
produits Hama :
Tél. +49 (0) 9091 / 502-115
Fax +49 (0) 9091 / 502-272
e-mail : [email protected]
66
67
Die Konformitätserklärung nach der R&TTE
Richtlinie 99/5/EG finden Sie unter
www.hama.com
d
See www.hama.com for declaration of
g
conformity according to R&TTE Directive 99/5/EC
guidelines
La déclaration de conformité à la directive
f
R&TTE 99/5/CE se trouve sur www.hama.com
La declaración de conformidad según la
directiva R&TTE 99/5/CE la encontrará en
www.hama.com
e
De conformiteitsverklaring conform de
R&TTE-richtlijn 99/5/EG vindt u onder
www.hama.com
o
Radio- ja telepäätelaitteita koskevan
direktiivin 99/5/EY mukainen
vaatimustenmukaisuusvakuutus löytyy
osoitteesta www.hama.com
m
Deklaracja zgodności według dyrektywy
q
R&TTE 99/5/EG dostępna na stronie internetowej
www.hama.com
A megfelelőségi követelmények megegyeznek h
az R&TTE Irányelvek 99/5/EG ajánlásaival
www.hama.com
Prohlášení, o shodě podle směrnice
c
R&TTE 99/5/EG, naleznete na www.hama.com
Prehlásenie o zhode podľa R&TTE smernice
99/5/EG nájdete na www.hama.com
v
La dichiarazione di conformità secondo la
i
direttiva R&TTE 99/5/CE è disponibile sul sito
www.hama.com
Τη δήλωση συμμόρφωσης σύμφωνα με την
οδηγία 99/5/EΚ περί R&TTE θα τη βρείτε στη
διεύθυνση www.hama.com
k
A declaração de conformidade segundo a
p
directiva R&TTE 99/5/CE pode ser consultada em
www.hama.com
Заявление о соответствии товара нормам
u
R&TTE 99/5/EG см. на веб-узле www.hama.com
Konformitetsförklaring enligt R&TTE riktlinje
99/5/EG finner du på www.hama.com
68
s
R&TTEDirektifi 99/5/EG’ye göre uygunluk
t
beyanı için www.hama.com adresine bakınız.
69