1
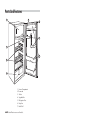
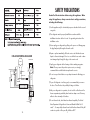
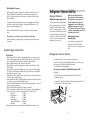
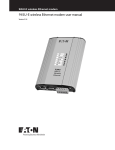
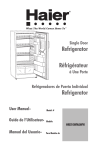
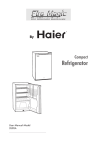
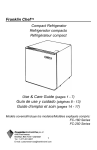
HR-245U
Parts And Features
1
8
5
6
2
7
3
4
1 . Freezer Compartment
2. Thermostat
3 . Shelves
4 . Vegetable Bin
5 . Refrigerator Door
6 . Dairy Box
7 . Bottle Shelf
NOTE: Not all features are on all models.
SAFETY PRECAUTIONS
Read all of the instructions before using this appliance. When
using this appliance, always exercise basic safety precautions,
including the following:
220V~,50Hz
1) Use this appliance only for its intended purpose as described in this use and
care guide.
2) This refrigerator must be properly installed in accordance with the
installation instructions before it is used. See grounding instructions in the
installation section.
3) Never unplug your refrigerator by pulling on the power cord. Always grasp
the plug firmly and pull straight out from the outlet.
4) Repair or replace immediately, all electric service cords that have become
HR-245US WIRING DIAGRAM
frayed or otherwise damaged. Do not use a cord that shows cracks or abra-
CAPACITOR
sion damage along its length, the plug or the connector end.
HEATER SWITCH
11
COMPRESSOR
14
5) Unplug your refrigerator before cleaning or before making any repairs.
Note: If for any reason this product requires service, we strongly
recommend that a certified technician performs the service.
6) Do not use any electrical device or any sharp instrument in defrosting your
refrigerator.
7) If your old refrigerator is not being used, we recommend that you remove
BLACK
BLUE
BLUE
G/Y
G/Y
BLACK
LEAD ASSY
G/Y
BROWN
E
SWITCH
4
BLACK
3
6
10
THERMOSTAT
RELAY
13
LAMP
PLUG
G/Y
E L 2
E L 1
BROWN
BLUE
N
N
the doors. This will reduce the possibility of danger to children.
8) After your refrigerator is in operation, do not touch the cold surfaces in the
freezer compartment, particularly when hands are damp or wet. Skin may
adhere to these extremely cold surfaces.
9) Do not refreeze foods, which have been thawed completely. The United
States Department of Agriculture in Home and Garden Bulletin No. 69
reads: "…You may safely refreeze frozen foods that have thawed if they still
12
.12.
contain ice crystals or if they are still cold-below 40˚F".
.1.
1
"…Thawed ground meats, poultry, or fish that have any off-odor or
off-color should not be refrozen and should not be eaten. Thawed ice cream
should be discarded. If the odor or color of any food is poor or
questionable, discard it. The food may be dangerous to eat."
"…Even partial thawing and re-freezing reduce the eating quality of foods,
particularly fruits, vegetables, and prepared foods. The eating
quality of red meats is affected less than that of many other foods. Use
refrozen foods as soon as possible, to save as much of its eating quality as
you can."
10) This refrigerator should not be recessed or built-in an enclosed cabinet. It is
designed for freestanding installation only.
11) Do not operate your refrigerator in the presence of explosive fumes.
TroubleShooting
Refrigerator Does Not Operate
•
•
•
•
Check thermostat control is not in the “OFF” position.
Check refrigerator is plugged in.
Check there is power at the ac outlet, by checking the circuit breaker.
Wait for 30-40 minutes to see whether refrigerator will start. It may be in
"defrost" mode and must complete this cycle before Compressor starts to operate.
Food temperature appears too warm
•
•
•
•
•
•
Frequent door openings.
Allow time for recently added warm food to reach fresh food or freezer temperature.
Check gaskets for proper seal.
Clean condenser coils (for models with exposed condenser coils).
Adjust temperature control to colder setting.
Check freezer compartment for air duct blockage from frozen food packages.
Food temperature is too cold
• If temperature control setting is too cold, adjust to a warmer setting and allow several hours for temperature to adjust.
Refrigerator runs too frequently
• This may be normal to maintain constant temperature during high temperature and
humid days.
• Doors may have been opened frequently or for an extended period of time.
• Clean condenser coils.
• Check gasket for proper seal.
• Check to see if doors are completely closed.
Moisture build up on interior or exterior of the refrigerator:
• This is normal during high humidity periods.
• Prolonged or frequent door openings.
• Check door gaskets for proper seal.
Refrigerator has an odor:
• Interior needs cleaning.
• Foods improperly wrapped or sealed are giving off odors.
Refrigerator light does not work:
• Check power supply.
• Tighten bulb in socket.
• Replace burned out bulb.
Refrigerator door does not shut properly:
• Level the refrigerator.
• Re-align refrigerator door.
• Check for blockages e.g. food containers, crisper cover, shelves, bins etc.
.2.
.11.
11
English
General:
• Prepare a cleaning solution of 3-4 tablespoons of
baking soda mixed with warm water. Use sponge or
soft cloth, dampened with the cleaning solution, to
wipe down your refrigerator.
• Rinse with clean warm water and dry with a soft cloth.
• Do not use harsh chemicals, abrasives, ammonia,
chlorine bleach,concentrated detergents, solvents or
metal scouring pads. SOME of these chemicals may
dissolve, damage and/or discolor your refrigerator.
Door Gaskets:
• Clean door gaskets every three months according to
general instructions. Gaskets must be kept clean and
pliable to assure a proper seal.
• Petroleum jelly applied lightly on the hinge side of gaskets
will keep the gasket pliable and assure a good seal.
Light Bulb Replacement
1. Switch off power to refrigerator.
2. Allow light bulb to cool before removing.
3. Remove bulb by screwing it out counter-clockwise.
4 Always replace with appliance type light bulb rated at 15 watts or lesser
wattage.
5. Do not exceed the 15 watts rating at any time.
Power Interruptions
• Occasionally there may be power interruptions due to thunderstorms or
other causes. Remove the power cord from AC outlet when a power
outage occurs. When power has been restored, replug power cord to AC
outlet. If outage is for a prolonged period, inspect and discard spoiled or
thawed food in freezer and refrigerator. Clean
refrigerator before reusing.
Installing Your Refrigerator
Unpacking Your Refrigerator
1. Remove all packaging material. This includes the foam base and all
adhesive tape holding the refrigerator accessories inside and
outside. Slide out and remove plastic or foam guard used to
secure the compressor from shipping damage due to vibration
and shock.
2. Inspect and remove any remains of packing, tape or printed
materials before powering on the refrigerator.
Adjusting Your Refrigerator
Leveling Your Refrigerator:
• Your refrigerator has two leveling legs which are located in the
front corners of your refrigerator. After properly placing your
refrigerator in its final position, you can level your refrigerator.
• Leveling legs can be adjusted by turning them clockwise to raise your
refrigerator or by turning them counterclockwise to lower
your refrigerator. The refrigerator door will close easier when the
leveling legs are raised.
Proper Air Circulation
• To assure your refrigerator works at the maximum efficiency it
was designed for, you should install it in a location where there is proper
air circulation, plumbing and electrical connections.
• The following are recommended clearances around the refrigerator:
Sides……………3/4 "(19mm)
Top....................2" (50mm)
Back..................2" (50mm)
Vacation and Moving Care
• For long vacations or absences, empty food from refrigerator and freezer,
move the temperature DIAL to the OFF position and clean the refrigerator
and door gaskets according to "General cleaning" section. Prop doors
open, so air can circulate inside.When moving always move the refrigerator vertically. Do not move with the unit lying down. Possible damage to
the sealed system could occur.
10
.10.
.3.
Frozen Food
Electrical Requirement
• Make sure there is a suitable power Outlet (220 volts, 15 amps outlet) with
proper grounding to power the refrigerator.
• Avoid the use of three plug adapters or cutting off the third grounding in
order to accommodate a two plug outlet. This is a dangerous practice
since it provides no effective grounding for the refrigerator and may result
in shock hazard.
Install Limitations
• Do not install your refrigerator in any location not properly insulated or
heated e.g. garage etc. Your refrigerator was not designed to operate in
temperature settings below 55˚ Fahrenheit.
• Select a suitable location for the refrigerator on a hard even
surface away from direct sunlight or heat source e.g. radiators, baseboard
heaters, cooking appliances etc. Any floor unevenness should be corrected
with the leveling legs located on the front bottom corners of the refrigerator.
WARNING:
The plug should be reachable by user after the appliance is positioned. If
the supply cord is damaged, it must be replaced by the manufacturer or its
authorized service agent.
The appliance must be properly earthen (grounded), especially in a place
of thick moisture.
• Proper freezer storage requires correct packaging. All foods must be in packages, which do not allow the flow of air or moisture in, or out. Improper storage will result in odor and taste transfer and will result in the drying out of the
improperly packaged food.
• Follow package or container instructions for proper storage.
• Packaging Recommendations:
Plastic containers with air tight lids
Heavy duty aluminum foil
Plastic wrap made from saran film
Self-sealing plastic bags
• Do not refreeze defrosted/thawed foods.
• It is recommended that the freezing date be marked on the packaging.
Normal Operating Sounds You May Hear
• The fan circulating air inside the interior of your unit to maintain the
temperature you have selected.
• Boiling water, gurgling sounds or slight vibrations that are the result of the
refrigerant circulating through the cooling coils.
• Sizzling or popping sounds resulting from frost melting during the defrost
cycle and dripping on the defrost heater.
• The sound of dripping water as ice melts from the evaporator and flows
into the drip pan during the defrost cycle.
• Cracking or popping sound caused by the expansion and/or contraction
of the cooling coils during the defrost cycle.
• The thermostat control will click when it cycles on and off.
Proper Refrigerator Care and Cleaning
Cleaning and Maintenance
Warning: To avoid electric shock always unplug your refrigerator before
cleaning. Ignoring this warning may result in death or injury.
Caution: Before using cleaning products, always read and follow manufacturer’s instructions and warnings to avoid personal injury or
product damage.
.4.
.9.
9
Defrosting the freezer
After a period of operation, a layer of frost will form on the surface of the
freezer. Additional electricity will be consumed if this layer becomes too
thick. The defrosting process must be carried out when a thick layer of frost
has been formed.
To defrost the freezer, first disconnect the power by unplugging the refrigerator, and then remove any food from the refrigerator and place it in a cool
place. Use a plastic defrosting tool.
After ice and frost are melted, wipe up the inside of the freezer compartment.
Caution:Never use a metal tool or electrical heater for defrosting.
After the defrosting is completed, plug in the refrigerator and it starts operation again.
Refrigerator Features And Use
General Features
(Note: If the refrigerator has
been placed in a horizontal or
tilted position for any period
of time wait 24 hours before
plugging the unit in. When the
ambient temperature is below
16 C, please turn on the low temperature compensation switch. If
not please turn it off.)
Adjustable temperature dial:
Your refrigerator will automatically maintain the temperature level you select. The
temperature control dial has 7 settings
plus off. 1 is the warmest. 7 is the coldest. Turning the dial to OFF stops cooling
in both the refrigeration and freezer sections. At first, set the dial to 4 and allow
24 hours to pass before adjusting the
temperature to your needs.
O
Refrigerator Section
Interior Light:
Your refrigerator is equipped with an
automatic interior light in the fresh
food section for you to easily locate your
food.
Food Storage Information
Refrigerator Interior Shelves
Fresh Food
• When storing fresh food, which is not prepackaged, be sure to wrap or store
food in airtight and moisture proof material unless otherwise noted. This will
ensure proper shelf life and prevent the transfer of odors and tastes.
• Wipe containers before storing to avoid needless spills.
• Eggs should be stored in an upright position in their original carton to maximize shelf life.
• Fruit should be washed and dried then stored in a crisper set for low humidity.
If you do not have humidity controlled crispers place the items in sealed plastic
bags before storing in the crisper.
• Vegetables with skins should be stored in plastic bags or containers and stored
in crisper with low humidity setting.
• Leafy vegetables should be washed and drained and then stored in plastic bags
or containers in crisper with high humidity setting.
• Hot food should be allowed to cool before storing in the refrigeration. This will
prevent unnecessary energy use.
• Fresh seafood should be used the same day as purchased.
• When storing meats in the fresh food section, keep in the original packaging or
rewrap as necessary. Follow the suggestions below for safe storage:
• Chicken
1-2 Days
• Ground Beef
1-2 Days
• Cold Cuts
3-5 Days
• Steaks/Roasts
3-5 Days
• Smoked/Cured Meats
7-10 Days
• All others
1-2 Days
If longer periods of storage are required, store immediately in the freezer section.
8
.8.
The refrigerator shelves of your refrigerator were designed
with you in mind. Their varied adjustability allows you to satisfy your personal storage needs. Only your model purchase and
your imagination limit the possibilities.
To remove or adjust a full-width slide-out shelf:
(see fig. # 1)
1. Gently tilt the shelf up and slide forward until the shelf has been
completely removed.
2. To replace the shelf, select the desired setting and gently slide the shelf
back until it rests in the locking position.
fig. # 1
.5.
Crisper and Crisper Cover
Refrigerator Door Shelves
To remove and install the crisper: (see fig. # 2)
To remove refrigerator door shelves: (see fig. # 5)
1. Grip the crisper firmly and slide out completely.
2. Replace the crisper by placing the crisper properly
and gently sliding it back into place.
1. Remove all items stored on the shelf.
2. Gently push up each side until the shelf is clear of the door shelf
brackets and then remove.
fig. # 2
door shelves
To remove the crisper cover: (see fig. # 3)
fig. # 4
1. First remove both crispers
2. Carefully grasp the crisper cover and slide out to remove.
To replace refrigerator door shelves: (see fig. # 4)
1. Align the ends of the shelves with the door shelf brackets.
fig. # 3
2. Carefully push down on each end of the door shelf until it is locked in
place in the refrigerator door brackets.
Defrosting the cold storage compartment
To replace the crisper cover:
1. Insert the rear of the crisper cover into the support bracket on the side
walls of the refrigerator.
2. Slide the crisper cover into place.
3. Replace the crispers as previously instructed.
6
.6.
The cold storage compartment is designed
for automatic defrosting. Frost formed on the
back wall will melt and flow via the drainpipe to the evaporating container over the
compressor on the back of the refrigerator,
where the heat generated by the compressor
will evaporate the water.(see fig. #5)
Water outlet
cleaning rod
fig. # 5
Caution: Always keep the drain over the vegetable and fruit tray clear to
ensure the normal flow of defrosted water. Use the rod provided to clear
any blockages.
.7.