1
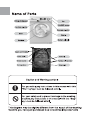
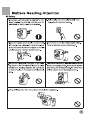
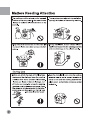
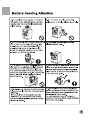
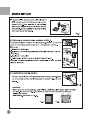
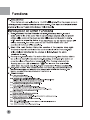
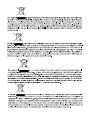
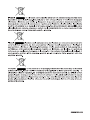
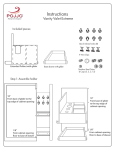
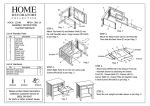
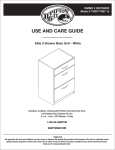
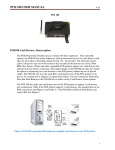
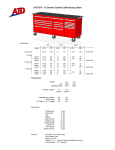
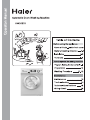
Го
—
a
©
=
ан
©
od
©
| 25
D
el
e
Haier
Automatic Drum Washing Machine
HWB1270
Table of Contents
Before using the appliance
Name of Parts...inside front cover
Matters Needing Attention......1-3
Installation... 4-5
Functions ...............—.—.....—...... 0-8
Maintenance ..................._..—... 13
Troubleshooting ..................... 14
Technical Specifications ........ 15
Wiring Circuit ................—....... 16
Name of Parts
——E O N
Detergent dispenser a A SN и
В роны ON/OFF button
\ a
A |
Function selector
Program selector
Door
Handle
Porthole Bottom planel
Spare earth terminal
Power cable Hose clip
Screws (3 pcs) Packing bolts (3 pcs)
Drainage hose Back plate
Caution and Warning symbols
For you safely,any instructions in this manual with this
"Warning"sign must be followed strictly.
machine,any instructions in this manual with this "Stop"
O For your safety and to prevent damage to the washing
sign must be followed strictly.
0
N
This diagram may be slightly different from the layout of the washing
machine you have just purchased due to techincal improvements
Matters Needing Attention
@ Safety
1.A separate earthed socket is required for the
power supply. The washing machine must be
positioned so that the plug is accessible.
2. Hold the plug and not the electric cable when
unplugging the washing machine.
3.Fuses in the power circuit should be rated for 15A.
If the supply cord is damaged, it must be replaced
by the manufacturer, its service agent or similarly
qualified persons in order to avoid a hazard.
4. Do not touch or use the washing machine bare-
footed or when the hands or feet are wet.
5.Do not use flammable detergent or dry clean
ing agent; do not use flammable spray in close
vicinity to the washing machine; do not remove
or insert the plug in the presence of flammable
gas.
6. The door of the washing machine will become hot
during the heating process. Avoid contact with the
door during the heating process. For safety, keep
children away from the washing machine.
Matters Needing Attention
8.The washing machine should not be installed
outdoors or in a damp place. In the event of water
leakage or splashes allow the machine to dry
naturally.
9. The carpet must not obstruct the ventilation
openings in the base of the washing machine.
10.Keep away from heat sources and direct sunlight
to prevent plastic and rubber components from
11.During installation, ensure that the electric
cable is not trapped by the washing machine
aging. and avoid damage to the electric cable.
e
4
DZ ©
During Use
—
. Before use, check the joints of the filling hose,
the tap and the drainage hose for possible
problems from water pressure fluctuations.
If joints are loose or there is leakage, turn
off the tap and repair. Do not use the washing
machine until the hoses are properly fixed.
The appliance is to be connected to the water
mains using new hose-sets and that old hose
‘D -sets should not be reused
D
<>,
o
2. Keep the door slightly open when the washing
machine is not in use to prevent formation of
odors; do not cover the washing machine with
plastic cover so that inside dampness cannot
be keptin.
Matters Needing Attention
3.Do not place heavy objects or container
with water on the washing machine,so as to
prevent deformation of the flat surface and
plastic parts.
4. Do not wash articles containing
polystyrene or similar elastic materials.
5. Before washing, do up zippers and ensure| 6.Do not open the detergent drawing
that buttons are securely fastened. Place
small items, such as socks,belts,etc. in a
small washing bag or a pillow-case . To
protect the washing machine, do not wash
garments containing wire parts.
during the wash cycle.
7. The door is fitted with a self-lock device
and can not be opened until 2-3 minutes
after the end of the programme.You are
not recommended to force the door open
before the programme end. Do not open the
door if the water level is above the lower
part of the door. 3
8. At the end of the wash cycle, turn off the
water supply to prevent water leakage, un-
plug the washing machine and thoroughly
clean the trim so as not to dirty the laundry
in the next wash cycle.
9.For appliances with type Y attachment,the
intructions shall contain the substance of the
following.
If the supply cord is damaged, it must be
replaced by the manufacturer,its service
agent or similarly qualifled persons in order
to avoid a hazard.
10.The installation instructions shall state
that the appliance is to be connected to the
water mains using new hose-sets and that
the old should not be used.
For washing machines with ventilation
openings in the base,that a carpet must not
obstruct the openings.
Installation
O Remove all the packing materials (including the
EPE base)to prevent vibration during use, as
shown in Fig.1.Upon opening of the package,
water drops may be seen on the plastic bag and
the porthole. This is normal phenomenon resulting
from water test in the factory.
Fig. 1
® Dismantle the packing bolts as shown in Fig. 2.
The packing bolts are designed for clamping anti-vibration components
nside of the washing machine during the transportation process.
Before use:
1. Remove the back plate;
2. Remove the three packing bolts on the back plate and take out the
rubber hose;
3. Replace the back plate;
4. Fill the holes left by the packing bolts with plastic plugs.
(Attention: The packing bolts and rubber hose should be kept in a safe
place for later use)
Fig.2
@® Adjusting the washing machine
There are adjustable feet under the bottom of the washing machine. Before
use, the washing machine should be adjusted, as shown in Fig. 3, so that it
is level.
Fig.3
Reminder:
When open the shrink package, you will find a Calcium plastic board which is sticky
one side. As shown in Fig. 1.The board is used for reducing noise by sticking
it under the cabinet
when setting. As shown in Fig. 2.
Fig.1 Fig.2
Installation
Connection of water inlet hose and washing machine
7
1. Place the water inlet hose nut on the water inlet hose nut
connector of the water inlet valve. 5
2. slightly shake the water inlet hose nut to see if B\
it is tightly and properly fixed. connector of water inlet valve
™
=
Water drainage hose
O The height of the terminal of the water drainage hose should be
between 80cm-100cm, the water drainage hose must be securely
placed on the clip on the back of the washing machine. X
@ Use the water drainage support supplied as an accessory for proper
installation of the water drainage hose.Fix the water drainage hose
support with waterproof string. Do not use an excessively long water
drainage hose and contract the authorized technician if the water drain-
age hose needs to be extended The water drainage hose should not y
be extended more than250cm.(longer extension will result in concur-
100cm
80cm
rent water inflow and outflow). The diameter of the extension hose should
be the same as the original hose.
caution:water drainage hose must not be immersed in water.the origi-
nal and extension hoses should be tightly connected.
@ The appliance is to be connected to the water mains using new
\_hose-sets and that old hose-sets should not be reused.
Connection of power supply
7
Check the following items before connection to the power supply.
load of the socket and power supply cable should not be less than 15A).
@ power supply voltage conforms to the required value.
e The power supply socket and the plug of the washing machine should be
machine should be connected to the earth before use.
e Supplementary earth cable should not be necessary if the socket is
connected to the earth.
e Supplementary earth cable should be installed on the upper back of
no earth connection.
heating pipes.
@ The socket conforms to the maximum power load (The maximum current
compatible. if they are not compatible, Refer to a washing machine technician or
~ a Haier designated service point for power cable replacement. The washing
the washing machine and connected to an earth if the power supply socket has
Caution: the supplementary earth cable should not be connected to water or
Functions
Control Panel Function Description
Hand wash Pa
. Cash Mere m— clan EU CK WE
Haier Wool Sportwash
De я TH EULCH | synthetic Duvet
Cotto Drain
U J | 7 -
foire inde 7
“но СВ
Display Information Introduction
Pre-wash Wash Rinse Spin
и a
\&/ Y WW ©) | >» Start/Pause
Progress Indication Bar ga ss -— == Rinse Hold
=|
Servation Time Display “eh 15 6% B| Foaming Indicator
o
60 1200 1-1
|
|
Temperature Display | Spin Speed Displ yl bacBelectionDisplay
Remaining Time Display Safety Child Lock Indicator
A. Power On/Off Key
Press the key and the washer will be automatically energized, release the key and powe
is disconnected.
B. Program Selection Knob
Turn the knob clockwise/counterclockwise to select the desired program. (please refer to
Program Setting Guidance Table )
C. Detergent Distribution Box- See Figure a for the drawer- type Detergent Dispenser
Open the dispenser box and you will see four detergent compartment of 1, 2, 3:
Compartment 1: Pre-wash Detergent LLL
Compartment 2: Washing Detergent
Compartment 3:Softener , Conditioner and Perfume Figure a
D. Reservation Selection Key
Press the key to select the desired time when the washing progress completes. When
setting this feature, the indicator lamp on the upper left corner of the key will illuminate.
Time reservation range is from 1 to 24 hours. The reserved time will increase by one
hour at each press of the key. When the feature is set, press Start/Pause key and th
reserve time will be displayed and countdown will start. At the same time, reservation
indicator lamp will start blinking and will go off after th e washer enters into normal
washing progress. Attention: The function " Reservation Selection " and "Rinse hold" are not
available at same time.
Functions
Note.
If Program key is turned after reservation time is set and before Program starts, the
reservation will be automatically cancelled.
When reservation feature is activated, the washing start time is fixed. There will be sane
difference between the reserved time and the actual program completion time due to different
water inlet time and load distribution condition durin gspin-dr yprocess.
E. LCD
LCD is a window to display information including washing status, washing progress,
reservation time, remaining time, heating temperature, spindry speed, load selection and error etc.
as well as to display additional features such as power clean, super clean rinse and foaming
auto-check etc.
F. Start/Pause Key
When the washer is energized, select the desired washing program and press the Start/Pause
key. The indicator lamp on the upper left corner of the key will illuminate to indicate that the
washer has started operation. If it needs to pause the washing process, simply press the Start/
Pause key and the indicator lamp and remining time display will blink and the washer enters into
condition. Press the Start/Pause key again to resume washing process.
(Note: Press the Start/Pause key only after the desired program and feature are set.
G. Rinse Hold Key
Press the key lightly,the screen displays the symbol. The washing machine does not drain the
water after the last rinse,but the laundry remains in a soak. To spin the laundry ,press this key
again .The symbol disappears from the screen and the program continues to the end .The
function is used to prevent the laundry creasing when left in the drum for a long time .
H. Temperature Selection Key
Press the key and LCD will display the selected heating temperature, which is adjustable as
needed. Note:--°C means cold water washing and no heating is involved.
I. Spin Speed Selection Key
Press the key and LCD will display the selected spin_dry revolution speed, which is adjustable
as needed. (When No Spindry feature is selected, the time will decrease correspondingly.)
J. Load Selection key
Turn the Program Knob to select the desired program (see Program Setting Guidance Table)
Press the key and manually select different programs and power-saving and water-seaving fea-
ture based on the volume of load. LCD will display L-1(2,3,4,5,F),indicating the washing load is
1(2,3,4,5,F) kg and program time will change accordingly. (The feature is not available in
Wool,Cashmere, Silk, Speedy, Drainage Only and Spin Only Program. Only L+1, 2, 3 are
available for Chemical Fiber program. )
Functions
K. Baby care Key
Press the key and super -clean icon in the LCD will illuminate. When the program comes to
softening process, the washer will add an extra rinse process. ( This feature is not available in some
programs. Please see Program Setting Guidance Table for details.)
A.
Introduction of Other Functions
Power-off Memory Function: Thewasher has power-off memory function.In case of
abrupt power failure or the power must be cut off during a program cycle, the present
settings will be saved and the preset operation will resume when the power is rezum-
ed.IFit needs to cancel this feature, press Start/Pause key so that the washer wil
will stop temporarily. Turn off the power key and restart the washer after a few
seconds and the feature will be cancelled.
Safety Child Lock Function: During the operation of the program, press down
Temperature key and Load Selection key concurrently and hold for 3 seconds." E"
will be displayed indicating that the program is locked. Repeat the above
procedures to unlock.
Foaming Auto-check Function: The washer offers foaming auto- check function, which is
is a solution to incomplete rinse due to over-dispensing of detergent. The washer can
sense the volume of foam formed automatically. When foaming is detected, the
Foaming icon in the LCD will illuminate № and an extra rinse cycle will be
added before the program completes. Program time duration will increase automatically.
. Auto-shower function: With automatic shower rinse technology,it can efficiently reduce
the residual detergent and make the rinse process more efficient and thorough. This
function operates without any intervention from human:
. Display messages:
Err1: Door is not properly shut.
Correction: Shut the door properly.
Err2: Drainage error, water not emptied within 4 min.
Correction: Clean the filter and check the drain hose for blockage. If error
still exists, please contact the maintenance personnel.
Err3: Temperature sensor short circuit or open circuit.
Correction: contact the maintenance personnel.
Err4: water heating element damage.
Correction:Contact the maintenance personnel.
Err5: Water fails to meet the specified level within 8 minutes.
Correction: Check the tap and the water pressure; if error still exists,
please contact the maintenance personnel.
Err6: Moter do not work.
Correction: Contact the maintenance personnel.
Err7: Moter overheat protection or damage.
Correction: Restart the power key if still display Err7 contact the maintance personnel.
Err8: Water exceeds protective level.
Correction: Contact the maintenance personnel.
End: End of a wash cycle.
Unb: After the last rinsing cycle finishes, spinning fails completely due to an
imbalance of the laundry.
1:25: Status information: Remaining program time.
Program Setting Guidance Table
Program Rec Default Program Temperature Rinse | Load Super Detergent Usage Method
Settin Adjustment Clean | Reserve
9 Laundry Capacity Temperature| Speed Hold | Selection | _. Compartment) Compartment) Compartment
Mode (Kg) | (© (rpm ) Range Rinse 1 2 3
Cott Heavilysoiled 1000 . -
оо viysoled | Р(7) 40 304050 | yes | yes | ves | ves | X x 0
Prewash | Cotton Fabrics -60-70-80-90
1000 -30-40-50
Cation | Cotton Fabrics| F() | 40 5070-30-90 | YES | YES | YES | YES X x 0
Synthetic | - Fsetcolour |, 60 | 800 _-3040 | yes | yes | YES | YES x 0
Fiber -50-60 X
Wool Wool / 40 600 __-80-40 | YES | NO | YES | YES X x О
Cashmere| Cashmere | / 4 | 400 _ 3040 | YES | NO | YES | YES X * 0
Hand wash) 9htv-solled |, 40 | 600 3040 | YES | № | YES | YES X * 0
Textiles
. Slightly-soiled
Quick wash| ” Texiles / 800 _ 3040 | YES | NO | NO | YES X x 0
Sport wash| Slightly-soiled | 30 800 -30 YES | NO | NO | YES X x О
Textiles TT
Duvet | Duvet | 40 |1000 3040 | YES | № | No | YES X + 0
Drain / / | / / NO | NO | NO | YES X X X
1000
Spin | / | NO | NO | NO | YES X X X
Note: O means that it needs to add perfume such as softener À means that it needs to add
detergent otherwise the desired washing result will not be achieved. X means it must not add
detergent. The data in Speed column is default spin speed of corresponding model (when
speed is not selected.)
Note: 1. Washing temperature refers to the highest temperature allowable during the whole
washing process. The washing time varies according to the type of clothes, selected
temperature and feature.
2. For clothes made of special materials such as woolens, cashmere and wool, please check if the
clothes has a machine-washing tag and the requests to the temperature.
3.The Rinse Hold key and the Delay Time key can not be choosen in one programme.
Preparation
1.Power supply
Plug in the power supply 220-240V~/50Hz
2.Water supply
Turn on the tap ensure that the water in clear.
Caution:Before staring the washing machine turn on the water
faucet to ensure the water faucet and the water inlet hose are
connected correctly and do not leak.
3.Detergent selection
Only special low foam detergent should
be used in automatic drum washing
mashine,form blended or wool fabrics
special deter-gent should ne used.dry
clearning solvent should not be used
such as trichhloroethy-lene or alike
(caution :load the required amount of
detergent only).
4 .Laundry treatment
O Sort out clothes according to type and extent of dirt. There are
three types of clothes:cotton,synthetical and woolen (silk) fabrics.
@ Separate white clothes from colored.If whites and coloreds
are combimed for one load, make sure the coloreds are colorfast.
-Clothing with frayed edges or yams should be put in a wash
bag or special bag before washing.
-repair damged clothing,lose buttons or damaged zips
and hooks before washing.
-Bed sheets and table ware should be loosely loaded and not
folded.
@This washing mashine is for househould use and designed
for mechanically washable clothes.When washing,separate
unwashable clothes with reference to clothes labels.
10
Washing Procedure
1. Loading
Open the door, put in the laundry piece by piece. Load Reference
Close the door tightly. ..
Notes: 1) When first using the washing ® Overalls Aa (800g)
machine, let it run unloaded for one program (cotton appr mun
e Blonded NN
® Cappr 2009)
to prevent the laundry from being tainted by
oil or dirty water from the washing machine. e Shirts
(appr 300g)
2) Do not overload the washing @7-shit LÉ
machine. 5° 0 appr oo | | CP unen Tabrics appr 70g)
@® Socks (blended
fabrics appr 50g)
@® Jackets gm EN
appr 80 &
o espe bed sheets
@® Woolen (cotton appr 800g)
blankets
(appr 30009 )
pr 800g)
2. Adding detergent
Slide out the detergent drawer and put the required detergent and
softening agent into the corresponding boxes. Push back the drawer gently.
Caution:
1) For pre-washing program, detergent should be added to both
compartments 1 and 2. Compartment 2 allows only solid detergents.
For other programs, do not add detergent to compartment 1.
2) Do not overuse softener; otherwise, it will damage the artificial
fibers. Refer to the instructions during use.
3) The softener can not exceed the "MAX" on the siphon hat.And
the softener should not be 100 гору .
3. Selecting washing program
To get the best washing effect, an appropriate washing program should be selected
according to the laundry type.
Note: The above operations refer to conditions without power-off memory. Or the washing
machine will continue operation from where the program was broken. To clear memory,
press the Start/Pause button. Turn off the power for a few seconds and turn on again, all
the settings will be renewed.
11
Washing Procedure
4. Setting washing temperature
Press the temperature button until " -- “C" is displayed if heating is not needed; otherwise, select
an appropriate temperature as required (refer to the "Guide to Operational Program Selection").
5. Function selecting button
Select functions as required (refer to the "Operational Functions” section).
6. Washing
Press Start/Pause key and the LCD will display " pp", which means the washer has started
operation. The LCD will display program remaining time.
The following functions cannot be re-selected.
1). Temperature Selection Key
2)» Reserve Time Key
3). All the functions already completed.
7. Finish
The washing machine will stop operation automatically when a wash cycle ends. The "End" sign will
appear. Open the door and take out the laundry. Then turn off the tap and unplug the power cable.
@® Hints for saving energy
During operation
1. Collect clothes for one full wash load.
2. Do not overload the washing machine.
3. Pre-wash heavily soiled clothes.
4. Reduce the amount of detergent or choose standard or delicate wash
programs for slightly soiled clothes.
5. Choose a proper washing temperature. Only exceed 60°C for heavily
soiled clothes.
6. Do not use more detergent than required.
7. Softening agent makes clothes feel softer and easier to iron.
12
Maintenance
1. Turn of the water and electricity sup- 2. Unplug the machine during cleaning and
prevent the formation of moisture and | S°@PY Liquid to clean the machine case and
odors. If the washing machine is left idle
for a long period, drain any remaining
water in the machine and replace the
drainage hose.
rubber components. Do not use corrosive or
abrasive chemicals or solvents.
3. Clean the detergent drawer regularly,see 4. Clean the filter Cleaning methods (once a month)
Fig. (a) 1) Pick up the bottom cover lightly (Fig. 1); |
Pull out the drawer completely by pushing 2) Screw out filter by turning counterclockwise (Fig. 2);
down the tab at the top of the drawer and 3) Flash clean with running water;
pulling.Rinse it clean with water and then 4) Replace the filter by turning clockwise and remount the
replace it. cover.
Fig.(a)
Caution: The filter must be in place, or it may lead to
leakage. (Fig3)
Fig1 Fig2
Fig3
5. To prevent block-
ages to the water
supply or the ingress
of contaminants,
clean the water inlet
and inlet water filter
regularly.
7. If the washing machine is left idle
for a long period turn off the water
and electricity supply and open the
door slightly to prevent the forma-
tion of moisture and odors.
6. If the machine is to be moved a distance
location, replace the vibration mounting locks
which were removed during installation as snown
elow.
Remove the Insert the transit Insert the bolts.
back cover. bolts
>
—
Tighten the bolts with the Replace the rear
spanner. panel.
13
Troubleshooting
The following circumstances do not constitute problems. Do not contact the maintenance service
until the problem has been confirmed.
Problem
Possible cause
The washing machine fails to operate
Poor connection to power supply
Power failure
Door is not properly closed
Machine has not been switched on
Washing machine cannot be filled
with water
Water tap is not turned on
Water pressure is less than 0.03MPa
The inlet hose is kinked
Water supply failure
The program dial is not properly set
The door is not properly closed
The inlet hose filter is blocked
The machine is draining while is
being filled
The height of the drainage hose is below 80cm (it
should be within 80-100cm)
The drainage hose end is in water
Drainage failure
Drainage hose is blocked
Drainage hose end is exceed 100cm above the floor
level
The filter is blocked
Strong vibration during spin drying
Not all packing bolts have been removed
Washing machine is located on an uneven surface
Machine load is over 7kg.
Operation stops before completion
of a wash cycle
Water or electricity failure
Washing machine is in soak cycle
Operation stops for a period of time
Washing machine is in soak cycle
Washing machine gives an error message.
Excessive foam in the drum, which
is spilled to the distribution drawer
The detergent is not a low-foaming type or for manual
wash
Excessive use of detergent
14
Technical Specifications
Model
HW B1270
Power supply
220V-240V~/(50Hz)
Power(Max) 2000
Water pressure (MPa) 0.03<p<1
Max. wash load (kg) 7
Spinning speed (Max) (r/min) 1200
Wash program 11
Weight (kg) 73
15
Wiring Circuit
HWB1270
1 | 1
1 | | I
| PCB | 1 №9 M8 MIO MI | HE A
| сес) | + 3 Hama |
L I | ]
rm 1 JAS JO7 JO! 9-7 9-е 9-1 93 9-4 3-5 3-6
¡MR 12-12 JE — PCE
(DISPLAY)
1-1 PCE (CONTROL) 1
12-3
12-4
12-2
9-9 12-6 12-5 12-10 12-9 12-8 12-7
EXE
M — Motor
PCB — Printed Circuit Board
MR — Door Lock
R — Heating Element
PS — Drainage Pump
EVF, EVP ,EVJ — Water Inlet Magnetic Valve
P — Pressure Switch
FA — Interference Suppresser
NTC — Temperature Sensor
| 1-Power switch
Das Symbol HE auf dem Produkt oder seiner Verpackung weist darauf hin, dass dieses Produkt
nicht als normaler Haushaltsabfall zu behandeln ist, sondern an einem Sammelpunkt für das Recycling von
elektrischen und elektronischen Geräten abgegeben werden muss. Durch Ihren Beitrag zum korrekten
Entsorgen dieses Produkts schützen Sie die Umwelt und die Gesundheit Ihrer Mitmenschen. Umwelt und
Gesundheit werden durch falsches Entsorgen gefährdet. Weitere Informationen über das Recycling dieses
Produkts erhalten Sie von Ihrem Rathaus, Ihrer Müllabfuhr oder dem Geschäft, in dem Sie das Produkt
gekauft haben.
Le symbo MEN sur le produit ou son emballage indique que ce produit ne peut être traité comme déchet
ménager. |! doit plutôt être remis au point de ramassage concerné, se chargeant du recy clage du matériel
électrique et électronique. En vous assurant que ce produit est éliminé correctement, vous favorisez la
prévention des conséquences négatives pour l’environnement et la santé humaine qui, sinon, seraient le
résultat d’un traitement inapproprié des déchets de ce produit. Pour obtenir plus de détails sur le recyclage de
ce produit, veuillez prendre contact avec le bureau municipal de votre région, votre service d’élimination des
déchets ménagers ou le magasin où vous avez acheté le produit.
Het symbool RE op het product of op de verpakking wijst erop dat dit product niet als
huishoudafval mag worden behandeld. Het moet echter naar een plaats worden gebracht waar elektrische
en elektronische apparatuur wordt gerecycled. Als u ervoor zorgt dat dit product op de correcte manier wordt
verwijderd, voorkomt u mogelijk voor mens en milieu negatieve gevolgen die zich zouden kunnen voordoen
in geval van verkeerde afvalbehandeling. Voor meer details in verband met het recyclen van dit product,
neemt u het best contact op met de gemeentelijke instanties, het bedrijf of de dienst belast met de
verwijdering van huishoudafval of de winkel waar u het product hebt gekocht.
O simbolo HE no produto ou na embalagem indica que este produto näo pode ser tratado como lixo
doméstico. Em vez disso, deve ser entregue ao centro de recolha selectiva para a reciclagem de
equipamento eléctrico e electrônico. Ao garantir uma eliminaçäo adequada deste produto, ira ajudar a evitar
eventuais consequéncias negativas para o meio ambiente e para a saúde pública, que, de outra forma,
poderiam ser provocadas por um tratamento incorrecto do produto. Para obter informacóes mais
pormenorizadas sobre a reciclagem deste produto, contacte os servicos municipalizados locais, o centro de
recolha selectiva da sua área de residéncia ou o estabelecimento onde adquiriu o produto.
El simbolo HE en el producto o en su embalaje indica que este producto no se puede tratar como
desperdicios normales del hogar. Este producto se debe entregar al punto de recolección de equipos
eléctricos y electrónicos para reciclaje. Al asegurarse de que este producto se deseche correctamente,
usted ayudará a evitar posibles consecuencias negativas para el ambiente y la salud pública, lo cual podría
ocurrir si este producto no se manipula de forma adecuada. Para obtener información más detallada sobre
el reciclaje de este producto, póngase en contacto con la administración de su ciudad, con su servicio de
desechos del hogar o con la tienda donde compró el producto.
I! simbolo sul prodotto o sulla confezione indica che il prodotto non deve essere considerato come
un normale rifiuto dom estico, ma deve essere portato nel punto di raccolta appropriato per il riciclaggio di
apparecchiature elettriche ed elettroniche. Provwedendo a smaltire questo prodotto in modo appropriato, si
contribuisce a evitare potenziali conseguenze negative per l ambiente e per la salute, che potrebbero
derivare da uno smaltimento inadeguato del prodotto. Per informazioni piú dettagliate sul riciclaggio di
questo prodotto, contattare l'ufficio com unale, il servizio locale di smaltimento rifiuti o il negozio in cui e stato
acquistato il prodotto.
The symbol EEE on the product or on its packaging indicates that this product may not be treated
as household waste. Instead it shall be handed over to the applicable collection point for the recycling of
electrical and electronic equipment. By ensuring this product is disposed of correctly, you will help prevent
potential negative consequences for the environment and human health, which could otherwise be caused
by inappropriate waste handling of this product. For more detailed information about recycling of this
product, please contact your local city office, your household waste disposal service or the shop where you
purchased the product.
0020505322D