1
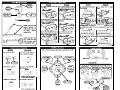
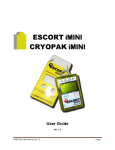
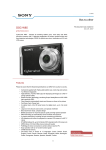
 Before using this system, please be sure to read,
understand, and follow the instruction of this manual.
0000...
hao audio”
SV iMini
www.h2oaudio.com
Copyright Notice:
This owner’s manual is copyrighted, all rights reserved. It may not, in whole or in part, be
copied, photocopied, reproduced, translated, or formed into any electronic format without prior
consent in writing. H20 Audio is a registrated trademark of Diver Entertainment Systems Inc.
iPod and iPod Mini are registrated trademarks of Apple Computers Inc.
Patents 6396769. 6614722. Others Pending. 1
General Storage Procedures
For long-term storage, remove T-Seal and store out of direct sunlight. If the T-Seal
will not be used for a long period of time, remove it from the housing and store in
a plastic bag out of direct sunlight. If the T-Seal is stored in a dry environment for
a long period of time, it will develop cracks and become unusable.
CAUTION: The life of a T-Seal is typically one (1) year. Contact H20 Audio for
spare T-Seals or a maintenance kit. Always remember to reinstall the T-Seal
before next use. Do not expose the housing to extreme heat, such as the inside of
a hot car, or in hot direct sunlight, such as a beach, or boat deck. Doing so may
cause damage and subsequent flooding,
CAUTION: Do not store housing in following environments:
* Solvents or other chemical fumes
* High humidity
* High Ozone
* Extreme temperature fluctuations
Storage in such conditions may lead to housing damage and leakage.
Rinse the EXTERIOR of the system in fresh water after EACH use:
1. Make sure the housing is sealed and closed
2. Soak in clean fresh water for 30 minutes.
3. Rinse the entire system with freshwater
4. Then completely dry the entire exterior of the system using a clean soft cloth.
5. Dry face down so water can properly drain from the Scroll Wheel.
Strong detergents, soaps, and chemicals MUST NEVER be used to clean the
system. If you must use soap, it should be a very diluted.
Introduction
The H20 Audio SV iMini system enables you to listen to digital audio while active
in watersports to a depth of 10 feet (3m). It houses the Apple iPod Mini .
HOUSING: The housing features a simple and secure locking mechanism to keep
the unit waterproof during operation. The H20 Audio SV housing allows for
functional control of the player while submerged in an aqueous environment.
NOTE: The iPod Mini is NOT waterproof without the H20 Audio and NOT
covered under this product warranty.
SPEAKERS: The speaker set is specially designed with clips for attachment around
the ears and neck. The cable is removable for users who wish to be able to use
other standard headphones with 3.5mm male connectors.
NOTE: Using this system with any other headphone will not be waterproof.
Leak Test
Before utilizing the system for the first time, it is highly recommended to perform
a 'Leak Test'. Follow the instructions below.
DO NOT INSTALL THE MP3 PLAYER INSIDE THE HOUSING FOR THE LEAK TEST
1. Visually inspect the main housing seal by opening the unit. Verify the seal is
seated as intended and the T-Seal is clean of any artifacts, then close and lock
the housing using the latch.
2. Immerse the housing, without the MP3 player, in water.
3. Manipulate the controls at various depths.
4. Remove from the water, dry the exterior, and visual inspect inside the
housing for any sign of leaks.
5. Only after a successful Leak Test, install the MP3 player in the housing,
General Use Notice
READ THIS MANUAL CAREFULLY. IF YOU HAVE ANY QUESTIONS PLEASE CONTACT
H20 AUDIO CUSTOMER SUPPORT PRIOR TO USE.
IMPROPER USE OF THIS SYSTEM MAY CAUSE THE USER TO MAKE MISTAKES OR
DECISIONS THAT MAY LEAD TO SERIOUS INJURY OR DEATH.
IMPORTANT WARNING AND DISCLOSURE:
THOSE USERS THAT ELECT TO UTILIZE THIS SYSTEM AT, OR NEAR, THE WATER'S
SURFACE, MUST MAINTAIN SAFETY AWARENESS OF MOVING WATER CRAFTS.
ALWAYS MAKE SURE TO HAVE THE MP3 PLAYER VOLUME TURNED TO ZERO AND THE
SPEAKERS AWAY FROM THE EARS WHEN TURNING ON THE H20 AUDIO SV UNIT. IF
THE VOLUME LEVEL IS NOT ZERO WHEN THE H20 AUDIO SV IS TURNED ON, IT MAY
CAUSE EAR INJURY DUE TO A SUDDEN BURST OF VOLUME. THE VOLUME SHOULD
BE SLOWLY INCREASED WITH AN AUDIO FILE PLAYING TO SET THE SPEAKER
VOLUME TO COMFORTABLE OUTPUT LEVELS PRIOR TO POSITIONING THE SPEAKERS
NEXT TO THE EARS.
DO NOT USE THE HEADPHONES WHILE DRIVING, CYCLING, OR OPERATING ANY
MOTORIZED VEHICLE. IT MAY CREATE A TRAFFIC HAZARD AND IS ILLEGAL IN SOME
AREAS. IT CAN ALSO BE POTENTIALLY DANGEROUS TO PLAY YOUR HEADSETS AT
HIGH VOLUME WHILE WALKING OR ENGAGING IN OTHER ACTIVITIES, ESPECIALLY
AT PEDESTRIAN CROSSINGS. YOU SHOULD EXERCISE EXTREME CAUTION OR
DISCONTINUE USE IN POTENTIALLY HAZARDOUS SITUATIONS.
AVOID USING HEADPHONES AT HIGH VOLUME. HEARING EXPERTS ADVISE AGAINST
CONTINUOUSLY LOUD AND EXTENDED PLAY. IF YOU EXPERIENCE RINGING IN YOUR
EARS, REDUCE VOLUME OR DISCONTINUE USE.
THE MANUFACTURE DOES NOT WARRANT AND WILL NOT BE HELD RESPONSIBLE IN
ANY WAY FOR DAMAGES TO THE AUDIO DEVICE, OR LOSS OF DATA, INCLUDING LOSS
OF DATA STORED IN THE DEVICE, RESULTING FROM AN EXCESSIVE IMPACT,
THUNDER, OR AN ELECTRICITY FAILURE, OR WATER DAMAGE. YOU WILL BE
RESPONSIBLE FOR SAFE GUARDING ALL DATA STORED ON YOUR DEVICE. 5
T-Seal Preparation
This product uses a high grade "T" seal.
DO NOT USE SILICONE GREASE as this will damage the seal.
Always check the T-Seal for hair, sand, lint, or other debris and wipe clean as
necessary before closing the lid. Be careful not to stretch the T-Seal. If the T-Seal
is cut or cracked it must be removed and replaced with a new T-Seal.
If you must replace the T-Seal, visually inspect the groove in the lid and the
contact surface for hair, sand, lint, or other debris and wipe clean as necessary.
Also, check the contact surface for scratches, blemishes, or other imperfections.
If the contact surface is damaged, do not use the housing. It is very possible the
housing will flood and damage the electronics. Contact H20 Audio Customer
Support for advice.
CAUTION: Never use sharp or metal objects to remove T-Seals as they damage
the seal or the contact surface. If you must install the T-Seal make sure that it is
seated uniformly, with no twists or loose areas. Be careful not to stretch the T-Seal
unnecessarily.
Contact Surface
Warranty Coverage
H20 Audio guarantees, to the original purchaser only, that the equipment purchased
(EXCLUDING THE MP3 PLAYER) is free of defects in material and/or under normal recreational
use for a period of one year (1) from date of consumer purchase from an Authorized Dealer;
provided that proper care and maintenance have been performed as prescribed by the owner's
guide included with the equipment. Should this product prove to be defective for any reason
(other than those listed as limitations below) the product will be serviced or replaced at H20
Audio's sole discretion at no charge (excluding shipping and handling). This warranty shall be
void if the registration is not completed and sent to H20 Audio Customer Services within 30
days of purchase. This warranty shall be void if the equipment has been tampered with by
anyone not Authorized by to perform service. The warranty is non-transferable and extends to
the original purchaser only and is valid only if the equipment was purchased from an Authorized
dealer. Warranty does not extend to cover damage from accident, abuse, tampering, lack of
maintenance, theft, or loss. Service or modifications by anyone other than an Authorized H20
Audio agent will void the warranty. H20 Audio will not be responsible for recovery or
replacement of the product in the event of loss or theft. H20 Audio, its Authorized International
Distributors, and Authorized Dealers make no other warranties, either express or implied or
orally, or in writing, with respect to any other warranty coverage except those expressly stated
within the preceding paragraphs. H20 Audio will not be held responsible for any agreements
orally or in writing with the exception of those expressly included in this warranty statement. The
Warranty registration card and the terms contained herein supersede all statements contained in
any and all owner's guides, instruction cards, or other equipment literature or catalogs. In no
event will H20 Audio, its Authorized International Distributors, and Authorized Dealers be held
responsible or liable for any personal injuries resulting from the use of the covered equipment,
or for any other damages, whether direct, indirect, incidental, or consequential; even if H20
Audio has been advised of such damages. Warranty does not extend to any damages that
may occur to the MP3 players or loss of any data.
Returning for Service
Prior to any return, a Return Authorization (RA) number must be attained. Proof of purchase from
an Authorized Dealer will be required. Contact Custom Support to attain an RA number and
shipping instructions. A copy of the original sales receipt and a copy of the owner's portion of the
warranty card must accompany all correspondence regarding the equipment covered by this
warranty agreement or in direct reference to this warranty.
Customer Support is available Monday to Friday 9AM to 5PM PST.
Website: http://www.h2oaudio.com
Phone: 800-708-6080 or 858-623-0339
Fax: 858-225-0815
Email: [email protected] 6
SV-iMini rev.06B
General Housing Operations
Display |
Window |
Click Wheel
Push Button
Scroll Wheel
Dial
Check the seal and
contact surface to
make sure it is clean of
all debris before
closing the lid.
Always make sure the
lid is sealed and the
latch is secure, prior
to entering the water.
7
Headset Connector Operations
Step 1: Align jack to connector
Disconnect
Step 1: Firmly grab onto rubber boot
below the taper of the connector.
a:
=
Step 2: Push jack into connector
=>
130
Step 3: Fully seat the rubber boot
Step 2: Pull connector apart with a
slight twisting motion.
=
Note: Do not bend the stereo jack
connector during disassembly.
Step 3: Wipe clean exposed parts
E |
(Rinse with fresh water & dry)
Latch Unlock / Lock Operations
Step 1: Slide latch button towards the
unlock @ icon
Step 2: While holding the latch button
on the unlock @* icon, simultaneously
push up on the side of the latch
wy
Step 3: Lift the top latch over the lid
hooks. Compress the lid to the base if
the latch does not clear the lid hooks.
Step 1: Lift the top latch over the lid
hooks.Compress the lid to the base if
Step 2: Snap the latch downwards to
lock it in place
Step 3: Verify the latch button is
positioned is on the lock icon @
Scroll Wheel
Rotate Clockwise
Previous
/Rewind
Button
Scroll Wheel
Rotate Counter-Clockwise
Next/
Fast-
Forward
Button
Select Button
11
MP3 Insertion / Removal Operations
Step 1: Align audio port €) with stereo ¡Step 1: Gently rotate the player
upwards.
jack in the housing.
Make sure to
plug into the
stereo jack. Be
gentle.
Do not bend
the stereo jack.
Step 2: Gently snap the player onto the
audio jack.
VA
р
LU
\ (0)
Step 3: Gently rotate the player
downwards into place.
NONE
Coiled Audio Cable
Ear Wrap Separation
The neck band can be separated from and reattached to the ear wrap.
While holding the Pull the neck band from
ear wrap to separate .
neck band, rotate the
ear wrap 90 degrees
x 19
№ | :
A
Note: Push neckband and ear
wrap together to reattach
| E
Position behind and swivel for best
the ear fit adjustments
12
SV-iMini rev.06A