1
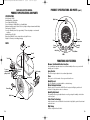
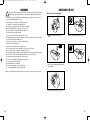
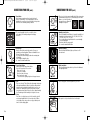
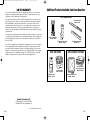
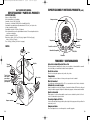
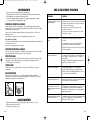
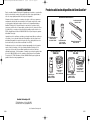
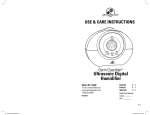
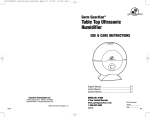
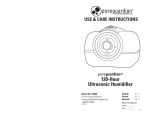
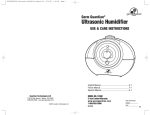
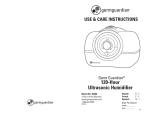
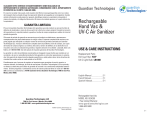
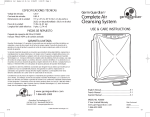
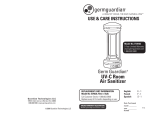
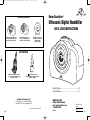
R3000REV0310:Digital Humidifier Manual 2L
3/2/10
3:59 PM
Page 1
Germ Guardian®
HUMIDIFICADORES
Ultrasonic Digital Humidifier
®
USE & CARE INSTRUCTIONS
Humidificador Digital Ultrasónico
con Tecnología Limpia de Plata
Modelo No. R3000 & R3010
Humidificador Ultrasónico con
Tecnología Limpia de Plata
Modelo No. R2000 & R2000B
Humidificador Ultrasónico
para Mesa con Tecnología
Limpia de Plata
Modelo No. H1000
ASPIRADORAS
Aspiradora Vertical y de Canastilla
2 en 1 con Tecnología Limpia de Plata
Modelo No. GGU300
Desinfectante de Aire
UV-C Recargable + Aspiradora de Mano
Modelo No. GGH200
English Manual......................................................E-1
Spanish Manual ....................................................S-1
Guardian Technologies LLC
7700 St Clair Avenue · Mentor, OH 44060
1-866-603-5900 · www.germguardian.com
©2007 Guardian Technologies LLC
S-12
MODEL NO. R3000
30 Day Limited Warranty
www.germguardian.com
1-866-603-5900
REV0310
Date Purchased
month
year
E-1
R3000REV0310:Digital Humidifier Manual 2L
3/2/10
3:59 PM
Page 2
READ AND SAVE THIS MANUAL
PRODUCT SPECIFICATIONS AND PARTS (cont.)
PRODUCT SPECIFICATIONS AND PARTS
SPECIFICATIONS
Model Number: R3000
Humidifying Mode: Combination
Power Supply: AC120V, 60Hz
Power Consumption: 140W (40W at cool humidification)
Maximum humidity capacity: About 350cc/Hr. (at highest setting and warm humidification)
Tank Capacity: 1.4 Gallons
Successive Humidity Hours: Up to approximately 72 hours depending on environmental
conditions.
Humidity Range: 25%-80%
Dimensions: Width-14.5 inches; Length-9 inches; Height-12 inches
Weight: 8.8 Pounds (not including packaging)
Night Lamp
Current
Temperature
Timer
PARTS
Humidity
Control
Spray
Control
Spout
Auto/Sleep
Cool/Warm
Handle
Power
Tank
Tank Lid
FUNCTIONS AND FEATURES
Warm or Cool Humidification Selection
Select humidifying temperature based on need. Warm humidity will use more power but will
humidify your room quicker.
To access
cleaning brush,
pull up on lid.
Cleaning
Brush
Air-Cleaning
Filter
Spray Control
The mist level may be adjusted to low, medium, high and turbo.
Timer
Spout Guide
Allows you to select the number of hours you want the unit to run.
Humidity Level
40%-55% Humidity is considered within the comfortable range.
Water Shortage Indicator
When the unit is low on water the Refill LED on the front panel will light up, and the unit
will shut off. Simply add more water to continue use.
Power Plug
Humidity Adjustment
Night Lamp
Body
The humidity volume may be adjusted based on need by pressing the humidity control button
on the front panel.
Silver Clean Technology
Small silver particles have been added to the water tank to help fight the growth of bacteria and
mold in the water.
Night Lamp
Provides soft light with on/off switch.
E-2
E-3
R3000REV0310:Digital Humidifier Manual 2L
3/2/10
3:59 PM
Page 3
WARNINGS
!
·
·
·
·
·
·
·
·
·
·
·
·
·
·
·
·
·
·
·
·
·
·
·
·
This product should be used only in accordance with the specifications outlined in this
manual. Usage other than what has been specified here may result in serious injury.
Disassembly, repair or remodeling by an unauthorized person may result in serious harm.
Do not use if plug is damaged or loose.
Keep this product out of the reach of children and pets.
Be careful not to put water in the humidity spout.
Before filling or cleaning the unit, make sure it is unplugged.
Once the humidifier has been turned on, do not move it.
Do not remove the water tank from the unit while it is on.
Do not handle the plug with wet hands.
Do not excessively bend, twist or pull the power cord.
Avoid placing this product where the humidity spout is pointed directly at an electrical object.
Do not directly inhale the humidity spout.
Do not place this product on a sloped or unstable surface.
When not in use, unplug the unit.
Do not fill the water tank with hot or boiling water.
Do not use this product in direct sunlight, or near a gas stove or heater.
If the water tank becomes cracked or damaged, do not use.
Do not keep this product running for an extended period of time without proper maintenance.
Do not clean the unit or water tank with detergents or chemicals of any kind.
Do not use this product near any other electronic device.
Do not cover the humidity opening at any time during use.
Do not use this product near a sink.
Do not drink water from water tank.
Do not place this product on an absorbent surface.
Do not pour anything but water in the water tank.
DIRECTIONS FOR USE
Make sure the unit is unplugged.
1. Separate the tank from the body of
the unit.
2. Open the tank lid, turning it to the left.
3. Pour cool, clean water directly into the
tank. Do not pour anything but water into
the water tank.
4. Close the tank lid, turning it to the right.
Failure to comply with the warnings listed above may result in electric shock or serious injury.
5. Attach the tank to the body of the unit.
E-4
E-5
R3000REV0310:Digital Humidifier Manual 2L
3/2/10
3:59 PM
Page 4
DIRECTIONS FOR USE (cont.)
E-6
DIRECTIONS FOR USE (cont.)
7. Power Button
Before turning on make sure there is water in the unit.
Press the Power Button. The unit will display the current
humidity in the room. Once the unit is turned on it may take a
short time for the humidity reading to stabilize.
13. Press to select cold or warm humidification*. Water temperature
is maintained at 40 degrees for cold and 80 degrees for warm.
Warm vs. cool mist is a matter of
personal preference. Warm will
humidify room quicker.
8. The current humidity level in the room will be shown
on the display. The humidity reading will not display
below 25%.
14. Humidity Control Button
Press the Humidity Control Button to change the humidity level.
· Humidity level options include: 30%, 35%, 40%, 45%, 50%,
55%, 60%, 65%, 70%, 75%, 80%.
· Five seconds after pressing this button the current humidity
level will be displayed.
This will not affect the spray output!
Co - means Constant Humidification.
9. Timer Button
Press the Timer button and set the number of hours you
would like your Germ Guardian™ Ultrasonic Humidifier to run
(1-hour, 2-hours up to 12 hours).
· If you press the button during operation the remaining time
is displayed.
· Press it again to adjust the time.
Co - means Constant Humidification.
15. Water Refill Button
When the Water Refill Button lights up it is time to refill
the water tank.
10. Spray Control Button
When you press the Spray Control Button
there are four options to choose from:
Press once for weak
Press twice for middle
Press three times for strong
Press four times for turbo
* You will notice the lights get higher as the spray increases.
16. Night Lamp Button
Press the night lamp button at the top of the unit to illuminate
the night light feature.
11. Auto
Press once for auto. This will keep the unit running continuously
with warm humidification. When selected this setting will automatically work to maintain the humidity in the room at a comfortable level. During this mode the unit operates at a warm
temperature and may shut off when it reaches optimal humidity.
It will restart again as the humidity level begins to decrease.
12. Sleep
Press twice to activate sleep mode. In this mode the unit will
run at warm humidification for 3 hours then shut off. When
selected this will also turn on the moon (sleep indicator) and
turn off all other display lights.
17. Press to display the current temperature in your room.
18. Turn spout to select preferred direction of mist output.
E-7
R3000REV0310:Digital Humidifier Manual 2L
3/2/10
3:59 PM
Page 5
MAINTENANCE
· Always unplug the unit before servicing it in any way.
· Be careful when handling the water if warm humidification was selected. The water
temperature of the water remaining in the unit after use may be high.
· Do not submerse the unit in water, or allow water to enter anywhere on the unit except the
designated water tank.
TROUBLESHOOTING GUIDE
PROBLEM
SOLUTION
Water vapor & humidity are not
produced.
Power Plug: Unplug and then try again.
Power Failure: When the power is returned, try again.
INSIDE THE BODY OF THE UNIT
Tank Installation: Make sure the tank is correctly
attached.
While the water tank has been treated with Silver Clean Technology to fight the growth of mold,
regular cleaning of the tank and body is recommended to maximize water cleanliness.
Make sure spring on tank cap moves freely when pushed.
Pour excess water out of the unit. Make sure water does not enter the hole where the water
vapor comes out.
Wash out the unit with fresh water, using a cleaning brush and a soft cloth.
Air blows but water vapor is not
produced.
The desired humidity is lower than the current
temperature: increase the desired humidity.
Ultrasonic Metal Disk
Humidity levels become weak when water spots remain on the surface of the ultrasonic
metal disk.
Detergent residue in the tank: Wash the tank out
and try again.
Do not use chemicals or detergents.
OUTER SURFACE OF THE UNIT
Humidity level is low.
Wipe the surface of the unit with a soft damp cloth if needed. Do not use any type of cleaning
chemical as it may corrode the surface.
The surface of the ultrasonic metal disk may be dirty:
Wipe it off with a dry soft cloth. Clean with white vinegar.
The water in the unit is too cold: Replace with cool, but
not cold water.
WATER TANK
If water spots remain in the water tank, wipe the inside with a soft cloth. Do not use soap or
detergents. Silver Clean particles have been added to the water tank to help fight the growth of
mold, mildew and bacteria.
Excessive Water: Remove a certain amount of water from
the tank.
Warm humidity is not produced.
It may take 10-15 min. before warm humidity is created.
The mist may not feel warm to the touch.
Check to see if the base of the unit feels warm to the
touch. If so, warm mist is being produced.
AIR FILTER
Gently wipe away debris from the filter with a soft cloth. This filter does not need to be replaced.
ULTRASONIC DISK
The humidity has a bad smell.
Poor maintenance or dirty water: Clean the product
thoroughly, and fill it with fresh water.
White dust is forming on nearby
furniture.
Hard water will deposit a certain amount of dust. Dust in
the air settles because of the added humidity in the room.
Use distilled water if this becomes a nuisance.
My current humidity will not go
below 25%.
The unit will not display a humidity setting below 25%.
This means the current humidity in your room is at or
below 25%.
Remove spray spout (Fig. 1) and use the enclosed cleaning brush to regularly remove build up
and deposits from this area (Fig. 2). White vinegar will help to prevent this build up.
Fig. 1
Fig. 2
STORAGE
· Fully dry the inside and outside of the unit before storing it.
· DO NOT leave water in the unit.
· Store in a cool dry place.
E-8
E-9
R3000REV0310:Digital Humidifier Manual 2L
3/2/10
3:59 PM
Page 6
LIMITED WARRANTY
Additional Products Available from Germ Guardian
®
To the consumer, Guardian Technologies LLC warrants this product to be free of defects in
materials or workmanship commencing upon the date of the original purchase. Save your
original sales receipt to validate start of warranty period.
UV-C SANITIZERS
If this product should become defective within the warranty period, we will repair or replace
any defective parts free of charge. The complete machine must be delivered pre-paid to any
authorized Guardian Technologies LLC warranty service center. Please include complete
information on the problem, day of purchase, copy of original sales receipt and your name,
address and telephone number. If you are not near a warranty station, call the factory for
assistance in the US and Canada at 1-866-603-5900. Use only genuine Guardian Technologies
replacement parts.
The warranty does not include unusual wear, damage resulting from accident, or unreasonable
use of the product. This warranty does not cover unauthorized repairs. This warranty gives you
specific legal rights and you may also have other rights (other rights may vary from state to
state in the U.S.A).
We consider the registration process important to ensuring superior service to our customers,
however submitting this card to Guardian Technologies LLC is optional and does not affect
your rights to utilize this warranty according to the conditions stated above. If you have any
questions or comments about our product call toll free at 1-866-603-5900 or send comments
to: Attn: Customer Service, Guardian Technologies LLC, 7700 St Clair Avenue · Mentor, OH
44060. This warranty can also be registered online at www.germguardian.com.
UV-C Sanitizer Wand
Model No. LW18
UV-C Room Air Sanitizer
Model No. EV9102
Pluggable UV-C Air Sanitizer
Model No. GG1000
HEAT SANITIZERS
UV-C Mini Sanitizer Wand
Model No. LW9
AIR CLEANSING SYSTEMS
®
®
Table Top Complete
Air Cleansing System
Model No. AC4000
Dry Heat Sanitizer
Model No. NS2000
Toothbrush Sanitizer
Model No. TS3000
Complete Air Cleansing System
Model No. AC6000
Guardian Technologies LLC
7700 St Clair Avenue · Mentor, OH 44060
1-866-603-5900 · www.germguardian.com
©2007 Guardian Technologies LLC
E-10
E-11
R3000REV0310:Digital Humidifier Manual 2L
3/2/10
3:59 PM
Page 7
Germ Guardian®
Humidificador Digital Ultrasónico
HUMIDIFIERS
®
INSTRUCCIONES DE USO Y CUIDADO
Ultrasonic Digital
Humidifier with
Silver Clean Technology
Model No. R3000 & R3010
Ultrasonic Humidifier
with Silver Clean Technology
Model No. R2000 & R2000B
Ultrasonic Table Top
Humidifier with Silver Clean
Technology
Model No. H1000
VACUUMS
2-in-1 Upright & Canister
with Silver Clean Technology
Model No. GGU300
Rechargeable
UV-C Air Sanitizer + Hand Vac
Model No. GGH200
Manual en Inglés ..................................................E-1
Manual en Español................................................S-1
MODEL NO. R3000
Garantía limitada por 30 dias
www.germguardian.com
1-866-603-5900
E-12
Fecha de compra
mes
año
S-1
R3000REV0310:Digital Humidifier Manual 2L
3/2/10
3:59 PM
Page 8
LEA Y GUARDE ESTE MANUAL
ESPECIFICACIONES Y PARTES DEL PRODUCTO (cont.)
ESPECIFICACIONES Y PARTES DEL PRODUCTO
ESPECIFICACIONES
Número de Modelo: R3000
Modo de humidificación: Combinado
Suministro eléctrico: 120 V CA, 60 Hz
Consumo de electricidad: 140 W (40 W con humidificación fría)
Capacidad de humedad máxima: Aproximadamente 350 cc/hr. (con el ajuste más
elevado y humidificación tibia)
Capacidad del depósito: 5.29 litros (1.4 galones)
Horas de humedad consecutiva: Aproximadamente hasta 72 horas dependiendo de las
condiciones ambientales.
Límites de humedad: 25%-80%
Dimensiones: Ancho – 36.83 cm (14.5 pulg.); longitud – 22.86 cm (9 pulg.);
altura – 30.48 cm (12 pulg.)
Peso: 3.99 Kg. (8.8 libras) (sin incluir el empaque)
Lámpara nocturna
Temperatura
actual
Temporizador
Control de
humedad
Control de rociado
PARTES
Automático/Suspendido
Boca
Frío/Tibio
Encendido
Asa
FUNCIONES Y CONFIGURACIONES
Depósito
Tapa del
depósito
Selección de humidificación tibia o fría
Elija la temperatura de humidificación en base a sus necesidades. La humedad tibia consumirá
más electricidad, pero humidificará la habitación más rápidamente.
Control de rociado
El nivel de rociado puede ajustarse a bajo, medio, alto y turbo.
Tire de la tapa
hacia arriba
para obtener
acceso al cepillo
para limpieza.
Cepillo
para
limpieza
Filtro de aire
Temporizador
Le permite seleccionar el número de horas que desea que funcione la unidad.
Nivel de humedad
Guía de la boca
Se considera que una humedad de 40% a 55% se encuentra dentro de los límites confortables.
Indicador de escasez de agua
Cuando la unidad tiene un nivel bajo de agua, se iluminará el indicador LED de relleno del panel
frontal y la unidad se apagará. Simplemente añada más agua para continuar usando la unidad.
Ajuste de humedad
Enchufe
Puede ajustarse el volumen de humedad de acuerdo a sus necesidades al oprimir el botón de
control de la humedad en el panel frontal.
Tecnología Limpia de Plata
Lámpara nocturna
Cuerpo
Se han incorporado partículas pequeñas de plata al depósito de agua para evitar la proliferación
de bacterias y moho.
Lámpara nocturna
Provee una lámpara tenue con un interruptor de encendido / apagado.
S-2
S-3
R3000REV0310:Digital Humidifier Manual 2L
3/2/10
3:59 PM
Page 9
ADVERTENCIAS
!
INSTRUCCIONES DE USO
Debe usarse este producto sólo de acuerdo a las especificaciones descritas en este
manual. Usarlo de una manera diferente a lo indicado puede ocasionar lesiones severas.
· Desarmarlo, repararlo o remodelarlo por una persona no autorizada puede provocar
daños severos.
· No lo utilice si el enchufe está dañado o suelto.
· Mantenga este producto fuera del alcance de los niños y mascotas.
· Tenga cuidado de no verter agua en la boca de humidificación.
· Antes de llenar o limpiar la unidad, asegúrese que esté desconectada.
· Una vez que haya encendido el humidificador, no lo mueva.
· No retire la cubeta si la unidad está encendida.
· No tome el enchufe con las manos mojadas.
· No doble, tuerza ni jale excesivamente el cordón eléctrico.
· Evite colocar este producto de manera que la neblina de humidificación apunte directamente
a un objeto eléctrico.
· No inhale la neblina de humedad directamente.
· No coloque este producto sobre una superficie inclinada o inestable.
· Cuando no la use, desconecte la unidad.
· No llene la cubeta con agua caliente o hirviendo.
· No use este producto bajo la luz solar directa ni cerca de una estufa o calentador de gas.
· No lo use si la cubeta se agrieta o presenta daños.
· Evite que este producto funcione por un período prolongado sin recibir el mantenimiento
adecuado.
· No limpie la unidad ni la cubeta con detergentes ni productos químicos de ningún tipo.
· No use este producto cerca de cualquier dispositivo electrónico.
· Cuando lo use, no cubra la apertura de humidificación en ningún momento.
· No use este producto cerca de un lavabo o fregadero.
· No beba el agua del depósito.
· No coloque este producto sobre una superficie absorbente.
1. Desconecte la unidad del tomacorriente.
2. Retire el depósito del cuerpo de la unidad.
3. Abra la tapa del depósito girándola hacia
la izquierda. No vierta ningún otro líquido
en el depósito que no sea agua limpia.
4. Vierta agua fría y limpia directamente
en el depósito.
5. Cierre la tapa del depósito girándola hacia
la derecha.
6. Vuelva a colocar el depósito en el
cuerpo de la unidad.
El no cumplir las advertencias enumeradas anteriormente puede provocar un choque
eléctrico o lesiones severas.
S-4
S-5
R3000REV0310:Digital Humidifier Manual 2L
3/2/10
3:59 PM
Page 10
INSTRUCCIONES DE USO (cont.)
7. Botón interruptor
Antes de encender la unidad verifique que la unidad esté llena
de agua. Oprima el botón interruptor. La unidad mostrará el nivel
de humedad actual de la habitación. Una vez que se enciende la
unidad, la lectura de humedad podría tomar un poco de tiempo
en estabilizarse.
13. Oprima para elegir una humidificación fría o tibia*. El agua se
mantiene a una temperatura de 4.4 grados C (40 grados F) para la
humidificación fría y a 26.6 grados
C (80 grados F) para una
humidificación tibia. La neblina tibia
o fría es una cuestión de preferencia
individual. La neblina tibia humidificará la habitación más rápidamente.
8. En la pantalla se mostrará el nivel de humedad actual de la
habitación. La lectura de humedad no mostrará valores por
debajo de 25%.
14. Botón de control de la humedad
Oprima el botón de control de la humedad para cambiar el
nivel de la humedad.
· Las opciones para el nivel de humedad incluyen: 30%, 35%,
40%, 45%, 50%, 55%, 60%, 65%, 70%, 75%, 80%.
· El nivel de humedad actual se mostrará en la pantalla cinco
segundos después de oprimir el botón.
¡Esta acción no afectará la cantidad de rociado!
La palabra “Co” significa humidificación constante.
9. Botón temporizador
Oprima el botón temporizador y ajuste el número de horas que
desea que funcione el Humidificador Ultrasónico Germ
Guardian™ (por ejemplo, 1 hora, 2 horas hasta un máximo de
12 horas).
· Si oprime el botón mientras la unidad está funcionando, se
mostrará el tiempo que queda.
· Oprímalo nuevamente para ajustar el tiempo.
La palabra “Co” significa humidificación constante.
10. Control de rociado
Cuando oprime el botón de control de rociado
usted debe elegir una de las cuatro opciones
siguientes:
Oprímalo una vez para una humedad ligera
Oprímalo dos veces para una humedad media
Oprímalo tres veces para una humedad fuerte
Oprímalo cuatro veces para turbo humedad
* Podrá notar que las luces son más intensas a medida que
se incrementa el rociado.
11. Automático
Oprímalo una vez para un ajuste automático. De esta manera la
unidad funcionará continuamente con humidificación tibia.
Cuando se selecciona, este ajuste mantendrá automáticamente la
humedad en la habitación en un nivel confortable. En esta modalidad, la unidad funciona a una temperatura tibia y podría apagarse
cuando alcanza el nivel óptimo de humedad. Volverá a encenderse
a medida que el nivel de humedad comienza a disminuir.
12. Modo suspendido
Oprima dos veces para activar el modo suspendido. En esta
modalidad, la unidad funcionará con humidificación tibia durante
3 horas y luego se apagará. Cuando se selecciona, también se
encenderá el icono de la luna (indicador de modo suspendido)
y se apagarán todas las demás luces de la pantalla.
S-6
INSTRUCCIONES DE USO (cont.)
15. Botón de rellenado de agua
Cuando se ilumina el botón de rellenado de agua indica que es
el momento de rellenar el depósito de agua.
16. Botón de lámpara nocturna
Oprima el botón de lámpara nocturna en la parte superior de la
unidad para activar la luz para la noche.
17. Oprima para mostrar la temperatura ambiente actual.
18. Gire la boca de humidificación para elegir la dirección preferida
de salida de la neblina.
S-7
R3000REV0310:Digital Humidifier Manual 2L
3/2/10
3:59 PM
Page 11
MANTENIMIENTO
· Desconecte siempre la unidad antes de darle mantenimiento.
· Tenga cuidado al tocar el agua si eligió la humidificación tibia. El agua que queda dentro
de la unidad después de usarla puede estar muy caliente.
· No sumerja la unidad en agua ni permita que entre agua en ningún lugar de la unidad,
con excepción del depósito designado para el agua.
INTERIOR DEL CUERPO DE LA UNIDAD
GUÍA DE SOLUCIÓN DE PROBLEMAS
PROBLEMA
La unidad no produce vapor de
agua ni humedad.
Aunque el depósito de agua ha sido tratado con la tecnología limpia de plata para evitar la
proliferación de moho, se recomienda limpiar regularmente el depósito y el cuerpo de la unidad
para maximizar la pureza del agua.
SOLUCIÓN
Enchufe: Desconéctelo, vuelva a conectar e intente nuevamente.
Interrupción del suministro eléctrico: Cuando se restablezca
el servicio, intente nuevamente.
Instalación de la cubeta: Verifique que la cubeta esté
conectada correctamente.
Cerciórese que el resorte de la tapa del depósito se mueve
libremente si se empuja.
Saque el exceso de agua de la unidad. Asegúrese que el agua no penetre en el orificio por
donde sale el vapor.
Lave la unidad con agua fresca con un cepillo para limpieza y un paño suave.
Disco Ultrasónico de Metal
Los niveles de humedad tienden a ser leves cuando existen manchas de agua en la superficie del
disco ultrasónico de metal.
Sale aire pero no se produce
vapor.
Cantidad excesiva de agua: Saque algo de agua de
la cubeta.
La humedad deseada es menor que la temperatura
actual: aumente el nivel deseado de humedad.
No limpie con sustancias químicas o detergentes.
Residuos de detergente en la cubeta: Lave bien la cubeta
e intente nuevamente.
SUPERFICIE EXTERIOR DE LA UNIDAD
De ser necesario, limpie la superficie de la unidad con un paño suave, húmedo. No use ningún
tipo de limpiador químico debido a que puede corroer la superficie.
Nivel de humedad bajo.
DEPÓSITO DE AGUA
Si quedan manchas de agua en el depósito, limpie el interior con un paño suave. No use jabón
ni detergentes. Se han añadido partículas nano-silver al depósito de agua para evitar el
crecimiento de moho, roya y bacterias.
La superficie del disco ultrasónico de metal podría estar
sucio: Límpielo con un paño suave, seco. Límpielo con
vinagre blanco.
El agua de la unidad está demasiado fría: Reemplace con
agua fresca, pero que no esté fría.
FILTRO DE AIRE
Limpie suavemente los residuos del filtro con un paño suave. Este filtro no necesita ser
reemplazado.
No produce humedad tibia.
Verifique si la base de la unidad está tibia al tacto. De ser
así, está generando una neblina tibia.
DISCO ULTRASÓNICO
Retire la boca de rociado (Fig. 1) y use el cepillo para limpieza incluido para eliminar
periódicamente las incrustaciones y materiales depositados en esta área (Fig. 2). Puede usar
vinagre blanco para prevenir estas incrustaciones.
Fig. 1
La humedad tibia tarda de 10 a 15 minutos para
producirse. Esta neblina podría no estar tibia al tacto.
Fig. 2
ALMACENAMIENTO
La humedad despide mal olor.
Mantenimiento deficiente o agua sucia: Limpie la unidad
meticulosamente y llénela de agua fresca.
En los muebles cercanos a la
unidad está apareciendo un polvo
blanco.
El agua dura creará ciertos depósitos de polvo. El polvo en
el aire también se asienta debido a la humedad de la
habitación. Si le molesta este polvo, use agua destilada en
lugar de agua del grifo.
La humedad actual de la unidad
nunca es menor de 25%.
La unidad no mostrará una lectura de humedad por debajo
de 25%. Esto significa que la humedad actual de la
habitación es de 25% o menor.
· Antes de guardar la unidad seque completamente la superficie interior y el exterior.
· NO deje agua dentro de la unidad.
· Guárdela en un lugar fresco y seco.
S-8
S-9
R3000REV0310:Digital Humidifier Manual 2L
3/2/10
3:59 PM
Page 12
GARANTÍA LIMITADA
Productos adicionales disponibles de Germ Guardian®
Para el consumidor, Guardian Technologies LLC garantiza que este producto se encuentra libre
de defectos de materiales o mano de obra a partir de la fecha de compra original. Guarde el
recibo de compra original para validar el inicio del período de garantía.
DESINFECTANTES UV-C
Si durante el período de garantía se encuentra que el producto es defectuoso, repararemos o
reemplazaremos las piezas defectuosas sin ningún costo. El aparato completo debe enviarse
con porte pagado por anticipado a cualquier centro de servicio de garantía autorizado por
Guardian Technologies LLC. Incluya la información completa sobre el problema, fecha de
compra, una copia del recibo de compra original y su nombre, dirección y número de teléfono.
Si su domicilio no se encuentra cerca de una estación de garantía y requiere atención en los
EE.UU. y Canadá, llame a la fábrica al 1-866-603-5900. Use sólo piezas de repuesto genuinas
de Guardian Technologies.
La garantía no cubre los problemas ocasionados por desgaste inusual, daños que resulten por
un accidente o el uso no razonable del producto. Esta garantía no cubre las reparaciones no
autorizadas. Esta garantía le otorga derechos legales específicos y usted pudiera tener otros
derechos adicionales (los cuales varían en cada estado en los EE.UU.)
Consideramos que el proceso de registro es importante para garantizar el servicio superior a
nuestros clientes; sin embargo, el envío de esta tarjeta a Guardian Technologies LLC es
opcional y no afecta sus derechos para utilizar la garantía de acuerdo a las condiciones
estipuladas anteriormente. Si tiene preguntas o comentarios acerca de nuestro producto llame
sin costo al 1-866-603-5900 o envíe sus comentarios a: Attn: Customer Service, Guardian
Technologies LLC, 7700 St Clair Avenue · Mentor, OH 44060. También puede registrar esta
garantía en Internet en www.germguardian.com.
Vara Desinfectante UV-C
Modelo No. LW18
Desinfectante de Aire para
Habitaciones UV-C
Modelo No. EV9102
Desinfectante de Aire
UV-C Conectable
Modelo No. GG1000
ESTERILIZADORES
TÉRMICOS
Minivara Desinfectante UV-C
Modelo No. LW9
SISTEMAS PARA LA LIMPIEZA
DEL AIRE
®
®
Sistema Completo
para la Limpieza del
Aire para Mesa
Modelo No. AC4000
Desinfectante por
calor seco
Modelo No. NS2000
Esterilizador para
Cepillos de Dientes
Modelo No. TS3000
Sistema Completo para la
Limpieza del Aire
Modelo No. AC6000
Guardian Technologies LLC
7700 St Clair Avenue · Mentor, OH 44060
1-866-603-5900 · www.germguardian.com
©2007 Guardian Technologies LLC
S-10
S-11