1
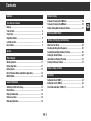
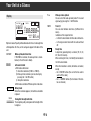
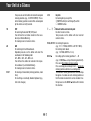
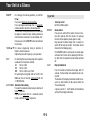
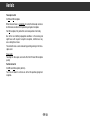
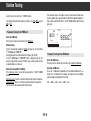
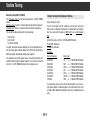
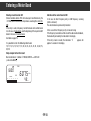
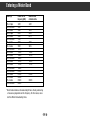
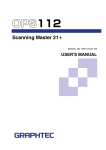
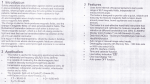
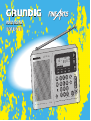
WORLD RECEIVER
YACHT BOY 400
YACHT BOY 400
SLEEP
TIME I
60
FM
TUNING
..5
...3...4.
0...1...2
ON TIME
ON/OFF
89.6
SLEEP
STORE
FREE
TIME 1/2
MHz
AUTO
TUNING
FM
AM
3
2
1
MEMO
4
5
6
7
8
9
RESET
0
FREQU./METER
LOCK
4 0
S T A T I O N
E S
M E M O R I
S SB
LW / M W / S W
/FM STEREO
SIZED
PLL SYNTHE
AUTO TUNING
ST E P
RSION
DUAL CONVE
Contents
Contents
Station Tuning
Your Unit at a Glance
Frequency Tuning in the FM Band.................................. 15
Frequency Tuning in the AM Band.................................. 15
Station Tuning with the Numeric Buttons ......................... 17
Display ................................................................. 04
Front of Unit............................................................ 06
Top of Unit ............................................................. 08
Right Side of Unit ..................................................... 09
Left Side of Unit ....................................................... 09
Rear of Unit ............................................................ 09
Entering a Meter Band
Storing, Calling Up, and Clearing
What Can You Store?..................................................20
Checking the Reception Frequency ................................ 20
Creating/Overwriting a Memory Position.......................... 20
Calling Up Stored Stations .......................................... 20
Indicating Free Memory Positions ................................. 21
Clearing a Memory Position......................................... 21
Aerials
Power Supply
Mains Operation ...................................................... 11
Battery Operation ..................................................... 11
Battery Check .......................................................... 11
Data Protection (Mains and Battery Operation) .................. 12
RESET Button .......................................................... 12
Going to Sleep to Music
The Clock
Setting the Clock (TIME I) ........................................... 23
Setting the Clock (TIME II) .......................................... 23
Clock Time Indication (TIME I/ II) .................................. 23
General Operation
Switching On/Off and Locking ....................................... 13
Direct Entries .......................................................... 13
Display Illumination .................................................. 13
Volume and Tone ..................................................... 14
Waveband Selection.................................................. 14
k1
GB
Contents
Automatic Switch-On/ Wake-Up Function
Entering a Switch-On Time .......................................... 24
Checking the Entered Switch-On Time............................. 24
Wake-Up with Radio/Automatic Switch-On ....................... 24
Wake-Up with Sound Signal/Date Reminder ..................... 25
Clearing the Wake-Up Function..................................... 25
Special Functions on AM
SSB Mode (Amateur Radio Reception) ............................ 26
Interferences........................................................... 26
Specification
Hints – Prescriptions ................................................. 29
Radio Stations ......................................................... 29
k2
Your Unit at a Glance
SNOOZE
LIGHT
S SB
+
STORE
SSB
0N
AUTO
FM
1
2
3
AM
4
5
6
7
8
9
s
MEMO
a
TUNING
s
a
RESET
0
LOCK
LW / M W / S W / F M S T E R E O
k3
FREQU./METER
PLL SYNTHESIZED
AUTO TUNING
OFF
FREE
ST E P
DUAL CONVERSION
HIGH
TIME 1/2
LOW
LOCAL STEREO MONO
DC 9V
M E M O R I E S
ON TIME
TONE
DX
NARR
S T A T I O N
SLEEP
VOLUME
SW EXT. ANT.
WIDE
4 0
ON/OFF
FINE TUNING
YACHT BOY 400
°°°°°°°°°°°°°°°°°°°°°°°°°°°°°°
°°°°°°°°°°°°°°°°°°°°°°°°°°°°°°
°°°°°°°°°°°°°°°°°°°°°°°°°°°°°°
°°°°°°°°°°°°°°°°°°°°°°°°°°°°°°
°°°°°°°°°°°°°°°°°°°°°°°°°°°°°°
°°°°°°°°°°°°°°°°°°°°°°°°°°°°°°
°°°°°°°°°°°°°°°°°°°°°°°°°°°°°°
°°°°°°°°°°°°°°°°°°°°°°°°°°°°°°
°°°°°°°°°°°°°°°°°°°°°°°°°°°°°°
°°°°°°°°°°°°°°°°°°°°°°°°°°°°°°
°°°°°°°°°°°°°°°°°°°°°°°°°°°°°°
°°°°°°°°°°°°°°°°°°°°°°°°°°°°°°
°°°°°°°°°°°°°°°°°°°°°°°°°°°°°°
°°°°°°°°°°°°°°°°°°°°°°°°°°°°°°
°°°°°°°°°°°°°°°°°°°°°°°°°°°°°°
°°°°°°°°°°°°°°°°°°°°°°°°°°°°°°
°°°°°°°°°°°°°°°°°°°°°°°°°°°°°°
°°°°°°°°°°°°°°°°°°°°°°°°°°°°°°
°°°°°°°°°°°°°°°°°°°°°°°°°°°°°°
°°°°°°°°°°°°°°°°°°°°°°°°°°°°°°
°°°°°°°°°°°°°°°°°°°°°°°°°°°°°°
°°°°°°°°°°°°°°°°°°°°°°°°°°°°°°
°°°°°°°°°°°°°°°°°°°°°°°°°°°°°°
°°°°°°°°°°°°°°°°°°°°°°°°°°°°°°
°°°°°°°°°°°°°°°°°°°°°°°°°°°°°°
°°°°°°°°°°°°°°°°°°°°°°°°°°°°°°
°°°°°°°°°°°°°°°°°°°°°°°°°°°°°°
°°°°°°°°°°°°°°°°°°°°°°°°°°°°°°
°°°°°°°°°°°°°°°°°°°°°°°°°°°°°°
°°°°°°°°°°°°°°°°°°°°°°°°°°°°°°
°°°°°°°°°°°°°°°°°°°°°°°°°°°°°°
°°°°°°°°°°°°°°°°°°°°°°°°°°°°°°
°°°°°°°°°°°°°°°°°°°°°°°°°°°°°°
°°°°°°°°°°°°°°°°°°°°°°°°°°°°°°
°°°°°°°°°°°°°°°°°°°°°°°°°°°°°°
°°°°°°°°°°°°°°°°°°°°°°°°°°°°°°
°°°°°°°°°°°°°°°°°°°°°°°°°°°°°°
°°°°°°°°°°°°°°°°°°°°°°°°°°°°°°
Your Unit at a Glance
Display
ON-TIME
8 8:8 8
BATT. CHECK
TIME II
FM
LW
MW
SW
SLEEP
MEMORY
STEP
88:88
BATT. CHECK
TUNING
0 ... 1 .. .2 ... 3 ... 4 ... 5
IIIIIIIIIIIIIIIIIIII
TIME II
Time I/II
You can select between two times (2 different time
zones).
Indication of the respective time:
– In the left numeric block with the radio switched on.
– In the large numeric block with the radio switched
off.
SLEEP
Sleept time
A sleep time (operating time) is entered (10, 20, 30,
40, 50 or 60 minutes).
When entering the time, it will briefly be indicated in
the left numeric block.
LOCK
When this indication is visible, all buttons are locked,
except
– the ¢ ON/OFF button (this can further be used to
switch off the radio);
– the ¶ SNOOZE button (the functions of this button are retained).
kHz
MHz
kHz
8 8 mFREE
Optimum read-off quality will be obtained when the set is brought into
a tilted position. For this, use the swing-out support at the back of the
unit.
ON-TIME
Wake-up mode symbols
You can select the wake-up mode (radio ¤ or sound
signal â ) by pressing the ¢ AUTO button.
LOCK
:
8.8.8.8.8
TUNING
0...1...2...3...4...5
¤â
Wake-up time/switch-on time
If ON-TIME is indicated, the wake-up time is shown
below (in the left numeric block).
Left numeric block
a. With radio switched on:
1) Clock time indication (TIME I or TIME II).
2) Wake-up time indication (can be called up by
pressing the ¢ AUTO button).
3) Sleep time indication.
b. With radio switched off: Wake-up time indication.
Battery check
When this indication appears, the batteries should be
replaced.
Tuning/field strength indication
The reception quality corresponds to the length of the
tuning bar.
k4
Your Unit at a Glance
)
FM
LW
MW
SW
kHz
MHz
Stereo
Indication in the case of stereo broadcasts.
8.8.8:8.8
Indication of the waveband (FM/LW/MW/SW) and
the frequency.
The associated numeric value is indicated in the large
numeric block.
88
Bottom numeric block
With the radio switched off: Seconds indication.
With the radio switched on: See following description.
88 FREE
MEMORY
STEP
88
88 kHz
88 m
k5
Large numeric block
With the radio switched on: Frequency indication and
special messages (e.g., E F F 8 F ).
With the radio switched off: Time 1 or time 2
(e.g., 2 : 0 4 ).
Free memory position
Indicates the number of a free memory position.
Memory position
Indicates the number of the memory position on
which the stored frequency is currently received.
Tuning step
Indicates the width of the manual tuning steps in the
AM wavebands (1, 5, 9 or 10 kHz).
Meter band indication
Indicates the number of the meter band selected.
Your Unit at a Glance
Front of Unit
ON TIME
Switch-on time
For calling up the wake-up time (in the left numeric
block) when the radio is switched on.
For setting the wake-up time (switch-on time)
(e.g., 7 . 3 0 ON-TIME = 7:30).
TIME 1/2
Time I/II
For selecting between Time I and Time II.
For setting and calling up the times I and II, e.g.,
2 1 . 4 0 TIME I/II or TIME I/II 2 1 . 4 0 TIME I/II.
FREE
Free
Indicates free memory positions in increasing order.
Two successive pressures on this button will clear
occupied memory positions (e.g., 4 FREE FREE).
STORE
Store in memory
You can store in memory up to 40 stations.
To avoid redundant storing, first check whether the
currently received station has already been stored.
If the station has not yet been stored, enter the number of the desired memory position and store the station in memory by pressing the STORE button (e.g.,
1 3 STORE).
If the selected memory position is not free, the indication will flash for approx. 5 seconds. The memory
position will not be overwritten.
Multifunction display
(Description see further up)
ON/OFF
On/off button
For switching the unit on and off.
You can switch the unit off even if all buttons are
locked (in LOCK position).
SLEEP
Sleep button
For entering a time after which the unit is switched
off (sleep time).
Initial value: 60 minutes. This value is decreased in
steps of 10 minutes by repeatedly pressing this button.
The following order is run through:
60 / 50 / 40 / 30 / 20 / 10 / Radio off /
Radio on for 60 min. / 50 ... .
Short pressure on the ¢ SLEEP button: Indication
of the remaining sleep time for approx. 5 seconds in
the display (left numeric block).
AUTO
AUTOMATIC button
For switching between the three function modes:
– Wake-up with radio. The display indicates ¤.
– Wake-up with sound signal (also with switched-on
radio). The display indicates â .
– Wake-up function off. When switching to this
function, the display (left numeric block) indicates
for approx. 5 seconds "-:--".
k6
Your Unit at a Glance
Two pressures on the button will overwrite occupied
memory positions (e.g., 23 STORE STORE): The selected memory position is overwritten and occupied
by the station currently tuned to.
FM
AM
RESET
LOCK
Key lock
For locking all keys except the
¢ ON/OFF button (for switching off) and the
¶ SNOOZE button.
. Numeric buttons and decimal point
0 ... 9, ¢
VHF
For selecting the desired FM (VHF) band.
You will hear the last station tuned to in this waveband (Last Station Memory).
For clearing incorrect numeric entries.
For direct numeric entries.
Two pressures on this button will clear incorrect
numeric entries.
FREQU./METER For entering frequencies
(e.g., 1 0 7 . 7 FREQU./ METER = FM 107.7 MHz).
For entering meter bands
(e.g., 1 3 FREQU./METER = 13 m).
AM
For switching to the AM wavebands.
Repeated pressures on this button will select the
wavebands in the following order:
LW – MW – SW – LW – MW – etc.
You will hear the station last received in the respective waveband (Last Station Memory).
For clearing incorrect numeric entries.
MEMO w
For clearing all stored data (memory positions, clock
time).
For resetting an eventually blocked keyboard (e.g.,
after static charges).
k7
For calling up the memory positions 1 ... 40
(e.g., 2 0 MEMO w = call-up of memory position 20).
Press once: Next higher memory position.
Press and keep pressed longer than 1 s: Automatic
memory position selection in ascending order.
The automatic memory position select function stops
for approx. 5 seconds on each memory position so
that the station received on it can be checked. A further pressure on the MEMO w button will terminate
this function.
Your Unit at a Glance
MEMO q
For calling up the memory positions (as with MEMO w).
Press once: Next lower memory position.
Press and keep pressed longer than 1 s: Automatic
memory position selection in descending order.
The automatic memory position select function stops
for approx. 5 seconds on each memory position so
that the station received on it can be checked. A further pressure on the MEMO q button will terminate
this function.
Top of Unit
Telescopic aerial
for FM and SW reception.
SNOOZE
Snooze button
Press once to switch off the radio or the alarm function after wake-up. After five minutes, the wake-up
function will be repeated (sound signal or radio).
Keep pressed the button longer than 2 seconds to
switch off the wake-up function. The function will be
retained for the following day(s).
If the SNOOZE button is not pressed, the sound signal
will sound for 5 minutes or the radio play for 60 minutes. After that, the respective function will be switched
off.
LIGHT
Display illumination
TUNING w / q For manual step-by-step tuning in direction of
higher or lower frequencies.
Keep button pressed: Frequency scan up or down.
STEP
For selecting the manual tuning steps (the respective
waveband must have been selected).
LW
1 kHz or 9 kHz
SW
1 kHz or 5 kHz
MW
1 kHz or 9 kHz resp. 10 kHz
For selecting the tuning step 9 kHz or 10 kHz in the
MW band, the unit must be switched off with the
¢ ON/OFF button.
Press this button to illuminate the display. After 10
seconds, the illumination will automatically be switched off.
The duration of the display illumination will be increased if any other button will be pressed within this
10-seconds period.
A pressure on the ¢ LIGHT button will immediately
switch off the display illumination.
AUTO TUNING Automatic station tuning
Press briefly: Automatic station tuning in direction of
higher frequencies.
Keep pressed longer then 0.5 s: Automatic station
tuning in direction of lower frequencies.
k8
Your Unit at a Glance
STEREO MONO On FM: Mono/stereo switch.
WIDE NARR On AM: Wide/narrow switch.
In the FM waveband, this switch is used to select
between mono and stereo reception.
In the AM wavebands, the same switch is used for
changing the bandwidth.
Right Side of Unit
FINE TUNING Fine tuning
For fine tuning on SSB reception.
SSB
SSW on/off switch
For switching on and off the SSB mode (Single Side
Band reception).
U
SSB is especially used for amateur SW radio reception.
TONE
Tone control
Y
DC 9V
Two positions: HIGH (treble) and LOW (bass).
VOLUME
Volume control
Left Side of Unit
SW EXT.ANT
Socket for external aerial
Aerial connection for SW reception. For external aerial with 3.5 mm ø jack plug.
DX/LOCAL
Sensitivity switch
Normal position is "DX" (distant reception).
If the signal is too strong resulting in reception interferences, set the switch to "LOCAL".
Headphone/earphone socket
For headphone or earphone with jack plug of
3.5 mm ø (32 Ohm impedance). Connecting a headphone disconnects the built-in loudspeaker. For this
reason, the headphone must be disconnected if you
wish to be woken up by the radio.
DC socket
For connecting a commercial plug-in mains unit with
coaxial plug (outer diameter 5.5 mm, inner diameter
2.1 mm; output voltage 9.0 V=; mains voltage
230 V ¦, 50/60 Hz; neutral conductor connected to
earth
).
Y
Rear of Unit
Swing-out support
Swing out this support to bring the unit into a tilted
position.
On the support there is an illustration showing the
time zones of the earth.
Below the support there is the type plate of the unit.
Battery compartment
For six 1.5V batteries (IEC LR6, UM-3).
k9
Aerials
Telescopic aerial
for FM and SW reception.
When the aerial base is completely retracted, the telescopic aerial can
be tilted and swivelled into the position giving best reception.
For SW reception, fully extend the aerial and position it vertically.
Due to the much better propagation conditions in the evening and
night hours with respect to daytime reception, interferences may
occur during these hours.
These interferences can be reduced by partially pushing in the telescopic aerial.
Please note:
Touching the telescopic aerial will affect the FM and SW reception
quality.
Ferrite rod aerial
for MW and LW reception (built-in).
Turn the unit about its vertical axis to find the position giving best
reception.
k 10
Power Supply
Mains Operation
Battery Check
Y
Only use a mains unit with the correct output voltage of 9V = and correct polarity
.
When the batteries get weak, the indication
the display.
Connect the mains unit to the DC 9V socket. This disconnects the
inserted batteries.
When the radio is switched on, it will switch off after a short time.
ON-TIME
8 6:3 0
No responsibility can be accepted for damage due to incorrect
mains operation.
BATT. CHECK
Remove the batteries if you intend to operate the unit permanently on the mains!
BATT. CHECK
will flash in
TIME I
:
8.I.8.0.0
00
Attention
Remove exhausted batteries immediately from the unit!
Battery Operation
with six 1.5 Volt batteries, type IEC LR 6 / UM-3/AA.
We recommend the use of alkaline-manganese batteries with low
mercury percentage or no mercury at all.
Disconnect the plug of the mains unit from the DC 9V socket.
If the unit is not to be used for long periods, also remove new batteries!
No responsibility can be accepted for damage caused by leaking batteries.
Open the cover of the battery compartment (at back of unit).
Protect the Environment!
Insert batteries with correct polarity (see scheme above battery compartment).
Do not throw exhausted batteries in the household waste!
When buying new batteries, hand over the old ones to your radio
dealer or a special collecting point.
Observe correct order of batteries when fitting them.
k 11
Power Supply
Data Protection (Mains and Battery Operation)
The data stored in the station memory, the clock time, and the Last
Station Memory are retained for approx. 10 minutes. You can calmly
exchange the batteries without being afraid of loosing the stored data.
RESET Button
If, due to external interferences (caused by static charges of carpets,
thunderstorms, etc.), the control electronics of your Yacht Boy 400
should receive bad information signals, or if no entries at all are possible, press the ¢ RESET button. This is to be found between the
¢ AM and the ¢ LOCK button.
For pushing this button, it is best to use a bent-up paper clip.
This releases the RESET impulse which in turn resets the unit to its
initial programming state.
The stored data for the individual station memory positions, the clock
time and the last station memory is cleared.
When the power supply is interrupted, the stored stations and
menu options are retained for approx. 10 minutes.
k 12
General Operation
For convenient operation, your Yacht Boy can be brought into a tilted
position by the swing-out stand provided at its rear.
The type plate is to be found below this stand.
On the stand, there is an illustration showing the time zones of the
world.
Button pressure times
Brief: less than 0.5 seconds.
Long: more than 0.5 seconds.
Switching On/Off and Locking
To switch the unit on and off, press the ¢ (ON/OFF) button (with the
LOCK not being activated, see below).
Locking
With the unit being switched on or off, you can lock the function buttons at the front of the unit by pressing the ¢ LOCK button. The buttons are thus protected against inadvertent operation (indication
LOCK in display).
To unlock the buttons, press the LOCK button once again.
TIME I
I 8:0 0
BATT. CHECK
FM
LW
MW
SW
For entering numeric values, use the numeric buttons. These values
are:
Frequencies, station position numbers (programming and calling
up), SW meter bands, clock times, and switching times. For each
data entry (pressure on a button), you dispose of up to approx.
5 seconds. When this time has elapsed, you must re-enter the whole
numeric value.
To immediately correct bad entries which have not yet been concluded, press the FM or AM button, or press twice the "." button (decimal point) of the numeric buttons.
If you should make a bad entry or operation, the error message
E F F 8 F will appear in the display.
Display Illumination
Pressing the ¶ LIGHT button switches on the display illumination for approx. 10 seconds.
If you press a button of the unit, this illumination time will be increased.
LOCK
8.9.8.6.0
Direct Entries
If you wish to immediately switch off the display illumination, press
the ¶ LIGHT button once again.
kHz
MHz
TUNING
0...1...2...3...4...5
k 13
General Operation
Volume and Tone
The volume
is adjusted with the VOLUME control.
The tone
is adjusted with the TONE switch.
LOW = Bass.
HIGH = Treble.
Waveband Selection
After switching on the unit with the ¢ ON/OFF button, it is ready for
reception and you hear the station last tuned to.
FM
The FM (VHF) band is selected with the ¢ FM button.
AM
The AM bands are selected with the ¢ AM button.
The first pressure on the ¢ AM button switches to the station last
received on one of the AM bands.
Each further pressure on the
bands in the order
¢
AM button steps through the AM
LW / MW / SW / LW / MW / etc.
and you will hear the station last tuned to in the selected band.
k 14
Station Tuning
Switch the unit on with the ¢ ON/OFF button.
The display indicates the frequency tuned to – on FM in MHz, and on
AM in kHz.
The automatic search will stop as soon as it has found a station worthy of reception (of a signal strength sufficient for good reception). It
then can be restarted with the ¢ AUTO TUNING button (brief or long
pressure).
TIME I
Frequency Tuning in the FM Band
I 8:0 0
Select the FM band.
You hear the station last tuned to in the FM band.
BATT. CHECK
FM
LW
MW
SW
:
8.9.8.6.0
kHz
MHz
TUNING
0...1...2...3...4...5
Manual tuning
Tune to the desired station by briefly pressing one of the buttons
TUNING w or TUNING q .
Each button pressure will change the frequency by 50 kHz.
If the
TUNING w or TUNING q button is kept pressed, the frequency range will be sanned in 50 kHz steps at high speed until the
respective button is released.
0
0
Automatic tuning (AUTO TUNING)
This frequency search is started by pressing the ¢ AUTO TUNING
button.
Short presssure: Search is started in direction of higher frequencies.
Long pressure: Search is started in direction of lower frequencies.
The search function operates with 50 kHz steps.
Frequency Tuning in the AM Bands
Select the AM range.
You will hear the station last tuned to in the respective AM band.
Selecting an AM band
Press the ¢ AM button repeatedly until the desired AM band is selected. This is indicated in the display. Each pressure on the button
steps through the AM band in the order
LW / MW / SW / LW / MW / etc.
k 15
Station Tuning
Adjusting the tuning steps
The tuning steps are adjusted with the ¢ STEP button.
With the unit switched on, you can switch between:
1 kHz or 9 kHz on LW
1 kHz or 5 kHz on SW
1 kHz or 9 resp. 10 kHz on MW.
The respective waveband must be selected.
Repeatedly press the ¢ STEP button until the desired tuning step
value (e.g., in the figure, STEP 9KHZ) is indicated in the display.
TIME I
I 8:0 0
BATT. CHECK
FM
LW
MW
SW
TUNING
0...1...2...3...4...5
8.8.I.5.3
MEMORY
STEP
kHz
MHz
kHz
8 9 mFREE
With the unit switched off, you can switch between the tuning steps
9 kHz and 10 kHz (for USA radio stations) in the MW band.
If the unit is not yet switched off, do this.
Press the AM button, then repeatedly press the ¢ STEP button until
the desired step value is indicated in the display.
After approx. 5 seconds, the display will indicate again the clock time.
This is a precaution to avoid accidental tuning step switching.
ON-TIME
8 6:3 0
TIME I
FM
LW
MW
SW
8.8.8.I.0
kHz
MHz
00
When activating the automatic tuning mode, the unit automatically
switches to the higher tuning step. However, the 9 kHz or 10 kHz
choice in the MW band is retained.
Manual tuning
– Tune to the desired station by briefly pressing on the TUNING w
or TUNING q button.
Each pressure on the button performs a tuning step of the value
adjusted for the respective waveband (FM: 50 kHz, AM: see chapter "Adjusting the tuning steps").
– When keeping pressed the TUNING w or TUNING q button, the
respective waveband will be scanned at high speed with the tuning
steps selected for it. Releasing the pressed button will stop scanning.
0
0
You can switch between 5 kHz and 10 kHz tuning steps
– as soon as the AM button has been pressed after switching off the
unit,
– until you switch the unit on again.
k 16
Station Tuning
Automatic tuning (AUTO TUNING)
This frequency search is started by pressing the ¢ AUTO TUNING
button.
Short presssure: Search is started in direction of higher frequencies.
Long pressure: Search is started in direction of lower frequencies.
The search function operates with the tuning steps
9 kHz on LW,
5 kHz on SW,
9 or 10 kHz on MW.
Station Tuning with the Numeric Buttons
(Direct frequency entry)
For this, the frequency of the station you wish to tune to must be
known. You can find these frequencies in station tables or radio guides. You can enter the frequency in MHz or kHz, or as meter band on
SW.
Confirm the entries with the ¢ FREQU./METER button.
If a lower step value has been adjusted, the unit will automatically select the tuning steps indicated above. For 9 kHz/10 kHz switching on
MW, see chapter "Adjusting the tuning steps", page 16.
The automatic search will stop as soon as it has found a station with
sufficient field strength for good reception. It can then be restarted
with the ¢ AUTO TUNING button (brief or long pressure).
On FM: MHz indication.
On AM: kHz indication.
Examples:
Desired frequency
Entry order
99.00 MHz
99.00 MHz
99.00 MHz
99.10 MHz
99.10 MHz
99.10 MHz
7000 kHz
99.
/¢
99.0 / ¢
99.00 / ¢
99.1 / ¢
99.10 / ¢
99.100 / ¢
7000 / ¢
FREQU./METER button
FREQU./METER button
FREQU./METER button
FREQU./METER button
FREQU./METER button
FREQU./METER button
FREQU./METER button
It is absolutely necessary to enter the decimal point, even if no further figures follow. The decimal point is the indication that the entry
is made in MHz. Without decimal point, the entry is interpreted as kHz
entry.
k 17
Entering a Meter Band
Entering a meter band on SW
Entered numbers below 100 with subsequent confirmation by the
¢ FREQU./METER button are interpreted as wavelength in meter for
SW.
If the entry is valid, a frequency next to the band centre will be tuned
to in the case of radio bands, and the beginning of the respective SW
band in the case of amateur bands.
See table on page 19.
It is possible to enter the following meter bands:
10, 11, 12, 13, 15, 16, 17, 19, 20, 22, 25, 30, 31, 40, 41, 49, 60, 75,
80, 90.
Indication of the current band on SW
In the case of direct frequency entry or SW frequency scanning
(within a m-band):
The selected band is permanently indicated.
In the case of direct frequency entry or manual tuning:
If the frequency tuned to lies within one of the above indicated bands,
this band will permanently be indicated in the display.
If the entry made is invalid, the indication " E F F 8 F appears for
approx. 5 seconds in the display.
Entry example for the 49-m band:
Numeric buttons 4 9, button ¢ FREQU./METER / 6075 kHz
(= Deutsche Welle).
TIME I
I 8:0 0
BATT. CHECK
FM
LW
MW
SW
8.6.0.7.5
TUNING
0...1...2...3...4...5
kHz
MHz
kHz
4 9 mFREE
k 18
Entering a Meter Band
Band (m)
Lower cut-off
frequecy (kHz)
Radio station*
or band centre
90-m tropic
80-m amateur
75-m radio
60-m tropic
49-m radio
40-m amateur
41-m radio
31-m radio
30-m amateur
25-m radio
22-m radio
20-m amateur
19-m radio
16-m radio
17-m amateur
15-m amateur
13-m radio
12-m radio
11-m radio
10-m amateur
3200
3500
3900
4750
5950
7000
7100
9500
10100
11650
13600
14000
15100
17550
18065
21000
21450
24890
25650
28000
3300
3955
4905
6075
7200
9635
11845
13700
15320
17705
21690
25820
* Not all radio stations are broadcasting 24 hours the day and during
all seasons a programme on this frequency. For this reason, consider the different broadcasting times.
k 19
Storing, Calling Up, and Clearing
What Can You Store?
You can programme up to 40 station memory positions (memory
positions 1 ... 40) in random order, also mixed from the 4 wavebands
FM-MW-LW-SW.
You can store in memory each frequency tuned to.
If the memory position is alread occupied,
– the frequency indication flashes in the display. The indications
"MEMORY" and the number of the selected memory position remain
steady.
– If you press the ¶ STORE button a second time within 5 seconds,
the memory position will be overwritten, otherwise it remains
unchanged.
Checking the Reception Frequency
You can check whether a frequency is already stored on one of the
memory positions.
Tune to the desired frequency.
Press the ¶ STORE button a long time.
The indication "MEMORY" appears in the display. The unit checks
whether the frequency is already stored.
If yes, the display indicates "MEMORY" and the number of the
memory position on which the frequency is stored.
If no, the indication "MEMORY" disappears from the display.
Creating/Overwriting a Memory Position
Tune to the station concerned.
Check whether the frequency is already stored in memory.
Enter the number of the desired memory position with the numeric
buttons (the number appears in the display).
Press the ¶ STORE button (within 5 seconds).
If the memory position is free,
– the display indicates "MEMORY", the number of the selected
memory position, and the frequency of the station tuned to.
TIME I
I 8:0 0
BATT. CHECK
FM
LW
MW
SW
TUNING
0...1...2...3...4...5
I.0.2.0.0
MEMORY
STEP
kHz
MHz
07
Calling Up Stored Stations
Direct entry
Enter the number of the desired memory position.
Briefly press the ¢ MEMO w or MEMO q button.
If the memory position is occupied,
– the unit automatically tunes to the station in the respective waveband.
– The display indicates the frequency of the station.
– The display indicates "MEMORY" and the number of the memory
position.
If the memory position is free,
the display indicates for approx. 5 seconds "MEMORY", the number
of the memory position, and "FREE".
k 20
Storing, Calling Up, and Clearing
Memo buttons
TIME I
A short pressure on the ¢ MEMO w button calls up the next higher
memory position. The unit automatically tunes to the corresponding
station in the correct waveband.
I 8:0 0
BATT. CHECK
Long pressure on the ¢ MEMO q button:
– All occupied memory positions are scanned in descending order.
– Each station remains tuned to for approx. 5 seconds before the unit
goes to the next one.
– A further pressure on the ¢ MEMO q button stops scanning.
Indicating Free Memory Positions
A pressure on the ¶ FREE button will indicate the first free memory
position in the display.
8.9.8.6.0
TUNING
0...1...2...3...4...5
A short pressure on the ¢ MEMO q button calls up the next lower
memory position. The unit automatically tunes to the corresponding
station in the correct waveband.
Long pressure on the ¢ MEMO wbutton:
– All occupied memory positions are scanned in ascending order.
– Each station remains tuned to for approx. 5 seconds before the unit
goes to the next one.
– A further pressure on the ¢ MEMO w button stops scanning.
FM
LW
MW
SW
MEMORY
3I
kHz
MHz
FREE
m kHz
Clearing a Memory Position
Enter the number fo the desired memory position with the numeric
buttons (the number is indicated in the large numeric block in the display).
Press the ¶ FREE button.
If the memory position is free,
– the display indicates "MEMORY", the number of the selected
memory position, and "FREE".
If the memory position is occupied,
– the display indicates "MEMORY" and the number of the selected
memory position.
– The frequency indication is flashing in the display.
If you press the ¶ FREE button within 5 seconds a second time, the
contents of the memory position will be cleared.
Each further pressure on the ¶ FREE button will indicate the next
free memory position in upward direction.
k 21
Going to Sleep to Music
You can enter a time period (60 minutes max.), after which the radio
switches automatically off.
When the programmed switch-on period has elapsed, the unit is switched off and the SLEEP indication goes out.
Press the ¢ SLEEP button.
When the radio was switched off, it will be switched on. The further
procedure is independent of whether the radio was switched off or
not.
The switch-on period (period until the radio is switched off) is 60
minutes.
The display indicates for approx. 5 seconds the remaining switch-on
period.
It indicates in addition SLEEP to signal that the "automatic switch-off
function" is activated.
Checking the switch-on time:
TIME I
60
BATT. CHECK
FM
LW
MW
SW
Briefly press the ¢ SLEEP button.
The display indicates the time left till the automatic switch-off.
Clearing the switch-on period prematurely:
Switch off the unit with the ¢ ON/OFF button or press the
¶ SNOOZE button.
SLEEP
8.9.8.6.0
kHz
MHz
TUNING
0...1...2...3...4...5
Repeated pressures on the ¢ SLEEP button will reduce the switchon period in steps of 10 minutes.
Each time the ¢ SLEEP button is pressed, the display indicates for
approx. 5 seconds the remaining switch-on time.
When pressing the ¢ SLEEP button has reduced the switch-on period to 0 second, the unit switches off. A further pressure on the
¢ SLEEP button switches the radio on again and the initial switchon time of 60 minutes is selected.
Repeated pressures on the ¢ SLEEP button give the following order:
60 / 50 / 40 / 30 / 20 / 10 / off / 60 / 50 / ...
The numbers indicate the minutes left till the automatic switch-off.
k 22
The Clock
Here too, each entry step (button pressure) must be completed
within a period of 5 seconds.
You can enter clock times no matter whether the unit is switched on
or off.
There are several possible methods for entering clock and switching
times.
Setting the Clock (TIME II/Clock Time II)
For setting TIME II follow the same steps, except that the display must
indicate TIME II.
As the seconds of TIME II are running synchronously with the seconds
of TIME I, it is not necessary to wait until the minute changes.
Examples:
Clock time
Possible entries
1st example: Clock time 6.30
2nd example: Clock time 15.00
3rd example: Clock time 0.15
Clock Time Indication (TIME I/II)
6.30
06.30
15.
15.00
.15
0.15
00.15
You can switch between the indications of the two clock times by pressing the ¶ TIME I/II button (no numeric entry beforehand).
ON-TIME
8 6:3 0
TIME II
:
8.I.6.0.0
00
Setting the Clock (TIME I)
Setting TIME I with the help of a reference clock.
Example TIME I: 6.30 h
The display must indicate TIME I.
Enter the clock time with the numeric buttons immediately before the
reference clock changes from 6.29.59 to 6.30.00. The period between
the last entry and 6.30.00 must not exceed 5 seconds.
Press the ¶ TIME I/II button at the moment when the reference
clock jumps from 6.29.59 to 6.30.00. When pressing the ¶ TIME
1/2 button, the clock is started exactly to the second and the minutes
indication will flash.
k 23
Automatic Switch-On/Wake-Up Function
Your radio allows you to enter a wake-up time (switch-on time).
¤ = Wake-up with radio programme.
When selecting the function "Wake-up with radio", you will hear the
last received radio station.
The switching times refer to the clock time (TIME I or TIME II) indicated in the display.
You hear the station last tuned to.
= Wake-up with sound signal.
The radio is muted and you hear a sound signal instead.
This function is also possible with the radio switched on, e.g.,
to remind you at a date.
-:-- = Wake-up function switched off.
Example:
â
You have entered the local time (e.g., CET or CEST) as TIME I.
TIME II stands for a second time zone (e.g. Greenwich Mean Time
/GMT).
You have entered 14.00 h as switch-on (wake-up) time and activated
the wake-up function.
If the display indicates TIME I, the unit will be switched on at 14.00 h
local time;
if the display indicates TIME II, the unit will be switched on at 14.00
h of the second time zone.
Entering a Switch-On Time
ON-TIME
8 6:3 0
TIME I
:
8.I.8.0.0
00
Checking the Entered Switch-On Time
When the radio is switched off, the display indicates the switch-on
time and the wake-up mode.
Switch on the radio.
Enter the desired switch-on (wake-up) time with the numeric buttons
0 ... 9.
Press the ¶ ON TIME button to store the entered switch-on time in
memory.
The switch-off time is automatically set to one hour after the switchon time.
Select the desired wake-up mode by repeated pressures on the
¢ AUTO button.
Wake-Up with Radio/Automatic Switch-On
Select "Wake-up with radio" (symbol ¤ in display) with the ¢ AUTO
button.
Adjust the wake-up time.
Before switching off the radio, tune to the station and adjust the volume with which you wish to be woken up.
Switch off the radio.
k 24
Automatic Switch-On/Wake-Up Function
At the programmed time, the radio is automatically switched on.
If no button is pressed, the radio will play for about 60 minutes and
then is switched off automatically.
If you press the ¶ SNOOZE button, the radio is switched off for 5
minutes and the ¤ symbol is flashing in the display. You can repeat
this snooze function as often as desired.
If you press the ¶ SNOOZE button longer than 2 seconds, the radio
is completely switched off. The ¤ symbol is permanently indicated.
The wake-up function is repeated next day.
Clearing the Wake-Up Function
Switch off the wake-up function with the ¢ AUTO button (the symbols ¤ and â must disappear from the display).
When the radio is switched off
– ON-TIME is not visible in the display.
– The indication -:-- appears instead of the programmed wake-up time
in the left numeric block in the display.
The programmed wake-up time remains stored in memory.
Wake-Up with Sound Signal (Date Reminder)
Select "Wake-up with sound signal" (symbol â in display) with the
¢ AUTO button.
Adjust the wake-up time.
"Wake-up with signal sound" is possible, if
– the radio is switched off (wake-up),
– the radio is switched on (date reminder).
The radio is automatically switched off and the sound signal is started.
If no button is pressed, the sound signal will last 5 minutes.
If you press the ¶ SNOOZE button, the alarm sound will be switched off for about 5 minutes and the â symbol is flashing in the display. The snooze function can be repeated as often as desired.
If you press the ¶ SNOOZE button for more than 2 seconds, the
alarm sound is completely switched off. The â symbol is permanently
visible and the wake-up function will be repeated next day.
k 25
Special Functions on AM
SSB Mode (Amateur Radio Reception)
SSB reception is an additional function to "normal" radio reception. It
allows you to listen to amateur transmissions (mostly speech). In
most cases, these are transmitted in the SSB mode (Single Side
Band).
Proceed as follows:
Switch the unit on and select a SW amateur band (see table in chapter "Entering a Meter Band").
Set the switch STEREO MONO
WIDE
NARR
As soon as a station is found – the speech is still unintelligible – tune
to best possible reception with the help of the FINE TUNING control.
When arriving at the limit of the finetuning range, it may be necessary to
TUNING w and
switch to the next tuning range by means of the
TUNING q buttons.
0
If you wish to terminate reception of SSB stations, do not forget to
switch back to normal radio reception:
DX LOCAL switch to DX.
SSB switch to OFF.
STEREO MONO WIDE NARR switch to STEREO.
TONE switch as desired.
to NARR(OW). Set the SSW switch ton ON.
Use the ¢ STEP button to adjust the tuning step to 1 kHz.
Set the TONE switch to HIGH.
TUNING w and TUNING q buttons to slowly scan the
Use the
band step by step for SSB stations.
0
Interferences
If interferences should occur in the AM bands (MW, LW, SW), you
can optimize reception with the FINE TUNING control.
When doing this, consider that the carrier is suppressed on SSB
broadcasts.
This means that reception is only possible when the transmitter is
actually broadcasting (mostly in speech).
The TUNING indication is of great help when searching SSB stations.
The TUNING indication deflects in the rythm of the speech.
k 26
Specification
Power Supply
By six 1.5 V batteries (IEC LR 6).
External supply: By a commercial 9 V DC mains unit (see connecting
socket).
Output Power
600 mW (via built-in loudspeaker).
Built-in Aerials
Telescopic aerial for FM and SW.
Ferrite rod aerial for MW and LW.
Connecting Sockets
For external voltage supply: DC 9V.
Coaxial socket (outer diameter 5.5 mm, inner diameter 2.1 mm).
Neutral concuctor connected to chassis
.
For earphone/headphone U.
Socket for jack plug of 3.5 mm ø,
32 Ohm impedance.
Y
For external aerial EXT ANT.
Socket for jack plug of 3.5 mm ø,
for shortwave reception.
k 27
Specification
Wavebands
FM:
875 ... 108 MHz
SW:
1.711 ... 30 MHz
3.95 ... 26,1 MHz (Yacht Boy 400 IB)
MW:
520 ... 1710 kHz
527 ... 1606 kHz (Yacht Boy 400 IB)
LW:
144 ... 353 kHz
149 ... 283 kHz (Yacht Boy 400 IB)
Tuning Steps
FM: 50 kHz
SW: 1 kHz / 5 kHz
MW: 1 kHz / 9 bzw. 10 kHz
LW: 1 kHz / 9 kHz
Fine tuning on SSB: ± 1 kHz
Intermediate Frequencies
FM: 10.7 MHz
AM: ZF 1: 55.85 MHz, ZF 2: 455 kHz
Receivable SW bands
Band
Frequency (kHz)
90-m tropical
80-m amateur
75-m radio
60-m tropical
49-m radio
41-m radio
40-m amateur
31-m radio
30-m amateur
25-m radio
22-m radio
20-m amateur
19-m radio
17-m amateur
16-m radio
15-m amateur
13-m radio
12-m amateur
11-m radio
10-m amateur
3200
3500
3900
4750
5950
7100
7000
9500
10100
11650
13600
14000
15100
18065
17550
21000
21450
24890
25650
28000
–
–
–
–
–
–
–
–
–
–
–
–
–
–
–
–
–
–
–
–
3400 (not with YB 400 IB)
3800 (not with YB 400 IB)
4000
5060
6200
7300
7099
9900
10150
12050
13800
14350
15600
18170
17900
21449
21850
24990
26100
29700 (not with YB 400 IB)
Dimensions: approx. 180 x 120 x 37 mm3 (width x hight x depth)
Weight: approx. 590 g
Subject to technical alterations and alterations in styling.
E. and O. E.
k 28
Specification
Hints – Prescriptions
Use only a soft cloth which picks up dust to clean the cabinet. Do not
use aggressive polishes or cleaning agents. Do not expose the set to
temperatures above 60°C. In the case of defects, consult your specialized dealer. Protect the unit against any moisture (e.g. dripping or
splashing).
Radio France Internationale
116 av. du Pres. Kennedy
F 75786 Paris Cedex 16
Radiotelevisione Italiana
Viale Mazzini 14
I-00195 Roma
The unit meets the CEE regulations concerning interference radiation.
BBC London External Services
Bush House
London WC2B 4PH
The unit complies with the safety regulations according to VDE 0860/
BS 415 and thus with the international safety regulations according
to IEC65.
Radio Moscow
Pjatnizkaja 25
Moskva Russische Föderation
Radio Stations
Deutsche Welle
D-50588 Köln
Radio Exterior de Espana
P. O. Box 156.202
E-28080 Madrid
Radio Austria International
A-1136 Wien
Würzburggasse 30
Swiss Radio International
CH-3000 Bern 15
Giacomettistr. 1
Radio Nederland
P. O. Box 222
NL-1200 JG Hilversum
k 29
k 30
Grundig
AG • Beuthener
41 • D-90471
Nürnberg • http://www.grundig.com
GRUNDIG AG
• Kurgartenstraße
37 •Str.
D-90762
Fürth • http://www.grundig.de
• http://www.grundig.com
737 7100
7100
72010 737