1
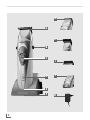
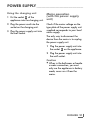
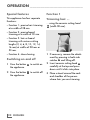
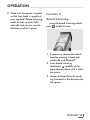
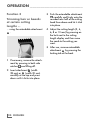
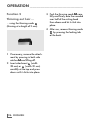
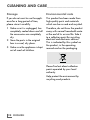
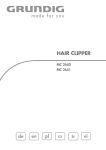
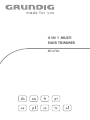
4 IN 1 MULTI
HAIR TRIMMER
MT 6740
_________________________________________________________
G
A
H
B
C
I
D
J
E
F
2
K
_________________________________________________________
DEUTSCH
4- 17
ENGLISH
18 - 29
FRANÇAIS
30 - 41
PORTUGUÊS
42 - 53
ESPAÑOL
54 - 65
POLSKI
66 - 77
ČESKY
78 - 89
TÜRKÇE
90 - 101
ΕΛΛΗΝΙΚA
102 - 113
3
SAFETY _______________________________________________
Please note the following instructions
when using the appliance:
7
7
7
The appliance is designed for
domestic use only.
7
7
Observe these instructions in
order to prevent damage to the
appliance or danger arising
from improper use. Keep them
in a safe place.
Never use the appliance in the
bath, shower or over a wash
basin filled with water; nor
should it be operated with wet
hands.
7
7
7
7
7
Do not immerse the appliance in
water or let it come into contact
with water, even during
cleaning.
Do not drop the appliance.
18 ENGLISH
Always disconnect the power
supply unit if the appliance is
not being charged or used.
If not already present, for additional protection it is recommend
to install a residual-current-operated protective device (RCD)
with a rated residual operating
current not exceeding 30 mA in
the electrical circuit of your bathroom. Ask your electrician for
advice.
Never use the appliance if it is
visibly damaged.
Keep the appliance away from
children.
Do not open the appliance
under any circumstances. No
warranty claims are accepted
for damage caused by incorrect
handling.
OVERVIEW__________________________________________
See the illustrations on page 2.
H
Extendable plug-in comb
system suitable for both cutting
widths, with precise trimming
grade display for hair lengths
of 2, 4, 6, 8, 10, 12, 14 and
16 mm.
Controls
A
Professional cutting head
made from industrial ceramic
(width 38 mm).
B
Side catches for removing
attachments.
I
Thinning comb for 2 mm
cutting length.
C
On/off switch.
J
D
Charging display (LED). Lights
up red when charging and
green when it is fully charged.
Shaving attachment with single
blade foil for a smooth shave.
K
Power supply unit.
E
F
Socket for plugging into the
charging unit or connecting the
power supply unit.
Charging unit.
Other accessories
1 x two combs.
1 x cleaning brush.
1 x oil for cutting head.
Accessories
G
Beard trimming attachment
(width 30 mm).
ENGLISH 19
POWER SUPPLY ___________________________________
Rechargeable battery
operation
7
When operating the appliance with
the built-in nickel metal hydride
battery, only use the power unit
supplied for charging.
Check if the mains voltage on the
type plate of the power supply unit
supplied corresponds to your local
mains supply.
1 Plug the power cord into the
appliance socket E and the
power supply unit into the wall
socket.
Notes
7 Charge up the batteries completely before you use them for the
first time or if you have not used
them for a long time (approx. 12
hours’ timer-controlled charging).
– The charging display D lights
up red when charging and
changes to green when it is
fully charged.
20 ENGLISH
7
7
Charging time is approx. 12
hours when the appliance is
switched off. If you switch on the
appliance while it is charging,
charging will stop.
– The charging display D disappears.
The ambient temperature should
be between 5 °C and 40 °C.
When fully charged, the appliance
works for around 60 minutes.
It is not advisable to charge the
batteries after every use, especially
if you do not use the appliance for
the full 60 minutes. Only charge
the batteries when they are
completely discharged. This
increases their service life. Do not
charge it every day.
POWER SUPPLY ___________________________________
Using the charging unit
1 Put the socket E of the
appliance into the charging unit.
2 Plug the power cord into the
socket on the charging unit.
3 Plug the power supply unit into
the wall socket.
Mains operation
(with the power supply
unit)
Check if the mains voltage on the
type plate of the power supply unit
supplied corresponds to your local
mains supply.
The only way to disconnect the
device from the mains is to unplug
the power supply unit.
1 Plug the power supply unit into
the socket E on the appliance.
2 Plug the power supply unit into
the wall socket.
Caution
7 When in the bathroom or beside
a water connection, you must
only use the appliance in battery
mode; never run it from the
mains.
ENGLISH 21
OPERATION ________________________________________
Special features
Function 1
This appliance has four separate
functions:
Trimming hair ...
– Function 1: precise hair trimming
at a width of 38 mm.
... using the ceramic cutting head
A (width 38 mm).
– Function 2: precise beard
trimming at a width of 30 mm.
– Function 3: hair or beard
trimming with various cutting
lengths (2, 4, 6, 8, 10, 12, 14,
16 mm) at widths of 38 mm or
30 mm.
– Function 4: close shaving.
Switching on and off
1 Press the button C to switch on
the appliance.
2 Press the button C to switch off
the appliance.
22 ENGLISH
1 If necessary, remove the attachment by pressing in both side
catches B and lifting off.
2 Insert ceramic cutting head A
carefully at the top and press
down until it clicks into place.
3 Place a towel around the neck
and shoulder of the person
whose hair you are trimming.
OPERATION ________________________________________
4 Make sure the person is seated
so that their head is roughly at
your eye level. Before trimming,
comb the hair so that it falls
naturally and you can see the
direction in which it grows.
Function 2
Beard trimming ...
... using the beard trimming attachment G (width 30 mm).
1 If necessary, remove the attachment by pressing in both side
catches B and lifting off.
2 Insert beard trimming
attachment G carefully at the
top and press down until it clicks
into place.
3 Loosen the beard hair by combing the beard in the direction the
hair grows.
ENGLISH 23
OPERATION ________________________________________
Function 3
Trimming hair or beards
at certain cutting
lengths ...
... using the extendable attachment
H.
3 Push the extendable attachment
H carefully and firmly onto the
rounded rear half of the cutting
head from above and let it click
into place.
4 Adjust the cutting length (2, 4,
6, 8 or 10 mm) by pressing on
the lock next to the cutting
length display and then move
the comb to the setting you
want.
5 After use, remove extendable
attachment H by pressing the
locking tab at the back.
1 If necessary, remove the attachment by pressing in both side
catches B and lifting off.
2 Insert attachment A (width
38 mm) or G (width 30 mm)
carefully at the top and press
down until it clicks into place.
24 ENGLISH
OPERATION ________________________________________
Function 4
Close shaving ...
... using the shaving attachment J .
Note
7 You can remove the single blade
foil of the shaving attachment. To
do this, press both side catches
on the shaving attachment. Clean
the blade head with the cleaning
brush supplied.
1 If necessary, remove the attachment by pressing in both side
catches B and lifting off.
2 Insert shaving attachment J
carefully at the top and press
down until it clicks into place.
Note
7 Do not apply a lot of pressure
when shaving, as this could
damage the single blade foil.
ENGLISH 25
OPERATION ________________________________________
Function 5
Thinning out hair ...
... using the thinning comb I
(thinning at a length of 2 mm).
3 Push the thinning comb I carefully and firmly onto the rounded
rear half of the cutting head
from above and let it click into
place.
4 After use, remove thinning comb
I by pressing the locking tab
at the back.
1 If necessary, remove the attachment by pressing in both side
catches B and lifting off.
2 Insert attachment A (width
38 mm) or G (width 30 mm)
carefully at the top and press
down until it clicks into place.
26 ENGLISH
CLEANING AND CARE ___________________________
Cleaning and care
1 Switch off the appliance and
unplug it from the mains.
2 Remove the attachment and
clean the blade head with the
brush supplied.
Caution
7 If cleaning with the brush is not
sufficient, you can also rinse the
attachment under running water.
However, only do this once the
attachment has been removed.
7
The cutting head on the attachment
does not normally need to be
oiled. If you clean the attachment
under running water regularly but
you also want to maintain the
original condition of the cutting
head for as long as possible, it is
worth oiling it at regular intervals
with the oil provided.
3 Use a soft, dry cloth or the brush
supplied to clean the appliance
housing and the charging unit.
Caution
7 Never put the appliance, charging
unit or power supply unit in water
or any other liquid.
4 Before using the appliance
again, dry all the attachments
properly using a soft towel.
5 Do not use any cleaning agents.
Note
7 Remove any clippings after each
use.
ENGLISH 27
CLEANING AND CARE___________________________
Storage
Environmental note
If you do not want to use the appliance for a long period of time,
please store it carefully.
This product has been made from
high-quality parts and materials
which can be re-used and recycled.
1 Make sure it is unplugged, has
completely cooled down and all
the accessories are completely
dry.
Therefore, do not throw the product
away with normal household waste
at the end of its service life. Take it
to a collection point for recycling
electrical and electronic devices.
This is indicated by this symbol on
the product, in the operating
manual and on the packaging.
2 Store the parts in the original
box in a cool, dry place.
3 Make sure the appliance is kept
out of reach of children.
Please find out about collection
points operated by your local
authority.
Help protect the environment by
recycling used products.
28 ENGLISH
INFORMATION ____________________________________
Technical data
This product fulfils the
European directives
2004/108/EC and
2006/95/EC.
Power supply
Batteries: Nickel metal hydride
Power supply unit
Ni-MH
Technical and design modifications reserved.
ENGLISH 29
Grundig Multimedia B.V.
Atrium, Strawinskylaan 3105 • NL-1077 ZX Amsterdam • http://www.grundig.com
72011 903 8000