1
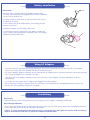
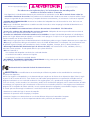
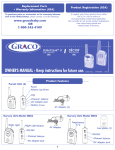
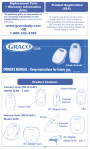
Replacement Parts
• Warranty Information (USA)
Product Registration (USA)
To purchase parts or accessories or for warranty information in the United States, please contact us at the following:
www.gracobaby.com
OR
1-800-345-4109
To register your Graco product from within
the U.S.A. visit us online at
www.gracobaby.com/productregistration.
We currently do not accept product registrations
from those living outside the
United States of America.
2M06
2:
PM
72˚ F
10
POWER
POWER
OWNER'S MANUAL - Keep instructions for future use.
©2005 Graco
ISPM006BA
10/05
Product Features
Parent Unit
Power
Volume: Up/Down
S1
S2
Clip
POWER
OFF
POWER
A CHANNEL B
S3 S2 S1
VOL
PM
-
6V DC
+
S3
Channel Selector
DC Adapter Jack
Battery Cover
AC Adapter
Nursery Unit
Record/Melody
Selector
VOL
Record Button
ON/OFF
Sensitivity
Selector
Volume
ON/OFF
RECORD
OFF LOW HIGH
OFF
RECORD
MELODY
Play Button
POWER
OFF
Record/Melody
Selector
PLAY
A CHANNEL B
Channel Selector
6V DC
+
DC Adapter Jack
AC Adapter
1
Failure to follow these warnings and the assembly
instructions could result in serious injury or death.
This device is designed only to monitor the sounds of your child. It will not alert you to your child’s silent activities.
This product is not designed or intended for use as a medical monitor. Always be sure that both the transmitter and receiver
are working properly and are within range of each other.
• STRANGULATION HAZARD. Keep the adapter cords out of the reach of children. Do not use with extension cords.
• DO NOT place the Nursery Unit or its cord within your child’s reach. Do not put the Nursery Unit inside a crib or play yard.
• Use ONLY with 110-120 volt AC electrical outlets.
• Protect the AC adapter cords. Place them so they are not walked on or pinched by furniture or other items.
• Allow for proper ventilation when units are in use. Do not cover the Nursery Unit or Parent Units with any object
such as a blanket. Do not place it in a drawer or in any location which would muffle the sound or interfere with the normal
flow of air.
• DO NOT immerse any part of the Nursery Unit or Parent Unit in water. Clean only with a dry cloth.
• DO NOT place unit near water and moisture. Do not use the Nursery Unit outdoors. Do not use the monitor near possible
wet areas, such as a bathtub, shower, wash basin, sink, laundry tub, swimming pool, wet basement, etc.
• Keep Nursery Unit away from heat sources, such as fireplaces, radiators, stoves, and TVs or other appliances. Heat can
damage the case or electrical parts.
• DO NOT use the monitor if:
• The adapter cords or plugs have been damaged.
• The unit has been exposed to liquids.
• Unit has been dropped or is damaged.
• DO NOT OPEN THE TRANSMITTER, RECEIVER OR ADAPTER. No user-serviceable parts inside. Risk of electrical shock, fire
or death.
FCC Statement:
WARNING Modifications not authorized by the manufacturer may void users authority to operate this device.
NOTE: This equipment has been tested and found to comply with the limits for a Class B digital device, pursuant to Part 15
of the FCC Rules. These limits are designed to provide reasonable protection against harmful interference in a residential
installation. This equipment generates, uses and can radiate radio frequency energy and, if not installed and used in
accordance with the instructions, may cause harmful interference to radio communications.
However, there is no guarantee that interference will not occur in a particular installation. If this equipment does cause
harmful interference to radio or television reception, which can be determined by turning the equipment off and on, the
user is encouraged to try to correct the interference by one or more of the following measures:
• Reorient or relocate the receiving antenna.
• Increase the separation between the equipment and receiver.
• Connect the equipment into an outlet on a circuit different from that to which the receiver is connected.
• Consult the dealer or an experienced radio/TV technician for help.
2
Battery Installation
Parent Unit
The Parent Unit is shipped with rechargeable batteries already
installed. The battery must be plugged into the Parent Unit before
the unit will be ready for use.
• Remove the battery door cover on the Parent Unit with a key or
flat blade screw driver.
• Lift the battery out of the compartment, and carefully plug the
battery into the unit.
• Replace the battery and the battery door cover.
• If it becomes necessary to purchase a new battery, remove the
cover, carefully unplug the battery and replace with a new battery.
Replace the battery door cover.
Using AC Adapters
• The Parent Unit can use either the rechargeable battery that comes with the unit or standard 120 volt AC household
current. The Nursery Unit uses standard 120 volt AC household current.
• To use AC adapters, plug the connector on the cord into the AC adapter jack on the side of the Parent Unit and the Nursery
Unit. Then plug adapter into a standard wall outlet.
• Use ONLY the Graco adapters included with the unit. Do not use these adapters with other equipment under any
circumstances.
• If units do not work, check that AC adapters are plugged into working outlets.
• When electricity is off (from a power failure, etc.), the Parent Unit will operate on rechargeable batteries, however, the
Nursery Unit will not operate until power is restored.
Low Battery
Parent Unit
• When the battery is low in the parent unit you may plug in the A/C adapter to recharge the batteries.
Out of Range Indication
• If the Parent Unit begins to lose the signal from the Nursery Unit you may hear static or other noise. Immediately move the
Parent Unit closer to the Nursery Unit to regain connection.
***Note: It is not uncommon for the Parent Unit to occasionally lose and regain connection with the Nursery
Unit in environments that have a significant amount of obstructions.
3
Selecting Channels
• In case you are experiencing some interference, the channel on the Nursery Unit can be changed by switching the channel
button on the side of the unit. The Parent Unit and Nursery Unit must both be set to the same channel, either channel “A”
or “B” (“X” or “Y”).
Setting Up the Baby Monitor
1. For optimum operation, it is best to use fully charged batteries in the Parent Unit. It is recommended that the batteries in
the Parent Unit be charged for 16 hours prior to initial use.
2. Place the Nursery Unit within 10 feet (3 meters) of your baby. Plug an AC adapter into the jack on the side of the Nursery
Unit. Plug it into a working 120 volt AC outlet.
3. Aim the Nursery Unit toward your baby. Check that there are no walls or large objects that could block sound transmission.
4. Set both the Nursery Unit and Parent Unit to the same channel, “A” or “B” (“X” or “Y”).
5. Turn on the Nursery Unit using the On/Off switch on the side. The green power light should come on.
6. Place the Parent Unit within five (5) feet (1.5 meters) of the Nursery Unit and turn on the Parent Unit using the On/Off
switch on the side of the unit. The green power light should come on. Your monitor is now ready for use.
Testing the System
It is VERY IMPORTANT to test the system when first set up, and at regular times thereafter. Test the units if you
suspect they may have been damaged or have not been used for a long time.
1. If two adults are present, have one take the Parent Unit to different locations, trying various volume settings, while the
other speaks into the Nursery Unit.
2. If only one adult is available, place a ticking clock, radio, or other sound-producing device near the Nursery Unit to test it.
3. When testing, keep the level of your child’s sounds in mind, and adjust the volume accordingly.
4. If there is sound interference, switch the Nursery Unit and the Parent Unit to the other channel setting.
4
Operation
To Listen To Baby
• Turn on Nursery Unit using the ON/OFF switch.
• Turn on Parent Unit using the ON/OFF switch.
• Adjust the volume on the Nursery Unit and Parent Unit by turning the Volume Up/Down knob.
• The Sound Lights on the Parent Unit will illuminate as your child (or other objects) make noise near the Nursery Unit.
Please note that the Sound Lights and volume control on the Parent Unit are independent of each other. When the volume
is turned all the way down, the Sound Lights will still illuminate as your child (or other objects) make noise near the Nursery
Unit.
Clock and Timer
To Set Clock:
• When the battery is first plugged in, the clock will beep and a few seconds later blink “12:00”.
• To set the hours, push the S1 button to the desired time. A small “PM” will appear on the left side of the window to
designate “pm”.
• To set the minutes, push the S2 button to the desired time.
• Once the correct time is displayed in the window, push the S3 button to start the clock.
To Change the time:
• To change the time push the S3 button and hold it down for 5 seconds. Repeat the steps above to change the time. Push
S3 to start the clock.
Timer Feature:
To Count UP from 0 (up to 19 hours and 59 minutes):
• Press both S1 and S2 buttons at the same time. The display will be “0:00”.
• Press the S3 button. The word “UP” will appear on the upper right side of the window and the timer will start to count up.
• To stop the timer push S3 again. You may stop and start the timer by pressing the S3 button.
• To reset the timer to “0:00”, press both the S1 and S2 buttons at the same time.
• If you want to view the clock time while in count up mode, press and hold the S1 button. Releasing the button will display
the counter again.
• To return to the clock, Push S1, S2 and S3 at the same time.
To set the alarm for a specific amount of time (up to 19 hours and 59 minutes):
• Press both S1 and S2 at the same time. The display will be “0:00”.
• Press the S1 button to set the hours up to 19 hours.
• Press the S2 button to set the minutes up to 59 minutes.
• Press the S3 button. The word “DOWN” will appear in the lower right corner of the window and the colon will blink.
• When the alarm sounds press the S3 button to stop the beep.
• To reset the alarm to “0:00” press the S1 and S2 buttons at the same time.
• If you want to view the clock time while in count down mode, press and hold the S1 button. Releasing the button will
display the counter again.
• To return to the clock, Push S1, S2 and S3 at the same time.
5
To Record a Message
To Record a Message
• Turn the Nursery Unit on and set to the desired sound level.
• Slide the “ON/OFF Sensitivity Selector” button on the back of the Nursery Unit to “OFF” and the “Record/Melody
Selector” button on the top of the Nursery Unit to “RECORD”.
• Push and hold the “RECORD” button on the back of the Nursery Unit. Record a message up to 15 seconds long. Release
the button when you are done. When the unit beeps, the record time has ended.
To Play back the Message or a Chosen Melody
Your Nursery Unit is equiped with a sensor that will trigger the unit to play either the message or one melody if the volume of
noise around the unit is sufficient to trigger the sensor. There are two settings. When the “ON/OFF Sensitivity Selector”
button on the back of the Nursery Unit is switched to the “LOW” setting, the sensor will detect low sounds near the Nursery
Unit and will trigger the unit to play the message or one melody. The “HIGH” setting will detect only the higher sounds near
the Nursery Unit and trigger the unit to play the message or one melody.
• Turn the Nursery Unit on and set to the desired sound level.
• Slide the “Record/Melody Selector” button on the top of the Nursery Unit to “RECORD”.
• Slide the “ON/OFF Sensitivity Selector” button on the back of the Nursery Unit to “LOW” or “HIGH”.
• The “Record/Melody Selector” button on the top of the Nursery Unit can also be set to the “MELODY” setting. If the sensor
detects sound, the unit will play one melody and then turn off. If the sound near the Nursery Unit continues, the unit will
play the next melody. This will continue as long as the sensor detects the sound.
Music
• To play music, slide the “ON/OFF Sensitivity Selector” button on the back of the Nursery Unit to “OFF” and the
“Record/Melody Selector” button on the top of the Nursery Unit to “MELODY”.
• Press the “PLAY” button no the back of the Nursery Unit. One of four tunes will begin to play. To select a specific tune,
push the “PLAY” button until the desired tune is on. The Nursery Unit will play one song and then shut off automatically.
6
TroubleShooting
DO NOT ATTEMPT to modify the unit. Any modifications to the transmitter and/or receiver can void the
operator’s authority to operate the equipment.
Most problems have a simple solution. First, check that:
• Power is turned ON for both units
• Both units are plugged in (or batteries are recharged in Parent Unit)
• Electrical outlet works
• Volume is turned up on Parent Unit
• Parent Unit is in range of the Nursery Unit
No Sound
• Battery dead or weak — recharge battery or use AC adapter.
• AC adapter not properly connected — check the connections.
• Nursery Unit covered or blocked — remove the obstruction.
Weak Sound
• Nursery Unit too far from baby — move closer.
• Large objects blocking the signal — try repositioning Nursery Unit.
• Volume setting too low — turn it up.
Static
• Interference from other electrical equipment — eliminate cause of static (TVs, mixers, computers, fans, fluorescent lights,
light dimmers, etc.)
• Parent Unit too far from Nursery Unit — move them closer.
• Significant amount of obstructions between Parent Unit and Nursery Unit such as walls, ceilings & buildings. Try moving
the Nursery Unit to another part of the room.
Shrill Sound (Feedback)
• Nursery Unit and Parent Unit too close together — move them farther apart.
• Volume set too high — lower the volume.
7
8
Piezas de repuesto
• Información sobre la garantía (EE.UU.)
Registro del producto (EE.UU.)
Para registrar su producto Graco desde dentro
de los EE.UU., visítenos en línea en
www.gracobebe.com/productregistration.
Actualmente no aceptamos registros de los
productos de quienes viven fuera de los
Estados Unidos de América.
Para comprar piezas o accesorios o para obtener
información sobre la garantía en los Estados Unidos,
por favor comuníquese con nosotros en:
www.gracobaby.com
O
1-800-345-4109
2M06
2:
PM
72° F
10
POWER
POWER
MANUAL DEL DUEÑO
- Guarde las instrucciones para uso futuro.
©2005 Graco
ISPM006BA
10/05
Características del producto
Unidad para padres
Encendido
Volumen: Subir/bajar
S1
S2
OFF
POWER
-
6V DC
+
S3
Presilla
POWER
A CHANNEL B
S3 S2 S1
VOL
PM
Selector de canales
Enchufe del adaptador de
corriente continua
Puerta de las pilas
Adaptador de
corriente alternad
Unidad del dormitorio
Selector de
grabación/melodía
Botón “grabar”
Volumen
ENCENDIDO/APAGADO
Selector de
ENCENDIDO/
APAGADO de
la sensibilidad
VOL
POWER
OFF
Selector de canales
RECORD
OFF LOW HIGH
PLAY
A CHANNEL B
6V DC
+
Botón
“reproducir”
Enchufe del
adaptador de
corriente continua
1
Selector de
grabación/
melodía
OFF
RECORD
MELODY
Adaptador de
corriente alternada
No observar estas advertencias y las instrucciones de armado podría
resultar en lesiones serias o la muerte
Este dispositivo ha sido diseñado solamente para monitorizar los sonidos de su niño. No le enviará alertas sobre las
actividades silenciosas de su niño. Este producto no ha sido diseñado ni debe usarse como un monitor médico. Tenga
siempre la seguridad de que el transmisor y el receptor funcionan correctamente y se encuentran a la distancia requerida.
• PELIGRO DE ESTRANGULACIÓN. Mantener los cordones del adaptador fuera del alcance de los niños. No lo use con
cordones de extensión.
• NO ponga la Unidad del dormitorio o su cordón cerca del alcance de su niño. No ponga la Unidad del dormitorio en el
interior de una cuna o corralito.
• Úselo SOLAMENTE con tomacorrientes eléctricos de corriente alternada de 110-120 voltios.
• Proteja los cordones del adaptador de corriente alternada. Colóquelos de manera que nadie camine encima de
ellos ni que resulten apretados por muebles u otros artículos.
• Permita una adecuada ventilación cuando usa las unidades. No tape la Unidad del dormitorio ni la Unidad para
padres con ningún objeto como por ejemplo, una frazada. No lo ponga en un cajón ni en un lugar que pudiera silenciar el
sonido o interferir con el flujo normal del aire.
• NO sumerja ninguna parte de la Unidad del dormitorio o Unidad para padres en agua. Límpiela solamente con un trapo seco.
• NO ponga la unidad cerca del agua o humedad. No use la Unidad del dormitorio a la intemperie. No use el monitor cerca
de posibles lugares húmedos, tales como bañera, ducha, lavadero, fregadero, lavarropa, piscina, sótano húmedo, etc.
• Mantenga la Unidad del dormitorio lejos de fuentes de calor, tales como estufas a leña, radiadores, cocinas y
televisores u otros aparatos. El calor puede dañar la caja o piezas eléctricas.
• NO use el monitor si:
• Los cordones del adaptador o enchufes han resultado dañados.
• La unidad ha entrado en contacto con líquidos.
• La unidad se ha caído o ha resultado dañada.
• NO ABRA EL TRANSMISOR, RECEPTOR O ADAPTADOR. No hay partes que el usuario pueda arreglar en el interior.
Riesgo de choque eléctrico, incendio o muerte.
Declaración de la Comisión Federal de Comunicaciones:
ADVERTENCIA Las modificaciones no autorizadas por el fabricante pueden anular autoridad de los usuarios para
funcionar este dispositivo.
NOTA: Este equipo ha sido probado y se ha determinado que cumple con los límites de un dispositivo digital Clase B, según
la parte 15 de las normas de la FCC. Estos límites han sido creados para proporcionar una protección razonable contra la
peligrosa interferencia en una instalación residencial. Este equipo genera, usa y puede emitir energía de radiofrecuencia y
si no se lo instala y usa de acuerdo a las instrucciones, podría causar interferencias peligrosas con las comunicaciones de radio.
Sin embargo, no se garantiza que la interferencia no ocurrirá en una instalación particular. Si este equipo causa interferencia
peligrosa con la recepción de radio o televisión, lo cual se puede determinar apagando y encendiendo el equipo, se sugiere
al usuario que trate de corregir la interferencia a través de una de las siguientes medidas:
• Reorientar o cambiar de lugar la antena de recepción.
• Aumentar la separación entre el equipo y el receptor.
• Conectar el equipo a un tomacorriente en un circuito diferente del que está conectado el receptor.
• Consultar al minorista o a un técnico experimentado de radio y televisión para obtener ayuda.
2
Instalación de las pilas
Unidad para padres
La Unidad para padres se envía con pilas recargables instaladas. La
pila debe estar instalada en la Unidad para padres antes de que la
unidad esté lista para su uso.
• Saque la puerta de las pilas de la Unidad para padres con una
llave o destornillador plano.
• Saque la pila del compartimiento y enchufe cuidadosamente la
pila en la unidad.
• Vuelva a instalar la pila y la puerta de la pila.
• Si resulta necesario comprar una nueva pila, saque la puerta,
desenchufe cuidadosamente la pila y cámbiela por una nueva.
Vuelva a instalar la puerta de la pila.
Uso de los adaptadores de
corriente alternada
• La Unidad para padres puede usar la pila recargable que viene con la unidad o la electricidad estándar de la vivienda de
120 voltios de corriente alternada. La Unidad del dormitorio usa la electricidad estándar de la vivienda de 120 voltios de
corriente alternada.
• Para usar los adaptadores de corriente alternada, enchufe la conexión del cordón en el enchufe del adaptador de la
corriente alternada en el costado de la Unidad para padres y la Unidad del dormitorio. Luego enchufe el adaptador
en un tomacorriente estándar de la pared.
• Use SOLAMENTE los adaptadores Graco que se incluyen con la unidad. No use estos adaptadores con otros equipos
en ninguna circunstancia.
• Si las unidades no funcionan, verifique que los adaptadores de corriente alternada están enchufados en tomacorrientes activados.
• Cuando se ha cortado la electricidad (por un corte de energía, etc.) la Unidad para padres funcionará con pilas recargables,
sin embargo, la Unidad del dormitorio no funcionará hasta que se vuelva a conectar la electricidad.
Indicador de pilas descargadas
Unidad para padres
• Cuando la pila está descargada en la Unidad para padres, puede enchufar el adaptador de corriente alternada para
recargar las pilas.
Unidad del dormitorio
• Si la Unidad para padres comienza a perder la señal de la Unidad del dormitorio, podría escuchar estática u otros ruidos.
Mueva inmediatamente la Unidad para padres más cerca a la Unidad del dormitorio para recuperar la conexión.
***Nota: Es poco común que la Unidad para padres ocasionalmente pierda y recupere la conexión con la
Unidad del dormitorio en ambientes que tienen una gran cantidad de obstrucciones.
3
Selección de canales
•En caso de experimentar alguna interferencia, el canal de la Unidad del dormitorio puede cambiarse oprimiendo el botón
“ch” en el costado de la unidad. La Unidad para padres y la Unidad del dormitorio deben usar el mismo canal, el canal
“A” o “B” (“X” o “Y”).
Instalación del monitor del bebé
1. Para obtener un mejor funcionamiento, es mejor usar pilas completamente cargadas en la Unidad para padres. Se
recomienda que las pilas en la Unidad para padres estén cargadas durante 16 horas antes del uso inicial.
2. Ponga la Unidad del dormitorio dentro de una distancia de 10 pies (3 metros) de su bebé. Enchufe un adaptador
de corriente alternada en el enchufe en el costado de la Unidad del dormitorio. Enchúfelo a un tomacorriente
energizado de 120 voltios de corriente alternada.
3. Oriente la Unidad del dormitorio hacia su bebé. Verifique que no haya paredes ni objetos grandes que pudieran
bloquear la transmisión del sonido.
4. Programa la Unidad para padres y la Unidad del dormitorio en el mismo canal, el canal “A” o “B” (“X” o “Y”).
5. Encienda la Unidad del dormitorio usando el interruptor de encendido y apagado del costado. Se deberá encender
la luz verde de encendido.
6. Ponga la Unidad para padres dentro de una distancia de cinco (5) pies (1,5 metros) de la Unidad del dormitorio y
encienda la Unidad para padres usando el interruptor de encendido y apagado del costado de la unidad. Se deberá
encender la luz verde de encendido.
Prueba del sistema
Es MUY IMPORTANTE probar al sistema cuando lo instala por primera vez y periódicamente en adelante.
Pruebe las unidades si sospecha que podrían haber resultado dañadas o no han sido usadas durante un tiempo largo.
1. Si hay dos adultos presentes, haga que uno lleve la Unidad para padres a lugares diferentes, probando varios niveles
del volumen mientras el otro habla en la Unidad del dormitorio.
2. Si solamente hay un adulto disponible, ponga un reloj que suene, radio u otro dispositivo que produzca sonidos cerca
de la Unidad del dormitorio para probarla.
3. Mientras hace la prueba, mantenga el nivel del sonido de su niño en mente y ajuste el volumen lo necesario.
4. Si hay interferencia con el sonido, pase la Unidad del dormitorio y las Unidades para padres a otro canal.
4
Funcionamiento
Para escuchar al bebé
• Encienda la Unidad del dormitorio usando el interruptor de ENCENDIDO/APAGADO.
• Encienda la Unidad para padres usando el interruptor de ENCENDIDO/APAGADO.
• Ajuste el volumen en la Unidad del dormitorio y la Unidad para padres girando la perilla para subir y bajar el volumen.
• Las luces indicadoras de sonido de la Unidad para padres se iluminarán cuando su niño (u otros objetos) hacen ruido
cerca de la Unidad del dormitorio. Por favor, note que las luces indicadoras de sonido y el control del volumen de la
Unidad para padres son independientes. Con el volumen totalmente bajo, las luces indicadoras de sonido se iluminarán
cuando su niño (u otros objetos) hagan ruido cerca de la Unidad del dormitorio.
Reloj y cronómetro
Para programar el reloj:
• Cuando primero se conecta la pila, el reloj sonará y en unos pocos segundos destellará “12:00”.
• Para programar las horas, empuje el botón S1 hasta llegar a la hora deseada. Aparecerá una pequeña “PM” en el
costado izquierdo de la pantalla para indicar “pm”.
• Para programar los minutos, empuje el botón S2 hasta llegar a la hora deseada.
• Una vez que aparece la hora correcta en la pantalla, empuje el botón S3 para activar el reloj.
Para cambiar la hora:
• Para cambiar la hora, empuje el botón S3 y manténgalo oprimido durante 5 segundos. Repita los pasos anteriores
para cambiar la hora. Empuje S3 para activar el reloj.
Función del cronómetro:
Para contar desde 0 (hasta 19 horas y 59 minutos):
• Oprima los dos botones S1 y S2 al mismo tiempo. La pantalla indicará “0:00”.
• Oprima el botón S3. La palabra “UP” aparecerá en el costado superior derecho de la pantalla y el cronómetro
comenzará a contar.
• Para detener el cronómetro empuje S3 de nuevo. Uno puede activar y desactivar el cronómetro al oprimir el botón S3.
•Para volver el cronómetro a “0:00”, oprima los dos botones S1 y S2 al mismo tiempo.
• Si desea ver la hora del reloj mientras está contando, oprima y mantenga oprimido el botón S1. Liberar el botón
mostrará el contador de nuevo.
• Para volver al reloj, empuje S1, S2 y S3 al mismo tiempo.
Para programar la alarma por una cantidad específica de tiempo (hasta 19 horas y 59 minutos):
• Oprima los dos botones S1 y S2 al mismo tiempo. La pantalla indicará “0:00”.
• Oprima el botón S1 para fijar la hora hasta 19 horas.
• Oprima el botón S2 para fijar los minutos hasta 59 minutos.
• Oprima el botón S3. La palabra “DOWN” aparecerá en el costado derecho inferior de la pantalla y los dos puntos destellarán.
• Cuando suene la alarma, oprima el botón S3 para cancelar el sonido.
• Para volver la alarma a “0:00” oprima los dos botones S1 y S2 al mismo tiempo.
• Si desea ver la hora del reloj mientras está contando, oprima y mantenga oprimido el botón S1. Liberar el botón
mostrará el contador de nuevo.
• Para volver al reloj, empuje S1, S2 y S3 al mismo tiempo.
5
Para grabar un mensaje
Para grabar un mensaje
• Encienda la Unidad del dormitorio y use el nivel deseado del sonido.
• Ponga el botón del “selector de ENCENDIDO/APAGADO de la sensibilidad” atrás de la Unidad del dormitorio a
“APAGADO” y el “selector de grabación/melodía” de arriba de la Unidad del dormitorio en “GRABAR”.
• Oprima y mantenga oprimido el botón “GRABAR” en la parte de atrás de la Unidad del dormitorio. Grabe un mensaje
de hasta 15 segundos de longitud. Libere el botón cuando haya terminado. Cuando la unidad suene, el tiempo de
grabación ha terminado.
Para reproducir el mensaje o una melodía elegida
Su Unidad del dormitorio está equipada con un detector que activará la unidad para que reproduzca un mensaje o una
melodía si el volumen o ruido alrededor de la unidad es suficiente para activar el detector. Hay dos valores. Cuando el
botón del “selector de ENCENDIDO/APAGADO de la sensibilidad” atrás de la Unidad del dormitorio se programa en el
valor “BAJO”, el detector escuchará sonidos bajos cerca de la Unidad del dormitorio y activará la unidad para que
reproduzca el sonido o una melodía. El valor “ALTO” detectará solamente los sonidos más altos cerca de la Unidad
del dormitorio y activará la unidad para que reproduzca el mensaje o una melodía.
• Encienda la Unidad del dormitorio y use el nivel deseado del sonido.
• Ponga el botón del “selector de grabación/melodía” de arriba de la Unidad del dormitorio en la posición “GRABAR”.
• Ponga el botón del “selector de ENCENDIDO/APAGADO de la sensibilidad” de atrás de la Unidad en “BAJO” o “ALTO”.
• El botón del “selector de grabación/melodía” de arriba de la Unidad del dormitorio también puede ser programado en la
posición “MELODÍA”. Si el detector escucha un sonido, la unidad reproducirá una melodía y luego se apagará. Si continúa
el sonido cerca de la Unidad del dormitorio, la unidad reproducirá la melodía siguiente. Esto continuará siempre que el
detector detecte el sonido.
Música
• Para reproducir música, ponga el botón del selector de ENCENDIDO/APAGADO” de la sensibilidad en la parte de atrás
de la Unidad del dormitorio a la posición “APAGADO” y el botón del “selector de grabación/melodía” arriba de la Unidad
del dormitorio en “MELODÍA”.
• Oprima el botón “REPRODUCIR” de atrás de la Unidad del dormitorio. Comenzará a escucharse una de las cuatro melodías.
Para elegir una melodía específica, oprima el botón “REPRODUCIR” hasta que escuche la melodía deseada. La Unidad del
dormitorio reproducirá una canción y luego se apagará automáticamente.
6
Solución de desperfectos
NO INTENTE modificar la unidad. Cualquier modificación al transmisor y/o receptor puede cancelar
la autoridad del operador para usar el equipo.
La mayoría de los problemas tienen simple solución. Primero, verifique que:
• La electricidad esté ENCENDIDA en ambas unidades
• Ambas unidades deben estar enchufadas (o las pilas recargadas en la Unidad para padres)
• El tomacorriente está energizado
• El volumen está alto en la Unidad para padres
• La Unidad para padres está dentro de la distancia requerida de la Unidad del dormitorio
No hay sonido
• La pila está descargada o con poca carga – cámbiela o use el adaptador de corriente alternada.
• El adaptador de corriente alternada no está conectado correctamente – verifique las conexiones.
• La Unidad del dormitorio está cubierta o bloqueada – saque la obstrucción.
Bajo sonido
• La Unidad del dormitorio está demasiado lejos del bebé – muévala más cerca.
• Objetos grandes bloquean la señal – trate de poner la Unidad del dormitorio en otro lugar.
• Volumen demasiado bajo – súbalo.
Estática
• Interferencia de otros equipos eléctricos – elimine la causa de la estática (televisores, mezcladores,
computadoras, ventiladores, luces fluorescentes, potenciómetro de luces, etc.)
• La Unidad para padres está demasiado lejos de la Unidad del dormitorio – muévala más cerca.
• Una cantidad significante de obstrucciones entre la Unidad para padres y la Unidad del dormitorio,
como paredes, techos y edificios. Pruebe mover la Unidad del dormitorio a otra parte de la sala.
Sonido agudo (retroalimentación)
• La Unidad del dormitorio y la Unidad para padres están demasiado cerca – sepárelas más.
• Volumen fijado demasiado alto – baje el volumen.
7
8