1
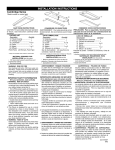
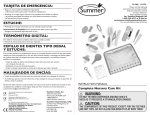
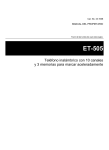
Replacement Parts Warranty Information
(USA)
Product Registration (USA)
To register your Graco product from
within the U.S.A. visit us
online at www.gracobaby.com/product registration. We
currently do not accept product registrations from those
living outside the United States of America.
To purchase parts or accessories or for
warranty information in the United States,
please contact us at the
following:
www.gracobaby.com
or
1-800-345-4109
18 Piece Baby Care Set
OWNER'S MANUAL KEEP INSTRUCTIONS FOR FUTURE REFERENCE.
©2011 Graco PD121385B 1/11
WARNING
Failure to follow these warnings and the assembly instructions could result in serious injury or death.
• The pieces of this health and grooming kit are not toys
and should only be used by adults.
BATTERY USE
• Keep the batteries out of children’s reach. Any battery
may leak battery acid if mixed with a different battery
type, if inserted incorrectly (put in backwards) or if
battery is not replaced or recharged at the same time.
• When discarding batteries, be sure to dispose of them
in the proper manner, according to your state and local
regulations. Any battery may leak battery acid or explode
if disposed of in fire or an attempt is made to charge a
battery not intended to be recharged.
• Adult supervision required. Never leave child unattended.
• Keep all medications out of child’s reach.
• Do not microwave any of the pieces of the kit.
1
Note:
Digital Thermometer
• If water accidentally splashes on the device, please simply dry
the device with any clean cloth before taking measurement. It
won’t affect the accuracy of the measurement.
• This product is for home use.
• WARNING: This product is not a toy. Store away from baby
and young children’s reach.
• DO NOT immerse any part of the thermometer in water.
• DO NOT drop the thermometer! Protect it from severe impact
Display
and shock.
• DO NOT place thermometer near water and moisture.
• Keep thermometer away from heat sources, such as fireplaces,
radiators, stoves, and TVs or other appliances. Heat can damage
the case or electrical parts and effect the temperature reading.
• DO NOT use the thermometer unit if:
- The unit has been exposed to liquids.
- Unit has been dropped or is damaged.
• Bending, biting, or chewing the thermometer will cause
damage.
• Keep thermometer at room temperature for at least 15 minutes
before use.
• DO NOT OPEN THE THERMOMETER as there are no
user-serviceable parts inside.
• When the “W” symbol (upside-down triangle) appears on the
right side of the display, the battery is exhausted and the
thermometer needs to be replaced. When discarding this
product, be sure to dispose of it according to your state and
local regulations.
• This thermometer is for oral use only and should not be used in
any body location other than the mouth.
ON/OFF
button
Thermometer
Tip
Turning on the Thermometer
To turn on the thermometer, briefly press the ON/OFF button.
1. A display test is performed. All segments should be displayed.
Then at an ambient temperature of less than 32 °C/90°F, an «L»
and a flashing «°C» appear at the display field.
2. The thermometer is now ready for use.
Function Test
Correct functioning of the thermometer is tested automatically
each time it is turned on. If a malfunction is detected
(measurement inaccuracy), this is indicated by «ERR» on the
display, and a measurement becomes impossible. In this case, the
thermometer must be replaced.
Using the Thermometer
To prolong the battery life, turn off the thermometer by briefly
pressing the ON/OFF button. Otherwise the thermometer
will automatically turn off after about 10 minutes.
Change the scale:
WARNING
Modifications not authorized by the manufacturer may void user’s
authority to operate this device.
NOTE: This equipment has been tested and found to comply with
the limits for a Class B digital device, pursuant to Part 15 of the
FCC Rules.
These limits are designed to provide reasonable protection against
harmful interference in a residential installation.
This equipment generates, uses and can radiate radio frequency
energy and, if not installed and used in accordance with the
instructions, may cause harmful interference to radio
communications.
However, there is no guarantee that interference will not occur in
a particular installation. If this equipment does cause harmful
interference to radio or television reception, which can be
determined by turning the equipment off and on, the user is
encouraged to try to correct the interference by one or more of
the following measures:
• Reorient or relocate the receiving antenna.
• Increase the separation between the equipment and receiver.
• Connect the equipment into an outlet on a circuit different from
that to which the receiver is connected.
• Consult the dealer or an experienced radio/TV technician for
help.
This device complies with part 15 of the FCC Rules. Operation is
subject to the following two conditions:
(1) This device may not cause harmful interference, and
(2) This device must accept any interference received, including
interference that may cause undesired operation.
If the ON/OFF button is held down for more than 3 seconds when
turning on the thermometer, then LCD will display the F/C, so
you could press again to switch the scale. About 2 seconds after
the button is released, the temperature value disappears and the
thermometer is ready to take a measurement.
Measuring Method
Try to keep your mouth closed for 5 minutes before taking the
temperature. Place the tip under the tongue at the back of the
mouth. For the most accurate read, place the tip as far back under
the tongue as possible. Press the tongue down over the tip, and
close your mouth. Hold the thermometer steady keeping the tip
in the same position for 1 minute.
x
= correct areas
= incorrect areas
Care and Maintenance: Hand wash in warm water with soap
or non-citrus based detergents and rinse throughly. Do not
submerge in any liquid.
Technical Specifications:
Type:
Temperature
measurement range:
Maximum temperature
thermometer
90 °F to 110 °F
If measured temperature is
below 90 °F, an “L” will display.
If measured temperature is above
110 °F, an “H” will display.
Important Safety Instructions
• The instrument may be used only for measuring body
Temperature
measurement accuracy:
± 0.2 °F
temperature!
• Protect the instrument from impact and dropping!
• Avoid ambient temperatures above 60 °C/140°F. NEVER boil the
thermometer!
Battery:
Non-replaceable. 1.5V. Type SR41.
Note:
This thermometer complies with
ASTM E 1112, EN 12470-3,
EC 60601-1, IEC 60601-1-2
2
Medicine spoon
Brush and Comb
Gently brush baby’s hair with the soft bristles of the
brush without worry for baby’s sensitive
scalp. Use either of the two teeth
options to comfortably comb hair
despite wetness or thickness.
1. Hold spoon and pour medicine to prescribed dosage according
to the dosage directions on the bottle.
Note: Insert stopper into medicine spoon to prevent spills.
2. Hold baby upright when administering medicine. Unplug
stopper then administer medicine slowly enough so your child
may swallow comfortably.
3. Pause and repeat if necessary.
Care and Maintenance: Hand wash in
warm water with soap or non-citrus based
detergents and rinse thoroughly. Allow
o drip dry. Do not clean in dishwasher.
Care and Maintenance: Hand wash in warm water with
soap or non-citrus based detergents and rinse throughly. Wash
thoroughly before first use and after each use. Do not clean in
dishwasher.
Stopper
Baby scissors
Our baby scissors make cutting your baby’s delicate
nails safe. The round tips ensure extra safety
when handling your baby’s nails.
NOTE: Cut fingernails following their
natural shape and toenails straight across.
Always leave a little white showing at the end of the nail.
Medicine syringe
1. Push plunger down and insert tip of syringe
into medicine.
2. Slowly pull plunger up to fill with medicine to
the prescribed dosage according to the dosage
direction on the bottle. Line the level of the
liquid medicine up to the prescribed dosage
line on the syringe body.
3. Insert tip of syringe in child’s mouth pointing
towards cheek.
4. Push plunger in slowly to dispense medicine.
Press slow enough to allow child to swallow
comfortably.
5. Pause dispensing medicine to allow child
swallow if necessary.
Care and Maintenance: Hand wash in warm water with soap
or non-citrus based detergents and rinse thoroughly. Wash
thoroughly before first use and after each use. Do not clean in
dishwasher.
Nail clippers and Emery boards
WARNING: The nail clipper contains batteries and is not a toy.
Keep product and batteries out of reach of children. Properly
dispose of used batteries.
The curved clipping edge on our clippers
makes clipping your baby’s delicate nails
safe and easy.
1. Lift the clip arm from hand grip and
rotate 180°.
2. Rotate light source up until you hear a
click and light comes on.
3. Gently push skin away from nail. Clip
fingernails following their natural shape and
toenails straight across. Always leave a little white showing at
the end of the nails.
4. Use emery board to smooth baby’s nails as needed.
Care and Maintenance: Pull plunger out of syringe to clean.
Hand wash in warm water with soap or non-citrus based
detergents and rinse thoroughly. Repeat after each use. Do not
clean in dishwasher.
Plunger
Nasal aspirator
1. Secure baby in an upright position.
2. Squeeze and hold aspirator bulb and gently insert into baby’s
nostril pointed toward the side. DO NOT point tip toward
center of baby’s nostril. DO NOT insert tip too far into baby’s
nostril.
3. Release bulb slowly to remove mucus from baby’s nostril.
4. Repeat on other nostril.
5. Repeat as necessary until congestion is relieved.
Battery installation: Requires 2 -CR1616 3-volt lithium
batteries (included). Replace when light begins to dim. Lift up
clip arm and unfasten battery cover. Insert 2 new batteries, one
on top of the other, positive (+) sides up, under the battery
terminal. Resecure the battery cover.
• Never push the aspirator too far into the
nostril and always dry thoroughly after each
use. Never use in baby’s mouth or ears.
Care and Maintenance: Hand wash in warm water with soap
or non-citrus based detergents and rinse thoroughly. Do not
submerge in any liquid. Remove batteries during long periods of
non-use. Do not clean in dishwasher.
Care and Maintenance: Hand wash in warm water with soap
or non-citrus based detergents and rinse thoroughly. Squeeze and
release the bulb several times to clean the inside of the bulb. Rinse
with warm water. Squeeze out all excess water from the bulb. Do
not clean in dishwasher.
3
Fingerbrush
Tweezers
Can be used to massage sore teething gums.
1. Slide over parent’s fingertip.
2. Lightly rub gums and teeth.
Ideal for removing small, hard to
grip items.
Care and Maintenance: Disinfect tweezers with rubbing
alcohol.
Note:
• Large bumps for massaging gums.
• Smaller bumps for cleaning out teeth.
Toddler toothbrush
Care and Maintenance: Hand wash in warm water with soap
or non-citrus based detergents and rinse thoroughly. Wash
thoroughly before first use and after each use. Do not clean in
dishwasher.
The toothbrush’s contoured handle
is ideal for small hands to grasp.
Clean toddler’s teeth and gums
comfortably with the
toothbrush’s soft bristles.
Care and Maintenance: Hand wash in warm water before and
after use. Do not clean in dishwasher.
4
Información sobre la garantía y las piezas
de repuesto (EE.UU.)
Registro del producto (EE.UU.)
Para registrar su producto Graco desde dentro de
los EE.UU., visítenos en línea en
www.gracobaby.com/productregistration.
Actualmente no aceptamos registros de los productos de
quienes viven fuera de los Estados Unidos de América.
Para comprar piezas o accesorios o para
obtener información sobre la garantía en los
Estados Unidos, por favor comuníquese con nosotros
en:
www.gracobaby.com
ó
1-800-345-4109
Juego de 18 piezas para cuidar al bebé
MANUAL DE DUEÑO GUARDE LAS INSTRUCCIONES PARA USO FUTURO.
©2011 Graco PD121385B 1/11
ADVERTENCIA
No observar estas advertencias y las instrucciones de armado
podría resultar en lesiones serias o la muerte.
• Las piezas de este juego para la salud y el aseo no son
juguetes y solamente deben usarlas los adultos.
USO A PILAS
• Mantenga las pilas fuera del alcance de los niños.
Cualquier pila puede perder ácido si se mezcla con un
tipo de pila diferente, si se la coloca de manera
incorrecta (puesta al revés) o si la pila no se cambia o
recarga al mismo tiempo.
• Cuando desecha las pilas, asegúrese de desecharlas de la
manera correcta, según las disposiciones locales y de su
estado. Cualquier pila puede perder ácido o explotar si
se la desecha en el fuego o se trata de cargar una pila
que no debe ser recargada.
• Requiere la supervisión de un adulto. Nunca deje a un
niño sin atender.
• Mantenga todos los medicamentos fuera del alcance de
los niños.
• No ponga ninguna de las piezas del juego en un horno
de microondas.
5
Nota:
Termómetro digital
• Si se salpica agua accidentalmente sobre el dispositivo,
simplemente séquelo con cualquier trapo limpio antes de
tomar una medición. No afectará la precisión de la medición.
• Este producto es para uso doméstico.
• ADVERTENCIA: Este producto no es un juguete. Guárdelo
fuera del alcance del bebé y niños pequeños.
• NO sumerja ninguna parte del termómetro en agua.
• ¡NO deje que el termómetro se caiga! Protéjalo contra
Pantalla
Punta del
termómetro
impactos severos y choques.
• NO ponga el termómetro cerca del agua o humedad.
• Mantenga el termómetro lejos de fuentes de calor, tales como
estufas a leña, radiadores, cocinas y televisores u otros
aparatos. El calor puede dañar la caja o partes eléctricas y
afectar la medición de la temperatura.
• NO use el termómetro si:
- La unidad ha entrado en contacto con líquidos.
- La unidad se ha caído o ha resultado dañada.
• Doblar, morder o masticar el termómetro causará daños.
• Guarde el termómetro a temperatura ambiente durante por lo
menos 15 minutos antes del uso.
• NO ABRA EL TERMÓMETRO ya que no contiene piezas en
su interior que pueda reparar el usuario.
• Cuando aparece el símbolo “W” (triángulo invertido) en el
costado derecho de la pantalla, la pila está descargada y
necesita comprar un nuevo termómetro. Cuando desecha
este producto, asegúrese de desecharlo de la manera correcta,
según las disposiciones locales y de su estado.
• Este termómetro es para uso oral solamente y no debe usarse
en ningún lugar del cuerpo que no sea la boca.
Botón de
ENCENDIDO/
APAGADO
Encendido del termómetro
Para encender el termómetro, oprima brevemente el botón de
ENCENDIDO/APAGADO.
1. Se realiza una prueba de la pantalla. Deberán aparecer todos
los segmentos. Luego, a una temperatura ambiente de menos
de 32 °C, aparecerán en la pantalla una «L» y una «°C» que
destella.
2. El termómetro ahora está listo para su uso.
Prueba de la función
El funcionamiento correcto del termómetro se prueba
automáticamente cada vez que se lo enciende. Si se detecta un
desperfecto (medición errónea), aparece «ERR» en la pantalla y la
medición resulta imposible. En este caso, hay que comprar otro
termómetro.
Uso del termómetro
Para prolongar la vida de las pilas, apague el termómetro
oprimiendo brevemente el botón de ENCENDIDO/APAGADO.
Caso contrario, el termómetro se apagará automáticamente
después de 10 minutos.
ADVERTENCIA
Las modificaciones no autorizadas por el fabricante podrían
cancelar la autoridad del usuario para usar este dispositivo.
NOTA: Este equipo ha sido probado y se ha determinado que
cumple con los límites de un dispositivo digital Clase B, según la
Parte 15 de las normas de la FCC.
Se han establecido estos límites para proporcionar una
protección razonable contra la interferencia peligrosa en una
instalación residencial.
Este equipo genera, usa y puede emitir energía de
radiofrecuencia y si no se lo instala y usa de acuerdo a las
instrucciones, podría causar interferencias peligrosas con las
comunicaciones de radio. Sin embargo, no existe garantía de
que no ocurrirá la interferencia en una instalación particular. Si
este equipo causa interferencia peligrosa a la recepción de radio
o televisión, lo que se puede determinar al encender y apagar el
equipo, se sugiere al usuario que trate de corregir la interferencia
a través de una o más de las siguientes medidas:
• Vuelva a orientar o ubicar la antena del receptor.
• Aumente la separación entre el equipo y el receptor.
• Conecte el equipo a un tomacorriente en un circuito diferente
al circuito en el que está conectado el receptor.
• Consulte al vendedor o a un técnico experimentado de radio y
televisión para recibir ayuda.
Este dispositivo cumple con la Parte 15 de las Normas de la
FCC. Su funcionamiento está sujeto a las dos condiciones
siguientes:
1) Este dispositivo no debería causar interferencia peligrosa, y
2) Este dispositivo debe aceptar cualquier interferencia recibida,
incluyendo interferencia que pudiera causar un
funcionamiento no deseado.
Cambio de la escala:
Si se oprime el botón de ENCENDIDO/APAGADO durante más
de 3 segundos cuando enciende el termómetro, la pantalla de
cristal líquido mostrará F/C, de manera tal que oprimirlo de
nuevo cambie la escala. Luego de 2 segundos de liberar el
botón, el valor de la temperatura desaparece y el termómetro
está listo para una medición.
Método de medición
Trate de mantener la boca cerrada durante 5 minutos antes de
tomarse la temperatura. Ponga la punta debajo de la lengua en
la parte de atrás de la boca.
Para lograr una medición más precisa, ponga la punta lo más
atrás que pueda debajo de la lengua. Ponga la lengua sobre la
punta y cierre la boca. Mantenga el termómetro
inmovilizado con la punta en el mismo lugar
durante 1 minuto.
= lugares correctos
x = lugares incorrectos
Atención y mantenimiento: Lávelo a mano en agua tibia
con jabón o detergentes sin cítricos y enjuáguelo
completamente. No lo sumerja en ningún líquido.
Especificaciones técnicas:
Tipo:
Termómetro para medir la temperatura
máxima
Variación en la medición
de la temperatura: 90 °F a 110 °F
Si la temperatura medida está por
debajo de los 90 °F, aparecerá una “L”.
Si la temperatura medida está por
encima de los 110 °F, aparecerá una “H”.
Importantes instrucciones de seguridad
• El instrumento debe usarse solamente para medir la
Precisión en la medición
de la temperatura: ± 0,2 °F
temperatura del cuerpo.
• Proteja al instrumento contra impactos y caídas.
• Evite las temperaturas ambientes superiores a los 60 °C/140 °F.
¡NUNCA hierva el termómetro!
6
Pila:
No se puede cambiar. ± 1,5V Tipo SR41.
Nota:
Este termómetro cumple con las normas
ASTM E 1112, EN 12470-3, EC 60601-1,
IEC 60601-1-2
Cuchara para medicamentos
Cepillo y peine
1. Agarre la cuchara y vierta el medicamento según la dosis
recetada de acuerdo a las instrucciones en la botella.
Nota: Ponga la tope en la cuchara para medicamentos para
prevenir derrames.
2. Mantenga al bebé sentado cuando le da el medicamento.
Desenchufe el tope y luego administre lentamente el
medicamento para que el niño pueda tragar cómodamente.
3. Haga una pausa y repita el proceso si fuera necesario.
Cepille suavemente el cabello del bebé con las
cerdas suaves del cepillo sin preocuparse
por la sensibilidad del cuero cabelludo
del bebé.
Use cualquiera de las dos opciones de
dientes para peinar cómodamente el
cabello a pesar de que esté mojado o
sea espeso.
Atención y mantenimiento: Lávela a mano en agua tibia con
jabón o detergentes sin cítricos y enjuáguela completamente.
Lávela completamente antes del primer uso y después de cada
uso. No la lave en el lavaplatos.
Tope
Atención y mantenimiento: Lávelo a
mano en agua tibia con jabón o detergentes
sin cítricos y enjuáguelo completamente. Deje que
se seque al aire. No lo lave en el lavaplatos.
Tijera para el bebé
Nuestra tijera para el bebé hace que cortar las delicadas
uñas del bebé sea seguro. Las puntas redondas ofrecen
mayor seguridad cuando corta las uñas del bebé.
NOTA: Corte las uñas siguiendo la forma
natural y las uñas del pie derechas. Deje
siempre una pequeña cantidad blanca al final
de la uña.
Jeringa para medicamentos
1. Empuje el émbolo hacia abajo y ponga la punta
de la jeringa en el medicamento.
2. Lentamente levante el émbolo hacia arriba
para llenar con medicamento según la dosis
recetada de acuerdo a las instrucciones de la
botella. Alínie el nivel de medicamento líquido
indicado hasta la línea de la dosis recetada del
cuerpo de la jeringa.
3. Ponga la punta de la jeringa en la boca del
niño apuntando hacia la mejilla.
4. Empuje el émbolo lentamente para dispensar
el medicamento. Empújelo con suficiente
lentitud para permitir que el niño trague
cómodamente.
5. Si fuera necesario, haga una pausa mientras dispensa el
medicamento para permitir que el niño trague.
el
Atención y mantenimiento: Lávela a mano en agua tibia con
jabón o detergentes sin cítricos y enjuáguela completamente.
Lávela completamente antes del primer uso y después de cada
uso. No la lave en el lavaplatos.
Cortaúñas y limas
ADVERTENCIA: El cortaúñas incluye pilas y no es un juguete.
Mantenga el producto y las pilas fuera del alcance de los niños.
Deseche correctamente las pilas usadas.
El borde curvo de nuestro cortaúñas hace
que cortar las delicadas uñas de su bebé
sea seguro y simple.
1. Levante la traba del puño y gírelo 180°.
2. Gire la fuente de luz hacia arriba hasta
que se escuche un ruido y se encienda la luz.
3. Saque suavemente la piel de la uña. Corte
las uñas siguiendo la forma natural y las uñas del
pie derechas. Deje siempre una pequeña cantidad blanca al
final de las uñas.
4. Use una lima para alisar las uñas del bebé si es necesario.
émbolo
Atención y mantenimiento: Saque el émbolo de la jeringa
para limpiarla. Lávela a mano en agua tibia con jabón o
detergentes sin cítricos y enjuáguela completamente. Repetir
después de cada uso. No la lave en el lavaplatos.
Aspirador nasal
Instalación de las pilas: Requiere 2 pilas de litio de 3 voltios
CR1616 (incluidas). Cambie las pilas cuando la luz comience a
perder brillo. Levante la traba y abra la tapa de las pilas. Inserte
2 pilas nuevas, una arriba de la otra, con el lado positivo (+)
hacia arriba, debajo del terminal de la pila. Cierre la tapa de la
pila.
1. Ponga al bebé en una posición de sentado.
2. Oprima y mantenga oprimido el bulbo del aspirador y
suavemente insértelo en la fosa nasal del bebé apuntando
hacia el costado. NO apunte hacia el centro de la nariz del
bebé. NO iponga la punta demasiado adentro de
la fosa nasal del bebé.
3. Libere lentamente el bulbo para eliminar la
mucosa de la fosa nasal del bebe.
4. Repita el proceso en la otra fosa nasal.
5. Repítalo lo necesario hasta que se alivie el congestionamiento.
• Nunca empuje demasiado el aspirador en la fosa nasal y
séquelo siempre después de cada uso. Nunca lo use en la boca
o los oídos del bebé.
Atención y mantenimiento: Lávelo a mano en agua tibia con
jabón o detergentes sin cítricos y enjuáguelo completamente.
No lo sumerja en ningún líquido. Saque las pilas durante largos
períodos sin usarlo. No lo lave en el lavaplatos.
Atención y mantenimiento: Lávelo a mano en agua tibia con
jabón o detergentes sin cítricos y enjuáguelo completamente.
Oprima y libere el bulbo varias veces para limpiar su interior.
Enjuáguelo con agua tibia. Elimine todo el exceso de agua del
bulbo. No lo lave en el lavaplatos.
7
Pinzas
Cepillo para el dedo
Se puede usar para masajear encías dolorosas.
1. Se coloca en los dedos de los padres.
2. Suavemente masaje las encías y los dientes.
Ideal para sacar elementos
pequeños difíciles de agarrar.
Atención y mantenimiento: Desinfecte las pinzas con
alcohol.
Nota:
• Protuberancias grandes para masajear las encías.
• Protuberancias pequeñas para limpiar los dientes.
Cepillo de dientes para niño pequeño
Atención y mantenimiento: Lávelo a mano en agua tibia con
jabón o detergentes sin cítricos y enjuáguelo completamente.
Lávelo completamente antes del primer uso y después de cada
uso. No lo lave en el lavaplatos.
La manija moldeada del cepillo de dientes
es ideal para que la agarren
manos pequeñas.
Limpie los dientes y las encías
del niño pequeño cómodamente con las
cerdas suaves del cepillo de dientes.
Atención y mantenimiento: Lávelo en agua tibia antes y
después de cada uso. No lo lave en el lavaplatos.
8